openstack云平台搭建---1基本环境配置
1.操作系统:centos 7
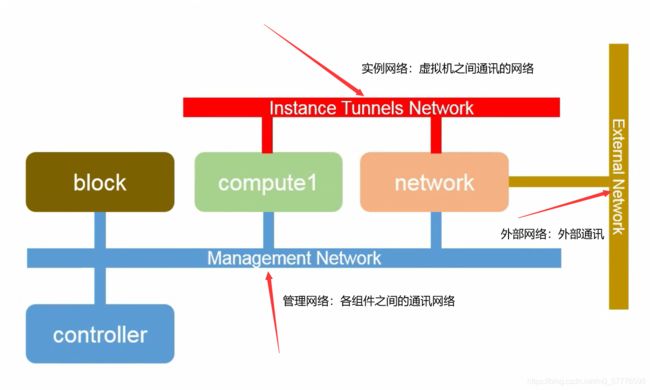
2.节点:controller(控制节点--keystone,镜像glance...),compute(计算节点--Nova),block(储存节点), neutron(网络节点),网络配置如下:
网络配置:
Controller:M--192.168.9.128
Compute:M--192.168.9.129
I--172.16.0.10
Network:M--192.168.9.130
I--172.16.0.6
E:100.100.100.10
Block:M—192.168.9.131
3.准配资源:
链接:https://pan.baidu.com/s/1HF8WH85MHFZq5lJ-My4Y9A
提取码:q5mp
以上资源为yum源,下到本地后通过server-u创建局域网,在linux中共享yum源
下图是我的操作系统:
[root@localhost ~]# cat /etc/redhat-release

CentOS Linux release 7.5.1804 (Core)
好,下面开始操作
1.设置主机名
[root@localhost ~]# hostnamectl set-hostname controller

##########设置完毕,查看设置成果
[root@localhost ~]# hostname

controller            ####设置完成
2.关闭防火墙,关闭selinux
[root@controller ~]# iptables -F     ######关闭防火墙

[root@controller ~]# systemctl stop firewalld    ######关闭防火墙

[root@controller ~]# systemctl disable firewalld  ###设置开机自动关闭防火墙
Removed symlink /etc/systemd/system/multi-user.target.wants/firewalld.service.
Removed symlink /etc/systemd/system/dbus-org.fedoraproject.FirewallD1.service.

[root@controller ~]# vi /etc/selinux/config ###编辑selinux配置文件,使selinux关闭

# This file controls the state of SELinux on the system.
# SELINUX= can take one of these three values:
#     enforcing - SELinux security policy is enforced.
#     permissive - SELinux prints warnings instead of enforcing.
#     disabled - No SELinux policy is loaded.
SELINUX=disabled
# SELINUXTYPE= can take one of three two values:
#     targeted - Targeted processes are protected,
#     minimum - Modification of targeted policy. Only selected processes are protected.
#     mls - Multi Lev

[root@controller ~]# setenforce 0   ###手动设置selinux,
[root@controller ~]# getenforce     ###查看的设置,已经完成
Permissive
3.添加host文件,主机名与ip的对应关系
[root@controller ~]# vi /etc/hosts
127.0.0.1   localhost localhost.localdomain localhost4 localhost4.localdomain4
::1         localhost localhost.localdomain localhost6 localhost6.localdomain6
192.168.9.128 controller
4.(1)配置局域网yum源
[root@controller ~]# cd /etc/yum.repos.d/
[root@controller yum.repos.d]# ls    ###首先把系统自带的yum源全部移到bak目录中去,如下:
CentOS-Base.repo  CentOS-Debuginfo.repo  CentOS-Media.repo    CentOS-Vault.repo
CentOS-CR.repo    CentOS-fasttrack.repo  CentOS-Sources.repo
[root@controller yum.repos.d]# mkdir bak
[root@controller yum.repos.d]# mv C* bak/
[root@controller yum.repos.d]# ls
bak

[root@controller yum.repos.d]# vi ftp.repo   ###创建yum仓库,添加如下命令:
[base]
name=base
baseurl=ftp://q:[email protected]/7/os/x86_64/
enabled=1
gpgcheck=0

[updates]
name=updates
baseurl=ftp://q:[email protected]/7/updates/x86_64/
enabled=1
gpgcheck=0

[extras]
name=extras
baseurl=ftp://q:[email protected]/7/extras/x86_64/
enabled=1
gpgcheck=0

[epel]
name=epel
baseurl=ftp://q:[email protected]/7/epel
enabled=1
gpgcheck=0

[rdo]
name=rdo
baseurl=ftp://q:[email protected]/7/rdo
enabled=1
gpgcheck=0

[root@localhost ~]# yum clean all    ###清除原来的缓存
Loaded plugins: fastestmirror
Cleaning repos: base epel extras rdo updates
Cleaning up everything
Maybe you want: rm -rf /var/cache/yum, to also free up space taken by orphaned data from disabled or removed repos
Cleaning up list of fastest mirrors

[root@controller ~]# yum makecache    ###生成新的yum缓存 如果这一步报错,那么在网卡中添加网关和DNS
Loaded plugins: fastestmirror
Loading mirror speeds from cached hostfile
base                                                                        | 3.6 kB  00:00:00
epel                                                                        | 4.4 kB  00:00:00
extras                                                                      | 3.4 kB  00:00:00
rdo                                                                         | 2.9 kB  00:00:00
updates                                                                     | 2.9 kB  00:00:00
(1/18): base/group_gz                                                       | 157 kB  00:00:00
(2/18): base/primary_db                                                     | 4.9 MB  00:00:00
(3/18): base/filelists_db                                                   | 5.8 MB  00:00:00
(4/18): base/other_db                                                       | 2.1 MB  00:00:00
(5/18): epel/group_gz                                                       | 250 kB  00:00:00
(6/18): epel/primary_db                                                     | 3.5 MB  00:00:00
(7/18): epel/filelists_db                                                   | 5.0 MB  00:00:00
(8/18): epel/other_db                                                       | 1.7 MB  00:00:00
(9/18): extras/filelists_db                                                 |  92 kB  00:00:00
(10/18): extras/prestodelta                                                 | 1.7 kB  00:00:00
(11/18): extras/primary_db                                                  |  35 kB  00:00:00
(12/18): extras/other_db                                                    |  67 kB  00:00:00
(13/18): rdo/primary_db                                                     | 148 kB  00:00:00
(14/18): rdo/filelists_db                                                   | 454 kB  00:00:00
(15/18): rdo/other_db                                                       |  94 kB  00:00:00
(16/18): updates/filelists_db                                               | 2.6 MB  00:00:00
(17/18): updates/other_db                                                   | 377 kB  00:00:00
(18/18): updates/primary_db                                                 | 4.4 MB  00:00:00
(1/2): epel/updateinfo                                                      | 130 kB  00:00:00
(2/2): epel/pkgtags                                                         | 1.3 MB  00:00:00
Metadata Cache Created
5.安装openstack预备包,此作用是防止高优先级软件被低优先级软件覆盖
[root@controller ~]# yum install -y yum-plugin-priorities
Loaded plugins: fastestmirror
Loading mirror speeds from cached hostfile
base                                                                        | 3.6 kB  00:00:00
epel                                                                        | 4.4 kB  00:00:00
extras                                                                      | 3.4 kB  00:00:00
rdo                                                                         | 2.9 kB  00:00:00
updates                                                                     | 2.9 kB  00:00:00
Resolving Dependencies
--> Running transaction check
---> Package yum-plugin-priorities.noarch 0:1.1.31-25.el7_0 will be installed
--> Finished Dependency Resolution

Dependencies Resolved

===================================================================================================
 Package                        Arch            Version                     Repository        Size
===================================================================================================
Installing:
 yum-plugin-priorities          noarch          1.1.31-25.el7_0             updates           23 k

Transaction Summary
===================================================================================================
Install  1 Package

Total download size: 23 k
Installed size: 28 k
Downloading packages:
yum-plugin-priorities-1.1.31-25.el7_0.noarch.rpm                            |  23 kB  00:00:00
Running transaction check
Running transaction test
Transaction test succeeded
Running transaction
  Installing : yum-plugin-priorities-1.1.31-25.el7_0.noarch                                    1/1
  Verifying  : yum-plugin-priorities-1.1.31-25.el7_0.noarch                                    1/1

Installed:
  yum-plugin-priorities.noarch 0:1.1.31-25.el7_0

Complete!
6.因为我们采用的是局域网yum源,因此需要进行升级软件包
[root@controller ~]# yum upgrade ###升级软件包7.安装openstack-selinux包---自动管理selinux,如果前面你的selinux已经设置关闭,那这个包可以不用安装
[root@controller ~]# yum install -y openstack-selinux ###自动管理selinux8.配置NTP时钟同步服务,在controller中安装作ntp服务端,其他节点同步controller的时间
编辑ntp配置文件把以下四行代码注释掉,
server 0.centos.pool.ntp.org iburst
server 1.centos.pool.ntp.org iburst
server 2.centos.pool.ntp.org iburst
server 3.centos.pool.ntp.org iburst
注释完之后在四行代码下面添加如下代码:
server 127.127.1.0
fudge 127.127.1.0 stratum 10
下图就是改过之后的代码,然后退出并保存
[root@controller ~]# yum install -y ntp   ###安装ntp服务
[root@controller ~]# vi /etc/ntp.conf
# For more information about this file, see the man pages
# ntp.conf(5), ntp_acc(5), ntp_auth(5), ntp_clock(5), ntp_misc(5), ntp_mon(5).

driftfile /var/lib/ntp/drift

# Permit time synchronization with our time source, but do not
# permit the source to query or modify the service on this system.
restrict default nomodify notrap nopeer noquery

# Permit all access over the loopback interface.  This could
# be tightened as well, but to do so would effect some of
# the administrative functions.
restrict 127.0.0.1
restrict ::1

# Hosts on local network are less restricted.
#restrict 192.168.1.0 mask 255.255.255.0 nomodify notrap

# Use public servers from the pool.ntp.org project.
# Please consider joining the pool (http://www.pool.ntp.org/join.html).
#server 0.centos.pool.ntp.org iburst
#server 1.centos.pool.ntp.org iburst
#server 2.centos.pool.ntp.org iburst
#server 3.centos.pool.ntp.org iburst
server 127.127.1.0
fudge 127.127.1.0 stratum 10
开启ntp,并设置为开机自启
[root@controller ~]# systemctl start ntpd  ###开启ntp
[root@controller ~]# systemctl enable ntpd ###设置开机自启ntp
Created symlink from /etc/systemd/system/multi-user.target.wants/ntpd.service to /usr/lib/systemd/system/ntpd.service.
至此openstack基础环境配置完毕!
