MQTT 是一种基于发布/订阅模式的 轻量级物联网消息传输协议 ,可在严重受限的硬件设备和低带宽、高延迟的网络上实现稳定传输。它凭借简单易实现、支持 QoS、报文小等特点,占据了物联网协议的半壁江山。
本文主要介绍如何在 Java 项目中使用 MQTT,实现客户端与服务器的连接、订阅和收发消息等功能。
引入客户端库
本文的开发环境为:
- 构建工具:Maven
- IDE:IntelliJ IDEA
- Java 版本:JDK 1.8.0
本文将使用 Eclipse Paho Java Client 作为客户端,该客户端是 Java 语言中使用最为广泛的 MQTT 客户端库。
添加以下依赖到项目 pom.xml 文件中。
       org.eclipse.paho
       org.eclipse.paho.client.mqttv3
       1.2.5
创建 MQTT 连接
MQTT 服务器
本文将使用 EMQX 提供的 免费公共 MQTT 服务器,该服务基于 EMQX 的 MQTT 云平台 创建。服务器接入信息如下:
- Broker: broker.emqx.io(中国用户可以使用 broker-cn.emqx.io)
- TCP Port: 1883
- SSL/TLS Port: 8883
普通 TCP 连接
设置 MQTT Broker 基本连接参数,用户名、密码为非必选参数。
String broker = "tcp://broker.emqx.io:1883";
// TLS/SSL
// String broker = "ssl://broker.emqx.io:8883";
String username = "emqx";
String password = "public";
String clientid = "publish_client";
然后创建 MQTT 客户端并连接。
MqttClient client = new MqttClient(broker, clientid, new MemoryPersistence());
MqttConnectOptions options = new MqttConnectOptions();
options.setUserName(username);
options.setPassword(password.toCharArray());
client.connect(options);
说明
- MqttClient: 同步调用客户端,使用阻塞方法通信。
- MqttClientPersistence: 代表一个持久的数据存储,用于在传输过程中存储出站和入站的信息,使其能够传递到指定的 QoS。
MqttConnectOptions: 连接选项,用于指定连接的参数,下面列举一些常见的方法。
- setUserName: 设置用户名
- setPassword: 设置密码
- setCleanSession: 设置是否清除会话
- setKeepAliveInterval: 设置心跳间隔
- setConnectionTimeout: 设置连接超时时间
- setAutomaticReconnect: 设置是否自动重连
TLS/SSL 连接
如果要使用自签名证书进行 TLS/SSL 连接,需添加 bcpkix-jdk15on 到 pom.xml 文件。
   org.bouncycastle
   bcpkix-jdk15on
   1.70
然后使用如下代码创建 SSLUtils.java 文件。
package io.emqx.mqtt;

import org.bouncycastle.jce.provider.BouncyCastleProvider;
import org.bouncycastle.openssl.PEMKeyPair;
import org.bouncycastle.openssl.PEMParser;
import org.bouncycastle.openssl.jcajce.JcaPEMKeyConverter;

import javax.net.ssl.KeyManagerFactory;
import javax.net.ssl.SSLContext;
import javax.net.ssl.SSLSocketFactory;
import javax.net.ssl.TrustManagerFactory;
import java.io.BufferedInputStream;
import java.io.FileInputStream;
import java.io.FileReader;
import java.security.KeyPair;
import java.security.KeyStore;
import java.security.Security;
import java.security.cert.CertificateFactory;
import java.security.cert.X509Certificate;

public class SSLUtils {
   public static SSLSocketFactory getSocketFactory(final String caCrtFile,
                                                   final String crtFile, final String keyFile, final String password)
           throws Exception {
       Security.addProvider(new BouncyCastleProvider());

       // load CA certificate
       X509Certificate caCert = null;

       FileInputStream fis = new FileInputStream(caCrtFile);
       BufferedInputStream bis = new BufferedInputStream(fis);
       CertificateFactory cf = CertificateFactory.getInstance("X.509");

       while (bis.available() > 0) {
           caCert = (X509Certificate) cf.generateCertificate(bis);
      }

       // load client certificate
       bis = new BufferedInputStream(new FileInputStream(crtFile));
       X509Certificate cert = null;
       while (bis.available() > 0) {
           cert = (X509Certificate) cf.generateCertificate(bis);
      }

       // load client private key
       PEMParser pemParser = new PEMParser(new FileReader(keyFile));
       Object object = pemParser.readObject();
       JcaPEMKeyConverter converter = new JcaPEMKeyConverter().setProvider("BC");
       KeyPair key = converter.getKeyPair((PEMKeyPair) object);
       pemParser.close();

       // CA certificate is used to authenticate server
       KeyStore caKs = KeyStore.getInstance(KeyStore.getDefaultType());
       caKs.load(null, null);
       caKs.setCertificateEntry("ca-certificate", caCert);
       TrustManagerFactory tmf = TrustManagerFactory.getInstance("X509");
       tmf.init(caKs);

       // client key and certificates are sent to server so it can authenticate
       KeyStore ks = KeyStore.getInstance(KeyStore.getDefaultType());
       ks.load(null, null);
       ks.setCertificateEntry("certificate", cert);
       ks.setKeyEntry("private-key", key.getPrivate(), password.toCharArray(),
               new java.security.cert.Certificate[]{cert});
       KeyManagerFactory kmf = KeyManagerFactory.getInstance(KeyManagerFactory
              .getDefaultAlgorithm());
       kmf.init(ks, password.toCharArray());

       // finally, create SSL socket factory
       SSLContext context = SSLContext.getInstance("TLSv1.2");
       context.init(kmf.getKeyManagers(), tmf.getTrustManagers(), null);

       return context.getSocketFactory();
  }
}
参照如下设置 options。
// 设置 SSL/TLS 连接地址
String broker = "ssl://broker.emqx.io:8883";
// 设置 socket factory
String caFilePath = "/cacert.pem";
String clientCrtFilePath = "/client.pem";
String clientKeyFilePath = "/client.key";
SSLSocketFactory socketFactory = getSocketFactory(caFilePath, clientCrtFilePath, clientKeyFilePath, "");
options.setSocketFactory(socketFactory);
发布 MQTT 消息
创建一个发布客户端类 PublishSample,该类将发布一条 Hello MQTT 消息至主题 mqtt/test。
package io.emqx.mqtt;

import org.eclipse.paho.client.mqttv3.MqttClient;
import org.eclipse.paho.client.mqttv3.MqttConnectOptions;
import org.eclipse.paho.client.mqttv3.MqttException;
import org.eclipse.paho.client.mqttv3.MqttMessage;
import org.eclipse.paho.client.mqttv3.persist.MemoryPersistence;

public class PublishSample {

   public static void main(String[] args) {

       String broker = "tcp://broker.emqx.io:1883";
       String topic = "mqtt/test";
       String username = "emqx";
       String password = "public";
       String clientid = "publish_client";
       String content = "Hello MQTT";
       int qos = 0;

       try {
           MqttClient client = new MqttClient(broker, clientid, new MemoryPersistence());
           // 连接参数
           MqttConnectOptions options = new MqttConnectOptions();
           // 设置用户名和密码
           options.setUserName(username);
           options.setPassword(password.toCharArray());
           options.setConnectionTimeout(60);
      options.setKeepAliveInterval(60);
           // 连接
           client.connect(options);
           // 创建消息并设置 QoS
           MqttMessage message = new MqttMessage(content.getBytes());
           message.setQos(qos);
           // 发布消息
           client.publish(topic, message);
           System.out.println("Message published");
           System.out.println("topic: " + topic);
           System.out.println("message content: " + content);
           // 关闭连接
           client.disconnect();
           // 关闭客户端
           client.close();
      } catch (MqttException e) {
           throw new RuntimeException(e);
      }
  }
}
订阅 MQTT 主题
创建一个订阅客户端类 SubscribeSample,该类将订阅主题 mqtt/test。
package io.emqx.mqtt;

import org.eclipse.paho.client.mqttv3.*;
import org.eclipse.paho.client.mqttv3.persist.MemoryPersistence;

public class SubscribeSample {
   public static void main(String[] args) {
       String broker = "tcp://broker.emqx.io:1883";
       String topic = "mqtt/test";
       String username = "emqx";
       String password = "public";
       String clientid = "subscribe_client";
       int qos = 0;

       try {
           MqttClient client = new MqttClient(broker, clientid, new MemoryPersistence());
           // 连接参数
           MqttConnectOptions options = new MqttConnectOptions();
           options.setUserName(username);
           options.setPassword(password.toCharArray());
           options.setConnectionTimeout(60);
      options.setKeepAliveInterval(60);
           // 设置回调
           client.setCallback(new MqttCallback() {

               public void connectionLost(Throwable cause) {
                   System.out.println("connectionLost: " + cause.getMessage());
              }

               public void messageArrived(String topic, MqttMessage message) {
                   System.out.println("topic: " + topic);
                   System.out.println("Qos: " + message.getQos());
                   System.out.println("message content: " + new String(message.getPayload()));

              }

               public void deliveryComplete(IMqttDeliveryToken token) {
                   System.out.println("deliveryComplete---------" + token.isComplete());
              }

          });
           client.connect(options);
           client.subscribe(topic, qos);
      } catch (Exception e) {
           e.printStackTrace();
      }
  }
}
MqttCallback 说明:
- connectionLost(Throwable cause): 连接丢失时被调用
- messageArrived(String topic, MqttMessage message): 接收到消息时被调用
- deliveryComplete(IMqttDeliveryToken token): 消息发送完成时被调用
测试
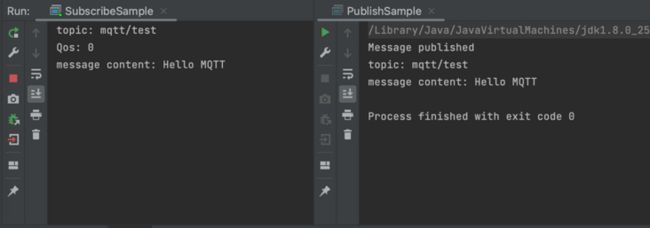
接下来运行 SubscribeSample,订阅 mqtt/test 主题。 然后运行 PublishSample,发布消息到 mqtt/test 主题。 我们将会看到发布端成功发布消息,同时订阅端接收到消息。
至此,我们完成了在 Java 中使用 Paho Java Client 来作为 MQTT 客户端连接到 公共 MQTT 服务器,并实现了测试客户端与 MQTT 服务器的连接、消息发布和订阅。
版权声明: 本文为 EMQ 原创,转载请注明出处。
