【SpringBoot】12.SpringBoot整合Dubbo+Zookeeper
1. 准 备
1.1 Dubbo 简介
Apache Dubbo 是一款高性能、轻量级的开源 Java RPC 框架,它提供了三大核心能力:面向接口的远程方法调用、智能容错和
负载均衡、以及服务自动注册和发现。
1.2 安 装
Windows下安装zookeeper
这里用到 zookeeper 作为注册中心,所以首先,先在 Window 下安装 zookeeper。

直接下载压缩包,然后解压,接着在 conf 目录下,创建一个配置文件 zoo.cfg,内容如下:
# The number of milliseconds of each tick
tickTime=2000
# The number of ticks that the initial
# synchronization phase can take
initLimit=10
# The number of ticks that can pass between
# sending a request and getting an acknowledgement
syncLimit=5
# the directory where the snapshot is stored.
# do not use /tmp for storage, /tmp here is just
# example sakes.
dataDir=/tmp/zookeeper
# the port at which the clients will connect
clientPort=2181
# the maximum number of client connections.
# increase this if you need to handle more clients
#maxClientCnxns=60
#
# Be sure to read the maintenance section of the
# administrator guide before turning on autopurge.
#
# http://zookeeper.apache.org/doc/current/zookeeperAdmin.html#sc_maintenance
#
# The number of snapshots to retain in dataDir
#autopurge.snapRetainCount=3
# Purge task interval in hours
# Set to "0" to disable auto purge feature
#autopurge.purgeInterval=1

## Metrics Providers
#
# https://prometheus.io Metrics Exporter
#metricsProvider.className=org.apache.zookeeper.metrics.prometheus.PrometheusMetricsProvider
#metricsProvider.httpPort=7000
#metricsProvider.exportJvmInfo=true

找到 bin 目录下的 zkServer.cmd ,双击运行,启动 zookeeper 注册中心
Windows下安装Dubbo
Dubbo 本身是一个 jar 包,不需要安装,只需在用到的时候,引入项目中即可。
2. 整 合
由于 SpringBoot 整合 Dubbo 的测试,需要一个服务提供者和一个服务消费者,因此这里需要新建两个项目,一个 springboot-provider 作为服务提供者,另外一个是 springboot-consumer 作为服务消费者。
2.1 服务提供者springboot-provider
开发环境:
- IDEA
- Dubbo 3.1.0
- SpringBoot 2.7.3
- JDK 1.8
2.1.1 新建项目
利用 IDEA 新建一个 springboot-provider 项目,这个项目的 pom.xml 文件信息如下:
<project xmlns="http://maven.apache.org/POM/4.0.0" xmlns:xsi="http://www.w3.org/2001/XMLSchema-instance"
         xsi:schemaLocation="http://maven.apache.org/POM/4.0.0 https://maven.apache.org/xsd/maven-4.0.0.xsd">
    <modelVersion>4.0.0modelVersion>
    <parent>
        <groupId>org.springframework.bootgroupId>
        <artifactId>spring-boot-starter-parentartifactId>
        <version>2.7.3version>
        <relativePath/>
    parent>
    <groupId>com.yuhuofeigroupId>
    <artifactId>springboot-providerartifactId>
    <version>0.0.1-SNAPSHOTversion>
    <name>springboot-providername>
    <description>provider project for Spring Bootdescription>
    <properties>
        <java.version>1.8java.version>
    properties>
    <dependencies>
        <dependency>
            <groupId>org.springframework.bootgroupId>
            <artifactId>spring-boot-starter-webartifactId>
        dependency>

        <dependency>
            <groupId>org.springframework.bootgroupId>
            <artifactId>spring-boot-starter-testartifactId>
            <scope>testscope>
        dependency>


        <dependency>
            <groupId>org.apache.dubbogroupId>
            <artifactId>dubbo-spring-boot-starterartifactId>
            <version>3.1.0version>
        dependency>


        <dependency>
            <groupId>org.apache.curatorgroupId>
            <artifactId>curator-x-discoveryartifactId>
            <version>5.3.0version>
        dependency>

    dependencies>

    <build>
        <plugins>
            <plugin>
                <groupId>org.springframework.bootgroupId>
                <artifactId>spring-boot-maven-pluginartifactId>
            plugin>
        plugins>
    build>

project>
我们实际需要引入的依赖就是下面的两个而已
        <dependency>
            <groupId>org.apache.dubbogroupId>
            <artifactId>dubbo-spring-boot-starterartifactId>
            <version>3.1.0version>
        dependency>


        <dependency>
            <groupId>org.apache.curatorgroupId>
            <artifactId>curator-x-discoveryartifactId>
            <version>5.3.0version>
        dependency>
2.1.2 更改配置
修改 application.properties 的内容,如下所示:
server.port=8082
#dubbo配置
dubbo.application.name=springboot-provider
dubbo.protocol.name=dubbo
dubbo.protocol.port=21882
dubbo.registry.address=zookeeper://127.0.0.1:2181
dubbo.registry.timeout=60000
dubbo.scan.base-packages=com.yuhuofei.service
2.1.3 编写对外提供服务的接口
编写一个ProviderUserInfo 接口,内容如下
package com.yuhuofei.service;

/**
 * @Description
 * @InterfaceName ProviderUserInfo
 * @Author yuhuofei
 * @Date 2022/8/28 12:11
 * @Version 1.0
 */
public interface ProviderUserInfo {

    String getName();

}
编写上面这个接口的实现类,并加上 @DubboService 注解,表示这是一个 Dubbo 接口
package com.yuhuofei.service.impl;

import com.yuhuofei.service.ProviderUserInfo;
import org.apache.dubbo.config.annotation.DubboService;

/**
 * @Description 服务提供者
 * @ClassName ProviderUserInfoImpl
 * @Author yuhuofei
 * @Date 2022/8/28 12:11
 * @Version 1.0
 */
@DubboService
public class ProviderUserInfoImpl implements ProviderUserInfo {

    @Override
    public String getName() {
        System.out.println("======dubbo接口被调用了======");
        return "王小贱";
    }
}
2.2 服务消费者springboot-consumer
开发环境:
- IDEA
- Dubbo 3.1.0
- SpringBoot 2.7.3
- JDK 1.8
2.2.1 新建项目
利用 IDEA 新建一个 springboot-consumer 项目,这个项目的 pom.xml 文件信息如下:
<project xmlns="http://maven.apache.org/POM/4.0.0" xmlns:xsi="http://www.w3.org/2001/XMLSchema-instance"
         xsi:schemaLocation="http://maven.apache.org/POM/4.0.0 https://maven.apache.org/xsd/maven-4.0.0.xsd">
    <modelVersion>4.0.0modelVersion>
    <parent>
        <groupId>org.springframework.bootgroupId>
        <artifactId>spring-boot-starter-parentartifactId>
        <version>2.7.3version>
        <relativePath/>
    parent>
    <groupId>com.yuhuofeigroupId>
    <artifactId>springboot-consumerartifactId>
    <version>0.0.1-SNAPSHOTversion>
    <name>springboot-consumername>
    <description>Consumer project for Spring Bootdescription>
    <properties>
        <java.version>1.8java.version>
    properties>
    <dependencies>
        <dependency>
            <groupId>org.springframework.bootgroupId>
            <artifactId>spring-boot-starter-webartifactId>
        dependency>

        <dependency>
            <groupId>org.springframework.bootgroupId>
            <artifactId>spring-boot-starter-testartifactId>
            <scope>testscope>
        dependency>


        <dependency>
            <groupId>org.apache.dubbogroupId>
            <artifactId>dubbo-spring-boot-starterartifactId>
            <version>3.1.0version>
        dependency>


        <dependency>
            <groupId>org.apache.curatorgroupId>
            <artifactId>curator-x-discoveryartifactId>
            <version>5.3.0version>
        dependency>

        <dependency>
            <groupId>com.yuhuofeigroupId>
            <artifactId>springboot-providerartifactId>
            <version>0.0.1-SNAPSHOTversion>
        dependency>
    dependencies>

    <build>
        <plugins>
            <plugin>
                <groupId>org.springframework.bootgroupId>
                <artifactId>spring-boot-maven-pluginartifactId>
            plugin>
        plugins>
    build>

project>
用到的依赖信息,基本和服务提供者的是一致的。
2.2.2 更改配置
服务消费者的配置信息如下,这里要注意的是,端口号不能和服务提供者的相同,那会导致端口冲突。
server.port=8081
#dubbo配置
dubbo.application.name=springboot-consumer
dubbo.protocol.name=dubbo
dubbo.protocol.port=21881
dubbo.registry.address=zookeeper://127.0.0.1:2181
dubbo.registry.timeout=60000
dubbo.scan.base-packages=com.yuhuofei.service
2.2.3 编写接口
编写接口,调用服务提供者提供的接口,实现业务逻辑
controller 层的接口 UserController,内容如下
package com.yuhuofei.controller;

import com.yuhuofei.service.UserInfo;
import org.springframework.beans.factory.annotation.Autowired;
import org.springframework.web.bind.annotation.GetMapping;
import org.springframework.web.bind.annotation.RequestMapping;
import org.springframework.web.bind.annotation.RestController;

/**
 * @Description
 * @ClassName UserController
 * @Author yuhuofei
 * @Date 2022/8/28 12:14
 * @Version 1.0
 */
@RestController
@RequestMapping("/user")
public class UserController {

    @Autowired
    private UserInfo userInfo;

    @GetMapping("/user-name")
    public String userName(){
        return userInfo.userName();
    }

}
service 层的接口 UserInfo,内容如下
package com.yuhuofei.service;

/**
 * @Description
 * @InterfaceName UserInfo
 * @Author yuhuofei
 * @Date 2022/8/28 12:20
 * @Version 1.0
 */
public interface UserInfo {

    String userName();
}
接口的实现类 UserInfoImpl ,因为要调用服务提供者提供的接口,因此需要用到注解 @DubboReference ,这是不能漏掉的。
package com.yuhuofei.service.impl;

import com.yuhuofei.service.ProviderUserInfo;
import com.yuhuofei.service.UserInfo;
import org.apache.dubbo.config.annotation.DubboReference;
import org.springframework.stereotype.Service;

/**
 * @Description
 * @ClassName UserInfoImpl
 * @Author yuhuofei
 * @Date 2022/8/28 12:21
 * @Version 1.0
 */
@Service
public class UserInfoImpl implements UserInfo {

    @DubboReference
    private ProviderUserInfo providerUserInfo;

    @Override
    public String userName() {
        return providerUserInfo.getName();
    }
}
3. 测 试
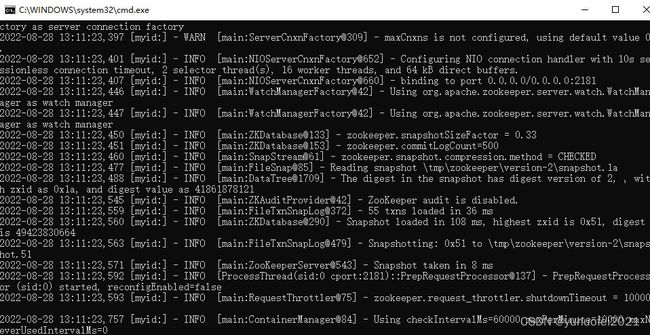
第一步,双击 zkServer.cmd ,启动 zookeeper 服务器
如下,这样就相当于把注册中心,给启动起来了。
第二步,启动服务提供者
利用 IDEA 启动服务提供者 springboot-provider ,它会自动注册到注册中心的。

第三步,启动服务消费者
利用 IDEA 启动服务消费者 springboot-consumer ,它也会自动注册到注册中心的,并在里面寻找自己调用的服务
第四步,打开浏览器调用接口
打开浏览器,调用 http://localhost:8081/user/user-name ,得到的结果如下

日志输出如下所示,虽然日志打印语句是写在服务提供者里面,但由于是消费者调用了,因此会打印到消费者所在服务,相当于是谁调用,就打印在谁那里。

至此,SpringBoot 整合 Dubbo+Zookeeper,就完成了。


