java后端微服务中间件快速使用
笔记记录了分布式架构中广泛使用的微服务中间件的使用文档
一 架构认识
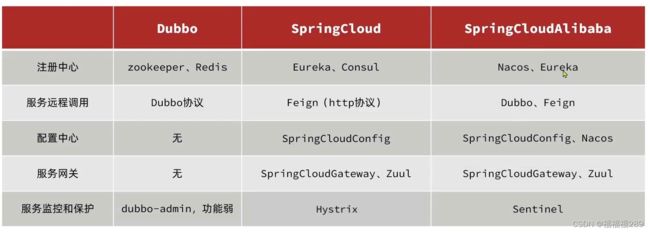
微服务技术对比
spring官方地址:Spring | Home
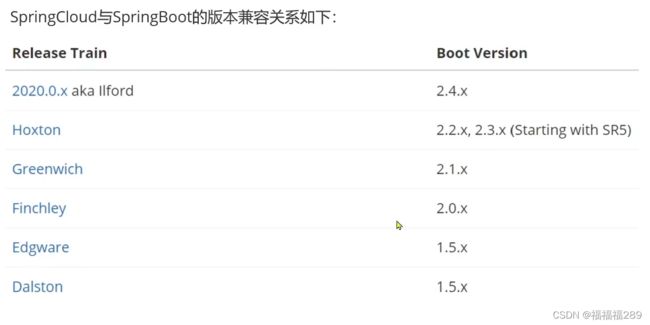
boot与cloud兼容性:
二 中间件使用
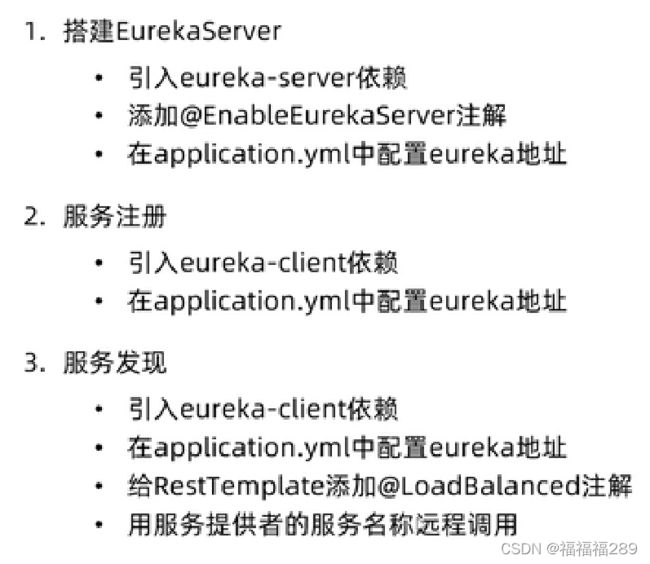
eureka
一 搭建EurekaServe
1 创建springboot工程,引入依赖
            org.springframework.cloud
            spring-cloud-starter-netflix-eureka-server
            3.1.0
2 开启服务:主应用加注解@EnableEurekaServer
@EnableEurekaServer
@SpringBootApplication
public class eureka_serverApplication {
    public static void main(String[] args) {
        SpringApplication.run(EurekaApplications.class,args);
    }
}
3 配置文件 application.yml
server:
  port: 10086
spring:
  application:
    name: eurekaserver
eureka:
  client:
    service-url:
      defaultZone: http://localhost:10086/eureka
搭建eurekaClient(服务注册与发现)
1 加入依赖
    org.springframework.cloud
    spring-cloud-starter-netflix-eureka-client
2 配置yml
spring:
  application:
    name: eurekaClient
eureka:
  client:
    service-url:
      defaultZone: http://localhost:10086/eureka
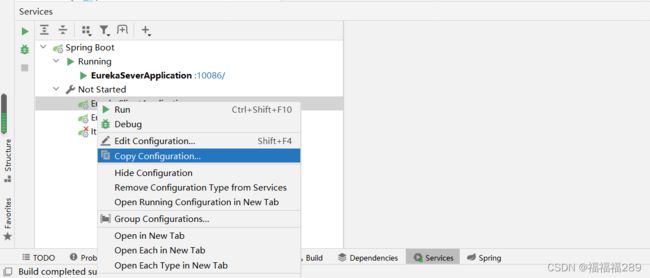
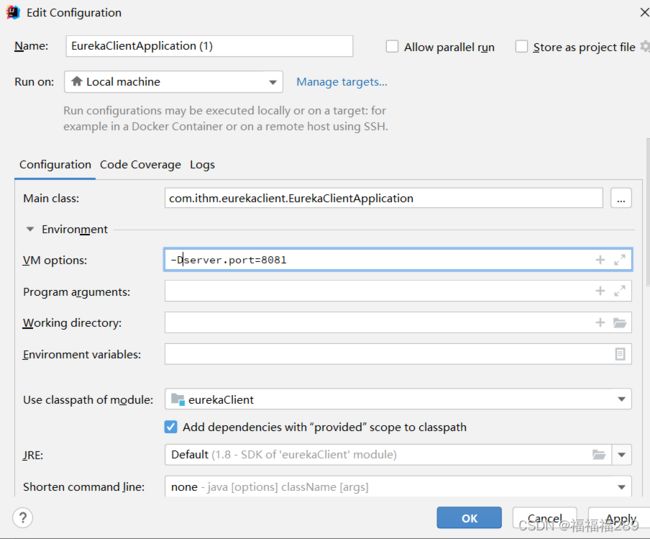
3 可以启动多个实例应用(非必要):虚拟机参数配置-Dserver.port=8081
特别地,服务发现:负载均衡远程调用容器加注解@LoadBalanced
Ribbon负载均衡
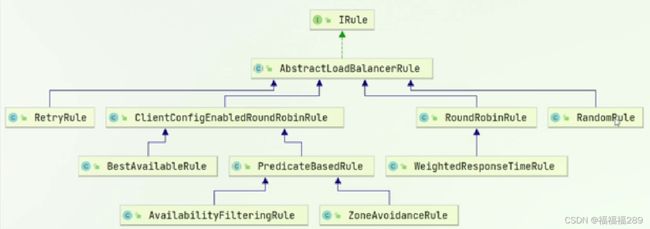
IRule负载策略
自定义IRule
1 代码方式(全局配置)
@Bean
public IRule randomRule(){
return new RandomRule();
}
配置文件方式(作用于)
userservice:
ribbon:
NFLoadBalancerRuleClassName: com.netflix.loadbalancer.RandomRule #均衡策略
饥饿加载配置(默认懒加载)
ribbon:
eager-load:
enabled: true
clients:
-userservice
# -xxx
总结Ribbon
Nacos
下载:https://github.com/alibaba/nacos/releases/tag/2.0.3
安装后bin目录启动或windows命令行
startup.cmd -m standalone
一 idea使用注册中心
1 引入cloud alibaba依赖
   com.alibaba.cloud
   spring-cloud-alibaba-dependencies
   2021.1
修改配置文件
     spring:
        cloud:
          nacos:
            server-addr: localhost:8848 #nacos服务地址
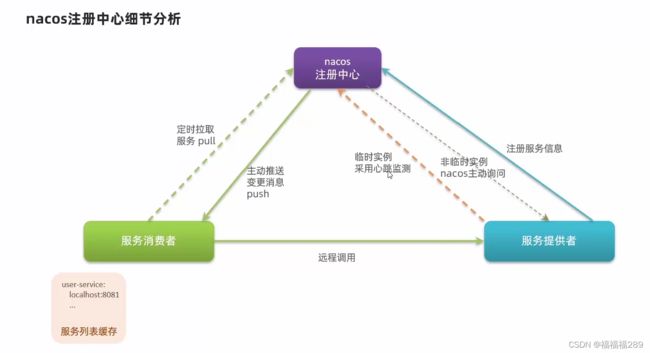
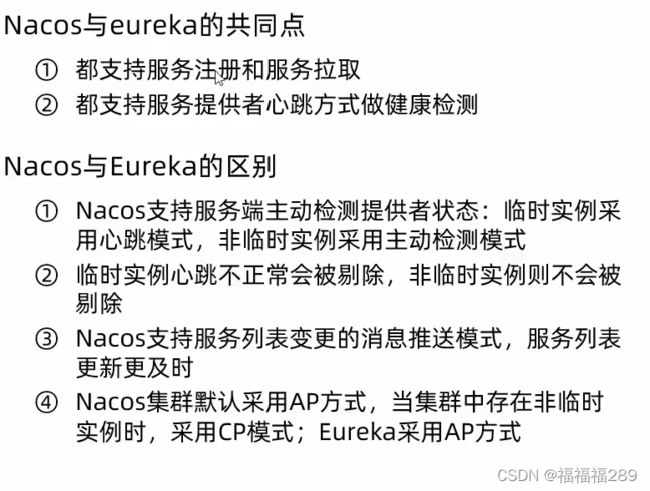
小结:
![]()
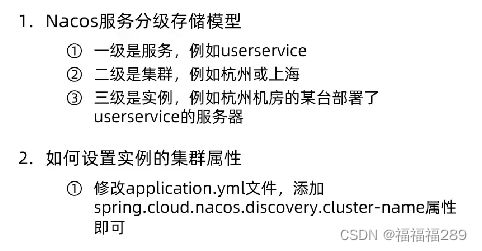
配置集群:
spring:
cloud:
  nacos:
    server-addr: localhost:8848 #nacos服务地址
    discovery:
      cluster-name: YN #集群名称,表示云南
配置nacos均衡策略
userService: #要做配置的微服务名称
  ribbon:
    NFLoadBalancerRuleClassName: com.alibaba.cloud.nacos.ribbon.NacosRule #设置优先集群服务,再按nacos默认随机负载均衡策略
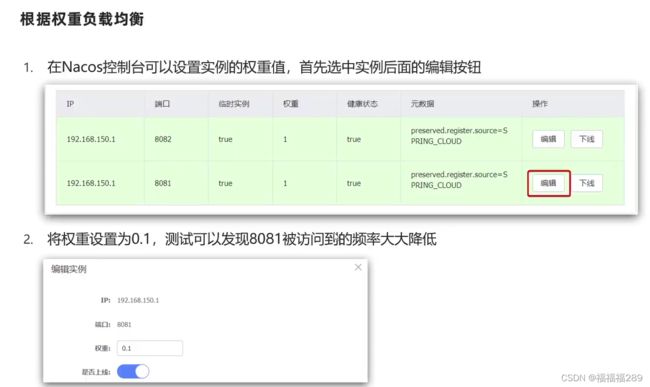
特别地,可以修改权重为0平滑升级系统,在修改为较小权重允许少量用户测试
nacos环境隔离namespace
配置yml
spring:
  cloud:
    nacos:
      server-addr: localhost:8848 #nacos服务地址
      discovery:
        cluster-name: YN #集群名称,表示云南
        namespace: 0e11a36f-04b2-42e3-b8bf-b7c5c266db00 #dev环境
配置临时实例
spring:
  cloud:
    nacos:
      server-addr: localhost:8848 #nacos服务地址
      discovery:
        cluster-name: YN #集群名称,表示云南
        namespace: 0e11a36f-04b2-42e3-b8bf-b7c5c266db00 #dev环境
        ephemeral: false #配置临时实例,false表示非临时,服务不可用不会被nacos剔除
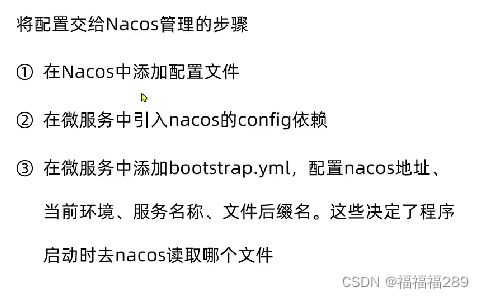
nacos配置中心
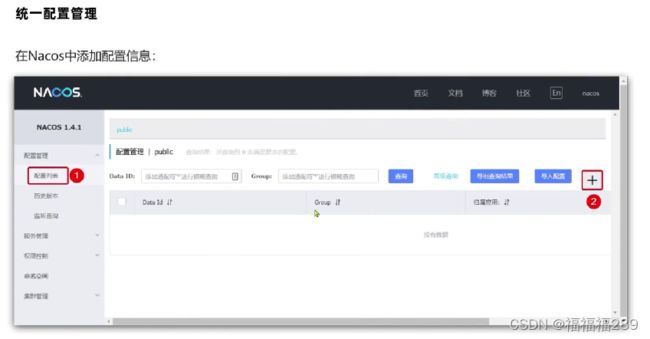
添加配置
idea开始测试
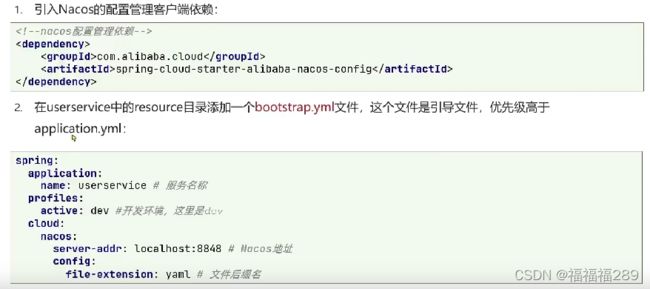
加入nacos配置中心依赖
            com.alibaba.cloud
            spring-cloud-starter-alibaba-nacos-config
            2021.1
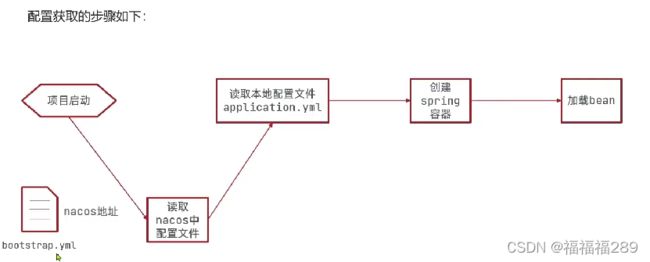
特别地:2020之后版本bootstrap.yml文件已经不默认加载
要加则添加依赖:
            org.springframework.cloud
            spring-cloud-starter-bootstrap
bootstrap.yml配置nacos配置中心的配置文件信息,也就是Data Id信息
spring:
  application:
    name: userServer #微服务名称
  profiles:
    active: dev #环境
  cloud:
    nacos:
      server-addr: localhost:8848 #nacos地址
      config:
        file-extension: yaml #文件后缀名
namespace: 0e11a36f-04b2-42e3-b8bf-b7c5c266db00 #配置namespace的id,这里dev
测试是否能读取nacos配置,编写代码测试
@RestController
@RequestMapping("/hello")
public class testNacosConfig {
//    测试nacos属性引入
    @Value("${pattern.dateformat}")
    private String dateformat;

//    编写controller,测试通过日期格式化时间并返回
    @GetMapping("now")
    public String now(){
        return LocalDateTime.now().format(DateTimeFormatter.ofPattern(dateformat));
    }
}
浏览器访问成功
小结:
配置热更新
方法1 在引入配置的类上加注解,例如:@Value引入nacos配置,@RefreshScope配置热更新
@RefreshScope
public class testNacosConfig {
//    测试nacos属性引入
    @Value("${pattern.dateformat}")
    private String dateformat;
方法2 加注解@ConfigurationProperties(prefix="pattern"),注意前缀和属性名和nacos配置属性一样
@Component
@Data
@ConfigurationProperties(prefix = "pattern")
public class PatternProperties {
    private String dateformat;
}
@Autowired
private PatternProperties patternProperties;
@GetMapping("now")
public String now(){
    return LocalDateTime.now().format(DateTimeFormatter
            .ofPattern(patternProperties.getDateformat()));
小结:
![]()
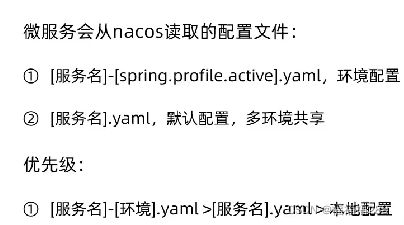
多环境配置共享
![]()
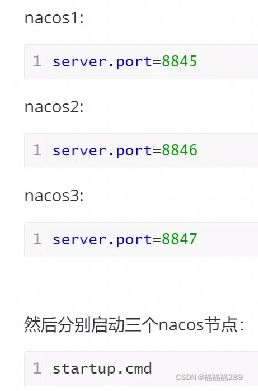
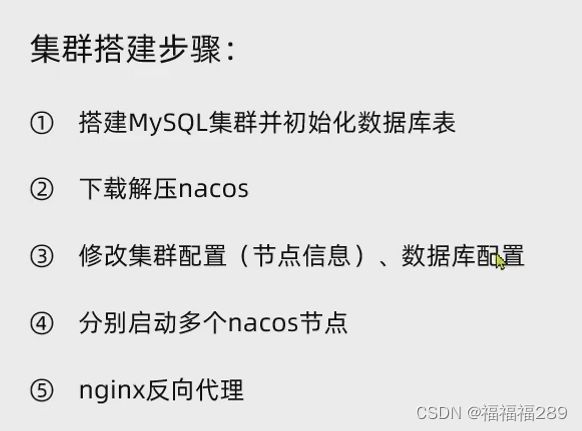
nacos集群,这里一台电脑配置:
数据库:nacos/config/nacos-mysql.sql文件
1 配置cluster.conf.exyample文件,改名cluster.conf,添加配置
127.0.0.1:8845
127.0.0.1:8846
127.0.0.1:8847
2 application.properties配置,填写自己数据库信息
### If use MySQL as datasource: 使用的数据库 mysql
spring.datasource.platform=mysql
### Count of DB: 数据库个数
db.num=1
### Connect URL of DB: 数据库连接信息
db.url.0=jdbc:mysql://127.0.0.1:3306/yf?characterEncoding=utf8&connectTimeout=1000&socketTimeout=3000&autoReconnect=true&useUnicode=true&useSSL=false&serverTimezone=UTC
db.user.0=root
db.password.0=root
复制多个nacos,分别进入pplication.properties文件配置不同端口,进入bin目录,启动
ngix
配置nginx.conf的http块中加入配置
upstream nacos-cluster{
server 127.0.0.1:8845
server 127.0.0.1:8846
server 127.0.0.1:8847
}
server {
listen 80;
server_name localhost;
location /nacos{
proxy_pass http://nacos-cluster;
}
}
启动nginx:nginx -s reload
补充nginx命令
nginx -s reopen #重启Nginx
nginx -s reload #重新加载Nginx配置文件,然后以优雅的方式重启Nginx
nginx -s stop #强制停止Nginx服务
nginx -s quit #优雅地停止Nginx服务(即处理完所有请求后再停止服务)
nginx -t #检测配置文件是否有语法错误,然后退出
nginx -?,-h #打开帮助信息
nginx -v #显示版本信息并退出
nginx -V #显示版本和配置选项信息,然后退出
nginx -t #检测配置文件是否有语法错误,然后退出
nginx -T #检测配置文件是否有语法错误,转储并退出
nginx -q #在检测配置文件期间屏蔽非错误信息
nginx -p prefix #设置前缀路径(默认是:/usr/share/nginx/)
nginx -c filename #设置配置文件(默认是:/etc/nginx/nginx.conf)
nginx -g directives #设置配置文件外的全局指令
killall nginx #杀死所有nginx进程
Nginx报错:nginx: [error] invalid PID number "" in "/run/nginx.pid" 解决方法:
服务器重启之后,执行 nginx -t 是OK的,然而在执行 nginx -s reload 的时候报错
nginx: [error] invalid PID number "" in "/run/nginx.pid"
解决方法:
需要先执行
nginx -c /etc/nginx/nginx.conf
nginx.conf文件的路径可以从nginx -t的返回中找到。
nginx -s reload
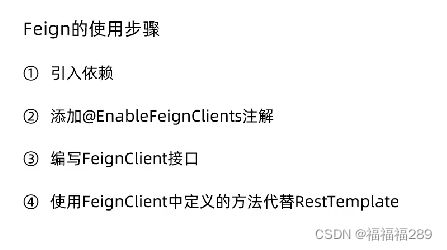
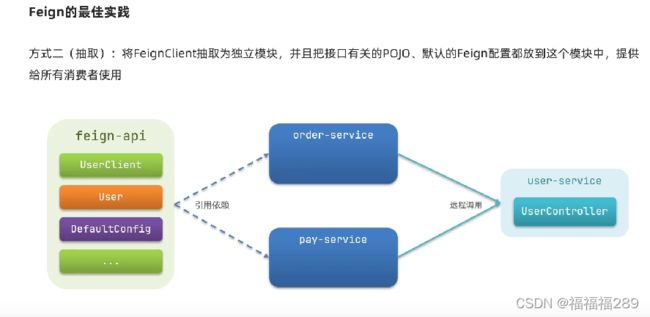
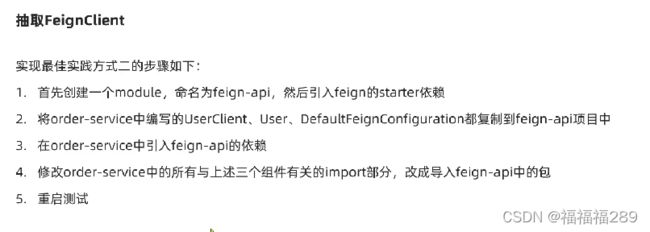
Feign:
1 依赖
            org.springframework.cloud
            spring-cloud-starter-openfeign
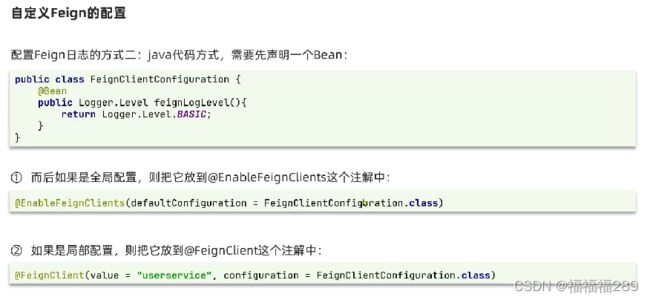
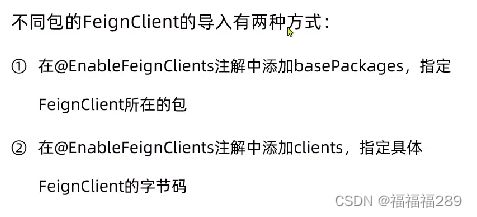
2 启动类@EnableFeignClients注解开启feign
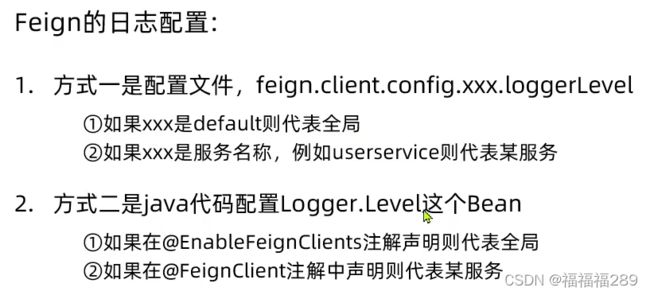
@EnableFeignClients(defaultConfiguration =feignLoglevalConfig.class) //配置feign全局日记,java代码方式
@SpringBootApplication
public class EurekaClientApplication {

    public static void main(String[] args) {
        SpringApplication.run(EurekaClientApplication.class, args);
    }
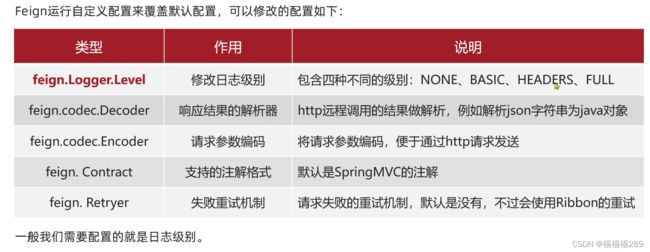
Feign常见自定义配置:
配置文件配置feign输出控制台日记
#配置feign的全局或局部日记,配置文件方式
feign:
  client:
    config:
      default:  #全局配置
    # userSevise #局部配置,微服务生效
      loggerLevel: FULL #配置日记级别
feign优化:
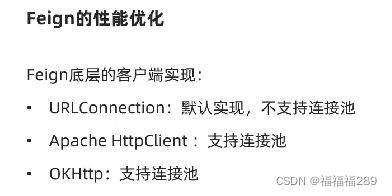
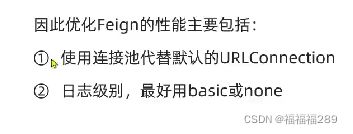
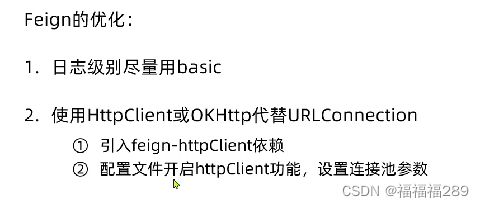
feign添加httpClient连接池优化:
1 引入依赖:
            io.github.openfeign
            feign-httpclient
2 文件配置;
#配置feign连接池,优化feign
feign:
  httpclient:
    enabled: true #支持httpclient开关
    max-connections: 200 #最大连接数,实际情况而定
    max-connections-per-route: 50 #单个路径最大连接数
feign实际应用:
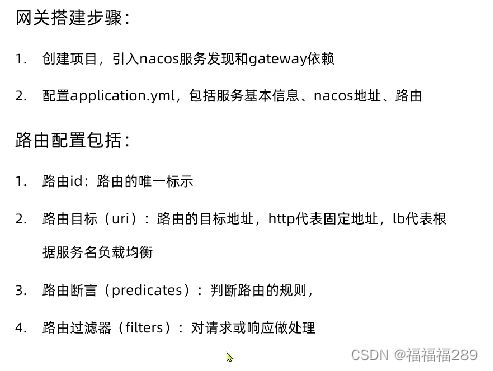
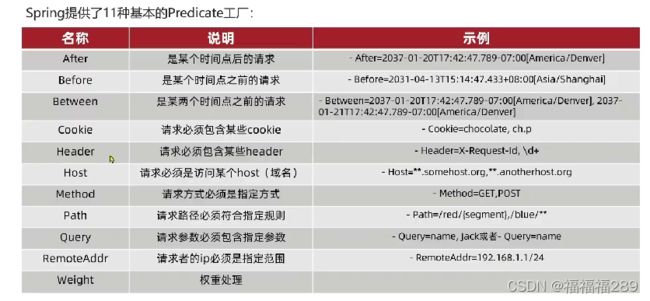
网关
搭建网关gateway
1 引入依赖
            org.springframework.cloud
            spring-cloud-starter-gateway


            com.alibaba.cloud
            spring-cloud-starter-alibaba-nacos-discovery
            2021.1
2 配置路由:
server:
  port: 10010
spring:
  application:
    name: gateway
  cloud:
    nacos:
      server-addr: localhost:81 #nacos地址
    gateway:
      routes:
        - id: eurekaSever
          uri: http://127.0.0.1:10086
          predicates:
            - Path=/**
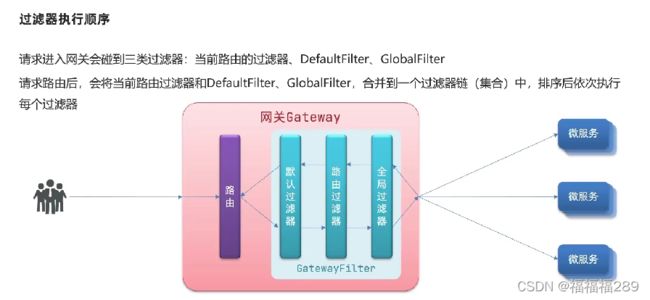
网关过滤器:
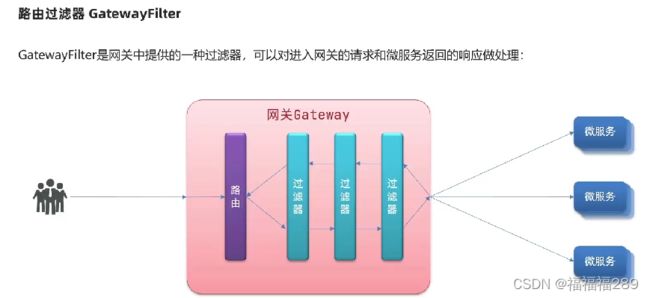
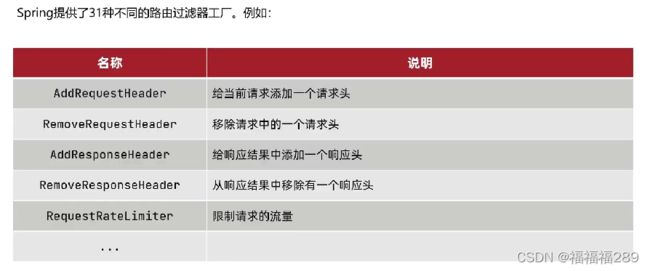
路由过滤器
配置路由过滤器yml:
server:
  port: 10010
spring:
  application:
    name: gateway
  cloud:
    nacos:
      server-addr: localhost:81 #nacos地址
    gateway:
      routes:
        - id: eurekaSever
          uri: http://127.0.0.1:10086
          predicates:
            - Path=/**
          filters:
            - AddRequestHeader=str, blue #配置局部过滤器,添加请求头
#      default-filters:
#        - AddRequestHeader=str, blue  #配置全局过滤器,位置和routes平级
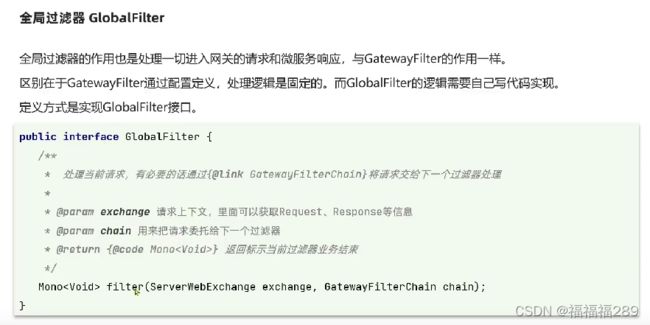
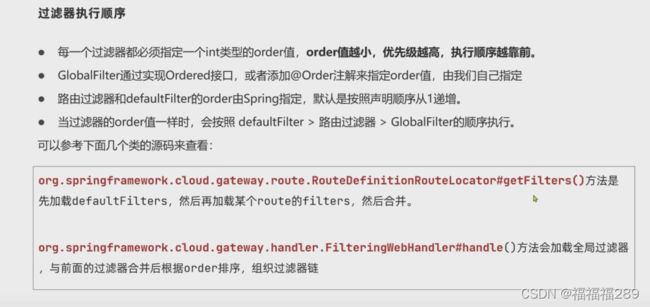
网关配置GlobalFilter全局过滤器
//@Order(-1)
@Component
public class AuthorizeFilter implements GlobalFilter,Order {

    @Override
    public Mono filter(ServerWebExchange exchange, GatewayFilterChain chain) {
//        1获取请求参数
        ServerHttpRequest request = exchange.getRequest();
        MultiValueMap queryParams = request.getQueryParams();
//        2获取authorizion参数
        String authorization = queryParams.getFirst("authorization");
//        3判断参数是否符合
        if ("admin".equals(authorization)){
//        4是,放行
            return chain.filter(exchange);
        }
//        5否,拦截

//        设置状态码
        exchange.getResponse().setStatusCode(HttpStatus.UNAUTHORIZED);
//        拦截请求
        return exchange.getResponse().setComplete();
    }

    @Override
    public int value() {
        return -1;
    }

    @Override
    public Class annotationType() {
        return null;
    }
}
测试时带参authorization=admin才能放行
spring:
    gateway:
#服务器端网关配置跨域cors方案
      globalcors: #全局跨域处理
        add-to-simple-url-handler-mapping: true #解决前端发送options请求询问服务器是否可以跨域,ture表示允许
        cors-configurations:
          '[/**]' #配置路径,表示微服务下,任意路径的请求http://微服务/**
            allowedOrigins: #允许可以发跨域请求的网站
              - "http://www.baidu.com"
              - "http://localhost:8888"
            allowedMethods: #允许请求的方式
              - "GET"
              - "POST"
              - "DELETE"
              - "PUT"
              - "DPTIONS"
            allowedHeaders: "*" #允许请求头携带信息,表示任意
            allowCredentials: ture #允许携带cookie
            maxAge: 360000 #允许跨域坚持时间
