数据仓库工具superset安装(完全可用)
数据仓库工具superset安装
我安装尝试了3.7版本,出错。看经验贴安3.8,3.9版本的,全都没有成功初始化。最终,安装Python3.6版本可以成功
1.首先在主目录下卸载已经安装的
conda remove -n superset --all
2.配置conda国内镜像
conda config --add channels https://mirrors.tuna.tsinghua.edu.cn/anaconda/pkgs/free
conda config --add channels https://mirrors.tuna.tsinghua.edu.cn/anaconda/pkgs/main
3.创建Python3.6环境
conda create --name superset python=3.6

4.进入superset环境
conda activate superser

5.安装Superset之前,需安装以下所需依赖
(superset) [@hadoop102 ~]$ sudo yum install -y gcc gcc-c++ libffi-devel python-devel python-pip python-wheel python-setuptools openssl-devel cyrus-sasl-devel openldap-devel

6.安装Superset
(superset) [atguigu@hadoop102 ~]$ pip install --upgrade setuptools pip -i https://pypi.douban.com/simple/
7.安装Supetset
(superset) [atguigu@hadoop102 ~]$ pip install apache-superset -i https://pypi.douban.com/simple/

9.对于上面的警告,咱们要先下载sqlalchemy和dataclasses
一定要执行下面的两句命令
pip install sqlalchemy==1.3.24
pip install dataclasses

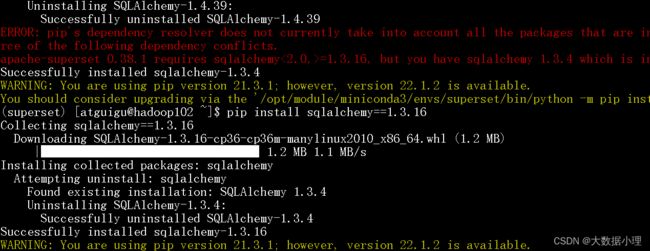
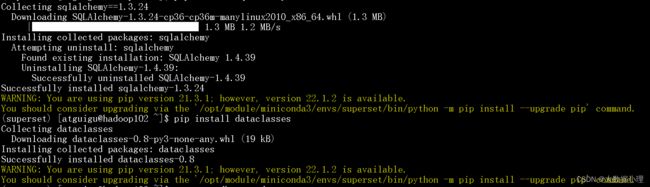
一直在报pip的版本不是新版,不用管,完全忽略这个报错
10.初始化Supetset数据库
(superset) [atguigu@hadoop102 ~]$ superset db upgrade

提示输入要创建的用户名

用户名输上,其他信息直接空格,密码不能空格,输入两次密码

11.管理员用户成功创建

12.superset初始化
superset init
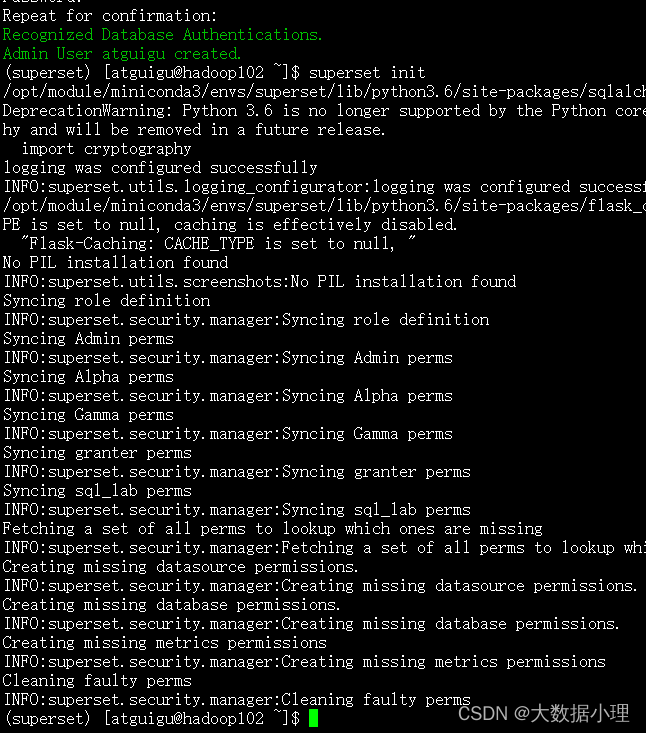
初始化完毕,superset安装完成
二.superset部署启停脚本
启动superset
1)安装gunicorn
注:gunicorn是一个Python Web Server,可以和java中的TomCat类比
pip install gunicorn -i https://pypi.douban.com/simple/
2)启动Superset
注:确保当前conda环境为superset,前面是(superset)字样;
superset启动成功
注:hadoop01:8787是我的主机名和端口号
gunicorn --workers 5 --timeout 120 --bind hadoop01:8787 “superset.app:create_app()” --daemon
说明:
–workers:指定进程个数
–timeout:worker进程超时时间,超时会自动重启
–bind:绑定本机地址,即为Superset访问地址
–daemon:后台运行
3)停止superset
停掉gunicorn进程
ps -ef | awk ‘/superset/ && !/awk/{print $2}’ | xargs kill -9
退出superset环境
conda deactivate
4)superset启停脚本
(1)创建superset.sh文件
vim superset.sh
添加内容如下:
#!/bin/bash
superset_status(){
result=ps -ef | awk '/gunicorn/ && !/awk/{print $2}' | wc -l
if [[ $result -eq 0 ]]; then
return 0
else
return 1
fi
}
superset_start(){
source ~/.bashrc
superset_status >/dev/null 2>&1
if [[ $? -eq 0 ]];
then conda activate superset ; gunicorn --workers 5 --timeout 120 --bind hadoop102:8787 --daemon ‘superset.app:create_app()’
else
echo “superset正在运行”
fi
}
superset_stop(){
superset_status >/dev/null 2>&1
if [[ $? -eq 0 ]]; then
echo “superset未在运行”
else
ps -ef | awk ‘/gunicorn/ && !/awk/{print $2}’ | xargs kill -9
fi
}
case $1 in
start )
echo “启动Superset”
superset_start ;;
stop )
echo “停止Superset”
superset_stop
;;
restart )
echo “重启Superset”
superset_stop
superset_start
;;
status )
superset_status >/dev/null 2>&1
if [[ $? -eq 0 ]]; then
echo “superset未在运行”
else
echo “superset正在运行”
fi
esac
(2)加执行权限
chmod +x superset.sh
(3)测试
启动superset
superset.sh start
停止superset
superset.sh stop
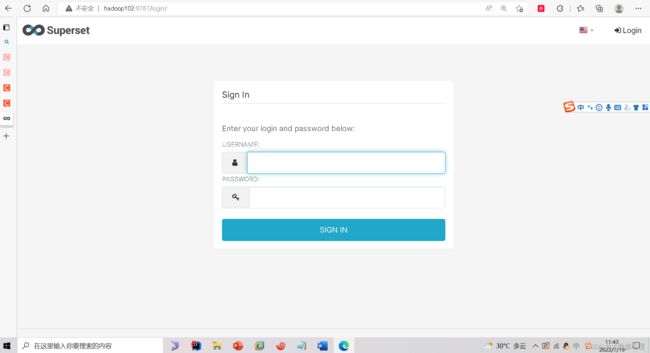
5)登录Superset
访问http://hadoop01:8787,并使用2.2.2节中第4步创建的管理员账号进行登录。
6)下载mysql依赖
conda install mysqlclient
注:对接不同的数据源,需安装不同的依赖,官网有说明
官网:http://superset.apache.org/installation.html#database-dependencies
7)重启
superset.sh restart
接下来suerset制作可视化