Project2_【结项】_一个小型视频社交APP项目
一、内容概述
- 对于不良人_springcloud项目中P22~P45内容的复现,实现了前台与用户交互的完整接口。后台与管理员交互的完整接口在传送门。前台项目完整源码。
- 这是一个社交类APP项目,用户可以发布视频、观看别人发布的视频、点赞收藏等,类似今日头条。是基于SpringCloud_Alibaba构建的微服务项目,采用前后端分离的架构。
- 项目含有的功能模块包括: (1)网关模块(easywatch_gateway); (2)公共工具模块(easywatch_commons); (3)短信模块(easywatch_sms); (4)用户模块(easywatch_users); (5)视频分类模块(easywatch_categories); (6)搜索模块(easywatch_search); (7)视频模块(easywatch_videos)。
- 我主要负责后台管理接口以及前台app接口的开发与调试。
- (1)后端架构:maven聚合形式开发,微服务拆分。
(2)通信方式: http+restful json。
(3)前端架构: 基于vue开发,有前端人员编写。
(4)接口文档生成工具: YAPI接口描述工具。 - 软体架构:
(1)SpringCloud: H版本SR6; SpringBoot: 2.2.5.RELEASE; SpringCloud Alibaba: 2.2.1.RELEASE; nacos; gateway
(2) ElasticSearch: 6.8.0; Kibana: 6.8.9
(3) Rabbitmq; Mysql; Redis; Mybatis
(4) Idea2019; jdk1.8
注:
(1) 当前springcloud最新版本为2020版本
(2) springcloud常用组件:
[1]服务注册中心 & 统一配置中心: nacos;
[2]服务间通信组件: openfeign,底层默认集成Ribbon组件,实现了负载均衡;
[3]服务网关组件: gateway;
[4]服务熔断限流: sentinel 流量防卫兵(微服务大规模访问时用到) - 开发亮点:
- 使用redis完成系统的 喜欢&不喜欢&点赞次数&播放次数功能。
其中,喜欢&不喜欢功能利用了redis的set存储结构。为了避免RDM中key太多,后续可采用二次组织的形式,利用redis的hash结构以减少外部key。 - 利用Rabbitmq异步处理完成数据库到索引库的同步。
首先,将上传视频接口划分到用户服务。当用户服务接收到视频后,上传视频到阿里云oss。用户服务通过openfeign调用视频服务来保存视频到数据库,而后将视频数据录入到ES索引库。
上述流程发现问题为:整个过程耗时很长,openfeign经常出现错误(因为openfeign默认超时时间为1s)。
一种解决方式是重设openfeign超时时间,这样不太好,另一种解决方案为:openfeign调用视频服务来保存视频,与此同时利用rabbitmq完成视频数据到ES索引库的异步处理。 - 前台类别接口在处理过程中,发现类别数据很少发生变化,后续可针对类别接口引入缓存处理,缓存处理机制可采用多级缓存技术。
一级缓存: 基于redis实现,是与服务器无关的分布式缓存。途径为将业务方法返回值存储到redis中(格式: key(MD5编码 类名+方法名+参数列表) value)。一级缓存的特点为:分布式缓存录入一次数据后,所有服务器都能共享。再次强调,一级缓存是对业务层service数据加缓存,Service层的数据是经过业务处理之后的结果。
二级缓存: 使用mybatis自身的cache实现,是只能当前服务器可用的本地缓存。途径为对dao层数据加缓存。注意:dao层和service层缓存的主要区别为 service层缓存的是直接结果,dao层缓存的是没有经过业务处理之后的结果。 - gateway权限处理设计。
已知所有的服务接口都需要权限认证后才能访问。通常方法为在自己的服务中加一个拦截器,通过拦截器去判断当前请求是否被认证。本项目采用将整个权限处理放入gateway网关的方式。
gateway的过滤器类型包括全局filter和局部filter(filterFacotry)。因为本项目中有些接口是允许公共访问的(比如短信发送接口),故采用局部filter。SpringCloud默认提供了很多Filter(比如StripFilter),但是没有满足本项目要求的,于是自定义了FilterFactory—>TokenFilterFactory,实现功能为判断redis中是否存在token,途径为配置文件加入: -token。
此外,现在gateway报错默认返回的异常是html页面,本项目自定义了网关的异常处理机制,以更适合前后端分离系统(异常返回json格式数据,不再是html页面)。
注: 接口安全如何考虑? 法1: 所有接口必须使用token才能访问; 法2:基于redis限制接口访问的频率。
二、主要功能模块说明
- 发送短信验证码接口
- 用户登录注册接口
- 获取已登录的用户信息接口
为方便以后所有接口获取用户信息,开发拦截器用于用户信息拦截提取。
step1: 开发拦截器(easywatch_users->…->interceptors->TokenInterceptor)
@Component
public class TokenInterceptor implements HandlerInterceptor {

    private static final Logger log = LoggerFactory.getLogger(TokenInterceptor.class);
    @Autowired
    private RedisTemplate redisTemplate;

    @Override
    public boolean preHandle(HttpServletRequest request, HttpServletResponse response, Object handler) {
        // 1.判断当前请求方法上是否存在RequiredToken注解
        boolean requiredToken = ((HandlerMethod) handler).getMethod().isAnnotationPresent(RequiredToken.class);
        // 2.若存在该注解
        if (requiredToken) {
            // 1. 获取token信息
            String token = request.getParameter("token");
            log.info("当前传递的token为:{}", token);
            // 2. 拼接前缀
            String tokenKey = RedisPrefix.TOKEN_KEY + token;
            // 3. 根据tokenKey获取用户信息
            User o = (User) redisTemplate.opsForValue().get(tokenKey);
            if (o == null) throw new RuntimeException("提示: 令牌无效,无效token!");
            // 4. 存储到当前请求的上下文中
            request.setAttribute("token", token);
            request.setAttribute("user", o);
        }
        return true;
    }
}
step2: 配置拦截器(easywatch_users->…->config->MvcConfig)
@Configuration
public class MvcConfig implements WebMvcConfigurer {

    @Autowired
    private TokenInterceptor tokenInterceptor;

    @Override
    public void addInterceptors(InterceptorRegistry registry) {
        registry.addInterceptor(tokenInterceptor)
                .addPathPatterns("/**");    // 拦截所有
    }
}
step3: 自定义注解(easywatch_users->…->annotations->RequiredToken)
@Retention(RetentionPolicy.RUNTIME) // 运行时有效
@Target(ElementType.METHOD)         // 加载方法上
public @interface RequiredToken {
}
step4: controller中的使用一例(easywatch_users->…->controller->UserContrller)
// 用户收藏列表
@GetMapping("/user/favorites")
@RequiredToken
public List<VideoVO> favorites(HttpServletRequest request) {
     User user = (User) request.getAttribute("user");
     List<VideoVO> videoVOS = favoriteService.findFavoritesByUserId(user.getId());
     log.info("当前用户收藏的视频为:{}", JSONUtils.writeJSON(videoVOS));
     return videoVOS;
}
- 注销登录接口修改用户信息接口
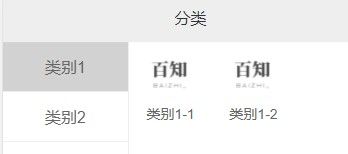
- 分类列表展示接口
- 根据类别id查询视频详情接口
- 上传视频接口
- openfeign相关:
首先在easywatch_users获取用户上传的视频,而后需调用easywatch_videos服务将视频数据入库,此时用到了openfeign组件。
openfeign组件用于完成服务与服务间的通信,是一个声明式的伪Http客户端,它使得写Http客户端变得更简单,使用Feign只需要创建一个接口并注解。它具有可插拔的注解特性。feign默认集成了ribbon,默认实现了负载均衡的效果并且springcloud为feign添加了springmvc注解的支持。
step1: 在easywatch_users中引入依赖
<!--spring-cloud-stater-openfeign(用于完成服务间调用)-->
<dependency>
     <groupId>org.springframework.cloud</groupId>
     <artifactId>spring-cloud-starter-openfeign</artifactId>
</dependency>
step2:在easywatch_users入口类加入注解开启openfeign支持
@SpringBootApplication
@EnableFeignClients   // 开启支持openFeign组件的调用
public class ApiUsersApplication {

    public static void main(String[] args) {
        SpringApplication.run(ApiUsersApplication.class, args);
    }

}
step3:新建feignclients->VideoClient接口
package com.salieri.feignclients;
...

// 调用API-VIDEOS服务的openfeign组件
@FeignClient("API-VIDEOS")       // 用来标识当前接口是一个 feign 的组件
public interface VideosClient {

    @PostMapping("publish")
    Video publish(@RequestBody Video video);  //RequestBody将json格式数据转为对象信息

    @GetMapping("getVideos")
    List<VideoVO> getVideos(@RequestParam("ids") List<Integer> ids);

}
step4: UserController中注入VideoClient并使用
@Autowired
private VideosClient videosClient;

@PostMapping("/user/videos")
@RequiredToken
public Video publishVideos(MultipartFile file, Video video, Integer category_id, HttpServletRequest request) throws IOException {

    ...

    // 调用视频服务
    Video videoResult = videosClient.publish(video);
    log.info("视频发布成功之后返回的视频信息: {}", JSONUtils.writeJSON(videoResult));
    return videoResult;
}
- rabbitmq相关
在VideoService中,利用了MQ异步处理机制将数据保存到ES索引库中。由此通过调用MQ的api使得VideoService服务不用等待ES处理完成便可返回结果。
rabbitmq主要模型为: [1]Hello World(一个消息只需要一个消费者,慢慢消费); [2]Work Queue(一个消息有多个消费者); [3]Publish/Subscribe(应用场景比如一个视频既要录入到ES中又要做日志记录) [4]Routing(比如一个消息可以指定特定的微服务来完成); [5]Topics(将Routing中的key动态变化,加了通配符,可以更灵活地处理消息)。本项目采用了Publish/Subscribe模型。
step1: 在easywatch-videos中引入rabbitmq依赖
<!-- 引入mq -->
<dependency>
     <groupId>org.springframework.boot</groupId>
     <artifactId>spring-boot-starter-amqp</artifactId>
</dependency>
step2: 在easywatch-videos的配置文件中写入rabbitmq相关的配置
 ...
 	rabbitmq:
 		host: 10.15.0.2
 		port: 5672
 		username: guest
 		password: guest
 		virtual-host: /
step3: rabbitmq生产者生产消息–>在VideoServiceImpl中
@Autowired
private RabbitTemplate rabbitTemplate;

===========

@Override
public Video insert(Video video) {
    video.setCreatedAt(new Date());//设置创建日期
    video.setUpdatedAt(new Date());//设置更新日期
    this.videoDao.insert(video);
    // 利用MQ异步处理来提升系统响应。
    // 将视频信息写入到ES索引库
    rabbitTemplate.convertAndSend("videos", "", JSONUtils.writeJSON(getVideoVO(video)));
    return video;
}
step4: rabbitmq消费者消费消息–>在easywatch_search微服务中引入rabbitmq依赖,写rabbitmq配置,而后在 easywatch_search->…->mq->VideoConsumer中进行如下配置
package com.salieri.mq;

@Component
public class VideoConsumer {

    private static final Logger log = LoggerFactory.getLogger(VideoConsumer.class);
    @Autowired
    private RestHighLevelClient restHighLevelClient;

    @RabbitListener(bindings = @QueueBinding(
            value = @Queue,
            exchange = @Exchange(name = "videos", type = "fanout")
    ))
    public void receive(String message) throws IOException {
        log.info("MQ将接收video信息为:{}", message);
        // 1. 将mq中video的json格式数据转为一个videoVO对象
        // 这里的videoVO跟easywatch_videos中转成message的对象是同一个
        VideoVO videoVO = new ObjectMapper().readValue(message, VideoVO.class);
        // 2.创建ES中索引请求对象  参数1:操作索引  参数2:操作类型  参数3:文档id
        IndexRequest indexRequest = new IndexRequest("video", "video", videoVO.getId().toString());
        // 3.设置ES文档的内容
        indexRequest.source(message, XContentType.JSON);
        // 4.执行索引操作(录入索引)
        IndexResponse indexResponse = restHighLevelClient.index(indexRequest, RequestOptions.DEFAULT);

        log.info("video信息录入ES的状态为: {}", indexResponse.status());
    }

}
- ElasticSearch相关
为将数据录入到ES中,可以选择entity中加注解的方式。本项目采用另一种方式,即首先通过kibana在ES中创建索引,而后在springboot录入数据信息。
step1: 通过kibana在es中创建索引
PUT /video
{
      "mappings": {
        "video":{
          "properties":{
            "title":{
              "type":"text",
              "analyzer":"ik_max_word"
            },
            "cover":{
              "type":"keyword"
            },
            "likes":{
              "type":"integer"
            },
            "uploader":{
              "type":"keyword"
            },
            "created_at":{
              "type":"date"
            }
          }
        }
      }
}
step2: 通过sringboot录入数据
针对easywatch_search微服务,首先引入依赖;而后写config->RestClientConfig,进行springboot整合es的配置;而后写mq->VideoConsumer。
- 首页视频推荐接口
在VideoController->@GetMapping(“recommends”)。涉及到一个集合转成另一个集合,一个对象转成另一个对象,服务间openfeign调用 - 视频搜索
后续可进行关于搜索信息高亮的优化 - 视频列表

点击任意类别会返回指定类别下的视频列表。 - 视频详情
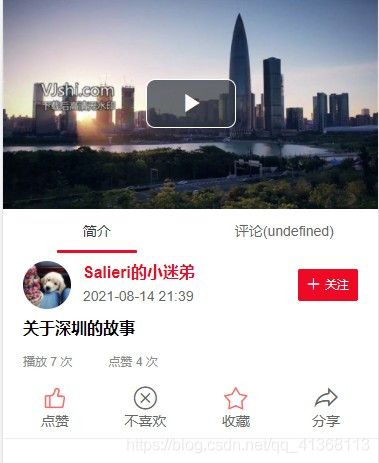
- 视频播放
位置在 UserController->@PutMapping("/user/played/{video_id}")中。其中存在非必须的token,即不要添加注解@RequiredToken。(用户登录播放->生成播放历史并记录播放次数;用户没登录播放->记录播放次数)。
// 视频播放
    @PutMapping("/user/played/{id}")
    public void played(@PathVariable("id") String videoId, HttpServletRequest request) {
        // 当前视频在redis中的播放次数+1
        stringRedisTemplate.opsForHash().increment("PLAYED", RedisPrefix.PLAYED_KEY + videoId, 1);
        // 获取登录用户信息
        User user = getUser(request);
        if (!ObjectUtils.isEmpty(user)) {
            // 记录用户的播放历史
            Played played = new Played();
            played.setUid(user.getId());
            played.setVideoId(Integer.valueOf(videoId));
            // insert中:当用户第一次播放视频时判断为新增,当用户非第一次播放时判断为更新
            played = playedService.insert(played);
            log.info("当前用户的播放记录保存成功,信息为:{}", JSONUtils.writeJSON(played));
        }
    }
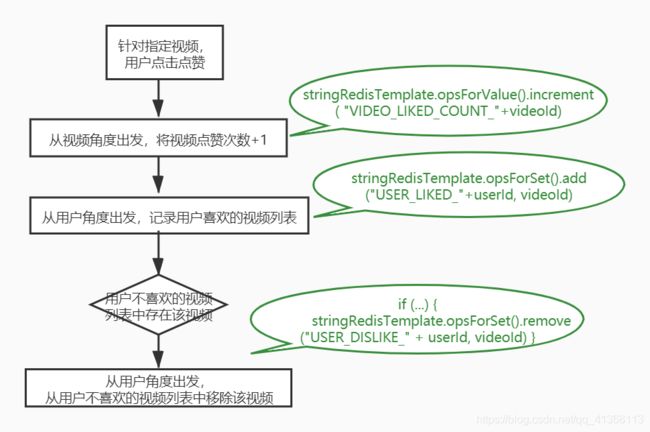
注意,对点赞次数有影响的只有“点赞”按钮的亮灭,用户点击点赞的业务逻辑如图b所示:
用户点击取消点赞的业务逻辑如图c所示:
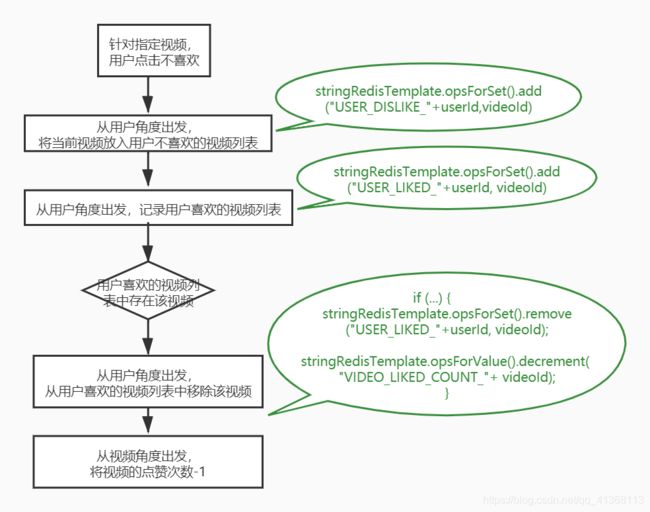
用户点击不喜欢的业务逻辑如图d所示:
用户点击取消不喜欢的业务逻辑如图f所示:


