扫码点餐小程序项目后端开发之“01.搭建服务器基础设施”
目录:
-
-
-
- 一、搭建并启动nodejs+koa服务器端
- 二、设置全局处理异常中间件
- 三、设置统一给前端返回的json格式的响应
- 四、请求获取小程序全局唯一后台接口调用凭据(access_token)
- 五、 试试向云开发数据库添加一条数据
-
-
一、搭建并启动nodejs+koa服务器端
- 编辑器选用:::Hbuilder 或VScode::,这随便选啦~
- 安装node环境
- 新建项目文件
- 安装项目需要的依赖包
安装命令:
$ npm install koa --save // koa框架
$ npm install koa-json --save // 处理返回给前端的json对象
$ npm install koa-router --save // 路由
$ npm install koa-bodyparser --save // 处理post请求参数
$ npm install koa2-cors --save // 由后端来解决跨域问题
$ npm install nodemon --save // 便于启动服务器
安装后在package.json中的显示:
"dependencies": {
    "koa": "^2.13.4",
    "koa-bodyparser": "^4.3.0",
    "koa-json": "^2.0.2",
    "koa-router": "^10.1.1",
    "koa2-cors": "^2.0.6",
    "nodemon": "^2.0.16"
}
- 新建::app.js文件::,用于集合所有接口在此启动
const Koa = require('koa')
const app = new Koa()
// 引入中间件
const json = require('koa-json')
const bodyParser = require('koa-bodyparser')
const cors = require('koa2-cors')
// 引入并实例化路由
const router = require('koa-router')()

// 注入中间件依赖
app.use(json())
app.use(bodyParser())
app.use(cors())

// 启动路由
app.use(router.routes())
app.use(router.allowedMethods())

// 启动8080端口
app.listen(8080);
console.log('启动成功!')
- 设置nodemon启动路径(package.json)
"scripts": {
    "test": "nodemon app.js"
  },
二、设置全局处理异常中间件
- 新建config目录
- 在该目录下新建handle.js,用于创建Error子类
// 创建一个Error的子类
class result extends Error {
 constructor(msg, code) {
  super()
  this.msg = msg
  this.code = code
 }
}

// 导出这个类
module.exports = result
- 在该目录下新建abnormal.js,用于创建自定义全局处理异常事件的中间件
// 引入Error子类
const result = require('./handle.js')

// 自定义全局处理异常中间件
const abnormal = async (ctx, next) => {
 try{
  // 等待下一个中间件执行完
  await next()
 } catch(err){
  // console.log(err);
  // 判断捕获到的错误对象在Error子类中是否存在,返回一个Boolen
  const isResult = err instanceof result
  if(isResult) {
   // 存在,表示是已知错误,将错误信息返回前端
   ctx.body = {
    msg: err.msg
   }
   ctx.status = err.code
  } else {
   // 不存在,表示为未知错误,,将错误信息返回前端
   ctx.body = {
    msg: '未知错误!'
   }
   ctx.status = 500
  }
 }
}
// 导出该中间件
module.exports = abnormal
- 将自定义全局处理异常事件中间件引入到app.js
// 引入自定义全局处理异常中间件
const abnormal = require('./config/abnormal')
// 注入自定义全局处理异常中间件依赖
app.use(abnormal())
三、设置统一给前端返回的json格式的响应
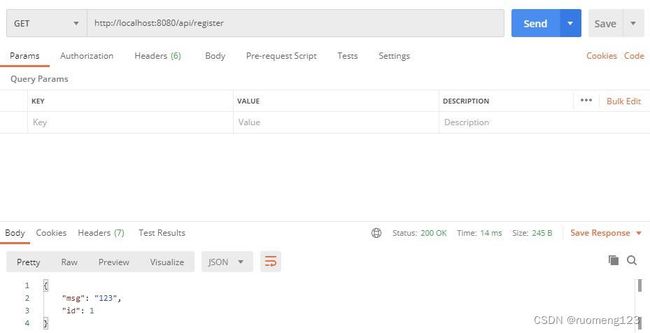
- 首先写一个’‘注册接口’‘用来示范
- 新建一个router/login目录
- 在该目录下新建login.js
/* 编写'注册','登录'等接口 */

// 引入路由
const router = require('koa-router')()

// 注册接口
router.get('/register', async ctx => {
  // 后面会大量使用到下面的代码,可以封装一个类供后续使用
  ctx.body = {
   msg: '123',
   id: 001
  }
  ctx.status = 200
})

// 导出接口
module.exports = router.routes()
- 在app.js中导入并配置
// 注册,登录接口
const login = require('./router/login/login.js')

// 配置路由接口
router.use('/api', login)
- 封装自定义类,以统一返回前端的响应格式
- 在config目录下新建一个result.js
// 定义一个统一返回给前端数据格式的类
class result {
 // 在参数中可以指定默认值,如果传了就用传过来的,没传就直接使用默认值
 constructor(ctx, msg='SUCCESS', code = 200, data = null, extra = null) {
  this.ctx = ctx,
  this.msg = msg,
  this.code = code,
  this.data = data,
  this.extra = extra // 额外数据
 }
 // 返回统一格式的方法
 answer() {
  this.ctx.body = {
   msg: this.msg,
   data: this.data,
   extra: this.extra
  }
  this.ctx.status = this.code
 }
}

// 导出这个类
module.exports = result
- 在login.js中引入并测试使用
/* 编写'注册','登录'等接口 */

// 引入路由
const router = require('koa-router')()
// 引入自定义统一响应格式的类
const result = require('../../config/result.js')

// 注册接口
router.get('/register', async ctx => {
 // 后面会大量使用到下面的代码,可以封装一个类供后续使用
 // ctx.body = {
 //  msg: '123',
 //  id: 001
 // }
 // ctx.status = 200
 new result(ctx, 'success').answer()
})

// 导出接口
module.exports = router.routes()
四、请求获取小程序全局唯一后台接口调用凭据(access_token)
- 在config目录下新建一个databaseapi.js,在此创建一些对数据“增删改查”操作的类
- 首先要下载和引入axios,用来发起网络请求
$ npm install axios --save
- 引入node内置的querystring模块,用于拼接请求参数
- 创建获取token的类
/* 在此创建对数据增删改查操作的一些类 */

// 引入axios
const axios = require('axios')
// 引入node内置模块qs
const qs = require('querystring')
// 引入Error的子类
const result = require('./handle.js')

/* 请求获取小程序全局唯一后台接口调用凭据(access_token)*/
// 拼接路径参数
const params = qs.stringify({
 grant_type: 'client_credential',
 appid: 'wxca00a4c4179d5a5b',
 secret: '1123517302032335af84f01d50cdc8d3'
})
// 请求路径
const url = 'https://api.weixin.qq.com/cgi-bin/token?' + params

// 创建类
class GetAccessToken {
 constructor() {
  // 不用传参
 }
 // 获取token
 async getAccessToken() {
  try{
   // 发起请求
   const token = await axios.get(url)
   // 判断是否成功
   if(token.status === 200) {
    // 成功后返回token值即可
    return token.data.access_token
   } else {
    // 状态码不是'200'和以'5'开头的时候,需要让它也走catch
    // 出现throw就会自动进入catch里,后面的提示信息也会进入它的参数里
    throw '获取token失败!'
   }
  } catch(err){
   // 只有状态码为'5'开头的会进入这里,抛出错误提示即可
   throw new result(err, 500)
  }
 }
}

// 导出
module.exports = {
 GetAccessToken
}
- 导出,在login.js中引用测试
// 注册接口
router.get('/register', async ctx => {
 new GetAccessToken().getAccessToken()
 // 后面会大量使用到下面的代码,可以封装一个类供后续使用
 // ctx.body = {
 //  msg: '123',
 //  id: 001
 // }
 // ctx.status = 200
 new result(ctx, 'success').answer()
})
五、 试试向云开发数据库添加一条数据
- 在databaseapi.js中获取token请求的类中创建一个posteve方法,因为云开发中对数据库操作的api基本都是post方法,可以单独封装一个post方法请求。
- 这个方法需要传的参数有两个,请求地址和请求参数。
- 请求地址由传入的地址再拼接上token组成。
- 请求参数中,云环境id是固定的,其他数据需要传入。
// 数据库插入记录请求路径
const addUrl = 'https://api.weixin.qq.com/tcb/databaseadd?access_token='
// 云环境ID
const env = 'cloud1-2gci1hg2f2593f4d'

// 调用云开发数据库api
 async posteve(dataUrl, query) {
  try{
   // 获取到token
   const token = await this.getAccessToken()
   // 发起请求
   const data = await axios.post(dataUrl + token, {env, query})
   console.log(data)
  catch(err) {
   throw new result(err, 500)
  }
 }

// 导出
module.exports = {
 GetAccessToken,
 addUrl
}
- 在login.js中调用测试一下。
- 测试之前需要先在数据库中添加一个集合test。
// 引入获取接口调用凭证的类
const { GetAccessToken, addUrl } = require('../../config/databaseapi.js')

// 注册接口
router.get('/register', async ctx => {
 const query = "db.collection(\"test\").add({data:{name: '若梦'}})"
 let res = await new GetAccessToken().posteve(addUrl, query)
})
- 完善一下该方法。
// 数据库插入记录请求路径
const addUrl = 'https://api.weixin.qq.com/tcb/databaseadd?access_token='
// 云环境ID
const env = 'cloud1-2gci1hg2f2593f4d'

// 调用云开发数据库api
 async posteve(dataUrl, query) {
  try{
   // 获取到token
   const token = await this.getAccessToken()
   // 发起请求
   const data = await axios.post(dataUrl + token, {env, query})
   // 判断请求是否成功
   if(data.data.errcode === 0) {
    return data.data
   } else {
    throw '请求失败!'
   }
  }catch(err){
   throw new result(err, 500)
  }
 }

// 导出
module.exports = {
 GetAccessToken,
 addUrl
}
// 引入获取接口调用凭证的类
const { GetAccessToken, addUrl } = require('../../config/databaseapi.js')

// 注册接口
router.get('/register', async ctx => {
 const name = '浮生'
 // 可以使用模版字符串拼接
 const query = `db.collection("test").add({data:{name:'${name}'}})`
 // const query = "db.collection(\"test\").add({data:{name: '若梦'}})"
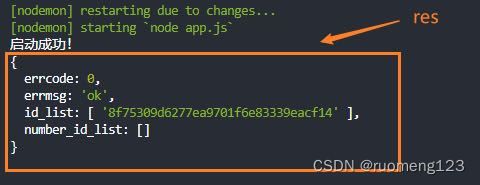
 let res = await new GetAccessToken().posteve(addUrl, query)
 console.log(res)
})
记录人:ruomeng123
Github: https://github.com/ruomeng123
下一篇:扫码点餐小程序项目后端开发之“02.注册登陆接口”


