Migrating a virtual machine from Virtual PC to Hyper-V and back
Migrating a virtual machine from Virtual PC to Hyper-V and back
This post is a companion to my webcast on migrating virtual machines from Virtual PC 2007 or Virtual Server 2005 to Hyper-V and vice-versa. (NOTE: The video is small in size and lacking resolution. I had to view the recording at 400% magnification.) Windows 7 Virtual PC is a different product and not tested or addressed in this post. Migrating to Hyper-V is officially supported by Microsoft. Migrating from Hyper-V is not, which is why this blog post is needed. There are two stumbling blocks to a completely successful migration:
1. Virtual Machine Additions and Integration Services must be removed fist.
2. Virtual PC / Virtual Server and Hyper-V have different HALs. Virtual PC and Virtual Server install an Advanced Configuration and Power InterfaceHAL. Hyper-V installs an ACPI HAL. They’re not the same. They aren’t fully and painlessly compatible.
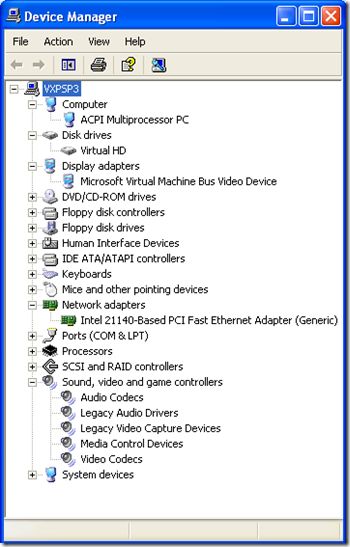
Virtual PC HAL on the left (look under Computer) and Hyper-V HAL on the right. Virtual Machine Additions are installed in the Virtual PC vm and Integration Services are installed in the Hyper-V vm. Only one logical processor is allocated in Hyper-V.
Same Hyper-V virtual machine after changing the number of logical processors from 1 to 4.
Migrating from one virtualization platform to another is a simple procedure requiring a few simple steps and a few reboots. The entire procedures for migrating from Virtual PC to Hyper-V and from Hyper-V to Virtual PC are demonstrated in my webcast. Outlines are published here.
Virtual PC / Virtual Server to Hyper-V Migration
1. In Virtual PC or Virtual Server, remove the Virtual Machine Additions if they are installed and commit the changes.
2. Copy the vhd to the Hyper-V server.
3. Create a new Hyper-V virtual machine using an existing vhd, the one copied from VPC or Virtual Server.
4. Boot the Hyper-V vm and login to it.
5. When you see New Hardware Found prompts, click Cancel on all of them.
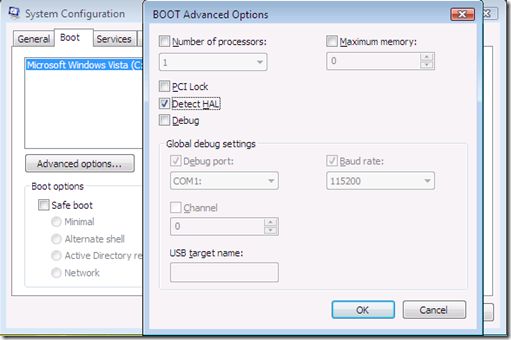
6. For Vista and Windows Server 2008 (this does not apply to Windows Server 2008 R2) only, go to Run and start msconfig. Click the Boot tab and then the Advanced options the button. Click the Detect HAL checkbox. Click OK and OK to commit the changes. It will tell you to reboot, but don’t do that, proceed to the next step. 
Detect HAL exists only on Vista and Windows Server 2008.
7. If your operating system is supported by Integration Services, install them.
8. Reboot.
NOTES:
1. If you are prompted to provide the installation media for the virtual machine’s operating system, do so as many times as you see the prompt. Use an iso file instead of physical media if you have an iso. Not only is an iso faster than physical media, you don’t have to have access to the physical server.
2. It is very important to understand that by default, you have a single emulated optical device accommodating only one optical media source at a time. If you replace the Integration Services iso file with the operating system media, you break the chain of the Integration Services installation process. Depending on your specific circumstances, you’ll either be prompted to reinsert the Integration Services iso file or the installation of Integration Services may not successfully complete. The point is that you keep trying to Install Integration Services until you see the dialog box that the install was successful. You might be able to prevent this mess by adding another virtual optical drive before booting the virtual machine. You could use the second device for the operating system media, leaving the default optical device dedicated to the Integration Services installation. All of this sounds much worse than it really is. I just use the default configuration and provide the correct media when prompted, if at all.
What if you forget to remove the Virtual Machine Additions?
Sometimes people forget to remove the Virtual Machine Additions first. Over the years, different versions of the Virtual Machine Additions have been released. The newer versions can be uninstalled from within a running Hyper-V machine. The older ones cannot. So, try to remove them if you can. If they uninstall, continue with the migration process. If they don’t uninstall, you’ll have to go back to Virtual PC or Virtual Server and remove them before proceeding.
Hyper-V to Virtual PC / Virtual Server Migration
This isn’t as easy. HAL differences keep a Hyper-V vhd from fully booting in Virtual PC or Virtual Server. You have to replace the HAL, but since you can’t really boot the virtual machine. you have to replace the HAL first. You’ll need a Virtual PC or Virtual Server vm with the same operating system. Using the technique I described in my previous post, you copy the HAL from the vhd for the working virtual machine to the vhd you copied from Hyper-V. My webcast shows the entire migration process including replacing the HAL.
1. Merge away or delete any snapshots. You have to reduce your virtual machine to a single vhd. In Hyper-V, uninstall Integration Services if they are installed.
2. Copy the vhd to where you have Virtual PC or Virtual Server installed.
3. Create a new Hyper-V virtual machine using an existing vhd, the one copied from VPC or Virtual Server.
4. Boot the newly created vm and login to it.
5. When you see New Hardware Found prompts, click Cancel on all of them.
6. For Vista and Windows Server 2008 (this does not apply to Windows Server 2008 R2) only, go to Run and start msconfig. Click the Boot tab and then the Advanced options the button. Click the Detect HAL checkbox. Click OK and OK to commit the changes. It will tell you to reboot, but don’t do that, proceed to the next step.
7. If your operating system is supported by Virtual Machine Additions, install them.
8. Reboot.
I’m probably supposed to say something about this type of migration being completely unsupported (and don’t do this at home, it could hurt you, etc.), which it is. But pragmatic developers do all kinds of things that are unsupported and there’s a need to do this from time to time.
In the webcast, there was a question asked about the number of processors that can be assigned to a virtual machine in Hyper-V. I think I may have misinterpreted the question, so I will provide some details here. Windows XP Pro supports 1 – 2 processors. More specifically, it supports 1 – 2 processors that can be hyperthreaded. Two hyperthreaded processors appear in Task Manager as four processors. This is the means by which four logical processors can be assigned to an XP virtual machine. There aren’t any single core processors that can run Hyper-V, so it’s not possible to create a situation where an XP virtual machine’s four logical processors come from more than two physical processors. Nothing about assigning four logical processors is exceeding the capabilities of XP – that’s the explanation I was seeking to provide, although in hindsight I’m not sure that was actually the question being asked.


