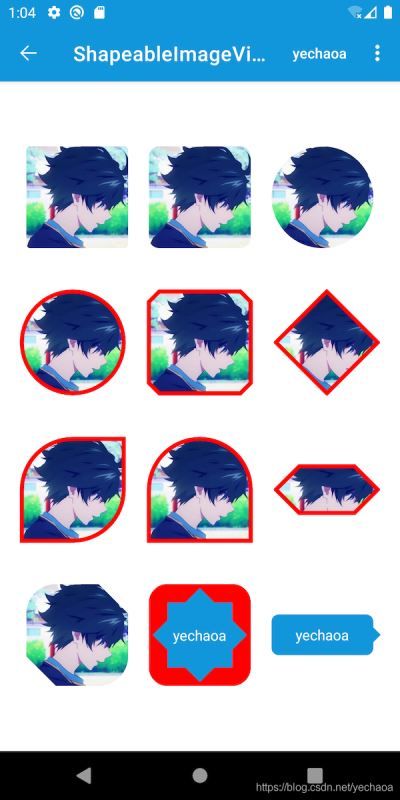
效果
前言
先来看一下ShapeableImageView是什么
由上图可以看到ShapeableImageView也没有什么神秘的,不过是ImageView的一个子类而已,但是从效果图来看,在不写shape、不引入三方库的情况下,还是挺容易实现预期效果的,而且扩展性良好。
使用
引入material包
implementation 'com.google.android.material:material:1.2.1'
常规
和ImageView正常使用没有区别
圆角
- 没有直接设置圆角的属性,需要用到
app:shapeAppearance,后面会说 - cornerFamily 角的处理方式,rounded圆角,cut裁剪
- cornerSize 圆角大小
圆
圆角的大小可以用百分比,也可以自己计算,比如宽高100dp,圆角50dp
描边
- app:strokeColor 描边颜色
- app:strokeWidth 描边宽度
- 注意这里padding的数值是描边宽度的一半,后面会说
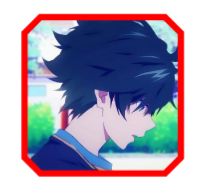
切角
cornerFamily:cut 处理模式变为裁剪
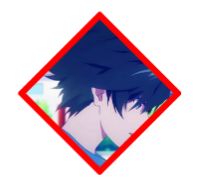
菱形
同样,裁剪模式下圆角大小也可以计算
叶子
- cornerSizeTopLeft 左上圆角
- cornerSizeBottomRight 右下圆角
- 以此类推,左上、左下、右上、右下等
半圆
六边形
属性
关于xml属性,我也做了一个整理,属性不多,只有4个
| 属性 | 描述 |
|---|---|
| strokeWidth | 描边宽度 |
| strokeColor | 描边颜色 |
| shapeAppearance | 外观样式 |
| shapeAppearanceOverlay | 同上,叠加层 |
扩展
前面为了整体的排版,埋了几个伏笔,下面来一一解答。
会涉及到源码,但是经过去繁从简,看起来也非常轻松的。
shapeAppearance
Shape appearance overlay style reference for ShapeableImageView.
ShapeableImageView的形状外观覆盖样式参考。
前面可以看到我们设置圆角其实是用的style,那为什么不直接用attrs呢,不是更加直观方便吗,带着疑问来看看源码是怎么处理的。
直接看ShapeableImageView的次构造方法:
public class ShapeableImageView extends AppCompatImageView implements Shapeable {

  ...

  public ShapeableImageView(Context context, @Nullable AttributeSet attrs, int defStyle) {
    super(wrap(context, attrs, defStyle, DEF_STYLE_RES), attrs, defStyle);
    // Ensure we are using the correctly themed context rather than the context that was passed in.
    context = getContext();

    clearPaint = new Paint();
    clearPaint.setAntiAlias(true);
    clearPaint.setColor(Color.WHITE);
    clearPaint.setXfermode(new PorterDuffXfermode(Mode.DST_OUT));
    destination = new RectF();
    maskRect = new RectF();
    maskPath = new Path();
    TypedArray attributes =
        context.obtainStyledAttributes(
            attrs, R.styleable.ShapeableImageView, defStyle, DEF_STYLE_RES);

    strokeColor =
        MaterialResources.getColorStateList(
            context, attributes, R.styleable.ShapeableImageView_strokeColor);

    strokeWidth = attributes.getDimensionPixelSize(R.styleable.ShapeableImageView_strokeWidth, 0);

    borderPaint = new Paint();
    borderPaint.setStyle(Style.STROKE);
    borderPaint.setAntiAlias(true);
    shapeAppearanceModel =
        ShapeAppearanceModel.builder(context, attrs, defStyle, DEF_STYLE_RES).build();
    shadowDrawable = new MaterialShapeDrawable(shapeAppearanceModel);
    if (VERSION.SDK_INT >= VERSION_CODES.LOLLIPOP) {
      setOutlineProvider(new OutlineProvider());
    }
  }
}
常规操作,获取自定义属性。
关键的两行代码:
    shapeAppearanceModel = ShapeAppearanceModel.builder(context, attrs, defStyle, DEF_STYLE_RES).build();
    shadowDrawable = new MaterialShapeDrawable(shapeAppearanceModel);
也就是说我们给shapeAppearance设置的style,并不是ShapeableImageView自己来处理的,而是由ShapeAppearanceModel来构建的,然后又交给MaterialShapeDrawable来绘制的。
ShapeAppearanceModel
这个类就厉害了,有点像Flutter中的Decoration,可以构建出花里胡哨的效果。
来看ShapeAppearanceModel部分源码:
public class ShapeAppearanceModel {

  /** Builder to create instances of {@link ShapeAppearanceModel}s. */
  public static final class Builder {

    @NonNull
    private CornerTreatment topLeftCorner = MaterialShapeUtils.createDefaultCornerTreatment();

    @NonNull
    private CornerTreatment topRightCorner = MaterialShapeUtils.createDefaultCornerTreatment();

    @NonNull
    private CornerTreatment bottomRightCorner = MaterialShapeUtils.createDefaultCornerTreatment();

    @NonNull
    private CornerTreatment bottomLeftCorner = MaterialShapeUtils.createDefaultCornerTreatment();

    @NonNull private CornerSize topLeftCornerSize = new AbsoluteCornerSize(0);
    @NonNull private CornerSize topRightCornerSize = new AbsoluteCornerSize(0);
    @NonNull private CornerSize bottomRightCornerSize = new AbsoluteCornerSize(0);
    @NonNull private CornerSize bottomLeftCornerSize = new AbsoluteCornerSize(0);

    @NonNull private EdgeTreatment topEdge = MaterialShapeUtils.createDefaultEdgeTreatment();
    @NonNull private EdgeTreatment rightEdge = MaterialShapeUtils.createDefaultEdgeTreatment();
    @NonNull private EdgeTreatment bottomEdge = MaterialShapeUtils.createDefaultEdgeTreatment();
    @NonNull private EdgeTreatment leftEdge = MaterialShapeUtils.createDefaultEdgeTreatment();

    public Builder() {}
    ...
  }
  ...
}
可以看到有各种边和角的属性,这里注意两个点:
MaterialShapeUtils.createDefaultCornerTreatment()创建默认角的处理方式MaterialShapeUtils.createDefaultEdgeTreatment()创建默认边的处理方式
也就意味着,边和角除了默认,是可以自定义的,这就有极大的想象空间了,
比如这样:
// 代码设置 角和边
val shapeAppearanceModel2 = ShapeAppearanceModel.builder().apply {
    setAllCorners(RoundedCornerTreatment())
    setAllCornerSizes(50f)
    setAllEdges(TriangleEdgeTreatment(50f, false))
}.build()
val drawable2 = MaterialShapeDrawable(shapeAppearanceModel2).apply {
    setTint(ContextCompat.getColor(this@ShapeableImageViewActivity, R.color.colorPrimary))
    paintStyle = Paint.Style.FILL_AND_STROKE
    strokeWidth = 50f
    strokeColor = ContextCompat.getColorStateList(this@ShapeableImageViewActivity, R.color.red)
}
mBinding.text2.setTextColor(Color.WHITE)
mBinding.text2.background = drawable2
再比如这样:
// 代码设置 聊天框效果
val shapeAppearanceModel3 = ShapeAppearanceModel.builder().apply {
    setAllCorners(RoundedCornerTreatment())
    setAllCornerSizes(20f)
    setRightEdge(object : TriangleEdgeTreatment(20f, false) {
        // center 位置 , interpolation 角的大小
        override fun getEdgePath(length: Float, center: Float, interpolation: Float, shapePath: ShapePath) {
            super.getEdgePath(length, 35f, interpolation, shapePath)
        }
    })
}.build()
val drawable3 = MaterialShapeDrawable(shapeAppearanceModel3).apply {
    setTint(ContextCompat.getColor(this@ShapeableImageViewActivity, R.color.colorPrimary))
    paintStyle = Paint.Style.FILL
}
(mBinding.text3.parent as ViewGroup).clipChildren = false // 不限制子view在其范围内
mBinding.text3.setTextColor(Color.WHITE)
mBinding.text3.background = drawable3
MaterialShapeDrawable
源码(有删减):
public class MaterialShapeDrawable extends Drawable implements TintAwareDrawable, Shapeable {
...
  @Override
  public void draw(@NonNull Canvas canvas) {
    fillPaint.setColorFilter(tintFilter);
    final int prevAlpha = fillPaint.getAlpha();
    fillPaint.setAlpha(modulateAlpha(prevAlpha, drawableState.alpha));

    strokePaint.setColorFilter(strokeTintFilter);
    strokePaint.setStrokeWidth(drawableState.strokeWidth);

    final int prevStrokeAlpha = strokePaint.getAlpha();
    strokePaint.setAlpha(modulateAlpha(prevStrokeAlpha, drawableState.alpha));

    if (pathDirty) {
      calculateStrokePath();
      calculatePath(getBoundsAsRectF(), path);
      pathDirty = false;
    }

    maybeDrawCompatShadow(canvas);
    if (hasFill()) {
      drawFillShape(canvas);
    }
    if (hasStroke()) {
      drawStrokeShape(canvas);
    }
...
  static final class MaterialShapeDrawableState extends ConstantState {
    ...
    public MaterialShapeDrawableState(@NonNull MaterialShapeDrawableState orig) {
      shapeAppearanceModel = orig.shapeAppearanceModel;
      elevationOverlayProvider = orig.elevationOverlayProvider;
      strokeWidth = orig.strokeWidth;
      colorFilter = orig.colorFilter;
      fillColor = orig.fillColor;
      strokeColor = orig.strokeColor;
      tintMode = orig.tintMode;
      tintList = orig.tintList;
      alpha = orig.alpha;
      scale = orig.scale;
      shadowCompatOffset = orig.shadowCompatOffset;
      shadowCompatMode = orig.shadowCompatMode;
      useTintColorForShadow = orig.useTintColorForShadow;
      interpolation = orig.interpolation;
      parentAbsoluteElevation = orig.parentAbsoluteElevation;
      elevation = orig.elevation;
      translationZ = orig.translationZ;
      shadowCompatRadius = orig.shadowCompatRadius;
      shadowCompatRotation = orig.shadowCompatRotation;
      strokeTintList = orig.strokeTintList;
      paintStyle = orig.paintStyle;
      if (orig.padding != null) {
        padding = new Rect(orig.padding);
      }
    }
	...
  }
...
}
没什么特别的,你只需要知道除了可以设置描边之外,还可以设置背景、阴影等其他属性。
说明
ShapeAppearanceModel只能是实现Shapeable接口的View才可以设置,比如Chip、MaterialButtom等。- 而
MaterialShapeDrawable其实就是Drawable,是所有View都可以设置的。
描边问题
这里借github一张图
又是自定义view的常规操作,有一半画笔是在边界外面的,所以需要设置padding为strokeWidth的一半。
默认圆角问题
有细心的同学会发现啊,第一个常规的ShapeableImageView还是有一点圆角的,没错,属于默认的,跟踪一下源码来看一下:
第一个是颜色,很明显不是我们要找的,继续看shapeAppearanceMediumComponent
只是一个简单的属性,继续查找关联引用
- @style/ShapeAppearance.MaterialComponents.MediumComponent
又引用了一个style,继续看ShapeAppearance.MaterialComponents.MediumComponent这个style
哦豁,看到了熟悉的属性cornerSize,藏的还挺深,继续看看数值是多少
4dp
默认4dp。
那如果不想要这个圆角怎么办呢,可以学习源码仿写一个,不过上面也看到了,有点绕,不如直接写个style搞定:
然后引用
app:shapeAppearance="@style/Corner0Style"
效果:
ok,到这里就差不多了,虽然还有很多相关知识点没有提及,但是也不少了,不如自己去尝试一番,慢慢消化。
Github
https://github.com/yechaoa/MaterialDesign
感谢
- ShapeableImageView 官方文档
- ShapeAppearanceModel 官方文档
- Android Material组件使用详解
- Android Notes|玩转 ShapeableImageView
- Material Components——Shape的处理
最后
到此这篇关于Android中ShapeableImageView使用详解的文章就介绍到这了,更多相关Android ShapeableImageView使用内容请搜索脚本之家以前的文章或继续浏览下面的相关文章希望大家以后多多支持脚本之家!
