- 【半夜爬起来学python】零基础学习Pygame|第一期|知识点+小球反弹游戏案例
奈樱.
python(pygame)pygame学习游戏pip
一.安装PygamePygame是跨平台Python模块,很多编译器不会向用户提供该模块,需要我们自己安装。安装步骤:打开Pygame官网:www.pygame.org点击PYGAME2.6.0-25JUN,2024下载好之后,解压压缩包,安装路径最好放在c盘里Administrator文件里在菜单栏点击搜索,输入cmd,找到“命令提示符”输入命令pipinstallpygame运行的时候会发现命
- 【Python】Pygame从零开始学习
宅男很神经
python开发语言
模块一:Pygame入门与核心基础本模块将引导您完成Pygame的安装,并深入理解Pygame应用程序的基石——游戏循环、事件处理、Surface与Rect对象、显示控制以及颜色管理。第一章:Pygame概览与环境搭建1.1什么是Pygame?Pygame是一组专为编写视频游戏而设计的Python模块。它构建在优秀的SDL(SimpleDirectMediaLayer)库之上,允许您使用Pytho
- 机器学习5——非参数估计
平和男人杨争争
山东大学机器学习期末复习机器学习概率论算法
非参数估计在参数估计中我们已经提到,想要估计后验概率P(ωi∣x)=p(x∣ωi)p(ωi)p(x)P\left(\omega_i\midx\right)=\frac{p\left(x\mid\omega_i\right)p\left(\omega_i\right)}{p(x)}P(ωi∣x)=p(x)p(x∣ωi)p(ωi),就需要估计类条件概率p(x∣ωi)p\left(x\mid\omega
- 机器学习4——参数估计之贝叶斯估计
平和男人杨争争
山东大学机器学习期末复习机器学习人工智能
贝叶斯估计问题建模:后验概率公式:P(ωi∣x,D)=P(x∣ωi,Di)P(ωi)∑j=1cP(x∣ωj,Dj)P(ωj)P\left(\omega_i\mid\mathbf{x},\mathcal{D}\right)=\frac{P\left(\mathbf{x}\mid\omega_i,\mathcal{D}_i\right)P\left(\omega_i\right)}{\sum_{j=1
- 麒麟系统使用-进行.NET开发
mystonelxj
麒麟系统.net麒麟系统控制台及web
文章目录前言一、搭建dotnet环境1.获取相关资源2.配置dotnet二、使用dotnet三、其他说明总结前言麒麟系统的内核是基于linux的,如果需要进行.NET开发,则需要安装特定的应用。由于NETFramework是仅适用于Windows版本的.NET,所以要进行.NET开发需要特定的安装及配置。使用.NET方式与在windows环境下使用有些出入。本文将细致讲解在如何在麒麟系统中使用.N
- 用Tensorflow进行线性回归和逻辑回归(十)
lishaoan77
tensorflow线性回归tensorboard可视化
用TensorBoard可视化线性回归模型TensorBoard是一种可视化工具,用于了解、调试和优化模型训练过程。它使用在执行程序时编写的摘要事件。上面定义的模型使用tf.summary.FileWriter来写日志到日志目录/tmp/lr-train.我们可以用命令调用日志目录的TensorBoard,见Example3-13(TensorBoard已黙认安装与TensorFlow一起).Ex
- 强化学习 16G实践以下是基于CQL(Conservative Q-Learning)与QLoRA(Quantized Low-Rank Adaptation)结合的方案相关开源项目及资源,【ai技】
行云流水AI笔记
开源人工智能
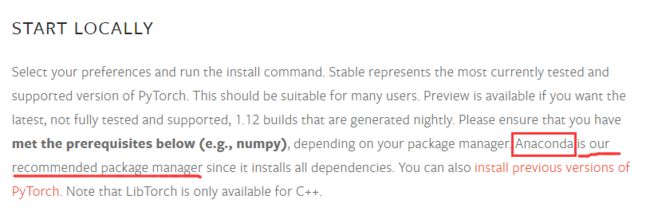
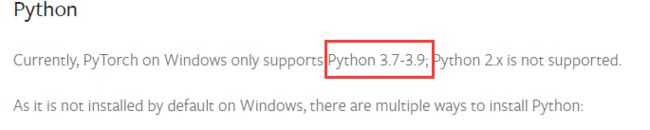
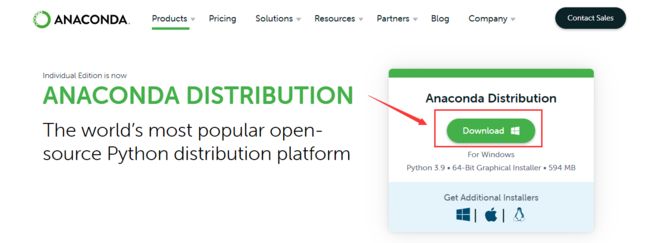
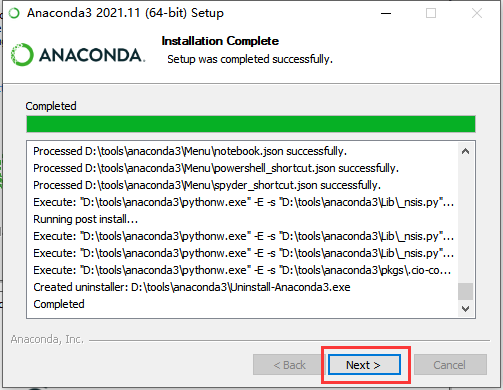
根据你提供的CUDA版本(11.5)和NVIDIA驱动错误信息,以下是PyTorch、TensorFlow的兼容版本建议及环境修复方案:1.版本兼容性表框架兼容CUDA版本推荐安装命令(CUDA11.5)PyTorch11.3/11.6pipinstalltorchtorchvisiontorchaudio--extra-index-urlhttps://download.pytorch.org/
- 【DeepSeek实战】3、Ollama实战指南:LobeChat+多网关架构打造高可用大模型集群
无心水
Ollama实战指南LobeChat实战DeepSeek实战DeepSeek全栈应用开发AI入门大模型CSDN技术干货
一、企业级大模型集群架构全景解析在人工智能落地应用的过程中,大模型服务的高可用性、成本控制和灵活扩展能力成为企业关注的核心痛点。本方案通过LobeChat前端、AI网关层和Ollama模型集群的三层架构设计,实现了无需复杂运维即可部署的生产级大模型服务体系。该架构不仅支持负载均衡、故障转移和模型热切换等企业级特性。还通过量化技术将硬件成本降低60%以上,为中小企业提供了与商业云服务相当的性能体验。
- 【python】判断值是否为NaN
MoFe1
python开发语言
importmathdefis_nan(value):returnisinstance(value,float)andmath.isnan(value)#测试print(is_nan(float('nan')))#输出:Trueprint(is_nan(None))#输出:Falseprint(is_nan('abc'))#输出:False
- 如何在 ArcGIS 中使用 Microsoft Excel 文件_20250614
Lauren_Lu
arcgismicrosoftexcel
如何在ArcGIS中使用MicrosoftExcel文件软件版本:win11;ArcGIS10.8;Office20241.确认ArcGIS10.8对.xlsx文件的支持ArcGIS10.8支持.xlsx文件(Excel2007及以上格式),但需要安装MicrosoftAccessDatabaseEngine驱动程序来读取这些文件。ArcGIS10.8是一个32位应用程序,因此需要32位的驱动程序
- print(3 or 5)的结果是什么?为什么?
Lauren_Lu
python
print(3or5)的结果是:3原因:在Python中,or是一个逻辑运算符,但当它作用于非布尔类型(比如整数)时,它的行为是:返回第一个为真的值;如果第一个值为假,则返回第二个值。具体分析:3是一个非零整数,在布尔上下文中被视为True所以3or5就是:如果3是True,就返回3;否则返回5由于3是True,所以返回的是3。类似例子:print(0or5)#输出5,因为0被视为Falsepri
- 生成式人工智能实战 | 深度卷积生成对抗网络(Deep Convolutional Generative Adversarial Network, DCGAN)
盼小辉丶
生成式人工智能实战150讲人工智能生成对抗网络神经网络
生成式人工智能实战|深度卷积生成对抗网络0.前言1.模型与数据集分析1.1模型分析1.2数据集介绍2.构建DCGAN生成人脸图像2.1数据处理2.2模型构建2.3模型训练0.前言深度卷积生成对抗网络(DeepConvolutionalGenerativeAdversarialNetworks,DCGAN)是基于生成对抗网络(ConvolutionalGenerativeAdversarialNet
- 深度学习实战:基于嵌入模型的AI应用开发
AIGC应用创新大全
AI人工智能与大数据应用开发MCP&Agent云算力网络人工智能深度学习ai
深度学习实战:基于嵌入模型的AI应用开发关键词:嵌入模型(EmbeddingModel)、深度学习、向量空间、语义表示、AI应用开发、相似性搜索、迁移学习摘要:本文将带你从0到1掌握基于嵌入模型的AI应用开发全流程。我们会用“翻译机”“数字身份证”等生活比喻拆解嵌入模型的核心原理,结合Python代码实战(BERT/CLIP模型)演示如何将文本、图像转化为可计算的语义向量,并通过“智能客服问答”“
- 【赵渝强老师】OceanBase OBServer节点的目录结构
OceanBaseOBServer节点工作目录下通常有audit、bin、etc、etc2、etc3、log、run、store等目录,但这些目录并非都是安装必须的。在启动OBServer节点前需要保证etc、log、run、store这4的目录存在,同时store下应该有clog、slog、sstable这3个目录。etc2、etc3是备份配置文件用的,由OBServer节点创建。audit下存
- 机器学习3——参数估计之极大似然估计
平和男人杨争争
山东大学机器学习期末复习机器学习人工智能算法
参数估计问题背景:P(ωi∣x)=p(x∣ωi)P(ωi)p(x)p(x)=∑j=1cp(x∣ωj)P(ωj)\begin{aligned}&P\left(\omega_i\mid\mathbf{x}\right)=\frac{p\left(\mathbf{x}\mid\omega_i\right)P\left(\omega_i\right)}{p(\mathbf{x})}\\&p(\mathbf
- 麒麟系统使用-运用VSCode运行.NET工程
mystonelxj
麒麟系统vscode.netide麒麟
文章目录前言一、VSCode安装与配置1.工具安装2.扩展安装3.环境配置二、运行相关工程1.基础设置2.设置并运行mytest工程(控制台演示工程)3.设置并运行mywebtest工程(网页演示工程)总结前言在麒麟系统使用-进行.NET开发一文中我们介绍了如何在麒麟系统系统创建.NET工程,本文将进一步介绍如何使用微软提供的IDE工具VSCode来运行相应的工程。一、VSCode安装与配置1.工
- [python系列] 创建虚拟环境 venv
en-route
pythonvirtualenv
虚拟环境定义Python中的虚拟环境是一个隔离的运行环境,旨在为每个Python项目提供独立的执行空间,支持在不同的项目中分别管理依赖关系,而不会影响到其他项目或系统的原始Python安装。可以将虚拟环境视为每个Python项目的“独立容器”,每个容器具备以下特点:拥有独立的Python解释器拥有各自独立的包管理和安装的软件包与其他虚拟环境相互隔离允许同一包存在不同版本使用虚拟环境的重要性体现在以
- 中国地图分幅编号计算工具
红衣大叔
gisjavascript分幅
fenfu中国地图分幅编号计算工具,符合GB/T13989-2012国家标准。支持单点计算和范围查询,适用于测绘、GIS开发、城市规划等场景。特性✅支持8种比例尺(100万至5000)✅单点坐标转图幅编号✅矩形范围批量图幅查询✅自动处理高纬度特殊分幅规则✅输入验证与错误处理✅TypeScript类型支持安装npminstallfenfu#或yarnaddfenfu使用示例1.单点计算constMa
- Python代理池的构建与应用:实现高效爬虫与防封禁策略
程序员威哥
python爬虫开发语言
在进行大规模网络数据抓取时,IP封禁是最常见的反爬虫手段之一。为了应对这一挑战,代理池成为了一个重要工具。通过构建代理池,爬虫程序可以随机切换代理IP,避免同一IP被频繁访问而导致封禁,确保数据抓取任务的稳定性和持续性。本文将详细介绍如何使用Python构建一个高效的代理池,并结合实际应用场景,讲解如何使用代理池提升爬虫的抓取能力和防封禁策略。一、代理池的工作原理代理池的基本工作原理是,爬虫请求时
- Python爬虫实战:用Tushare和Baostock爬取股票历史数据及K线图与技术指标计算
在金融数据分析和量化交易中,股票历史数据的获取是进行技术分析、回测和策略研究的第一步。传统上,投资者需要依赖付费数据服务,然而如今,借助Python强大的爬虫工具和开源数据接口,我们能够轻松地爬取免费的历史股票数据,并结合K线图与技术指标来进行深入分析。Tushare和Baostock是两个非常流行的开源金融数据接口。Tushare提供了丰富的国内外金融数据,特别是A股市场的历史数据和实时数据,而
- 2024年AI 智能助手(大模型)产品市场分析|商派
徐礼昭|商派软件市场负责人
人工智能
一、引言人工智能的浪潮不断向前推进,智能助手作为其中的重要应用,已经逐渐渗透到我们生活的各个方面。它们以其便捷性和个性化的特点,改变了我们与世界的互动方式。本报告将对AI智能助手进行全面的行业分析,包括行业概况、主要玩家、用户数据、发展要素以及未来趋势等方面,并通过具体案例分享,帮助读者深入了解这一领域的现状和未来发展潜力。二、行业概览(一)智能助手的定义和发展阶段智能助手是利用人工智能技术为用户
- 电动汽车一键启动手机撑控无钥匙进入
移动管家汽车手机智能控制系统具有汽车远程启动、汽车远程熄火、远程开关车门锁、远程断油、远程供油、远程监听车内动态、入侵报警提示、GPS定位、车辆状态信息实时定位等各种智能化实用功能,安装时不改动任何原车线路,适用于所有车型。将手机的控制功能整合到汽车模块,实现手机与汽车之间的智能对接,手机控制汽车,新增APP远程启动熄火,微信云钥匙等多项功能集成一体,用手机控制汽车,实现汽车智能钥匙的成功开启,为
- 大模型RLHF强化学习笔记(一):强化学习基础梳理Part1
Gravity!
大模型笔记大模型LLM算法机器学习强化学习人工智能
【如果笔记对你有帮助,欢迎关注&点赞&收藏,收到正反馈会加快更新!谢谢支持!】一、强化学习基础1.1Intro定义:强化学习是一种机器学习方法,需要智能体通过与环境交互学习最优策略基本要素:状态(State):智能体在决策过程中需要考虑的所有相关信息(环境描述)动作(Action):在环境中可以采取的行为策略(Policy):定义了在给定状态下智能体应该选择哪个动作,目标是最大化智能体的长期累积奖
- Mariadb-Server的二进制安装
linux土老帽
linux土老帽mariadblinuxcentos
搭建环境:OS:centos7.6版本mariadb:mariadb-10.2.25-linux-x86_64.tar.gz#下载地址:DownloadMariaDBServer-MariaDB.org1.创建用户组useradd-r-s/sbin/nologin-d/data/mysqlmysql#创建用户-r系统账户-s指定shell/sbin/nologin-d指定家目录但是不创建原因是系统
- 高通 QCS8550 大模型性能深度解析:从算力基准到场景实测的全维度 Benchmark
伊利丹~怒风
Qualcomm人工智能AI编程pythonarm自然语言处理
前言在人工智能技术狂飙突进的时代,大模型正以前所未有的速度重塑各行业生态,从智能客服到多模态交互,从边缘推理到端侧部署,其应用场景不断拓展。而这一切革新的背后,离不开底层硬件的强力支撑。高通QCS8550作为面向下一代智能设备的旗舰级计算平台,凭借高达48TOPS的AI算力与先进的第七代高通AI引擎,在大模型性能表现上极具竞争力。其异构多核架构不仅能高效处理复杂的神经网络计算,还通过软硬件协同优化
- windows mysql主从备份_windows下mysql主从备份设置
韩山云客
windowsmysql主从备份
Windowsserver2008mysql主从数据设置步骤:一、安装MySQL说明:在两台MySQL服务器192.168.21.169和192.168.21.168上分别进行如下操作,安装MySQL5.5.22二、配置MySQL主服务器(192.168.21.169)mysql-uroot-p#进入MySQL控制台createdatabaseosyunweidb;#建立数据库osyunweidb
- iphone se 一代 不完美越狱 14.6 视频壁纸教程(踩坑笔记)
YANG_301
iosiphone
iphonese一代不完美越狱14.6加视频壁纸教程-踩坑笔记越狱流程1.爱思助手制作启动u盘坑点:2.越狱好后视频壁纸软件1.源2.软件安装越狱流程1.爱思助手制作启动u盘https://www.i4.cn/news_detail_42302.html此网址为具体流程,但要注意!!!坑点:下图中最后一排quickmode应被勾选(勾选后是×(´ཀ`」∠))进入options后不禁要勾选allow
- Docker+Portainer 离线安装
qq_30024063
docker容器运维
1.Docker安装步骤一:官网下载docker安装包步骤二:解压安装包;tar-zxvfdocker-24.0.6.tgz步骤三:将解压之后的docker文件移到/usr/bin目录下;cpdocker/*/usr/bin/步骤四:将docker注册成系统服务;vim/etc/systemd/system/docker.service然后在文件中添加以下内容,退出并保存(:wq!)[Unit]D
- mongodb替代品SequoiaDB的安装使用
码农下的天桥
mongodbsequoiadb数据库
前言1、为什么不直接使用mongodb啊?答:mongodb的使用协议是SSPL,一旦使用需要将你服务器程序都开源处理–或者给钱。非常不好,而SequoiaDB号称能够兼容mongodb协议,这次来安装试试。mongodb-SSPL,SequoiaDB是AGPL3,勉强比mongodb的协议可用。至少不修改则不用开源。准备工作首先去官网下载:www.sequoiadb.com我下载的版本是:也不知
- Python_计算两个省市之间的直线距离_2506
夏天里的肥宅水
PYTHONpythonspring开发语言
更新代码上一版链接importpandasaspdimporttimeimportpickleimportosimportsysfromgeopy.geocodersimportNominatimfromgeopy.distanceimportgeodesicfromtqdmimporttqdm#ConfigurationINPUT_FILE=r"距离.xlsx"#输入文件路径OUTPUT_FIL
- 矩阵求逆(JAVA)初等行变换
qiuwanchi
矩阵求逆(JAVA)
package gaodai.matrix;
import gaodai.determinant.DeterminantCalculation;
import java.util.ArrayList;
import java.util.List;
import java.util.Scanner;
/**
* 矩阵求逆(初等行变换)
* @author 邱万迟
*
- JDK timer
antlove
javajdkschedulecodetimer
1.java.util.Timer.schedule(TimerTask task, long delay):多长时间(毫秒)后执行任务
2.java.util.Timer.schedule(TimerTask task, Date time):设定某个时间执行任务
3.java.util.Timer.schedule(TimerTask task, long delay,longperiod
- JVM调优总结 -Xms -Xmx -Xmn -Xss
coder_xpf
jvm应用服务器
堆大小设置JVM 中最大堆大小有三方面限制:相关操作系统的数据模型(32-bt还是64-bit)限制;系统的可用虚拟内存限制;系统的可用物理内存限制。32位系统下,一般限制在1.5G~2G;64为操作系统对内存无限制。我在Windows Server 2003 系统,3.5G物理内存,JDK5.0下测试,最大可设置为1478m。
典型设置:
java -Xmx
- JDBC连接数据库
Array_06
jdbc
package Util;
import java.sql.Connection;
import java.sql.DriverManager;
import java.sql.ResultSet;
import java.sql.SQLException;
import java.sql.Statement;
public class JDBCUtil {
//完
- Unsupported major.minor version 51.0(jdk版本错误)
oloz
java
java.lang.UnsupportedClassVersionError: cn/support/cache/CacheType : Unsupported major.minor version 51.0 (unable to load class cn.support.cache.CacheType)
at org.apache.catalina.loader.WebappClassL
- 用多个线程处理1个List集合
362217990
多线程threadlist集合
昨天发了一个提问,启动5个线程将一个List中的内容,然后将5个线程的内容拼接起来,由于时间比较急迫,自己就写了一个Demo,希望对菜鸟有参考意义。。
import java.util.ArrayList;
import java.util.List;
import java.util.concurrent.CountDownLatch;
public c
- JSP简单访问数据库
香水浓
sqlmysqljsp
学习使用javaBean,代码很烂,仅为留个脚印
public class DBHelper {
private String driverName;
private String url;
private String user;
private String password;
private Connection connection;
privat
- Flex4中使用组件添加柱状图、饼状图等图表
AdyZhang
Flex
1.添加一个最简单的柱状图
? 1 2 3 4 5 6 7 8 9 10 11 12 13 14 15 16 17 18 19 20 21 22 23 24 25 26 27 28
<?xml version=
"1.0"&n
- Android 5.0 - ProgressBar 进度条无法展示到按钮的前面
aijuans
android
在低于SDK < 21 的版本中,ProgressBar 可以展示到按钮前面,并且为之在按钮的中间,但是切换到android 5.0后进度条ProgressBar 展示顺序变化了,按钮再前面,ProgressBar 在后面了我的xml配置文件如下:
[html]
view plain
copy
<RelativeLa
- 查询汇总的sql
baalwolf
sql
select list.listname, list.createtime,listcount from dream_list as list , (select listid,count(listid) as listcount from dream_list_user group by listid order by count(
- Linux du命令和df命令区别
BigBird2012
linux
1,两者区别
du,disk usage,是通过搜索文件来计算每个文件的大小然后累加,du能看到的文件只是一些当前存在的,没有被删除的。他计算的大小就是当前他认为存在的所有文件大小的累加和。
- AngularJS中的$apply,用还是不用?
bijian1013
JavaScriptAngularJS$apply
在AngularJS开发中,何时应该调用$scope.$apply(),何时不应该调用。下面我们透彻地解释这个问题。
但是首先,让我们把$apply转换成一种简化的形式。
scope.$apply就像一个懒惰的工人。它需要按照命
- [Zookeeper学习笔记十]Zookeeper源代码分析之ClientCnxn数据序列化和反序列化
bit1129
zookeeper
ClientCnxn是Zookeeper客户端和Zookeeper服务器端进行通信和事件通知处理的主要类,它内部包含两个类,1. SendThread 2. EventThread, SendThread负责客户端和服务器端的数据通信,也包括事件信息的传输,EventThread主要在客户端回调注册的Watchers进行通知处理
ClientCnxn构造方法
&
- 【Java命令一】jmap
bit1129
Java命令
jmap命令的用法:
[hadoop@hadoop sbin]$ jmap
Usage:
jmap [option] <pid>
(to connect to running process)
jmap [option] <executable <core>
(to connect to a
- Apache 服务器安全防护及实战
ronin47
此文转自IBM.
Apache 服务简介
Web 服务器也称为 WWW 服务器或 HTTP 服务器 (HTTP Server),它是 Internet 上最常见也是使用最频繁的服务器之一,Web 服务器能够为用户提供网页浏览、论坛访问等等服务。
由于用户在通过 Web 浏览器访问信息资源的过程中,无须再关心一些技术性的细节,而且界面非常友好,因而 Web 在 Internet 上一推出就得到
- unity 3d实例化位置出现布置?
brotherlamp
unity教程unityunity资料unity视频unity自学
问:unity 3d实例化位置出现布置?
答:实例化的同时就可以指定被实例化的物体的位置,即 position
Instantiate (original : Object, position : Vector3, rotation : Quaternion) : Object
这样你不需要再用Transform.Position了,
如果你省略了第二个参数(
- 《重构,改善现有代码的设计》第八章 Duplicate Observed Data
bylijinnan
java重构
import java.awt.Color;
import java.awt.Container;
import java.awt.FlowLayout;
import java.awt.Label;
import java.awt.TextField;
import java.awt.event.FocusAdapter;
import java.awt.event.FocusE
- struts2更改struts.xml配置目录
chiangfai
struts.xml
struts2默认是读取classes目录下的配置文件,要更改配置文件目录,比如放在WEB-INF下,路径应该写成../struts.xml(非/WEB-INF/struts.xml)
web.xml文件修改如下:
<filter>
<filter-name>struts2</filter-name>
<filter-class&g
- redis做缓存时的一点优化
chenchao051
redishadooppipeline
最近集群上有个job,其中需要短时间内频繁访问缓存,大概7亿多次。我这边的缓存是使用redis来做的,问题就来了。
首先,redis中存的是普通kv,没有考虑使用hash等解结构,那么以为着这个job需要访问7亿多次redis,导致效率低,且出现很多redi
- mysql导出数据不输出标题行
daizj
mysql数据导出去掉第一行去掉标题
当想使用数据库中的某些数据,想将其导入到文件中,而想去掉第一行的标题是可以加上-N参数
如通过下面命令导出数据:
mysql -uuserName -ppasswd -hhost -Pport -Ddatabase -e " select * from tableName" > exportResult.txt
结果为:
studentid
- phpexcel导出excel表简单入门示例
dcj3sjt126com
PHPExcelphpexcel
先下载PHPEXCEL类文件,放在class目录下面,然后新建一个index.php文件,内容如下
<?php
error_reporting(E_ALL);
ini_set('display_errors', TRUE);
ini_set('display_startup_errors', TRUE);
if (PHP_SAPI == 'cli')
die('
- 爱情格言
dcj3sjt126com
格言
1) I love you not because of who you are, but because of who I am when I am with you. 我爱你,不是因为你是一个怎样的人,而是因为我喜欢与你在一起时的感觉。 2) No man or woman is worth your tears, and the one who is, won‘t
- 转 Activity 详解——Activity文档翻译
e200702084
androidUIsqlite配置管理网络应用
activity 展现在用户面前的经常是全屏窗口,你也可以将 activity 作为浮动窗口来使用(使用设置了 windowIsFloating 的主题),或者嵌入到其他的 activity (使用 ActivityGroup )中。 当用户离开 activity 时你可以在 onPause() 进行相应的操作 。更重要的是,用户做的任何改变都应该在该点上提交 ( 经常提交到 ContentPro
- win7安装MongoDB服务
geeksun
mongodb
1. 下载MongoDB的windows版本:mongodb-win32-x86_64-2008plus-ssl-3.0.4.zip,Linux版本也在这里下载,下载地址: http://www.mongodb.org/downloads
2. 解压MongoDB在D:\server\mongodb, 在D:\server\mongodb下创建d
- Javascript魔法方法:__defineGetter__,__defineSetter__
hongtoushizi
js
转载自: http://www.blackglory.me/javascript-magic-method-definegetter-definesetter/
在javascript的类中,可以用defineGetter和defineSetter_控制成员变量的Get和Set行为
例如,在一个图书类中,我们自动为Book加上书名符号:
function Book(name){
- 错误的日期格式可能导致走nginx proxy cache时不能进行304响应
jinnianshilongnian
cache
昨天在整合某些系统的nginx配置时,出现了当使用nginx cache时无法返回304响应的情况,出问题的响应头: Content-Type:text/html; charset=gb2312 Date:Mon, 05 Jan 2015 01:58:05 GMT Expires:Mon , 05 Jan 15 02:03:00 GMT Last-Modified:Mon, 05
- 数据源架构模式之行数据入口
home198979
PHP架构行数据入口
注:看不懂的请勿踩,此文章非针对java,java爱好者可直接略过。
一、概念
行数据入口(Row Data Gateway):充当数据源中单条记录入口的对象,每行一个实例。
二、简单实现行数据入口
为了方便理解,还是先简单实现:
<?php
/**
* 行数据入口类
*/
class OrderGateway {
/*定义元数
- Linux各个目录的作用及内容
pda158
linux脚本
1)根目录“/” 根目录位于目录结构的最顶层,用斜线(/)表示,类似于
Windows
操作系统的“C:\“,包含Fedora操作系统中所有的目录和文件。 2)/bin /bin 目录又称为二进制目录,包含了那些供系统管理员和普通用户使用的重要
linux命令的二进制映像。该目录存放的内容包括各种可执行文件,还有某些可执行文件的符号连接。常用的命令有:cp、d
- ubuntu12.04上编译openjdk7
ol_beta
HotSpotjvmjdkOpenJDK
获取源码
从openjdk代码仓库获取(比较慢)
安装mercurial Mercurial是一个版本管理工具。 sudo apt-get install mercurial
将以下内容添加到$HOME/.hgrc文件中,如果没有则自己创建一个: [extensions] forest=/home/lichengwu/hgforest-crew/forest.py fe
- 将数据库字段转换成设计文档所需的字段
vipbooks
设计模式工作正则表达式
哈哈,出差这么久终于回来了,回家的感觉真好!
PowerDesigner的物理数据库一出来,设计文档中要改的字段就多得不计其数,如果要把PowerDesigner中的字段一个个Copy到设计文档中,那将会是一件非常痛苦的事情。