前端路由原理解析和实现
什么是前端路由?
路由的概念来源于服务端,在服务端中路由描述的是 url 与处理函数之间的映射关系。
在前端单页应用 SPA(Single Page Application)中,路由描述的是 url 与 UI 之间的映射关系。vue的单页面应用是基于路由和组件的,路由用于设定访问路径,并将路径和组件映射起来。传统的页面应用,是用一些超链接来实现页面切换和跳转的。在 vue-router 单页面应用中,则是路径之间的切换,也就是组件的切换。
Vue Router 实现原理
路由器对象底层实现的三大步骤:
(1)监视地址栏变化;
(2)查找当前路径对应的页面组件;
(3)将找到的页面组件替换到 router-vieW 的位置。
如何实现前端路由?
要实现前端路由,需要解决两个核心:
- 如何改变 URL 却不引起页面刷新?
- 如何检测 URL 变化了?
下面分别使用 hash 和 history 两种实现方式回答上面的两个核心问题。
hash 实现
http://www.xxx.com/#/loginhash(#)是URL的锚点,代表的是网页中的一个位置,单单改变#后的部分,浏览器只会滚动到相应位置,不会重新加载网页,也就是说#是用来指导浏览器动作的,对服务器端完全无用,HTTP请求中也不会不包括#,同时每一次改变#后的部分,都会在浏览器的访问历史中增加一个记录,使用 "后退" 按钮,就可以回到上一个位置。- 通过 hashchange 事件监听 URL hash 的变化。
改变 hash 的方式有以下几种:
1. 浏览器前进、后退
2.a链接
3.window.location.hash = '#/home'
这几种情况改变 URL 都会触发 hashchange 事件。
window.addEventListener('hashchange', matchAndUpdate)history 实现
-
利用了
HTML5 History Interface中新增的pushState()和replaceState()方法。这两个方法应用于浏览器的历史记录栈,改变 URL 的 path 部分不会引起页面重新加载。 - history 提供类似 hashchange 事件的 popstate 事件。
不同的是:只有通过浏览器前进后退改变 URL 时会触发 popstate 事件,通过pushState/replaceState或标签改变 URL 不会触发 popstate 事件。好在我们可以拦截pushState/replaceState的调用和标签的点击事件来检测 URL 变化,所以监听 URL 变化可以实现,只是没有 hashchange 那么方便。
生产环境问题及解决
当我们使用 history 模式路由时,比如有这么一个 url:www.test.com/home,如果我们刷新页面的话,浏览器会发送新的请求 www.test.com/home, 如果后端服务器没有 /home 对应的接口,那么就会返回404。
刷新 404 的解决办法:在服务端增加一个覆盖所有情况的候选资源:如果 URL 匹配不到任何静态资源,接口则应该返回首页 index.html。
开发环境- historyApiFallback
有些小伙伴会有疑问,为什么开发环境没有遇到这个问题呢,不是和生产同样的刷新操作嘛。
因为在 vue-cli 中 webpack 帮我们做了处理:
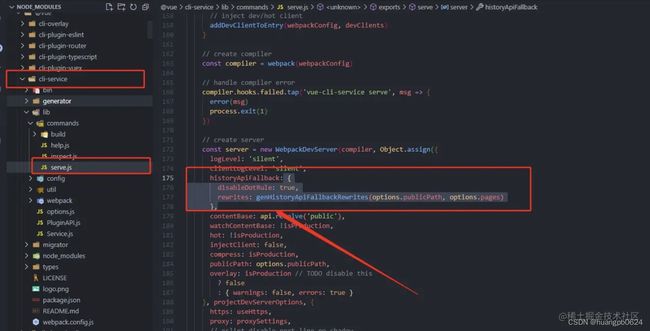
如果我们把该配置改为 false,浏览器会把我们这个当做是一次 get 请求,如果后端没有对应的接口,就会出现下面这个报错提示。

总结
hash路由兼容性更好,但是带#显得丑些histroy和正常 url 路径一样,但是需要在服务器进行单独配置。
原生JS前端路由实现
基于上节讨论的两种实现方式,分别实现 hash 版本和 history 版本的路由,示例使用原生 HTML/JS 实现,不依赖任何框架。
基于 hash 实现
运行效果: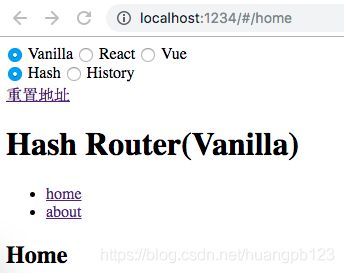
HTML 部分:
JavaScript 部分:
// 页面加载完不会触发 hashchange,这里主动触发一次 hashchange 事件
window.addEventListener('DOMContentLoaded', onLoad)
// 监听路由变化
window.addEventListener('hashchange', onHashChange)
// 路由视图
var routerView = null
function onLoad () {
routerView = document.querySelector('#routeView')
onHashChange()
}
// 路由变化时,根据路由渲染对应 UI
function onHashChange () {
switch (location.hash) {
case '#/home':
routerView.innerHTML = 'Home'
return
case '#/about':
routerView.innerHTML = 'About'
return
default:
return
}
}封装一下就是:
// hash路由
class Route{
constructor(){
// 路由存储对象
this.routes = {}
// 当前hash
this.currentHash = ''
// 绑定this,避免监听时this指向改变
this.freshRoute = this.freshRoute.bind(this)
// 监听
window.addEventListener('load', this.freshRoute, false)
window.addEventListener('hashchange', this.freshRoute, false)
}
// 存储
storeRoute (path, cb) {
this.routes[path] = cb || function () {}
}
// 更新
freshRoute () {
this.currentHash = location.hash.slice(1) || '/'
this.routes[this.currentHash]()
}
}
/**
* 使用
*/
const myRoute = new Route();
// 定义路由
myRoute.storeRoute('/', () => {
console.log('/')
})
myRoute.storeRoute('/index', () => {
console.log('/index')
})
myRoute.storeRoute('/home', () => {
console.log('/home')
})
基于 history 实现
运行效果: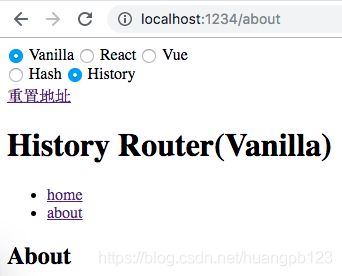
HTML 部分:
JavaScript 部分:
window.addEventListener('DOMContentLoaded', onLoad)
// 监听路由变化
window.addEventListener('popstate', onPopState)
// 路由视图
var routerView = null
function onLoad () {
routerView = document.querySelector('#routeView')
onPopState()
// 拦截 标签点击事件默认行为, 点击时使用 pushState 修改 URL 并手动更新 UI,从而实现点击链接更新 URL 和 UI 的效果。
var linkList = document.querySelectorAll('a[href]')
linkList.forEach(el => el.addEventListener('click', function (e) {
e.preventDefault()
history.pushState(null, '', el.getAttribute('href'))
onPopState()
}))
}
// 路由变化时,根据路由渲染对应 UI
function onPopState () {
switch (location.pathname) {
case '/home':
routerView.innerHTML = 'Home'
return
case '/about':
routerView.innerHTML = 'About'
return
default:
return
}
}React 版前端路由实现
基于 hash 实现
运行效果: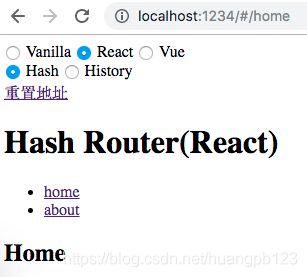
使用方式和 react-router 类似:
-
home
-
about
Home
} />
About
} />
RouteContext 实现
export default React.createContext();HashRouter 实现
export default class HashRouter extends React.Component {
state = {
currentPath: this.getHash(window.location.href)
};
getHash(url) {
return url.split('#').pop();
}
onHashChange = e => {
const currentPath = this.getHash(e.newURL);
console.log("onHashChange:", currentPath);
this.setState({ currentPath });
};
componentDidMount() {
window.addEventListener("hashchange", this.onHashChange);
}
componentWillUnmount() {
window.removeEventListener("hashchange", this.onHashChange);
}
render() {
return (
{this.props.children}
);
}
}Route 实现
export default ({ path, render }) => (
{({currentPath}) => currentPath === path && render()}
);Link 实现
export default ({ to, ...props }) => ;基于 history 实现
运行效果:
使用方式和 react-router 类似:
-
home
-
about
Home
} />
About
} />
HistoryRouter 实现
export default class HistoryRouter extends React.Component {
state = {
currentPath: this.getHash(window.location.href)
};
getHash(url) {
// 这里只考虑一级路由
return '/' + url.split('/').pop();
}
onPopState = e => {
const currentPath = this.getHash(window.location.href);
console.log("onPopState:", currentPath);
this.setState({ currentPath });
};
componentDidMount() {
window.addEventListener("popstate", this.onPopState);
}
componentWillUnmount() {
window.removeEventListener("popstate", this.onPopState);
}
render() {
return (
{this.props.children}
);
}
}Route 实现
export default ({ path, render }) => (
{({currentPath}) => currentPath === path && render()}
);Link 实现
export default ({ to, ...props }) => (
{({ onPopState }) => (
{
e.preventDefault();
window.history.pushState(null, "", to);
onPopState();
}}
/>
)}
);Vue 版本前端路由实现
基于 hash 实现
运行效果: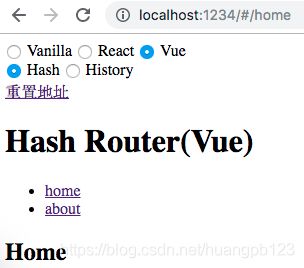
使用方式和 vue-router 类似(vue-router 通过插件机制注入路由,但是这样隐藏了实现细节,为了保持代码直观,这里没有使用 Vue 插件封装):
    home
    about
const routes = {
'/home': {
template: 'Home
'
},
'/about': {
template: 'About
'
}
}
const app = new Vue({
el: '.vue.hash',
components: {
'router-view': RouterView,
'router-link': RouterLink
},
beforeCreate () {
this.$routes = routes
}
})router-view 实现
router-link 实现
基于 history 实现
运行效果:
使用方式和 vue-router 类似:
    home
    about
const routes = {
'/home': {
template: 'Home
'
},
'/about': {
template: 'About
'
}
}
const app = new Vue({
el: '.vue.history',
components: {
'router-view': RouterView,
'router-link': RouterLink
},
created () {
this.$routes = routes
this.boundPopState = this.onPopState.bind(this)
},
beforeMount () {
window.addEventListener('popstate', this.boundPopState)
},
beforeDestroy () {
window.removeEventListener('popstate', this.boundPopState)
},
methods: {
onPopState (...args) {
this.$emit('popstate', ...args)
}
}
})router-view 实现:
router-link 实现
小结
所有的示例的代码放在 Github 仓库:GitHub - whinc/web-router-principle: 基于 hash 和 history 两种模式,分别使用原生JS/React/Vue 实现简单的前端路由,总共六个实现版本以供参考。