【Java】从0开始个人网站建立(一)工程建立到登录与认证-Spring boot、Shiro、Mybatis-Plus、MySql
个人网站建立
- 一、登录界面实现
-
- 1.1 工程建立
- 1.2 前端
- 1.3 页面显示测试
- 二、Shiro登录验证
-
- 2.1 数据库
-
- 2.1.1 数据表设计
- 2.1.2 插入数据
- 2.1.3 联表查看信息
- 2.2 工程项目继续开发
-
- 2.2.1 添加mybatis-plus和druid依赖
- 2.2.2 配置数据库连接
- 2.2.3 创建实体类
- 2.2.4 创建一个dao并测试
- 2.2.5 创建UsersLogin有关的接口及类
- 2.2.6 创建UserService
- 2.3 Shiro验证
-
- 2.3.1 添加Shiro相关依赖
- 2.3.2 创建UserRealm
- 2.3.3 创建ShiroConfig
- 2.3.4 创建Json返回类
- 2.3.5 创建LoginController
- 2.3.6 MD5加盐生成密码并保存数据库
- 2.3.7 更改login.js的验证
- 2.3.8 运行测试
- 2.4 分析
-
- 2.4.1 login.js分析
- 2.4.2 js文件中log()函数分析
写在前面
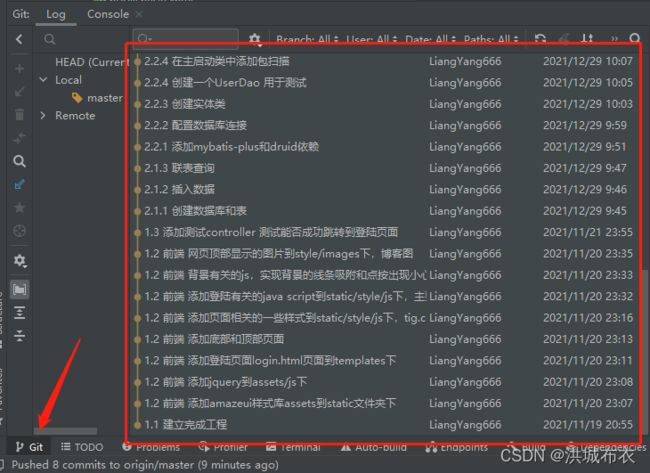
本项目续 腾讯云服务器购买与配置博客,项目github网址为 链接,项目所需前端文件(HTML和JS)可以从GitHub仓库中下载获取,另外本项目按照步骤依次进行了commit,因此如果使用git clone将项目下载下来,将会得到与博客教程几乎一致的历史线,如图用IDEA打开时,观察Git,将得到如下图,因此可根据博客内容,每个小节进行检查
一、登录界面实现
1.1 工程建立
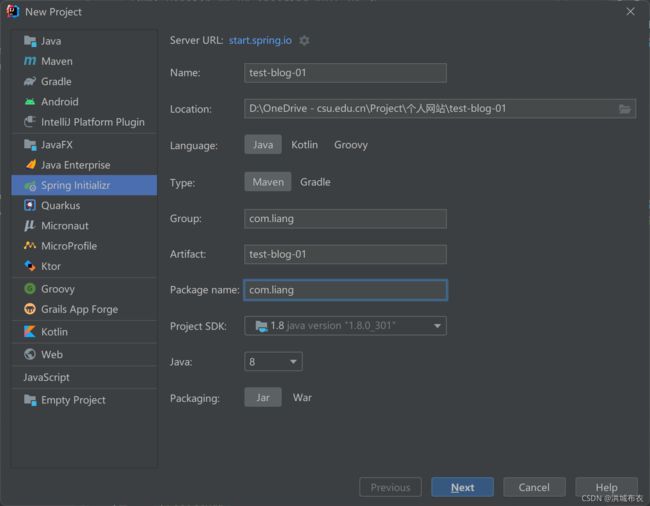
- 新建,加载失败的可将Server URL改成
https://start.aliyun.com
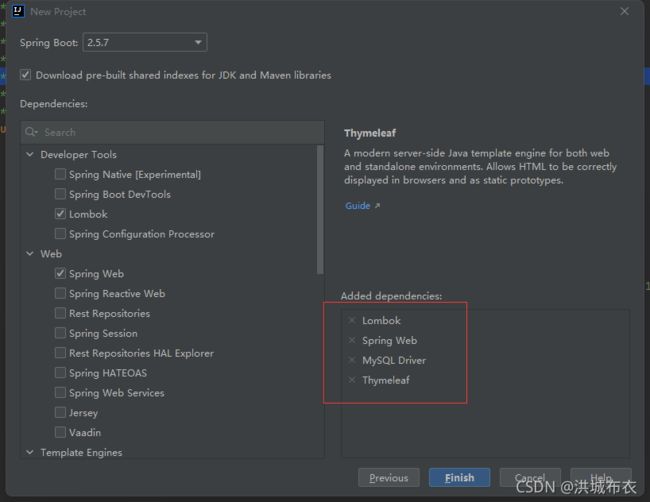
- 选择4个初始依赖,
Thymeleaf在Template Engines中
- 等待依赖下载完成

- 依赖下载完成后目录结构,文件标志将变化

1.2 前端
因为还要适配移动端的页面,因此选择amazeui作为基本样式库
- 安装amazui样式库
点击使用手册页面,选择版本进行下载
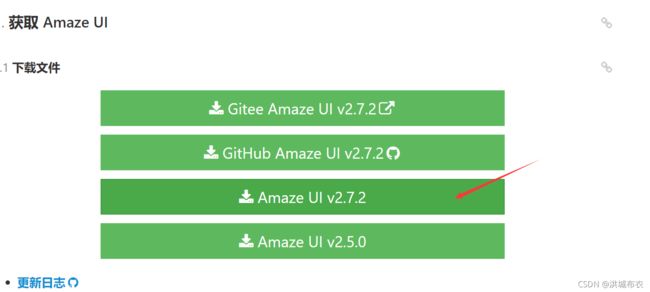
解压后将assets复制到resources/static目录下

- 添加jQuery
下载jquery-1.12.4.min.js,添加至resources/static/assets/js下,也可在我的github工程中下载

- 添加login(登陆页面),footer(网页底部),和lheader(网页头部)三个页面到
resources/templates下

- 添加页面相关的
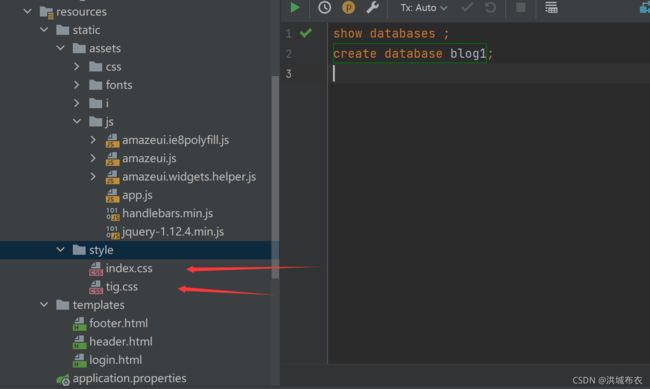
index.css和tig.css两个样式文件到resources/static/style/js下,其中tig.css设置初始时“用户名或密码错误”和“客官,密码格式6-18位”两个提示不显示
- 添加登陆有关的
login.js和background.js到resources/static/style/js下,
这两个是个java scrip
login.js主要作用为判断账号和密码是否符合有关的判断,显示有关提示
background.js是背景有关的,实现背景的线条吸附和点按出现小心心

- 添加博客logo
网页顶部显示的博客logo图片到resources/style/images下,命名为myPicture.jpg
最终目前所有前端有关文件结构如下图所示

1.3 页面显示测试
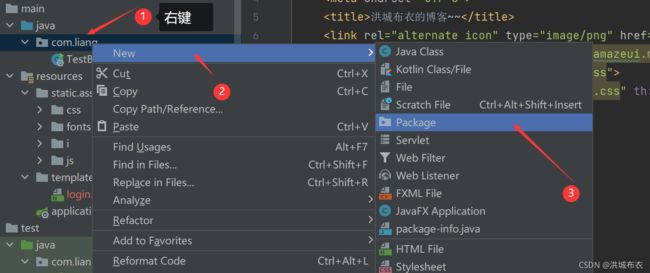
- 新建controller包
创建com.liang.modules.sys.controller包

- 新建类
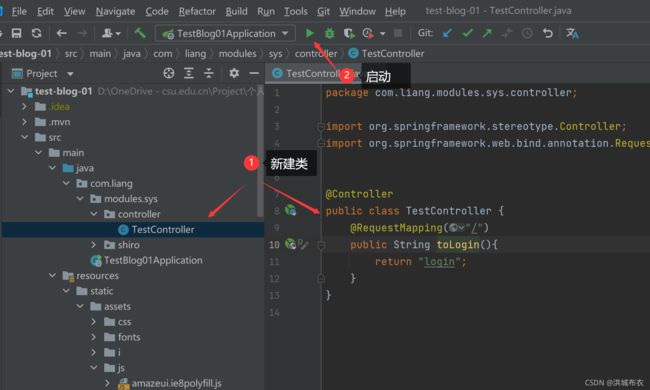
 新建TestController类,并写入,启动
@Controller
public class TestController {
    @RequestMapping("/")
    public String toLogin(){
        return "login";
    }
}
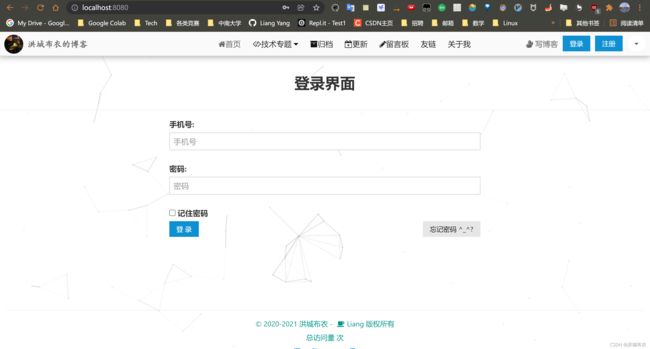
- 浏览器输入http://localhost:8080/,查看界面如下
二、Shiro登录验证
2.1 数据库
2.1.1 数据表设计
创建数据库,并依次创建用户信息表、角色表、权限表、角色权限映射表
create database blog1;
use blog1;

# 创建用户信息表
create table users(
    `id` int(11) not null auto_increment comment 'id',
    `username` varchar(255) not null comment '用户名',
    `password` varchar(60) not null comment '密码',
    `phone` varchar(11) not null comment '手机',
    `last_time` date default null comment '最后登录时间',
    `role_id` int(1) not null comment '角色id',
    primary key (`id`)
)engine=InnoDB DEFAULT CHARSET=utf8mb4;

# 创建角色表
create table roles(
    `id` int(1) not null comment '角色id',
    `role_name` varchar(10) not null comment '角色名称',
    primary key (`id`)
)engine=InnoDB DEFAULT CHARSET=utf8mb4;

# 创建权限表
create table permission(
    `id` int(1) not null comment '权限id',
    `permission_name` varchar(10) not null comment '权限名称',
    primary key(`id`)
)engine=InnoDB DEFAULT CHARSET=utf8mb4;

# 创建角色和权限对应表
create table role_permission (
    `role_id` int(1) not null comment '角色id',
    `permission_id` int(1) not null comment '权限id',
    key `role_id` (`role_id`),
    key `permission_id` (`permission_id`)
)engine=InnoDB DEFAULT CHARSET=utf8mb4;
2.1.2 插入数据
# 插入角色表信息
insert into roles values (1, 'admin');
insert into roles values (2, 'user');
insert into roles values (3, 'partner');
# 插入权限表信息
insert into permission values (1, 'editor');
insert into permission values (2, 'manage');
insert into permission values (3, 'comment');
#插入角色和对应的权限对应关系
insert into role_permission values (1, 2);
insert into role_permission values (2, 3);
insert into role_permission values (3, 1);
# 插入用户信息
insert into users values(1, '洪城布衣','123456', '12345678910', '2021-12-22', 1);
2.1.3 联表查看信息
select u.*, r.role_name, rpn.permission_id, p.permission_name from users u
join roles r on u.role_id = r.id
join role_permission rpn on r.id = rpn.role_id
join permission p on rpn.permission_id = p.id;
2.2 工程项目继续开发
2.2.1 添加mybatis-plus和druid依赖
在pom.xml的标签中添加如下
        <dependency>
            <groupId>com.baomidougroupId>
            <artifactId>mybatis-plus-boot-starterartifactId>
            <version>3.1.0version>
        dependency>

        <dependency>
            <groupId>com.alibabagroupId>
            <artifactId>druid-spring-boot-starterartifactId>
            <version>1.1.14version>
        dependency>
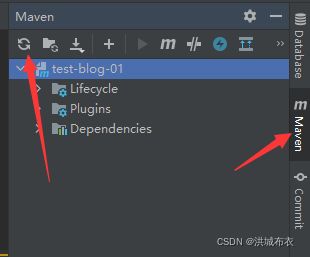
添加后,版本号或包会是红色,点Maven->再刷新,将会对相应的依赖进行下载和加载,加载完成后红色就消失,当添加其它依赖时也是这样操作,一直等待其红色消失
2.2.2 配置数据库连接
- 在resources下创建application.yaml和application-dev.yaml,如下图所示

- 在application.yaml中填写如下内容
# 使用application的配置文件 spring: # 配置文件 dev|test|prod profiles: active: dev # mybatis-plus配置 mybatis-plus: mapper-locations: classpath:mappering/*.xml #实体扫描,多个package用逗号或者分号分隔 type-aliases-package: com.liang.modules.sys.entity global-config: db-config: table-underline: true db-type: mysql - 在application-dev.yaml中填写如下内容,
server:
  port: 8080
spring:
  datasource:
    username: root
    password: 123456
    url: jdbc:mysql://localhost:3306/blog1?serverTimezone=UTC&useUnicode=true&characterEncoding=utf-8
    driver-class-name: com.mysql.cj.jdbc.Driver
    type: com.alibaba.druid.pool.DruidDataSource
    druid:
      initial-size: 5
      min-idle: 5
      max-active: 20
      max-wait: 60000
      time-between-eviction-runs-millis: 60000
      min-evictable-idle-time-millis: 300000
      validation-query: SELECT 1 FROM DUAL
      test-while-idle: true
      test-on-borrow: false
      test-on-return: false
      pool-prepared-statements: true
      filter:
        commons-log:
          connection-logger-name: stat,wall,log4j
      max-pool-prepared-statement-per-connection-size: 20
      use-global-data-source-stat: true
      connection-properties: druid.stat.mergeSql=true;druid.stat.slowSqlMillis=500
2.2.3 创建实体类
- 首先创建com.liang.modules.sys.entity包,即在modules.sys下创建entity,entity下将会存放普通实体类,在entity下继续创建com.liang.modules.sys.entity.VO包(视图对象类)
- 在entity下创建PermissionEntity、RoleEntity、UsersEntity三个类,VO下创建UsersVOEntity和RoleVOEntity两个类,如下图所示,图中文件名显示红色请忽略,是git有关的

- 各个类的主体代码如下
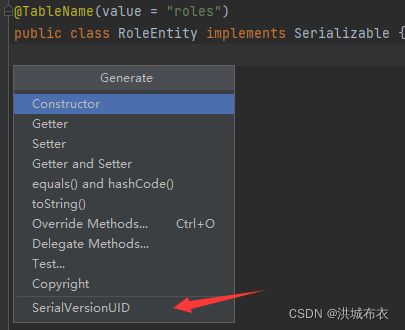
@Data @TableName(value = "users") public class UsersEntity implements Serializable { private static final long serialVersionUID = 4183054704913917874L; @TableId("id") private long id; private String username; private String password; private String phone; private String lastTime; private Integer roleId; } @Data @TableName(value = "permission") public class PermissionEntity implements Serializable { private static final long serialVersionUID = 7501360721677209850L; private int id; private String permissionName; } @Data @TableName(value = "roles") public class RoleEntity implements Serializable { private static final long serialVersionUID = 7840592564845432616L; private int id; private String roleName; } @Data @TableName(value = "roles") public class RoleVOEntity extends RoleEntity implements Serializable { private static final long serialVersionUID = 3137462801862176163L; @TableField(exist = false) private Set<PermissionEntity> permissionSet; } @Data @TableName(value = "users") public class UsersVOEntity extends UsersEntity implements Serializable { private static final long serialVersionUID = -8860349534536707832L; @TableField(exist = false) private Set<RoleVOEntity> roles; } - 其中每个实体类的serialVersionUID是序列化有关的,可以删除我写的,然后自己生成,生成方式如下:Idea安装 GenerateSerialVersionUID 插件,重启Idea,在类中键盘按
alt+Insetrt自动生成序列化uid
2.2.4 创建一个dao并测试
- 创建com.liang.modules.sys.dao包
- 创建com.liang.modules.sys.dao.UserDao.java接口,内容如下
@Repository public interface UserDao extends BaseMapper<UsersEntity> { } - 添加包扫描
在com.liang.TestBlog01Application前面添加
@MapperScan("com.liang.modules.sys.dao")
如下图所示

- 测试类编写
在测试类com.liang.TestBlog01ApplicationTests中,填写测试内容,测试类所在位置可看下一步的测试
填写内容如下,主要调用的是mybatis-plus生成的CRUD@SpringBootTest class TestBlog01ApplicationTests { @Autowired private UserDao userDao; @Test void contextLoads() { List<UsersEntity> usersEntities = userDao.selectList(null); System.out.println(usersEntities); } }
2.2.5 创建UsersLogin有关的接口及类
UsersLoginDao接口、UsersLoginDao.xml、UserService接口以及UserServiceImpl实现类
- com.liang.modules.sys.dao.UsersLoginDao接口
@Repository public interface UserLoginDao extends BaseMapper<UsersVOEntity> { UsersVOEntity findByPhone(String phone); } - 在resources下新建mappering目录,并在mappering目录下新建UsersLoginDao.xml文件,内容如下
DOCTYPE mapper PUBLIC "-//mybatis.org//DTD Mapper 3.0//EN" "http://mybatis.org/dtd/mybatis-3-mapper.dtd"> <mapper namespace="com.liang.modules.sys.dao.UserLoginDao"> <resultMap id="userMap" type="com.liang.modules.sys.entity.VO.UserVOEntity"> <id property="id" column="id"/> <result property="username" column="username"/> <result property="password" column="password"/> <result property="phone" column="phone"/> <result property="lastTime" column="last_time"/> <collection property="roles" ofType="com.liang.modules.sys.entity.VO.RoleVOEntity"> <id property="id" column="role_id"/> <result property="roleName" column="role_name"/> <collection property="permissionSet" ofType="com.liang.modules.sys.entity.PermissionEntity"> <id property="id" column="permission_id"/> <result property="permissionName" column="permission_name"/> collection> collection> resultMap> <select id="findByPhone" parameterType="String" resultMap="userMap"> select u.*, r.role_name, p.id as permission_id, p.permission_name from users u join roles r on u.role_id=r.id join role_permission rp on r.id = rp.role_id join permission p on p.id = rp.permission_id where phone=#{phone}; select> mapper> - 在测试类中加一个测试函数,并将userLoginDao注入
@Autowired private UserLoginDao userLoginDao; @Test void test2(){ UserVOEntity byPhone = userLoginDao.findByPhone("12345678910"); System.out.println(byPhone.getUsername()); System.out.println(byPhone.getPassword()); System.out.println("====>Roles"); byPhone.getRoles().forEach(x-> System.out.println(x.getId()+" "+x.getRoleName()+ x.getPermissionSet())); } - 运行这个测试方法
输出如下

2.2.6 创建UserService
- 创建
com.liang.modules.sys.service包 - 创建
com.liang.modules.sys.service.UserService接口和com.liang.modules.sys.service.impl.UserServiceImpl实现类 - 内容分别如下
public interface UserService {
    UserVOEntity findByPhone(String phone);
}
@Service public class UserServiceImpl implements UserService { @Autowired private UserLoginDao userLoginDao; @Override public UserVOEntity findByPhone(String phone) { return userLoginDao.findByPhone(phone); } } - 同理你也可以使用测试类对写的service层作一个测试
    @Autowired
    private UserServiceImpl userServiceImpl;
    @Test
    void test3(){
        UserVOEntity byPhone = userServiceImpl.findByPhone("12345678910");
        System.out.println(byPhone.getUsername());
        System.out.println(byPhone.getPassword());
        System.out.println("====>Roles");
        byPhone.getRoles().forEach(x-> System.out.println(x.getId()+" "+x.getRoleName()+ x.getPermissionSet()));
    }
2.3 Shiro验证
2.3.1 添加Shiro相关依赖
pom.xml中添加
        <dependency>
            <groupId>org.apache.shirogroupId>
            <artifactId>shiro-spring-boot-web-starterartifactId>
            <version>1.7.1version>
        dependency>


        <dependency>
            <groupId>com.github.theborakompanionigroupId>
            <artifactId>thymeleaf-extras-shiroartifactId>
            <version>2.0.0version>
        dependency>
2.3.2 创建UserRealm
创建com.liang.modules.sys.shiro.UserRealm类
暂时重写认证方法,主要内容为通过token获取到网页传来的username(其实为手机号)与密码加盐后生成编码,即内容暂时为
public class UserRealm extends AuthorizingRealm {

    @Autowired
    private UserService userService;

    @Override
    protected AuthorizationInfo doGetAuthorizationInfo(PrincipalCollection principalCollection) {
        return null;
    }

    @Override
    protected AuthenticationInfo doGetAuthenticationInfo(AuthenticationToken authenticationToken) throws AuthenticationException {
        UsernamePasswordToken userToken = (UsernamePasswordToken) authenticationToken;
        UserVOEntity user = userService.findByPhone(userToken.getUsername());
        if (user==null){
            throw new UnknownAccountException("该手机号不存在!");
        } else {
            // 以手机号作为盐值进行MD5加盐
            ByteSource salt = ByteSource.Util.bytes(user.getPhone());
            return new SimpleAuthenticationInfo(user, user.getPassword(),  salt, this.getName());
        }
    }
}
2.3.3 创建ShiroConfig
创建com.liang.modules.sys.shiro.ShiroConfig
@Configuration
public class ShiroConfig {

    /**
     * 密码校验规则 HashedCredentialsMatcher
     * 这个Bean自动装载到Spring中,当登录认证的时候自动使用这种方式对密码进行编码,因为首先密码不会在数据库中明文保存
     */
    @Bean("hashedCredentialsMatcher")
    public HashedCredentialsMatcher hashedCredentialsMatcher() {
        HashedCredentialsMatcher credentialsMatcher = new HashedCredentialsMatcher();
        //指定加密方式为MD5
        credentialsMatcher.setHashAlgorithmName("MD5");
        //加密次数
        credentialsMatcher.setHashIterations(1024);
        credentialsMatcher.setStoredCredentialsHexEncoded(true);
        return credentialsMatcher;
    }

    @Bean
    public ShiroFilterFactoryBean shiroFilterFactoryBean(
            @Qualifier("defaultWebSecurityManager") WebSecurityManager securityManager
    ){
        ShiroFilterFactoryBean bean = new ShiroFilterFactoryBean();
        bean.setSecurityManager(securityManager);   // 设置安全管理器
        // 设置登录url映射
        bean.setLoginUrl("login");
        // 设置未授权时的跳转的请求
        bean.setUnauthorizedUrl("/");
        // 添加shiro的内置过滤器
        /*
            anon: 无需认证就可以登录
            authc:必须认证才能登录
            user: 必须拥有“记住我”这个功能
            perms:拥有对某个资源的权限才能访问
            role:拥有某个角色才能访问
         */
        LinkedHashMap<String, String> filterMap = new LinkedHashMap<>();    //使用LinkedHashMap可以保证顺序 以便 /** anon在最后过滤
        // 权限授权,访问url需要权限,支持通配符
        filterMap.put("/", "anon");
        filterMap.put("/user", "authc");    // authc --   认证(登录)才能使用
        filterMap.put("/editor", "roles[admin]");
        filterMap.put("/SuperAdmin", "roles[admin]");
        filterMap.put("/druid/**", "anon");
        filterMap.put("/**", "anon");
        bean.setFilterChainDefinitionMap(filterMap);
        return bean;
    }
    //2. 获取安全管理器
    @Bean(name = "defaultWebSecurityManager")
    public DefaultWebSecurityManager defaultWebSecurityManager(
            @Qualifier("userRealm") UserRealm userRealm){
        DefaultWebSecurityManager securityManager = new DefaultWebSecurityManager();
        securityManager.setRealm(userRealm);    //注入
        return securityManager;
    }
    //  1.定义userRealm进springboot组件 并配置认证加密方式
    @Bean(name="userRealm")
    public UserRealm userRealm(){
        UserRealm userRealm = new UserRealm();
        userRealm.setCredentialsMatcher(hashedCredentialsMatcher());
        return userRealm;
    }
}
2.3.4 创建Json返回类
创建com.liang.common.utils.JsonResult类
@Data
@AllArgsConstructor
public class JsonResult {
    private Integer status; //业务相应状态
    private String msg;     //响应消息
    private Object data;    //响应数据
}
2.3.5 创建LoginController
创建com.liang.modules.sys.controller.LoginController
该部分代码主要完成登陆的验证跳转,具体流程可看后面的流程分析
@RestController
public class LoginController {

    @GetMapping("loginUser")
    public JsonResult loginUser(@RequestParam("phone") String phone,
                                @RequestParam("password") String password,
                                HttpSession session){
        UsernamePasswordToken token = new UsernamePasswordToken(phone, password);
        Subject subject = SecurityUtils.getSubject();
        try {
            subject.login(token);
            UserVOEntity user = (UserVOEntity) subject.getPrincipal();
            user.setPassword("");
            session.setAttribute("user", user);
            return new JsonResult(200, "ok", null);
        } catch (AuthenticationException e){
            return new JsonResult(500, "用户名或密码错误", null);
        }
    }
}
2.3.6 MD5加盐生成密码并保存数据库
创建类
public class ShiroMD5 {
    public static Object MD5(String phone, String password){
        // 与UserRealm中的认证方法一样,以手机号作为盐值进行MD5加盐
        ByteSource salt = ByteSource.Util.bytes(phone);

        // 参数分别是加密方式、待加密串(密码)、盐、加密次数
        // 这里的加密方式和次数要与ShiroConfig中我们写的hashedCredentialsMatcher一致
        return new SimpleHash("MD5", password, salt, 1024);
    }

    public static void main(String[] args) {
        // 保存密码到数据库的时候,可以将手机号、密码输入进来,这将生成一个加密后的字符串,
        // 将生成的加密字符串保存至数据库即可,下次登陆时将使用加密串进行核验
        System.out.println(MD5("12345678910", "123456"));
    }
}
运行main函数,我得到的是f878b04f4dcf4610626327d0630fc81f
在博客使用的数据库中执行如下指令更新数据库
update users
set password='f878b04f4dcf4610626327d0630fc81f'
where phone='12345678910';
2.3.7 更改login.js的验证
这里由于我们使用的手机号是12345678910,其实是没有这种12开头规范的手机号,我们将resources/static/style/js/login.js中的myreg正则表达式更改为可以匹配我们设定的手机号的
即将log函数中这个
var myreg = /^(((13[0-9]{1})|(14[0-9]{1})|(17[0]{1})|(15[0-3]{1})|(15[5-9]{1})|(18[0-9]{1}))+\d{8})$/;
改为
var myreg = /^(((12[0-9]{1})|(13[0-9]{1})|(14[0-9]{1})|(17[0]{1})|(15[0-3]{1})|(15[5-9]{1})|(18[0-9]{1}))+\d{8})$/;
2.3.8 运行测试
我在做到这里的时候出现了依赖错误,具体情况是程序报红但点进去后又不爆红了,不爆红后点运行,出现org.apache.shiro.spring.web不存在(如下图),但点进程序段又没爆红,最后是通过配置使用其他maven解决的,没出现问题可以继续往后进行

运行主启动类,即com.liang.TestBlog01Application
输入网址http://localhost:8080/
输入手机12345678910
输入密码,先随机输入一个错误的密码,例如123123,登录
提示密码错误
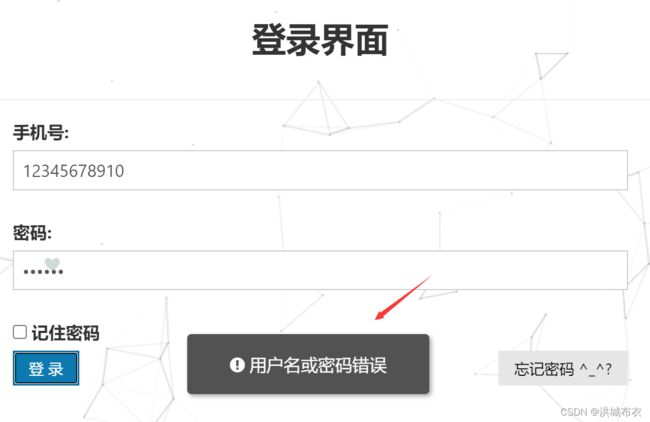
再输入123456,跳转到另外一个界面,并且浏览器地址栏显示为http://localhost:8080/lasturl,证明代码到此就完成了登陆的认证操作

2.4 分析
2.4.1 login.js分析
- 首先该文件在
login.html中被加载,插入的为 login.js中定义了两个变量,分别为qz-login样式和notice-box样式的元素选择器,其中的样式可以在login.html中可以查看到,js就是对这些元素进行了选择var qzLogin = $(".qz-login"); var noticeBox = $(".notice-box");login.js中定义了一个html中样式为qz-login的按钮按下的事件,查看login.html可以得知该按钮就为登录按钮,按下后就进入log()函数进行登录验证qzLogin.click(function () { log(); });- 还定义了一个密码框按键松开后的事件,功能为监测样式为
pass的按键松开情况,同理查看html文件可知实际就为密码输入框,弹起后检查是否为回车键,是的话进入log()函数进行登录验证$(".pass").keyup(function (event) { if (event.which == "13") { log(); } }); - 定义了一个登录函数log()
2.4.2 js文件中log()函数分析
-
该函数首先过滤低级错误,比如电话不符合规范,密码长度不符合等
var phone = $("#username").val().trim(); var pass = $("#password").val(); var myreg = /^(((12[0-9]{1})|(13[0-9]{1})|(14[0-9]{1})|(17[0]{1})|(15[0-3]{1})|(15[5-9]{1})|(18[0-9]{1}))+\d{8})$/; if(phone.length == 0 || phone.length != 11 || !myreg.test(phone) ){ $(".notice-box-res").show(); } else if(pass.length < 6 || pass.length > 18){ $(".notice-box-password-num").show(); } -
当基本条件符合后就进行请求,请求
loginUser链接var str = {phone: phone, password: pass}; $.ajax({ type: "GET", url: "loginUser", // contentType: "application/x-www-form-urlencoded", contentType: "application/json", dataType: "json", data: str, -
该链接的处理在
LoginController中有定义,Controller通过调用Shiro中的SecurityUtils进行用户名和密码认证,成功返回200状态码,失败返回500状态码,并传回msg信息@GetMapping("loginUser") public JsonResult loginUser(@RequestParam("phone") String phone, @RequestParam("password") String password, HttpSession session){ UsernamePasswordToken token = new UsernamePasswordToken(phone, password); Subject subject = SecurityUtils.getSubject(); try { subject.login(token); UserVOEntity user = (UserVOEntity) subject.getPrincipal(); user.setPassword(""); session.setAttribute("user", user); return new JsonResult(200, "ok", null); } catch (AuthenticationException e){ return new JsonResult(500, "用户名或密码错误", null); } } -
log函数成功获取到请求返回的结果后,密码错误则提示,正确则跳转至"/lasturl"页面
 success: function (data) {
     //放入数据
     if(data.status == 200){
         window.location.href="/lasturl";
     }else if(data.status == 500){
         $(".notice-box-res").show();
         setTimeout(function () {
             noticeBox.hide();
         }, 3000);
     }
 },
