探究 Flex 组件的生命周期
司 美琴 , 开发工程师, IBM
司美琴目前工作于 IBM 开发中心,主要从事 Optim 产品的开发工作, 参加过多个 Flex 框架项目的调研及开发。具有多年 J2EE 和 Web 项目开发经验,喜欢关注新技术。
简介: 最为新一代 RIA 技术的典型框架,Adobe Flex 既有传统桌面程序的交互相应性强,健壮性以及容易编程调试的特点,又有着 Web 程序容易部署,更丰富多彩的 UI,灵活的分布式应用等优势。而 Flex Framework 提供的丰富的组件库,以及健壮、规范的组件开发流程,更使得他成为了展现层技术的首选。其中要想正确高效地开发 Flex 组件,对组件生命周期的必不可少。掌握组件的生命周期,可以方便 UI 展示、优化组件执行性能,避免内存泄露。本文将从开发人员的角度,向您介绍 Flex 组件的生命周期中的重要阶段,以及每个阶段在编码过程中应该注意的问题。学习的目的是为了最终指导实践,所以本文还会通过一个具体的例子,讲解生命周期现实应用。也许之前您一直在开发 Flex 组件,但是学习本文之后,您会做的更好。
学习本文,您需要有一定的 Flex 编程经验,对 Actionscript 语言有一定的了解。
开始之前
在开始本篇文章之前,首先问大家两个问题:第一、什么是 Flex;第二、为什么选择 Flex。作为一个有着 Flex 开发经历的编程人员,您可能会给出很多答案:Flex 是支持 RIA 技术的开发框架;Flex 是一个开发和部署 RIA 的平台;Flex 是 Adobe 公司的开发工具 Flex Builder 等等,其实这些解释都不错,因为 Flex 本来就是对这一系列开发技术产品的概括词。那么为什么选择 Flex 呢 ? 您肯定会给出很多 Flex 的优点,比如说:开发方便,因为它提供了大量的组件库可以使用;跨平台和浏览器,因为它运行在 Flash player 播放器中之中;健壮性:Flex2 及其以后的版本都基于 ActionScript 3.0,作为 Flash Player9 的衍生产品,实现了从解释到编译语言的飞跃,具有更高的性能和安全性。不错,这些印象都很对,因为 Adobe 公司对 Flex 设计的初衷就是,提供一个透明的平台,使得每一个基于 flash player 的开发人员(比如说 Flash 开发人员)都可以开发应用程序;又使得每一个应用程序的开发人员(比如说熟悉 java 或者 .NET 的程序员)都可以像开发普通应用那样地开发 RIA 应用。
--------------------------------------------------------------------------------
Flex 本质
提起 Flex 我们不得不追述其发展历史以及两个很重要的名词或者说技术,那就是 Flash 和 Flash Player。Flash 是 Adobe 推出的基于时间轴的交互式矢量图和 Web 动画的标准。一般被大量应用于互联网网页的矢量动画设计。而 Flash Player,则是运行 Flash 程序的播放器,特别是 flash player 9 之后,他通过 Action Script 3.0 和新一代的虚拟机 AVM2 带来了更加强大的运行时功能。下面我们就来简单类比和对比下这三者之间的关系,从而得出 Flex 的本质到底是什么。
Flex、Flash 和 Flash Player
Flex 和 Flash 程序有很多相同点:他们都基于 Action Script 语言;并且都会被编译成一个 .swf 文件。Flash Player 是运行 Flash 和 Flex 应用的播放器或者说运行时环境。他通过读取 swf 文件里的二进制内容同 Flex 或者 Flash 应用进行交互,从而来指示他们执行某些操作,比如说加载图片,绘制图形,发送 HTTP 请求等等。Flash Player 提供了所有可以执行的操作的 API,而 Flash 和 Flex 应用只能够做 Flash Player 允许他们做的事情。所以 Flash player 环境是 Flex 和 Flash 应用开发的基础,Flex 的很多类都是 Flash player API 的子类。
Flex 和 Flash 应用都运行在相同的 Flash Player 里,具有着同样的用户体验。因为无论哪种应用程序,他们都只包含指令,需要由 Flash Player 来执行这些指令。所以,Flash 和 Flex 程序的区别并不是内容不同,而是他们创建内容的方式不同。
基于帧的 Flex
基于以上阐述,我们知道了 Flex 程序的本质就是 Flash,他是面相程序员的 Flash 变种。Flex 程序的根 mx.managers.SystemManager 就是 Flash 类 flash.display.MovieClip 的扩展。所以,Flex 也可以说成是基于时间轴的,只不过他在时间轴上的帧只有两帧:第一帧是预加载,由 Flex 框架控制,也就是我们在 Application 运行之初看到的进度条,被称之为 Preloader( 如图 1 所示 );第二帧,就是我们真正的应用程序。了解这点对于我们理解 flex 组件的生命周期至关重要,因为帧的执行模式有一个重要的特点,那就是在一帧中会先执行脚本后渲染屏幕,即通常称为的 Elastic Racetrack 模型(如图 2 所示)。 这个模型预示着过长的代码执行会影响屏幕渲染的用户体验。Flex 组件构建在帧模型基础上的,需要同样遵行帧的这种执行模式。
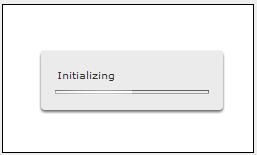
图 1. Flex 程序第一帧—— Preloader
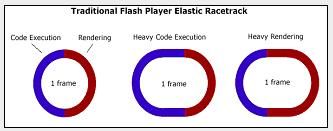
图 2. Elastic Racetrack 帧加载模型
--------------------------------------------------------------------------------
Flex 组件生命周期概述
书归正传,下面我们就来介绍 Flex 的生命周期。
首先,Flex 组建的生命周期是什么?它是指 Flex 框架如何同每一个 Flex 组件进行交互,通过什么方法来来控制 Flex 组件的产生、刷新和销毁,以及各个组件又是如何和外界进行通讯的。概括地说,Flex 组件的生命周期可以总结为两个模式、三个时期、四个方法、五个事件、七个阶段。
同客观世界的物质一样,Flex 组件也有着从出生到销毁的三个时期:初生阶段、生长阶段、销毁阶段。每个阶段又会经历若干个重要步骤包括:构造、准备、装配、验证、提交、交互、拆卸和回收。其中,有些步骤组件在一生中只会经历一次,有的则会伴随生命周期重复若干。这些步骤会通过四个重要方法负责实现。那么 Flex 组件如何通知 Flex Engineer 当前处于哪个步骤,又如何告诉变成开发人员当前的状态如何呢?他会通过派发五个不同的事件来进行内外交互;并通过验证 - 提交模式(invitation-validation pattern)来响应更新,从而实现了一个延迟渲染的松耦合的事件模型。
为了能够更加容易理解一下的讲解,让我们来举例说明,我们来从 Flex 组件的基类 UIComponent 出发创建一个简单的图片查看器 ImageViewer(如下图 3 所示), 然后以此为例分别讲解各个时期里,Flex 框架对该组建都做了什么。
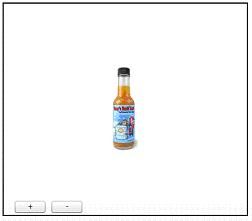
图 3. 一个简单的 Flex 组件 ImageViewer
--------------------------------------------------------------------------------
出生时期
组件的出生阶段包括三个步骤:构造,配置,装配和初始化。(分别对应了 4 个 protected 方法,constructor、createChildren,commitProperties,measure 和 updatedisplayList)
构造函数(Constructor)
编程建议一: 通常对组件本身(并不是组件子元素)的事件监听器会在构造函数里注册。 我们通常也不再构造函数里添加子元素 , 在下面的篇章里会讲解我们为什么不这样做。
首先组件从构造函数(construct)开始出生。当您使用 new 操作符(如清单 1 所示)或者在 mxml 里声明一个组件的时候,构造函数就被调用了。通过调用构造函数,一个组件类的实例被创建在了内存里。但是仅此而已。因为他是组件生命周期的最早部分,此时组件中的子元素还没有被创建,属性值也不明,所以,通常我们在这一阶段里所做的事情很少;但是他也是一个为组件添加时间监听器的好地方,因为一个组件的构造函数会且只会被调用一次。
清单 1. 构造函数被调用
view plaincopy to clipboardprint?
private var myImageView : ImageViewer = new ImageViewer();
private var myImageView : ImageViewer = new ImageViewer();
配置阶段(get & set)
初生阶段的第二个步骤是配置。在组件中定义的一些特性(properties)会在这个阶段通过 set 方法被赋值。但是请注意,此时组件的子元素仍然没有被创建,所以如果组件的某个属性的 set 方法里涉及到了对子元素或者其属性的操作的话,请格外留意。如清单 2 所示,假设我们把 ImageViewer 组件放到一个 Panel 容器里 (),此时代码的执行顺序如下:
清单 2. 配置阶段的执行顺序
view plaincopy to clipboardprint?
<mx:Panel width="100">
<sample:ImageViewer imageHeight="150"/>
</mx:Panel>
<mx:Panel width="100">
<sample:ImageViewer imageHeight="150"/>
</mx:Panel>
输出顺序:
view plaincopy to clipboardprint?
Panel : constructor
Panel.with : setter
ImageViewer Calendar : constructor
ImageViewer.imageHeight :setter
Panel : constructor
Panel.with : setter
ImageViewer Calendar : constructor
ImageViewer.imageHeight :setter
所以 Adobe 建议开发人员在配置阶段只缓存特性值,而把业务逻辑推迟到到以后的验证阶段(参见清单 3)。这就是之前提到的验证 - 提交模式(invitation-validation pattern),关于这一概念我们会在下面的章节做详细说明。
编程建议二: 使用组件的 set 方法是缓存特性值。将真正的业务逻辑推迟到提交阶段。
清单 3. 例子 ImageViewer 的 set imageHeight() 方法
view plaincopy to clipboardprint?
public
function
set imageHeight(value:Number): void
{
if (_imageHeight != value)
{
_imageHeight = value;
imageHeightChanged = true ;
this .invalidateDisplayList()
dispatchEvent( new Event( "imageHeightChanged" ));
}
}
public
function
set imageHeight(value:Number): void
{
if (_imageHeight != value)
{
_imageHeight = value;
imageHeightChanged = true ;
this .invalidateDisplayList()
dispatchEvent( new Event( "imageHeightChanged" ));
}
}
装配阶段(addChild)
组件被构造以及赋值之后,并不会自动进入整个生命周期的循环,他必须经过装配时期,及组件自身装配到显示列表(Display List)上。组件只有通过 addChild 或者 addChildAt 方法被转配到 Display List 上,才会依次进入到以下的生命周期时期,否则得话,以后的步骤和方法都不会被调用。为此我们可以做这样一个实验。我们在组件代码里添加 trace(清单 4),然后再分别执行应用程序 Test1.mxml(清单 5)和 Test1.mxml(清单 6),再来 对两个输出。
清单 4. 验证装配阶段 ImageViewer 组件的执行顺序
view plaincopy to clipboardprint?
package dw.flex.sample
{
import mx.core.UIComponent;
public
class ImageViewer extends UIComponent
{
public
function ImageViewer()
{
trace( "constructor" );
super();
}
override
protected
function createChildren(): void
{
trace( "createChildren" );
super.createChildren()
}
override
protected function commitProperties(): void
{
trace( "commitProperties" );
super.createChildren()
}
override
protected function measure(): void
{
trace( "measure" );
super.createChildren()
}
override
protected function updateDisplayList(w:Number, h:Number): void
{
trace( "createChildren" );
super.updateDisplayList(w,h)
}
}
}
清单 5. 应用程序 Test1 及其输出
应用程序 Test1.mxml
view plaincopy to clipboardprint?
<?xml version="1.0" encoding="utf-8"?>
<mx:Application xmlns:mx="http://www.adobe.com/2006/mxml" layout="vertical">
<mx:Script>
<!--[CDATA[
import dw.flex.sample.ImageViewer;
private
var myImageView : ImageViewer = new ImageViewer();
]]-->
</mx:Script>
</mx:Application>
<?xml version="1.0" encoding="utf-8"?>
<mx:Application xmlns:mx="http://www.adobe.com/2006/mxml" layout="vertical">
<mx:Script>
<!--[CDATA[
import dw.flex.sample.ImageViewer;
private
var myImageView : ImageViewer = new ImageViewer();
]]-->
</mx:Script>
</mx:Application>
输出:
constructor
编程建议三: 推迟组件的装配(使用 addChild 方法将组建添加到父节点上),除非您真的需要他。
清单 6. 应用程序 Test2 及其输出
应用程序 Test2.mxml
view plaincopy to clipboardprint?
<?xml version="1.0" encoding="utf-8"?>
<mx:Application xmlns:mx="http://www.adobe.com/2006/mxml" layout="vertical">
<mx:Script>
<!--[CDATA[
import dw.flex.sample.ImageViewer;
private
var myImageView : ImageViewer = new ImageViewer();
override
protected
function createChildren(): void
{
super.createChildren();
addChild(myImageView);
}
]]-->
</mx:Script>
</mx:Application>
输出:
view plaincopy to clipboardprint?
constructor
createChildren
commitProperties
measure
createChildren
constructor
createChildren
commitProperties
measure
createChildren
初始化阶段(Initialization)
初始化阶段发生在装配之后,这个阶段包含了 3 个子阶段,派发 3 个事件。
组件派发 Preinitialize 事件。这个阶段意味着组件已经被添加到了显示列表(DisplayList)上。
调用 protected 方法 createChildren() 来生成子元素。在这个阶段里,您可以覆盖这个方法添加需要的子元素。
派发 initialize 事件。这意味着组件及其所有的子元素都已经被创建、配置装备到了 DisplayList 上。
进入第一次验证和提交阶段。Flex 框架会通过 layoutManager 引擎来依次调用组件的三个验证方法 invalidateProperties,invalidateSize() 和 invalidateDisplayList(). 以及其其分别对应的三个提交方法 CommitProperties(),measure() 和 updateDisplayList()。关于这三组方法究竟都是做什么的,我们会在以下的验证阶段详细介绍。
最后配发 creationComplete 事件。
至此,组件的初始化阶段完成,同时也意味着 Flex 组件的出生时期结束了。总结以上个步骤,我们用图 4 来标注组件出生时期的流程图。
编程提示四: 覆盖 createChildren 方法来添加子节点,此方法会且只会被执行一次。 尽量把创建动态形式和数据驱动(data-driven)形式的子元素推迟到 CommitProperties() 方法里添加或者执行。
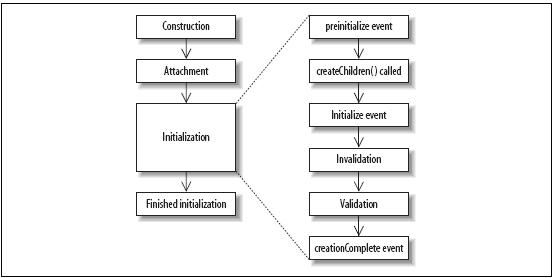
图 4. 组件出生时前交互流程
--------------------------------------------------------------------------------
生活时期
组件经过出生时期之后就进入了生活时期,这个时期意味着组件可以被看见,被操作,甚至被删除。并且作为一个成熟的个体,组件可以和外界进行交互,对更新请求进行响应。Flex 组件使用 Invalidation – Validation 模式来响应更新请求。
验证 - 提交模式(Invalidation -Validation Pattern)
Flex 的生命周期是建立的帧模型基础之上的,所以同样遵循着先执行脚本后渲染屏幕的规则。为了达到流畅的视觉体验,我们通常期望能够尽量减少代码执行的消耗,而给画面渲染留下充足的时间,为了实现这点 Flex 使用了 Invalidation – Validation 模式,来实现资源的有效利用。
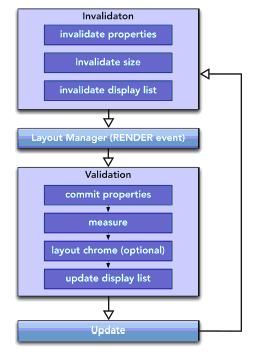
图 5. Invalidation-Validation 模式
Invalidation – Validation 模式即验证提交 - 模式提供了一个低耦合的处理过程,将数据的改变(旧数据的实效)和数据的处理(对新数据的重新使用)区分开来,这样做的好处是:
只在有屏幕刷新需求的时候的时候进行相应数据操作和计算;
并且避免了不必要的重复渲染。
以清单 7 为例,通过 Invalidation – Validation 模式,第二行的代码的结果永远不会生效,即不会也从来没有显示到屏幕上。
清单 7. 相同属性被多次赋值的例子
view plaincopy to clipboardprint?
myImageView.height = 50;
myImageView. height = 100;
myImageView.height = 50;
myImageView. height = 100;
那 Flex 框架是如何实现这一模式的呢?让我们来看一下 Flex 是如何将这一模式应用到组件上的。
首先我们来看一下 Flex 可视化组件基类 UIComponent 是如和处理 set width() 方法的。
清单 8. UIComponent 的 set width ()方法
view plaincopy to clipboardprint?
public function set width(value:Number):void {
if(explicitWidth != value) {
explicitWidth = value;
invalidateSize();
}
// 其他代码省略
}
public function set width(value:Number):void {
if(explicitWidth != value) {
explicitWidth = value;
invalidateSize();
}
// 其他代码省略
}
从清单 8 我们可以看出,UIComponent 在首先会去判断属性赋值是否改变,从而避免重复赋值带来的消耗,然后调用 protected 方法 invalidateSize()。
invalidateSize()是 UIComponent 提供的验证方法之一,它用来校验与组件尺寸大小相关的属性,当此方法被调用后,Flex 组件引擎 LayoutManager 会首先检查该属性的更新请求是否已经调用过 invalidateSize()方法,如果调用过,说明此类型的更改请求已经记录在案,无需赘述。如果没有,则会将此次请求记录到 LayoutManager 校验队列上进行等待。那么对 width 属性值的更新什么时候生效呢? LayoutManager 会在监听到下一次 RENDER 事件派发的时候,将组件推送到提交阶段。
在提交阶段,LayoutManager 得到更新请求队列,调用 commitProperties()方法使得属性 width 的最新值(假设记录在了 _width 私有变量上)得以生效。Flex 就是通过这种属性值延迟生效的方法来保证每次用于渲染画面的请求都是最新的,从而避免了不必要的资源浪费。
因此,在我们的例子 ImageViewer 里,我们也使用了类似机制。(如清单 9 所示),只不过这里我们调用的是 invalidateProterties()方法。与 invalidateSize()类似,组件的 scale 属性值会在提交阶段通过调用 commitProperties()方法生效。
清单 9. ImageViewer 的 set scale 方法
view plaincopy to clipboardprint?
public
function
set scale(value : Number): void
{
if (_scale != value)
{
_scale = value;
scaleChanged = true ;
invalidateProperties();
dispatchEvent( new Event( "scaleChanged" ));
}
}
public
function
set scale(value : Number): void
{
if (_scale != value)
{
_scale = value;
scaleChanged = true ;
invalidateProperties();
dispatchEvent( new Event( "scaleChanged" ));
}
}
验证阶段(Invalidation)
验证阶段是组件在生活要经历的第一步,具体地说是响应更新请求的第一步。作为 invalidation-validation 循环的一份子他会在组件的生命周期中多次执行。Flex 组件基类 UIcomponent 提供了三种验证方法:invalidateProperties()、invalidateSize()和 invalidateDisplayList() 来分别响应组件对值相关,布局相关和显示相关属性的更新请求。
组件会通过两种方式进入到验证阶段:
第一种方式是在初始化阶段,通过父节点调用 childrenCreated() 方法,组件进入第一次 Invalidation – validation 循环。这一次,三种验证方法都会被自动调用以确保组件初始化成功。这类调用在组件的生命周期内只会经历一次。
第二种方式是响应更新请求。组件的任何一方面特性发生更新请求后,都会进入到验证阶段。而此时,用户需要根据特性的不同类别来自行决定调用哪种验证方法。还是以清单 9 为例,通过调用 invalidateProperties()方法,确保了在接下来的提交阶段,更新会对值计算生效。
在这个时期,我们通常不去做太多的事情,因为此时只是验证阶段,更新并不生效。我们所要做的只是记录此次更新,并且等待进入提交阶段。
编程提示五: 响应组件更新请求时,调用三种验证方(invalidateProperties()、invalidateSize()、 invalidateDisplayList()),而不要显试调用提交方法(commitProperties(),measure()和 updateDisplayList())。Flex 框架会在最合适的时候自行调用提交方法。
提交阶段(Validation)
通过以上的介绍,我们已经很清楚组件更新会在提交阶段实际生效。和验证阶段的随时更新随时校验不同,Flex 框架为提交阶段设计了线性执行的顺序,将三个提交方法分为了三个阶段。顺序调用三个提交方法:commitProperties(),measure()和 updateDisplayList()。这样做的目的和每个方法的功能有关。commitProperties()方法主要负责属性值的计算和生效,因此首先执行,因为这些自己算过的值可能用于布局,也可能用于显示。这里也可以用来移除不需要的子节点,但是您需要通过标志位来判断子节点是否存在。
measure()方法用于根据组件的内容大小计算组件尺寸。由于尺寸的计算是自下而上的,所组件子元素的大小改变都会隐试的触发此方法。
UpdatedisplayList() 方法用来更新显示列表(Display List)的布局以及渲染。组件的布局是一个自上而下的过程,所以在这个方法里您需要对不仅仅是组件设置布局属性,而且也要对子元素进行相应的调整。这里也是使用 Flash 绘图 API 的好地方。
这里,我们所要做的就是覆盖(override)这几个方法,在正确的时间、正确的地方做正确的事。
编程提示六: 通过挑选并重写合适的提交方法,您可以把复杂的逻辑处理延迟到提交阶段通过设置标志位,可以进一步优化提交阶段的更新性能。
交互阶段(Interaction)
交互严格地说组件生命周期中的某种行为,他是促使组件更新,推动验证 - 提交循环的动力。
Flex 使用事件驱动的交互模式,来实现一种完全松耦合的体系结构。简单地说,任何组件如果想要告诉外界当前发生了什么事或者即将发什么事的话,他可以派发一个事件,那么在该类事件可及范围内的任何组件都可以通过注册该事件的监听器的方式来对此类事件进行相应。关于 Flex 在事件机制处理方面信息的由于超出了本文的范围,这里不再多讲,感兴趣的读者可以关注后续教程《探索 Flex 的事件机制》,或者阅读资料部分的相应文档。
一般来说,组件的交互行为有以下几种:
用户同组件的交互,比如说:输入数据,缩放大小等等。
通过派发和响应事件。
应用(Application)或者父节点(parent)与组件的交互。比如说 ItemRenderer 实例和宿主对象之间的 data 传递。(关于 ItemRenderer 机制和实践讲解,也会有后续教程加以探讨)
--------------------------------------------------------------------------------
销毁时期
任何事物都会有一个归宿,Flex 组件也不例外。当某个组件不再需要的时候,我们需要把他销毁。(这听起来有点残酷,但是我们不得不这么做)
拆卸阶段(removeChild)
销毁组件的一种方法是通过调用组件父亲节点(parent)的 removeChild()方法,该方法会将他从显示列表(Display List)上拆卸掉,并且检查是否存在对此组件的引用,如果没有的话,组件会被标记为“可以回收”,这预示着组件进入到了回收阶段,并且可以被 AVM 垃圾回收。
回收阶段(GC)
刚才我么提到了通过 removeChild()方法将组建拆卸掉以后,组件可以被垃圾回收。这意味着该组件的实例会被从内存中完全删除掉,并且释放资源。但是请注意,垃圾回收并不一定在此刻马上发生,AVM 有着自己的垃圾回收时间。因此这个打了标签的组件需要等待回收时刻的到来。
拆卸阶段并不是组件销毁的必经阶段。当某个组件被拆卸掉之后,如果该组件包含了子组件,而他们都不存在外界引用的话,所有的元素都会被标记为“可以回收”,也就是说该系统中的子组件并不需要进入到拆卸阶段,也可以在回收时刻到来的时候被 AVM 回收掉。那么开发人员所需要注意的就是,在这个时刻发生之前,将引用去除掉。
--------------------------------------------------------------------------------
回页首
实际编程中的应用
到目前为止我们学习的多是 Flex 生命周期的理论。学习理论的最终目的就是知道编程实践,现在我们来看一下生命周期是如何在例子 ImageViewer 里是被贯彻执行的。
关于 createChildren()方法
清单 10 显示了组件 ImageViewer 的 createChildren() 方法。正如大家注意的那样,在创建每一个子节点的时候,首先判断该节点是否存在是一个很好的习惯,这样可以防止子节点在某种情况下已被实例化。是的,这种情况是可能发生的。以清单 11 里的 Table 类为例, Table 里的子节点 row 有一个 set()方法,而我们从“初生阶段”里知道,装配阶段(set 方法调用)要早于初始化阶段,那么请大家思考一下清单 12 的执行结果会是如何。
清单 10. ImageViewer 的 createChildren() 方法
view plaincopy to clipboardprint?
override
protected
function createChildren(): void
{
super.createChildren();
if (! this.border){
createBorder();
}
if (!controlBar){
controlBar = new UIComponent();
}
if (!zoomInButton){
zoomInButton = new Button();
zoomInButton.label = "+" ;
zoomInButton.addEventListener(MouseEvent.CLICK,
zoomInButtonClickHandler);
controlBar.addChild(zoomInButton);
}
if (!zoomOutButton){
zoomOutButton = new Button();
zoomOutButton.label = "-" ;
zoomOutButton.addEventListener(MouseEvent.CLICK,
zoomOutButtonClickHandler);
controlBar.addChild(zoomOutButton);
}
// added controlBar the last time
addChild(controlBar);
}
清单 11. Table 类的例子
view plaincopy to clipboardprint?
public
class Table extends TableBase
{
private
var _row : Row;
public
function
getrow():Row
{
return
this._row;
}
public
function
setrow(r : Row): void
{
_row = r;
this.invalidateDisplayList();
}
public
function Table()
{
super();
}
override
protected
function createChildren(): void
{
super.createChildren();
if (!_row){
_row = new Row();
}
this.addChild(_row);
}
public
class Table extends TableBase
{
private
var _row : Row;
public
function
getrow():Row
{
return
this._row;
}
public
function
setrow(r : Row): void
{
_row = r;
this.invalidateDisplayList();
}
public
function Table()
{
super();
}
override
protected
function createChildren(): void
{
super.createChildren();
if (!_row){
_row = new Row();
}
this.addChild(_row);
}
清单 12. Table 和 Row 的初始化顺序
view plaincopy to clipboardprint?
var t : Table = new Table();
t.row = new Row();
addChild(t);
var t : Table = new Table();
t.row = new Row();
addChild(t);
我们也看到 controlBar 在该方法的末尾才被添加到 Display List 上,正如之前提到的那样,我们只在需要的时候装配他。同时,此时也是为子节点添加监听器的好地方。
关于 commitProperties()方法
下面我们来看一下 ImageViewer 组件在 commitProperties()里都做了什么(如清单 13 所示)。
CommitProperties()是验证方法 invalidateProperties()所对应的提交方法,也是初始化阶段会被调用的第一个提交方法。他的目的是使得任何通过 set 方法提交的数值更改生效。所以您可以看到在清单 9 的 set scale()方法里,按照 invalidation-validation 模式,我们调用了 invalidateProperties()方法从而将值的生效延迟到了 commitProperties()里,并且为了做到 “局部更新”,我们使用了标志位 scaleChanged。
另外,这里这里一个奇怪的地方,那就是为什么在 commitProperties()会有添加子节点的操作呢?这也是我们要特意举例说明的一个地方。
对于有些子节点,他的诞生可能是和某些属性值相关联的,也就是我们在编程提示四里提到的动态创建或者数据驱动的子节点。这些子节点,由于他们并不是随着组件的产生而产生,而是要受属性值的变化而产生或者变化,甚至在某些情况下,根本就不需要存在。所以我们应该在值的提交阶段,也就是 commitProperties()方法调用的时候,当新值真正生效的时候再去创建它。
清单 13. ImageViewer 的 commitProperties()方法
view plaincopy to clipboardprint?
override
protected
function commitProperties(): void
{
super.commitProperties();
if (sourceChanged){
if (! this.image){
image = new Image();
this.addChild(image);
image.source = this._source;
} else {
image.source = this._source;
}
sourceChanged = false ;
}
if (scaleChanged){
this.imageWidth = this.imageWidth * this.scale;
this.imageHeight = this.imageHeight *+ this.scale;
scaleChanged = false ;
}
}
关于 measure() 方法
measure()方法是组件自动计算尺寸大小的地方,在例子 ImageViewer 的 measure()方法里(如清单 14 所示),我们做的事很少。这是因为,我们 ImageViewer 被设计为:需要显式指定大小(当然这里只是为了举例方便,您可以根据需要,制作可以自动度量大小的组件)。即在应用时设置 width 和 height 值。如清单 15 所示:
在这种情况家,measure()方法不会被调用。所以需要提请读者注意的就是,一旦您的组件在组装阶段被设置了 with 和 height 属性值,那么请不要期望在 measure 里会执行您的业务逻辑。
清单 14. ImageViewer 的 measure() 方法
view plaincopy to clipboardprint?
override
protected
function measure(): void
{
super.measure();
measuredWidth = Math.max(image.width, controlBar.getExplicitOrMeasuredWidth()) ;
measuredHeight = image.height + controlBar.getExplicitOrMeasuredHeight();
measuredMinWidth = measuredWidth;
measuredMinHeight = measuredHeight;
}
override
protected
function measure(): void
{
super.measure();
measuredWidth = Math.max(image.width, controlBar.getExplicitOrMeasuredWidth()) ;
measuredHeight = image.height + controlBar.getExplicitOrMeasuredHeight();
measuredMinWidth = measuredWidth;
measuredMinHeight = measuredHeight;
}
清单 15. 使用 ImageViewer 的应用 Sample.mxml
view plaincopy to clipboardprint?
<sample:ImageViewer width="400" height="350" imageWidth="150" imageHeight="140"
source="product.jpg" borderColor="0x000000"/>
<sample:ImageViewer width="400" height="350" imageWidth="150" imageHeight="140"
source="product.jpg" borderColor="0x000000"/>
关于 updateDisplayList ()方法
updateDisplayList()方法用于对组件内容进行布局以及渲染,一切屏幕上可见的内容都需要在这里被处理,所以 updateDisplayList()可以说是最繁忙的一个提交方法,他所包含的实现可以非常多。清单 16 中,我们省略了部分代码。只留下了需要讲解的部分。
在 measure()方法里我们可以获取 Flex 自动计算的尺寸(如果被调用的话),这些数据需要在 updateDisplayList() 方法里被应用处理,所以我们会大量使用 setActualSize()方法,特别是子元素比较多的时候。
作为提交方法,updateDisplayList()的最重要的职责之一就相对应的 invalidateDisplayList()方法的更新请求进行响应。比如说清单 16 里方法就对清单 17 里的 set imageWidth()方法进行了相应。并且就像在 commitProperties()部分里介绍的那样,这里同样使用了“标志位”方法来进行“局部跟新”。
局部更新是普遍应用于提交方法里的一种技巧,因为我们知道这三个提交方法是公用的,任何更新的提交都会在这几个方法里被处理。而每次更新都可能只是局部的更改,所以是当地使用标志位方法进行局部更新可以有效地优化代码的执行。
最后要提到的是,渲染屏幕的职责也决定了 updateDisplayList()方法是调用 Flash Player 绘图 API 的好地方。所以我们在清单 16 中特意使用了 drawRect()方法为图片家了一个边框。
清单 16. ImageViewer 的 updateDisplayList () 方法。
view plaincopy to clipboardprint?
override
protected
function updateDisplayList(unscaledWidth:Number, unscaledHeight:Number): void
{
super.updateDisplayList(unscaledWidth, unscaledHeight);
// 省略部分代码
zoomInButton.setActualSize(50, 20);
zoomOutButton.setActualSize(50, 20);
var tmpx : Number = 20;
controlBar.setActualSize(tmpx, 20);
controlBar.move(0, unscaledHeight-25);
zoomInButton.move(tmpx, 0);
tmpx +=60;
zoomOutButton.move(tmpx, 0);
if (imageHeightChanged ||imageWidthChanged){
image.width = this.imageWidth;//w;
image.height = this.imageHeight;//h - 20;
var tempX : Number = x+ (w-imageWidth) * 0.5;
var tempY : Number = y + (h-imageHeight) * 0.5;
image.x = tempX;
image.y = tempY;
imageHeightChanged = false ;
imageWidthChanged = false ;
var g:Graphics = graphics;
g.clear();
g.beginFill(0x6F7777);
g.drawRect(tempX-1, tempY-1, imageWidth+2, imageHeight+2);
g.endFill();
}
}
清单 17. ImageViewer 的 set imageWidth () 方法。
view plaincopy to clipboardprint?
public
function
set imageWidth(value:Number): void
{
if (_imageWidth != value)
{
_imageWidth = value;
imageWidthChanged = true ;
this.invalidateDisplayList()
dispatchEvent( new Event( "imageWidthChanged" ));
}
}
public
function
set imageWidth(value:Number): void
{
if (_imageWidth != value)
{
_imageWidth = value;
imageWidthChanged = true ;
this.invalidateDisplayList()
dispatchEvent( new Event( "imageWidthChanged" ));
}
}
--------------------------------------------------------------------------------
结束语
本文对 Flex 生命周期的各个阶段进行了分类和讲解,根据各个时期的特点提出了一些编程方面的提示,并且通过实例分析将这些编程提示应用到实践中,希望对您的 Flex 开发工作有所帮助。
本文来自CSDN博客,转载请标明出处:http://blog.csdn.net/lixinye0123/archive/2010/11/19/6021357.aspx
1、生命周期(LifeCycle)简述
⑴调用Flex组件构造函数。构造函数没有返回类型,没有参数,使用super()调用父类的构造器
⑵使用set,get设置Flex组件属性,常在set方法内监控一个布尔变量来实现失效机制
⑶调用addChild()方法将Flex组件添加到父Flex组件显示列表中,FLEX将自动调用createChildren(),invalidateProperties(),invalidateSize(),invalidateDisplayList()。只有将Flex组件添加到父容器中,FLEX才能确定它的大小(size),设置它所继承样式(style)属性,或者在屏幕上画出它
⑷Flex组件的parent属性设置为对父容器的引用
⑸样式(style)设置
⑹Flex组件分发preinitialize事件
⑺调用Flex组件createChildren()方法
⑻调用invalidateProperties(),invalidateSize(),invalidateDisplayList()失效方法,FLEX将在下一个“渲染事件”(renderevent)期间对相应的commitProperties(),measure(),updateDisplayList()方法进行调用。这个规则唯一例外就是当用户设置Flex组件的height和width属性时,Flex不会调用measure()方法。也就是说,只有当Flex组件的explicitWidth和explicitHeight属性是NaN时Flex才会调用measure()方法。
⑼Flex组件分发initialize事件。此时Flex组件所有的子Flex组件初始化完成,但Flex组件尚未更改size和布局,可以利用这个事件在Flex组件布局之前执行一些附加的处理
⑽在父容器上分发childAdd事件
⑾在父容器上分发initialize事件
⑿在下一个“渲染事件”(renderevent)中,Flex执行以下动作:
a.调用Flex组件的commitProperties()方法
b.调用Flex组件的measure()方法
c.调用Flex组件的layoutChrome()方法
d.调用Flex组件的updateDisplayList()方法
e.在Flex组件上分发updateComplete事件
⒀如果commitProperties(),measure(),updateDisplayList()方法调用了invalidateProperties(),invalidateSize(),invalidateDisplayList()方法,则Flexh会分发另外一个render事件
⒁在最后的render事件发生后,Flex执行以下动作:
a.设置Flex组件visible属性使其可视
b.Flex组件分发creationComplete事件,Flex组件的大小(size)和布局被确定,这个事件只在Flex组件创建时分发一次
c.Flex组件分发updateComplete事件。无论什么时候,只要Flex组件的布局(layout),位置,大小或其它可视的属性发生变化就会分发这事件,然后更新Flex组件来正确地显示。
2、为什么使用失效机制(invalidationmechanism)
一种情况是,当设置了Flex组件的多个属性后,比如Button控件的label和icon属性,我们需要所有属性被设置后一次性执行commitProperties(),measure(),updateDisplayList()方法,而不是设置过label属性后执行一遍这些方法,然后在设置icon属性后又执行一次这些方法。
另一种情况是几个Flex组件同时更改了它们的字体大小。程序更改字体大小的执行速度大大快于Flex更新应用的速度,因此要在确定最终更改字体之后才开始更新布局。另外,Flex需要协调布局操作以消除任何冗余过程,而不是在每个Flex组件更新它的字体大小之后都执行一次布局操作。
Flex使用“失效机制(invalidationmechanism)”来同步Flex组件的更改。Flex用一系列方法的调用,比如在setter方法内监控一个变更变量来标记Flex组件的某些东西已经发生变化,然后在下一个“渲染事件(renderevent)”中触发Flex组件的commitProperties(),measure(),layoutChrome(),updateDisplayList()检查这些布尔变量来完成最终的变更逻辑。这样做的额外好处就是setter方法可以更迅速地返回,把对新属性值的处理留给了commitProperties()方法。
失效方法及其对应的触发函数如下:
invalidateProperties()通知Flex组件,以使下次屏幕更新时,它的commitProperties()方法被调用。
invalidateSize()通知Flex组件,以使下次屏幕更新时,它的measure()方法被调用。
invalidateDisplayList()通知Flex组件,以使下次屏幕更新时它的layoutChrome()方法和
updateDisplayList()方法能被调用。
当Flex组件调用一个“失效”方法时,它就通知Flex该Flex组件已经被更新。当多个Flex组件调用失效
方法,Flex会在schedules中协调这些更新,以使这些更新操作在下一次屏幕更新时一起执行。注意,createChildren()没有对应的失效方法,它会在调用后被立即执行。
Flex组件生命周期
Flex组件在初始化阶段会依次触发下列的几个事件:
preinitialize - 当组件在创建的原始阶段触发,它的子元素都还没有创建
initialize - 当组件及其子元素都已经创建完毕的时候触发,但此时组件的大小尺寸还没有决定
creationComplete - 当组件布局完成并显示之后触发
因此,我们一般在initialize的时候,可以对组件上要显示的字符信息等进行设置;尤其是在该时刻设置和组件尺寸相关的值。而要获取和组件布局相关的信息的操作,则放在creationComplete时。
Flex组件的实例化生命周期
我们来看下面这段MXML代码:
 <?
xml version="1.0"
?>
 <
mx:Application
xmlns:mx
="http://www.adobe.com/2006/mxml"
>
 <
mx:Box
id
="box1"
width
="200"
>
 <
mx:Button
id
="button1"
label
="Submit"
/>
 </
mx:Box
>
 </
mx:Application
>
和这段MXML等同的ActionScript代码是:
 var
box1:Box
=
new
Box();
 box1.width
=
200
;

 var
button1:Button
=
new
Button()
 button1.label
=
"
Submit
"
;

 box1.addChild(button1);
其实,当你用MXML创建组件时,Flex SDK会生成相应的AS代码,以上代码在看似简单,但在执行过程中会发生很或的事情,我们来看下创建Button组件时执行的流程:
1)调用构造方法来创建实例
var button1:Button = new Button();
2)对创建的Button实例设置属性
button1.label = "Submit";
3)调用Button实例的addChild()方法把按钮添加到父容器中
box1.addChild(button1);
在调用这行代码的时候,将会产生以下动作:
a.设置组件实例的parent属性,使其关联到父容器
b.设置组件实例的样式
c.触发组件实例的add事件
d.触发父容器的childAdd事件
e.触发组件实例的preinitialize事件,触发时,组件实例处于非常原始的状态
f.创建组件实例的子元素
g.组件触发initialize事件,此时,组件和其子元素都已经创建完毕,但和布局相关的属性都还没有处理
4)显示应用,render事件被触发,并且会做以下处理:
a.所有涉及显示和布局相关的东西被处理完成
b.设置组件的visible属性为true
c.组件的creationComplete事件被触发
d.组件的updateComplete事件被触发
-----------------------官方文档-------------------------------------
原文来自Adobe live doc
The component instantiation life cycle describes the sequence of steps that occur when you create a component object from a component class. As part of that life cycle, Flex automatically calls component methods, dispatches events, and makes the component visible.
The following example creates a Button control in ActionScript and adds it to a container:
// Create a Box container.
var boxContainer:Box = new Box();
// Configure the Box container.

// Create a Button control.
var b:Button = new Button()
// Configure the button control.
b.label = "Submit";
...
// Add the Button control to the Box container.
boxContainer.addChild(b);
The following steps show what occurs when you execute the code to create the Button control, and add the control to the Box container:
- You call the component's constructor, as the following code shows:
// Create a Button control.
var b:Button = new Button()
- You configure the component by setting its properties, as the following code shows:
// Configure the button control.
b.label = "Submit";
Component setter methods might call the invalidateProperties(), invalidateSize(), or invalidateDisplayList() methods.
- You call the
addChild() method to add the component to its parent, as the following code shows:
// Add the Button control to the Box container.
boxContainer.addChild(b);
Flex performs the following actions:
- Sets the
parent property for the component to reference its parent container.
- Computes the style settings for the component.
- Dispatches the
preinitialize event on the component.
- Calls the component's
createChildren() method.
- Calls the
invalidateProperties(), invalidateSize(), and invalidateDisplayList() methods to trigger later calls to the commitProperties(), measure(), or updateDisplayList() methods during the next render event. The only exception to this rule is that Flex does not call the measure() method when the user sets the height and width of the component.
- Dispatches the
initialize event on the component. At this time, all of the component's children are initialized, but the component was not sized or processed for layout. You can use this event to perform additional processing of the component before it is laid out.
- Dispatches the
childAdd event on the parent container.
- Dispatches the
initialize event on the parent container.
- During the next
render event, Flex performs the following actions:
- Calls the component's
commitProperties() method.
- Calls the component's
measure() method.
- Calls the component's
layoutChrome() method.
- Calls the component's
updateDisplayList() method.
- Dispatches the
updateComplete event on the component.
- Flex dispatches additional
render events if the commitProperties(), measure(), or updateDisplayList() methods call the invalidateProperties(), invalidateSize(), or invalidateDisplayList() methods.
- After the last
render event occurs, Flex performs the following actions:
- Makes the component visible by setting the
visible property to true.
- Dispatches the
creationComplete event on the component. The component is sized and processed for layout. This event is only dispatched once when the component is created.
- Dispatches the
updateComplete event on the component. Flex dispatches additional updateComplete events whenever the layout, position, size, or other visual characteristic of the component changes and the component is updated for display.
Most of the work for configuring a component occurs when you add the component to a container by using the addChild() method. That is because until you add the component to a container, Flex cannot determine its size, set inheriting style properties, or draw it on the screen.
You can also define your application in MXML, as the following example shows:
<mx:Application xmlns:mx="http://www.adobe.com/2006/mxml">

<mx:Box>
<mx:Button label="Submit"/>
</mx:Box>
</mx:Application>
The sequence of steps that Flex executes when creating a component in MXML are equivalent to the steps described for ActionScript.
You can remove a component from a container by using the removeChild() method. If there are no references to the component, it is eventually deleted from memory by the garbage collection mechanism of Macromedia Flash Player 9 from Adobe.
------------------------------------翻译-------------------------------------
关于组件实例化生命周期
描述执行的序列步骤,当你从一个组件类创建一个组件时。作为生命周期的一部分,Flex自动调用组件方法,分发事件,使组件可视。
下例是在AS中创建一个按钮并增加到一个容器中:
1.调用组件的构造函数,新建一个组件:
// Create a Button control.
var b:Button = new Button()
2.通过设置它的属性,配置组件,如:
// Configure the button control.
b.label = "Submit";
3.你调用addChild()方法来增加组件到它的父对象:
// Add the Button control to the Box container.
boxContainer.addChild(b);
Flex执行如下的动作:
a.为组件设置parent属性引用它的父容器
b.计算组件的style设置
c.在组件上分发preinitialize事件
d.调用组件的createChildren()方法
e.调用invalidateProperties(),invalidateSize(),和invalidateDisplayList()方法,以触发延迟的调用commitProperties(),measure(),或updateDisplayList()方法在下一个render事件期。
这条规则仅有的例外是Flex不调用measure()方法当用户设置组件的height和width时。
f.在组件上分发initialize事件。在这时,组件的所有子对象被初始化,但这个组件组件还未为布局而被尺寸化或处理,你能使用这个事件来执行这个组件附加的处理,在它被布局前。
g.分发childAdd事件在父容器上
h.分发initialize事件在父容器上
4.在下一个render事件期间,Flex执行如下的行为:
a.调用组件的commitProperties()方法
b.调用组件的measure()方法
c.调用组件的layoutChrome()方法
d.调用组件的updateDisplayList()方法
e.在组件上分发updateComplete事件
5.Flex分发附加render事件,如果commitProperties(),measure(),或updateDisplayList()方法调用invalidateProperties(),invalidateSize(),或invalidateDisplayList()方法。
6.在最后的render事件执行后,Flex执行如下动作:
通过设置visible属性为ture让组件可视
分发creationComplete事件在组件上。组件为布局被sized和processed。这个事件仅被分发一次当组件被创建时。
分发updateComplete事件在组件上。Flex分发附加的updateComplete事件不管何时布局,位置,尺寸,或组件别的可视特性改变,并且组件被更新显示。
为配置一个组件的多数的工作执行,当你使用addChild()方法,增加一个组件到一个容器。这是因为,直到你增加组件到一个容器,Flex不能决定它的尺寸,设置继承的style属性,或画它在屏幕上。
在MXML里增加一个组件的步骤等效于AS中执行的步骤:
<mx:Application xmlns:mx="http://www.adobe.com/2006/mxml">
<mx:Box>
<mx:Button label="Submit"/>
</mx:Box>
</mx:Application>
从一个容器中删除一个组件,通过使用removeChild()方法,如果没有引用到这个组件,它最终会被内存中删除,由Flash Player9的垃圾回收机制。
 <?
xml version="1.0"
?>
 <
mx:Application
xmlns:mx
="http://www.adobe.com/2006/mxml"
>
 <
mx:Box
id
="box1"
width
="200"
>
 <
mx:Button
id
="button1"
label
="Submit"
/>
 </
mx:Box
>
 </
mx:Application
>
 var
box1:Box
=
new
Box();
 box1.width
=
200
;
 var
button1:Button
=
new
Button()
 button1.label
=
"
Submit
"
;
 box1.addChild(button1);


