【SpringBoot】springboot整合redis以及原理
前言
前面的文章介绍了缓存的原理,以及基于currentHashMap缓存的应用,接下来主要讲解SpringBoot整合redis
1、maven坐标
        <dependency>
            <groupId>org.springframework.boot</groupId>
            <artifactId>spring-boot-starter-data-redis</artifactId>
            <exclusions>
                <exclusion>
                    <groupId>io.lettuce</groupId>
                    <artifactId>lettuce-core</artifactId>
                </exclusion>
            </exclusions>
        </dependency>

        <dependency>
            <groupId>redis.clients</groupId>
            <artifactId>jedis</artifactId>
        </dependency>
lettuce是springBoot默认集成的redis客户端,我们将它移除,换成jedis
2、 yml
spring:
	redis:
		host: 152.136.XXX.XXX
		port: 6379
3、快速入门
@RestController
public class HelloRedis {
    @Autowired
    private StringRedisTemplate stringRedisTemplate;

    @GetMapping("/helloRedis")
    public String hello(){
        this.stringRedisTemplate.opsForValue().set("hello","redis");
        String result = this.stringRedisTemplate.opsForValue().get("hello");
        return  result;
    }
}
浏览器访问地址:http://localhost:8083/helloRedis 返回如下内容

4、详解
通过3,我们知道Spring将操作Redis的API 封装成了Template,其中stringRedisTemplate是我们最长用的,还有一个是RedisTemplate ,我们且看下面的源码:
@Configuration(proxyBeanMethods = false)
@ConditionalOnClass(RedisOperations.class)
@EnableConfigurationProperties(RedisProperties.class)
@Import({ LettuceConnectionConfiguration.class, JedisConnectionConfiguration.class })
public class RedisAutoConfiguration {

	@Bean
	@ConditionalOnMissingBean(name = "redisTemplate")
	public RedisTemplate<Object, Object> redisTemplate(RedisConnectionFactory redisConnectionFactory)
			throws UnknownHostException {
		RedisTemplate<Object, Object> template = new RedisTemplate<>();
		template.setConnectionFactory(redisConnectionFactory);
		return template;
	}

	@Bean
	@ConditionalOnMissingBean
	public StringRedisTemplate stringRedisTemplate(RedisConnectionFactory redisConnectionFactory)
			throws UnknownHostException {
		StringRedisTemplate template = new StringRedisTemplate();
		template.setConnectionFactory(redisConnectionFactory);
		return template;
	}

}
通过源码我们看到RedisTemplate的key和value都是Object类型,而stringRedisTemplate的key和value都是String 类型
5、测试redisTemplate
如果键值对都是string的形式我们可以用StringResdisTemplate ,接下来我们用redisTemplate进行存储对象形式。
代码:
    @Autowired
    private RedisTemplate redisTemplate;

    @Autowired
    private EmployeeService employeeService;

    @GetMapping("/getEmp/{id}")
    public Employee  emp(@PathVariable("id") Integer id){
        Employee emp = employeeService.getEmpById(id);
        this.redisTemplate.opsForValue().set("emp", emp);
        return (Employee) this.redisTemplate.opsForValue().get("emp");
    }
测试接口报了 DefaultSerializer requires a Serializable payload but received an object of typ这个错,如下图:说Employee不能序列化
![]()
我们此时给类Employee 进行实例化
public class Employee implements Serializable {
此时不会在报错,但是我们的redis中存储的一堆看不懂的东西,如下图:key和value都是乱码

这是因为redis有它自己的默认的序列化的规则(JDK序列化策略),接下来我们改下序列化方式:
@Configuration
public class MyRedisConfig {
    @Bean
    public RedisTemplate  getRedisTemplate(RedisConnectionFactory connectionFactory)
    {
        RedisTemplate redisTemplate = new RedisTemplate<>();
        redisTemplate.setConnectionFactory(connectionFactory);
        // 使用Jackson2JsonRedisSerialize替换默认序列化方式
        Jackson2JsonRedisSerializer jackson2JsonRedisSerializer = new Jackson2JsonRedisSerializer<>(Object.class);
        StringRedisSerializer stringRedisSerializer = new StringRedisSerializer();
        ObjectMapper om = new ObjectMapper();
        om.setVisibility(PropertyAccessor.ALL, JsonAutoDetect.Visibility.ANY);
        //启用默认的类型
        om.activateDefaultTyping(LaissezFaireSubTypeValidator.instance , ObjectMapper.DefaultTyping.NON_FINAL, JsonTypeInfo.As.WRAPPER_ARRAY);
        //序列化类,对象映射设置
        jackson2JsonRedisSerializer.setObjectMapper(om);
        redisTemplate.setKeySerializer(stringRedisSerializer);
        redisTemplate.setValueSerializer(jackson2JsonRedisSerializer);
        redisTemplate.setHashKeySerializer(stringRedisSerializer);
        redisTemplate.setHashValueSerializer(jackson2JsonRedisSerializer);
        redisTemplate.afterPropertiesSet();
        return redisTemplate;
    }
}
此时将 redisTemplate 改为如下:
    @Autowired
    private RedisTemplate<String,Object> redisTemplate;
另外上两篇博客说的基于缓存的注解这里同样适用,就不多说了。如有需要请看上两篇博客
6、BoundXXX绑定key操作
在上面的例子中,每进行一次操作,就需要传一次key,如果对同一个key进行多次操作,这样就显得特么麻烦。所以spring为我们提供了BoundXXXXOps()方法。
我们对之前的helloRedis进行改进一下:
    @GetMapping("/helloRedis")
    public String hello(){
        BoundValueOperations<String, String> boundValue = this.stringRedisTemplate.boundValueOps("hello");
        boundValue.set("redis");
        return boundValue.get();
    }
7、基于注解缓存的原理
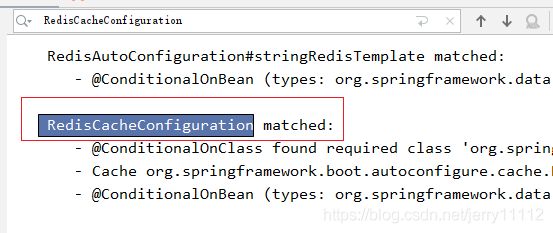
之前是默认的currenthashmap缓存管理器(CacheManager)帮我们创建出缓存组件,缓存组件来实际的进行crud,现在我们打开SpringBoot的自动配置的报告,就是在yml里面写下如下的代码:
debug: true
此时我们查看控制台,找到 RedisCacheConfiguration,如下图发现已经匹配上,而其他的CacheConfiguration都是未匹配:

说明引入redis的starter,容器中保存的是RedisCacheManager,帮我们创建RedisCache来作为缓存组件,RedisCache通过操作redis来缓存数据。综上我们得出一个结论,引入redis后组件之间的依赖关系为CacheAutoConfiguration --> RedisCacheConfiguration(autoconfigure.cache) --> RedisCacheManager–> RedisCache–>RedisCacheConfiguration(redis.cache)
此时我们以注解@cacheable的方式进行缓存数据
    @Cacheable(cacheNames =  {"emp"},key="#a0")
    public Employee getEmpById(Integer id){
        return this.employeeMapper.getEmpById(id);
    }
redis中缓存后的value值是乱码,这是因为它默认的序列化机制是JDK方式,接下来注册自定义的redis.cache.RedisCacheConfiguration组件,对value序列化的规则改为json类型
    /*
    * 注册自定义RedisCacheConfiguration组件,解决@Cacheable @Cacheput注解在向Redis中保存的Value是java序列化乱码的问题
     */
    @Bean
    public RedisCacheConfiguration redisCacheConfiguration() {
        RedisCacheConfiguration config = RedisCacheConfiguration.defaultCacheConfig();
      config=config.serializeValuesWith(RedisSerializationContext.SerializationPair.fromSerializer(RedisSerializer.json()));
        return config;
    }
    @Cacheable(cacheNames =  {"emp"},key="#a0")
    public Employee getEmpById(Integer id){
        return this.employeeMapper.getEmpById(id);
    }
此时redis中序列化后的数据如下:
后记:
文章借鉴:https://blog.csdn.net/studying0419/article/details/107466232


