12.netty中tcp粘包拆包问题及解决方法
【README】
- 1.本文源代码总结自B站《netty-尚硅谷》;
- 2.本文介绍了tcp粘包拆包问题;
- 3.本文po 出了粘包拆包问题解决方案及源代码实现;
【1】tcp粘包拆包问题
refer2 How to deal with the problem of packet sticking and unpacking during TCP transmission? - 编程知识
【1.1】粘包拆包问题描述
- 假设客户端发送2个连续的数据包到服务器,数据包用packet1,packet2分别表示,则服务器接收到的数据可以分为3种情况;
1)情况1: 服务器接收到2个数据包,没有拆包,也没有粘包问题;

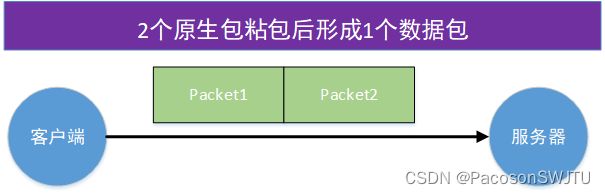
2)情况2: 服务器只接收到一个数据包(存在粘包问题)
- 因为tcp不会丢失数据包,因此这一个数据包就封装了2个原生数据包的信息,这种现象叫做粘包。
- 在这种情况,接收者并不知道2个原生包的界限,因此接收者很难处理;
3)情况3: 接收者接收到2个冗余或不完整的数据包(粘包与拆包问题同时发生)
- 接收者接收到2个数据包,但这2个数据包要么不完整,要么掺杂了其他数据包的部分数据。
- 在这种情况下,粘包与拆包同时发生。
- 如果这2个包不被特殊处理,对于接收者来说也很难处理;

【1.2】代码演示粘包拆包问题
注意:
- 限于篇幅,本节没有po出全部代码, 能够表达意思即可;
1)业务场景:客户端连续发送10条消息(字符串)到服务器,查看服务器接收情况;
2)客户端发送消息代码: 
3)服务器接收消息代码:

3.1)服务器接收消息的打印效果:
=================================
服务器收到的数据 hello server0

服务器累计收到 [1] 个消息包
=================================
服务器收到的数据 hello server1

服务器累计收到 [2] 个消息包
=================================
服务器收到的数据 hello server2
hello server3
hello server4
hello server5
hello server6

服务器累计收到 [3] 个消息包
=================================
服务器收到的数据 hello server7
hello server8
hello server9

服务器累计收到 [4] 个消息包
【效果解说】
- 客户端发送了10条消息,服务器接收到了 4个数据包,而不是10个数据包 ;
- 显然,发生了tcp粘包;
- 这10条消息本来是10个数据报文,却被合并(粘)为4个数据包;
- 问题是: 如何把这4个数据包还原为10个数据包呢 (在高并发情况下,各式各样的数据包会更多)
- 如果无法还原,则服务器无法正确解析报文并做相应处理;
【2】 粘包与拆包原因
1)粘包原因:
- 发送的数据大小 小于 发送缓冲区,tcp就会把发送的数据多次写入缓冲区,此时发生粘包;
- 接收数据方的应用层没有及时从 接收缓冲区读取数据,也会发生粘包;
2)拆包原因:
- 发送的数据大小 大于 tcp发送缓冲区,就会发生拆包;
- 发送的数据大小 大于 报文最大长度,也会拆包;
【3】粘包拆包解决方法
解决粘包拆包的关键在于 为每一个数据包添加界限标识,常用方法如下:
- 方法1)发送方为每一个数据包添加报文头部。头部至少包含数据包长度(类似http协议的头部length)。 通过这种方式,接收方通过读取头部的长度知道当前数据包的界限,并在界限处停止读取。
- 方法2)发送方以固定长度封装数据包。如果不足,则补0填充。
- 方法3)自定义设置数据包的界限标识,如添加特别标识(如======)。接收方通过标识可以识别不同的数据包;
【4】粘包拆包问题解决的源代码实现
解决方法是:采用方法1,设置每个数据包的长度到报文头部;
【4.1】协议数据包封装类
/**
 * @Description 协议数据包
 * @author xiao tang
 * @version 1.0.0
 * @createTime 2022年09月10日
 */
public class ProtocolMessage {

    private int length;
    private byte[] content;

    /**
     * @description 构造器
     * @author xiao tang
     * @date 2022/9/10
     */
    public ProtocolMessage() {
    }

    public int getLength() {
        return length;
    }

    public void setLength(int length) {
        this.length = length;
    }

    public byte[] getContent() {
        return content;
    }

    public void setContent(byte[] content) {
        this.content = content;
    }
}
【4.2】服务器
1)服务器 :
public class ProtocolNettyServer89 {

    public static void main(String[] args) throws InterruptedException {
        EventLoopGroup bossGroup = new NioEventLoopGroup(1);
        EventLoopGroup workerGroup = new NioEventLoopGroup();
        try {
            ServerBootstrap serverBootstrap = new ServerBootstrap();
            serverBootstrap.group(bossGroup, workerGroup)
                    .channel(NioServerSocketChannel.class)
                    .childHandler(new ProtocolNettyServerInitializer()); // 自定义一个初始化类
            // 自动服务器
            ChannelFuture channelFuture = serverBootstrap.bind(8089).sync();
            System.out.println("服务器启动成功");
            // 监听关闭
            channelFuture.channel().closeFuture().sync();
        } finally {
            bossGroup.shutdownGracefully();
            workerGroup.shutdownGracefully();
        }
    }
}
2) 服务端初始化器:
public class ProtocolNettyServerInitializer extends ChannelInitializer {
    @Override
    protected void initChannel(SocketChannel ch) throws Exception {
        ChannelPipeline pipeline = ch.pipeline();
        // 添加入站解码器-把字节转为协议报文便于业务逻辑处理
        pipeline.addLast(new ProtocolMessageDecoder());
        // 添加出站编码器-把协议报文转为字节便于网络传输
        pipeline.addLast(new ProtocolMessageEncoder());

        // 添加业务逻辑handler
        pipeline.addLast(new ProtocolNettyServerHandler());
    }
}
3)处理器:
public class ProtocolNettyServerHandler extends SimpleChannelInboundHandler {

    private int count = 0;

    @Override
    protected void channelRead0(ChannelHandlerContext ctx, ProtocolMessage msg) throws Exception {
        // 接收到数据并处理
        int length = msg.getLength();
        String bodyStr = new String(msg.getContent(), StandardCharsets.UTF_8);
        System.out.println("====================================");
        System.out.println("服务器接收的消息如下:");
        System.out.println("报文长度:" + length);
        System.out.println("报文体内容: " + bodyStr);
        System.out.println("服务器累计接收到的消息包数量 = " + ++this.count);

        //  回复客户端
        byte[] body = ("我是服务器" + count).getBytes(StandardCharsets.UTF_8);
        int responseLen = body.length;
        // 构建一个响应协议包
        ProtocolMessage responseMsg = new ProtocolMessage();
        responseMsg.setLength(responseLen);
        responseMsg.setContent(body);
        ctx.writeAndFlush(responseMsg);
    }

    @Override
    public void exceptionCaught(ChannelHandlerContext ctx, Throwable cause) throws Exception {
        cause.printStackTrace();
        ctx.close();
    }
}
【4.3】客户端
1)客户端:
public class ProtocolNettyClient89 {
    public static void main(String[] args) throws InterruptedException {
        EventLoopGroup group = new NioEventLoopGroup();
        try {
            Bootstrap bootstrap = new Bootstrap();
            bootstrap.group(group)
                    .channel(NioSocketChannel.class)
                    .handler(new ProtocolNettyClientInitializer());  // 自定义一个初始化类
            // 连接服务器
            ChannelFuture channelFuture = bootstrap.connect("localhost", 8089).sync();
            channelFuture.channel().closeFuture().sync();
        } finally {
            group.shutdownGracefully();
        }
    }
}
2)初始化器:
public class ProtocolNettyClientInitializer extends ChannelInitializer {
    @Override
    protected void initChannel(SocketChannel ch) throws Exception {
        ChannelPipeline pipeline = ch.pipeline();
        // 添加出站处理器- 协议报文转字节以便网络传输
        pipeline.addLast(new ProtocolMessageEncoder());
        // 添加入站解码器-把字节转为协议报文对象以便业务逻辑处理
        pipeline.addLast(new ProtocolMessageDecoder());

        // 添加一个自定义handler,处理业务逻辑
        pipeline.addLast(new ProtocolNettyClientHandler());
    }
}
3)处理器:
public class ProtocolNettyClientHandler extends SimpleChannelInboundHandler {
    private int count;

    @Override
    protected void channelRead0(ChannelHandlerContext ctx, ProtocolMessage msg) throws Exception {
        // 读取服务器响应报文
        int length = msg.getLength();
        byte[] body = msg.getContent();
        System.out.println("=============================");
        System.out.println("客户端接收的消息如下:");
        System.out.println("长度 = " + length);
        System.out.println("报文体 = " + new String(body, StandardCharsets.UTF_8));
        System.out.println("客户端累计接收的消息包数量 = " + ++count);
    }

    @Override
    public void channelActive(ChannelHandlerContext ctx) throws Exception {
        // 发送10条数据到服务器
        for (int i = 1; i <= 5; i++) {
            byte[] body = ("你好服务器,我是客户端张三" + i).getBytes(StandardCharsets.UTF_8);
            // 创建协议包对象
            ProtocolMessage message = new ProtocolMessage();
            message.setContent(body);
            message.setLength(body.length);
            // 发送
            ctx.writeAndFlush(message);
        }
    }

    @Override
    public void exceptionCaught(ChannelHandlerContext ctx, Throwable cause) throws Exception {
        cause.printStackTrace();
        ctx.close();
    }
}
【4.4】编码器与解码器
1)解码器
/**
* @Description 协议报文解码器
* @author xiao tang
* @version 1.0.0
* @createTime 2022年09月10日
*/
public class ProtocolMessageDecoder extends ByteToMessageDecoder {
@Override
protected void decode(ChannelHandlerContext ctx, ByteBuf in, List2)编码器 :
/**
 * @Description 协议消息编码器
 * @author xiao tang
 * @version 1.0.0
 * @createTime 2022年09月10日
 */
public class ProtocolMessageEncoder extends MessageToByteEncoder {
    @Override
    protected void encode(ChannelHandlerContext ctx, ProtocolMessage msg, ByteBuf out) throws Exception {
        System.out.println("ProtocolMessageEncoder.encode() 被调用");
        out.writeInt(msg.getLength());
        out.writeBytes(msg.getContent());
    }
}
【4.5】目录结构:

【4.6】打印效果:
1)客户端发送5条消息到服务器:

2)服务器接收的数据包为 5个,如下(显然没有发生拆包粘包问题):
ProtocolMessageDecoder.decode() 被调用
====================================
服务器接收的消息如下:
报文长度:40
报文体内容: 你好服务器,我是客户端张三1
服务器累计接收到的消息包数量 = 1
ProtocolMessageEncoder.encode() 被调用
ProtocolMessageDecoder.decode() 被调用
====================================
服务器接收的消息如下:
报文长度:40
报文体内容: 你好服务器,我是客户端张三2
服务器累计接收到的消息包数量 = 2
ProtocolMessageEncoder.encode() 被调用
ProtocolMessageDecoder.decode() 被调用
====================================
服务器接收的消息如下:
报文长度:40
报文体内容: 你好服务器,我是客户端张三3
服务器累计接收到的消息包数量 = 3
ProtocolMessageEncoder.encode() 被调用
ProtocolMessageDecoder.decode() 被调用
====================================
服务器接收的消息如下:
报文长度:40
报文体内容: 你好服务器,我是客户端张三4
服务器累计接收到的消息包数量 = 4
ProtocolMessageEncoder.encode() 被调用
ProtocolMessageDecoder.decode() 被调用
====================================
服务器接收的消息如下:
报文长度:40
报文体内容: 你好服务器,我是客户端张三5
服务器累计接收到的消息包数量 = 5
ProtocolMessageEncoder.encode() 被调用