zynq-linux的相关脚本分析
米联客公司提供的zynq-linux的相关脚本分析,欢迎讨论。
参考视频连接https://www.bilibili.com/video/BV1WE411g7dY?p=7
一.全局重要的两个sh文件
settings64.sh

usage() {
    echo "Purpose: To configure the developing environment automatically"
    echo "Version: V2018.06"
    echo "Usage  : source $(basename ${BASH_SOURCE})"
    exit 0;
}
打印函数,其中
basename:bashname命令用于获取路径中的文件名或路径名
   1: [[email protected] lianxi]# basename /etc/passwd
   2: passwd
 BASH_SOURCE:
 https://www.junmajinlong.com/shell/bash_source/

 expr "$*" : ".*--help" > /dev/null && usage
 "$*"的含义: https://zhuanlan.zhihu.com/p/57784678
 :的含义:空命令, 等价于 “NOP”
 >:含义为输出到
 上式的含义为将一些help信息输出到/dev/null,并调用usage()脚本。


 # => Make sure the script is being source'd, not executed.  Otherwise, environment variables set here will not stick.
if [ ${BASH_SOURCE[0]} == "$0" ]; then
    printf "\033[31m[ERROR]\033[0m Please execute the script, such as: source `basename "$0"`\n" && exit 1
fi
需要采用source执行该脚本。上述033 31m是对字体进行设置


#------------------------------------------------------------------------------
# The basic directory
#------------------------------------------------------------------------------
# => Directory containing the running script (as required)
export ZN_SCRIPTS_DIR="$(cd $(dirname ${BASH_SOURCE}) && pwd)"
设置变量ZN_SCRIPTS_DIR为当前脚本所在目录,后面的&&pwd含义不清楚。

# => Import local function from common.sh
if [ -f "${ZN_SCRIPTS_DIR}/common.sh" ]; then
    source ${ZN_SCRIPTS_DIR}/common.sh
else
    printf "\033[31m[ERROR]\033[0m Could not find file '${ZN_SCRIPTS_DIR}/common.sh'\n" &&  return 1
fi
执行当前目录下的common.sh文件。

# => The Top Directory (as required)
export ZN_TOP_DIR="$(dirname $ZN_SCRIPTS_DIR)"
export ZN_TOP_NAME="$(basename $ZN_TOP_DIR)"
dirname:是找当前文件夹或文件的上一级目录的路径
basename:是找当前文件夹上一级文件夹的名字

# => The Boards Directory (as required)
export ZN_BOARDS_DIR="${ZN_TOP_DIR}/boards"
# => The Sources Directory (as required)
export ZN_SOURCES_DIR="${ZN_TOP_DIR}/sources"
# => The Documents Directory (as required)
export ZN_DOCUMENTS_DIR="${ZN_TOP_DIR}/documents"
# => The Packages (as required)
export ZN_DOWNLOADS_DIR="${ZN_TOP_DIR}/packages"
# => Host tools, cross compiler, utilities (as required)
export ZN_TOOLS_DIR=${ZN_TOP_DIR}/tools

# => Invoke a second make in the output directory, passing relevant variables
# check that the output directory actually exists
mkdir -p ${ZN_BOARDS_DIR} ${ZN_SOURCES_DIR} ${ZN_DOCUMENTS_DIR} ${ZN_DOWNLOADS_DIR} ${ZN_TOOLS_DIR}
创建相应的子目录。

#------------------------------------------------------------------------------
# Project basic settings
#------------------------------------------------------------------------------
下面是导出一些关键变量:
# => The Board Name
# export ZN_BOARD_NAME="zybo"
  export ZN_BOARD_NAME="z1458"
# export ZN_BOARD_NAME="z1459"
# export ZN_BOARD_NAME="miz702a"
# export ZN_BOARD_NAME="miz702b"
echo_info "板子名称: ${ZN_BOARD_NAME}"

# => The Board Directory
export ZN_BOARD_DIR="${ZN_BOARDS_DIR}/${ZN_BOARD_NAME}"
echo_info "板子目录: ${ZN_BOARD_DIR}"

# => The Project Name
# export ZN_PROJECT_NAME="base"
  export ZN_PROJECT_NAME="bundle"
# export ZN_PROJECT_NAME="axi_tft"
# export ZN_PROJECT_NAME="axi_vdma"
# export ZN_PROJECT_NAME="keyboard"
# export ZN_PROJECT_NAME="lab"
# export ZN_PROJECT_NAME="debian"
# export ZN_PROJECT_NAME="ubuntu"
echo_info "项目名称: ${ZN_PROJECT_NAME}"

# => The Project Version
export ZN_PROJECT_VERSION=${ZN_PROJECT_VERSION:-1.0}
echo_info "项目版本: ${ZN_PROJECT_VERSION}"

# => The Project Directory
export ZN_PROJECT_DIR="${ZN_BOARD_DIR}/${ZN_PROJECT_NAME}"
echo_info "项目目录: ${ZN_PROJECT_DIR}"

# => The Build Output Directory
export ZN_OUTPUT_DIR=${ZN_PROJECT_DIR}/output
export ZN_TARGET_DIR=${ZN_OUTPUT_DIR}/target
export ZN_ROOTFS_MOUNT_POINT=${ZN_OUTPUT_DIR}/rootfs
export ZN_SDCARD_MOUNT_POINT=${ZN_OUTPUT_DIR}/sdcard

# => The System Images Directory
export ZN_IMGS_DIR=${ZN_PROJECT_DIR}/images

创建相关的文件夹。
# => Invoke a second make in the output directory, passing relevant variables
# check that the output directory actually exists
mkdir -p ${ZN_BOARD_DIR} ${ZN_PROJECT_DIR} ${ZN_OUTPUT_DIR} ${ZN_TARGET_DIR} \
    ${ZN_ROOTFS_MOUNT_POINT} ${ZN_SDCARD_MOUNT_POINT} ${ZN_IMGS_DIR}


#------------------------------------------------------------------------------
设置与FPGA相关的文件目录
# System Hardware Design
# 1. Configure PS
# 2. Develop RTL/IP
# 3. Add/Integrate IP
# 4. Genrate Bitstream
# 5. Export to SDK
# 6. Standalone applications
#------------------------------------------------------------------------------
# => Current Vivado/LabTool/SDK Version (Example:2015.4).
# export VIVADO_VERSION="${VIVADO_VERSION:-2013.4}"
# export VIVADO_VERSION="${VIVADO_VERSION:-2014.4}"
# export VIVADO_VERSION="${VIVADO_VERSION:-2014.4}"
# export VIVADO_VERSION="${VIVADO_VERSION:-2016.4}"
# export VIVADO_VERSION="${VIVADO_VERSION:-2017.4}"
  export VIVADO_VERSION="${VIVADO_VERSION:-2018.2}"

# => Vivado工程名称(根据项目需求进行修改)
export ZN_VIVADO_PROJECT_NAME=system
echo_info "工程名称: ${ZN_VIVADO_PROJECT_NAME}"

# => Vivado工程路径(根据项目需求进行修改)
export ZN_VIVADO_PROJECT_DIR="${ZN_PROJECT_DIR}/fpga/${ZN_VIVADO_PROJECT_NAME}"
echo_info "工程路径: ${ZN_VIVADO_PROJECT_DIR}"

# => SDK工程路径(根据项目需求进行修改)
export ZN_SDK_PROJECT_DIR="${ZN_VIVADO_PROJECT_DIR}/${ZN_VIVADO_PROJECT_NAME}.sdk"

# => Block design name(根据项目需求进行修改)
export ZN_BD_NAME="system"

# => Vivado export a hardware description file for use whith the SDK
export ZN_HW_DESC_FILE_DIR="${ZN_SDK_PROJECT_DIR}/${ZN_BD_NAME}_wrapper_hw_platform_0"

# => Standalone Application
export ZN_STANDALONE_DIR=${ZN_PROJECT_DIR}/standalone

# => Invoke a second make in the output directory, passing relevant variables
# check that the output directory actually exists
mkdir -p ${ZN_VIVADO_PROJECT_DIR} ${ZN_STANDALONE_DIR}


#------------------------------------------------------------------------------
# Describe the toolchain for developing an embedded Linux operating system
#------------------------------------------------------------------------------
# => ARCH指明目标体系架构,即编译好的内核运行在什么平台上,如x86、arm或mips等
export ARCH=arm

# => 设置交叉编译工具
# http://www.wiki.xilinx.com/Install+Xilinx+tools
export ZN_TOOLCHAIN_PATH=${ZN_TOOLS_DIR}/cross_compiler
if [ -d "${ZN_TOOLCHAIN_PATH}/bin" ]; then
    export PATH=$PATH:${ZN_TOOLCHAIN_PATH}/bin
    if which arm-linux-gnueabihf-gcc > /dev/null 2>&1 ; then
        export ZN_TOOLCHAIN_PREFIX=arm-linux-gnueabihf
        export CROSS_COMPILE=${ZN_TOOLCHAIN_PREFIX}-
    elif which arm-xilinx-linux-gnueabi-gcc > /dev/null 2>&1 ; then
        export ZN_TOOLCHAIN_PREFIX=arm-xilinx-linux-gnueabi
        export CROSS_COMPILE=${ZN_TOOLCHAIN_PREFIX}-
    else
        echo_error "Could not find the cross compiler" && return 1
    fi
else
    echo_error "Could not find the cross compiler" && return 1
fi

# => Scale the maximum concurrency with the number of CPUs.
# 方法一:
export MAKE_JOBS="-j$(nproc)"
export PARALLEL_MAKE="-j$(nproc)"
获取处理器的核数:$(nproc)
# 方法二:
# # http://www.verydemo.com/demo_c131_i121360.html
# NUMBER_THREADS=`cat /proc/cpuinfo | grep "processor" | wc -l`
# # Do not run with really big numbers unless you want your machine to be dog-slow!
# if [ ${NUMBER_THREADS} -le 8 ] ; then
#     export MAKE_JOBS="-j${NUMBER_THREADS}"
#     export PARALLEL_MAKE="-j${NUMBER_THREADS}"
# else
#     export MAKE_JOBS="-j`expr ${NUMBER_THREADS} / 2`"
#     export PARALLEL_MAKE="-j`expr ${NUMBER_THREADS} / 2`"
# fi


#------------------------------------------------------------------------------

# System Software Development
#------------------------------------------------------------------------------
# => FSBL
# ==> Create the First Stage Boot Loader (FSBL) or U-BOOT spl bootloader
export ZN_FSBL_NAME=zynq_fsbl
# export ZN_FSBL_DIR=${ZN_STANDALONE_DIR}/zynq_fsbl
# ==> Invoke a second make in the output directory, passing relevant variables
# check that the output directory actually exists
# mkdir -p ${ZN_FSBL_DIR}
设备树相关
# => Device Tree
# ==> DTG (Device Tree Generator)
export ZN_DTG_DIR=${ZN_SOURCES_DIR}/dtg

# ==> DTS (Device Tree Source)
export ZN_DTS_NAME="system-top.dts"
export ZN_DTS_DIR=${ZN_PROJECT_DIR}/dts

# ==> DTB (Device Tree Blob)
export ZN_DTB_NAME="devicetree.dtb"
export ZN_DTB_DIR=${ZN_TARGET_DIR}

# ==> DTC (Device Tree Compiler) {{{
# When enabling verified boot you are going to build device tree files,
# therefore you also must install the device tree compiler.

# 方法一:单独下载dtc源码
# export ZN_DTC_DIR=${ZN_TOOLS_DIR}/dtc
# export PATH=${ZN_DTC_DIR}:$PATH

# 方法二:使用内核里的dtc(注:已经将该部分移到Linux小节进行配置)
# export ZN_DTC_DIR=${ZN_KERNEL_DIR}/scripts/dtc
# export PATH=${ZN_DTC_DIR}:$PATH

# 方法三: Ubuntu 12.04 LTS (Precise Pangolin) and later provide a version
# which is recent enough:
# sudo apt-get install device-tree-compiler
# }}}

# ==> Invoke a second make in the output directory, passing relevant variables
# check that the output directory actually exists
mkdir -p ${ZN_DTG_DIR} ${ZN_DTS_DIR}
# => Build U-Boot
# ==> ssbl : this folder stores all the U-Boot code.
export ZN_UBOOT_DIR=${ZN_SOURCES_DIR}/u-boot
# The uImage target of the Linux kernel compilation needs a recent mkimage tool
# which is actually built during U-Boot compilation as explained further below.
# Ensure that one is included in PATH:
export PATH=${ZN_UBOOT_DIR}/tools:$PATH
表示追加$PATH全局变量。
# ==> Configure the bootloader for the Zynq target
if [ "${ZN_BOARD_NAME}" = "zybo" ]; then
    export ZN_UBOOOT_DEFCONFIG=zynq_zybo_defconfig

elif [ "${ZN_BOARD_NAME}" = "z1458" ]; then
    export ZN_UBOOOT_DEFCONFIG=zynq_z1458_defconfig

elif [ "${ZN_BOARD_NAME}" = "z1459" ]; then
    export ZN_UBOOOT_DEFCONFIG=zynq_z1459_defconfig

elif [ "${ZN_BOARD_NAME}" = "miz702a" ]; then
    export ZN_UBOOOT_DEFCONFIG=zynq_miz702a_defconfig

elif [ "${ZN_BOARD_NAME}" = "miz702b" ]; then
    export ZN_UBOOOT_DEFCONFIG=zynq_miz702b_defconfig

else
    echo_error "Does not support ${ZN_BOARD_NAME}" && return 1
fi
# ==> Invoke a second make in the output directory, passing relevant variables
# check that the output directory actually exists
mkdir -p ${ZN_UBOOT_DIR}

# => Build Linux
# ==> kernel : this folder stores the object files (not sources) of the kernel
# build process.
export ZN_KERNEL_DIR=${ZN_SOURCES_DIR}/kernel
export KSRC=${ZN_KERNEL_DIR}

# ==> modules : this folder stores the user kernel  modules. This is the place
# to create custom kernel modules.  Each module has to be in a subfolder of
# this one.
export ZN_MODULE_DIR=${ZN_SOURCES_DIR}/modules

# ==> 使用内核里的dtc
export ZN_DTC_DIR=${ZN_KERNEL_DIR}/scripts/dtc
export PATH=${ZN_DTC_DIR}:$PATH

# ==> Configure the Linux Kernel for the Zynq target
if [ "${ZN_BOARD_NAME}" = "zybo" ]; then
    export ZN_LINUX_KERNEL_DEFCONFIG=xilinx_zybo_defconfig

elif [ "${ZN_BOARD_NAME}" = "z1458" ]; then
    export ZN_LINUX_KERNEL_DEFCONFIG=xilinx_z1458_defconfig

elif [ "${ZN_BOARD_NAME}" = "z1459" ]; then
    export ZN_LINUX_KERNEL_DEFCONFIG=xilinx_z1459_defconfig

elif [ "${ZN_BOARD_NAME}" = "miz702a" ]; then
    export ZN_LINUX_KERNEL_DEFCONFIG=xilinx_miz702a_defconfig

elif [ "${ZN_BOARD_NAME}" = "miz702b" ]; then
    export ZN_LINUX_KERNEL_DEFCONFIG=xilinx_miz702b_defconfig

else
    echo_error "Does not support ${ZN_BOARD_NAME}" && return 1
fi

# ==> Invoke a second make in the output directory, passing relevant variables
# check that the output directory actually exists
mkdir -p ${ZN_KERNEL_DIR} ${ZN_MODULE_DIR}

# => The root filesystem (buildroot, debian, ubuntu)
if [ "${ZN_PROJECT_NAME}" = "ubuntu" ]; then
    export ZN_ROOTFS_TYPE="ubuntu"

elif [ "${ZN_PROJECT_NAME}" = "debian" ]; then
    export ZN_ROOTFS_TYPE="debian"

else
    export ZN_ROOTFS_TYPE="buildroot"
fi

echo_info "文件系统: ${ZN_ROOTFS_TYPE}"
if [ "${ZN_ROOTFS_TYPE}" = "debian" ]; then
    export ZN_ROOTFS_DIR=${ZN_SOURCES_DIR}/rootfs/${ZN_ROOTFS_TYPE}

elif [ "${ZN_ROOTFS_TYPE}" = "ubuntu" ]; then
    export ZN_ROOTFS_DIR=${ZN_SOURCES_DIR}/rootfs/${ZN_ROOTFS_TYPE}

elif [ "${ZN_ROOTFS_TYPE}" = "buildroot" ]; then
    export ZN_ROOTFS_DIR=${ZN_SOURCES_DIR}/rootfs/${ZN_ROOTFS_TYPE}
    # setup Buildroot download cache directory
    export BR2_DL_DIR=${ZN_DOWNLOADS_DIR}/buildroot

    # ==> Configure the buildroot for the Zynq target
    if [ "${ZN_BOARD_NAME}" = "zybo" ]; then
        export ZN_BUILDROOT_DEFCONFIG=zynq_zybo_defconfig

    elif [ "${ZN_BOARD_NAME}" = "z1458" ]; then
        export ZN_BUILDROOT_DEFCONFIG=zynq_z1458_defconfig

    elif [ "${ZN_BOARD_NAME}" = "z1459" ]; then
        export ZN_BUILDROOT_DEFCONFIG=zynq_z1459_defconfig

    elif [ "${ZN_BOARD_NAME}" = "miz702a" ]; then
        export ZN_BUILDROOT_DEFCONFIG=zynq_miz702a_defconfig

    elif [ "${ZN_BOARD_NAME}" = "miz702b" ]; then
        export ZN_BUILDROOT_DEFCONFIG=zynq_miz702b_defconfig

    else
        echo_error "Does not support ${ZN_BOARD_NAME}" && return 1
    fi

    # => Ramdisk Constants
    export ZN_BLOCK_SIZE=1024
    export ZN_RAMDISK_SIZE="$((128 * 1024))" # 128MB

    # ==> Invoke a second make in the output directory, passing relevant variables
    # check that the output directory actually exists
    mkdir -p ${BR2_DL_DIR}

else
    echo_error "There is no root filesystem" && exit 1
fi

# ==> Invoke a second make in the output directory, passing relevant variables
# check that the output directory actually exists
mkdir -p ${ZN_ROOTFS_DIR}

#------------------------------------------------------------------------------
# Application Development
# SDK: Build & Compile Application Code
#------------------------------------------------------------------------------
# => Linux Application
export ZN_APPS_DIR=${ZN_SOURCES_DIR}/applications

# => Invoke a second make in the output directory, passing relevant variables
# check that the output directory actually exists
mkdir -p ${ZN_APPS_DIR}

#------------------------------------------------------------------------------
# Adding the Directory to the Path
#------------------------------------------------------------------------------
export PATH=${ZN_SCRIPTS_DIR}:$PATH

for dir in $( ls ${ZN_SCRIPTS_DIR}/ ); do
    if [ -d "${ZN_SCRIPTS_DIR}/${dir}" ]; then
        export PATH=${ZN_SCRIPTS_DIR}/${dir}:$PATH
    fi
done

if [ -d "${ZN_SCRIPTS_DIR}/rootfs/${ZN_ROOTFS_TYPE}" ]; then
    export PATH="${ZN_SCRIPTS_DIR}/rootfs/${ZN_ROOTFS_TYPE}":$PATH
fi

# => The end
export ZN_CONF_DONE="done"
common.sh
#!/bin/bash
###############################################################################
# 版    权:米联客
# 技术社区:www.osrc.cn
# 功能描述:一些常用函数
# 版 本 号:V1.0
###############################################################################
# => Writing a Warning Message to the Console Window
echo_warn() {
    local msg="$1"
    printf "\033[33m[WARNING] \033[0m";
    printf "$msg\n";
}
export -f echo_warn

# => Writing a Infomation Message to the Console Window
echo_info() {
    local msg="$1"
    printf "\033[32m[INFO] \033[0m";
    printf "$msg\n";
}
export -f echo_info

# => Writing a Error Message to the Console Window
echo_error() {
    local msg="$1"
    printf "\033[31m[ERROR] \033[0m";
    printf "$msg\n";
}
export -f echo_error

# => Writing a Warning Message to the Console Window
print_warn() {
    local msg="$1"
    printf "\033[33m$msg\033[0m";
}
export -f print_warn

# => Writing a Infomation Message to the Console Window
print_info() {
    local msg="$1"
    printf "\033[32m$msg\033[0m";
}
export -f print_info

# => Writing a Error Message to the Console Window
print_error() {
    local msg="$1"
    printf "\033[31m$msg\033[0m";
}
export -f print_error

# => Writing a Error Message to the Console Window and exit
error_exit() {
    local msg="$1"
    printf "\033[31m[ERROR] \033[0m";
    printf "$msg\n";
    exit 1;
}
export -f error_exit
二.uboot相关的sh文件
2.1cfg_boot.sh
#!/bin/bash
###############################################################################
# 版    权:米联客
# 技术社区:www.osrc.cn
# 功能描述:1. 清除配置文件和编译中间结果
#           2. 重新配置 U-Boot
#           3. 编译开发所需要的工具
# 版 本 号:V1.0
###############################################################################
# => Setting The Development Environment Variables
if [ ! "${ZN_CONFIG_DONE}" ];then
    echo "[ERROR] 请以“source settings64.sh”的方式执行 settings64.sh 脚本。" && exit 1
fi
在settings64.sh文件的最后会将该变量变为DONE。

# => Filename of the running script.
ZN_SCRIPT_NAME="$(basename ${BASH_SOURCE})"
dirname:是找当前文件夹或文件的上一级目录的路径
basename:是找当前文件夹上一级文件夹的名字

###############################################################################
# => The beginning
echo_info "[ $(date "+%Y/%m/%d %H:%M:%S") ] Starting ${ZN_SCRIPT_NAME}"

# => Make sure the source is there
if [ "`ls -A ${ZN_UBOOT_DIR}`" = "" ]; then
    error_exit "Can't find the source code of u-boot"
else
    cd ${ZN_UBOOT_DIR}
fi
ZN_UBOOT_DIR在setting64.sh中设置,进入该目录下后会执行如下操作。
# => 1. Cleaning the Sources
# => 2. To configure the sources for the intended target.
# => 3. Prepare for compiling the source code


# => 1. Cleaning the Sources
echo_info "To delete all build products as well as the configuration"
make distclean || error_exit "Failed to make distclean"

# => 2. To configure the sources for the intended target.
echo_info "Configure u-boot on the ${ZN_UBOOT_DIR}"
make ${ZN_UBOOOT_DEFCONFIG} || error_exit "Failed to make ${ZN_UBOOOT_DEFCONFIG}"
ZN_UBOOOT_DEFCONFIG为uboot的配置文件,在setting64.sh中设定。

# => 3. Prepare for compiling the source code
echo_info "Prepare for compiling the source code"
make tools || error_exit "Failed to make tools"

make的目标为tools
# => The end
echo_info "[ $(date "+%Y/%m/%d %H:%M:%S") ] Finished ${ZN_SCRIPT_NAME}"
###############################################################################
2.2save_uboot_defconfig.sh
#!/bin/bash
###############################################################################
# 版    权:米联客
# 技术社区:www.osrc.cn
# 功能描述:保存配置文件到硬盘
# 版 本 号:V1.0
###############################################################################
# => Setting The Development Environment Variables
if [ ! "${ZN_CONFIG_DONE}" ];then
    echo "[ERROR] Please source the settings64.sh script first" && exit 1
fi

# => Filename of the running script.
ZN_SCRIPT_NAME="$(basename ${BASH_SOURCE})"

###############################################################################
# => The beginning
echo_info "[ $(date "+%Y/%m/%d %H:%M:%S") ] Starting ${ZN_SCRIPT_NAME}"

# => Make sure the source is there
if [ "`ls -A ${ZN_UBOOT_DIR}`" = "" ]; then
    error_exit "Can't find the source code of u-boot"
fi

# => To save bootloader config use the command :
echo_info "To save bootloader config"
make -C ${ZN_UBOOT_DIR} savedefconfig
if [ $? != 0 ]; then
    error_exit "Failed to save defconfig"
else
    cp ${ZN_UBOOT_DIR}/defconfig ${ZN_UBOOT_DIR}/configs/${ZN_UBOOOT_DEFCONFIG}
fi
将uboot目录下的defconfig文件拷贝到uboot/configs文件夹下,并重新命名为${ZN_UBOOOT_DEFCONFIG}

# => The end
echo_info "[ $(date "+%Y/%m/%d %H:%M:%S") ] Finished ${ZN_SCRIPT_NAME}"
###############################################################################
2.3make_uboot.sh
#!/bin/bash
###############################################################################
# 版    权:米联客
# 技术社区:www.osrc.cn
# 功能描述:编译并安装 U-Boot
# 版 本 号:V1.0
###############################################################################
# => Setting The Development Environment Variables
if [ ! "${ZN_CONFIG_DONE}" ];then
    echo "[ERROR] Please source the settings64.sh script first" && exit 1
fi

# => Filename of the running script.
ZN_SCRIPT_NAME="$(basename ${BASH_SOURCE})"

###############################################################################
# => The beginning
echo_info "[ $(date "+%Y/%m/%d %H:%M:%S") ] Starting ${ZN_SCRIPT_NAME}"

# => Make sure the source is there
if [ "`ls -A ${ZN_UBOOT_DIR}`" = "" ]; then
    error_exit "Can't find the source code of u-boot"
else
    cd ${ZN_UBOOT_DIR}
fi

# => Building the U-Boot bootloader is a part of the Xilinx design flow.
echo_info "Build U-Boot on the ${ZN_UBOOT_DIR}"
make ${MAKE_JOBS}
if [ $? -eq 0 ]; then
 shell脚本中$?是指上一次命令执行的成功或者失败的状态。如果成功就是0,失败为1.。语句if [ $? -eq 0 ] 是判断if语句的上一个命令执行如果成功就执行if中的语句,否则就执行else中的内容。
    ###
    # 1. U-Boot normally
    ###
    cp ${ZN_UBOOT_DIR}/u-boot ${ZN_TARGET_DIR}/u-boot.elf

    ###
    # 2. U-Boot SPL
    ###
    if [ -f "${ZN_UBOOT_DIR}/u-boot.img" ]; then
        cp ${ZN_UBOOT_DIR}/u-boot.img        ${ZN_TARGET_DIR}
        cp ${ZN_UBOOT_DIR}/spl/boot.bin      ${ZN_TARGET_DIR}
    fi

    echo_info "U-Boot - Build OK"
else
    error_exit "U-Boot - Build Failed"
fi

# => The end
echo_info "[ $(date "+%Y/%m/%d %H:%M:%S") ] Finished ${ZN_SCRIPT_NAME}"
###############################################################################
	uboot分为uboot-spl和uboot两个组成部分。SPL是Secondary Program Loader的简称,第二阶段程序加载器,这里所谓的第二阶段是相对于SOC中的BROM来说的,之前的文章已经有所介绍,SOC启动最先执行的是BROM中的固化程序。

	BROM会通过检测启动方式来加载第二阶段bootloader。uboot已经是一个bootloader了,那么为什么还多一个uboot spl呢?

	这个主要原因是对于一些SOC来说,它的内部SRAM可能会比较小,小到无法装载下一个完整的uboot镜像,那么就需要spl,它主要负责初始化外部RAM和环境,并加载真正的uboot镜像到外部RAM中来执行。

	所以由此来看,SPL应该是一个非常小的loader程序,可以运行于SOC的内部SRAM中,它的主要功能就是加载真正的uboot并运行之。
————————————————
版权声明:本文为CSDN博主「程序猿Ricky的日常干货」的原创文章,遵循CC 4.0 BY-SA版权协议,转载请附上原文出处链接及本声明。
原文链接:https://blog.csdn.net/rikeyone/article/details/51646200
三.kernel相关的sh文件
该文件加下的sh文件与uboot问价夹下相同,功能也相同。
3.1cfg_kernel.sh
#!/bin/bash
###############################################################################
# 版    权:米联客
# 技术社区:www.osrc.cn
# 功能描述:1. 清除配置文件和编译中间结果
#           2. 重新配置内核
#           3. 编译开发所需要的工具
# 版 本 号:V1.0
###############################################################################
# => Setting The Development Environment Variables
if [ ! "${ZN_CONFIG_DONE}" ];then
    echo "[ERROR] 请以“source settings64.sh”的方式执行 settings64.sh 脚本。" && exit 1
fi

# => Filename of the running script.
ZN_SCRIPT_NAME="$(basename ${BASH_SOURCE})"

###############################################################################
# => The beginning
echo_info "[ $(date "+%Y/%m/%d %H:%M:%S") ] Starting ${ZN_SCRIPT_NAME}"

# => Make sure the source is there
if [ "`ls -A ${ZN_KERNEL_DIR}`" = "" ]; then
    error_exit "Can't find the source code of kernel"
else
    cd ${ZN_KERNEL_DIR}
fi

# => 1. Cleaning the Sources
echo_info "To delete all build products as well as the configuration"
make distclean || error_exit "Failed to make distclean"

# => 2. To configure the sources for the intended target.
echo_info "Configure Linux kernel on the ${ZN_KERNEL_DIR}"
make ${ZN_LINUX_KERNEL_DEFCONFIG} || error_exit "Failed to make ${ZN_LINUX_KERNEL_DEFCONFIG}"

# => 3. Prepare for compiling the source code
echo_info "Prepare for compiling the source code"
make prepare scripts || error_exit "Failed to make prepare scripts"

# => The end
echo_info "[ $(date "+%Y/%m/%d %H:%M:%S") ] Finished ${ZN_SCRIPT_NAME}"
###############################################################################
3.2save_kernel_defconfig.sh
#!/bin/bash
###############################################################################
# 版    权:米联客
# 技术社区:www.osrc.cn
# 功能描述:保存配置文件到硬盘
# 版 本 号:V1.0
###############################################################################
# => Setting The Development Environment Variables
if [ ! "${ZN_CONFIG_DONE}" ];then
    echo "[ERROR] Please source the settings64.sh script first" && exit 1
fi

# => Filename of the running script.
ZN_SCRIPT_NAME="$(basename ${BASH_SOURCE})"

###############################################################################
# => The beginning
echo_info "[ $(date "+%Y/%m/%d %H:%M:%S") ] Starting ${ZN_SCRIPT_NAME}"

# => Make sure the source is there
if [ "`ls -A ${ZN_KERNEL_DIR}`" = "" ]; then
    error_exit "Can't find the source code of kernel"
fi

# => To save kernel config use the command :
echo_info "To save kernel config"
make -C ${ZN_KERNEL_DIR} savedefconfig
if [ $? != 0 ]; then
    error_exit "Failed to save defconfig"
else
    cp ${ZN_KERNEL_DIR}/defconfig ${ZN_KERNEL_DIR}/arch/arm/configs/${ZN_LINUX_KERNEL_DEFCONFIG}
fi

# => The end
echo_info "[ $(date "+%Y/%m/%d %H:%M:%S") ] Finished ${ZN_SCRIPT_NAME}"
###############################################################################
3.3make_kernel.sh
#!/bin/bash
###############################################################################
# 版    权:米联客
# 技术社区:www.osrc.cn
# 功能描述:1. 编译并安装内核
#           2. 编译并安装设备树
#           3. 编译并安装内核模块(注意:需要先准备好根文件系统)
# 版 本 号:V1.0
###############################################################################
# => Setting The Development Environment Variables
if [ ! "${ZN_CONFIG_DONE}" ];then
    echo "[ERROR] Please source the settings64.sh script first" && exit 1
fi

# => Filename of the running script.
ZN_SCRIPT_NAME="$(basename ${BASH_SOURCE})"

###############################################################################
# => The beginning
echo_info "[ $(date "+%Y/%m/%d %H:%M:%S") ] Starting ${ZN_SCRIPT_NAME}"

# => Make sure the source is there
if [ "`ls -A ${ZN_KERNEL_DIR}`" = "" ]; then
    error_exit "Can't find the source code of kernel"
else
    cd ${ZN_KERNEL_DIR}
fi

# => Make sure the target directory is there
[[ ! "${ZN_TARGET_DIR}" ]] && error_exit "Can't find the target directory"

# => 1. Compiling the Kernel
echo_info "Building the kernel image on the ${ZN_KERNEL_DIR}"
make ${MAKE_JOBS} UIMAGE_LOADADDR=0x8000 uImage
if [ $? -eq 0 ]; then
    echo_info "Installing the Kernel Image"
    cp -a ${ZN_KERNEL_DIR}/arch/arm/boot/zImage ${ZN_TARGET_DIR}
    cp -a ${ZN_KERNEL_DIR}/arch/arm/boot/uImage ${ZN_TARGET_DIR}
    cp -a ${ZN_KERNEL_DIR}/arch/arm/boot/uImage ${ZN_TARGET_DIR}/uImage.bin
else
    error_exit "Kernel Image - Build Failed"
fi

# => 2. Compiling the Device Tree Binaries
echo_info "Building the Device Tree Binaries on the ${ZN_DTS_DIR}"

${ZN_DTC_DIR}/dtc -I dts -O dtb -o ${ZN_DTB_DIR}/${ZN_DTB_NAME} ${ZN_DTS_DIR}/${ZN_DTS_NAME}
if [ $? -eq 0 ]; then
    echo_info "The Device Tree - Build OK"
else
    error_exit "The Device Tree - Build Failed"
fi

# => 3. Compiling the Kernel Modules
echo_info "Building the Kernel Modules on the ${ZN_KERNEL_DIR}"

make ${MAKE_JOBS} modules
if [ $? -eq 0 ]; then
    echo_info "Installing the Kernel Modules"

    sudo rm -rf ${ZN_ROOTFS_MOUNT_POINT}/*
    sudo tar zxf ${ZN_TARGET_DIR}/rootfs.tar.gz -C ${ZN_ROOTFS_MOUNT_POINT}
    sudo rm -rf ${ZN_ROOTFS_MOUNT_POINT}/lib/modules/

    sudo make ${MAKE_JOBS} ARCH=arm INSTALL_MOD_PATH=${ZN_ROOTFS_MOUNT_POINT} modules_install
    if [ $? -eq 0 ]; then
        sudo rm ${ZN_TARGET_DIR}/rootfs.tar.gz
        sudo tar zcf ${ZN_TARGET_DIR}/rootfs.tar.gz -C ${ZN_ROOTFS_MOUNT_POINT} .
        sudo rm -rf ${ZN_ROOTFS_MOUNT_POINT}/*
        echo_info "The Kernel Modules - Install OK"
    else
        sudo rm -rf ${ZN_ROOTFS_MOUNT_POINT}/*
        error_exit "The Kernel Modules - Install Failed"
    fi

else
    error_exit "Kernel Modules - Build Failed"
fi

# => The end
echo_info "[ $(date "+%Y/%m/%d %H:%M:%S") ] Finished ${ZN_SCRIPT_NAME}"
###############################################################################
四.rootfs相关的sh文件
4.1save_rootfs_defconfig.sh
#!/bin/bash
###############################################################################
# 版    权:米联客
# 技术社区:www.osrc.cn
# 功能描述:保存配置文件到硬盘
# 版 本 号:V1.0
###############################################################################
# => Setting The Development Environment Variables
if [ ! "${ZN_CONFIG_DONE}" ];then
    echo "[ERROR] 请以“source settings64.sh”的方式执行 settings64.sh 脚本。" && exit 1
fi

# => Filename of the running script.
ZN_SCRIPT_NAME="$(basename ${BASH_SOURCE})"

###############################################################################
# => The beginning
echo_info "[ $(date "+%Y/%m/%d %H:%M:%S") ] Starting ${ZN_SCRIPT_NAME}"

# => TODO nothing now

# => The end
echo_info "[ $(date "+%Y/%m/%d %H:%M:%S") ] Finished ${ZN_SCRIPT_NAME}"
###############################################################################

什么也没有做。
4.2cfg_rootfs.sh
#!/bin/bash
###############################################################################
# 版    权:米联客
# 技术社区:www.osrc.cn
# 功能描述:
# 版 本 号:V1.0
###############################################################################
# => Setting The Development Environment Variables
if [ ! "${ZN_CONFIG_DONE}" ];then
    echo "[ERROR] 请以“source settings64.sh”的方式执行 settings64.sh 脚本。" && exit 1
fi

# => Filename of the running script.
ZN_SCRIPT_NAME="$(basename ${BASH_SOURCE})"

###############################################################################
# => The beginning
echo_info "[ $(date "+%Y/%m/%d %H:%M:%S") ] Starting ${ZN_SCRIPT_NAME}"

# => TODO nothing now

# => The end
echo_info "[ $(date "+%Y/%m/%d %H:%M:%S") ] Finished ${ZN_SCRIPT_NAME}"
###############################################################################
4.3make_rootfs.sh
#!/bin/bash
###############################################################################
# 版    权:米联客
# 技术社区:www.osrc.cn
# 功能描述:编译安装根文件系统
# 版 本 号:V1.0
###############################################################################
# => Setting The Development Environment Variables
if [ ! "${ZN_CONFIG_DONE}" ];then
    echo "[ERROR] 请以“source settings64.sh”的方式执行 settings64.sh 脚本。" && exit 1
fi

# => Filename of the running script.
ZN_SCRIPT_NAME="$(basename ${BASH_SOURCE})"

###############################################################################
# => The beginning
echo_info "[ $(date "+%Y/%m/%d %H:%M:%S") ] Starting ${ZN_SCRIPT_NAME}"

# => 1. Install required packages on your pc
host_packages="debootstrap qemu-user-static qemu-system"
for package in ${host_packages} ; do
    dpkg-query -W -f='${Package}\n' | grep ^$package$ > /dev/null
    if [ $? != 0 ] ; then
        echo_info "Installing ${package}"
        sudo apt-get --assume-yes install ${package}
    fi
done
	debootstrap 是一个可以快速获得基本 Debian 系统的一个工具, 你可以将 Debootstrap 看作是一种特殊的安装工具。
	qemu-user-static 是一个用于利用当前操作系统来运行其它架构的一个仿真器。
	qemu-system虚拟化相关。
	dpkg-query命令是Debian linux中软件包的查询工具,它从dpkg软件包数据库中查询并显示软件包的信息。
	上述主要功能就是首先查找当前系统是否已经安装上述三个包,否则就进行安装。

# => 2. Configuring an Debian/Ubuntu guest rootfs
# 2.1 Supported Architectures
# ARCH="armel"                                                 # ARM
  ARCH="armhf"                                                 # ARM with hardware FPU

# 2.2 Setup a distribution
# DISTRO="xenial"                                              # Ubuntu LTS 16.04
  DISTRO="bionic"                                              # Ubuntu LTS 18.04

# 2.3
  BASETGZ="rootfs.tar.gz"
  BUILDPLACE="${ZN_ROOTFS_DIR}/rootfs"

# 2.4
# MIRRORSITE="http://ports.ubuntu.com/ubuntu-ports"            # default
  MIRRORSITE="https://mirrors.ustc.edu.cn/ubuntu-ports"

# 2.5
#######################################################################################
# [NOTE] The repository components are:
# Main - Officially supported software.
# Restricted - Supported software that is not available under a completely free license.
# Universe - Community maintained software, i.e. not officially supported software.
# Multiverse - Software that is not free.
#######################################################################################
  COMPONENTS="main,restricted,multiverse,universe"
  REPOSITORIS="main restricted multiverse universe"

# 2.6 Add useful packages (https://pkgs.org/)
  EXTRA_PKGS="sudo,udev,apt-utils,dialog,locales,bash-completion,can-utils,i2c-tools,usbutils"
  EXTRA_PKGS="${EXTRA_PKGS},ethtool,net-tools,ifupdown,dhcpcd5,ssh,curl,wget,rsync,vim,parted"
  EXTRA_PKGS="${EXTRA_PKGS},dosfstools,build-essential"

  armel和armhf区别:https://www.jianshu.com/p/a7e5952b2e83
  xenial和bionic指的是ubuntu的发行版本号。

# => 3. Checking if a File Exists
if [ -f ${ZN_ROOTFS_DIR}/${BASETGZ} ]; then
    echo_info "The ${BASETGZ} Normal already exists."
    read -p "Do you want to use the existing file system and exit [y/N]? " REPLY
    case ${REPLY} in
        y|Y)
            echo_info "Copy Root File System Image on ${ZN_TARGET_DIR}"
            sudo rm -rf ${ZN_TARGET_DIR}/rootfs.tar.gz
            sudo cp ${ZN_ROOTFS_DIR}/${BASETGZ} ${ZN_TARGET_DIR}/rootfs.tar.gz
            echo_info "[ $(date "+%Y/%m/%d %H:%M:%S") ] Finished ${ZN_SCRIPT_NAME}" && exit 0
            ;;
        *)
            sudo rm -rf ${ZN_ROOTFS_DIR}/${BUILDPLACE}
            sudo rm -rf ${ZN_ROOTFS_DIR}/${BASETGZ}
            ;;
    esac
fi

使用qemu-debootstrap构建文件系统。
# => 4. Create an Debian/Ubuntu guest rootfs (First Stage / Second Stage)
sudo qemu-debootstrap --arch=${ARCH} --components=${COMPONENTS}   \
    --include=${EXTRA_PKGS} ${DISTRO} ${BUILDPLACE} ${MIRRORSITE} \
    || error_exit " Could not create the debian/ubuntu base system"

###############################################################################
# mount stuff, you will need more often
sudo mount --bind /dev     ${BUILDPLACE}/dev
sudo mount --bind /dev/pts ${BUILDPLACE}/dev/pts
sudo mount --bind /proc    ${BUILDPLACE}/proc

sudo mount:的解释如下https://blog.csdn.net/HayPinF/article/details/105849589
进行挂在是为了后续chroot服务的:
https://blog.csdn.net/weixin_31082779/article/details/116898580
###############################################################################
# => 6. Update and upgrade the system
这里主要是更新源镜像。
cat << END | sudo chroot ${BUILDPLACE}

cat << EOF > /etc/apt/sources.list
  deb     ${MIRRORSITE}/          ${DISTRO}           ${REPOSITORIS}
# deb-src ${MIRRORSITE}/          ${DISTRO}           ${REPOSITORIS}

  deb     ${MIRRORSITE}/          ${DISTRO}-updates   ${REPOSITORIS}
# deb-src ${MIRRORSITE}/          ${DISTRO}-updates   ${REPOSITORIS}

  deb     ${MIRRORSITE}/          ${DISTRO}-backports ${REPOSITORIS}
# deb-src ${MIRRORSITE}/          ${DISTRO}-backports ${REPOSITORIS}

# deb     ${MIRRORSITE}-security/ ${DISTRO}/updates   ${REPOSITORIS}
# deb-src ${MIRRORSITE}-security/ ${DISTRO}/updates   ${REPOSITORIS}
EOF

END

一,关于cat << EOF语句的意思

在linux shell脚本中cat << EOF的语句,起到什么作用?

首先必须要说明的是EOF在这里没有特殊的含义,你可以使用FOE或OOO等(当然也不限制在三个字符或大写字符)。

接下来,简单描述一下几种常见的使用方式及其作用:

1、cat<<EOF,以EOF输入字符为标准输入结束:

2、cat>filename,创建文件,并把标准输入输出到filename文件中,以ctrl+d作为输入结束:

3、cat>filename<<EOF,以EOF作为输入结束,和ctrl+d的作用一样:
————————————————
版权声明:本文为CSDN博主「沙门空海」的原创文章,遵循CC 4.0 BY-SA版权协议,转载请附上原文出处链接及本声明。
原文链接:https://blog.csdn.net/robin90814/article/details/86705155

chroot的用法
chroot命令用来在指定的根目录下运行指令。chroot,即 change root directory (更改 root 目录)。在 linux 系统中,系统默认的目录结构都是以/,即是以根 (root) 开始的。而在使用 chroot 之后,系统的目录结构将以指定的位置作为/位置。
https://www.cnblogs.com/charlieroro/p/9259675.html
# => 6. setup locales
sudo chroot ${BUILDPLACE} apt-get install -y locales dialog
sudo chroot ${BUILDPLACE} apt-get install -y language-pack-zh language-pack-zh-base
sudo chroot ${BUILDPLACE} /bin/sh -c "echo LANG="zh_CN.UTF-8" >> /etc/environment"
sudo chroot ${BUILDPLACE} /bin/sh -c "echo LANGUAGE="zh_CN:zh:en_US:en" >> /etc/environment"
sudo chroot ${BUILDPLACE} locale-gen zh_CN.UTF-8 en_US.UTF-8


# => 7. Customize rootfs

# ==> Changing password for root.
echo "root:root" | sudo chroot ${BUILDPLACE} chpasswd

# ==> Create a User Administrator (https://wiki.ubuntu.com/Security/Privileges)
USERNAME=osrc
PASSWORD=osrc
sudo chroot ${BUILDPLACE} adduser --disabled-password --gecos "" $USERNAME
sudo chroot ${BUILDPLACE} usermod -aG sudo    $USERNAME    # add to sudo group for root access
sudo chroot ${BUILDPLACE} usermod -aG tty     $USERNAME    # add to tty group for tty access
sudo chroot ${BUILDPLACE} usermod -aG dialout $USERNAME    # add to dialout group for UART access
echo "$USERNAME:$PASSWORD" | sudo chroot ${BUILDPLACE} chpasswd

# ==> Set the hostname
HOSTNAME="${DISTRO}-${ARCH}"
echo ${HOSTNAME} | sudo tee ${BUILDPLACE}/etc/hostname

# ==> Set minimal hosts {{{
cat << END | sudo chroot ${BUILDPLACE}

cat > /etc/hosts << EOF
127.0.0.1    localhost
127.0.1.1    $HOSTNAME
EOF

END
# }}}

# ==> Configure networking:
cat << END | sudo chroot ${BUILDPLACE}

cat << EOF > /etc/network/interfaces
######################################################################
# /etc/network/interfaces -- configuration file for ifup(8), ifdown(8)
# See the interfaces(5) manpage for information on what options are
# available.
######################################################################

# We always want the loopback interface.
#
auto lo
iface lo inet loopback

# A. For DHCP on eth0
# auto eth0
# iface eth0 inet dhcp

# B. For static on eth0
# auto eth0
# iface eth0 inet static
#     address 192.168.0.42
#     network 192.168.0.0
#     netmask 255.255.255.0
#     broadcast 192.168.0.255
#     gateway 192.168.0.1

EOF

END

# => System update and upgrade
sudo chroot ${BUILDPLACE} apt-get update
# sudo chroot ${BUILDPLACE} apt-get -q -y upgrade

# => System cleaning
sudo chroot ${BUILDPLACE} apt-get -q -y autoremove
sudo chroot ${BUILDPLACE} apt-get -q -y autoclean

###############################################################################
[ ! -z ${BUILDPLACE} ] && sudo umount ${BUILDPLACE}/proc
[ ! -z ${BUILDPLACE} ] && sudo umount ${BUILDPLACE}/dev/pts
[ ! -z ${BUILDPLACE} ] && sudo umount ${BUILDPLACE}/dev
###############################################################################
# => Binary Tarball
sudo tar zcf ${ZN_ROOTFS_DIR}/${BASETGZ} -C ${BUILDPLACE} .
sudo cp ${ZN_ROOTFS_DIR}/${BASETGZ} ${ZN_TARGET_DIR}/rootfs.tar.gz
sudo rm -rf ${BUILDPLACE}

# => The end
print_info "[ $(date "+%Y/%m/%d %H:%M:%S") ] Finished ${ZN_SCRIPT_NAME}\n"
###############################################################################
4.4make_parted.sh
该脚本用来制作分区
#!/bin/bash
###############################################################################
# 版    权:米联客
# 技术社区:www.osrc.cn
# 功能描述:1. 卸载已经挂了的分区
#           2. 删除已有的分区
#           3. 重新分区
#           4. 格式化分区
# 版 本 号:V1.0
###############################################################################
# => Setting The Development Environment Variables
if [ ! "${ZN_CONFIG_DONE}" ];then
    echo "[ERROR] 请以“source settings64.sh”的方式执行 settings64.sh 脚本。" && exit 1
fi

# => Filename of the running script.
ZN_SCRIPT_NAME="$(basename ${BASH_SOURCE})"
###############################################################################
# => The beginning
echo "[ $(date "+%Y/%m/%d %H:%M:%S") ] Starting ${ZN_SCRIPT_NAME}"

# => Check for dependencies
type parted >/dev/null 2>&1 || { sudo apt-get update; sudo apt-get install parted; }

parted是一个分区工具。一般情况下,type命令被用于判断另外一个命令是否是内置命令。
bash中 2>&1 & 的解释:https://blog.csdn.net/astonqa/article/details/8252791
# 0、 Plug in your SD Card to your Linux machine.
# 1、Determine what device to use
until [[ -b /dev/${DISK} && ${DISK} != "hda" && ${DISK} != "sda" && ${DISK} != "sr*" ]]; do
    lsblk -o NAME,RM,SIZE,TYPE,MODEL,SERIAL | grep -vE "hda|sda|sr|loop|part|boot|rpmb"
    read -p "[INFO] Type device filename, or press  to exit: " DISK
    [[ -z ${DISK} ]] && exit 0
done
until语句 :提供循环执行,它与while循环相反, until循环将反复执行直到条件为真就结束循环,而while循环条件为假就结束循环。
linux中hda和sda的区别
hda一般是指IDE接口的硬盘,hda一般指第一块硬盘,类似的有hdb,hdc等
sda一般是指SATA接口的硬盘,sda一般指第一块硬盘,类似的有sdb,sdc等
现在的内核都会把硬盘,移动硬盘,U盘之类的识别为sdX的形式
/dev/sr0 光驱的设备名,sr*代表虚拟化设备。

lsblk 默认是树形方式显示块设备:
NAME   MAJ:MIN RM   SIZE RO TYPE MOUNTPOINT
sda      8:0    0   2.7T  0 disk
├─sda1   8:1    0   1.3M  0 part
├─sda2   8:2    0   400M  0 part /boot
├─sda3   8:3    0 390.6G  0 part /
├─sda4   8:4    0  97.7G  0 part /home
├─sda5   8:5    0   7.8G  0 part [SWAP]
└─sda6   8:6    0   2.2T  0 part /data0
NAME : 这是块设备名。
MAJ:MIN : 本栏显示主要和次要设备号。
RM : 本栏显示设备是否可移动设备。注意,在本例中设备sdb和sr0的RM值等于1,这说明他们是可移动设备。
SIZE : 本栏列出设备的容量大小信息。例如298.1G表明该设备大小为298.1GB,而1K表明该设备大小为1KB。
RO : 该项表明设备是否为只读。在本案例中,所有设备的RO值为0,表明他们不是只读的。
TYPE :本栏显示块设备是否是磁盘或磁盘上的一个分区。在本例中,sda和sdb是磁盘,而sr0是只读存储(rom)。
MOUNTPOINT : 本栏指出设备挂载的挂载点。

grep not操作
使用 grep -v可以实现反向选择操作
如:筛选出test.txt文本中不包含匹配内容的行
grep or操作
1、使用 grep -E可以实现or操作(也可以写成egrep)

如:筛选出test.txt文本中包含“a”或“b”的行

exit(0):正常运行程序并退出程序;
exit(1):非正常运行导致退出程序;
exit 0 可以告知你的程序的使用者:你的程序是正常结束的。如果 exit 非 0 值,那么你的程序的使用者通常会认为你的程序产生了一个错误。
# 2. Remove All Existing Partitions
read -p "[WARNING] ALL DATA ON ${DISK} WILL BE ERASED!!! DO YOU WANT TO CONTINUE [y/N]? " REPLY
case ${REPLY} in
    y|Y)
        echo_info "Umount All Mounted Partitions"
        for part in $(lsblk /dev/${DISK} -o mountpoint --noheadings); do
            sudo umount ${part}
        done

        echo_info "Remove All Existing Partitions from ${DISK}"
        for PARTITION in $(sudo parted /dev/${DISK} print | awk '/^ /{print $1}'); do
            sudo parted -s /dev/${DISK} rm ${PARTITION}
        done
awk是一个强大的文本分析工具,相对于grep的查找,sed的编辑,awk在其对数据分析并生成报告时,显得尤为强大。简单来说awk就是把文件逐行的读入,以空格为默认分隔符将每行切片,切开的部分再进行各种分析处理。
awk -F':' '{print $1}'
表示以“:”分割字符串,打印第一个


        echo_info "Choose the MBR Partitioning Standard"
        sudo parted -s /dev/$DISK mklabel msdos
MBR分区的分区表保存在硬盘的第一个扇区,而且只有64字节,所以最多只能有四个表项。https://blog.csdn.net/zt_xcyk/article/details/53669383
        echo_info "Create the fat32 partition of 100MB and make it bootable"
        sudo parted -s /dev/$DISK mkpart primary fat32 0% 100MiB && sudo parted -s /dev/$DISK set 1 boot on

        echo_info "Create the ext4 partition until end of device"
        sudo parted -s /dev/$DISK mkpart primary ext4 100MiB 100%

        echo_info "Re-read The Partition Table Without Rebooting Linux System"
        sudo partprobe /dev/$DISK && sleep 1 && lsblk /dev/$DISK
partprobe命令用于重读分区表,将磁盘分区表变化信息通知内核,请求操作系统重新加载分区表。如果删除文件后,仍然提示占用空间,可以用partprobe在不重启的情况下重读分区 。
        # Create a Filesystem on the New Partition
        for PARTITION in $(lsblk -l /dev/$DISK | grep part | awk '{print $1}'); do
            PARTNUM=${PARTITION##*[[:alpha:]]}
            case ${PARTNUM} in
                1)
                    echo_info "To format a FAT32 filesystem on /dev/${PARTITION} with a 'boot' disk label,换句话就是生产新的分区,并命名为'boot'"
                    sudo mkfs.vfat -F 32 -n boot /dev/${PARTITION}
                    ;;
https://www.cnblogs.com/reddusty/p/4745309.html
                2)
                    echo_info "To format an ext4 filesystem on /dev/${PARTITION} with a 'rootfs' disk label"
                    echo y | sudo mkfs.ext4 -L rootfs /dev/${PARTITION}
                    ;;
                *)
                    echo_warn "Extra unintended partition"
                    ;;
            esac
        done

        ;;
    *)
        ;;
esac

# => The end
echo "[ $(date "+%Y/%m/%d %H:%M:%S") ] Finished ${ZN_SCRIPT_NAME}"
###############################################################################
4.5create_image.sh
#!/bin/bash
###############################################################################
# 版    权:米联客
# 技术社区:www.osrc.cn
# 功能描述:创建系统安装镜像
# 版 本 号:V1.0
###############################################################################
# => Setting The Development Environment Variables
if [ ! "${ZN_CONFIG_DONE}" ];then
    echo "[ERROR] 请以“source settings64.sh”的方式执行 settings64.sh 脚本。" && exit 1
fi

# => Filename of the running script.
ZN_SCRIPT_NAME="$(basename ${BASH_SOURCE})"
###############################################################################
# => The beginning
echo_info "[ $(date "+%Y/%m/%d %H:%M:%S") ] Starting ${ZN_SCRIPT_NAME}"

# => Make sure the following files are needed.
targets=(                          \
    "zynq_fsbl.elf"                \
    "system.bit"                   \
    "u-boot.elf"                   \
    "uImage"                       \
    "devicetree.dtb"               \
    "rootfs.tar.gz"                \
    )

for target in "${targets[@]}"; do
    [[ ! -f "${ZN_TARGET_DIR}/${target}" ]] && error_exit "Target cannot be found: ${target}."
done

# => Make sure the target dir is there
DIRECTORIES=(                      \
    "boot"                         \
    "rootfs"                       \
    )

for DIR in ${DIRECTORIES[@]}; do
    [[ ! -d "${ZN_IMGS_DIR}/${DIR}" ]] && mkdir -p ${ZN_IMGS_DIR}/${DIR}
done

# => Setting Zynq-7000 Development Environment Variables
if [ -f "${ZN_SCRIPTS_DIR}/xilinx/export_xilinx_env.sh" ]; then
    source ${ZN_SCRIPTS_DIR}/xilinx/export_xilinx_env.sh
else
    error_exit "Could not find file ${ZN_SCRIPTS_DIR}/xilinx/export_xilinx_env.sh"
fi

# =>
echo_info "1. Generate the boot image for sdcard mode"

BIF_FILE=${ZN_TARGET_DIR}/sd_image.bif

echo "//arch = zynq; split = false; format = BIN"          > ${BIF_FILE}
echo "the_ROM_image:"                                      >>${BIF_FILE}
echo "{"                                                   >>${BIF_FILE}
echo "  [bootloader]${ZN_TARGET_DIR}/zynq_fsbl.elf"        >>${BIF_FILE}
echo "  ${ZN_TARGET_DIR}/system.bit"                       >>${BIF_FILE}
echo "  ${ZN_TARGET_DIR}/u-boot.elf"                       >>${BIF_FILE}
echo "}"                                                   >>${BIF_FILE}
#[bootloader]只是写入‘[bootloader]’,因为bif格式需要这个:https://www.cnblogs.com/schips/p/xilinx-petalinux-package-boot_bin_and_image_ub.html
bootgen -image ${BIF_FILE} -o ${ZN_IMGS_DIR}/boot/BOOT.bin -w on

# =>
echo_info "2. Linux kernel with modified header for U-Boot"
cp ${ZN_TARGET_DIR}/uImage ${ZN_IMGS_DIR}/boot/uImage

# =>
echo_info "3. Device tree blob"
cp ${ZN_TARGET_DIR}/devicetree.dtb ${ZN_IMGS_DIR}/boot/devicetree.dtb

# =>
echo_info "4. Generate the ${ZN_ROOTFS_TYPE} Root filesystem"
cp ${ZN_TARGET_DIR}/rootfs.tar.gz ${ZN_IMGS_DIR}/rootfs/rootfs.tar.gz

# => The end
echo_info "[ $(date "+%Y/%m/%d %H:%M:%S") ] Finished ${ZN_SCRIPT_NAME}"
###############################################################################
4.6deploy_image.sh
#!/bin/bash
###############################################################################
# 版    权:米联客
# 技术社区:www.osrc.cn
# 功能描述:部署系统镜像到 SD 卡
# 版 本 号:V1.0
###############################################################################
# => Setting The Development Environment Variables
if [ ! "${ZN_CONFIG_DONE}" ];then
    echo "[ERROR] 请以“source settings64.sh”的方式执行 settings64.sh 脚本。" && exit 1
fi

# => Filename of the running script.
ZN_SCRIPT_NAME="$(basename ${BASH_SOURCE})"

###############################################################################
# => The beginning
echo_info "[ $(date "+%Y/%m/%d %H:%M:%S") ] Starting ${ZN_SCRIPT_NAME}"

# 0、 Plug in your SD Card to your Linux machine.

# 1、Determine what device to use
until [[ -b /dev/${DISK} && ${DISK} != "hda" && ${DISK} != "sda" && ${DISK} != "sr*" ]]; do
    lsblk -o NAME,RM,SIZE,TYPE,MODEL,SERIAL | grep -vE "hda|sda|sr|loop|part"
    read -p "[INFO] Type device filename, or press  to exit: " DISK
    [[ -z ${DISK} ]] && exit 0
done

# 2、
echo_info "Umount All Mounted Partitions"
for part in $(lsblk /dev/${DISK} -o mountpoint --noheadings); do
    sudo umount ${part}
done

# 3、
BOOT_MOUNT_POINT=${ZN_SDCARD_MOUNT_POINT}/boot
ROOT_MOUNT_POINT=${ZN_SDCARD_MOUNT_POINT}/rootfs
mkdir -p ${BOOT_MOUNT_POINT} ${ROOT_MOUNT_POINT}

for PARTITION in $(lsblk -l /dev/$DISK | grep part | awk '{print $1}'); do
    PARTNUM=$( echo "$PARTITION" | tr -d "$DISK" | tr -cd "[0-9]" )
    case ${PARTNUM} in
        1)
            [[ $(lsblk -no FSTYPE /dev/${PARTITION}) != 'vfat' ]] && error_exit "no bootable device found"

            echo_info "mount the boot partition to ${BOOT_MOUNT_POINT}"
            sudo mount -t vfat /dev/${PARTITION} ${BOOT_MOUNT_POINT}

            echo_info "Install boot images to ${BOOT_MOUNT_POINT}"
            sudo rsync -rv ${ZN_IMGS_DIR}/boot/ ${BOOT_MOUNT_POINT} && sync

            echo_info "umount the boot partition from ${BOOT_MOUNT_POINT}"
            sudo umount ${BOOT_MOUNT_POINT}
            ;;
        2)
            [[ $(lsblk -no FSTYPE /dev/${PARTITION}) != 'ext4' ]] && error_exit "no rootfs partition found"

            echo_info "mount the rootfs partition to ${ROOT_MOUNT_POINT}"
            sudo mount -t ext4 /dev/${PARTITION} ${ROOT_MOUNT_POINT}

            if [ "`ls -A ${ROOT_MOUNT_POINT}`" != "lost+found" ]; then
                sudo umount ${ROOT_MOUNT_POINT}
                error_exit "The ROOTFS partition is dirty ,please clean it!"
            fi

            echo_info "Install rootfs images to ${ROOT_MOUNT_POINT}"
            sudo tar zxf ${ZN_IMGS_DIR}/rootfs/rootfs.tar.gz -C ${ROOT_MOUNT_POINT} && sync

            echo_info "umount the rootfs partition from ${ROOT_MOUNT_POINT}"
            sudo umount ${ROOT_MOUNT_POINT}
            ;;
        *)
            echo_warn "[WARNING] Extra unintended partition"
            ;;
    esac
done

# recovery

# => The end
echo_info "[ $(date "+%Y/%m/%d %H:%M:%S") ] Finished ${ZN_SCRIPT_NAME}"
###############################################################################
五.Xilinx相关sh文件
5.1export_xilinx_env.sh
#!/bin/bash
###############################################################################
# 版    权:米联客
# 技术社区:www.osrc.cn
# 功能描述:配置开发所需要的环境变量
# 版 本 号:V1.0
###############################################################################
# => Setting The Development Environment Variables
if [ ! "${ZN_CONFIG_DONE}" ];then
    echo "[ERROR] 请以“source settings64.sh”的方式执行 settings64.sh 脚本。" && exit 1
fi

# => 确保使用 source export_xilinx_env.sh 的方式来执行本脚本。
if [ ${BASH_SOURCE[0]} == "$0" ]; then
    echo "[ERROR] 请以“source export_xilinx_env.sh”的方式执行本脚本。" && exit 1
fi

# => Current Vivado/LabTool/SDK Version (Example:2015.4).
export VIVADO_VERSION="${VIVADO_VERSION:-2015.4}"

# => Set Xilinx installation path (Default: /opt/Xilinx/).
export XILINX="${XILINX:-/mnt/workspace/Xilinx}"


:=句法
在这种替换中,使用和前例中相同的:=句法来设置默认值。
username=””
echo “${username:=$LOGNAME}”
在使用“:=”进行比较时,username变量已经被定义了,但是它的值为空。因此,这里对echo命令使用了变量LOGNAME的值,即设置变量username的值为LOGNAME的值。
有了这个特殊的句法,只有当变量username已被定义,而且有一个实际的非空值时,变量username才会被设置为变量LOGNAME的值。
和前例的主要不同是使用活动命令(echo)而不是被动的冒号来设置变量的默认值,当活动命令被调用时,默认赋值仍然会执行,并输出显示结果。

# => Vivado Design Suite
export XILINX_VIVADO=${XILINX}/Vivado/${VIVADO_VERSION}

# => Xilinx Software Development Kit (XSDK):
# (only needed to build the FSBL).
export XILINX_SDK=${XILINX}/SDK/${VIVADO_VERSION}

# => High-Level Synthesis (HLS)
# 注意: 2017.4及以后版本, HLS 与 Vivado 为同一目录
export XILINX_VIVADO_HLS=${XILINX}/Vivado_HLS/${VIVADO_VERSION}

# => the SDSoC Development Environment
export XILINX_SDX=${XILINX}/SDx/${VIVADO_VERSION}

# => Docnav
export XILINX_DOCNAV=${XILINX}/DocNav

# => The Vivado Environment needs to be setup beforehand
###
# Note: There are two settings files available in the Vivado toolset:
# settings64.sh for use on 64-bit machines with bash;
# settings64.csh for use on 64-bit machines with C Shell.
###
if [ -d "${XILINX_VIVADO}" ]; then
    source ${XILINX_VIVADO}/settings64.sh
else
    echo_error "找不到Vivado设计套件" && return 1
fi

###
# Fixed: librdi_common* not found executing vivado
# https://forums.xilinx.com/t5/Installation-and-Licensing/librdi-common-not-found-executing-vivado/td-p/536991
###
if [ -n "${LD_LIBRARY_PATH}" ]; then
    export LD_LIBRARY_PATH=${XILINX_VIVADO}/lib/lnx64.o:$LD_LIBRARY_PATH
else
    export LD_LIBRARY_PATH=${XILINX_VIVADO}/lib/lnx64.o
fi

###
# Fixed: SDK (SWT issues in Eclipse)
###
# Try lsb_release, fallback with /etc/issue then uname command
distributions="(Debian|Ubuntu|RedHat|CentOS|openSUSE|SUSE)"
首先区分当前系统,然后下面根据当前的distributions重新生成distribution变量
distribution=$(                                             \
    lsb_release -d 2>/dev/null | grep -Eo $distributions    \
    || grep -Eo $distributions /etc/issue 2>/dev/null       \
    || grep -Eo $distributions /etc/*-release 2>/dev/null   \
    || uname -s                                             \
    )

case ${distribution} in
    Ubuntu)
        export SWT_GTK3=0
        ;;
    *)
        ;;
esac

LSB是Linux Standard Base的缩写, lsb_release命令 用来显示LSB和特定版本的相关信息。如果使用该命令时不带参数,则默认加上-v参数。
-v 显示版本信息。
-i 显示发行版的id。
-d 显示该发行版的描述信息。
-r 显示当前系统是发行版的具体版本号。
-c 发行版代号。
-a 显示上面的所有信息。
-h 显示帮助信息。


###
# Fixed: Docnav
###
if [ -n "${LD_LIBRARY_PATH}" ]; then
    export LD_LIBRARY_PATH=${XILINX_DOCNAV}:$LD_LIBRARY_PATH
else
    export LD_LIBRARY_PATH=${XILINX_DOCNAV}
fi
比如下面有一条文本 tmp.txt ,其中内容为:
{"aid":45,"path":"attachment/Mon_1112/2_1_5728040df3ab346.jpg"}
我们想从中过略出 aid 的值即 45 ,那么可以先如下这么做:
grep -o -E 'aid":[1-9]*' tmp.txt
得到的结果为:
aid":45
这时就好办了,我们可以使用 awk 的 -F 选项指示出冒号分隔符,这样就容易过滤出 45 这个值来,整个命令综合如下:
grep -o -E 'aid":[1-9]*' tmp.txt |awk -F: '{print $2}'

uname命令的英文全称即“Unix name”。
用于显示系统相关信息,比如主机名、内核版本号、硬件架构等。
如果未指定任何选项,其效果相当于执行”uname -s”命令,即显示系统内核的名字。
5.2get_hw_description.sh
#!/bin/bash
###############################################################################
# 版    权:米联客
# 技术社区:www.osrc.cn
# 功能描述:1. 导入 system.bit
#           2. 导入 zynq_fsbl.elf
# 版 本 号:V1.0
###############################################################################
# => Setting The Development Environment Variables
if [ ! "${ZN_CONFIG_DONE}" ];then
    echo "[ERROR] 请以“source settings64.sh”的方式执行 settings64.sh 脚本。" && exit 1
fi

# => Filename of the running script.
ZN_SCRIPT_NAME="$(basename ${BASH_SOURCE})"

###############################################################################
# => The beginning
echo_info "[ $(date "+%Y/%m/%d %H:%M:%S") ] Starting ${ZN_SCRIPT_NAME}"
# => hw_platform
ZYNQ_HW_PLATFORM_DIR=${ZN_VIVADO_PROJECT_DIR}/${ZN_VIVADO_PROJECT_NAME}.sdk/${ZN_BD_NAME}_wrapper_hw_platform_0
# => bitstream
ZYNQ_BITSTREAM=${ZYNQ_HW_PLATFORM_DIR}/${ZN_BD_NAME}_wrapper.bit
if [ ! -f "${ZYNQ_BITSTREAM}" ]; then
    error_exit "could not find file 'system.bit'"
fi
cp ${ZYNQ_BITSTREAM} ${ZN_TARGET_DIR}/system.bit

# => zynq_fsbl
ZYNQ_FSBL_DIR=${ZN_VIVADO_PROJECT_DIR}/${ZN_VIVADO_PROJECT_NAME}.sdk/zynq_fsbl
# 确定fsbl.elf文件是否存在
if [ -f "${ZYNQ_FSBL_DIR}/Release/zynq_fsbl.elf" ]; then
    cp ${ZYNQ_FSBL_DIR}/Release/zynq_fsbl.elf ${ZN_TARGET_DIR}/zynq_fsbl.elf
elif [ -f "${ZYNQ_FSBL_DIR}/Debug/zynq_fsbl.elf" ]; then
    cp ${ZYNQ_FSBL_DIR}/Debug/zynq_fsbl.elf ${ZN_TARGET_DIR}/zynq_fsbl.elf
else
    error_exit "could not find file 'zynq_fsbl.elf'"
fi

# => The end
echo_info "[ $(date "+%Y/%m/%d %H:%M:%S") ] Finished ${ZN_SCRIPT_NAME}"
###############################################################################
5.3install_cable_drivers.sh
#!/bin/bash
###############################################################################
# 版    权:米联客
# 技术社区:www.osrc.cn
# 功能描述:安装 JTAG 驱动
#           2. 重新配置内核
#           3. 编译开发所需要的工具
# 版 本 号:V1.0
###############################################################################
# => Setting The Development Environment Variables
if [ ! "${ZN_CONFIG_DONE}" ];then
    echo "[ERROR] 请以“source settings64.sh”的方式执行 settings64.sh 脚本。" && exit 1
fi

# => Filename of the running script.
ZN_SCRIPT_NAME="$(basename ${BASH_SOURCE})"

###############################################################################
# => The beginning
echo_info "[ $(date "+%Y/%m/%d %H:%M:%S") ] Starting ${ZN_SCRIPT_NAME}"
# => Setting Zynq-7000 Development Environment Variables
if [ -f "${ZN_SCRIPTS_DIR}/xilinx/export_xilinx_env.sh" ]; then
    source ${ZN_SCRIPTS_DIR}/xilinx/export_xilinx_env.sh
else
    error_exit "Could not find file ${ZN_SCRIPTS_DIR}/xilinx/export_xilinx_env.sh"
fi

# You may have noticed that during installation (see step 5 above) the option
# to install cable drivers is grayed out, with a note to check guide UG973.
# If you own a Xilinx Platform USB cable you will need to manually install them:
if [ -d "${XILINX_VIVADO}" ]; then
    cd ${XILINX_VIVADO}/data/xicom/cable_drivers/lin64/install_script/install_drivers/
    sudo ./install_drivers
else
    error_exit "找不到Vivado设计套件"
fi

# => The end
echo_info "[ $(date "+%Y/%m/%d %H:%M:%S") ] Finished ${ZN_SCRIPT_NAME}"
###############################################################################
5.4run_vivado.sh
#!/bin/bash
###############################################################################
# 版    权:米联客
# 技术社区:www.osrc.cn
# 功能描述:打开 Vivado 开发套件
# 版 本 号:V1.0
###############################################################################
# => Setting The Development Environment Variables
if [ ! "${ZN_CONFIG_DONE}" ];then
    echo "[ERROR] 请以“source settings64.sh”的方式执行 settings64.sh 脚本。" && exit 1
fi

# => Filename of the running script.
ZN_SCRIPT_NAME="$(basename ${BASH_SOURCE})"

###############################################################################
# => The beginning
echo_info "[ $(date "+%Y/%m/%d %H:%M:%S") ] Starting ${ZN_SCRIPT_NAME}"
# The Vivado Environment needs to be setup beforehand
if [ -f "${ZN_SCRIPTS_DIR}/xilinx/export_xilinx_env.sh" ]; then
    source ${ZN_SCRIPTS_DIR}/xilinx/export_xilinx_env.sh
else
    error_exit "Could not find file ${ZN_SCRIPTS_DIR}/xilinx/export_xilinx_env.sh"
fi

# vivado.jou and vivado.log files
# 1. The vivado.jou file is a journal file which contains tcl commands.
# 2. The vivado.log file also contains the tcl commands captured from the GUI
# operations but also contains all the messages returned by Vivado.

# This will ensure that the .jou and .log files are placed in the project directory.
cd ${ZN_VIVADO_PROJECT_DIR}

# => Open the Vivado Development Environment
if [ -f "${ZN_VIVADO_PROJECT_DIR}/${ZN_VIVADO_PROJECT_NAME}.xpr" ]; then
    vivado ${ZN_VIVADO_PROJECT_DIR}/${ZN_VIVADO_PROJECT_NAME}.xpr > /dev/null 2>&1 &

elif [ -f "${ZN_VIVADO_PROJECT_DIR}/create_project.tcl" ]; then
    vivado -source ${ZN_VIVADO_PROJECT_DIR}/create_project.tcl > /dev/null 2>&1 &

else
    vivado > /dev/null 2>&1 &
fi

# => The end
echo_info "[ $(date "+%Y/%m/%d %H:%M:%S") ] Finished ${ZN_SCRIPT_NAME}"
###############################################################################
六.SD卡配置Ubuntu的例子
step1,修改osrc-labs/scripts/下的settings64.sh文件中的
	export ZN_PORJECT_NAME = “ubuntu”
Step2,使用source settings64.sh设置全系统变量
Step3,在osrc-labs/scripts/rootfs/ubuntu目录下运行cfg_rootfs.sh配置rootfs
Step4,在osrc-labs/scripts/rootfs/ubuntu目录下运行make_rootfs.sh编译得到rootfs.tar.gz文件系统
	执行该脚本后会将rootfs.tar.gz拷贝到osrc-labs/boards/MZ7X/ubuntu/output/target/目录下
Step5,进入osrc-labs/scripts/kernels目录下运行cfg_kernel.sh文件配置kernel
Step6,进入osrc-labs/scripts/kernels目录下运行nake_kernel.sh
	执行完该操作后会在osrc-labs/boards/MZ7X/ubuntu/output/target/目录下生成devicetree.dtb、uImage、uImage.bin、zImage文件
Step7,进入osrc-labs/scripts/Xilinxs目录下运行get_hw_description.sh
	执行完该操作后,会将vivado工程生成的zynq_fsbl.elf文件以及system.bit文件拷贝到osrc-labs/boards/MZ7X/ubuntu/output/target/目录下。
Step8,进入osrc-labs/scripts/uboots目录下运行cfg_uboot.sh
Step9,进入osrc-labs/scripts/uboots目录下运行make_uboot.sh
	执行完该操作后会在osrc-labs/boards/MZ7X/ubuntu/output/target/目录下生成boot.bin、u-boot.elf、u-boot.img文件
Step10,进入osrc-labs/scripts/rootfs/ubuntu目录下运行create_image.sh
	该操作的作用是生成sd卡中放置的相关文件,创建系统安装镜像,执行完该操作后会在osrc-labs/boards/MZ7X/ubuntu/output/target/目录下生成sd_image.bif文件,在osrc-labs/boards/MZ7X/ubuntu/images/boot目录下生成BOOT.bin文件、uImage文件、devicetree.dtb文件。在osrc-labs/boards/MZ7X/ubuntu/images/rootfs目录下生成rootfs.tar.gz文件
	我们真正用于配置SD卡的就是上述四个文件:BOOT.bin文件、uImage文件、devicetree.dtb文件、rootfs.tar.gz文件。
Step11,插入SD卡,执行osrc-labs/scripts/rootfs/ubuntu目录下的make_parted.sh对SDD卡进行分区。
	分区后sd卡会得到boot、rootfs两个子盘符
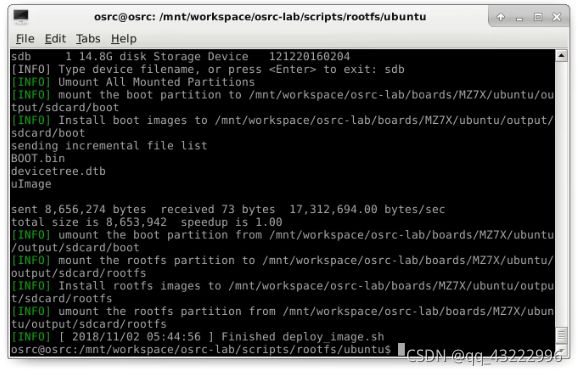
Step12,分区好后,执行osrc-labs/scripts/rootfs/ubuntu目录下的deploy_image.sh进行烧录
	在弹出的[INFO]Type device filenames,or press <Enter> to exit:输入sdb
	执行后系统运行:
文件目录被解压到rootfs分区中,编译后的uboot、内核、设备树被拷贝到boot分区中。
