手把手教你用idea搭建ssm项目并实现简单demo(超详细)
闲暇之余,想搭建一个ssm项目玩玩,结果发现,不百度根本打不出来,搭建出来也有一堆问题,所以在此一步一步记录一下。
- 使用idea搭建ssm项目,首先就是将整个框架整起来
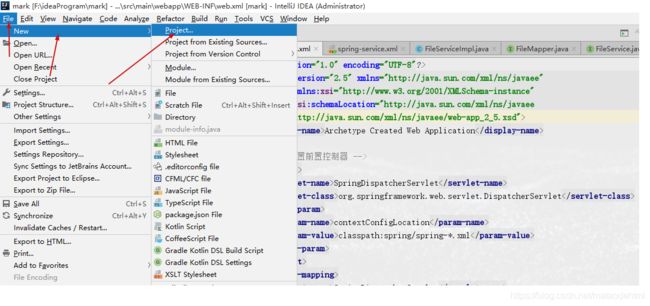
- 如果已经在项目中了,点击左上角file->new->project(刚打开idea是新建->project)
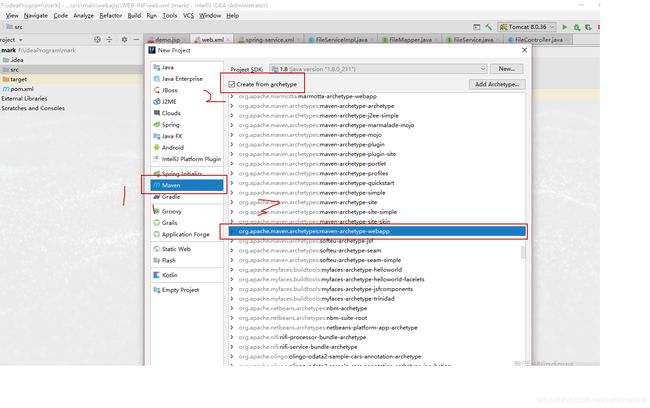
- 左侧栏目选择maven并勾选create from archetype,然后在下面找到org.apache.maven.archetype:maven-archetype-webapp(注意全拼,不要搞错了)点击Next
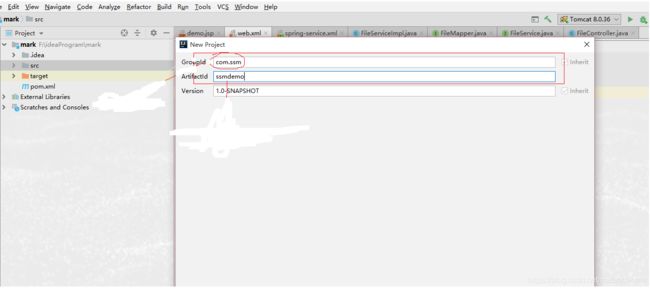
- 输入对应的Groupid,Artifactid,然后点击next
- 到此为止,项目基本结构已经完成了,但是这个项目只能说骨架搭好了,现在开始配置成maven标准的ssm项目结构
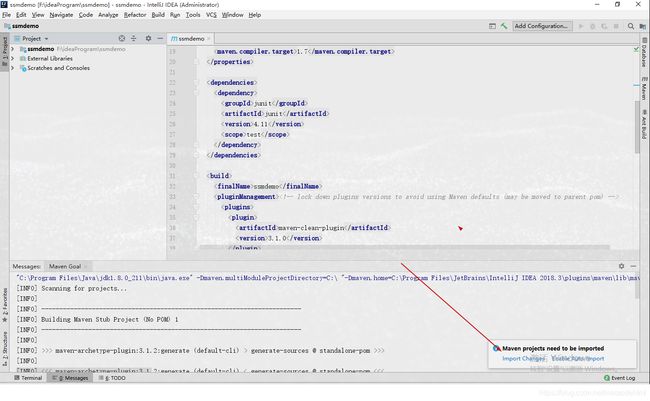
- 当idea将项目创建好后,你的项目右下角可能会有一个提示,选择import changes即可,自动帮你从仓库中配置jar,当然,如果你的仓库没有对应的jar包的话,这个过程将会长一点
- 项目创建好后是这样的,很明显不是标准的ssm结构

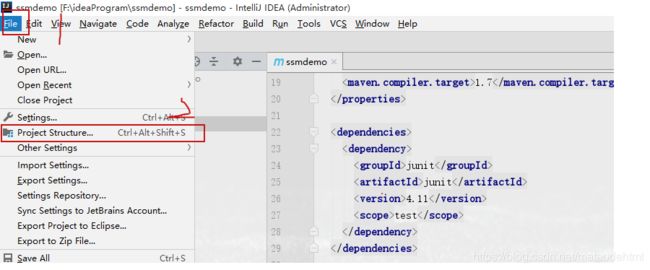
我们要手动的在main下面去创建java文件夹以及resources文件夹,当我们创建好对应的文件夹后会发现,一般的ssm项目在idea中的java文件夹和resources的文件夹是有特殊的颜色的,这时候我们需要点击file->project structure然后选择Modules,我这里的结构:

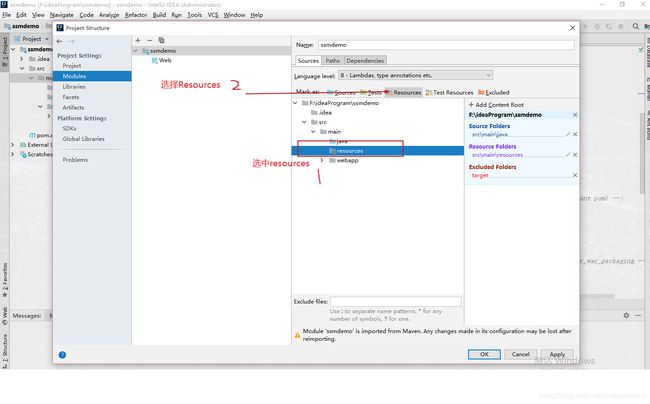
然后鼠标点中java文件夹,选择上面的Sources,这样你就看到java文件夹对应的颜色出来了,然后同样点击resources文件夹选择Resources,同样的resources文件夹的颜色出来了。最后点击apply和ok,就能看到我们项目的文件意见变成我们想要的了。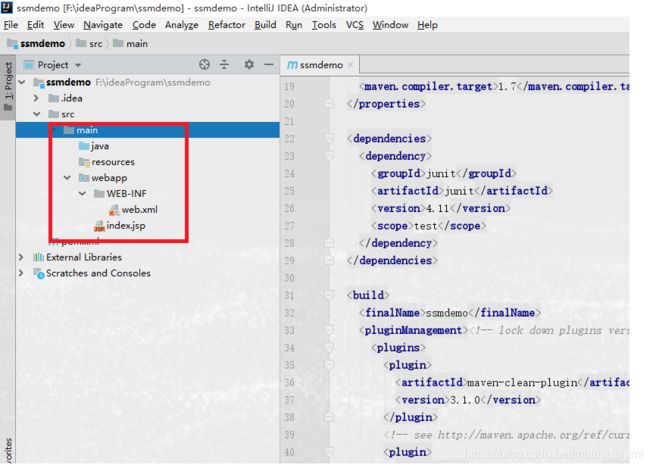

- 到此我们的项目骨架也搭建好了,接下面我们将整合ssm,编写配置文件了
-
在编写配置文件之前,我们需要先在java下面将对应的文件包都创建好,不然配置文件找不到对应的包会报错。
这是我创建好的文件包: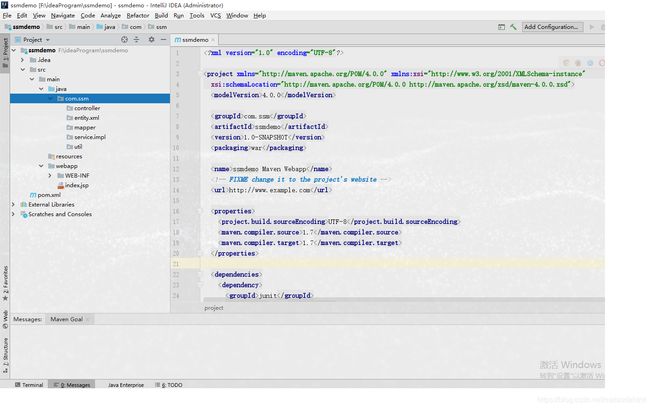
稍微的解释下包名吧:
controller: web层的包,请求就在这里接收
entity:实体所在包
entity.xml: mapper映射的xml所在包
mapper:mapper文件(接口)所在包
service:业务接口所在包
service.impl:业务接口所在的实现类
util:后期可能需要的工具类所在包 -
当你的包名都创建好后,我们开始整合ssm
首先我们先在WEB-INF创建以及jsp的文件夹,然后将index.jsp放入jsp文件夹下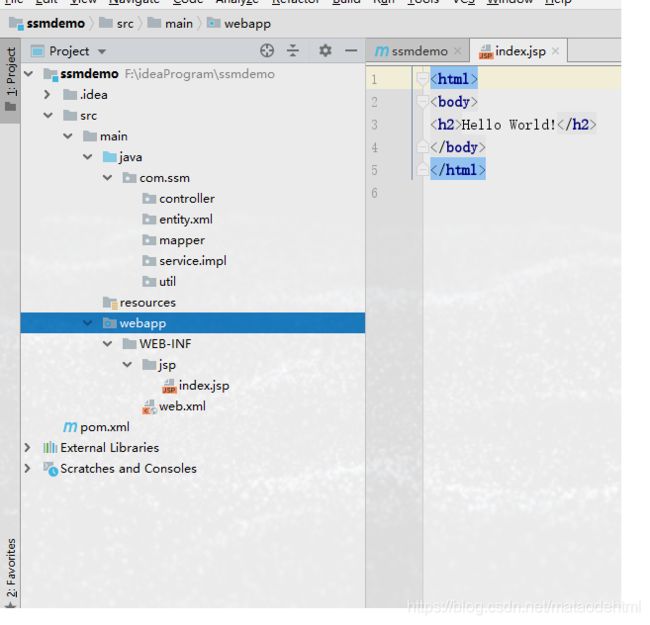
然后我们在pom.xml中引入spring以及mybatis以及mysql等的相关依赖,下面是我加入后的整体pom代码
<project xmlns="http://maven.apache.org/POM/4.0.0" xmlns:xsi="http://www.w3.org/2001/XMLSchema-instance"
         xsi:schemaLocation="http://maven.apache.org/POM/4.0.0 http://maven.apache.org/xsd/maven-4.0.0.xsd">
    <modelVersion>4.0.0modelVersion>
    <groupId>com.ssmgroupId>
    <artifactId>ssmdemoartifactId>
    <version>1.0-SNAPSHOTversion>
    <packaging>warpackaging>
    <name>ssmdemo Maven Webappname>

    <url>http://www.example.comurl>

    <properties>
        <project.build.sourceEncoding>UTF-8project.build.sourceEncoding>
        <maven.compiler.source>1.7maven.compiler.source>
        <maven.compiler.target>1.7maven.compiler.target>

        <spring.version>5.0.5.RELEASEspring.version>
    properties>

    <dependencies>
        <dependency>
            <groupId>junitgroupId>
            <artifactId>junitartifactId>
            <version>4.11version>
            <scope>testscope>
        dependency>

        <dependency>
            <groupId>ch.qos.logbackgroupId>
            <artifactId>logback-classicartifactId>
            <version>1.1.1version>
        dependency>

        <dependency>
            <groupId>jstlgroupId>
            <artifactId>jstlartifactId>
            <version>1.2version>
        dependency>

        <dependency>
            <groupId>org.springframeworkgroupId>
            <artifactId>spring-contextartifactId>
            <version>${spring.version}version>
        dependency>
        <dependency>
            <groupId>org.springframeworkgroupId>
            <artifactId>spring-coreartifactId>
            <version>${spring.version}version>
        dependency>
        <dependency>
            <groupId>org.springframeworkgroupId>
            <artifactId>spring-beansartifactId>
            <version>${spring.version}version>
        dependency>
        <dependency>
            <groupId>org.springframeworkgroupId>
            <artifactId>spring-context-supportartifactId>
            <version>${spring.version}version>
        dependency>
        <dependency>
            <groupId>org.springframeworkgroupId>
            <artifactId>spring-aopartifactId>
            <version>${spring.version}version>
        dependency>
        <dependency>
            <groupId>org.springframeworkgroupId>
            <artifactId>spring-aspectsartifactId>
            <version>${spring.version}version>
        dependency>
        <dependency>
            <groupId>org.springframeworkgroupId>
            <artifactId>spring-expressionartifactId>
            <version>${spring.version}version>
        dependency>
        <dependency>
            <groupId>org.springframeworkgroupId>
            <artifactId>spring-jdbcartifactId>
            <version>${spring.version}version>
        dependency>
        <dependency>
            <groupId>org.springframeworkgroupId>
            <artifactId>spring-ormartifactId>
            <version>${spring.version}version>
        dependency>
        <dependency>
            <groupId>org.springframeworkgroupId>
            <artifactId>spring-txartifactId>
            <version>${spring.version}version>
        dependency>
        <dependency>
            <groupId>org.springframeworkgroupId>
            <artifactId>spring-webartifactId>
            <version>${spring.version}version>
        dependency>
        <dependency>
            <groupId>org.springframeworkgroupId>
            <artifactId>spring-webmvcartifactId>
            <version>${spring.version}version>
        dependency>

        <dependency>
            <groupId>mysqlgroupId>
            <artifactId>mysql-connector-javaartifactId>
            <version>5.1.31version>
        dependency>
        <dependency>
            <groupId>com.mchangegroupId>
            <artifactId>c3p0artifactId>
            <version>0.9.5.2version>
        dependency>

        <dependency>
            <groupId>org.mybatisgroupId>
            <artifactId>mybatisartifactId>
            <version>3.4.6version>
        dependency>

        <dependency>
            <groupId>org.mybatisgroupId>
            <artifactId>mybatis-springartifactId>
            <version>1.3.2version>
        dependency>


        <dependency>
            <groupId>javax.servletgroupId>
            <artifactId>javax.servlet-apiartifactId>
            <version>4.0.1version>
            <scope>providedscope>
        dependency>

        <dependency>
            <groupId>com.alibabagroupId>
            <artifactId>fastjsonartifactId>
            <version>1.2.47version>
        dependency>
    dependencies>
     <build>
        <finalName>ssmdemofinalName>
        <pluginManagement>
            <plugins>
                <plugin>
                    <artifactId>maven-clean-pluginartifactId>
                    <version>3.1.0version>
                plugin>

                <plugin>
                    <artifactId>maven-resources-pluginartifactId>
                    <version>3.0.2version>
                plugin>
                <plugin>
                <artifactId>maven-compiler-pluginartifactId>
                    <version>3.8.0version>
                plugin>
                <plugin>
                    <artifactId>maven-surefire-pluginartifactId>
                    <version>2.22.1version>
                plugin>
                <plugin>
                <artifactId>maven-war-pluginartifactId>
                    <version>3.2.2version>
                plugin>
                <plugin>
                    <artifactId>maven-install-pluginartifactId>
                    <version>2.5.2version>
                plugin>
                <plugin>
                <artifactId>maven-deploy-pluginartifactId>
                    <version>2.8.2version>
                plugin>
            plugins>
        pluginManagement>
    build>
project>
当你依赖导入之后右下角会出现是否引入,选择import program即可。
- 依赖导入之后,开始编写配置文件
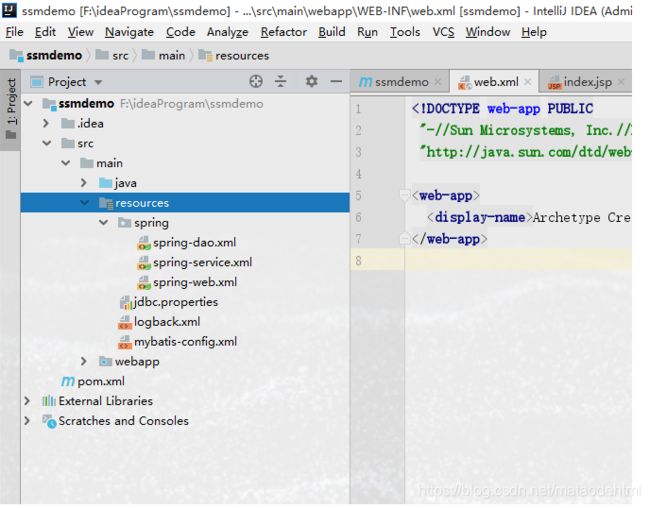
在你导入成功spring依赖后,在resources先创建一个spring的文件夹,我们把配置的spring都放在spring文件夹下。
然后在spring下右键new->XML Configuration File->Spring Config。
注意:如果你的选择项中没有Spring config说明你的spring依赖没有导入成功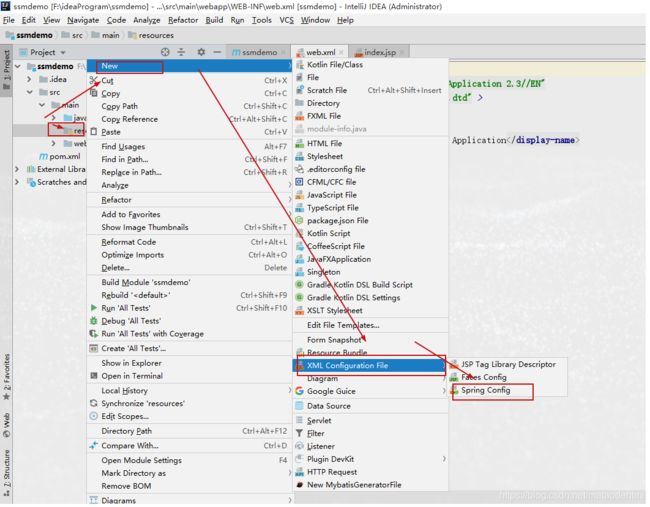
然后创建名为spring-dao.xml,spring-service.xml,spring-web.xml三个配置文件。(这里的名字可以随意),并在resources下创建mysql连接的文件jdbc.properties文件
文件内容:
jdbc.driver=com.mysql.jdbc.Driver
jdbc.url=jdbc:mysql://localhost:3306/mark?useUnicode=true&characterEncoding=utf8
jdbc.username=root
jdbc.password=123456
然后在resources下创建mybatis配置文件mybatis-config.xml,并写入内容:
<configuration>
<settings>

        <setting name="lazyLoadingEnabled" value="true" />
        <setting name="aggressiveLazyLoading" value="false" />

        <setting name="useGeneratedKeys" value="true" />

        <setting name="useColumnLabel" value="true" />


        <setting name="mapUnderscoreToCamelCase" value="true" />
    settings>
configuration>
继续在resources下创建日志文件logback.xml
<configuration debug="true">
    <appender name="STDOUT" class="ch.qos.logback.core.ConsoleAppender">

        <encoder>
                 <pattern>%d{HH:mm:ss.SSS} [%thread] %-5level %logger{36} - %msg%npattern>
        encoder>
    appender>

    <root level="debug">
        <appender-ref ref="STDOUT" />
    root>
configuration>
- 编写spring配置文件内容
首先编写spring-dao.xml的内容
<beans xmlns="http://www.springframework.org/schema/beans"
       xmlns:xsi="http://www.w3.org/2001/XMLSchema-instance" xmlns:context="http://www.springframework.org/schema/context"
       xsi:schemaLocation="http://www.springframework.org/schema/beans
       	http://www.springframework.org/schema/beans/spring-beans.xsd
	http://www.springframework.org/schema/context
	http://www.springframework.org/schema/context/spring-context.xsd">


    <context:property-placeholder location="classpath:jdbc.properties" />


    <bean id="dataSource" class="com.mchange.v2.c3p0.ComboPooledDataSource">

        <property name="driverClass" value="${jdbc.driver}" />
        <property name="jdbcUrl" value="${jdbc.url}" />
        <property name="user" value="${jdbc.username}" />
        <property name="password" value="${jdbc.password}" />

        <property name="maxPoolSize" value="30" />
        <property name="minPoolSize" value="10" />

        <property name="autoCommitOnClose" value="false" />

        <property name="checkoutTimeout" value="10000" />

        <property name="acquireRetryAttempts" value="2" />
        bean>


    <bean id="sqlSessionFactory" class="org.mybatis.spring.SqlSessionFactoryBean">

        <property name="dataSource" ref="dataSource" />

        <property name="configLocation" value="classpath:mybatis-config.xml" />

        <property name="typeAliasesPackage" value="com.ssm.entity" />

        <property name="mapperLocations" value="classpath:com/ssm/entity/*/*.xml" />
         bean>


    <bean class="org.mybatis.spring.mapper.MapperScannerConfigurer">

        <property name="sqlSessionFactoryBeanName" value="sqlSessionFactory" />

        <property name="basePackage" value="com.ssm.mapper" />
    bean>
    beans>
当你加入以上代码的时候可以会有红的报错,
classpath:com/ssm/entity//.xml。因为还没有.xml文件,所在暂时先不用管
继续配置spring-service.xml内容
<beans xmlns="http://www.springframework.org/schema/beans"
       xmlns:xsi="http://www.w3.org/2001/XMLSchema-instance"
       xmlns:context="http://www.springframework.org/schema/context"
        xmlns:tx="http://www.springframework.org/schema/tx"
       xsi:schemaLocation="http://www.springframework.org/schema/beans
	http://www.springframework.org/schema/beans/spring-beans.xsd
	http://www.springframework.org/schema/context
	http://www.springframework.org/schema/context/spring-context.xsd
	http://www.springframework.org/schema/tx
	http://www.springframework.org/schema/tx/spring-tx.xsd">

    <context:component-scan base-package="com.ssm.service" />

    <context:property-placeholder location="classpath:jdbc.properties" />

     <bean id="dataSource" class="com.mchange.v2.c3p0.ComboPooledDataSource">

        <property name="driverClass" value="${jdbc.driver}" />
        <property name="jdbcUrl" value="${jdbc.url}" />
        <property name="user" value="${jdbc.username}" />
        <property name="password" value="${jdbc.password}" />

        <property name="maxPoolSize" value="30" />
        <property name="minPoolSize" value="10" />

        <property name="autoCommitOnClose" value="false" />

        <property name="checkoutTimeout" value="10000" />

        <property name="acquireRetryAttempts" value="2" />
        bean>

    <bean id="transactionManager"
          class="org.springframework.jdbc.datasource.DataSourceTransactionManager">

        <property name="dataSource" ref="dataSource" />
    bean>


    <tx:annotation-driven transaction-manager="transactionManager" />
beans>
配置spring-web.xml
<beans xmlns="http://www.springframework.org/schema/beans"
       xmlns:xsi="http://www.w3.org/2001/XMLSchema-instance"
       xmlns:context="http://www.springframework.org/schema/context"
       xmlns:mvc="http://www.springframework.org/schema/mvc"
       xsi:schemaLocation="http://www.springframework.org/schema/beans
	http://www.springframework.org/schema/beans/spring-beans.xsd
	http://www.springframework.org/schema/context
	http://www.springframework.org/schema/context/spring-context.xsd
	http://www.springframework.org/schema/mvc
	http://www.springframework.org/schema/mvc/spring-mvc-3.0.xsd">


    <mvc:annotation-driven />


    <mvc:default-servlet-handler/>


    <bean class="org.springframework.web.servlet.view.InternalResourceViewResolver">
        <property name="viewClass" value="org.springframework.web.servlet.view.JstlView" />
        <property name="prefix" value="/WEB-INF/jsp/" />
        <property name="suffix" value=".jsp" />
    bean>

    <context:component-scan base-package="com.ssm.controller" />
beans>
以上的spring配置就结束了,然后将spring配置文件挂载到服务启动的时候。
配置web.xml
<web-app>
  <display-name>Archetype Created Web Applicationdisplay-name>

    <servlet>
        <servlet-name>SpringDispatcherServletservlet-name>
        <servlet-class>org.springframework.web.servlet.DispatcherServletservlet-class>
        <init-param>
            <param-name>contextConfigLocationparam-name>

            <param-value>classpath:spring/spring-*.xmlparam-value>
        init-param>
    servlet>
    <servlet-mapping>
        <servlet-name>SpringDispatcherServletservlet-name>
        <url-pattern>/url-pattern>
    servlet-mapping>


    <welcome-file-list>
        <welcome-file>/WEB-INF/jsp/index.jspwelcome-file>
    welcome-file-list>
web-app>
以上ssm整合就已经完全结束了
- ssm整合结束,接下面我们看案例,看整合效果
- 配置tomcat服务
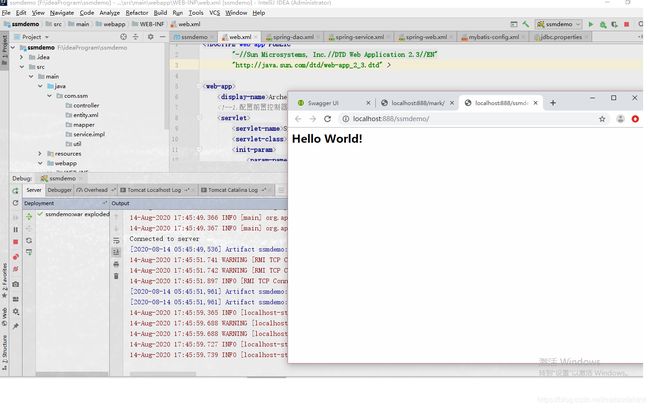
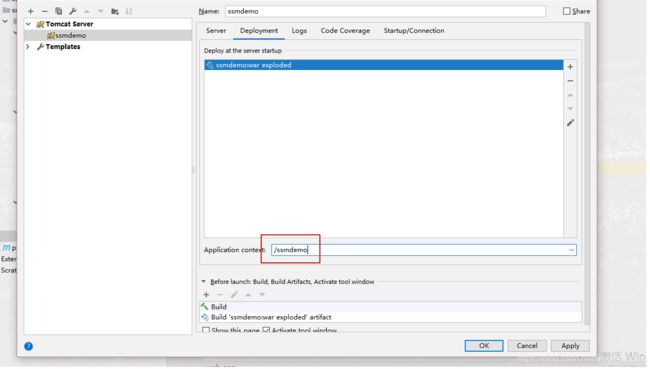
依次点击右上角Add Configuration->±>Tomcat server->local,然后输入服务名,选择Deployment点击+点击Artifact然后选择后缀为exploded的,然后修改Application context的值将后缀去掉,当然也可以不修改。然后点击ok即可。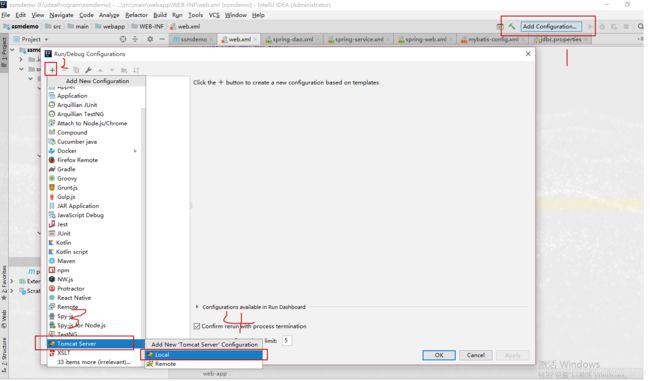

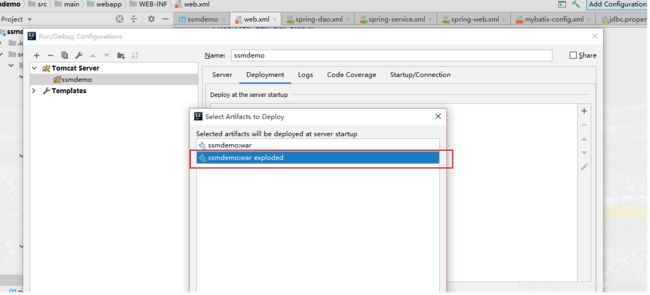
千万不要以为这就完了 因为我们还没有连接数据库,测试流程,现在只是简单的欢迎页面,下面我自己尝试有不少的坑。所以请继续看下去!!!
- 创建案例流程:
- 在你自己配置的数据库中创建一个数据库(我这里创建了一个名为mark),并创建一个表(file),字段随便吧 我这里写了四个字段。
- 然后在对应的项目包下创建对应的实体,接口以及mapper等,我这里直接使用MybatisCodeHelperPro插件直接生成mapper,实体,接口和xml等,安装教程查看https://blog.csdn.net/mataodehtml/article/details/108018023
自动生成后的文件(这里我们测试只能到一个根据主键查询的,所以我将多余的删除了):
entity:
package com.pdf.entity;

/**
 * @anther mt
 * @creater 2020-08-14 14:03
 */
public class File {
    /**
     * 上传的文件
     */
    private Integer id;

    /**
     * 文件名称
     */
    private String filename;

    /**
     * 文件地址
     */
    private String fileurl;/**
     * 是否删除(0否 1是)
     */
    private Integer isdel;

    public Integer getId() {
        return id;
    }

    public void setId(Integer id) {
        this.id = id;
    }

    public String getFilename() {
        return filename;
    }public void setFilename(String filename) {
        this.filename = filename;
    }

    public String getFileurl() {
        return fileurl;
    }

    public void setFileurl(String fileurl) {
        this.fileurl = fileurl;
    }

    public Integer getIsdel() {
        return isdel;
    }

    public void setIsdel(Integer isdel) {
        this.isdel = isdel;
    }
}
xml:
<mapper namespace="com.ssm.mapper.FileMapper">
  <resultMap id="BaseResultMap" type="com.ssm.entity.File">


    <id column="id" jdbcType="INTEGER" property="id" />
    <result column="filename" jdbcType="VARCHAR" property="filename" />
    <result column="fileurl" jdbcType="VARCHAR" property="fileurl" />
    <result column="isdel" jdbcType="INTEGER" property="isdel" />
  resultMap>
  <sql id="Base_Column_List">

    id, filename, fileurl, isdel
  sql>
  <select id="selectByPrimaryKey" parameterType="java.lang.Integer" resultMap="BaseResultMap">

    select
    <include refid="Base_Column_List" />
    from file
    where id = #{id,jdbcType=INTEGER}
  select>
mapper>
mapper:
package com.ssm.mapper;

import com.ssm.entity.File;

/**
*   @anther  mt
*   @creater 2020-08-15 9:24
*/
public interface FileMapper {
    File selectByPrimaryKey(Integer id);
}
service:
package com.ssm.service;

import com.ssm.entity.File;
    /**
*   @anther  mt
*   @creater 2020-08-15 9:24
*/
public interface FileService{

    File selectByPrimaryKey(Integer id);

}
service.impl:
package com.ssm.service.impl;

import org.springframework.stereotype.Service;
import javax.annotation.Resource;
import com.ssm.mapper.FileMapper;
import com.ssm.entity.File;
import com.ssm.service.FileService;
/**
*   @anther  mt
*   @creater 2020-08-15 9:24
*/
@Service
public class FileServiceImpl implements FileService{
    @Resource
    private FileMapper fileMapper;
    @Override
    public File selectByPrimaryKey(Integer id) {
        return fileMapper.selectByPrimaryKey(id);
    }
}
- 然后编写一个用于测试的controller(FileController)
package com.ssm.controller;

import com.ssm.entity.File;
import com.ssm.service.FileService;
import org.springframework.stereotype.Controller;
import org.springframework.web.bind.annotation.RequestMapping;

import javax.annotation.Resource;
import javax.servlet.http.HttpServletRequest;
/**
 * @anther mt
 * @creater 2020-08-15 9:39
 */
@Controller
@RequestMapping("/file")
public class FileController {

    @Resource
    private FileService fileService;

    @RequestMapping("getDataById")
    public String getDataById(HttpServletRequest request){
        Integer id = 1;
        File file = fileService.selectByPrimaryKey(id);
        request.setAttribute("file",file);
        return "show";
    }

}
- 对应的我们在jsp文件夹下创建一个叫show的jsp文件,并使用jsp内置作用域展示request中的对象
show.jsp
<%@ page contentType="text/html;charset=UTF-8" language="java" %>
<html>
<head>
    <title>Titletitle>
head>
<body>
<h3>展示数据h3>
    <div>文件id:${file.id}div>
    <div>文件名称:${file.filename}div>
    <div>文件地址:${file.fileurl}div>
body>
html>
***6. 然后根据我们的controller书写的方式去访问controller,访问后将出现第一个坑,报错了:***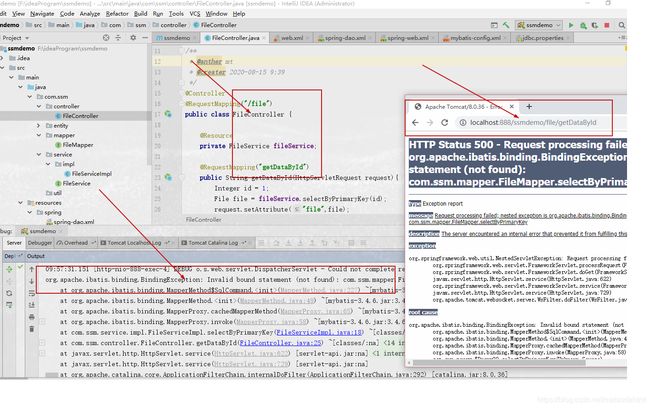
报错原因:mapper默认是在resources中的,所以编译的时候无法编译到entity下的xml文件,这样就会找不到对应的接口,你可以查看下对应的target中就会发现没有打包出xml文件。
解决方案:我们需要在pom加入对xml的扫描,放在bulid标签下面
    <resources>
      <resource>
        <directory>src/main/javadirectory>
        <includes>
          <include>**/*.xmlinclude>
        includes>
        <filtering>falsefiltering>
      resource>
    resources>
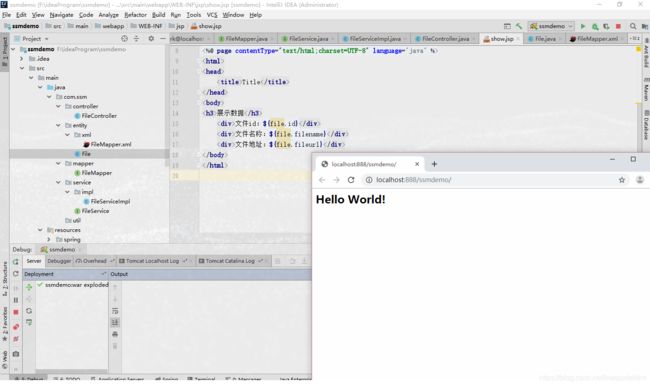
然后我们重启一下,重启访问,你会发现没有报错了,但是又出现了另一个问题:页面没有解析jsp内置作用域。
效果:
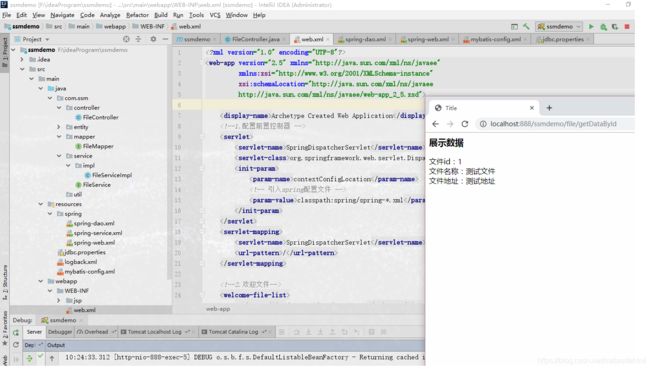
我也是查了很多方案,才知道的。我们现在使用的web.xml是自动生成的,我们只需要将web.xml的这些
改成
<web-app version="2.5" xmlns="http://java.sun.com/xml/ns/javaee"
         xmlns:xsi="http://www.w3.org/2001/XMLSchema-instance"
         xsi:schemaLocation="http://java.sun.com/xml/ns/javaee
         http://java.sun.com/xml/ns/javaee/web-app_2_5.xsd">
大功告成!!!!
