Spring boot 实战指南(二):Mybatis、动态绑定、多数据源、分页插件、Mybatis-Plus
文章目录
- 一、整合Mybatis
-
- 1.搭建数据库环境
- 2.基于注解整合Mybatis
-
- (1)创建项目
- (2)具体代码实现
- (3)测试
- 3.基于xml整合Mybatis
- 4.Mybatis的动态SQL
-
- (1)if
- (2)choose
- (3)trim、where、set
- (4)foreach
- (5)bind
- 二、整合 Mybatis 多数据源
-
- 1.数据库环境搭建
- 2.实体类
- 3.在application.yml配置数据源
- 4.配置类配置数据源
- 5.配置类配置 Mybatis
- 6.编写 Dao接口和 SQL 映射文件
- 7.编写controller
- 8.测试
- 三、整合分页插件 PageHelper
-
- 1.搭建数据库、项目配置
- 2.添加依赖
- 3.在代码中使用PageHelper
-
- (1)entity
- (2)dao
- (3)controller
- (4)测试
- (5)返回类PageInfo
- 四、整合 Mybatis-Plus
-
- 1.数据库搭建、配置
- 2.添加依赖
- 3.代码实现
-
- (1)entity
- (2)dao
- (3)service
- (4)config
-
- 配置分页插件
- 条件构造器
- (5)controller
- 4.测试
Mybatis在整个体系中的作用是负责连接并访问数据库层。搞过开发的同学都知道,没有数据库的项目一无是处,所以Mybatis的学习是很有必要的。
准备工作:
- 数据库:在进入正式学习前,先确保Mysql已经在电脑上安装好了,最好再安装一个可视化管理工具Navicat Premium for mysql。当然,你还要会mysql的语法和基本操作等。
- spring boot项目创建以及一些前置知识:可以看我上一篇博客
一、整合Mybatis
整合Mybatis可以基于注解,也可以基于xml文件,二者的区别:
1.搭建数据库环境
新建一个数据库boot_demo,然后执行以下sql语句:
-- 创建表
USE `boot_demo`;
DROP TABLE IF EXISTS `tb_user`;
CREATE TABLE `tb_user`  (
  `user_id` int(11) NOT NULL ,
  `user_name` varchar(20)  DEFAULT NULL,
  `user_age` int(11)  DEFAULT NULL,
   PRIMARY KEY (`user_id`)
) ENGINE = InnoDB;

-- 插入数据
REPLACE INTO `tb_user` (`user_id`, `user_name`, `user_age`) VALUES ('100', 'test01', '100');
2.基于注解整合Mybatis
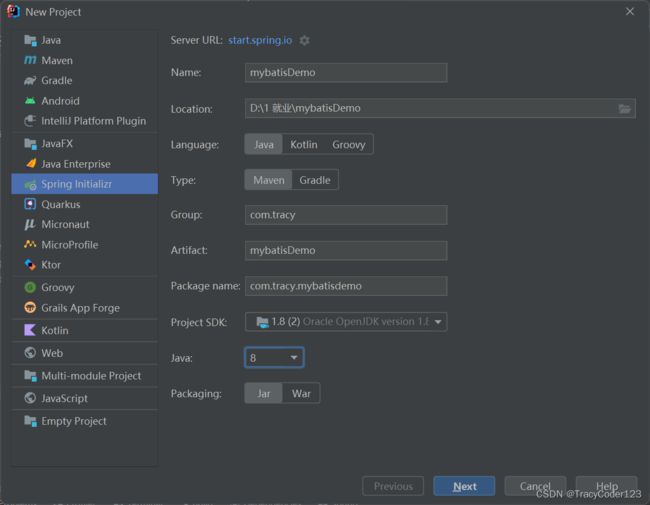
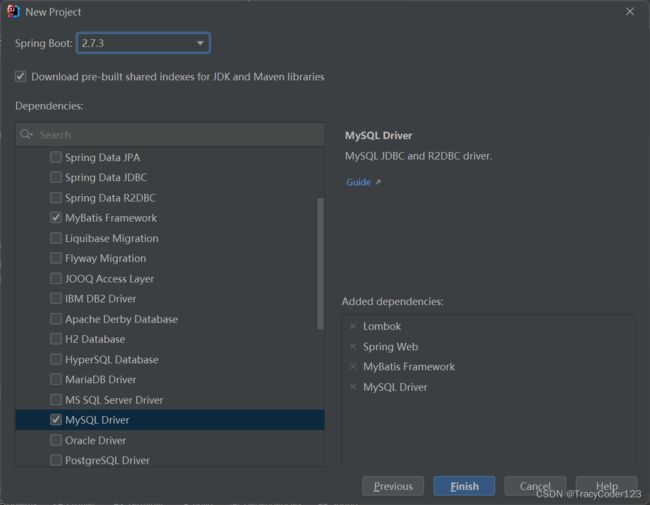
(1)创建项目
项目信息填写如下:
选择初始依赖:
完善目录结构:
在main/java/com/tracy/mybatisdemo下依次新建 entity 、dao 和 controller 文件夹。一般来说,应该再创建一个service包,前端调用controller接口,controller调用service,service再调用dao,但这章为了简化操作省去了service部分,到后面项目实战的时候我会创建更完善的目录结构。
(2)具体代码实现
- 实体类User:
在entity包下创建User类,代码如下:
package com.tracy.mybatisdemo.entity;

import lombok.Data;

//此注解来源于Lombok插件,运行时会自动为类添加 Getter、Setter 、有参构造、toString 、equals 和 hashCode 方法
@Data
public class User {
    private Integer userId;
    private String userName;
    private Integer userAge;
}
- 持久层UserDao接口:
在dao包下创建UserDao接口:
package com.tracy.mybatisdemo.dao;

import com.tracy.mybatisdemo.entity.User;
import org.apache.ibatis.annotations.*;
import org.springframework.stereotype.Repository;

import java.util.List;

@Repository
public interface UserDao {
    @Select("select user_id,user_name,user_age from tb_user")
    List<User> findAll();

    @Select("select user_id,user_name,user_age from tb_user where user_id = #{userId}")
    User findById(Integer userId);

    @Insert("insert into tb_user (user_id,user_name,user_age) values (#{userId},#{userName},#{userAge})")
    Integer insert(User user);

    @Update("update tb_user set user_name=#{userName},user_age=#{userAge} where user_id = #{userId}")
    Integer update(User user);

    @Delete("delete from tb_user where user_id=#{userId}")
    Integer delete(Integer userId);
}
- 配置包扫描:
为了使每个dao接口都被扫描到,可以在每个dao接口上加上@Mapper注解,但当dao接口比较多的时候,推荐直接在启动类上通过注解@MapperScan("com.tracy.mybatisdemo.dao")的形式扫描整个dao包:
@SpringBootApplication
@MapperScan("com.tracy.mybatisdemo.dao")
public class MybatisDemoApplication {

    public static void main(String[] args) {
        SpringApplication.run(MybatisDemoApplication.class, args);
    }

}
- 控制层UserController类:
在controller包下创建UserController类:
package com.tracy.mybatisdemo.controller;

import com.tracy.mybatisdemo.dao.UserDao;
import com.tracy.mybatisdemo.entity.User;
import org.springframework.beans.factory.annotation.Autowired;
import org.springframework.web.bind.annotation.*;

import java.util.List;

@RestController
@RequestMapping("/user")
public class UserController {
    @Autowired
    private UserDao userDao;

    @GetMapping("/findAll")
    public List<User> findAll(){
        return userDao.findAll();
    }

    @GetMapping("/findById")
    public User findById(Integer userId){
        return userDao.findById(userId);
    }

    @PostMapping("/insert")
    public String insert(User user){
        userDao.insert(user);
        return "插入成功后的数据为" + userDao.findById(user.getUserId());
    }

    @PutMapping("/update")
    public String update(User user){
        userDao.update(user);
        return "更新成功后的数据为" + userDao.findById(user.getUserId());
    }

    @DeleteMapping("/delete")
    public String delete(Integer userId){
        userDao.delete(userId);
        return "删除成功的id" + userId;
    }
}
- 添加数据库配置:
在application.yml中添加以下配置:
# 数据源
spring:
  datasource:
    driver-class-name: com.mysql.cj.jdbc.Driver
    url: jdbc:mysql://localhost:3306/boot_demo?serverTimezone=UTC&useUnicode=true&characterEncoding=utf-8
    username: root
    password: 你的密码

# Mybatis配置
# 开启驼峰式命名规则自动转换
mybatis:
  configuration:
    map-underscore-to-camel-case: true
(3)测试
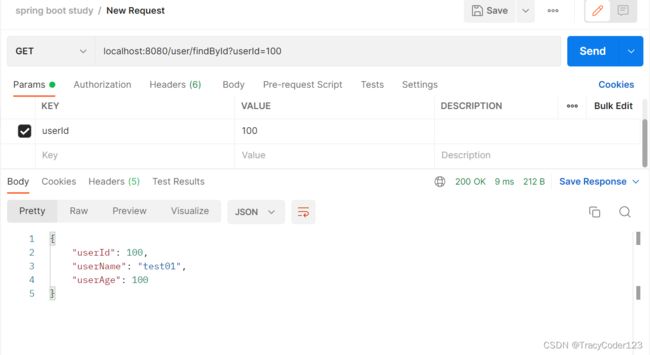
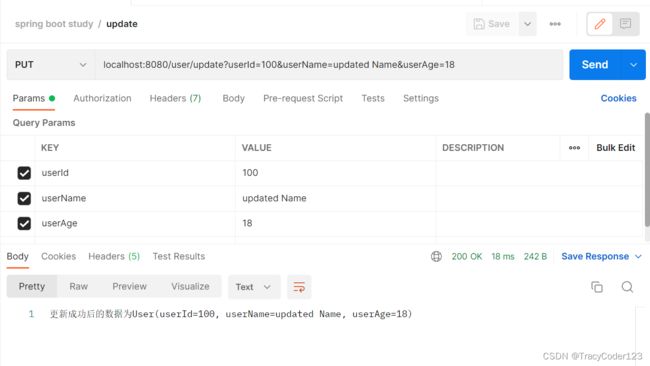
测试工具我使用的是postman,怎么安装和使用可以网上百度一下。
- 测试 localhost:8080/user/findAll GET
- 测试 localhost:8080/user/findById GET
- 测试 localhost:8080/user/insert POST
- 测试 localhost:8080/user/update PUT
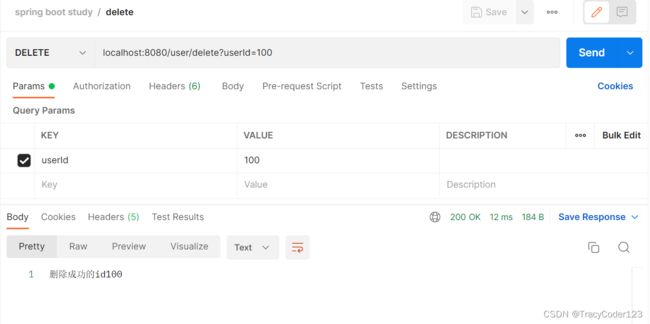
- 测试 localhost:8080/user/delete DELETE
成功!
3.基于xml整合Mybatis
基于注解的Mybatis使用只能应付一些比较简单的数据库查询语句,虽然省事,但在一定程度上也丧失了灵活性,因此,有必要学习一下基于xml整合Mybatis。
- 首先,请先删除UserDao接口中每个方法上的注解语句:
package com.tracy.mybatisdemo.dao;

import com.tracy.mybatisdemo.entity.User;
import org.springframework.stereotype.Repository;

import java.util.List;

@Repository
public interface UserDao {
    List<User> findAll();

    User findById(Integer userId);

    Integer insert(User user);

    Integer update(User user);

    Integer delete(Integer userId);
}
- 添加xml映射文件:
在resources目录下创建目录mapper,仔仔mapper目录下创建UserMapper.xml文件:
注意 mapper namespace=“com.tracy.mybatisdemo.dao.UserDao” 一定要与dao包下的接口对应起来。
<?xml version="1.0" encoding="UTF-8"?>
<!DOCTYPE mapper PUBLIC "-//mybatis.org//DTD Mapper 3.0//EN" "http://mybatis.org/dtd/mybatis-3-mapper.dtd">
<mapper namespace="com.tracy.mybatisdemo.dao.UserDao">
    <!--查询所有用户-->
    <select id="findAll" resultType="user">
        select * from tb_user
    </select>
    <!--根据id查询单个用户-->
    <select id="findById" parameterType="int" resultType="user">
        select * from tb_user where user_id = #{userId}
    </select>
    <!--插入用户-->
    <insert id="insert" parameterType="user">
        insert into tb_user (user_id,user_name,user_age) values (#{userId},#{userName},#{userAge})
    </insert>
    <!--更新用户信息-->
    <update id="update" parameterType="map">
        update tb_user set user_name = #{userName}, user_age = #{userAge}
        where user_id = #{userId}
    </update>
    <!--删除用户-->
    <delete id="delete" parameterType="int">
        delete from tb_user where user_id = #{userId}
    </delete>
</mapper>
- 添加Mybatis实体映射配置:
在application.yml配置文件中增加mybatis部分的配置:
# Mybatis配置
# 开启驼峰式命名规则自动转换
mybatis:
  configuration:
    map-underscore-to-camel-case: true
  type-aliases-package: com.tracy.mybatisdemo.entity
  mapper-locations: classpath:mapper/*Mapper.xml
type-aliases-package: com.tracy.mybatisdemo.entity 表示将UserMapper.xml中的resultType与com.tracy.mybatisdemo.entity包下的实体类绑定起来,否则UserMapper.xml中的resultType需要写上完整的包名com.tracy.mybatisdemo.entity.user。
*mapper-locations: classpath:mapper/Mapper.xml 表示将dao路径下的各个接口与resources/mapper路径下的各个xml文件映射起来,classpath等价于resources目录。
- 测试:
前面已经演示过了,url和过程都是一模一样的,请用postman或者别的测试工具自行测试吧。
4.Mybatis的动态SQL
(1)if
if 在 where 子句中做简单的条件判断。
我们以UserMapper.xml中的update方法的实现为例:
- 原来的写法:
当我们调用这个接口时,必须把用户名、用户年龄参数都传入,也就是说我们必须修改每一个属性值。但是如果我们只想选择性地修改属性值呢,比如,有时候我们只想修改user_name,有时候又只想修改user_age。
    <!--更新用户信息-->
    <update id="update" parameterType="map">
        update tb_user set user_name = #{userName}, user_age = #{userAge}
        where user_id = #{userId}
    </update>
- 使用if进行动态SQL绑定:
我们为每个参数的传入加上一个if判断,test="user_name!=null"表明了它的判断条件,只有当该参数传入不为空时才进行修改,这就是一种动态绑定的策略。
    <!--更新用户信息-->
    <update id="update" parameterType="map">
        update tb_user set user_id = #{userId}
        <if test="userName!=null">
            user_name = #{userName}
        </if>
        <if test="userAge!=null">
            user_age = #{userAge}
        </if>
        where user_id = #{userId}
    </update>
(2)choose
相当于java语言中的Switch语句。
- 仍以update方法为例:
每个when语句都是一个条件,第一个条件满足了就跳出choose语句,否则判断下一个when条件。如果所有的when条件都不满足,就直接选择otherwise中的条件。
    <!--更新用户信息-->
    <update id="update" parameterType="map">
        update tb_user set
        <choose>
            <when test="userName!=null">
                user_name = #{userName}
            </when>
            <when test="userAge!=null">
                user_age = #{userAge}
            </when>
            <otherwise>
                user_id = #{userId}
            </otherwise>
        </choose>
        where user_id = #{userId}
    </update>
(3)trim、where、set
- trim:
先来看看这个语句,如果两个if条件都不成立,那sql语句就会变成update tb_user set where user_id = #{userId},这就会导致语法上的错误:
    <!--更新用户信息-->
    <update id="update" parameterType="map">
        update tb_user set
        <if test="userName!=null">
            user_name = #{userName}
        </if>
        <if test="userAge!=null">
            user_age = #{userAge}
        </if>
        where user_id = #{userId}
    </update>
使用trim语句,prefix表示整个trim语句的前缀是set,suffixOverrides属性表示消除每个子句末尾可能会带来的冗余符号(不冗余则不消除),prefixOverrides消除的是子句头部的冗余:
    <!--更新用户信息-->
    <update id="update" parameterType="map">
        update tb_user
        <trim prefix="set" suffixOverrides=",">
            <if test="userName!=null">
                user_name = #{userName},
            </if>
            <if test="userAge!=null">
                user_age = #{userAge},
            </if>
        </trim>
        where user_id = #{userId}
    </update>
- 可使用专门的set语句:
    <!--更新用户信息-->
    <update id="update" parameterType="map">
        update tb_user
        <set>
            <if test="userName!=null">
                user_name = #{userName}
            </if>
            <if test="userAge!=null">
                user_age = #{userAge}
            </if>
            <if test="userId!=null">
                user_id = #{userId}
            </if>
        </set>
        where user_id = #{userId}
    </update>
- 可使用专门的where语句:
在where元素中至少有一个if子句成立;where元素能智能地处理 and 和 or 条件。
<!--更新用户信息-->
    <update id="update" parameterType="map">
        update tb_user
        <trim prefix="set" suffixOverrides=",">
            <if test="userName!=null">
                user_name = #{userName},
            </if>
            <if test="userAge!=null">
                user_age = #{userAge},
            </if>
            <if test="userId!=null">
                user_id = #{userId},
            </if>
        </trim>
        <where>
            <if test="userId!=null">
                user_id = #{userId},
            </if>
        </where>
(4)foreach
当需要对一个集合进行遍历时,foreach 元素是很有用的,尤其在 in 语句查询时特别有用。
这部分看这两篇博客:1、2
(5)bind
这部分看这篇:这里
二、整合 Mybatis 多数据源
如果开发人员配置了多个数据源,那么 Spring Boot 中 DataSource 和 Mybatis 的自动配置类将不会再生效。
1.数据库环境搭建
创建数据库dabase1后执行:
use `database1`;
-- ----------------------------
-- Table structure for teacher
-- ----------------------------
DROP TABLE IF EXISTS `teacher`;
CREATE TABLE `teacher` (
  `id` int(11) NOT NULL COMMENT '教师编号',
  `name` varchar(50) DEFAULT NULL COMMENT '教师姓名',
  `course` varchar(50) DEFAULT NULL COMMENT '所教课程',
  PRIMARY KEY (`id`)
) ENGINE=InnoDB DEFAULT CHARSET=utf8;

-- ----------------------------
-- Records of teacher
-- ----------------------------
INSERT INTO `teacher` VALUES ('1', 'teacher01', 'C语言');
INSERT INTO `teacher` VALUES ('2', 'teacher02', 'Java');
创建数据库dabase2后执行:
USE `database2`;
-- ----------------------------
-- Table structure for student
-- ----------------------------
DROP TABLE IF EXISTS `student`;
CREATE TABLE `student` (
  `id` int(11) NOT NULL COMMENT '学号',
  `name` varchar(50) DEFAULT NULL COMMENT '学生姓名',
  `age` int(11) DEFAULT NULL COMMENT '年龄',
  PRIMARY KEY (`id`)
) ENGINE=InnoDB DEFAULT CHARSET=utf8;

-- ----------------------------
-- Records of student
-- ----------------------------
INSERT INTO `student` VALUES ('1', 'student01', '20');
INSERT INTO `student` VALUES ('2', 'student02', '22');
2.实体类
在entity包下创建两个实体类:
package com.tracy.mybatisdemo.entity;

import lombok.Data;

@Data
public class Teacher {
    private Integer id;
    private String name;
    /**
     * 所教课程
     */
    private String course;
}
package com.tracy.mybatisdemo.entity;

import lombok.Data;

@Data
public class Student {
    private Integer id;
    private String name;
    private Integer age;
}
3.在application.yml配置数据源
spring:
  datasource:
#    datasource01
    database1:
      driver-class-name: com.mysql.cj.jdbc.Driver
      jdbc-url: jdbc:mysql://localhost:3306/database1?serverTimezone=UTC&useUnicode=true&characterEncoding=utf-8
      username: root
      password:
#    datasource01
    database2:
      driver-class-name: com.mysql.cj.jdbc.Driver
      jdbc-url: jdbc:mysql://localhost:3306/database2?serverTimezone=UTC&useUnicode=true&characterEncoding=utf-8
      username: root
      password:
4.配置类配置数据源
在config包下创建DatasourceConfig类:
package com.tracy.mybatisdemo.config;

import org.springframework.boot.context.properties.ConfigurationProperties;
import org.springframework.boot.jdbc.DataSourceBuilder;
import org.springframework.context.annotation.Bean;
import org.springframework.context.annotation.Configuration;
import org.springframework.context.annotation.Primary;

import javax.sql.DataSource;

/**
 * 根据配置文件中的属性值配置两个数据源datasource01和datasource02
 */
@Configuration
public class DatasourceConfig {

    /**
     * 实例化数据源 datasource01
     */
    @Bean("datasource01")
    // 设置该数据源为默认数据源
    @Primary
    // 以spring.datasource.database1为前缀的属性值自动绑定到对应的字段中
    @ConfigurationProperties(prefix = "spring.datasource.database1")
    public DataSource getDatasource01() {
        return DataSourceBuilder.create().build();
    }

    /**
     * 实例化数据源 datasource02
     */
    @Bean("datasource02")
    @ConfigurationProperties(prefix = "spring.datasource.database2")
    public DataSource getDatasource02() {
        return DataSourceBuilder.create().build();
    }
}
@Primary 注解指定默认数据源,它是必要的,否则会报错。
5.配置类配置 Mybatis
给每一个数据源都创建 SqlSessionFactory 和 SqlSession 。
- 数据源1:
在config包下创建SqlSessionConfig01类:
package com.tracy.mybatisdemo.config;

import org.apache.ibatis.session.SqlSessionFactory;
import org.mybatis.spring.SqlSessionFactoryBean;
import org.mybatis.spring.SqlSessionTemplate;
import org.mybatis.spring.annotation.MapperScan;
import org.springframework.beans.factory.annotation.Qualifier;
import org.springframework.context.annotation.Bean;
import org.springframework.context.annotation.Configuration;
import org.springframework.context.annotation.Primary;
import org.springframework.core.io.support.PathMatchingResourcePatternResolver;

import javax.sql.DataSource;

/**
 * 根据数据源datasource01配置sqlSessionFactory01和sqlSession01
 */
@Configuration
@MapperScan(basePackages = "com.tracy.mybatisdemo.dao.database1", sqlSessionFactoryRef = "sqlSessionFactory01")
public class SqlSessionConfig01 {

    /**
     * 向容器中实例化sqlSessionFactory01实例
     */
    @Bean("sqlSessionFactory01")
    // 设置为默认SqlSessionFactory
    @Primary
    public SqlSessionFactory getSqlSessionFactory(
            // 根据名称从容器中获取实例
            @Qualifier("datasource01") DataSource dataSource) {
        try {
            // 实例化一个工具类,用来创建SqlSessionFactory
            SqlSessionFactoryBean factoryBean = new SqlSessionFactoryBean();
            factoryBean.setDataSource(dataSource);
            factoryBean.setMapperLocations(
                    // 设置Mybatis的xml文件位置
                    new PathMatchingResourcePatternResolver().getResources("classpath:mapper/database1/*.xml"));
            // 返回创建好的sqlSessionFactory实例
            return factoryBean.getObject();
        } catch (Exception e) {
            e.printStackTrace();
        }
        // 当创建失败时返回null
        return null;
    }

    /**
     * 向容器中实例化sqlSession01实例
     */
    @Bean("sqlSession01")
    // 设置为默认SqlSession
    @Primary
    public SqlSessionTemplate getSqlSession(@Qualifier("sqlSessionFactory01") SqlSessionFactory sqlSessionFactory) {
        // 利用SqlSessionFactory实例构建一个由SpringBoot管理的线程安全的SqlSession
        return new SqlSessionTemplate(sqlSessionFactory);
    }
}
在config包下创建SqlSessionConfig02类:
package com.tracy.mybatisdemo.config;

import org.apache.ibatis.session.SqlSessionFactory;
import org.mybatis.spring.SqlSessionFactoryBean;
import org.mybatis.spring.SqlSessionTemplate;
import org.mybatis.spring.annotation.MapperScan;
import org.springframework.beans.factory.annotation.Qualifier;
import org.springframework.context.annotation.Bean;
import org.springframework.context.annotation.Configuration;
import org.springframework.context.annotation.Primary;
import org.springframework.core.io.support.PathMatchingResourcePatternResolver;

import javax.sql.DataSource;

/**
 * 根据数据源datasource02配置sqlSessionFactory02和sqlSession02
 */
@Configuration
@MapperScan(basePackages = "com.tracy.mybatisdemo.dao.database2", sqlSessionFactoryRef = "sqlSessionFactory02")
public class SqlSessionConfig02 {

    /**
     * 向容器中实例化sqlSessionFactory02实例
     */
    @Bean("sqlSessionFactory02")
    // 设置为默认SqlSessionFactory
    @Primary
    public SqlSessionFactory getSqlSessionFactory(
            // 根据名称从容器中获取实例
            @Qualifier("datasource02") DataSource dataSource) {
        try {
            // 实例化一个工具类,用来创建SqlSessionFactory
            SqlSessionFactoryBean factoryBean = new SqlSessionFactoryBean();
            factoryBean.setDataSource(dataSource);
            factoryBean.setMapperLocations(
                    // 设置Mybatis的xml文件位置
                    new PathMatchingResourcePatternResolver().getResources("classpath:mapper/database2/*.xml"));
            // 返回创建好的sqlSessionFactory实例
            return factoryBean.getObject();
        } catch (Exception e) {
            e.printStackTrace();
        }
        // 当创建失败时返回null
        return null;
    }

    /**
     * 向容器中实例化sqlSession02实例
     */
    @Bean("sqlSession02")
    // 设置为默认SqlSession
    @Primary
    public SqlSessionTemplate getSqlSession(@Qualifier("sqlSessionFactory02") SqlSessionFactory sqlSessionFactory) {
        // 利用SqlSessionFactory实例构建一个由SpringBoot管理的线程安全的SqlSession
        return new SqlSessionTemplate(sqlSessionFactory);
    }
}
6.编写 Dao接口和 SQL 映射文件
- 数据库database1:
在dao包下创建文件夹database1,然后在database1下创建TeacherDao接口:
package com.tracy.mybatisdemo.dao.database1;

import com.tracy.mybatisdemo.entity.Teacher;
import org.springframework.stereotype.Repository;

import java.util.List;

@Repository
public interface TeacherDao {

    List<Teacher> findAll();
}
在 resources/mapper 下新建 database1 文件夹 , 在该文件夹下新建 Mapper 接口同名的映射文件即 TeacherMapper.xml 文件:
<?xml version="1.0" encoding="UTF-8"?>
<!DOCTYPE mapper PUBLIC "-//mybatis.org//DTD Mapper 3.0//EN" "http://mybatis.org/dtd/mybatis-3-mapper.dtd">
<mapper namespace="com.tracy.mybatisdemo.dao.database1.TeacherDao">
    <!--查询所有教师信息-->
    <select id="findAll" resultType="com.tracy.mybatisdemo.entity.Teacher">
        select * from teacher
    </select>
</mapper>
- 数据库database2:
在dao包下创建文件夹database2,然后在database2下创建StudentDao接口:
package com.tracy.mybatisdemo.dao.database2;

import com.tracy.mybatisdemo.entity.Student;
import org.springframework.stereotype.Repository;

import java.util.List;

@Repository
public interface StudentDao {

    List<Student> findAll();

}
在 resources/mapper 下新建 database2 文件夹 , 在该文件夹下新建 Mapper 接口同名的映射文件即 StudentMapper.xml 文件:
<?xml version="1.0" encoding="UTF-8"?>
<!DOCTYPE mapper PUBLIC "-//mybatis.org//DTD Mapper 3.0//EN" "http://mybatis.org/dtd/mybatis-3-mapper.dtd">
<mapper namespace="com.tracy.mybatisdemo.dao.database2.StudentDao">
    <!--查询所有学生信息-->
    <select id="findAll" resultType="com.tracy.mybatisdemo.entity.Student">
        select * from student
    </select>
</mapper>
7.编写controller
在controller包下创建TestController类:
package com.tracy.mybatisdemo.controller;

import com.tracy.mybatisdemo.dao.database1.TeacherDao;
import com.tracy.mybatisdemo.dao.database2.StudentDao;
import com.tracy.mybatisdemo.entity.Student;
import com.tracy.mybatisdemo.entity.Teacher;
import org.springframework.beans.factory.annotation.Autowired;
import org.springframework.web.bind.annotation.GetMapping;
import org.springframework.web.bind.annotation.RestController;

import java.util.List;

@RestController
public class TestController {

    // 从容器中获取teacherMapper(dataSource01操作)
    @Autowired
    private TeacherDao teacherDao;

    // 从容器中获取studentMapper(dataSource02操作)
    @Autowired
    private StudentDao studentDao;

    /**
     * 从database1数据库中查询所有教师信息
     */
    @GetMapping("/teacher")
    public List<Teacher> findAllTeacher() {
        List<Teacher> teachers = teacherDao.findAll();
        return teachers;
    }

    /**
     * 从database2数据库中查询所有学生信息
     */
    @GetMapping("/student")
    public List<Student> findAllStudent() {
        List<Student> students = studentDao.findAll();
        return students;
    }

}
8.测试
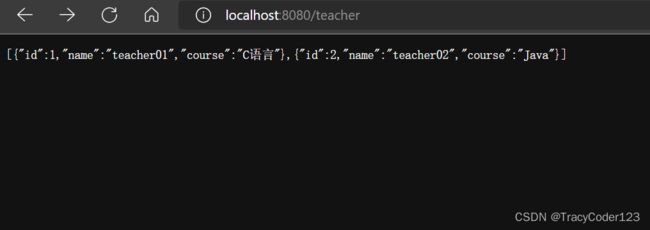
启动项目,然后在浏览器中访问http://localhost:8080/teacher和http://localhost:8080/student。
三、整合分页插件 PageHelper
官方文档参考: 这里
博客参考: 这里
Mybatis 内部其实提供了分页功能。实现原理是将数据一次性查询到内存中,再进行切分,从而实现分页,是一种逻辑分页方式。当数据量过大的时候,一次性读取数据对数据库和程序的性能都有很大的影响,因此这种方式不推荐使用。
而PageHelper 插件是一种物理分页方式。其实现原理是在执行查询的时候,获取页面参数,通过拦截器在 SQL 语句中添加分页参数生成分页 SQL, 最终实现分页查询。
1.搭建数据库、项目配置
在mysql中创建数据库page,然后执行:
USE `page`;
DROP TABLE IF EXISTS `tb_user`;
CREATE TABLE `tb_user`  (
  `user_id` int(11) NOT NULL AUTO_INCREMENT,
  `user_name` varchar(20) CHARACTER SET utf8 COLLATE utf8_general_ci NULL DEFAULT NULL,
  `user_age` int(11) NULL DEFAULT NULL,
  PRIMARY KEY (`user_id`) USING BTREE
) ENGINE = InnoDB CHARACTER SET = utf8 COLLATE = utf8_general_ci ROW_FORMAT = Compact;

-- ----------------------------
-- Records of tb_user
-- ----------------------------
INSERT INTO `tb_user` VALUES (1, 'user01', 18);
INSERT INTO `tb_user` VALUES (2, 'user02', 19);
INSERT INTO `tb_user` VALUES (3, 'user03', 18);
INSERT INTO `tb_user` VALUES (4, 'user04', 19);
INSERT INTO `tb_user` VALUES (5, 'user05', 18);
INSERT INTO `tb_user` VALUES (6, 'user06', 19);
INSERT INTO `tb_user` VALUES (7, 'user07', 18);
INSERT INTO `tb_user` VALUES (8, 'user08', 19);
INSERT INTO `tb_user` VALUES (9, 'user09', 18);
INSERT INTO `tb_user` VALUES (10, 'user10', 19);
INSERT INTO `tb_user` VALUES (11, 'user11', 18);
INSERT INTO `tb_user` VALUES (12, 'user12', 19);
INSERT INTO `tb_user` VALUES (13, 'user13', 18);
INSERT INTO `tb_user` VALUES (14, 'user14', 19);
INSERT INTO `tb_user` VALUES (15, 'user15', 18);
INSERT INTO `tb_user` VALUES (16, 'user16', 19);
INSERT INTO `tb_user` VALUES (17, 'user17', 18);
INSERT INTO `tb_user` VALUES (18, 'user18', 19);
INSERT INTO `tb_user` VALUES (19, 'user19', 18);
INSERT INTO `tb_user` VALUES (20, 'user20', 19);
在启动类上配置包扫描:
@MapperScan("com.tracy.mybatisdemo.dao")
在application.yml中配置:
# 数据源
spring:
  datasource:
    driver-class-name: com.mysql.cj.jdbc.Driver
    url: jdbc:mysql://localhost:3306/page?serverTimezone=UTC&useUnicode=true&characterEncoding=utf-8
    username: root
    password: 你的密码

# Mybatis配置
# 开启驼峰式命名规则自动转换
mybatis:
  configuration:
    map-underscore-to-camel-case: true
2.添加依赖
在pom.xml中添加以下依赖:
<!--PageHelper分页插件-->
<dependency>
    <groupId>com.github.pagehelper</groupId>
    <artifactId>pagehelper-spring-boot-starter</artifactId>
    <version>1.4.3</version>
</dependency>
3.在代码中使用PageHelper
(1)entity
在entity包下创建User类:
package com.tracy.mybatisdemo.entity;

import lombok.Data;

// 添加Getter,Setter,toString等方法
@Data
public class User {
    private Integer userId;
    private String userName;
    private Integer userAge;
}
(2)dao
在dao包下创建UserDao接口:
这里为了简化使用注解绑定sql。
package com.tracy.mybatisdemo.dao;

import com.tracy.mybatisdemo.entity.User;
import org.apache.ibatis.annotations.Select;
import org.springframework.stereotype.Repository;

import java.util.List;

@Repository
public interface UserDao {
    @Select("select user_id,user_name,user_age from tb_user")
    List<User> findAll();
}
(3)controller
在controller包下创建UserController类:
package com.tracy.mybatisdemo.controller;

import com.github.pagehelper.PageHelper;
import com.github.pagehelper.PageInfo;
import com.tracy.mybatisdemo.dao.UserDao;
import com.tracy.mybatisdemo.entity.User;
import org.springframework.beans.factory.annotation.Autowired;
import org.springframework.web.bind.annotation.GetMapping;
import org.springframework.web.bind.annotation.RequestMapping;
import org.springframework.web.bind.annotation.RestController;

import java.util.List;

@RestController
@RequestMapping("/user")
public class UserController {
    @Autowired
    private UserDao userDao;

    @GetMapping("/findAll")
    public PageInfo<User> findAll(){
        //startPage静态方法,传递两个参数(当前页码,每页查询条数)
        PageHelper.startPage(1,3);
        //紧跟着的第一个select 方法会被分页
        List<User> list=userDao.findAll();
        PageInfo pageInfo = new PageInfo(list);
        return pageInfo;
    }
}
(4)测试
启动项目,然后在浏览器访问http://localhost:8080/user/findAll
页面上出现:
[{"userId":1,"userName":"user01","userAge":18},{"userId":2,"userName":"user02","userAge":19},{"userId":3,"userName":"user03","userAge":18}]
成功!
(5)返回类PageInfo
此类是插件里封装好的类,可以了解一下:
public class PageInfo<T> implements Serializable {
private static final long serialVersionUID = 1L;
//当前页
private int pageNum;
//每页的数量
private int pageSize;
//当前页的数量
private int size;
//由于startRow 和endRow 不常用,这里说个具体的用法
//可以在页面中"显示startRow 到endRow 共size 条数据"
//当前页面第一个元素在数据库中的行号
private int startRow;
//当前页面最后一个元素在数据库中的行号
private int endRow;
//总记录数
private long total;
//总页数
private int pages;
//结果集
private List<T> list;
//前一页
private int prePage;
//下一页
private int nextPage;
//是否为第一页
private boolean isFirstPage = false;
//是否为最后一页
private boolean isLastPage = false;
//是否有前一页
private boolean hasPreviousPage = false;
//是否有下一页
private boolean hasNextPage = false;
//导航页码数
private int navigatePages;
//所有导航页号
private int[] navigatepageNums;
//导航条上的第一页
private int navigateFirstPage;
//导航条上的最后一页
private int navigateLastPage;
}
四、整合 Mybatis-Plus
Mybatis-Plus (简称 MP )是由国内 baomidou 组织开源的 Mybatis 的增强工具。在原生 Mybatis 的基础上只做增强不做改变,为简化开发,提高效率而生。
在使用过程中,MP 提供了一套通用的 Mapper 和 Service 操作,只需要继承接口,进行简单的配置便可以进行单表的 CRUD 操作。对于一些复杂的查询,提供了使用数据库字段和 POJO 属性两种方式来构造条件进行查询。此外,它自带乐观锁、性能分析插件、代码生成器和物理分页插件等特色功能。
1.数据库搭建、配置
数据库搭建和上一章一模一样。
配置application.yml:
# 数据源
spring:
  datasource:
    driver-class-name: com.mysql.cj.jdbc.Driver
    url: jdbc:mysql://localhost:3306/page?serverTimezone=UTC&useUnicode=true&characterEncoding=utf-8
    username: root
    password:

# MyBatis-Plus的设置
# 别名包扫描路径,为路径下的所有类创建别名
mybatis-plus:
  type-aliases-package: com.tracy.mybatisdemo.entity
  # xml扫描路径。然后在Mapper接口写上自定义方法并关联XML语句,即可实现手写SQL
  mapper-locations: classpath*:mapper/*.xml
  # MyBatis-Plus驼峰转换,配置后不论手写SQL还是接口方法,都能自动映射(默认on)
  configuration:
    map-underscore-to-camel-case: on
  # 配置生成SQL日志
    log-impl: org.apache.ibatis.logging.stdout.StdOutImpl
2.添加依赖
<!--Mybatis-Plus启动器-->
<dependency>
    <groupId>com.baomidou</groupId>
    <artifactId>mybatis-plus-boot-starter</artifactId>
    <version>3.4.1</version>
</dependency>
3.代码实现
com.tracy.mybatisdemo目录下需要5个包:entity、dao、service、controller、config。resources目录下需要有mapper文件夹。
(1)entity
创建一个 User 实体类:
package com.tracy.mybatisdemo.entity;

import lombok.Data;
import com.baomidou.mybatisplus.annotation.*;


// 建立实体类和数据库表之间的对应关系
@TableName("tb_user")
// 添加getter,setter,toString等方法
@Data
public class User {
    // 用于标识数据库表的主键字段,MP 默认数据库表中名为 id 的字段是主键,如若不是,需通过该注解进行标识。
    // type = IdType.AUTO 表示数据库主键自增
    @TableId(value = "user_id", type = IdType.AUTO)
    private Integer id;

    // 建立实体类字段和数据库表属性之间的对应关系,当两者相同时可省略该注解。
    @TableField
    private String userName;

    private Integer userAge;

}
在 MP 中,自动支持实体类字段按照驼峰转下划线形式的进行转换。
(2)dao
创建UserDao接口:
package com.tracy.mybatisdemo.dao;

import com.baomidou.mybatisplus.core.mapper.BaseMapper;
import com.tracy.mybatisdemo.entity.User;
import org.springframework.stereotype.Repository;


@Repository
// 继承Mybatis-Plus提供的BaseMapper,提供基础的CRUD及分页方法
public interface UserDao extends BaseMapper<User> {
}
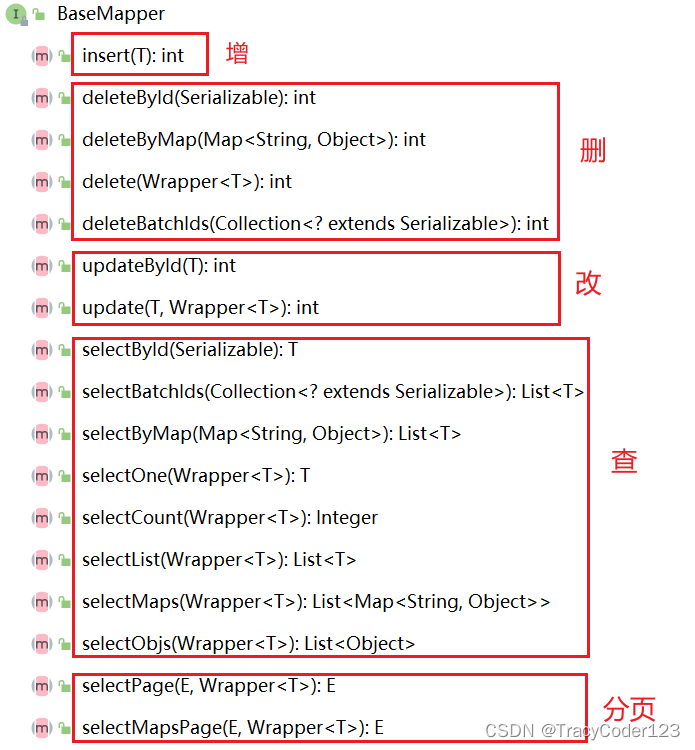
BaseMapper:
Wrapper是一个条件构造器,作用就是帮我们写 SQL 语句中 where 字段后的那部分内容。
若通用方法无法满足业务需求,你可以在 Mapper 接口中添加自定义方法,同时在 XML 中添加 SQL ,与传统 Mybatis 的写法一致。
(3)service
- 接口:
在service包下创建UserService接口:
package com.tracy.mybatisdemo.service;

import com.baomidou.mybatisplus.extension.service.IService;
import com.tracy.mybatisdemo.entity.User;

public interface UserService extends IService<User> {
}
继承 MP 提供的 IService 接口:
为了避免和 Mapper 接口中的方法混淆,Service 层中的方法命名和 Mapper 有些区别。
增加:insert → save
删除:delete → remove
更新:udpate → update
查询: select → get,list
- 实现:
在service包下创建UserServiceImpl类:
package com.tracy.mybatisdemo.service;

import com.baomidou.mybatisplus.extension.service.impl.ServiceImpl;
import com.tracy.mybatisdemo.dao.UserDao;
import com.tracy.mybatisdemo.entity.User;
import org.springframework.stereotype.Service;

@Service
public class UserServiceImpl extends ServiceImpl<UserDao, User> implements UserService{
}
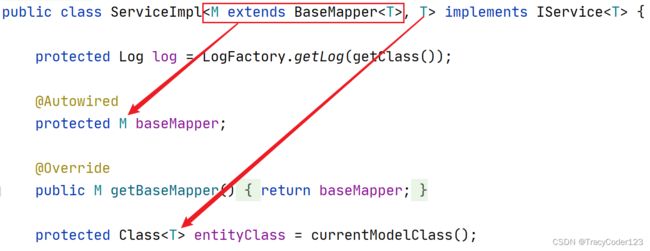
在 ServiceImpl 类中,它会获取泛型参数中的 UserDao 接口和 User 类,利用这两者来封装 Service 层的操作:
(4)config
配置分页插件
在config包下新建 MybatisPlusConfig配置类:
package com.tracy.mybatisdemo.config;

import com.baomidou.mybatisplus.annotation.DbType;
import com.baomidou.mybatisplus.extension.plugins.MybatisPlusInterceptor;
import com.baomidou.mybatisplus.extension.plugins.inner.PaginationInnerInterceptor;
import org.mybatis.spring.annotation.MapperScan;
import org.springframework.context.annotation.Bean;
import org.springframework.context.annotation.Configuration;

@Configuration
@MapperScan("com.tracy.mybatisdemo.dao") //配置dao包扫描
public class MybatisPlusConfig {
    /**
     * 添加分页插件
     */
    @Bean
    public MybatisPlusInterceptor mybatisPlusInterceptor() {
        MybatisPlusInterceptor interceptor = new MybatisPlusInterceptor();
        // 新的分页插件,一缓和二缓遵循mybatis的规则
        interceptor.addInnerInterceptor(new PaginationInnerInterceptor(DbType.MYSQL));
        return interceptor;
    }
}
分页插件配置完成后,通过如下方式便可进行分页:
 Page<User> userPage = new Page<>();
// 设置当前页
userPage.setCurrent(pageNum);
// 设置页面大小
userPage.setSize(pageSize);
// 方式1.无条件分页查询
Page<User> page = userService.page(userPage);
// 方式2.条件分页查询
Page<User> pageByWrapper = userService.page(userPage,new LambdaQueryWrapper<User>() .isNotNull(User::getUserName));
条件构造器
针对复杂 SQL ,可以采用条件构造器构造条件。
- QueryWapper
针对 QueryWapper ,它使用数据库 Column 来构造条件,在编译期间无法检查出错误。
// 构建一个条件构造器
QueryWrapper<User> queryWrapper = new QueryWrapper<>();
// 查询名字不为空且年龄大于18的用户,使用数据库字段
queryWrapper
    .isNotNull("user_name")
    .ge("user_age",18);
// 条件查询
List<User> users = userService.list(queryWrapper);
- LambdaQueryWrapper
针对 LambdaQueryWrapper ,它使用 POJO 对象字段来构造条件,可以在程序编译的时候就能发现错误。
// 构建一个条件构造器
LambdaQueryWrapper<User> lambdaWrapper = new LambdaQueryWrapper<>();
// 查询名字不为空且年龄大于18的用户,使用实体类字段
lambdaWrapper
        .isNotNull(User::getUserName)
        .ge(User::getUserAge,18);
// 条件查询
List<User> users = userService.list(lambdaWrapper);
更多用法可参考博客:这里
(5)controller
在controller包下创建:
package com.tracy.mybatisdemo.controller;

import com.baomidou.mybatisplus.core.conditions.query.LambdaQueryWrapper;
import com.baomidou.mybatisplus.core.conditions.query.QueryWrapper;
import com.baomidou.mybatisplus.extension.plugins.pagination.Page;


import com.tracy.mybatisdemo.entity.User;
import com.tracy.mybatisdemo.service.UserService;
import org.springframework.beans.factory.annotation.Autowired;
import org.springframework.web.bind.annotation.*;

import java.util.List;

@RestController
@RequestMapping("/user")
public class UserController {
    @Autowired
    public UserService userService;

    /**
     * 查询所有-list()方法
     */
    @GetMapping("/list")
    public String list() {
        List<User> list = userService.list();
        return list.toString();
    }

    /**
     * 根据年龄查询用户
     */
    @GetMapping("/queryByAge")
    public String queryByAge(Integer age) {
        // 查询名字不为空且年龄大于给定年龄的用户
        // 条件查询方式1:使用QueryWrapper,使用数据库字段
        List<User> list = userService.list(new QueryWrapper<User>().isNotNull("user_name").ge("user_age", age));
        // 条件查询方式2:使用LambdaQueryWrapper,使用POJO字段
        List<User> list1 = userService
                .list(new LambdaQueryWrapper<User>().isNotNull(User::getUserName).ge(User::getUserAge, age));
        // 条件查询方式3:使用链式query,使用数据库字段
        List<User> list2 = userService.query().isNotNull("user_name").ge("user_age", age).list();
        // 条件查询方式4:使用链式lambdaquery,使用POJO字段
        List<User> list3 = userService.lambdaQuery().isNotNull(User::getUserName).ge(User::getUserAge, age).list();
        // 只返回其中一种方式的查询结果
        return list.toString();
    }

    /**
     * 添加用户-save()
     */
    @PostMapping("/save")
    public boolean save(String userName, Integer userAge) {
        User user = new User();
        user.setUserName(userName);
        user.setUserAge(userAge);
        return userService.save(user);
    }

    /**
     * 删除用户-removeById()
     */
    @DeleteMapping("/remove")
    public boolean remove(Integer userId) {
        return userService.removeById(userId);
    }

    /**
     * 更新用户-updateById()
     */
    @PutMapping("/update")
    public boolean update(User user) {
        // 注意,参数是一个对象
        return userService.updateById(user);
    }

    /**
     * 分页查询
     */
    @GetMapping("/page")
    public Page<User> page(Integer pageNum, Integer pageSize) {
        Page<User> userPage = new Page<>();
        // 设置当前页
        userPage.setCurrent(pageNum);
        // 设置页面大小
        userPage.setSize(pageSize);
        // 方式1.无条件分页查询
        Page<User> page = userService.page(userPage);
        // 方式2.条件分页查询
        Page<User> pageByWrapper = userService.page(userPage,
                new LambdaQueryWrapper<User>().isNotNull(User::getUserName));
        return page;
    }

}
4.测试
运行项目后请自行在postman中测试每个方法,不再赘述。
