微服务-Nacos注册中心兼配置中心
1. Nacos是什么
Nacos是一个更易于构建云原生应用的动态服务发现、配置管理和服务管理平台。前四个字母分别为Naming和Configuration的前两个字母,最后的s为Service。( Nacos: Dynamic Naming and Configuration Service )
从上面对Nacos名称分解可以看出, Nacos就是 注册中心 + 配置中心的组合, 即 Nacos = Eureka+ Spring Cloud Config + Spring Cloud Bus. 替代Eureka做服务注册中心, 替代 Spring Cloud Config做服务配置中心.
→Nacos的GitHub开源
→Nacos官网
→Spring Cloud Alibaba Nacos Discovery
→Spring Cloud Alibaba Nacos Config
2. Nacos安装运行
Nacos下载, 大家可以在tags中选择自己需要的版本, 下面以1.1.4版本为例:

我这里首先下载的Windows版本, 解压Nacos安装包,直接运行bin目录下的startup.cmd.

startup.cmd -m standalone, 没有指定默认为单例运行.

查看启动日志, 可以看出是以单例运行.

命令运行成功后直接访问 http://localhost:8848/nacos (账号密码默认为 nacos/nacos)

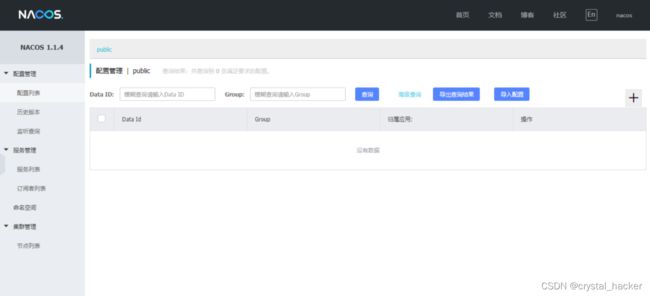
登录成功后, 查看结果页面.
3. Nacos作为服务注册中心
创建服务提供者模块cloudalibaba-provider-payment-9001.
3.1 依赖
父工程pom引入SpringCloudAlibaba
<dependencyManagement>

	<dependency>
		<groupId>com.alibaba.cloudgroupId>
		<artifactId>spring-cloud-alibaba-dependenciesartifactId>
		<version>2.1.0.RELEASEversion>
		<type>pomtype>
		<scope>importscope>
	dependency>
dependencyManagement>
自身pom文件依赖
<project xmlns="http://maven.apache.org/POM/4.0.0"
         xmlns:xsi="http://www.w3.org/2001/XMLSchema-instance"
         xsi:schemaLocation="http://maven.apache.org/POM/4.0.0 http://maven.apache.org/xsd/maven-4.0.0.xsd">
    <parent>
        <artifactId>atguigu-cloud-2020artifactId>
        <groupId>com.atguigu.springcloudgroupId>
        <version>1.0-SNAPSHOTversion>
    parent>
    <modelVersion>4.0.0modelVersion>

    <artifactId>cloudalibaba-provider-payment-9001artifactId>

    <dependencies>

        <dependency>
            <groupId>com.alibaba.cloudgroupId>
            <artifactId>spring-cloud-starter-alibaba-nacos-discoveryartifactId>
        dependency>

        <dependency>
            <groupId>org.springframework.bootgroupId>
            <artifactId>spring-boot-starter-webartifactId>
        dependency>
        <dependency>
            <groupId>org.springframework.bootgroupId>
            <artifactId>spring-boot-starter-actuatorartifactId>
        dependency>

        <dependency>
            <groupId>org.springframework.bootgroupId>
            <artifactId>spring-boot-devtoolsartifactId>
            <scope>runtimescope>
            <optional>trueoptional>
        dependency>
        <dependency>
            <groupId>org.projectlombokgroupId>
            <artifactId>lombokartifactId>
            <optional>trueoptional>
        dependency>
        <dependency>
            <groupId>org.springframework.bootgroupId>
            <artifactId>spring-boot-starter-testartifactId>
            <scope>testscope>
        dependency>
    dependencies>
project>
3.2 编写配置文件
server:
  port: 9001
spring:
  application:
    name: nacos-payment-provider
  cloud:
    nacos:
      discovery:
        server-addr: 127.0.0.1:8848 #配置Nacos地址
management:
  endpoints:
    web:
      exposure:
        include: '*'
3.3 编写启动类
添加注解 @EnableDiscoveryClient 开启服务发现的配置.
package com.atguigu.springcloud;

import org.springframework.boot.SpringApplication;
import org.springframework.boot.autoconfigure.SpringBootApplication;
import org.springframework.cloud.client.discovery.EnableDiscoveryClient;

@SpringBootApplication
@EnableDiscoveryClient // 开启服务发现配置
public class PaymentMain9001 {

    public static void main(String[] args) {
        SpringApplication.run(PaymentMain9001.class);
    }
}
3.3 编写controller
package com.atguigu.springcloud.controller;

import org.springframework.beans.factory.annotation.Value;
import org.springframework.web.bind.annotation.GetMapping;
import org.springframework.web.bind.annotation.PathVariable;
import org.springframework.web.bind.annotation.RestController;

@RestController
public class PaymentController {

    @Value("${server.port}")
    private String serverPort;

    // http://localhost:9001/payment/nacos/1
    @GetMapping(value = "/payment/nacos/{id}")
    public String getPayment(@PathVariable("id") Integer id) {
        return "nacos registry, serverPort: " + serverPort + "\t id" + id;
    }
}
3.4 测试
启动服务, 登录nacos控制台查看, 服务已经成功注册.

访问 http://localhost:9001/payment/nacos/1, 成功返回数据. nacos服务注册中心+服务提供者9001都OK了.

4. 创建消费者模块
为了演示nacos的负载均衡,参照9001新建9002模块. cloudalibaba-provider-payment-9002
创建消费者模块 , cloudalibaba-consumer-nacos-order-83.
4.1 依赖
<project xmlns="http://maven.apache.org/POM/4.0.0"
         xmlns:xsi="http://www.w3.org/2001/XMLSchema-instance"
         xsi:schemaLocation="http://maven.apache.org/POM/4.0.0 http://maven.apache.org/xsd/maven-4.0.0.xsd">
    <parent>
        <artifactId>atguigu-cloud-2020artifactId>
        <groupId>com.atguigu.springcloudgroupId>
        <version>1.0-SNAPSHOTversion>
    parent>
    <modelVersion>4.0.0modelVersion>

    <artifactId>cloudalibaba-consumer-nacos-order-83artifactId>

    <dependencies>

        <dependency>
            <groupId>com.alibaba.cloudgroupId>
            <artifactId>spring-cloud-starter-alibaba-nacos-discoveryartifactId>
        dependency>

        <dependency>
            <groupId>com.atguigu.springcloudgroupId>
            <artifactId>cloud-api-commonsartifactId>
            <version>${project.version}version>
        dependency>

        <dependency>
            <groupId>org.springframework.bootgroupId>
            <artifactId>spring-boot-starter-webartifactId>
        dependency>
        <dependency>
            <groupId>org.springframework.bootgroupId>
            <artifactId>spring-boot-starter-actuatorartifactId>
        dependency>

        <dependency>
            <groupId>org.springframework.bootgroupId>
            <artifactId>spring-boot-devtoolsartifactId>
            <scope>runtimescope>
            <optional>trueoptional>
        dependency>
        <dependency>
            <groupId>org.projectlombokgroupId>
            <artifactId>lombokartifactId>
            <optional>trueoptional>
        dependency>
        <dependency>
            <groupId>org.springframework.bootgroupId>
            <artifactId>spring-boot-starter-testartifactId>
            <scope>testscope>
        dependency>
    dependencies>
project>
4.2 编写配置
application.yaml
server:
  port: 83
spring:
  application:
    name: nacos-order-consumer
  cloud:
    nacos:
      discovery:
        server-addr: 127.0.0.1:8848 # 配置nacos地址
#消费者将要去访问的微服务名称(注册成功进nacos的微服务提供者)
service-url:
  nacos-user-service: http://nacos-payment-provider
编写配置类, 实例化RestTemplate , 添加@LoadBalanced开启负载均衡配置.(内置Ribbon).
package com.atguigu.springcloud.alibaba.config;

import org.springframework.cloud.client.loadbalancer.LoadBalanced;
import org.springframework.context.annotation.Bean;
import org.springframework.context.annotation.Configuration;
import org.springframework.web.client.RestTemplate;

@Configuration
public class ApplicationContextBean {

    @Bean
    @LoadBalanced  // 开启负载均衡配置
    public RestTemplate restTemplate() {
        return new RestTemplate();
    }
}
4.3 编写启动类
package com.atguigu.springcloud.alibaba;

import org.springframework.boot.SpringApplication;
import org.springframework.boot.autoconfigure.SpringBootApplication;
import org.springframework.cloud.client.discovery.EnableDiscoveryClient;

@SpringBootApplication
@EnableDiscoveryClient
public class OrderNacosMain83 {
    public static void main(String[] args) {
        SpringApplication.run(OrderNacosMain83.class);
    }
}
4.4 编写controller
package com.atguigu.springcloud.alibaba.controller;

import org.springframework.beans.factory.annotation.Value;
import org.springframework.web.bind.annotation.GetMapping;
import org.springframework.web.bind.annotation.PathVariable;
import org.springframework.web.bind.annotation.RestController;
import org.springframework.web.client.RestTemplate;

import javax.annotation.Resource;

@RestController
public class OrderNacosController {

    @Resource
    private RestTemplate restTemplate;

    @Value("${service-url.nacos-user-service}")
    private String serverURL;

    // http://localhost:83/consumer/payment/nacos/13
    @GetMapping("/consumer/payment/nacos/{id}")
    public String paymentInfo(@PathVariable("id") Long id) {
        return restTemplate.getForObject(serverURL + "/payment/nacos/" + id, String.class);
    }
}
4.5 测试
启动服务提供者9001, 9002 ; 启动消费者模块 , 进入nacos控制台查看服务列表.

访问http://localhost:83/consumer/payment/nacos/13 , 服务消费者远程调用服务提供者, 多请求几次, 完成负载均衡验证.


4.6 负载均衡
为什么Nacos支持负载均衡?
因为spring-cloud-starter-alibaba-nacos-discovery内置了Ribbon.

5. Nacos作为配置中心
5.1 基础配置
5.1.1 配置中心客户端准备
创建一个基于nacos实现的配置中心客户端:
cloudalibaba-config-nacos-client-3377
pom依赖文件:
<project xmlns="http://maven.apache.org/POM/4.0.0"
         xmlns:xsi="http://www.w3.org/2001/XMLSchema-instance"
         xsi:schemaLocation="http://maven.apache.org/POM/4.0.0 http://maven.apache.org/xsd/maven-4.0.0.xsd">
    <parent>
        <artifactId>atguigu-cloud-2020artifactId>
        <groupId>com.atguigu.springcloudgroupId>
        <version>1.0-SNAPSHOTversion>
    parent>
    <modelVersion>4.0.0modelVersion>

    <artifactId>cloudalibaba-config-nacos-client-3377artifactId>

    <dependencies>

        <dependency>
            <groupId>com.alibaba.cloudgroupId>
            <artifactId>spring-cloud-starter-alibaba-nacos-configartifactId>
        dependency>

        <dependency>
            <groupId>com.alibaba.cloudgroupId>
            <artifactId>spring-cloud-starter-alibaba-nacos-discoveryartifactId>
        dependency>

        <dependency>
            <groupId>org.springframework.bootgroupId>
            <artifactId>spring-boot-starter-webartifactId>
        dependency>
        <dependency>
            <groupId>org.springframework.bootgroupId>
            <artifactId>spring-boot-starter-actuatorartifactId>
        dependency>

        <dependency>
            <groupId>org.springframework.bootgroupId>
            <artifactId>spring-boot-devtoolsartifactId>
            <scope>runtimescope>
            <optional>trueoptional>
        dependency>
        <dependency>
            <groupId>org.projectlombokgroupId>
            <artifactId>lombokartifactId>
            <optional>trueoptional>
        dependency>
        <dependency>
            <groupId>org.springframework.bootgroupId>
            <artifactId>spring-boot-starter-testartifactId>
            <scope>testscope>
        dependency>
    dependencies>
project>
编写bootstrap.yml配置文件
server:
  port: 3377
spring:
  application:
    name: nacos-config-client
  cloud:
    nacos:
      discovery:
        server-addr: 127.0.0.1:8848 # nacos注册中心地址
      config:
        server-addr: 127.0.0.1:8848 # nacos配置中心地址
        file-extension: yaml #指定yaml格式的配置
        #group: TEST_GROUP
        #namespace: d1d90afc-fecd-46ee-86fd-eca0973f232d

## 远程配置中心配置文件的格式   ej: nacos-config-client-dev.yaml
# # ${spring.application.name}-${spring.profiles.active}.${spring.cloud.nacos.config.file-extension}
编写application.yml配置文件
spring:
  profiles:
    active: dev # 表示开发环境 dev test prod
为什么需要两个配置文件?
Nacos同spring cloud config一样,在项目初始化时,要保证先从配置中心进行配置拉取,拉取配置之后,才能保证项目的正常
启动。springboot中配置文件的加载是存在优先级顺序的,bootstrap优先级高于application.
编写主启动类, 添加@EnableDiscoveryClient注解开启服务发现配置.
package com.atguigu.springcloud.alibaba;

import org.springframework.boot.SpringApplication;
import org.springframework.boot.autoconfigure.SpringBootApplication;
import org.springframework.cloud.client.discovery.EnableDiscoveryClient;

@SpringBootApplication
@EnableDiscoveryClient
public class NacosConfigClientMain3377 {
    public static void main(String[] args) {
        SpringApplication.run(NacosConfigClientMain3377.class);
    }
}
编写controller, 在控制器类加入@RefreshScope注解使当前类下的配置支持Nacos的动态刷新功能。
package com.atguigu.springcloud.alibaba.controller;

import org.springframework.beans.factory.annotation.Value;
import org.springframework.cloud.context.config.annotation.RefreshScope;
import org.springframework.web.bind.annotation.GetMapping;
import org.springframework.web.bind.annotation.RestController;

@RestController
@RefreshScope
public class ConfigClientController {
    @Value("${config.info}")
    private String configInfo;

    // http://localhost:3377/config/info
    @GetMapping("/config/info")
    public String getConfigInfo() {
        return configInfo;
    }
}
通过Spring Cloud 原生注解
@RefreshScope实现配置自动更新.
5.1.2 Nacos的配置规则
Nacos官网手册
Nacos中dataId的组成格式, 以及与SpringBoot配置文件的匹配规则:
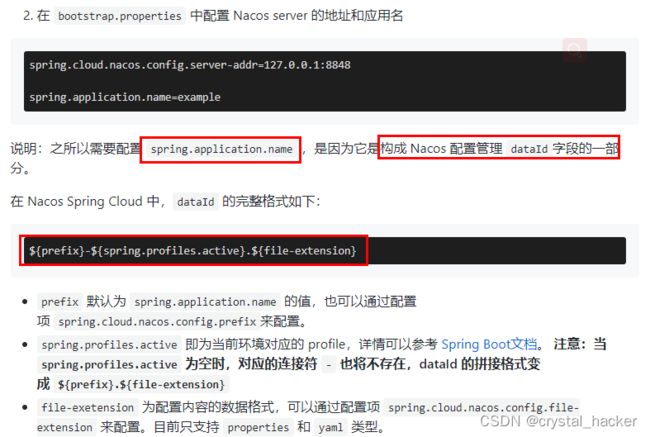
最后公式:
${spring.application.name}-${spring.profiles.active}.${spring.cloud.nacos.config.file-extension}
上面application.yml配置文件中指定了spring.profiles.active.
spring:
  profiles:
    active: dev # 表示开发环境 dev test prod
bootstrap.yml配置文件中指定了spring.application.name 和 spring.cloud.nacos.config.file-extension
spring:
  application:
    name: nacos-config-client
  cloud:
    nacos:
      discovery:
        server-addr: 127.0.0.1:8848 # nacos注册中心地址
      config:
        server-addr: 127.0.0.1:8848 # nacos配置中心地址
        file-extension: yaml #指定yaml格式的配置
5.1.3 在nacos中添加配置
进入nacos控制台, 选择配置列表
定义配置文件名称为 nacos-config-client-dev.yaml

点击右侧+号编辑要添加的配置文件名称和配置信息, 然后发布到Nacos配置中心.

发布到Nacos配置中心后, 可以从配置列表中看到刚刚添加的配置文件.

5.1.4 历史配置
Nacos会记录配置文件的历史版本, 默认保留30天, 此外还有一键回滚功能, 回滚操作将会触发配置更新.

5.1.5 测试
启动配置中心客户端应用. 确认在启动前在nacos配置中心-配置管理栏目里有对应的yaml配置信息.
nacos-config-client-dev.yaml

访问http://localhost:3377/config/info, 查看配置信息, 与上面添加的配置信息一致, 成功获取到了配置中心的配置信息.

修改Nacos配置中心 nacos-config-client-dev.yaml的配置内容.


访问http://localhost:3377/config/info, 查看配置信息 , 发现配置已经自动更新.

5.1.6 存在的问题
问题1
在实际开发中,通常一个系统会有dev, test, prod 等多环境, 如何保证指定环境启动时服务能正确读取到Nacos上相应环境的配置文件内容呢?
问题2
一个大型分布式微服务系统会有很多微服务子项目,每个微服务项目又都会有相应的dev, test, prod 环境等, 那怎么对这些微服务配置进行管理呢?
下面 分类配置 章节中将详细记录多环境多项目的配置文件管理方案.
5.2 分类配置
5.2.1 Nacos图形化配置管理
5.2.2 关系介绍
Namespace + Group + DataId 三者是什么关系? 为什么这么设计?
最外层的namespace是可以用于区分部署环境的,Group和DataID逻辑上区分两个目标对象, 类似Java里面的package包名和类名.

默认情况:
Namespace=public,Group=DEFAULT_GROUP, 默认Cluster是DEFAULT
Nacos默认的命名空间是public,Namespace主要用来实现隔离。比方说我们现在有三个环境:开发、测试、生产环境,我们就可以创建三个Namespace,不同的Namespace之间是隔离的。
Group默认是DEFAULT_GROUP,Group可以把不同的微服务划分到同一个分组里面去.
Service就是微服务;一个Service可以包含多个Cluster(集群),Nacos默认Cluster是DEFAULT,Cluster是对指定微服务的一个虚拟划分。比方说为了容灾,将Service微服务分别部署在了杭州机房和广州机房,然后可以给杭州机房的Service微服务起一个集群名称(HZ),给广州机房的Service微服务起一个集群名称(GZ),还可以尽量让同一个机房的微服务互相调用,以提升性能。
最后是Instance,就是微服务的实例。
5.2.3 DataID方案
指定spring.profiles.active和配置文件的DataID来实现不同环境读取不同的配置文件, 使用默认空间(public) + 默认分组(DEFAULT_GROUP) + 新建dev和test两个DataID 的组合方式.
新建dev配置DataID

新建test配置的DataID

新增完成后, 查看配置列表.

通过spring.profiles.active属性进行多环境配置文件的读取.
spring:
  profiles:
    active: dev # 表示开发环境 dev test prod , 配置哪个环境就会读取哪个环境的配置
测试
访问http://localhost:3377/config/info

修改spring.profiles.active=test , 再次访问http://localhost:3377/config/info, 读取的已经是test环境的配置内容了.

5.2.4 Group方案
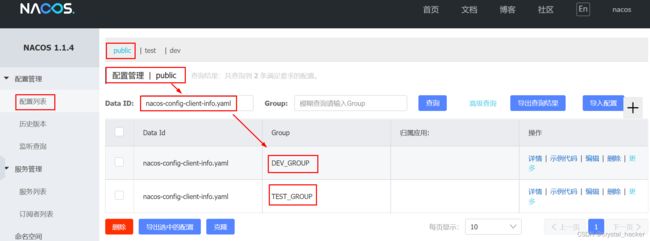
通过Group实现环境区分(默认DEFAULT_GROUP) . 新建DEV_GROUP, TEST_GROUP. 为了测试方便, 我重新创建配置文件.
新建DEV_GROUP群组的配置文件nacos-config-client-info.yaml

新建TEST_GROUP群组的配置文件nacos-config-client-info.yaml

创建完成后, 查看配置列表.
bootstrap.yml添加配置spring.cloud.nacos.config.group=DEV_GROUP或TEST_GROUP来指定群组.
spring:
  application:
    name: nacos-config-client
  cloud:
    nacos:
      discovery:
        server-addr: 127.0.0.1:8848 # nacos注册中心地址
      config:
        server-addr: 127.0.0.1:8848 # nacos配置中心地址
        file-extension: yaml #指定yaml格式的配置
        group: DEV_GROUP
application.yml修改配置spring.profiles.active=info指定环境.
spring:
  profiles:
    active: info # 表示开发环境 dev test prod info
测试
访问http://localhost:3377/config/info , 确实读取的是DEV_GROUP的配置内容.

修改spring.cloud.nacos.config.group=TEST_GROUP, 再次访问http://localhost:3377/config/info, 读取到TEST群组配置.

5.2.5 Namespace方案
Namespace默认为public, 无法删除.
新建dev和tes的命名空间

创建完成namespace后, 回到配置管理-配置列表查看.

服务管理-服务列表也同步更新了创建的namespace

在dev的namespace下面创建三个群组的配置文件. nacos-config-client-dev.yaml

bootstrap.yml文件里添加配置spring.cloud.config.namespace来指定命名空间.
spring:
  application:
    name: nacos-config-client
  cloud:
    nacos:
      discovery:
        server-addr: 127.0.0.1:8848 # nacos注册中心地址
      config:
        server-addr: 127.0.0.1:8848 # nacos配置中心地址
        file-extension: yaml #指定yaml格式的配置
        group: TEST_GROUP
        namespace: d1d90afc-fecd-46ee-86fd-eca0973f232d
application.yml文件修改配置为dev
spring:
  profiles:
    active: dev # 表示开发环境 dev test prod info
测试
访问 http://localhost:3377/config/info, 读取到dev命名空间的test群组配置内容.

6. Nacos集群和持久化配置(重要)
6.1 官网说明
官网架构图
![]()
翻译上图后就是:

Nacos默认使用嵌入式数据库实现数据的存储。所以,如果启动多个默认配置下的Nacos节点,数据存储是存在一致性问题的。为了解决这个问题,Nacos采用了集中式存储的方式来支持集群化部署,目前只支持MySQL的存储。Nacos的三种部署模式

6.2 Nacos持久化配
我关闭Nacos服务后, 重新启动, 进入Nacos控制台查看仍然有之前创建的那些配置文件, 说明这些配置文件被持久化到本机某个位置了. Nacos默认自带的嵌入式数据库是derby, 可以在nacos开源的pom文件查看依赖包含有derby数据库.

derby切换如何到mysql数据库
首先在/nacos/conf目录下找到nacos-mysql.sql脚本, 并在本机mysql客户端执行脚本, 初始化nacos_config数据库.

查看执行结果, 已经有了nacos_config数据库及相关库表.

然后, 在/nacos/conf目录下找到application.properties文件, 在文件最后添加如下内容:
# switch datasource
spring.datasource.platform=mysql

db.num=1
db.url.0=jdbc:mysql://127.0.0.1:3306/nacos_config?characterEncoding=utf8&connectTimeout=1000&socketTimeout=3000&autoReconnect=true
db.user=root
db.password=root
再重启Nacos服务, 进入Nacos控制台, 可以看到是一个全新的空记录界面, 以前是derby的配置记录. 至此已切换到mysql数据库.
以后再创建的配置文件及配置信息就会被持久化到本机的mysql数据库中.
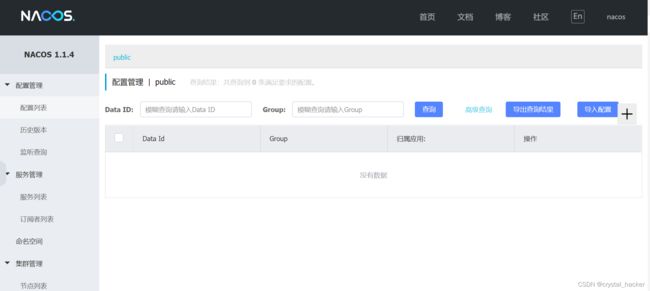
演示一下, 我创建一个nacos-config-client-dev.yaml的配置文件.

添加完成后, 查看配置列表, 已经有了创建的nacos-config-client-dev.yaml配置文件.

此时就已经持久化到本机mysql数据库了, 我们查看本机持久化的配置信息数据存在了config_info表中.

历史版本的配置文件存在his_config_info表中.


6.3 Linux版Nacos+MySQL生产环境配置
集群搭建预计至少需要, 1个Nginx + 3个Nacos注册中心 + 1个mysql
6.3.1 Linux版Nacos下载安装
Nacos下载, 下载Linux版本. 也可以下载Nacos源码自己构建部署的jar包.
需要JDK1.8+, 64bit的Linux系统, Maven 3.2.x环境, 3个或3个以上Nacos节点才能构成集群.

Linux系统可以使用自己搭建虚拟机完成, 参考博客 VMWare安装CentOs7系统及使用
下载完成后, 解压到指定目录.
tar -xvf nacos-1.1.4.tar.gz /usr/local/nacos-1.1.4
6.3.2 使用docker安装mysql
## 安装docker
yum install docker
## 启动docker
systemctl start docker
## 停止docker
systemctl stop docker
## 设置开机自启动
systemctl enable docker
## 搜索mysql镜像
docker search mysql
## 下载mysql镜像
docker pull mysql:5.7
## 查看下载的mysql镜像
docker images mysql
在Docker下运行MySQL服务
## 运行第一个mysql01容器, 将本机端口3306映射到mysql01容器的3306端口
docker run --name mysql01 -p 3306:3306 -e MYSQL_ROOT_PASSWORD=123456 -d mysql:5.7
## 运行第二个mysql02容器, 将本机端口3307映射到mysql01容器的3306端口
docker run --name mysql02 -p 3307:3306 -e MYSQL_ROOT_PASSWORD=123456 -d mysql:5.7
## 查看运行的容器
docker ps -a
## 停止mysql01容器
docker stop mysql01
## 启动mysql01容器
docker start mysql01
## 删除mysql01容器
docker rm mysql01
## 进入mysql01容器
docker exec -it mysql01 /bin/bash
6.3.3 Nacos切换到Mysql
在/nacos/conf目录下面获取nacos数据库脚本.

mysql客户端(navicat)连接后执行上面的nacos-mysql.sql脚本.

修改配置文件
# 复制一份示例配置进行修改
cp /usr/local/nacos-1.1.4/conf/application.properties.example  /usr/local/nacos-1.1.4/conf/application.properties
vi /usr/local/nacos-1.1.4/conf/application.properties
application.properties文件最后面添加如下内容:
# 切换为mysql数据库
spring.datasource.platform=mysql

db.num=1
db.url.0=jdbc:mysql://http://192.168.65.129:3306/nacos_config?characterEncoding=utf8&connectTimeout=1000&socketTimeout=3000&autoReconnect=true
db.user=root
db.password=123456
6.3.4 配置Nacos集群
/nacos/conf目录下复制一份集群配置文件示例来做修改.
cp cluster.conf.example  cluster.conf
# 查看当前机器地址
hostname -i
# 添加集群配置
vi cluster.conf
在cluster.conf文件中添加三台Nacos集群服务器(我这使用的一台机器的三个端口模拟三台Nacos服务).
192.168.65.129:3333
192.168.65.129:4444
192.168.65.129:5555
6.3.5 修改启动脚本
平时单机版的启动,都是./startup.sh即可. 集群方式需要修改/nacos/bin目录下启动脚本 startup.sh
集群启动,我们希望可以类似其它软件的shell命令,传递不同的端口号启动不同的nacos实例。
命令:./startup.sh -p 3333 表示启动端口号为3333的nacos服务器实例,和上一步的cluster.conf配置的一致。

按照指定端口分别启动三台nacos实例.

使用ps -ef|grep nacos|grep -v grep|wc -l命令查看启动的nacos集群数量. 可以看到是三台.

6.3.6 Nginx下载安装
LINUX安装nginx详细步骤
/usr/local/nginx/conf目录下备份nginx.conf
cp nginx.conf nginx.conf.bak
修改nginx.conf配置, 添加nacos的代理
#gzip  on;
upstream cluster{
   # 配置负载均衡地址,
   # 当访问 http://ip:1111/nacos时, 就会转发到其中一台Nacos服务,比如  http://ip:3333/nacos
	server 127.0.0.1:3333;
	server 127.0.0.1:4444;
	server 127.0.0.1:5555;
}

server {
  # 修改监听端口为1111
	listen       1111;
	server_name  localhost;

	#charset koi8-r;

	#access_log  logs/host.access.log  main;

	location / {
		#root   html;
		#index  index.html index.htm;
		# 添加nacos集群的代理
		proxy_pass http://cluster;
	}

	# set site favicon
	location /favicon.ico {
		root html;
	}
}
6.3.7 测试
通过Nginx访问nacos, 请求 http://192.168.65.129:1111/nacos/#/login

修改微服务应用的配置
server:
  port: 9002
spring:
  application:
    name: nacos-payment-provider
  cloud:
    nacos:
      discovery:
        server-addr: 192.168.65.129:1111 # nacos注册中心地址
启动微服务应用, 查看nacos控制台的服务列表, 已经成功注册到Nacos集群中.

6.3.8 集群高可用总结
至此, 已经实现了Nacos集群的高可用, 通过Nginx负载均衡到可用的Nacos服务获取要远程调用的微服务实例.

个人博客
欢迎访问个人博客: https://www.crystalblog.xyz/
备用地址: https://wang-qz.gitee.io/crystal-blog/


