Spring Boot
文章目录
-
- SSM 项目的简单整合
-
- XMl配置 spring
- Java配置 ssm
- 第 01 章 Spring Boot 入门
-
- 1. 介绍
- 2. 工程创建
- 3. spring boot 启动类配置
- 4. Spring Boot 项目中的 parent
- 第 02 章 Spring Boot 基础配置
-
- 1. 启动时 banner 的定制
- 2. 配置容器相关信息
- 3. spring 的属性注入
- 4. spring boot 类型安全的属性注入
- 5. spring boot 的 yaml 配置
- 6. Profile 多种环境的配置
- 第 03 章 Spring Boot 整合视图层技术
-
- 整合 FreeMarker
-
- 1.初始用
- 2. 简介
- 3. 使用和引用
- 4. 插值规则
- 5. 常用指令
- 整合 Thymeleaf
-
- 简介
- 整合 jsp
- 第 04 章 Spring Boot 整合 Web 开发
-
- 1. spring boot 默认的 json 解析方案
- 2. 使用 Gson 处理
- 3. spring boot 整合 FastJson
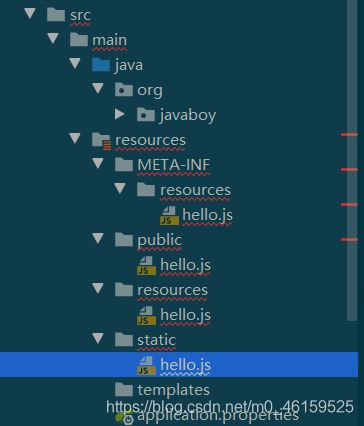
- 4. spring boot 默认静态资源访问方案
- 5. 自定义静态 web 资源的位置
- 6. 文件上传
- 7. Ajax 上传文件
- 8. 多文件的上传
- 9. @ControllerAdvice 注解
- 10. spring boot 自定义异常的处理
- 11. cors 实现跨域
- 12. spring boot 加载 XML 文件配置
- 13. spring boot 中的拦截器
- 14. CommandLineRunner 实现系统启动任务
- 15. ApplicationRunner 实现系统启动任务
- 16. Spring Boot 整合 Web 基础组件
- 17. 23.Spring Boot 路径映射
- 18.Spring Boot 中使用类型转换器
- 19. spring boot 中整合 AOP
- 20. Spring Boot 自定义欢迎页
- 21. Spring Boot 自定义 favicon
- 22. Spring Boot 除去自动化配置
- 第 05 章 Spring Boot 整合持久层技术
-
- 1.Spring Boot 整合 JdbcTemplate
- 2. Spring Boot 整合 JdbcTemplate 多数据源
- 3. Spring Boot 整合 MyBatis
- 4. Spring Boot 整合 MyBatis 多数据源
- 5. Spring Data 和 Jpa 简介
-
- 1. Spring Boot 整合 Spring Data Jpa
- 2. Spring Data Jpa 关键字定义查询方法
- 3. Spring Data Jpa 自定义查询 SQL
- 4.Spring Data Jpa 自定义数据修改 SQL
- 5. Spring Boot 整合 Jpa 多数据源
- 第 06 章 Spring Boot 整合 NoSQL
-
- 1. Spring Boot 整合 Redis
- 2. 为什么需要 session 共享
- 3. Nginx 简介
- 4. Spring Session 实现 Session 共享
- 5. 引入 Nginx 负载均衡
- 6. Spring Boot 整合 MongoDB
- 第 07 章 构建 REST 服务
-
- 1. 搭建 Jpa 环境
- 2. Spring Boot 中 REST 默认提供的增删改查
- 3. Spring Boot 中 REST 自定义查询方法
- 4. REST 配置 CORS
- 5. 自定义 REST 配置
- 6. MongoDB 实现 REST
- 第 08 章 开发者工具与单元测试
-
- 1. devtools 工作原理
- 2. 自定义监控资源
- 3. LiveReload 自动刷新页面
- 4. 禁用自动重启
- 5. 项目重启中的全局配置
- 6.Service 测试
- 7. Controller 测试
- 8. JSON 测试
- 第 09 章 Spring Boot 缓存
-
- 1. Spring Cache 整合 Redis
- 2. 3.Spring Cache 整合 Ehcache
- 第 10 章 Spring Boot 安全管理
-
- 1. Spring Security 初体验
- 2. 手工配置用户名密码
- 3. HttpSecurity 配置
- 4. 登录表单详细配置
- 5. 注销登录配置
- 6. 多个 HttpSecurity
- 7. 密码加密
- 8. 方法安全
- 9. 基于数据库的认证
- 10. 角色继承
- 11.OAuth2 简介
- 12. Spring Security 结合 OAuth2
- 13.整合 Shiro 方式一
- 14.Spring Security 使用 JSON 登录
- 15. Spring Security 整合 Jwt
- 第 11 章 Spring Boot 整合 WebSocket
-
- 1. WebSocket 实现在线群聊
- 2. WebSocket 实现在线单聊
- 第 12 章 消息服务
-
- 1. ActiveMQ
- 2. Spring Boot 整合 ActiveMQ
- 3. RabbitMQ 简介并安装
- 4. Spring Boot 整合RabbitMQ
- 第 13 章 企业开发
-
- 1. 邮件协议简介
- 2. 申请 QQ 邮箱授权码
- 3. 发送简单邮件
- 4.发送带附件的邮件
- 5.发送带图片资源的邮件
- 6.Thymeleaf 做邮件模板
- 7. Freemarker 做邮件模板
- 8. Spring Boot 定时任务实现方案一(@Scheduled)
- 9. Spring Boot 定时任务实现方案二(Quartz)
- 10. Spring Boot 整合 Swagger2
- 第 14 章 应用监控
-
- 1. 应用端点
- 2. Health 端点
- 3. Info 端点
- 4. 监控信息可视化
- 5. 邮件报警
- 第 15 章 项目构建与部署
-
- 1. jar
- 2. war
- 第 16 章 Spring Boot 国际化
-
- 1. 原文
- 2. 使用
SSM 项目的简单整合
XMl配置 spring
1.新建maven项目 xmlssm
2.添加相关的依赖
<?xml version="1.0" encoding="UTF-8"?>
<project xmlns="http://maven.apache.org/POM/4.0.0"
         xmlns:xsi="http://www.w3.org/2001/XMLSchema-instance"
         xsi:schemaLocation="http://maven.apache.org/POM/4.0.0 http://maven.apache.org/xsd/maven-4.0.0.xsd">
    <modelVersion>4.0.0</modelVersion>

    <groupId>org.javaboy</groupId>
    <artifactId>xmlssm</artifactId>
    <version>1.0-SNAPSHOT</version>

    <!--打成war包-->
    <packaging>war</packaging>

    <dependencies>
        <!--注入springmvc的依赖-->
        <dependency>
            <groupId>org.springframework</groupId>
            <artifactId>spring-webmvc</artifactId>
            <version>5.2.6.RELEASE</version>
        </dependency>

    </dependencies>

</project>
3.编写两个配置文件

只有添加springmvc的依赖之后系统才会默认的去添加 springconfig 的选项
applicationContext.xml
<?xml version="1.0" encoding="UTF-8"?>
<beans xmlns="http://www.springframework.org/schema/beans"
       xmlns:xsi="http://www.w3.org/2001/XMLSchema-instance"
       xmlns:context="http://www.springframework.org/schema/context"
       xsi:schemaLocation="http://www.springframework.org/schema/beans http://www.springframework.org/schema/beans/spring-beans.xsd http://www.springframework.org/schema/context https://www.springframework.org/schema/context/spring-context.xsd">


    <!--spirng MVC 是spring 的子容器 springMVC可以扫描到sping但是spring扫描不到springMVC里的东西-->
    <!--use-default-filters="true" 使用默认过滤
    <context:exclude-filter type="annotation" expression="org.springframework.stereotype.Controller"/>
    去除controller
    -->
    <context:component-scan base-package="org.javaboy" use-default-filters="true">
        <context:exclude-filter type="annotation" expression="org.springframework.stereotype.Controller"/>
    </context:component-scan>

</beans>
spring-servlet.xml
<?xml version="1.0" encoding="UTF-8"?>
<beans xmlns="http://www.springframework.org/schema/beans"
       xmlns:xsi="http://www.w3.org/2001/XMLSchema-instance"
       xmlns:context="http://www.springframework.org/schema/context"
       xmlns:mvc="http://www.springframework.org/schema/mvc"
       xsi:schemaLocation="http://www.springframework.org/schema/beans http://www.springframework.org/schema/beans/spring-beans.xsd http://www.springframework.org/schema/context https://www.springframework.org/schema/context/spring-context.xsd http://www.springframework.org/schema/mvc https://www.springframework.org/schema/mvc/spring-mvc.xsd">


    <context:component-scan base-package="org.javaboy" use-default-filters="false">
        <!--把controller包含进来-->
        <context:include-filter type="annotation" expression="org.springframework.stereotype.Controller"/>
    </context:component-scan>
    <!--开启driven,选择mvc的-->
    <mvc:annotation-driven/>

</beans>
修改配置 web.xml


<?xml version="1.0" encoding="UTF-8"?>
<web-app xmlns="http://xmlns.jcp.org/xml/ns/javaee"
         xmlns:xsi="http://www.w3.org/2001/XMLSchema-instance"
         xsi:schemaLocation="http://xmlns.jcp.org/xml/ns/javaee http://xmlns.jcp.org/xml/ns/javaee/web-app_4_0.xsd"
         version="4.0">
    <!--spring配置-->
    <context-param>
        <param-name>contextConfigLocation</param-name>
        <param-value>classpath:applicationContext.xml</param-value>
    </context-param>
    <listener>
        <listener-class>org.springframework.web.context.ContextLoaderListener</listener-class>
    </listener>
    <!--springmvc配置-->
    <servlet>
        <servlet-name>springmvc</servlet-name>
        <servlet-class>org.springframework.web.servlet.DispatcherServlet</servlet-class>
        <init-param>
            <param-name>contextConfigLocation</param-name>
            <param-value>classpath:spring-servlet.xml</param-value>
        </init-param>
    </servlet>

    <servlet-mapping>
        <servlet-name>springmvc</servlet-name>
        <url-pattern>/</url-pattern>
    </servlet-mapping>

</web-app>
4.创建 HelloController 和 HelloService 两个类
F6 调整包的结构:


HelloController:
@RestController
public class HelloController {

    @Autowired
    HelloService helloService;
    // produces = "text/html;charset=utf-8" 设置编码格式

    @GetMapping(value = "/hello",produces = "text/html;charset=utf-8")
    public String hello(){
        return  helloService.sayHello();
    }

}
HelloService:
@Service
public class HelloService {

    public String sayHello(){
        return "hello Java 极致播客";
    }
}
配置整合tomcat
测试:访问路径http://localhost:8080/hello
结果:

Java配置 ssm
1.采用 java 文件去代替 xml 文件中的配置,新建一个 config 包添加如下的 java 文件
SpringConfig:
@Configuration
//进行包扫描
@ComponentScan(basePackages="org.javaboy",
        useDefaultFilters = true,
        excludeFilters = {@ComponentScan.Filter(type = FilterType.ANNOTATION,classes = Controller.class)})
public class SpringConfig {

}
SpringMVCConfig:
@Configuration
//进行包扫描
@ComponentScan(basePackages = "org.javaboy",
useDefaultFilters = false,
        includeFilters = {@ComponentScan.Filter(type = FilterType.ANNOTATION,
                classes = Controller.class),@ComponentScan.Filter(type =FilterType.ANNOTATION,classes = Configuration.class)}
)
public class SpringMVCConfig {
}
WebInit 去代替以前的 web.xml
// 代替web.xml

public class WebInit implements WebApplicationInitializer {
    @Override
    public void onStartup(javax.servlet.ServletContext servletContext) throws ServletException {
        // 加载两个配置文件
        AnnotationConfigWebApplicationContext context = new AnnotationConfigWebApplicationContext();

        context.setServletContext(servletContext);
        context.register(SpringMVCConfig.class);
        // 添加一个 servlet
        ServletRegistration.Dynamic springmvc
                = servletContext.addServlet("springmvc", new DispatcherServlet(context));
        springmvc.addMapping("/");
        springmvc.setLoadOnStartup(1);


    }
}
测试 新建 HelloController,HelloService 和配置tomca访问即可。
springboot 静态资源配置
在 resources 目录下 hello.html 静态资源文件

在 SpringMVCConfig 中 继承 WebMvcConfigurationSupport 类
实现 addResourceHandlers 方法

访问路径:http://localhost:8080/static/hello.html

添加拦截器 新建 interceptor 包编写 MyInterceptor 实现 HandlerInterceptor 接口,重写方法代码如下:
public class MyInterceptor implements HandlerInterceptor {
    @Override
    public boolean preHandle(HttpServletRequest request, HttpServletResponse response, Object handler) throws Exception {
        System.out.println("preHandle");
        return true;
    }

    @Override
    public void postHandle(HttpServletRequest request, HttpServletResponse response, Object handler, ModelAndView modelAndView) throws Exception {
        System.out.println("postHandle");
    }

    @Override
    public void afterCompletion(HttpServletRequest request, HttpServletResponse response, Object handler, Exception ex) throws Exception {
        System.out.println("afterCompletion");
    }
}
添加 servlet 的依赖
  <!--添加servlet,不要添加早期的版本不出注解依赖-->
        <!-- https://mvnrepository.com/artifact/javax.servlet/javax.servlet-api -->
        <dependency>
            <groupId>javax.servlet</groupId>
            <artifactId>javax.servlet-api</artifactId>
            <version>4.0.1</version>
            <scope>provided</scope>
        </dependency>
在 SpringMVCConfig 类中注入 MyInterceptor
@Bean
    MyInterceptor myInterceptor(){
        return new MyInterceptor();
    }
添加 addInterceptors 方法
  // 添加拦截器
    @Override
    protected void addInterceptors(InterceptorRegistry registry) {
        //添加拦截器
       registry.addInterceptor(myInterceptor())
               //添加拦截路径
               .addPathPatterns("/**");
    }
jackson,gson,fastjson 的区别https://www.cnblogs.com/yanduanduan/p/7508992.html
使用 fastjson解析字符串
添加 fastjson 的依赖
  <!--引入 fastjson-->
        <dependency>
            <groupId>com.alibaba</groupId>
            <artifactId>fastjson</artifactId>
            <version>1.2.56</version>
        </dependency>
在 SpringMVCConfig 重写 configureMessageConverters 方法
@Override
    protected void configureMessageConverters(List<HttpMessageConverter<?>> converters) {
        FastJsonHttpMessageConverter converter = new FastJsonHttpMessageConverter();
        converters.add(converter);
    }
测试 :HelloController
@GetMapping(value = "/data",produces = "text/html;charset=utf-8")
    public List<String> getData(){
        ArrayList list = new ArrayList();
        for (int i = 0; i <10; i++) {
            list.add("www.just java.com>>>"+i);
        }
        return  list;
    }

第 01 章 Spring Boot 入门
1. 介绍
官网:https://spring.io/projects/spring-boot
查看参考文档:


官方介绍:

- 更广泛的+快速的 spring 开发体验
- 一系列开箱即用的 starter
- 一些类非功能性的自动化配置(跟业务相关的不能自动化配置)
- 没有 XML 配置文件生成
2. 工程创建
-
在线创建,官方地址:https://start.spring.io/

-
通过 IDE 创建
-
通过改造一个普通 Maven 工程来创建

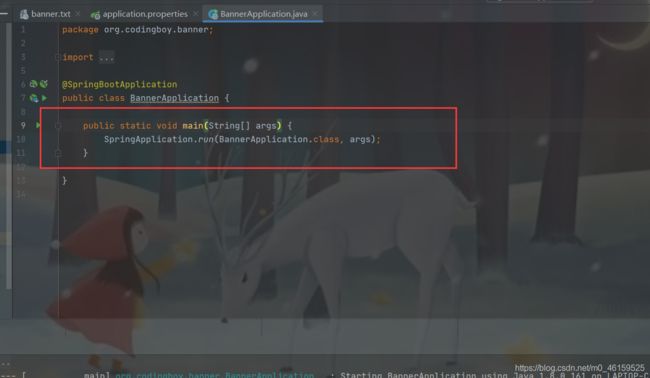
3. spring boot 启动类配置

@SpringBootConfiguration的注解

如果启动类不是放在根包下面的话,例如放在 config 包下,其他的包则扫描不到。
包结构:

解决办法:
添加 @ComponentScan(basePackages = “org.javaboy”) 注解
示例代码:
package org.javaboy.springboot_demo01.config;

import org.springframework.boot.SpringApplication;
import org.springframework.boot.autoconfigure.SpringBootApplication;
import org.springframework.context.annotation.ComponentScan;

@SpringBootApplication
@ComponentScan(basePackages = "org.javaboy")
public class SpringbootDemo01Application {

	public static void main(String[] args) {
		SpringApplication.run(SpringbootDemo01Application.class, args);
	}

}
4. Spring Boot 项目中的 parent
基本功能
当我们创建一个 Spring Boot 工程时,可以继承自一个 spring-boot-starter-parent ,也可以不继承自它,我们先来看第一种情况。先来看 parent 的基本功能有哪些?
1.定义了 Java 编译版本为 1.8 。
2.使用 UTF-8 格式编码。
3.继承自 spring-boot-dependencies,这个里边定义了依赖的版本,也正是因为继承了这个依赖,所以我们在写依赖时才不需要写版本号。
4.执行打包操作的配置。
5.自动化的资源过滤。
6.自动化的插件配置。
7.针对 application.properties 和 application.yml 的资源过滤,包括通过 profile 定义的不同环境的配置文件,例如 application-dev.properties 和 application-dev.yml。
具体博客内容:http://www.javaboy.org/2019/0413/spring-boot-parent.html
第 02 章 Spring Boot 基础配置
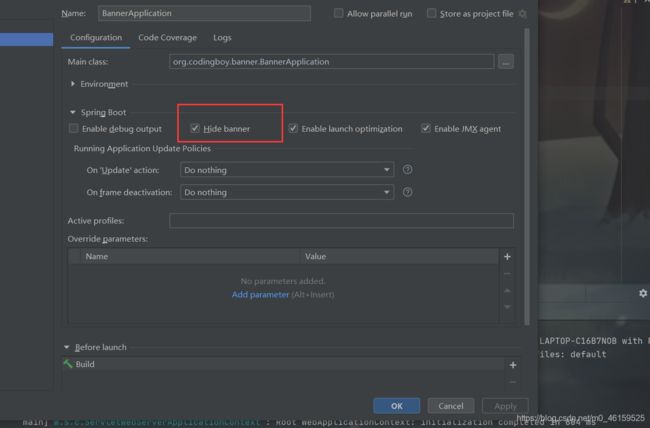
1. 启动时 banner 的定制
spring boot 规定大于配置
在 resources 目录下创建 banner.txt 文件 写入要修改的为文字。
修改文字的网站:http://patorjk.com/software/taag/
测试结果:

修改banner 字体颜色和版本号:

配置文件的配置:

如何关闭 banner
方式一:
在启动类中配置
package org.javaboy.springboot_demo01.config;

import org.springframework.boot.Banner;
import org.springframework.boot.SpringApplication;
import org.springframework.boot.autoconfigure.SpringBootApplication;
import org.springframework.boot.builder.SpringApplicationBuilder;
import org.springframework.context.annotation.ComponentScan;

@SpringBootApplication
@ComponentScan(basePackages = "org.javaboy")
public class SpringbootDemo01Application {

	public static void main(String[] args) {

		//SpringApplication.run(SpringbootDemo01Application.class, args);

		SpringApplicationBuilder builder = new SpringApplicationBuilder(SpringbootDemo01Application.class);

		SpringApplication build = builder.build();
		build.setBannerMode(Banner.Mode.OFF);
		build.run(args);
	}

}
方式二:
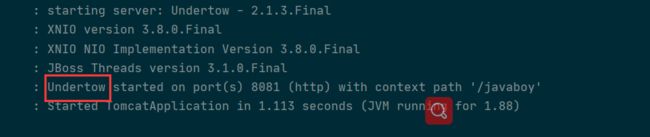
2. 配置容器相关信息
- spring boot 项目中内嵌 tomcat

- tomcat 的配置信息,在application,properties 中进行修改
在这里插入代码片# 配置tomcat
# 修改该服务器端口号
server.port=8081

# 修改上下文路径,项目启动 之后要在前面加上 javaboy 才能访问到
server.servlet.context-path=/javaboy

# 配置 Tom URL 编码
server.tomcat.uri-encoding=UTF-8


# jetty 和 tomcat 的配置几乎一样
- 排除 tomcat
如果不想使用 spring boot 中默认的容器我们可以排除 tomcat
    <dependency>
           <groupId>org.springframework.bootgroupId>
           <artifactId>spring-boot-starter-webartifactId>

           <exclusions>
               <exclusion>
                    <groupId>org.springframework.bootgroupId>
                    <artifactId>spring-boot-starter-tomcatartifactId>
               exclusion>
           exclusions>

       dependency>
- 添加 jetty 容器
        <dependency>
            <groupId>org.springframework.bootgroupId>
            <artifactId>spring-boot-starter-jettyartifactId>
        dependency>

- 添加 undertow [ˈʌndərtoʊ]
容器
   <dependency>
            <groupId>org.springframework.bootgroupId>
            <artifactId>spring-boot-starter-undertowartifactId>
        dependency>
3. spring 的属性注入
- 在 application 中添加如下配置
book.name=三国演义
book.author=罗贯中
book.id=99
- 创建 book 类,并将配置文件中的信息注入到对象中
@Component
public class Book {
    @Value("${book.id}")
    private Long id;
    @Value("${book.name}")
    private String name;
    @Value("${book.author}")
    private String author;

    public Long getId() {
        return id;
    }

    public void setId(Long id) {
        this.id = id;
    }

    public String getName() {
        return name;
    }

    public void setName(String name) {
        this.name = name;
    }

    public String getAuthor() {
        return author;
    }

    public void setAuthor(String author) {
        this.author = author;
    }

    @Override
    public String toString() {
        return "Book{" +
                "id=" + id +
                ", name='" + name + '\'' +
                ", author='" + author + '\'' +
                '}';
    }
}
- 测试代码:
@SpringBootTest
class PropertiesApplicationTests {
    @Autowired
  Book book;
    @Test
    void contextLoads() {

        System.out.println(book);
    }

}
如果有乱码:

- 在实际开发中 application.properties 的配置信息都是系统级别的配置,所以我们要新建一个 book.properties 文件,配置信息和刚刚的配置文件信息相同。
5.在 book 类中添加注解 @PropertySource 注解
@PropertySource(“classpath:book.properties”)

最终测试结果

4. spring boot 类型安全的属性注入
如上的需要赋值的属性较少,当我们遇到相当多的属性时该怎么做
在 book 类上添加 @ConfigurationProperties(prefix = “book”) 该注解,该注解为 spring boot 提供,prefix 表示前缀为 book 的进行匹配,不用使用 @Value 注解了。

注意:在为属性赋值时一定要在添加属性的 set 方法,否则无法赋值
5. spring boot 的 yaml 配置
yaml 配置和 properties 配置的对比:
- yaml 的配置是有序,而 properties 是无序的
- 自定义的 yaml 目前在世不支持使用注解直接注入到 spring boot 项目中

yaml 的解析器
新建 RedisCluster 类:
@Component
@ConfigurationProperties(prefix = "redis")
public class RedisCluster {
    private Integer port;
    private List<String> hosts;

   // 添加 get,set 和 toString方法,此处省略。m

    }
application 的配置
server:
  port: 8081
  servlet:
    context-path: /javaboy

redis:
  port: 6379
  # 多个值 空两格加上 -
  hosts:
    - 192.168.66.128
    - 192.168.66.129
    - 192.168.66.130
    - 192.168.66.131
测试:
@SpringBootTest
class YamlApplicationTests {

    @Autowired
    RedisCluster redisCluster;

    @Test
    void contextLoads() {
        System.out.println(redisCluster);
    }

}
如果在 RedisCluster 类中添加对象属性该如何配置:
创建 Redis 类:
// 注入对象
public class Redis {
    private Integer port;
    private String host;
    // 此处省略 get,set 和 toString 方法
    }
将 Redis 对象注入到 RedisCluster 对象中:

在 yaml 文件中修改配置

6. Profile 多种环境的配置
在实际开发中我们可能有多种配置环境,如生产环境,测试环境,以及产品上线,每个环境使用的软件配置各不相同。例如:开发时使用的数据库的配置信息和产品上线以后的配置信息可能不相同。
目录结构:


在 application.properties 文件中选择所需要的环境文件

第 03 章 Spring Boot 整合视图层技术
spring boot 对于整合 FreeMarker 和 Thymeleaf 较为简单,但是整合 jsp 比较繁琐,不仅需要添加好几个依赖,还要增加一个 webapp 目录。
整合 FreeMarker
1.初始用
官网:http://flume.apache.org/
创建的时候添加 freemarker 的模板
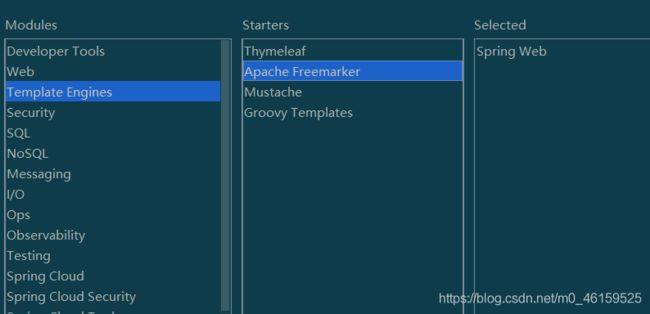
spring boot 添加了 freeMarker 的自动化配置
![]()
扫描是否添加了 freemarker 的 jar 包,如果有,则启动下面的配置


FreeMarkerServletWebConfiguration 类

FreeMarkerProperties 类

测试代码 :
- 新建 User 类
package org.javaboy.freemarker.bean;

/**
 * @author yueLQ
 * @date 2020-08-19 19:45
 */
public class User {
    private Long id;
    private String username;
    private String address;

    @Override
    public String toString() {
        return "User{" +
                "id=" + id +
                ", username='" + username + '\'' +
                ", address='" + address + '\'' +
                '}';
    }

    public Long getId() {
        return id;
    }

    public void setId(Long id) {
        this.id = id;
    }

    public String getUsername() {
        return username;
    }

    public void setUsername(String username) {
        this.username = username;
    }

    public String getAddress() {
        return address;
    }

    public void setAddress(String address) {
        this.address = address;
    }
}
- 创建 controller 类
package org.javaboy.freemarker.controller;
import org.javaboy.freemarker.bean.User;
import org.springframework.stereotype.Controller;
import org.springframework.ui.Model;
import org.springframework.web.bind.annotation.GetMapping;
import java.util.ArrayList;
import java.util.List;
/**
* @author yueLQ
* @date 2020-08-19 19:46
*/
@Controller
public class UserController {
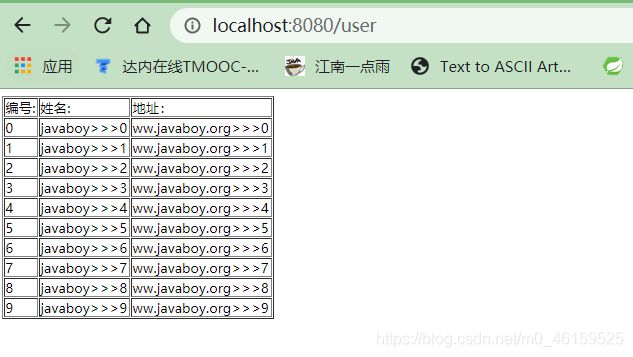
@GetMapping("/user")
public String user(Model model){
List<User> list=new ArrayList<>();
for (int i = 0; i <10 ; i++) {
User user=new User();
user.setId((long)i);
user.setUsername("javaboy>>>"+i);
user.setAddress("ww.javaboy.org>>>"+i);
list.add(user);
}
model.addAttribute("user", list);
return "user";
}
}
在 resources 目录下的 templates 下新建 user.ftlh 文件(和 html 文件一样,将后缀名字改变即可)
<html lang="en">
<head>
    <meta charset="UTF-8">
    <title>Titletitle>
head>
<body>
<table border="1">
    <tr>
        <td>编号:td>
        <td>姓名:td>
        <td>地址:td>
    tr>
    <#list user as u>
    <tr>
        <td>${u.id}td>
        <td>${u.username}td>
        <td>${u.address}td>
    tr>
    #list>
table>
body>
html>
测试结果:
如果不满意 spring boot 对于 freemarker 的配置,也可以自己去修改,在 application.properties 文件中修改
# 自定义模板位置,默认模板位置在 classpath 下面的 templates 下面的目录中
spring.freemarker.template-loader-path=classpath:/javaboy

# 模板的编码格式,默认的就是 utf-8
spring.freemarker.charset=UTF-8

# 定义模板的 content-type
spring.freemarker.content-type=text/html
# 是否开启缓存
spring.freemarker.cache=false
# 配置模板的后缀
spring.freemarker.suffix=.ftl
2. 简介
FreeMarker是一个基于Java的模板引擎,最初专注于使用MVC软件架构生成动态网页。但是,它是一个通用的模板引擎,不依赖于servlets或HTTP或HTML,因此它通常用于生成源代码,配置文件或电子邮件。FreeMarker是自由软件。
3. 使用和引用
- 引入freemarker相关jar
<dependency>
    <groupId>org.freemarkergroupId>
    <artifactId>freemarkerartifactId>
    <version>2.3.23version>
dependency>
- 创建freemarker变量文件
resoures目录下创建文件,如下:

文件内容如下:root=m3 - spring-mvc配置文件中配置freemarker
配置分三步:
3.1 引入变量文件
<bean id="freemarkerProperties" class="org.springframework.beans.factory.config.PropertyPlaceholderConfigurer">
    <property name="locations">
        <list>
            <value>classpath:freemarker-variable.propertiesvalue>
        list>
    property>
bean>
3.2freemarker配置
<bean id="freemarkerConfigurer" class="org.springframework.web.servlet.view.freemarker.FreeMarkerConfigurer">
    <property name="templateLoaderPath" value="/"/>
    <property name="defaultEncoding" value="UTF-8"/>
    <property name="freemarkerSettings">
        <props>

            <prop key="template_update_delay">10prop>
            <prop key="locale">zh_CNprop>
            <prop key="datetime_format">yyyy-MM-dd HH:mm:ssprop>
            <prop key="date_format">yyyy-MM-ddprop>
            <prop key="time_format">HH:mm:ssprop>
            <prop key="number_format">#.####prop>
        props>
    property>
    <property name="freemarkerVariables">
        <map>
            <entry key="root" value="${root}"/>
        map>
    property>
bean>
3.3视图解析器配置
<bean id="freeMarkerViewResolver" class="org.springframework.web.servlet.view.freemarker.FreeMarkerViewResolver">
    <property name="contentType" value="text/html;charset=UTF-8"/>
    <property name="viewClass" value="org.springframework.web.servlet.view.freemarker.FreeMarkerView"/>
    <property name="suffix" value=".ftl"/>
    <property name="cache" value="true"/>

    <property name="exposeSessionAttributes" value="true" />

    <property name="exposeRequestAttributes" value="true" />

    <property name="allowSessionOverride" value="true" />

    <property name="order" value="0" />
bean>
4. 插值规则
通用插值
对于通用插值,又可以分为以下4种情况:
-
插值结果为字符串值:直接输出表达式结果
-
插值结果为数字值:根据默认格式(由#setting指令设置)将表达式结果转换成文本输出.可以使用内建的字符串函数格式化单个插值
-
插值结果为日期值:根据默认格式(由#setting指令设置)将表达式结果转换成文本输出.可以使用内建的字符串函数格式化单个插值
-
插值结果为布尔值:根据默认格式(由#setting指令设置)将表达式结果转换成文本输出.可以使用内建的字符串函数格式化单个插值
代码如下:
${user}<br/>
<#setting number_format="currency"/>
<#assign foo=true/>
${foo?string("yes", "no")}<br/>
<#assign answer=42/>
<#assign lastupdate=2011-01-01/>
${answer}<br/>
${answer?string} <br/><#-- the same as ${answer} -->
${answer?string.number}<br/>
${answer?string.currency}<br/>
${answer?string.percent}<br/>
${answer}<br/>
${d?string("yyyy-MM-dd HH:mm:ss")}<br/>
显示效果如下:

数字格式化插值
数字格式化插值可采用#{expr;format}形式来格式化数字,其中format可以是:
mX:小数部分最小X位
MX:小数部分最大X位
如下面的例子:
<#assign x=2.582/><br/>
<#assign y=4/><br/>
#{x; M2} <#-- 输出2.58 --><br/>
#{y; M2} <#-- 输出4 --><br/>
#{x; m1} <#-- 输出2.6 --><br/>
#{y; m2} <#-- 输出4.00 --><br/>
#{x; m1M2} <#-- 输出2.58 --><br/>
#{y; m1M2} <#-- 输出4.0 --><br/>
字符串操作
FreeMarker的表达式对字符串操作非常灵活,可以将字符串常量和变量连接起来,也可以返回字符串的子串等.
字符串连接有两种语法:
1,使用${…}或#{…}在字符串常量部分插入表达式的值,从而完成字符串连接.
2,直接使用连接运算符+来连接字符串
例如有如下数据模型:
Map root = new HashMap(); root.put(“user”,“annlee”);
下面将user变量和常量连接起来:
${“hello, ${user}!”} //使用第一种语法来连接
" h e l l o , " + u s e r + " ! " / / 使 用 + 号 来 连 接 上 面 的 输 出 字 符 串 都 是 h e l l o , a n n l e e ! , 可 以 看 出 这 两 种 语 法 的 效 果 完 全 一 样 . 值 得 注 意 的 是 , {"hello, " + user + "!"} //使用+号来连接 上面的输出字符串都是hello,annlee!,可以看出这两种语法的效果完全一样. 值得注意的是, "hello,"+user+"!"//使用+号来连接上面的输出字符串都是hello,annlee!,可以看出这两种语法的效果完全一样.值得注意的是,{…}只能用于文本部分,不能用于表达式,下面的代码是错误的:
<#if KaTeX parse error: Expected 'EOF', got '#' at position 15: {isBig}>Wow! <#if "{isBig}">Wow!
应该写成:<#if isBig>Wow!
截取子串可以根据字符串的索引来进行,截取子串时如果只指定了一个索引值,则用于取得字符串中指定索引所对应的字符;如果指定两个索引值,则返回两个索引中间的字符串子串.假如有如下数据模型:
Map root = new HashMap(); root.put(“book”,“struts2,freemarker”);
可以通过如下语法来截取子串:
b o o k [ 0 ] {book[0]} book[0]{book[4]} //结果是su
${book[1…4]} //结果是tru
5. 常用指令
if
这是一个典型的分支控制指令,该指令的作用完全类似于Java语言中的if,if指令的语法格式如下:
<#if condition>…
<#elseif condition>…
<#elseif condition>…
<#else> …
例子如下:
<#assign age=23>
<#if (age>60)>老年人
<#elseif (age>40)>中年人
<#elseif (age>20)>青年人
<#else> 少年人
输出结果是:青年人
上面的代码中的逻辑表达式用括号括起来主要是因为里面有>符号,由于FreeMarker会将>符号当成标签的结束字符,可能导致程序出错,为了避免这种情况,我们应该在凡是出现这些符号的地方都使用括号.
switch、case、default、 break
这些指令显然是分支指令,作用类似于Java的switch语句,switch指令的语法结构如下:
<#switch value>
<#case refValue>…<#break>
<#case refValue>…<#break>
<#default>…
list、break
list指令是一个迭代输出指令,用于迭代输出数据模型中的集合,list指令的语法格式如下:
<#list sequence as item>
…
上面的语法格式中,sequence就是一个集合对象,也可以是一个表达式,但该表达式将返回一个集合对象,而item是一个任意的名字,就是被迭代输出的集合元素.此外,迭代集合对象时,还包含两个特殊的循环变量:
item_index:当前变量的索引值
item_has_next:是否存在下一个对象
也可以使用<#break>指令跳出迭代
例子如下:
<#list [“星期一”, “星期二”, “星期三”, “星期四”, “星期五”, “星期六”, “星期天”] as x>
x i n d e x + 1 . {x_index + 1}. xindex+1.{x}<#if x_has_next>,
<#if x=“星期四”><#break>
include
include指令的作用类似于JSP的包含指令,用于包含指定页.include指令的语法格式如下:
<#include filename [options]>
在上面的语法格式中,两个参数的解释如下:
filename:该参数指定被包含的模板文件
options:该参数可以省略,指定包含时的选项,包含encoding和parse两个选项,其中encoding指定包含页面时所用的解码集,而parse指定被包含文件是否作为FTL文件来解析,如果省略了parse选项值,则该选项默认是true.
import
该指令用于导入FreeMarker模板中的所有变量,并将该变量放置在指定的Map对象中,import指令的语法格式如下:
<#import “/lib/common.ftl” as com>
上面的代码将导入/lib/common.ftl模板文件中的所有变量,交将这些变量放置在一个名为com的Map对象中.
noparse
noparse指令指定FreeMarker不处理该指定里包含的内容,该指令的语法格式如下:
<#noparse>…
看如下的例子:
<#noparse>
<#list books as book>
escape
escape指令导致body区的插值都会被自动加上escape表达式,但不会影响字符串内的插值,只会影响到body内出现的插值,使用escape指令的语法格式如下:
<#escape identifier as expression>…
<#noescape>…
看如下的代码:
<#escape x as x?html>
First name: f i r s t N a m e L a s t n a m e : {firstName} Last name: firstNameLastname:{lastName}
Maiden name:KaTeX parse error: Expected 'EOF', got '#' at position 16: {maidenName} 上面的代码等同…{firstName?html}
Last name: l a s t N a m e ? h t m l M a i d e n n a m e : {lastName?html} Maiden name: lastName?htmlMaidenname:{maidenName?html}
escape指令在解析模板时起作用而不是在运行时起作用,除此之外,escape指令也嵌套使用,子escape继承父escape的规则,如下例子:
<#escape x as x?html>
Customer Name:${customerName}
Items to ship;
<#escape x as itemCodeToNameMap[x]>
${itemCode1}
${itemCode2}
${itemCode3}
KaTeX parse error: Expected 'EOF', got '#' at position 15: {itemCode4} {customerName?html}
Items to ship;
${itemCodeToNameMap[itemCode1]?html}
${itemCodeToNameMap[itemCode2]?html}
${itemCodeToNameMap[itemCode3]?html}
${itemCodeToNameMap[itemCode4]?html}
对于放在escape指令中所有的插值而言,这此插值将被自动加上escape表达式,如果需要指定escape指令中某些插值无需添加escape表达式,则应该使用noescape指令,放在noescape指令中的插值将不会添加escape表达式.
assign指令
assign指令在前面已经使用了多次,它用于为该模板页面创建或替换一个顶层变量,assign指令的用法有多种,包含创建或替换一个顶层变量,或者创建或替换多个变量等,它的最简单的语法如下:<#assign name=value [in namespacehash]>,这个用法用于指定一个名为name的变量,该变量的值为value,此外,FreeMarker允许在使用assign指令里增加in子句,in子句用于将创建的name变量放入namespacehash命名空间中.
assign指令还有如下用法:<#assign name1=value1 name2=value2 … nameN=valueN [in namespacehash]>,这个语法可以同时创建或替换多个顶层变量,此外,还有一种复杂的用法,如果需要创建或替换的变量值是一个复杂的表达式,则可以使用如下语法格式:<#assign name [in namespacehash]>capture this,在这个语法中,是指将assign指令的内容赋值给name变量.如下例子:
<#assign x>
<#list [“星期一”, “星期二”, “星期三”, “星期四”, “星期五”, “星期六”, “星期天”] as n>
${n}
${x}
上面的代码将产生如下输出:星期一 星期二 星期三 星期四 星期五 星期六 星期天
虽然assign指定了这种复杂变量值的用法,但是我们也不要滥用这种用法,如下例子:<#assign x>Hello ${user}!,以上代码改为如下写法更合适:<#assign x=“Hello ${user}!”>
setting指令
该指令用于设置FreeMarker的运行环境,该指令的语法格式如下:<#setting name=value>,在这个格式中,name的取值范围包含如下几个:
locale:该选项指定该模板所用的国家/语言选项
number_format:指定格式化输出数字的格式
boolean_format:指定两个布尔值的语法格式,默认值是true,false
date_format,time_format,datetime_format:指定格式化输出日期的格式
time_zone:设置格式化输出日期时所使用的时区
整合 Thymeleaf
简介
Thymeleaf 是新一代 Java 模板引擎,它类似于 Velocity、FreeMarker 等传统 Java 模板引擎,但是与传统 Java 模板引擎不同的是,Thymeleaf 支持 HTML 原型。
它既可以让前端工程师在浏览器中直接打开查看样式,也可以让后端工程师结合真实数据查看显示效果,同时,SpringBoot 提供了 Thymeleaf 自动化配置解决方案,因此在 SpringBoot 中使用Thymeleaf 非常方便。
事实上,Thymeleaf 除了展示基本的HTML,进行页面渲染之外,也可以作为一个HTML片段进行渲染,例如我们在做邮件发送时,可以使用Thymeleaf作为邮件发送模板。
另外,由于Thymeleaf模板后缀为.html, 可以直接被浏览器打开,因此,预览时非常方便。
- 整合 Thymeleaf 模板

spring boot 整合 thymeleaf 的配置


创建实体类:
package org.javaboy.teymeleaf.bean;

/**
 * @author yueLQ
 * @date 2020-08-21 10:15
 */
public class Book {

    private Integer id;
    private String name;
    private String author;
    private Double price;

    public Integer getId() {
        return id;
    }

    public void setId(Integer id) {
        this.id = id;
    }

    public String getName() {
        return name;
    }

    public void setName(String name) {
        this.name = name;
    }

    public String getAuthor() {
        return author;
    }

    public void setAuthor(String author) {
        this.author = author;
    }

    public Double getPrice() {
        return price;
    }

    public void setPrice(Double price) {
        this.price = price;
    }

    @Override
    public String toString() {
        return "Book{" +
                "id=" + id +
                ", name='" + name + '\'' +
                ", author='" + author + '\'' +
                ", price=" + price +
                '}';
    }
}
创建UserController 类
package org.javaboy.teymeleaf.controller;

import org.javaboy.teymeleaf.bean.Book;
import org.springframework.stereotype.Controller;
import org.springframework.ui.Model;
import org.springframework.web.bind.annotation.GetMapping;

import java.util.ArrayList;
import java.util.List;

/**
 * @author yueLQ
 * @date 2020-08-21 10:19
 */
@Controller
public class UserController {

    @GetMapping("/book")
    public String book(Model model){

        List<Book> bookList=new ArrayList<>();
        for (int i = 0; i < 10; i++) {
            Book book=new Book();
            book.setId(i);
            book.setName("三国演义"+i);
            book.setAuthor("罗贯中"+i);
            book.setPrice(30.0);
            bookList.add(book);
        }

        model.addAttribute("books", bookList);

        return "books";
    }
}
在 templates 下创建books.html
<html lang="en" xmlns:th="http://www.thymeleaf.org">
<head>
    <meta charset="UTF-8">
    <title>Titletitle>
head>
<body>
    <table border="1">
        <tr>
            <td>编号:td>
            <td>名字:td>
            <td>作者:td>
            <td>价格:td>
        tr>
        <tr th:each="book:${books}">
            <td th:text="${book.id}">td>
            <td th:text="${book.name}">td>
            <td th:text="${book.author}">td>
            <td th:text="${book.price}">td>

        tr>
    table>
body>
html>
测试即可
整合 jsp
- 引入 jsp 和 jstl 标签库的依赖
        <dependency>
            <groupId>org.apache.tomcat.embedgroupId>
            <artifactId>tomcat-embed-jasperartifactId>
        dependency>

        <dependency>
            <groupId>jstlgroupId>
            <artifactId>jstlartifactId>
            <version>1.2version>
        dependency>
- 注意 jsp 的文件要放在 webapp 的目录下,创建 webapp 目录:


最终的目录结构如图所示:

- 在 jsp 的目录下新建 hello.jsp
<%--
  Created by IntelliJ IDEA.
  User: 岳立强
  Date: 2020/8/21
  Time: 11:24
  To change this template use File | Settings | File Templates.
--%>
<%@ page contentType="text/html;charset=UTF-8" language="java" %>
<%@ taglib prefix="c" uri="http://java.sun.com/jsp/jstl/core" %>>
<html>
<head>
    <title>Titletitle>
head>
<body>
 <h1>${name}h1>
<c:forEach begin="" end="" items="" varStatus="">

c:forEach>
body>
html>
- 创建 HelloController 类
@Controller
public class HelloController {

    @GetMapping("/hello")

    public String hello(Model model,String name){
            model.addAttribute("name", name);
        return "hello";
    }
}
- 创建 WebMVCConfig 类 ,配置解析 jsp 的视图解析器
@Configuration
public class WebMVCConfig implements WebMvcConfigurer {

    // 配置视图解析器
    @Override
    public void configureViewResolvers(ViewResolverRegistry registry) {

        registry.jsp("/jsp/", ".jsp");

    }
}
第 04 章 Spring Boot 整合 Web 开发
1. spring boot 默认的 json 解析方案

HttpMessageConverter ,看名字就知道,这是一个消息转换工具,有两个方面的功能:
- 将服务端返回的对象序列化成 json 字符串
- 将前端传来的 json 字符串,反序列化 java 对象
所有的 json 生成都离不开相关的HttpMessageConverter,spring MVC 自动配置了 Jackson 和 Gson 的HttpMessageConverter,spirng boot中有对此做了自动化配置:
jackson 的自动化配置

gson自动化的配置

所以如果用户使用 Jackson 和 Gson,没有其他的额外配置,则只需要添加依赖即可。
测试代码:
- 创建 User 类
public class User {
    private Integer id;
    private String name;
    private String address;
    private Date birthday;
    // 省略 get/set/tostring 方法
    }
创建 UserController 类
//@Controller
@RestController
public class UserController {
    // @ResponseBody
    @GetMapping("/user")
    public List<User> getAllUser() {
        List<User> users = new ArrayList<>();
        for (int i = 0; i < 10; i++) {
            User user = new User();
            user.setId(i);
            user.setName("javaboy>>>" + i);
            user.setAddress("www.javaboy.org>>>" + i);
            user.setBirthday(new Date());
            users.add(user);
        }
        return users;
    }
}
测试结果:
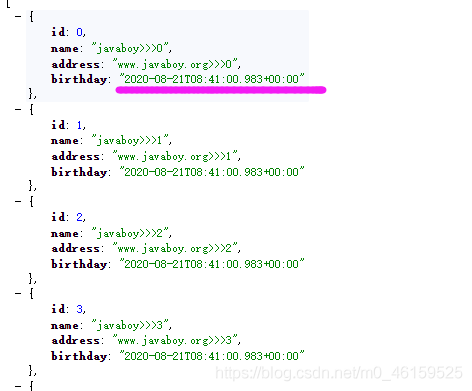
上述测测试结果中我们发现日期格式并不时我们所需要的,修改方式:
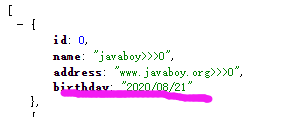
- 方法一: 在实体类日期的属性上添上如下注解:
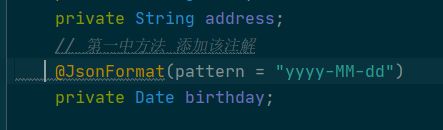
上面的方法有个弊端,不能进行全局的处理。 - 方法二:重写
MappingJackson2HttpMessageConverter
或者ObjectMapper(修改任意一个即可)
@Configuration
public class WebMvcConfig {
//    @Bean
//    MappingJackson2HttpMessageConverter mappingJackson2HttpMessageConverter(){
//
//        MappingJackson2HttpMessageConverter converter = new MappingJackson2HttpMessageConverter();
//        ObjectMapper objectMapper = new ObjectMapper();
//        // 设置日期
//        objectMapper.setDateFormat(new SimpleDateFormat("yyyy/MM/dd"));
//
//        converter.setObjectMapper(objectMapper);
//        return converter;
//    }

    @Bean
    ObjectMapper objectMapper(){
        ObjectMapper objectMapper = new ObjectMapper();
        // 设置日期
        objectMapper.setDateFormat(new SimpleDateFormat("yyyy/MM/dd"));

        return objectMapper;
    }

}
测试结果:
org.springframework.boot.autoconfigure.jackson.JacksonAutoConfiguration 类下的

原理就是 spring boot 的里重要的思想 约定大于配置
2. 使用 Gson 处理
使用 Gson 首先要排除 spring boot 自身 Jackson,然后注入 Gson 依赖。
  <dependency>
            <groupId>org.springframework.bootgroupId>
            <artifactId>spring-boot-starter-webartifactId>

            <exclusions>
                <exclusion>
                    <groupId>org.springframework.bootgroupId>
                    <artifactId>spring-boot-starter-jsonartifactId>
                exclusion>
            exclusions>

        dependency>


        <dependency>
            <groupId>com.google.code.gsongroupId>
            <artifactId>gsonartifactId>
        dependency>
spirng boot 自动化解析的配置

测试结果:

修改日期的格式,重写 GsonHttpMessageConverter 和 Gson (修改任意一个即可)
 @Bean
    GsonHttpMessageConverter gsonHttpMessageConverter(){
        GsonHttpMessageConverter converter = new GsonHttpMessageConverter();
        Gson gson = new Gson();

        converter.setGson(new GsonBuilder().setDateFormat("yyyy/MM/dd").create());
        return converter;
    }


//    @Bean
//    Gson gson(){
//
//        Gson gson = new GsonBuilder().setDateFormat("yyyy-MM-dd").create();
//        return gson;
//    }
测试结果:

3. spring boot 整合 FastJson
注入 FastJson 的依赖:
        <dependency>
            <groupId>com.alibabagroupId>
            <artifactId>fastjsonartifactId>
            <version>1.2.60version>
        dependency>
测试:

spirng boot 自动化解析的配置
代码:
 @Bean
    FastJsonHttpMessageConverter fastJsonHttpMessageConverter(){

        FastJsonHttpMessageConverter converter = new FastJsonHttpMessageConverter();
        FastJsonConfig fastJsonConfig = new FastJsonConfig();
        fastJsonConfig.setDateFormat("yyyy/MM/dd");
        converter.setFastJsonConfig(fastJsonConfig);
        return converter;
    }
测试结果:

4. spring boot 默认静态资源访问方案
org.springframework.boot.autoconfigure.web.servlet.WebMvcAutoConfiguration 类


加载的优先级顺序排名:


新建文件夹进行测试:
5. 自定义静态 web 资源的位置
在 resources 目录下新建一 javaboy 的目录

1. 在 application 配置文件中修改
#spring.resources.static-locations=classpath:/javaboy/
# 自定义匹配规则
#spring.mvc.static-path-pattern=/**
2. java 代码修改
新建一个 WebMvcConfing 类
@Configuration
public class WebMvcConfig implements WebMvcConfigurer {
    @Override
    public void addResourceHandlers(ResourceHandlerRegistry registry) {

        registry.addResourceHandler("/**")
                .addResourceLocations("classpath:/javaboy/");
    }
}
6. 文件上传


新建 FileUploadController
@RestController
public class FileUploadController {
    SimpleDateFormat simpleDateFormat=new SimpleDateFormat("/yyyy/MM/dd/");
    @PostMapping("/fileUpload")
    public String fileUpload(MultipartFile file, HttpServletRequest request){
        String format = simpleDateFormat.format(new Date());
        // 获取保存地址
        String realPath = request.getServletContext().getRealPath("/img") +format;

        File folder=new File(realPath);
        // 如果文件夹不存在则创建新的文件夹
        if (!folder.exists()){
            folder.mkdirs();
        }
        // 获取文件旧的名字
        String oldName = file.getOriginalFilename();

        // 创建新的文件名
        String newName = UUID.randomUUID().toString().replace("-", "") + oldName.substring(oldName.lastIndexOf("."));

        try {
            // 保存文件
            file.transferTo(new File(folder, newName));
            // 返回一个路径,协议要动态的获取。如 http/https
            String url= request.getScheme()+ //获取协议
                    "://"+request.getServerName() //获取服务器的名称
                    +":"+request.getServerPort() // 获取端口号
                    +"/img"
                    +format+newName;
            return  url;
        } catch (IOException e) {
            e.printStackTrace();
        }
        return "error";
    }
}
在 resources/static 目录下创建 index.html
<html lang="en">
<head>
    <meta charset="UTF-8">
    <title>Titletitle>
head>
<body>
<form action="/fileUpload" method="post" enctype="multipart/form-data">
    <input type="file" name="file">
    <input type="submit" value="提交">
form>
body>
html>
如果需要配置限制在 application 文件下进行配置
# 单个文件上传的大小默认是1MB
spring.servlet.multipart.max-file-size=1KB
# 上传的文件总大小
# spring.servlet.multipart.max-request-size=10MB
# 临界值,达到多少的时候不在写在内存中而是硬盘中
#spring.servlet.multipart.file-size-threshold
# 临界值,达到一定承兑先写在一个文件夹中,在写入硬盘
#spring.servlet.multipart.location
# 是否开启 multipart
#spring.servlet.multipart.enabled=true
# 是否延迟解析
#spring.servlet.multipart.resolve-lazily=false
最终测是结果:
![]()
7. Ajax 上传文件
创建 index2.html 文件
<html lang="en">
<head>
    <meta charset="UTF-8">
    <title>Titletitle>
head>

<body>
<div id="result">div>
<input type="file" id="file">
<input type="button" value="上传" onclick="btn()">
<script  src="jquery-3.4.1.js">script>
<script>
    function btn() {
        var file = $("#file")[0].files[0];
        var formData = new FormData();
        // 不能连着 append
        formData.append("file",file)
        $.ajax({
            type:"post",
            url:"/fileUpload",
            data:formData,
            processData: false, // 是否把上传的数据处理成对象,默认为 true
            contentType:false,// 是否设置请求头,有可能破坏分割符的请求头
            success:function (msg) {

                $("#result").html(msg);
            }
        })
    }
script>
body>
html>
后台代码不用修改!!!
8. 多文件的上传
新建 index3.html 文件
<html lang="en">
<head>
    <meta charset="UTF-8">
    <title>Titletitle>
head>
<body>
<form action="/fileUploads" method="post" enctype="multipart/form-data">

    <input type="file" name="files" multiple>
    <input type="submit" value="提交">
form>
body>
html>
在FileUploadController 添加 新的方法
 @PostMapping("/fileUploads")
    public String fileUploads(MultipartFile[] files, HttpServletRequest request) {
        String format = simpleDateFormat.format(new Date());
        // 获取保存地址
        String realPath = request.getServletContext().getRealPath("/img") + format;

        File folder = new File(realPath);
        // 如果文件夹不存在则创建新的文件夹
        if (!folder.exists()) {
            folder.mkdirs();
        }


        for (MultipartFile file : files) {

            // 获取文件旧的名字
            String oldName = file.getOriginalFilename();

            // 创建新的文件名
            String newName = UUID.randomUUID().toString().replace("-", "") + oldName.substring(oldName.lastIndexOf("."));

            try {
                // 保存文件
                file.transferTo(new File(folder, newName));
                // 返回一个路径,协议要动态的获取。如 http/https
                String url = request.getScheme() + //获取协议
                        "://" + request.getServerName() //获取服务器的名称
                        + ":" + request.getServerPort() // 获取端口号
                        + "/img"
                        + format + newName;
                System.out.println(url);
            } catch (IOException e) {
                e.printStackTrace();
            }

        }


        return "success";
    }
9. @ControllerAdvice 注解
不是 spring boot 注解,是 spring 中的注解。
- 处理全局异常
- 预设全局数据
- 请求参数预处理
全局异常处理
借用上面文件上传的代码,修改 application 文件,限制文件上传的大小修改为 1KB

创建全局异常处理 MyCustomException
@ControllerAdvice
public class MyCustomException {

    // 只有文件大小异常的会进到这里
//    @ExceptionHandler(MaxUploadSizeExceededException.class)
//    public void myException(MaxUploadSizeExceededException e, HttpServletResponse response) throws IOException {
//        response.setContentType("text/html;charset=utf-8");
//        PrintWriter out = response.getWriter();
//        out.write("上传文件大小超出啊限制!");
//        out.flush();
//        out.close();
//    }
测试结果:

返回视图层:
- 添加
thymeleaf依赖
     <dependency>
            <groupId>org.springframework.bootgroupId>
            <artifactId>spring-boot-starter-thymeleafartifactId>
    dependency>
- 在 templates 文件创建 myerror.html 文件
<html lang="en" xmlns:th="http://www.thymeleaf.org">
<head>
    <meta charset="UTF-8">
    <title>Titletitle>
head>
<body>
<h1 th:text="${error}">h1>
body>
html>
MyCustomException添加处理视图的方法
// 返回视图
    @ExceptionHandler(MaxUploadSizeExceededException.class)
    public ModelAndView myModelAndView(MaxUploadSizeExceededException e){

        ModelAndView modelAndView = new ModelAndView("myerror");
        modelAndView.addObject("error", "上传文件大小超出限制");
        return modelAndView;

    }
测试结果:

预设全局数据
新建项目,创建 GlobalData 类
// 全局处理,任何一个 controller 都可以获取到该数据
@ControllerAdvice
public class GlobalData {

    @ModelAttribute(value = "info")
    public Map<String,Object> mydata(){

        HashMap<String, Object> map = new HashMap<>();
        map.put("name", "javaboy");
        map.put("addr", "www.javaboy.org");
        return map;

    }

}
添加 HelloController 类
@RestController
public class HelloController {
    @GetMapping("/hello")
    public void hello(Model model, HttpServletResponse response) throws IOException {

        Map<String, Object> map = model.asMap();
        Set<String> keySet = map.keySet();

        for (String key : keySet) {

            Object value=map.get(key);
            PrintWriter out = response.getWriter();
            out.write(key+":"+value);
            out.close();
            out.flush();
        }


    }
}
测试结果:

请求参数的预处理
新建 Book 类 和 Author 类
public class Book {

    private String name;
    private Double price;
    // 此处省略 get/set/toString 方法
}
public class Author {
    private String name;
    private Integer age;
    // 此处省略 get/set/toString 方法
}
创建 BookController 类
@RestController
public class BookController {

    @PostMapping("/book")
    // @ModelAttribute 取别名区分名字
    public void addBook( Book book, Author author){
        System.out.println(book);
        System.out.println(author);
    }
使用 postmen 测试

测试结果:

发现两个对象里的属性值相同。
解决办法:
- 在
BookController中传入的参数添加@ModelAttribute注解

在 GlobalData 类中新建两个解析绑定传入参数的方法,有点像数据库中修改表的名字
 @InitBinder("b")  // 绑定 b
    public void initB(WebDataBinder binder){
        binder.setFieldDefaultPrefix("b.");
    }

    @InitBinder("a") //绑定 a
    public void initA(WebDataBinder binder){
        binder.setFieldDefaultPrefix("a.");
    }
重新测试:

测试结果:

10. spring boot 自定义异常的处理
优先级: 先精确高于模糊,动态的高于静态的
新建项目,创建 HelloController 类
@RestController
public class HelloController {

    @GetMapping("/hello")
    public String  hello(){
        int i=1/0;
        return "hello";
    }
}
添加静态的错误页面
例如:

<html lang="en">
<head>
    <meta charset="UTF-8">
    <title>Titletitle>
head>
<body>
<h1>404h1>
body>
html>
也可以添加动态页面,但是要添加 thymeleaf 的依赖
页面内容和上面相似
测试结果:

自定义异常处理的源码分析
org.springframework.boot.autoconfigure.web.servlet.error.ErrorMvcAutoConfiguration


org.springframework.boot.autoconfigure.web.servlet.error.DefaultErrorViewResolver


自定义异常数据
ErrorMvcAutoConfiguration

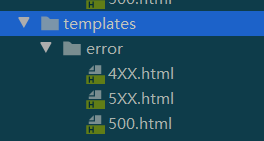
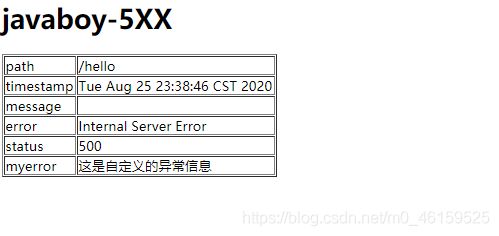
在 templates/error 下修改 5xx.html
<html lang="en" xmlns:th="http://www.thymeleaf.org">
<head>
    <meta charset="UTF-8">
    <title>Titletitle>
head>
<body>
<h1>thymeleaf-5XXh1>
<table border="1">
    <tr>
        <td>pathtd>
        <td th:text="${path}">td>
    tr>
    <tr>
        <td>timestamptd>
        <td th:text="${timestamp}">td>
    tr>

    <tr>
        <td>messagetd>
        <td th:text="${message}">td>
    tr>

    <tr>
        <td>errortd>
        <td th:text="${error}">td>
    tr>

    <tr>
        <td>statustd>
        <td th:text="${status}">td>
    tr>


table>
body>
html>
对应的属性来自
DefaultErrorAttributes

测试结果:

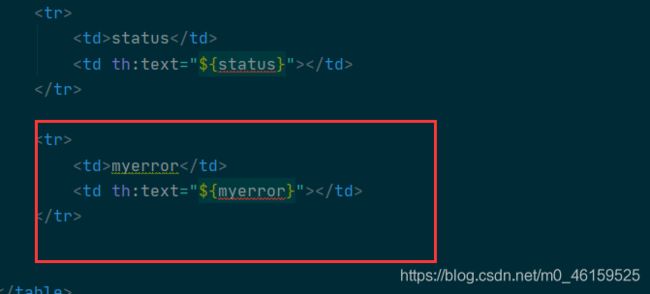
自己定义新建 MyErrorAtribute 类
@Component
public class MyErrorAtribute extends DefaultErrorAttributes {
// 重写该方法
    @Override
    public Map<String, Object> getErrorAttributes(WebRequest webRequest, ErrorAttributeOptions options) {
        Map<String, Object> map = super.getErrorAttributes(webRequest, options);
        map.put("myerror","这是自定义的异常信息");

        return map;
    }
}
在 5xx.html 文件
测试结果:

自定义异常视图
不想用 spring boot 定义的视图,自己定义
ErrorMvcAutoConfiguration 类中的视图解析,重写该方法

新建 MyErrorViewResolver 类
@Component
public class MyErrorViewResolver extends DefaultErrorViewResolver {
    /**
     * Create a new {@link DefaultErrorViewResolver} instance.
     *
     * @param applicationContext the source application context
     * @param resourceProperties resource properties
     */
    public MyErrorViewResolver(ApplicationContext applicationContext, ResourceProperties resourceProperties) {
        super(applicationContext, resourceProperties);
    }

    @Override
    public ModelAndView resolveErrorView(HttpServletRequest request, HttpStatus status, Map<String, Object> model) {
        ModelAndView modelAndView = super.resolveErrorView(request, status, model);

        modelAndView.setViewName("javaboy");
        modelAndView.addObject(model);
        return modelAndView;
    }

}
复制一份 5xx.html 文件,粘贴在 templates 下,改名为 javaboy,html


测试结果:
11. cors 实现跨域
同源策略
很多人对跨域有一种误解,以为这是前端的事,和后端没关系,其实不是这样的,说到跨域,就不得不说说浏览器的同源策略。
同源策略是由 Netscape 提出的一个著名的安全策略,它是浏览器最核心也最基本的安全功能,现在所有支持 JavaScript 的浏览器都会使用这个策略。所谓同源是指协议、域名以及端口要相同。同源策略是基于安全方面的考虑提出来的,这个策略本身没问题,但是我们在实际开发中,由于各种原因又经常有跨域的需求,传统的跨域方案是 JSONP,JSONP 虽然能解决跨域但是有一个很大的局限性,那就是只支持 GET 请求,不支持其他类型的请求,而今天我们说的 CORS(跨域源资源共享)(CORS,Cross-origin resource sharing)是一个 W3C 标准,它是一份浏览器技术的规范,提供了 Web 服务从不同网域传来沙盒脚本的方法,以避开浏览器的同源策略,这是 JSONP 模式的现代版。
在 Spring 框架中,对于 CORS 也提供了相应的解决方案,今天我们就来看看 SpringBoot 中如何实现 CORS 。
新建两个项目 cors1 和 cors2
在 cors1 上创建 HelloController
@RestController
public class HelloController {
    @GetMapping("/hello")
    public String hello(){

        return  "hello cors";
    }

    @PutMapping("/doput")
    public String doput(){

        return "doput";
    }
}
在 cors2 上创建 index.html,引入 jq 文件
<html lang="en">
<head>
    <meta charset="UTF-8">
    <title>Titletitle>
head>
<body>
<div id="app">div>
<input type="button" value="Get" onclick="getData()">
<input type="button" value="Put" onclick="putData()">
<script src="jquery-3.4.1.js">script>
<script>
    function getData() {
        $.get(
                "http://localhost:8080/hello",
                function(msg){
                    $("#app").html(msg)
                }

            )

    }

    function putData() {

        $.ajax({
            url:"http://localhost:8080/doput",
            type:"put",
            success:function (msg) {
                $("#app").html(msg)
            }
        })
    }

script>
body>
html>
在 application.properties 文件中修改端口号修改为 8081
测试访问:
http://localhost:8081/
![]()
在 cors1 的 HelloController 中添加 @CrossOrigin 注解,该注解可以添加到方法上,也可以添加在类上。

上面的方法有个弊端,就是不能大量的配置,创建 WebMvcConfig 取解决全局配置
@Configuration
public class WebMvcConfig implements WebMvcConfigurer {
    @Override
    public void addCorsMappings(CorsRegistry registry) {

        registry.addMapping("/**") //那写接口可以使用,/** 代表所有
        .allowedOrigins("http://localhost:8081")
                .allowedHeaders("*") //允许通过的请求头
        .allowedMethods("*") //允许通过的方法
        .maxAge(30*1000); // 探测请求的有效期
    }
}
测试结果:

put 方法额探测请求
先发送探测请求,成功之后,在设置的该时间段内不在发送该请求。


12. spring boot 加载 XML 文件配置
新建项目,创建 SayHello 类
public class SayHello {
    public String sayHello(){

        return "hello xml";
    }
}
在 resources 目录下创建 beans.xml

<beans xmlns="http://www.springframework.org/schema/beans"
       xmlns:xsi="http://www.w3.org/2001/XMLSchema-instance"
       xsi:schemaLocation="http://www.springframework.org/schema/beans http://www.springframework.org/schema/beans/spring-beans.xsd">


    <bean id="sayHello" class="org.javaboy.xml.SayHello">bean>
beans>
创建 WebMvcConfig 去加载 xml 文件
@Configuration
// 导入配置文件
@ImportResource(value = "classpath:beans.xml")
public class WebMvcConfig {
}
单元测试:
@SpringBootTest
class XmlApplicationTests {
    @Autowired
    SayHello sayHello;
    @Test
    void contextLoads() {
        System.out.println(sayHello.sayHello());
    }

}
结果:

13. spring boot 中的拦截器
新建项目创建 MyInterceptor 类
public class MyInterceptor implements HandlerInterceptor {

    // 只有第一个方法返货 true 后面的方法才会执行

    @Override
    public boolean preHandle(HttpServletRequest request, HttpServletResponse response, Object handler) throws Exception {
        System.out.println("preHandle");
        return true;
    }

    @Override
    public void postHandle(HttpServletRequest request, HttpServletResponse response, Object handler, ModelAndView modelAndView) throws Exception {
        System.out.println("postHandle");
    }

    @Override
    public void afterCompletion(HttpServletRequest request, HttpServletResponse response, Object handler, Exception ex) throws Exception {
        System.out.println("afterCompletion");
    }
}
创建 WebMvcConfig 类,实现拦截器
@Configuration
// 在该类中配置我们的拦截器
public class WebMvcConfig implements WebMvcConfigurer {
    @Override
    public void addInterceptors(InterceptorRegistry registry) {

        registry.addInterceptor(myInterceptor()) //添加拦截器
        .addPathPatterns("/**"); //拦截所有的路径

    }

    @Bean
    MyInterceptor myInterceptor(){
        return new MyInterceptor();
    }
}
创建 HelloController
@RestController
public class HelloController {

    @GetMapping("/hello")
    public String hello(){
        return "hello";
    }
}
测试结果

14. CommandLineRunner 实现系统启动任务
新建项目,创建 MyCommandLineRunner 和 MyCommandLineRunner2,代码如下:
@Component
@Order(99)
public class MyCommandLineRunner1 implements CommandLineRunner {
    @Override
    public void run(String... args) throws Exception {
        System.out.println("MyCommandLineRunner1"+ Arrays.toString(args));
    }
}
@Component
// 数字越大优先级越低
@Order(98)
public class MyCommandLineRunner2 implements CommandLineRunner {
    @Override
    public void run(String... args) throws Exception {
        System.out.println("MyCommandLineRunner2"+ Arrays.toString(args));
    }
}
@Order(98) 执行顺序的优先级,数字越大优先级越低。
启动时进行参数的配置。


测试结果

具体原理

项目上线打包之后,启动了怎么传值,先将刚才的项目打包。

打包之后会在 target 的目录下存在

可以在 cmd 的命令窗口中启动传值,我这里使用 idea 中的
Terminal

测试结果

15. ApplicationRunner 实现系统启动任务
新建项目,创建 MyApplicationRunner01 和 MyApplicationRunner02 类
@Component
@Order(99)
public class MyApplicationRunner01 implements ApplicationRunner {
    // 这里传入的参数不是数组而是对象
    @Override
    public void run(ApplicationArguments args) throws Exception {

        String[] sourceArgs = args.getSourceArgs(); // 获取启动的所有参数
        System.out.println("MyApplicationRunner01>>>sourceArgs"+ Arrays.toString(sourceArgs));

        List<String> nonOptionArgs = args.getNonOptionArgs();// 直接是数组,没有key的参数
        System.out.println("MyApplicationRunner01>>>nonOptionArgs"+nonOptionArgs);
        System.out.println(">>>>>>>>>>>>>>>>>>>>>>>");
        Set<String> optionNames = args.getOptionNames(); // key-value形式
        for (String optionName : optionNames) {
            System.out.println(optionName+":"+args.getOptionValues(optionName));
        }

        System.out.println("》》》》》》》》》》01结束");
    }
}
@Component
@Order(98)
public class MyApplicationRunner02 implements ApplicationRunner {
    @Override
    public void run(ApplicationArguments args) throws Exception {
        String[] sourceArgs = args.getSourceArgs(); // 获取启动的所有参数
        System.out.println("MyApplicationRunner02>>>sourceArgs"+ Arrays.toString(sourceArgs));

        List<String> nonOptionArgs = args.getNonOptionArgs();// 直接是数组,没有key的参数
        System.out.println("MyApplicationRunner02>>>nonOptionArgs"+nonOptionArgs);
        System.out.println(">>>>>>>>>>>>>>>>>>>>>>>");
        Set<String> optionNames = args.getOptionNames(); // key-value形式
        for (String optionName : optionNames) {
            System.out.println(optionName+":"+args.getOptionValues(optionName));
        }

        System.out.println("》》》》》》》》》》02结束");
    }
}
将项目打包和 CommandLineRunner 中的方法一样
测试的参数对比

测试结果:

16. Spring Boot 整合 Web 基础组件
新建项目
1. Servlet
创建MyServlet 类
@WebServlet(urlPatterns = "/servlet") //浏览器访问的路径
public class MyServlet extends HttpServlet {
    @Override
    protected void doGet(HttpServletRequest req, HttpServletResponse resp) throws ServletException, IOException {
        System.out.println("MyServlet");
    }
}
2. Filter
创建 MyFilter 类
@WebFilter(urlPatterns = "/*") //添加拦截的地址
public class MyFilter implements Filter {
    @Override
    public void doFilter(ServletRequest servletRequest, ServletResponse servletResponse, FilterChain filterChain) throws IOException, ServletException {
        System.out.println("MyFilter");
        filterChain.doFilter(servletRequest,servletResponse);
    }
}
3. Listener
创建 MyRequestListener 类
@WebListener
public class MyRequestListener implements ServletRequestListener {

    @Override
    public void requestDestroyed(ServletRequestEvent sre) {
        System.out.println("MyRequestListener.requestDestroyed");
    }

    @Override
    public void requestInitialized(ServletRequestEvent sre) {
        System.out.println("MyRequestListener.requestInitialized");
    }
}
最后,在 spring boot 项目启动类上添加 @ServletComponentScan(basePackages= "org.javaboy.servlet") 注解,这样配置的 servlet,fliter 和 listener 才能生效。

测试结果:

17. 23.Spring Boot 路径映射
新建项目,添加依赖

在 templeates 目录下创建 hello.html 文件
<!DOCTYPE html>
<html lang="en">
<head>
    <meta charset="UTF-8">
    <title>Title</title>
</head>
<body>
<h1>HelloSpringboot</h1>
</body>
</html>
创建 HelloController 类
@Controller
public class HelloController {
    @GetMapping("/hello")
    public String hello(){
        return "hello";
    }
}
我们发现以上的代码并没有在动态页面上渲染数据,只是进行了一个普通的页面跳转,为了避免每次有一个页面跳转,都要创建一个 controller ,所以我们使用路径映射去解决上面的问题
创建一个 WebMvcConfig
@Configuration
public class WebMvcConfig implements WebMvcConfigurer {
    @Override
    public void addViewControllers(ViewControllerRegistry registry) {
        // 有多个就配置多个即可,这些页面都是不需要渲染数据的,知识一个普通的路径跳转。
        registry.addViewController("/javaboy").setViewName("hello");
    }
}
测试结果

18.Spring Boot 中使用类型转换器
新建项目,创建 UserController 类
@RestController
public class UserController {

    @GetMapping("/hello")
    public void hello(Date birth){

        System.out.println(birth);
    }
    }
前台浏览器传入数据:

发现出错:

解决方法:
- 方法一,在
UserController类中添加如下方法:
    @InitBinder
    public void InitBinder (ServletRequestDataBinder binder){
        binder.registerCustomEditor(java.util.Date.class,
                new CustomDateEditor(new SimpleDateFormat("yyyy-MM-dd"), true)
        );
    }
- 方法二,创建
DateConverter类
@Component
public class DateConverter implements Converter<String, Date> {

    SimpleDateFormat dateFormat=new SimpleDateFormat("yyyy-MM-dd");
    @Override
    public Date convert(String source) {
        if(!StringUtils.isEmpty(source)){

            try {
                return dateFormat.parse(source);
            } catch (ParseException e) {
                e.printStackTrace();
            }
        }
        return null;
    }
}
测试结果

19. spring boot 中整合 AOP
新建项目,添加 web 依赖,和 aop 的依赖
  <dependency>
            <groupId>org.springframework.bootgroupId>
            <artifactId>spring-boot-starter-aopartifactId>
        dependency>
创建 servic 包下的 UserService
@Service
public class UserService {

    public String getUserName(Integer id){
        System.out.println("UserService.getUserName");

        return "hello AOP";
    }

    public void  deleteUserNameById(Integer id){
        System.out.println("UserService.deleteUserNameById");
    }
}
创建 UserController 类
@RestController
public class UserController {
    @Autowired
    UserService userService;

    @GetMapping("/test1")
    public String getUserName(Integer id){


        return userService.getUserName(id);
    }
    @GetMapping("/test2")
    public void  deleteUserNameById(Integer id){

        userService.deleteUserNameById(id);
    }
}
创建 LoggerCommponent 类
@Component
@Aspect
public class LoggerCommponent {
@Pointcut("execution(* org.javaboy.aop.service.*.*(..))")
public void pc1(){
}
// 五种通知
@Before(value ="pc1()")
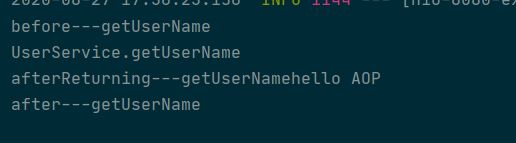
public void before(JoinPoint joinPoint){
String name = joinPoint.getSignature().getName(); //获取方法名
System.out.println("before---"+name);
}
@After("pc1()")
public void after(JoinPoint joinPoint){
String name = joinPoint.getSignature().getName(); //获取方法名
System.out.println("after---"+name);
}
@AfterReturning(value = "pc1()",returning = "result") //returning 是获取方法的返回值是什莫的一个参数
public void afterReturning(JoinPoint joinPoint,Object result){
String name = joinPoint.getSignature().getName(); //获取方法名
System.out.println("afterReturning---"+name+result);
}
@AfterThrowing(value = "pc1()",throwing = "e")
public void afterThrowing(JoinPoint joinPoint,Exception e){
String name = joinPoint.getSignature().getName(); //获取方法名
System.out.println("afterThrowing---"+name+e);
}
@Around("pc1()")
public Object around(ProceedingJoinPoint proceedingJoinPoint) throws Throwable {
// 前置通知
Object proceed = proceedingJoinPoint.proceed();
// 后置通知
// 异常通知
return "www.javaboy.org"; //可以串改方法的返回值
}
}
测试结果:

20. Spring Boot 自定义欢迎页
新建项目,注入 web 和 thymeleaf 的依赖
在 resources/statc 目录和 resources/templates 下分贝创建 index.html 页面
<html lang="en">
<head>
    <meta charset="UTF-8">
    <title>Titletitle>
head>
<body>
<h1>Hello static!h1>
body>
html>
<html lang="en">
<head>
    <meta charset="UTF-8">
    <title>Titletitle>
head>
<body>
    <h1>Hello thymeleafh1>
body>
html>
创建 HelloController 类
@RestController
public class HelloController {
    @GetMapping("/hello")
    public String hello(){
        return "index";
    }

}
也可以使用 spring boot 的路径映射
@Configuration
public class WebMvcConfig implements WebMvcConfigurer {
    @Override
    public void addViewControllers(ViewControllerRegistry registry) {

        registry.addViewController("/index").setViewName("index");
    }
}
测试结果:
访问路径 localhost:8080
当静态页面和动态页面都存在的时候,优先显示静态,当静态页面不存在的时候,显示的是动态页面。
21. Spring Boot 自定义 favicon
在线制作 favicon 的网站:https://tool.lu/favicon/

在 static 目录下或者 resources 目录下,将下载好的文件粘贴到目录下,在 static 目录下的优先级高于 resources。
22. Spring Boot 除去自动化配置
方法一:在启动类上进行配置

方法二:在配置文件上进行配置

第 05 章 Spring Boot 整合持久层技术
1.Spring Boot 整合 JdbcTemplate
新建项目,注入依赖
    <dependencies>
        <dependency>
            <groupId>org.springframework.bootgroupId>
            <artifactId>spring-boot-starter-jdbcartifactId>
        dependency>

        <dependency>
            <groupId>org.springframework.bootgroupId>
            <artifactId>spring-boot-starter-webartifactId>
        dependency>


        <dependency>
            <groupId>mysqlgroupId>
            <artifactId>mysql-connector-javaartifactId>
            <scope>runtimescope>
            <version>5.1.27version>
        dependency>


        <dependency>
            <groupId>com.alibabagroupId>
            <artifactId>druid-spring-boot-starterartifactId>
            <version>1.1.10version>
        dependency>
添加数据库的配置:
spring.datasource.type=com.alibaba.druid.pool.DruidDataSource
spring.datasource.username=root
spring.datasource.password=root
spring.datasource.url=jdbc:mysql://localhost:3306/javaboy
创建 User 类
public class User {
    private Integer id;
    private String username;
    private String address;

    @Override
    public String toString() {
        return "User{" +
                "id=" + id +
                ", username='" + username + '\'' +
                ", address='" + address + '\'' +
                '}';
    }

    public Integer getId() {
        return id;
    }

    public void setId(Integer id) {
        this.id = id;
    }

    public String getUsername() {
        return username;
    }

    public void setUsername(String username) {
        this.username = username;
    }

    public String getAddress() {
        return address;
    }

    public void setAddress(String address) {
        this.address = address;
    }
}
创建 UserService 类
@Service
public class UserService {
    @Autowired
    JdbcTemplate jdbcTemplate;
    // 新增
    public Integer addUser(User user){
        // 增删改 都是 update 方法
        int count = jdbcTemplate.update("insert into user(username,address) value (?,?)", user.getUsername(), user.getAddress());
        return count;
    }

    // 修改
    public  Integer updateUser(User user){

       return  jdbcTemplate.update("update user set username=? where id=?", user.getUsername(),user.getId());
    }

    // 删除
    public Integer deleteUserById(Integer id){
        return  jdbcTemplate.update("delete from user where id=?", id);
    }

    // 查询

    public List<User> findAllUser(){

       return jdbcTemplate.query("select * from user", new RowMapper<User>() {
            @Override
            public User mapRow(ResultSet resultSet, int i) throws SQLException {
                User user=new User();
                int id = resultSet.getInt("id");
                String username = resultSet.getString("username");
                String address = resultSet.getString("address");
                user.setId(id);
                user.setUsername(username);
                user.setAddress(address);

                return user;
            }
        });
    }

    // 前提: 数据库的属性和bean类型的属性是名字相同
    public List<User> findAllUser2(){

        return jdbcTemplate.query("select * from user", new BeanPropertyRowMapper<>(User.class));
    }
}
测试:
@SpringBootTest
class JdbcTemplatesApplicationTests {
    @Autowired
    UserService userService;
    @Test
    void addUser() {
        User user=new User();
        user.setUsername("javaboy");
        user.setAddress("www.javaboy.org");
        userService.addUser(user);
    }


    @Test
    void updateUser() {
        User user=new User();
        user.setUsername("javaboy2");
       user.setId(5);
        userService.updateUser(user);
    }

    @Test
    void deleteUser() {

        userService.deleteUserById(5);
    }


    @Test
    void findUser() {

        List<User> allUser = userService.findAllUser();
        for (User user : allUser) {
            System.out.println(user);
        }
    }

    @Test
    void findUser2() {

        List<User> allUser = userService.findAllUser2();
        for (User user : allUser) {
            System.out.println(user);
        }
    }
}
2. Spring Boot 整合 JdbcTemplate 多数据源
新建项目,注入依赖
   <dependencies>
        <dependency>
            <groupId>org.springframework.bootgroupId>
            <artifactId>spring-boot-starter-jdbcartifactId>
        dependency>
        <dependency>
            <groupId>org.springframework.bootgroupId>
            <artifactId>spring-boot-starter-webartifactId>
        dependency>

        <dependency>
            <groupId>mysqlgroupId>
            <artifactId>mysql-connector-javaartifactId>
            <scope>runtimescope>
            <version>5.1.27version>
        dependency>
        <dependency>
            <groupId>com.alibabagroupId>
            <artifactId>druid-spring-boot-starterartifactId>
            <version>1.1.10version>
        dependency>
在配置文件中配置数据源
spring.datasource.one.url=jdbc:mysql://localhost:3306/javaboy
spring.datasource.one.username=root
spring.datasource.one.password=root
spring.datasource.one.type=com.alibaba.druid.pool.DruidDataSource


spring.datasource.two.url=jdbc:mysql://localhost:3306/javaboy2
spring.datasource.two.username=root
spring.datasource.two.password=root
spring.datasource.two.type=com.alibaba.druid.pool.DruidDataSource
有一个统一修改的快捷键 Alt+鼠标左键 向下拉取。
创建 DataSourceConfig 类
@Configuration
public class DataSourceConfig {

    @Bean
    @ConfigurationProperties(prefix = "spring.datasource.one")
    DataSource dsOne(){
        return DruidDataSourceBuilder.create().build();
    }

    @Bean
    @ConfigurationProperties(prefix = "spring.datasource.two")
    DataSource dsTwo(){
        return DruidDataSourceBuilder.create().build();
    }
}
创建 JdbcTemplateConfig 类,注入数据源
@Configuration
public class JdbcTemplateConfig {

    @Bean
    JdbcTemplate jdbcTemplateOne(@Qualifier("dsOne") DataSource dsOne){
        return new JdbcTemplate(dsOne);
    }

    @Bean
    JdbcTemplate jdbcTemplateTwo(@Qualifier("dsTwo") DataSource dsTwo){
        return new JdbcTemplate(dsTwo);
    }
}
测试:
package org.javaboy.jdbc_templeates2;

import org.javaboy.jdbc_templeates2.bean.User;
import org.junit.jupiter.api.Test;
import org.springframework.beans.factory.annotation.Autowired;
import org.springframework.beans.factory.annotation.Qualifier;
import org.springframework.boot.test.context.SpringBootTest;
import org.springframework.jdbc.core.BeanPropertyRowMapper;
import org.springframework.jdbc.core.JdbcTemplate;

import javax.annotation.Resource;
import javax.jws.Oneway;
import java.util.List;

@SpringBootTest
class JdbcTempleates2ApplicationTests {
    @Autowired
    @Qualifier("jdbcTemplateOne")
    JdbcTemplate jdbcTemplateOne;

    @Resource(name = "jdbcTemplateTwo")
    JdbcTemplate jdbcTemplateTwo;

    @Test
    void contextLoads() {

        List<User> query1 = jdbcTemplateOne.query("select * from user", new BeanPropertyRowMapper<>(User.class));
        System.out.println(query1);

        List<User> query2 = jdbcTemplateT.query("select * from user", new BeanPropertyRowMapper<>(User.class));
        System.out.println(query2);
    }

}

3. Spring Boot 整合 MyBatis
新建项目,注入依赖
 <dependencies>
        <dependency>
            <groupId>org.springframework.bootgroupId>
            <artifactId>spring-boot-starter-webartifactId>
        dependency>
        <dependency>
            <groupId>org.mybatis.spring.bootgroupId>
            <artifactId>mybatis-spring-boot-starterartifactId>
            <version>2.1.3version>
        dependency>

        <dependency>
            <groupId>mysqlgroupId>
            <artifactId>mysql-connector-javaartifactId>
            <scope>runtimescope>
            <version>5.1.27version>
        dependency>

        <dependency>
            <groupId>com.alibabagroupId>
            <artifactId>druid-spring-boot-starterartifactId>
            <version>1.1.10version>
        dependency>
在 application 进行配置
spring.datasource.type=com.alibaba.druid.pool.DruidDataSource
spring.datasource.username=root
spring.datasource.password=root
spring.datasource.url=jdbc:mysql:///javaboy
新建 User 类
public class User {

    private Integer id;
    private String username;
    private String address;
}
创建 UserMapper 接口
//@Mapper
public interface UserMapper {

    List<User> getAllUser();
}
配置包扫描的注解有两种方法:
- 在该类上使用
@Mapper注解进行声明。 - 或者在启动类上使用
@MapperScan注解进行全局的包扫描。

创建 UserMapper.xml 文件
<?xml version="1.0" encoding="UTF-8" ?>
<!DOCTYPE mapper
        PUBLIC "-//mybatis.org//DTD Mapper 3.0//EN"
        "http://mybatis.org/dtd/mybatis-3-mapper.dtd">
<mapper namespace="org.javaboy.mybatis.mapper.UserMapper">
    <select id="getAllUser" resultType="org.javaboy.mybatis.Bean.User">
        select  * from USER
    </select>
</mapper>
mapper 文件有三种存放地址:
-
第一种,mapper 文件夹的目录必须和
UserMapper接口的目录结构一一对应。

-
第二种,将 mapper 的文件放在
UserMapper接口相同的 java 文件包中。

进项测试的时候,出现错误。
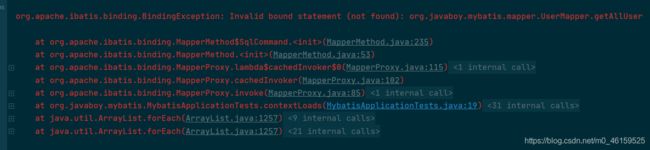
查看target 目录,发现 mapper 的 xml 没有加载进去

解决办法:
在 pom 文件中的bulid 标签中 进行配置
     <resources>
            <resource>
                <directory>src/main/javadirectory>
                <includes>
                    <include>**/*.xmlinclude>
                includes>
            resource>
      resources>
告诉 maven 打包的时候不要吧 xml 文件忽略掉了,这样有个弊端,会认为 java 目录是 resources 目录,resources 目录就不是 resources 目录了,我们自己运行可能没有问题,但是把项目发给别人的话可能运行出错,所以我们需要把配置配全。
我们还要将 resources 也添加进去。

再次测试

- 第三种,在
resources下自定义目录,例如:

这个时候要在 application 中声明mapper.xml文件的位置

测试代码:
@SpringBootTest
class MybatisApplicationTests {

    @Autowired
    UserMapper userMapper;
    @Test
    void contextLoads() {

        List<User> allUser = userMapper.getAllUser();
        System.out.println(allUser);

    }

}
4. Spring Boot 整合 MyBatis 多数据源
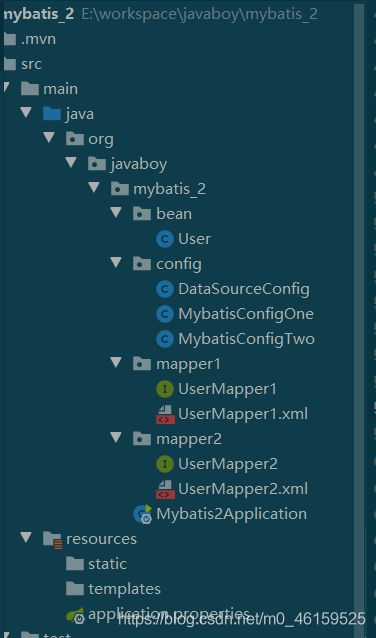
新建项目,项目结构
注入依赖
<project xmlns="http://maven.apache.org/POM/4.0.0" xmlns:xsi="http://www.w3.org/2001/XMLSchema-instance"
         xsi:schemaLocation="http://maven.apache.org/POM/4.0.0 https://maven.apache.org/xsd/maven-4.0.0.xsd">
    <modelVersion>4.0.0modelVersion>
    <parent>
        <groupId>org.springframework.bootgroupId>
        <artifactId>spring-boot-starter-parentartifactId>
        <version>2.3.3.RELEASEversion>
        <relativePath/>
    parent>
    <groupId>org.javaboygroupId>
    <artifactId>mybatis_2artifactId>
    <version>0.0.1-SNAPSHOTversion>
    <name>mybatis_2name>
    <description>Demo project for Spring Bootdescription>

    <properties>
        <java.version>1.8java.version>
    properties>

    <dependencies>
        <dependency>
            <groupId>org.springframework.bootgroupId>
            <artifactId>spring-boot-starter-webartifactId>
        dependency>
        <dependency>
            <groupId>org.mybatis.spring.bootgroupId>
            <artifactId>mybatis-spring-boot-starterartifactId>
            <version>2.1.3version>
        dependency>

        <dependency>
            <groupId>mysqlgroupId>
            <artifactId>mysql-connector-javaartifactId>
            <scope>runtimescope>
            <version>5.1.27version>
        dependency>

        <dependency>
            <groupId>com.alibabagroupId>
            <artifactId>druid-spring-boot-starterartifactId>
            <version>1.1.10version>
        dependency>

        <dependency>
            <groupId>org.springframework.bootgroupId>
            <artifactId>spring-boot-starter-testartifactId>
            <scope>testscope>
            <exclusions>
                <exclusion>
                    <groupId>org.junit.vintagegroupId>
                    <artifactId>junit-vintage-engineartifactId>
                exclusion>
            exclusions>
        dependency>
    dependencies>

    <build>
        <resources>
            <resource>
                <directory>src/main/java/directory>
                <includes>
                    <include>**/*.xmlinclude>
                includes>
            resource>

            <resource>
                <directory>src/main/resources/directory>
            resource>

        resources>
        <plugins>
            <plugin>
                <groupId>org.springframework.bootgroupId>
                <artifactId>spring-boot-maven-pluginartifactId>
            plugin>
        plugins>
    build>

project>
在 application.properties 文件中添加配置
spring.datasource.one.url=jdbc:mysql:///javaboy
spring.datasource.one.username=root
spring.datasource.one.password=root
spring.datasource.one.type=com.alibaba.druid.pool.DruidDataSource

spring.datasource.two.url=jdbc:mysql:///javaboy2
spring.datasource.two.username=root
spring.datasource.two.password=root
spring.datasource.two.type=com.alibaba.druid.pool.DruidDataSource
创建 DataSourceConfig 类
@Configuration
public class DataSourceConfig {

    @Bean
    @ConfigurationProperties(prefix = "spring.datasource.one")
    DataSource dsOne(){
        return  DruidDataSourceBuilder.create().build();
    }

    @Bean
    @ConfigurationProperties(prefix = "spring.datasource.two")
    DataSource dsTwo(){
        return  DruidDataSourceBuilder.create().build();
    }
}
创建 MybatisConfigOne 类
@Configuration
@MapperScan(basePackages = "org.javaboy.mybatis_2.mapper1",sqlSessionFactoryRef = "sqlSessionFactory1",
sqlSessionTemplateRef = "sqlSessionTemplate1")
public class MybatisConfigOne {
    @Resource(name = "dsOne")
    DataSource dsOne;
    @Bean
    SqlSessionFactory sqlSessionFactory1(){
        SqlSessionFactoryBean bean = new SqlSessionFactoryBean();

        try {
            bean.setDataSource(dsOne);
            return  bean.getObject();
        } catch (Exception e) {
            e.printStackTrace();
        }
        return null;
    }
    @Bean
    SqlSessionTemplate sqlSessionTemplate1(){

        return  new SqlSessionTemplate(sqlSessionFactory1());
    }
}
创建 MybatisConfigTwo 类
@Configuration
@MapperScan(basePackages = "org.javaboy.mybatis_2.mapper2",sqlSessionFactoryRef = "sqlSessionFactory2",
sqlSessionTemplateRef = "sqlSessionTemplate2")
public class MybatisConfigTwo {
    @Resource(name = "dsTwo")
    DataSource dsTwo;
    @Bean
    SqlSessionFactory sqlSessionFactory2(){
        SqlSessionFactoryBean bean = new SqlSessionFactoryBean();

        try {
            bean.setDataSource(dsTwo);
            return  bean.getObject();
        } catch (Exception e) {
            e.printStackTrace();
        }
        return null;
    }
    @Bean
    SqlSessionTemplate sqlSessionTemplate2(){

        return  new SqlSessionTemplate(sqlSessionFactory2());
    }
}
新建 User 类
public class User {
    private Integer id;
    private String username;
    private String address;
}
新建 mapper1/UserMapper1 接口和 UserMapper1.xml 文件
public interface UserMapper1 {
    List<User> getAllUsers();
}
<mapper namespace="org.javaboy.mybatis_2.mapper1.UserMapper1">
    <select id="getAllUsers" resultType="org.javaboy.mybatis_2.bean.User">
        select * from USER
    select>
mapper>
新建 mapper2/UserMapper2 接口和 UserMapper2.xml 文件
public interface UserMapper2 {

    List<User> getAllUsers();
}
<mapper namespace="org.javaboy.mybatis_2.mapper2.UserMapper2">
    <select id="getAllUsers" resultType="org.javaboy.mybatis_2.bean.User">
        select * from USER
    select>
mapper>
测试类代码:
@SpringBootTest
class Mybatis2ApplicationTests {

    @Autowired
    UserMapper1 userMapper1;
    @Autowired
    UserMapper2 userMapper2;

    @Test
    void contextLoads() {
        List<User> allUsers = userMapper1.getAllUsers();
        System.out.println(allUsers);
        List<User> allUsers1 = userMapper2.getAllUsers();
        System.out.println(allUsers1);
    }
5. Spring Data 和 Jpa 简介
了解文章:http://www.javaboy.org/2019/0412/springdata-jpa.html
1. Spring Boot 整合 Spring Data Jpa
新建项目,注入依赖

<dependency>
            <groupId>org.springframework.bootgroupId>
            <artifactId>spring-boot-starter-data-jpaartifactId>
        dependency>
        <dependency>
            <groupId>org.springframework.bootgroupId>
            <artifactId>spring-boot-starter-webartifactId>
        dependency>

        <dependency>
            <groupId>mysqlgroupId>
            <artifactId>mysql-connector-javaartifactId>
            <scope>runtimescope>
            <version>5.1.27version>
        dependency>
        <dependency>
            <groupId>com.alibabagroupId>
            <artifactId>druid-spring-boot-starterartifactId>
            <version>1.1.10version>

        dependency>
配置数据源
## spring.datasource.driver-class-name=com.mysql.jdbc.Driver
#spring.datasource.username=root
#spring.datasource.password=root
#spring.datasource.url=jdbc:mysql:///javaboy
#spring.datasource.type=com.alibaba.druid.pool.DruidDataSource
#
#spring.jpa.database=mysql
#spring.jpa.database-platform=mysql
#spring.jpa.hibernate.ddl-auto=update
#spring.jpa.show-sql=true
#spring.jpa.properties.hibernate.dialect=org.hibernate.dialect.MySQL57Dialect


spring.datasource.type=com.alibaba.druid.pool.DruidDataSource
spring.datasource.username=root
spring.datasource.password=root
spring.datasource.driver-class-name=com.mysql.jdbc.Driver
spring.datasource.url=jdbc:mysql://localhost:3306/javaboy?useUnicode=true&characterEncoding=utf-8


# jpa 额外的配置
# 展示 sql
spring.jpa.show-sql=true
# 数据库的平台b
spring.jpa.database=mysql
spring.jpa.database-platform=mysql
# 创建实体类,框架会根据实体类去数据库创建表,update 是数据库中没有该表则创建,有则不创建
spring.jpa.hibernate.ddl-auto=update
# 指定 mysql 的方言

spring.jpa.properties.hibernate.dialect=org.hibernate.dialect.MySQL57Dialect
创建 Book 类
@Entity(name = "t_book") //默认的表名是类名
public class Book {
    @Id
    @GeneratedValue(strategy = GenerationType.IDENTITY)
    private Integer id;
    @Column(name = "t_name",updatable = true)
    private String name;
    @Column(name = "t_author",updatable = true)
    private String author;

    @Override
    public String toString() {
        return "Book{" +
                "id=" + id +
                ", name='" + name + '\'' +
                ", auhtor='" + author + '\'' +
                '}';
    }

    public Integer getId() {
        return id;
    }

    public void setId(Integer id) {
        this.id = id;
    }

    public String getName() {
        return name;
    }

    public void setName(String name) {
        this.name = name;
    }

    public String getAuthor() {
        return author;
    }

    public void setAuthor(String auhtor) {
        this.author = auhtor;
    }
}
创建 BookMapper 接口继承 JpaRepository 接口,T是要实现的实体类,ID是该实体类的id的数据类型
public interface BookMapper extends JpaRepository<Book,Integer> {
}
测试代码:
@SpringBootTest
class JpaApplicationTests {

    @Autowired
    BookMapper bookMapper;
    **@Test
    void save() {
        Book book=new Book();u
        book.setName("三国演义");
        book.setAuthor("罗贯中");
        bookMapper.save(book);
    }
    @Test
    void  update(){
        Book book = new Book();
        book.setName("sanguoyanyi");
        book.setAuthor("luoguanzhong");
        book.setId(1);
        bookMapper.saveAndFlush(book);
    }**

    @Test
    void delete(){
        bookMapper.deleteById(1);
    }

    @Test
    public void find1(){
        Optional<Book> byId = bookMapper.findById(2);
        System.out.println(byId);

        List<Book> all = bookMapper.findAll();
        System.out.println(all);
    }

    @Test
    public void find2(){
        Sort sort = Sort.by(Sort.Direction.DESC, "id");
        List<Book> id = bookMapper.findAll(sort);
        System.out.println(id);

    }

    @Test
    public void find3(){
        PageRequest of = PageRequest.of(0, 2);
        Page<Book> page = bookMapper.findAll(of);
        System.out.println("总计记录数:"+page.getTotalElements());
        System.out.println("当前页记录数:"+page.getNumberOfElements());
        System.out.println("每页记录数:"+page.getSize());
        System.out.println("获取总页数:"+page.getTotalPages());
        System.out.println("获取查询结果:"+page.getContent());
        System.out.println("获取当前页数(页数是从零开始的):"+page.getNumber());
        System.out.println("是否为首页:"+page.isFirst());
        System.out.println("是否为尾页:"+page.isLast());
    }

}
2. Spring Data Jpa 关键字定义查询方法
使用上面创建的项目在BookMapper 接口中自定义方法
public interface BookMapper extends JpaRepository<Book,Integer> {

    Book findBookById(Integer id);
    // id 大于多少的
    List<Book> findBookByIdGreaterThan(Integer id);

    // id 小于多少,或者书名包含什么的,这里传入的参数必须一一对应
    List<Book> findBookByIdLessThanOrNameContaining(Integer id,String name);
}
测试:
@Test
    public void find4() {
        Book bookById = bookMapper.findBookById(3);
        System.out.println(bookById);
    }

    @Test
    public void find5() {
        List<Book> bookByIdGreaterThan = bookMapper.findBookByIdGreaterThan(3);
        System.out.println(bookByIdGreaterThan);
        List<Book> book = bookMapper.findBookByIdLessThanOrNameContaining(3, "月亮");
        System.out.println(book);
    }


3. Spring Data Jpa 自定义查询 SQL
当有些场景使用受限的时候我们可以自定义 sql
在 BookMapper 接口中添加自己定义的方法
   // nativeQuery 表示前面的是原生查询
    @Query(value="select * from t_book where id=(select max(id) from t_book)",nativeQuery=true) //自己写 sql
    Book getMaxIdBook();

测试代码
@Test
    public void find6() {

        Book maxIdBook = bookMapper.getMaxIdBook();
        System.out.println(maxIdBook);
    }
4.Spring Data Jpa 自定义数据修改 SQL
在 BookMapper 接口中添加自己定义的方法
  @Query(value="insert into t_book(t_name,t_author) value(?,?)",nativeQuery=true)
    // 告诉这是修改的操作
    @Modifying
    // 要添加事务,否则不能运行
    @Transactional
    Integer addBook(String name,String author);

    // 下面的属性可以位置可以不一一对应
    @Query(value="insert into t_book(t_name,t_author) value(:name,:author)",nativeQuery=true)
    @Modifying
    @Transactional
    Integer addBook2(@Param("name") String author,@Param("author") String name);
测试代码:
@Test
    public void test1() {
        bookMapper.addBook("朝花夕拾", "鲁迅");
        bookMapper.addBook2("呐喊", "鲁迅");
    }
5. Spring Boot 整合 Jpa 多数据源
新建项目,注入依赖

    <dependency>
            <groupId>org.springframework.bootgroupId>
            <artifactId>spring-boot-starter-data-jpaartifactId>
        dependency>
        <dependency>
            <groupId>org.springframework.bootgroupId>
            <artifactId>spring-boot-starter-webartifactId>
        dependency>

        <dependency>
            <groupId>mysqlgroupId>
            <artifactId>mysql-connector-javaartifactId>
            <scope>runtimescope>
            <version>5.1.27version>
        dependency>
        <dependency>
            <groupId>com.alibabagroupId>
            <artifactId>druid-spring-boot-starterartifactId>
            <version>1.1.10version>
        dependency>
配置数据源
spring.datasource.one.type=com.alibaba.druid.pool.DruidDataSource
spring.datasource.one.url=jdbc:mysql:///javaboy?useUnicode=true&characterEncoding=utf-8
spring.datasource.one.username=root
spring.datasource.one.password=root


spring.datasource.two.type=com.alibaba.druid.pool.DruidDataSource
spring.datasource.two.url=jdbc:mysql:///javaboy2?useUnicode=true&characterEncoding=utf-8
spring.datasource.two.username=root
spring.datasource.two.password=root
# 要加一个 properties 这些属性都要加到 properties 里
spring.jpa.properties.database=mysql
spring.jpa.properties.database-platform=mysql
spring.jpa.properties.hibernate.ddl-auto=update
spring.jpa.properties.show-sql=true
spring.jpa.properties.hibernate.dialect=org.hibernate.dialect.MySQL57Dialect
项目的目录结构

创建 DataSourceConfig 类
@Configuration
public class DataSourceConfig {

    @Bean
    @Primary // 有多个数据源的时候优先使用谁,谁有这个注解就有限使用谁
    @ConfigurationProperties(prefix = "spring.datasource.one")
    DataSource dsOne(){
        return DruidDataSourceBuilder.create().build();
    }

    @Bean
    @ConfigurationProperties(prefix = "spring.datasource.two")
    DataSource dsTwo(){
        return DruidDataSourceBuilder.create().build();
    }
}
创建 JpaConfig1 类
 */
@Configuration
//和 jpa 相关的包扫描
@EnableJpaRepositories(basePackages = "org.javaboy.jpa2.dao1",entityManagerFactoryRef ="localContainerEntityManagerFactoryBean1",
transactionManagerRef = "platformTransactionManager1")
public class JpaConfig1 {

    @Autowired
    @Qualifier(value = "dsOne")
    DataSource dsOne;

    @Autowired
    JpaProperties jpaProperties;


    @Bean
    @Primary
    LocalContainerEntityManagerFactoryBean localContainerEntityManagerFactoryBean1(EntityManagerFactoryBuilder builder){

        return builder.dataSource(dsOne)
                .properties(jpaProperties.getProperties())
                .persistenceUnit("pu1") //配置单一源
                .packages("org.javaboy.jpa2.Bean") //要扫描的包
                 .build();
    }

    // 配置事务
    @Bean
    PlatformTransactionManager platformTransactionManager1(EntityManagerFactoryBuilder builder){

        return new JpaTransactionManager(localContainerEntityManagerFactoryBean1(builder).getObject());
    }

}
创建 JpaConfig2 类
@Configuration
//和 jpa 相关的包扫描
@EnableJpaRepositories(basePackages = "org.javaboy.jpa2.dao2",entityManagerFactoryRef ="localContainerEntityManagerFactoryBean2",
transactionManagerRef = "platformTransactionManager2")
public class JpaConfig2 {

    @Autowired
    @Qualifier(value = "dsTwo")
    DataSource dsTwo;

    @Autowired
    JpaProperties jpaProperties;


    @Bean
    LocalContainerEntityManagerFactoryBean localContainerEntityManagerFactoryBean2(EntityManagerFactoryBuilder builder){

        return builder.dataSource(dsTwo)
                .properties(jpaProperties.getProperties())
                .persistenceUnit("pu2") //配置单一源
                .package s("org.javaboy.jpa2.Bean") //要扫描的包
                 .build();
    }

    // 配置事务
    @Bean
    PlatformTransactionManager platformTransactionManager2(EntityManagerFactoryBuilder builder){

        return new JpaTransactionManager(localContainerEntityManagerFactoryBean2(builder).getObject());
    }

}
创建 Book 类
@Entity(name = "t_book")
public class Book {
    @Id
    @GeneratedValue(strategy = GenerationType.IDENTITY)
    private  Integer id;
    private  String name;
    private String author;

    @Override
    public String toString() {
        return "Book{" +
                "id=" + id +
                ", name='" + name + '\'' +
                ", author='" + author + '\'' +
                '}';
    }

    public Integer getId() {
        return id;
    }

    public void setId(Integer id) {
        this.id = id;
    }

    public String getName() {
        return name;
    }

    public void setName(String name) {
        this.name = name;
    }

    public String getAuthor() {
        return author;
    }

    public void setAuthor(String author) {
        this.author = author;
    }
}
创建 BookDao1 和 BookDao2 接口
public interface BookDao1 extends JpaRepository<Book,Integer> {
}
public interface BookDao2 extends JpaRepository<Book,Integer> {
}
测试代码:
@SpringBootTest
class Jpa2ApplicationTests {

    @Autowired
    BookDao1 bookDao1;
    @Autowired
    BookDao2 bookDao2;

    @Test
    void contextLoads() {
        List<Book> all = bookDao1.findAll();
        System.out.println(all);
        List<Book> all1 = bookDao2.findAll();
        System.out.println(all1);

    }

}
测试结果:

第 06 章 Spring Boot 整合 NoSQL
1. Spring Boot 整合 Redis
创建项目,注入依赖

spring data redis 整合的不是 jedis 而是lettuce
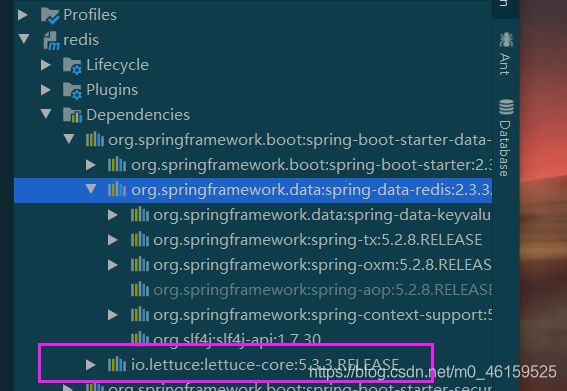
连接 redis
spring.redis.port=6379
spring.redis.host=连接自己的服务器
# redis 用那个库
spring.redis.database=0
#  redis 的密码
#spring.redis.password=123456

# 也可以配置连接池
#spring.redis.jedis.pool.max-active=
#spring.redis.lettuce.cluster.refresh.adaptive=
spring boot 自动加载 redis 源码
org.springframework.boot.autoconfigure.data.redis.RedisAutoConfiguration

创建 HelloController 类
@RestController
public class HelloController {

    @Autowired
    StringRedisTemplate stringRedisTemplate;
    @GetMapping("/set")
    public void set(){
        ValueOperations<String, String> ops = stringRedisTemplate.opsForValue();
        ops.set("name", "javaboy");

    }

    @GetMapping("/get")
    public void get(){
        ValueOperations<String, String> ops = stringRedisTemplate.opsForValue();
        String name = ops.get("name");
        System.out.println(name);
    }
}
2. 为什么需要 session 共享
博客地址:
http://www.javaboy.org/2019/1217/springboot-springsession.html
3. Nginx 简介
博客地址:
http://www.javaboy.org/2019/0605/nginx-guide.html
4. Spring Session 实现 Session 共享
新建项目,注入依赖

配置 redis 连接
spring.redis.host=45.32.15.186
spring.redis.port=6379
spring.redis.database=0

server.port=8080
创建 HelloController 类
@RestController
public class HelloController {

    @Autowired
    StringRedisTemplate stringRedisTemplate;

    @Value("${server.port}")
     Integer port;

    @GetMapping("/set")
    public String set(HttpSession session){
        session.setAttribute("name","javaboy");

        return String.valueOf(port);
    }

    @GetMapping("/get")
    public String get(HttpSession session){
        return session.getAttribute("name")+":"+port;
    }
}
将项目打包

运行启动 8080 端口,和 8081 端口

测试结果
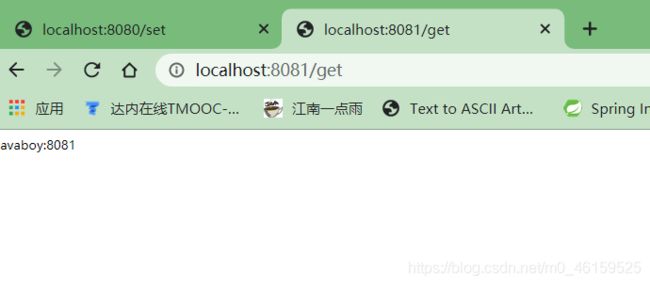
5. 引入 Nginx 负载均衡
将上面的项目打包,上传到服务器,然后启动

启动成功之后,直接 cat 8080.log 查看启动日志,取获取到 spring security 的密码。

测试访问即可。
配置 nginx 进行负载均衡的配置

重启 nginx 之后,进行测试

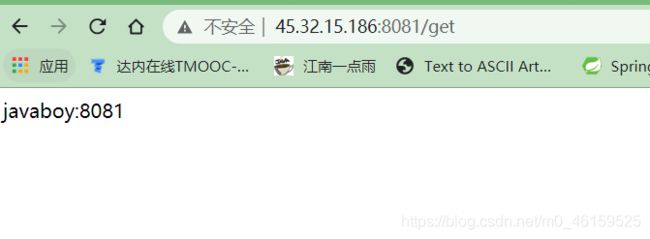
发现已经可以进行负载均衡了。
6. Spring Boot 整合 MongoDB
新建项目,添加依赖

添加 monggodb 配置
spring.data.mongodb.host=45.32.15.186

spring.data.mongodb.database=javaboy
spring.data.mongodb.port=27017
spring.data.mongodb.username=root
spring.data.mongodb.password=123456
# 使用的数据库
spring.data.mongodb.authentication-database=admin
spring boot 整合 mongodb 有两种方式,一种是 MongoRepository (用法和 spring data jpa 相同),另一种方法就是注入 MongoTemplate (用法和 redisTemplate 相同)
创建 User 类
public class Book {
    private Integer id;
    private String name;
    private String author;

    public Integer getId() {
        return id;
    }

    public void setId(Integer id) {
        this.id = id;
    }

    public String getName() {
        return name;
    }

    public void setName(String name) {
        this.name = name;
    }

    public String getAuthor() {
        return author;
    }

    public void setAuthor(String author) {
        this.author = author;
    }

    @Override
    public String toString() {
        return "Book{" +
                "id=" + id +
                ", name='" + name + '\'' +
                ", author='" + author + '\'' +
                '}';
    }
}
创建 UserDao 接口
public interface BookDao extends MongoRepository<Book,Integer> {

    // 和 spring data jpa 一样可以用关键字自定义查询语句
    // 查询一本书包含神魔字
    List<Book> findBookByNameContaining(String name);

}
测试代码:
@SpringBootTest
class MongoApplicationTests {

    @Autowired
    BookDao bookDao;

    @Test
    void contextLoads() {
        Book book = new Book();
        book.setId(2);
        book.setName("红楼梦");
        book.setAuthor("曹雪芹");
        bookDao.insert(book);
    }

    @Test
    void test1() {
        List<Book> all = bookDao.findAll();
        System.out.println(all);
    }

    @Test
    void test2() {
        List<Book> book = bookDao.findBookByNameContaining("红");
        System.out.println(book);
    }
    @Autowired
    MongoTemplate mongoTemplate;

    @Test
    void test3() {
        Book book = new Book();
        book.setId(3);
        book.setName("水浒传");
        book.setAuthor("施耐庵");
        mongoTemplate.insert(book);

        List<Book> all = mongoTemplate.findAll(Book.class);
        System.out.println(all);
    }
}
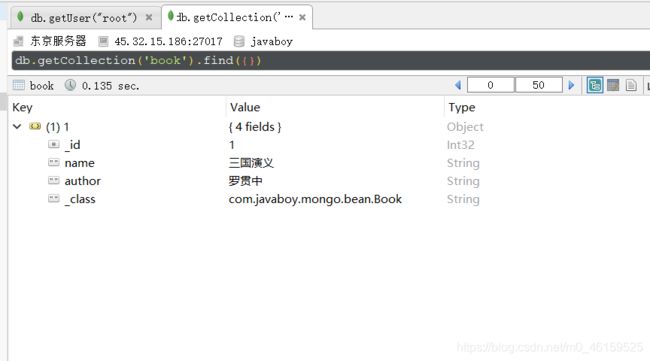
第 07 章 构建 REST 服务
1. 搭建 Jpa 环境
创建项目,添加依赖。

在 application.properties 中配置中配置相关信息
spring.datasource.url=jdbc:mysql:///javaboy?useUnicode=true&characterEncoding=utf-8
spring.datasource.username=root
spring.datasource.password=root
spring.datasource.type=com.alibaba.druid.pool.DruidDataSource


spring.jpa.show-sql=true
spring.jpa.database-platform=mysql
spring.jpa.hibernate.ddl-auto=update
spring.jpa.database=mysql
spring.jpa.properties.hibernate.dialect=org.hibernate.dialect.MySQL57Dialect
创建 Book 的实体类
@Entity(name = "t_book")
public class  Book {
    @Id
    @GeneratedValue(strategy = GenerationType.IDENTITY)
    private Integer id;
    private String name;
    private String author;

    @Override
    public String toString() {
        return "Book{" +
                "id=" + id +
                ", name='" + name + '\'' +
                ", autthor='" + author + '\'' +
                '}';
    }

    public Integer getId() {
        return id;
    }

    public void setId(Integer id) {
        this.id = id;
    }

    public String getName() {
        return name;
    }

    public void setName(String name) {
        this.name = name;
    }

    public String getAuthor() {
        return author;
    }

    public void setAuthor(String autthor) {
        this.author = autthor;
    }
}
创建 BookDao 接口
public interface BookDao extends JpaRepository<Book,Integer> {
}
2. Spring Boot 中 REST 默认提供的增删改查
在 postman 进行测试
查询


分页查询


排序查询

根据id查询

添加


修改

删除

3. Spring Boot 中 REST 自定义查询方法
在 BookDao 中添加自定义的查询方法。
public interface BookDao extends JpaRepository<Book,Integer> {


    List<Book> findBookByNameContaining(@Param("name") String name);
}
测试:
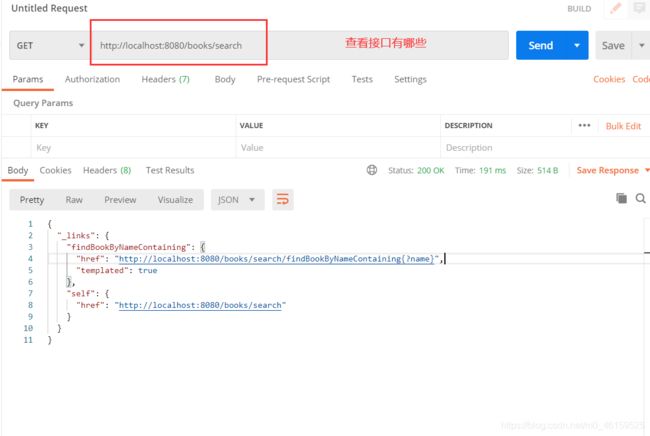

上述的查询我们发现 url的地址有点长所以,可以子啊方法上添加 @RestResource 注解进行修改


我们也可以修改 books 这个路径

在 BookDao 接口上添加该注解 @RepositoryRestResource

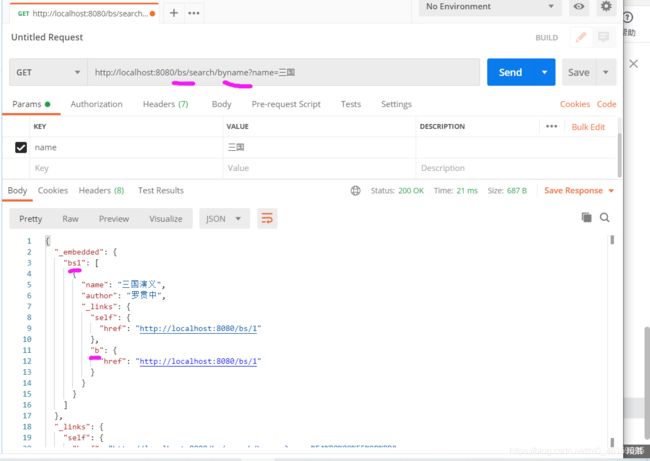
4. REST 配置 CORS
因为没有 controller 所以局部跨域

全局跨域还和以前一样
5. 自定义 REST 配置
可以在配置文件中配置
# rest 配置
# 请求的时候路径要添加 api 才能访问到
spring.data.rest.base-path=/api
# 添加条数据之后,那条数据要不要返回来
spring.data.rest.return-body-on-create=true
# 每页默认的记录数
spring.data.rest.default-page-size=20
# size 名,分页查询的名字,默认为size
#spring.data.rest.limit-param-name=
# 最大记录数
#spring.data.rest.max-page-size=
也可以在 java 代码中配置
// 如果 java 代码和 配置文件都配置了,java 代码的优先级跟高
    @Configuration
public class RestConfig implements RepositoryRestConfigurer {
    @Override
    public void configureRepositoryRestConfiguration(RepositoryRestConfiguration config) {

        config.setBasePath("/javaboy")
                .setDefaultPageSize(2);
    }
}
如果 配置文件和 java 代码都进行了配置,则 java 代码的优先级更高。
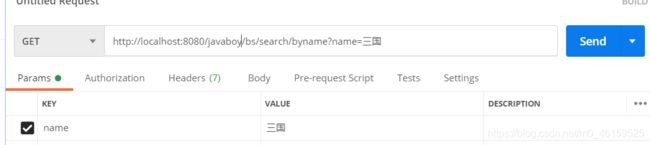
6. MongoDB 实现 REST
新建项目,注入依赖

配置
spring.data.mongodb.authentication-database=admin
spring.data.mongodb.host=45.32.15.186
spring.data.mongodb.port=27017
spring.data.mongodb.password=123456
spring.data.mongodb.username=root
spring.data.mongodb.database=javaboy
创建 Book 类
public class Book {
    private  Integer id;
    private String name;
    private String author;

    @Override
    public String toString() {
        return "Book{" +
                "id=" + id +
                ", name='" + name + '\'' +
                ", author='" + author + '\'' +
                '}';
    }

    public Integer getId() {
        return id;
    }

    public void setId(Integer id) {
        this.id = id;
    }

    public String getName() {
        return name;
    }

    public void setName(String name) {
        this.name = name;
    }

    public String getAuthor() {
        return author;
    }

    public void setAuthor(String author) {
        this.author = author;
    }
}
创建 BookDao 接口
public interface BookDao extends MongoRepository<Book,Integer> {
}
测试(增删改查基本上和 mysql 数据库一样)


第 08 章 开发者工具与单元测试
1. devtools 工作原理
创建项目,添加依赖


创建 HelloControll类
@RestController
public class HelloController {
    @Autowired
    @GetMapping("/hello")
    public  String hello(){

        return  "hello devtools,Hello javaboy!!!!!";
    }
}

因为 idea 和 eclipse(ctl+s 才编译),而idea不是
快捷键:ctl + shift + atl + /


2. 自定义监控资源
根据上面的方法,我们发现只对 java 代码才能进行热部署,而 resources 下的静态资源则无法热部署。
在 static 目录下创建 hello.html 页面
<html lang="en">
<head>
    <meta charset="UTF-8">
    <title>Titletitle>
head>
<body>
<h1>hello devTools1112123h1>
body>
html>
解决方法(在 application.properties 中,添加配置):
- 从不触发重启的目录中除去 static,只要项目修改就会重启
# 从不触发重启的目录中除去 static,只要项目修改就会重启
spring.devtools.restart.exclude=classpath:/static/**
- 将static 目录加到重启里边来。和上面的正好相反
# 将static 目录加到重启里边来。和上面的正好相反
spring.devtools.restart.exclude=src/main/resources/static
- 上面的两种方式都是文件每修改一次都加载一次,影响性能。解决办法:
在项目中创建 .trigger-file 文件,只有当代码,和这个文件同时修改该的时候才会生效
# 在项目中创建 .trigger-file 文件,只有当代码,和这个文件同时修改该的时候才会生效
spring.devtools.restart.trigger-file=.trigger-file
3. LiveReload 自动刷新页面
静态页面因为不需要编译,所以并不需要热部署,我们可以使用 livereload 插件。

使用这个插件就可以自动的去加载修改后的静态页面。
如果不想让他自动的加载,我们可以在配置文件中添加如下配置。

4. 禁用自动重启
如果添加了 devtools 的依赖,但是我们又不想用,该如何解决。
在配置文件中添加如下的配置。
# 禁止启动 devtools
spring.devtools.restart.enabled=false
也可以在 java 代码中进行配置,在启动类中添加

5. 项目重启中的全局配置
在自己的用户目录下添加该文件
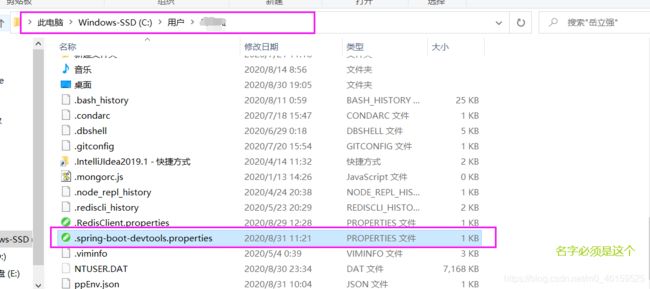
文件内容,和 配置文件内容相同

重启项目,每次修改文件之后,再次修改.trigger-file 文件,项目就自动加载了
6.Service 测试
新建项目,注入依赖,创建HelloService 类
@Service
public class HelloService {

    public String sayHello(String name){
        return "hello"+name;
    }
}
测试类代码
@SpringBootTest
class TestApplicationTests {

    @Autowired
    HelloService helloService;

    @Test
    void contextLoads() {
        String hello = helloService.sayHello("javaboy");
        // 断言
        Assert.assertThat(hello, Matchers.is("hellojavaboy"));
    }

}
7. Controller 测试
public class Book {
    private Integer id;
    private String name;
    private String author;

    @Override
    public String toString() {
        return "Book{" +
                "id=" + id +
                ", name='" + name + '\'' +
                ", author='" + author + '\'' +
                '}';
    }

    public Integer getId() {
        return id;
    }

    public void setId(Integer id) {
        this.id = id;
    }

    public String getName() {
        return name;
    }

    public void setName(String name) {
        this.name = name;
    }

    public String getAuthor() {
        return author;
    }

    public void setAuthor(String author) {
        this.author = author;
    }
}
@RestController
public class HelloController {
    @GetMapping("/hello")
    public String hello(String name){

        return "hello"+ name;
    }
    @PostMapping("/book")
    public Book add(@RequestBody Book book){

        return book;
    }


}
@SpringBootTest
class TestApplicationTests {

    @Autowired
    HelloService helloService;

    @Autowired
    WebApplicationContext context;

    MockMvc mockMvc;


    @Test
    void contextLoads() {
        String hello = helloService.sayHello("javaboy");
        // 断言
        Assert.assertThat(hello, Matchers.is("hellojavaboy"));
    }


    @Before
    public void before() {
        mockMvc = MockMvcBuilders.webAppContextSetup(context).build();
    }


    @Test
    public void test1() throws Exception {
        MvcResult mvcResult = mockMvc.perform(
                MockMvcRequestBuilders.get("/hello")
                        .contentType(MediaType.APPLICATION_FORM_URLENCODED)
                        .param("name", "javaboy"))
                .andExpect(MockMvcResultMatchers.status().isOk())
                .andDo(MockMvcResultHandlers.print())
                .andReturn();
        System.out.println(mvcResult.getResponse().getContentAsString());
    }


    @Test
    public void test2() throws Exception {
        Book book = new Book();
        book.setId(99);
        book.setName("三国演义");
        book.setAuthor("罗贯中");
        String s = new ObjectMapper().writeValueAsString(book);
        MvcResult mvcResult = mockMvc.perform(MockMvcRequestBuilders.post("/book").contentType(MediaType.APPLICATION_JSON).content(s))
                .andExpect(MockMvcResultMatchers.status().isOk())
                .andReturn();
        System.out.println(mvcResult.getResponse().getContentAsString());
    }

}
@SpringBootTest(webEnvironment = SpringBootTest.WebEnvironment.DEFINED_PORT)
class TestApplicationTests2 {

@Autowired
    TestRestTemplate testRestTemplate;

    @Test
    void contextLoads() {
        String javaboy = testRestTemplate.getForObject("/hell?name={1}", String.class, "javaboy");
        System.out.println(javaboy);


    }


}
8. JSON 测试
创建 book.json

{"id": 99,"name": "红楼梦","author":"曹雪芹"}
@RunWith(SpringRunner.class)
@JsonTest
class TestApplicationTests2 {


    @Autowired
    JacksonTester<Book> jacksonTester;


    @Test
    void contextLoads1() throws IOException {
        Book book = new Book();
        book.setId(99);
        book.setName("红楼梦");
        book.setAuthor("曹雪芹");
        Assertions.assertThat(jacksonTester.write(book))
                .isEqualToJson("book.json");

        Assertions.assertThat(jacksonTester.write(book))
                .hasJsonPathStringValue("@.name");
        Assertions.assertThat(jacksonTester.write(book))
                .extractingJsonPathStringValue("@.name")
                .isEqualTo("红楼梦");

    }


    @Test
    public void test2() throws IOException {
        String content = "{\"id\":99,\"name\":\"红楼梦\",\"author\":\"曹雪芹\"}";
        Assertions.assertThat(jacksonTester.parseObject(content).getName()).isEqualTo("红楼梦");
    }

}

第 09 章 Spring Boot 缓存
1. Spring Cache 整合 Redis
创建项目,添加依赖
配置文件:
spring.redis.host=45.32.15.186
spring.redis.port=6379
spring.redis.database=0


# 配置缓存的名字
spring.cache.cache-names=c1
启动类中加入启动缓存的注解

创建实体类:
public class User implements Serializable {

    private Integer id;
    private String username;
    private String address;


    @Override
    public String toString() {
        return "User{" +
                "id=" + id +
                ", username='" + username + '\'' +
                ", address='" + address + '\'' +
                '}';
    }

    public Integer getId() {
        return id;
    }

    public void setId(Integer id) {
        this.id = id;
    }

    public String getUsername() {
        return username;
    }

    public void setUsername(String username) {
        this.username = username;
    }

    public String getAddress() {
        return address;
    }

    public void setAddress(String address) {
        this.address = address;
    }
}

实体类中一定要序列不然会出现上述错误
创建 UserService 类
public class UserService {


    @Cacheable(cacheNames = "c1")  // 默认情况下,方法的参数就是缓存的key,方法的返回值就是 value
    public User getUserById( Integer id){
        System.out.println("UserService.getUserById>>>>>>"+id);
        User user = new User();

        user.setId(id);
        return user;
    }
   }
测试代码:
    @Test
    void contextLoads() {
        User userById = userService.getUserById(1);
        User userById2 = userService.getUserById(1);
        System.out.println(userById);
        System.out.println(userById2);
    }

}


修改 UserService 类中的 getUserById,清空 redis 中的缓存

测试代码:
 @Test
    void contextLoads() {
        User userById = userService.getUserById(1,"aaa");
        User userById2 = userService.getUserById(1,"bbb");
        System.out.println(userById);
        System.out.println(userById2);
    }
测试结果:

@Cacheable(cacheNames = "c1") // 默认情况下,方法的参数就是缓存的key,方法的返回值就是 value,测试方法中的 name 值的属性不相同,不能缓存。
如果非要进行缓存我们可以忽略 name 的属性的值,配置如下

测试结果:

@Cacheable 中的key 可以传入的值为,
- methodName
- method
- caches 当前方法的缓存
- args 当前方法的参数
- target
- targetClass

一般使用参数作为 key 就够用了
自定义 key
创建 MyKeyGennerator 类
@Component
public class MyKeyGennerator implements KeyGenerator {
    @Override
    // 第一个参数当前方法的对象
    // 第二个是方法
    // 第三个是参数
    public Object generate(Object o, Method method, Object... objects) {
        return method.getName()+":"+ Arrays.toString(objects);
    }
}
server 类的方法上

测试结果:

删除数据或者修改数据的时候缓存没有及时跟新,解决方法,在 service 类上添加两个方法
// 删除
@CacheEvict(cacheNames = "c1",key = "#id")
    public  void  deleteUserById(Integer id){
        System.out.println("UserService.deleteUserById>>>>"+id);
    }

// 修改
    @CachePut(cacheNames = "c1",key = "#user.id")
    public User updataUserById(User user){


        return user;
    }

删除测试 :
@Test
    void contextLoads() {
        User userById = userService.getUserById(1,"aaa");
        userService.deleteUserById(1);
        User userById2 = userService.getUserById(1,"bbb");
        System.out.println(userById);
        System.out.println(userById2);
    }

修改测试:
@Test
    void contextLoads() {
        User userById = userService.getUserById(1,"aaa");
        User user = new User();
        user.setId(1);
        user.setUsername("javaboy");
        user.setAddress("深圳");
        userService.updataUserById(user);
        User userById2 = userService.getUserById(1,"bbb");
        System.out.println(userById);
        System.out.println(userById2);
    }

注:这里的每一次测试都最好 FLUSHALL redis

根据上面的图片我们发现,每写一个方法都要配置 cacheName,和key,我们可以在该类之前进行统一的配置

2. 3.Spring Cache 整合 Ehcache
创建项目,添加依赖:

手动添加 ehcache 的依赖
        <dependency>
            <groupId>net.sf.ehcachegroupId>
            <artifactId>ehcacheartifactId>
            <version>2.10.6version>
        dependency>
配置一个配置文件,名字是固定的就叫做 eheache.xml 名字最好不要改,如果要修改该的话要在其他的配置中修改该一下名字
#spring.cache.ehcache.config=classpath:aaa.xml
ehcache.xml
<ehcache>
    <diskStore path="java.io.tmpdir/ehcache"/>


    <defaultCache
            maxElementsInMemory="10000"
            eternal="false"
            timeToIdleSeconds="120"
            timeToLiveSeconds="120"
            overflowToDisk="false"
            diskPersistent="false"
            diskExpiryThreadIntervalSeconds="120"
    />


    <cache name="mycache"
           timeToIdleSeconds="120"
           maxElementsInMemory="10000"
           eternal="false"
           overflowToDisk="true"
           diskPersistent="true"
           diskExpiryThreadIntervalSeconds="600"/>
ehcache>
启动类,添加启动缓存注解

创建 User
public class User implements Serializable {
    private Integer  id;
    private String name;
    private String addr;

    public Integer getId() {
        return id;
    }

    public void setId(Integer id) {
        this.id = id;
    }

    public String getName() {
        return name;
    }

    public void setName(String name) {
        this.name = name;
    }

    public String getAddr() {
        return addr;
    }

    public void setAddr(String addr) {
        this.addr = addr;
    }

    @Override
    public String toString() {
        return "User{" +
                "id=" + id +
                ", name='" + name + '\'' +
                ", addr='" + addr + '\'' +
                '}';
    }
}
创建 UserService 类
@Service
public class UserService {

    @Cacheable(cacheNames = "mycache")
    public User getUserById(Integer id){


        User user = new User();
        user.setId(id);
        System.out.println("UserService.getUserById"+id);
        return user;
    }
}
测试:
@SpringBootTest
class CahceEhcahceApplicationTests {
    @Autowired
    UserService userService;
    @Test
    void contextLoads() {

        User userById = userService.getUserById(1);
        User userById1 = userService.getUserById(1);
        System.out.println(userById);
        System.out.println(userById1);
    }

}

第 10 章 Spring Boot 安全管理
1. Spring Security 初体验
创建项目,注入依赖

创建 HelloController
@RestController
public class HelloController {
@GetMapping("/hello")
    public String hello(){

        return  "hellp sercurity!";
    }
}
访问

用户名是:user
密码:

2. 手工配置用户名密码
方法一:
可以在配置文件中进行配置
# 配置密码
spring.security.user.password=123
# 配置用户名
spring.security.user.name=javaboy
# 角色
spring.security.user.roles=admin
方法二:
java 代码测试,创建 SecurityConfig 类
@Configuration
public class SecurityConfig extends WebSecurityConfigurerAdapter {
// 在 spring 5 之前这样写是没问题的,但是在spring 5之后 security的密码是需要加密的不然会出现问题
// 不加密的方案
@Bean
PasswordEncoder passwordEncoder(){
return NoOpPasswordEncoder.getInstance();
}
@Override
protected void configure(AuthenticationManagerBuilder auth) throws Exception {
auth.inMemoryAuthentication() //基于内存的认证
.withUser("javaboy")
.password("123")
.roles("admin")
// 如果需要可以继续添加用户
.and()
.withUser("江南一点雨")
.password("123").roles("user");
}
}
如果不配置不加密方案会出现如下错误:

3. HttpSecurity 配置
在 SecurityConfig 上继续重写父类的方法
protected void configure(HttpSecurity http) throws Exception {
http.authorizeRequests() //开启配置
.antMatchers("/admin/**") //匹配路径规则
.hasRole("admin") // 角色必须是 admin
// 拦截路径由他们两个其中一个即可
// .antMatchers("/user/**").hasAnyRole("admin", "user")
// 临是添加角色
.antMatchers("/user/**").access("hasAnyRole('user','admin')")
// 剩下其他的只要认证登录就能访问
.anyRequest().authenticated()
.and()
// 处理表单的提交
.formLogin()
.loginProcessingUrl("/doLogin") //处理登录请求的 url 请求地址,咋 postman 测试最好带上
.permitAll() // 和登录相关的地址直接可以访问
.and()
.csrf().disable(); //我们要使用 postman 测试,要关闭 csrf 的攻击
}
在 postman 测试


浏览器测试:
省略
4. 登录表单详细配置
@Override
protected void configure(HttpSecurity http) throws Exception {
http.authorizeRequests() //开启配置
.antMatchers("/admin/**") //匹配路径规则
.hasRole("admin") // 角色必须是 admin
// 拦截路径由他们两个其中一个即可
// .antMatchers("/user/**").hasAnyRole("admin", "user")
// 临是添加角色
.antMatchers("/user/**").access("hasAnyRole('user','admin')")
// 剩下其他的只要认证登录就能访问
.anyRequest().authenticated()
.and()
// 处理表单的提交
.formLogin()
.loginProcessingUrl("/doLogin") //处理登录请求的 url 请求地址
.loginPage("/login") // 修改自定义的登陆页面
// 这两个配置是 url 路径传入的参数
.usernameParameter("uname")
.passwordParameter("passwd")
//.successForwardUrl("") // 前后端不分离
.successHandler(new AuthenticationSuccessHandler() {
@Override
// Authentication 保存了我们登录成功的用户信息
public void onAuthenticationSuccess(HttpServletRequest request, HttpServletResponse response, Authentication authentication) throws IOException, ServletException {
response.setContentType("application/json;charset=utf-8");
PrintWriter out = response.getWriter();
Map<String, Object> map = new HashMap<>();
map.put("status", 200);
map.put("msg", authentication.getPrincipal());
String asString = new ObjectMapper().writeValueAsString(map);
out.write(asString);
out.flush();
out.close();
}
})
// 登录失败的处理
.failureHandler(new AuthenticationFailureHandler() {
// AuthenticationException 锁定出错的问题
@Override
public void onAuthenticationFailure(HttpServletRequest request, HttpServletResponse response, AuthenticationException e) throws IOException, ServletException {
response.setContentType("application/json;charset=utf-8");
PrintWriter out = response.getWriter();
Map<String, Object> map = new HashMap<>();
map.put("status", 401);
if (e instanceof LockedException) {
map.put("msg", "账户被锁定登录失败!");
} else if (e instanceof BadCredentialsException) {
map.put("msg", "用户名或密码输入错误登录失败!");
} else if (e instanceof DisabledException) {
map.put("msg", "账户被禁用!");
} else if (e instanceof AccountExpiredException) {
map.put("msg", "账户过期,登录失败!");
}else if (e instanceof CredentialsExpiredException){
map.put("msg", "密码过期,登录失败!");
}
else {
map.put("msg", "登录失败!");
}
String asString = new ObjectMapper().writeValueAsString(map);
out.write(asString);
out.flush();
out.close();
}
})
.permitAll() // 和登录相关的地址直接可以访问
.and()
.csrf().disable(); //我们要使用 postman 测试,要关闭 csrf 的攻击
}


测试结果:

5. 注销登录配置
// 注销登录
.and()
.logout()
.logoutUrl("/logout")
.logoutSuccessHandler(new LogoutSuccessHandler() {
@Override
public void onLogoutSuccess(HttpServletRequest request, HttpServletResponse response, Authentication authentication) throws IOException, ServletException {
response.setContentType("application/json;charset=utf-8");
PrintWriter out = response.getWriter();
Map<String, Object> map = new HashMap<>();
map.put("status", 200);
map.put("msg", "注销登录成功!");
String asString = new ObjectMapper().writeValueAsString(map);
out.write(asString);
out.flush();
out.close();
}
})

测试结果

6. 多个 HttpSecurity
创建 MultiHttpSecurityConfig 类
@Configuration
public class MultiHttpSecurityConfig {
@Bean
PasswordEncoder passwordEncoder(){
return NoOpPasswordEncoder.getInstance();
}
// 配置多个的时候不许要继承 WebSecurityConfigurerAdapter
@Autowired
protected void configure(AuthenticationManagerBuilder auth) throws Exception {
auth.inMemoryAuthentication() //基于内存的认证
.withUser("javaboy")
.password("111")
.roles("admin")
// 如果需要可以继续添加用户
.and()
.withUser("江南一点雨")
.password("222").roles("user");
}
@Configuration
@Order(1) //优先级问题
public static class AdminSecurityConfig extends WebSecurityConfigurerAdapter{
@Override
protected void configure(HttpSecurity http) throws Exception {
http.antMatcher("/admin/**")
.authorizeRequests().
anyRequest()
.hasAnyRole("admin");
}
}
@Configuration
public static class OtherSecurityConfig extends WebSecurityConfigurerAdapter{
@Override
protected void configure(HttpSecurity http) throws Exception {
http.authorizeRequests().anyRequest().authenticated()
.and()
.formLogin()
.loginProcessingUrl("/doLogin")
.permitAll()
.and().csrf().disable();
}
}
}
测试结果:

7. 密码加密
创建测试:
@Test
void contextLoads() {
for (int i = 0; i < 10; i++) {
BCryptPasswordEncoder encoder =new BCryptPasswordEncoder();
System.out.println(encoder.encode("123"));
}
}

每次加密的结果都不相同,将加密后的字符串复制两条,粘贴在密码设置中

测试结果:

8. 方法安全
开启方法安全的注解 @EnableGlobalMethodSecurity

-
prePostEnabled 开启两个注解,一个是@PreAuthorize 方法执行之前进行校验和 @PostAuthorize方法之后校验
-
securedEnabled 里面可以写表达式,解锁 @Secured 注解
创建 MethodService 类
@Service
public class MethodService {
@PreAuthorize("hasRole('admin')")
public String admin(){
return "hello admin";
}
@Secured("ROLE_user")
public String user(){
return "hello user";
}
@PreAuthorize("hasAnyRole('admin','user')")
public String hello(){
return "hello hello";
}
}
在 HelloController 类中添加如下方法:
@Autowired
MethodService methodService;
@GetMapping("/hello1")
public String hello1() {
return methodService.admin();
}
@GetMapping("/hello2")
public String hello2() {
return methodService.user();
}
@GetMapping("/hello3")
public String hello3() {
return methodService.hello();
}
测试:
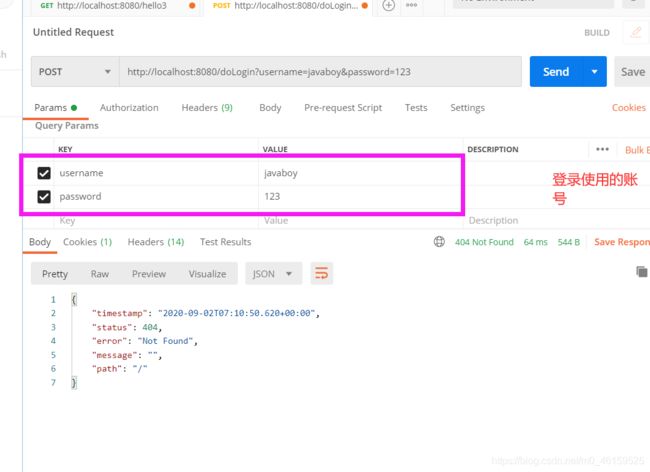


9. 基于数据库的认证
sql 语句
/*
Navicat MySQL Data Transfer
Source Server : localhost
Source Server Version : 50717
Source Host : localhost:3306
Source Database : security
Target Server Type : MYSQL
Target Server Version : 50717
File Encoding : 65001
Date: 2018-07-28 15:26:51
*/
SET FOREIGN_KEY_CHECKS=0;
-- ----------------------------
-- Table structure for role
-- ----------------------------
DROP TABLE IF EXISTS `role`;
CREATE TABLE `role` (
`id` int(11) NOT NULL AUTO_INCREMENT,
`name` varchar(32) DEFAULT NULL,
`nameZh` varchar(32) DEFAULT NULL,
PRIMARY KEY (`id`)
) ENGINE=InnoDB AUTO_INCREMENT=4 DEFAULT CHARSET=utf8;
-- ----------------------------
-- Records of role
-- ----------------------------
INSERT INTO `role` VALUES ('1', 'dba', '数据库管理员');
INSERT INTO `role` VALUES ('2', 'admin', '系统管理员');
INSERT INTO `role` VALUES ('3', 'user', '用户');
-- ----------------------------
-- Table structure for user
-- ----------------------------
DROP TABLE IF EXISTS `user`;
CREATE TABLE `user` (
`id` int(11) NOT NULL AUTO_INCREMENT,
`username` varchar(32) DEFAULT NULL,
`password` varchar(255) DEFAULT NULL,
`enabled` tinyint(1) DEFAULT NULL,
`locked` tinyint(1) DEFAULT NULL,
PRIMARY KEY (`id`)
) ENGINE=InnoDB AUTO_INCREMENT=4 DEFAULT CHARSET=utf8;
-- ----------------------------
-- Records of user
-- ----------------------------
INSERT INTO `user` VALUES ('1', 'root', '$2a$10$RMuFXGQ5AtH4wOvkUqyvuecpqUSeoxZYqilXzbz50dceRsga.WYiq', '1', '0');
INSERT INTO `user` VALUES ('2', 'admin', '$2a$10$RMuFXGQ5AtH4wOvkUqyvuecpqUSeoxZYqilXzbz50dceRsga.WYiq', '1', '0');
INSERT INTO `user` VALUES ('3', 'sang', '$2a$10$RMuFXGQ5AtH4wOvkUqyvuecpqUSeoxZYqilXzbz50dceRsga.WYiq', '1', '0');
-- ----------------------------
-- Table structure for user_role
-- ----------------------------
DROP TABLE IF EXISTS `user_role`;
CREATE TABLE `user_role` (
`id` int(11) NOT NULL AUTO_INCREMENT,
`uid` int(11) DEFAULT NULL,
`rid` int(11) DEFAULT NULL,
PRIMARY KEY (`id`)
) ENGINE=InnoDB AUTO_INCREMENT=5 DEFAULT CHARSET=utf8;
-- ----------------------------
-- Records of user_role
-- ----------------------------
INSERT INTO `user_role` VALUES ('1', '1', '1');
INSERT INTO `user_role` VALUES ('2', '1', '2');
INSERT INTO `user_role` VALUES ('3', '2', '2');
INSERT INTO `user_role` VALUES ('4', '3', '3');
SET FOREIGN_KEY_CHECKS=1;
包目录的结构

创建新项目,注入依赖
<dependency>
<groupId>org.springframework.bootgroupId>
<artifactId>spring-boot-starter-securityartifactId>
dependency>
<dependency>
<groupId>org.springframework.bootgroupId>
<artifactId>spring-boot-starter-webartifactId>
dependency>
<dependency>
<groupId>org.mybatis.spring.bootgroupId>
<artifactId>mybatis-spring-boot-starterartifactId>
<version>2.1.3version>
dependency>
<dependency>
<groupId>mysqlgroupId>
<artifactId>mysql-connector-javaartifactId>
<scope>runtimescope>
<version>5.1.27version>
dependency>
<dependency>
<groupId>com.alibabagroupId>
<artifactId>druid-spring-boot-starterartifactId>
<version>1.1.10version>
dependency>
<dependency>
<groupId>org.springframework.bootgroupId>
<artifactId>spring-boot-starter-testartifactId>
<scope>testscope>
<exclusions>
<exclusion>
<groupId>org.junit.vintagegroupId>
<artifactId>junit-vintage-engineartifactId>
exclusion>
exclusions>
dependency>
<dependency>
<groupId>org.springframework.securitygroupId>
<artifactId>spring-security-testartifactId>
<scope>testscope>
dependency>
配置数据源
spring.datasource.url=jdbc:mysql:///javaboy?Unicode=true&characterEncoding=utf-8
spring.datasource.type=com.alibaba.druid.pool.DruidDataSource
spring.datasource.username=root
spring.datasource.password=root
创建 User 类
// 如果我们要自己从数据库中加载用户,则需要实现 UserDetails 接口
public class User implements UserDetails {
private Integer id;
private String username;
private String password;
private Boolean enabled;
private Boolean locked;
private List<Role> roles;
public Integer getId() {
return id;
}
public void setId(Integer id) {
this.id = id;
}
@Override
public String getUsername() {
return username;
}
// 账户是否未过期
@Override
public boolean isAccountNonExpired() {
return true;
}
// 账户是没有被锁定
@Override
public boolean isAccountNonLocked() {
return !locked;
}
// 密码是否未过期
@Override
public boolean isCredentialsNonExpired() {
return true;
}
// 是否可用
@Override
public boolean isEnabled() {
return enabled;
}
public void setUsername(String username) {
this.username = username;
}
// 返回用户的所有角色
@Override
public Collection<? extends GrantedAuthority> getAuthorities() {
List<SimpleGrantedAuthority> authorities=new ArrayList<>();
for (Role role : roles) {
// 在 spring security 中的一个要求,角色必须式 ROLE_ 开始的
// 如果数据库中由 ROLE_的话,就不用加了反之则需要加
authorities.add(new SimpleGrantedAuthority("ROLE_"+role.getName()));
}
return authorities;
}
@Override
public String getPassword() {
return password;
}
public void setPassword(String password) {
this.password = password;
}
public void setEnabled(Boolean enabled) {
this.enabled = enabled;
}
public void setLocked(Boolean locked) {
this.locked = locked;
}
public List<Role> getRoles() {
return roles;
}
public void setRoles(List<Role> roles) {
this.roles = roles;
}
@Override
public String toString() {
return "User{" +
"id=" + id +
", username='" + username + '\'' +
", password='" + password + '\'' +
", enabled=" + enabled +
", locked=" + locked +
", roles=" + roles +
'}';
}
}
创建 Role 类
public class Role {
private Integer id;
private String name;
private String nameZH;
@Override
public String toString() {
return "Roole{" +
"id=" + id +
", name='" + name + '\'' +
", nameZH='" + nameZH + '\'' +
'}';
}
public Integer getId() {
return id;
}
public void setId(Integer id) {
this.id = id;
}
public String getName() {
return name;
}
public void setName(String name) {
this.name = name;
}
public String getNameZH() {
return nameZH;
}
public void setNameZH(String nameZH) {
this.nameZH = nameZH;
}
}
创建 UserMapper 接口
@Mapper
public interface UserMapper {
User loadUserByUsername(String username);
List<Role> getUserRoles(Integer id);
}
创建 UserMapper.xml 文件
<mapper namespace="org.javaboy.securitydb.mapper.UserMapper">
<select id="loadUserByUsername" resultType="org.javaboy.securitydb.Bean.User">
select * from user where username=#{username}
select>
<select id="getUserRoles" resultType="org.javaboy.securitydb.Bean.Role">
SELECT * FROM role WHERE id IN (SELECT rid FROM user_role WHERE uid=#{id})
select>
mapper>
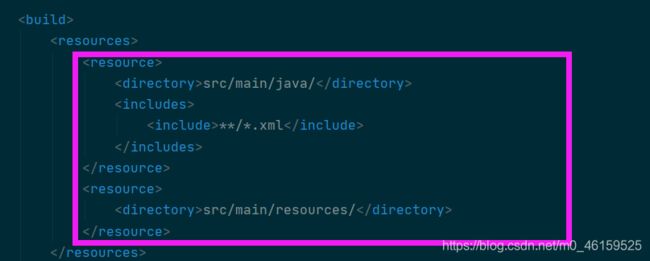
创建UserService 类
@Service
public class UserService implements UserDetailsService {
@Autowired
UserMapper userMapper;
@Override
public UserDetails loadUserByUsername(String username) throws UsernameNotFoundException {
User user=userMapper.loadUserByUsername(username);
if (user==null){
throw new UsernameNotFoundException("用户名不存在");
}
user.setRoles(userMapper.getUserRoles(user.getId()));
// 登录成功之后,它会将对象返回,至于密码是否正确 security 自己会比对
return user;
}
}
创建 HelloController 类
@RestController
public class HelloController {
@Autowired
UserService userService;
@GetMapping("/hello")
public String hello(){
return "hello security db";
}
@GetMapping("/dba/hello")
public String dba(){
return "hello dba";
}
@GetMapping("/admin/hello")
public String admin(){
return "hello admin";
}
@GetMapping("/user/hello")
public String user(){
return "hello user";
}
}
创建 SecurityConfig 配置类
@Configuration
public class SecurityConfig extends WebSecurityConfigurerAdapter {
@Autowired
UserService userService;
@Bean
PasswordEncoder passwordEncoder(){
return new BCryptPasswordEncoder();
}
// 配置用户的加载路径
@Override
protected void configure(AuthenticationManagerBuilder auth) throws Exception {
auth.userDetailsService(userService);
}
@Override
protected void configure(HttpSecurity http) throws Exception {
http.authorizeRequests().antMatchers("/dba/**").hasRole("dba")
.antMatchers("/admin/**").hasRole("admin")
.antMatchers("/user/**").hasRole("user")
.anyRequest().authenticated()
.and()
.formLogin()
.permitAll()
.and()
.csrf().disable();
}
}
测试结果:


10. 角色继承
博客地址:http://www.javaboy.org/2019/0613/springsecurity-role.html
测试结果:

11.OAuth2 简介
博客地址:
https://mp.weixin.qq.com/s/AELXf1nmpWbYE3NINpLDRg
12. Spring Security 结合 OAuth2
创建项目,注入依赖
<dependency>
<groupId>org.springframework.bootgroupId>
<artifactId>spring-boot-starter-securityartifactId>
dependency>
<dependency>
<groupId>org.springframework.bootgroupId>
<artifactId>spring-boot-starter-webartifactId>
dependency>
<dependency>
<groupId>org.springframework.security.oauthgroupId>
<artifactId>spring-security-oauth2artifactId>
<version>2.3.6.RELEASEversion>
dependency>
<dependency>
<groupId>org.springframework.bootgroupId>
<artifactId>spring-boot-starter-data-redisartifactId>
dependency>
<dependency>
<groupId>org.springframework.bootgroupId>
<artifactId>spring-boot-starter-testartifactId>
<scope>testscope>
<exclusions>
<exclusion>
<groupId>org.junit.vintagegroupId>
<artifactId>junit-vintage-engineartifactId>
exclusion>
exclusions>
dependency>
<dependency>
<groupId>org.springframework.securitygroupId>
<artifactId>spring-security-testartifactId>
<scope>testscope>
dependency>
配置 redis
spring.redis.host=45.32.15.186
spring.redis.port=6379
spring.redis.database=0
授权服务器,创建AuthorizationServerConfig
@Configuration
@EnableAuthorizationServer
public class AuthorizationServerConfig extends AuthorizationServerConfigurerAdapter {
// password 模式
@Autowired
AuthenticationManager authenticationManager;
@Autowired
RedisConnectionFactory redisConnectionFactory;
@Autowired
UserDetailsService userDetailsService;
@Bean
PasswordEncoder passwordEncoder(){
return new BCryptPasswordEncoder();
}
// 配置机中模式,和授权的模式
@Override
public void configure(ClientDetailsServiceConfigurer clients) throws Exception {
clients.inMemory() // 配置内存里边的
.withClient("password") //认证模式 password 模式
.authorizedGrantTypes("password","refresh_token") //配置授权模式
.accessTokenValiditySeconds(1800) // token 的过期事件
.resourceIds("rid") //资源id
.scopes("all")
.secret("$2a$10$cYu7c7.SKeFPveIkDSyhWuTpqnD29Zng8IUjgcmhVMn9I.8jCN5IO") ;//这里放置密码
}
// 令牌的存储
@Override
public void configure(AuthorizationServerEndpointsConfigurer endpoints) throws Exception {
endpoints.tokenStore(new RedisTokenStore(redisConnectionFactory))
.authenticationManager(authenticationManager)
.userDetailsService(userDetailsService);
}
// 支持 clentId 和 clentSecret 的认证
@Override
public void configure(AuthorizationServerSecurityConfigurer security) throws Exception {
security.allowFormAuthenticationForClients();
}
}
资源服务器ResourceServerConfig 类
@Configuration
@EnableResourceServer
public class ResourceServerConfig extends ResourceServerConfigurerAdapter {
@Override
public void configure(ResourceServerSecurityConfigurer resources) throws Exception {
resources.resourceId("rid") // 配置资源 id 和前面配置保持一致
.stateless(true); // 资源是基于令牌认证的
}
// 这是我们提供的资源
@Override
public void configure(HttpSecurity http) throws Exception {
http.authorizeRequests().antMatchers("/admin/**")
.hasRole("admin")
.antMatchers("/user/**")
.hasRole("user")
.anyRequest().authenticated();
}
}
SecurityConfig 类
@Configuration
public class SecurityConfig extends WebSecurityConfigurerAdapter {
@Override
@Bean
protected AuthenticationManager authenticationManager() throws Exception {
return super.authenticationManager();
}
@Override
@Bean
protected UserDetailsService userDetailsService() {
return super.userDetailsService();
}
@Override
protected void configure(AuthenticationManagerBuilder auth) throws Exception {
auth.inMemoryAuthentication().
withUser("javaboy").password("$2a$10$cYu7c7.SKeFPveIkDSyhWuTpqnD29Zng8IUjgcmhVMn9I.8jCN5IO")
.roles("admin")
.and()
.withUser("江南一点雨")
.password("$2a$10$cYu7c7.SKeFPveIkDSyhWuTpqnD29Zng8IUjgcmhVMn9I.8jCN5IO")
.roles("user");
}
@Override
protected void configure(HttpSecurity http) throws Exception {
// 主要配置 oauth 的请求
http.antMatcher("/oauth/**") // 有几个和 oauth 相关的请求不需要拦截,否则无法获取 token
.authorizeRequests()
.antMatchers("/oauth/**")
.permitAll()
.and()
.csrf().disable();
}
}
创建HelloController 类
@RestController
public class HelloController {
@GetMapping("/admin/hello")
public String admin(){
return "hello admin";
}
@GetMapping("/user/hello")
public String user(){
return "hello user";
}
@GetMapping("/hello")
public String hello(){
return "hello hello";
}
}
测试:
获取 tokent


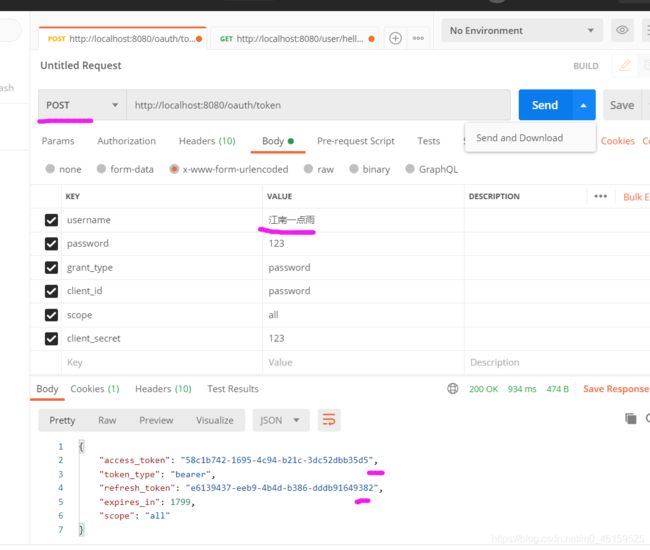


刷新 token

13.整合 Shiro 方式一
新建项目:
<dependencies>
<dependency>
<groupId>org.springframework.bootgroupId>
<artifactId>spring-boot-starter-webartifactId>
dependency>
<dependency>
<groupId>org.apache.shirogroupId>
<artifactId>shiro-webartifactId>
<version>1.4.0version>
dependency>
<dependency>
<groupId>org.apache.shirogroupId>
<artifactId>shiro-springartifactId>
<version>1.4.0version>
dependency>
<dependency>
<groupId>org.springframework.bootgroupId>
<artifactId>spring-boot-starter-testartifactId>
<scope>testscope>
<exclusions>
<exclusion>
<groupId>org.junit.vintagegroupId>
<artifactId>junit-vintage-engineartifactId>
exclusion>
exclusions>
dependency>
dependencies>
创建MyRealm 类
public class MyRealm extends AuthorizingRealm {
// 做授权的
@Override
protected AuthorizationInfo doGetAuthorizationInfo(PrincipalCollection principals) {
return null;
}
// 做认证的
@Override
protected AuthenticationInfo doGetAuthenticationInfo(AuthenticationToken token) throws AuthenticationException {
String username = (String) token.getPrincipal();
if ("javaboy".equals(username)){
return new SimpleAuthenticationInfo(username,"123",getName());
}
return null;
}
}
创建 ShiroConfig
@Configuration
public class ShiroConfig {
@Bean
MyRealm myRealm(){
return new MyRealm();
}
@Bean
SecurityManager securityManager(){
DefaultWebSecurityManager manager = new DefaultWebSecurityManager();
manager.setRealm(myRealm());
return manager;
}
@Bean
ShiroFilterFactoryBean shiroFilterFactoryBean(){
ShiroFilterFactoryBean bean = new ShiroFilterFactoryBean();
bean.setSecurityManager(securityManager());
bean.setLoginUrl("/login");
bean.setSuccessUrl("/index");
Map<String,String> map =new LinkedHashMap<>();
map.put("/doLogin","anon");
map.put("/**","authc");
bean.setFilterChainDefinitionMap(map); //定义拦截规则
return bean;
}
}
创建 HelloController
@RestController
public class HelloController {
@GetMapping("/login")
public String loging() {
return "please login";
}
@PostMapping("/doLogin")
public void doLogin(String username, String password) {
Subject subject = SecurityUtils.getSubject();
try {
subject.login(new UsernamePasswordToken(username, password));
System.out.println("success");
} catch (AuthenticationException e) {
e.printStackTrace();
System.out.println("fail>>" + e.getMessage());
}
}
@GetMapping("/hello")
public String hello() {
return "hello shiro!";
}
}
测试:


14.Spring Security 使用 JSON 登录
为啥登录的时候传入的参数的形式是:key-value 的形式,
org.springframework.security.web.authentication.UsernamePasswordAuthenticationFilter 类


创建项目,注入依赖
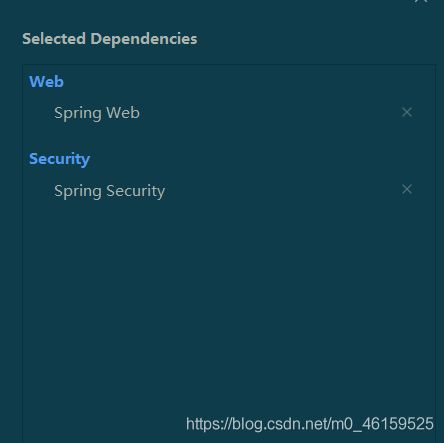
配置 security 的用户名和密码
spring.security.user.name=javaboy
spring.security.user.password=123
创建 MyAuthenticationFilter 类
public class MyAuthenticationFilter extends UsernamePasswordAuthenticationFilter {
@Override
public Authentication attemptAuthentication(HttpServletRequest request, HttpServletResponse response) throws AuthenticationException {
if (!request.getMethod().equals("POST")) {
throw new AuthenticationServiceException("Authentication method not supported: " + request.getMethod());
}
if (request.getContentType().equals(MediaType.APPLICATION_JSON_VALUE)){
// 说明用户以json 传入的参数
String username = null;
String password = null;
try {
Map<String,String > map= new ObjectMapper().readValue(request.getInputStream(), Map.class);
username=map.get("username");
password=map.get("password");
} catch (IOException e) {
e.printStackTrace();
}
if (username == null) {
username = "";
}
if (password == null) {
password = "";
}
username = username.trim();
UsernamePasswordAuthenticationToken authRequest = new UsernamePasswordAuthenticationToken(username, password);
this.setDetails(request, authRequest);
return this.getAuthenticationManager().authenticate(authRequest);
}
return super.attemptAuthentication(request, response);
}
}
创建SecurityConfig 类
@Configuration
public class SecurityConfig extends WebSecurityConfigurerAdapter {
@Bean
MyAuthenticationFilter myAuthenticationFilter() throws Exception {
MyAuthenticationFilter filter = new MyAuthenticationFilter();
filter.setAuthenticationManager(authenticationManagerBean());
// 成功的回调函数,或者失败的回调函数在这里写,在以前的位置写方法是失效的
//filter.setAuthenticationSuccessHandler();
//filter.setAuthenticationFailureHandler();
return filter;
}
@Override
protected void configure(HttpSecurity http) throws Exception {
http.authorizeRequests().anyRequest().authenticated()
.and()
.formLogin().permitAll()
.and().csrf().disable();
http.addFilterAt(myAuthenticationFilter(), UsernamePasswordAuthenticationFilter.class);
}
}
创建 HelloController 类
@RestController
public class HelloController {
@GetMapping("/hello")
public String hello(){
return "hello security";
}
}

15. Spring Security 整合 Jwt
jwt 简介:http://www.javaboy.org/2019/0408/springboot-jwt.html
第 11 章 Spring Boot 整合 WebSocket
1. WebSocket 实现在线群聊
新建项目,注入依赖。
<dependency>
<groupId>org.springframework.boot</groupId>
<artifactId>spring-boot-starter-web</artifactId>
</dependency>
<dependency>
<groupId>org.springframework.boot</groupId>
<artifactId>spring-boot-starter-websocket</artifactId>
</dependency>
<!-- https://mvnrepository.com/artifact/org.webjars/sockjs-client -->
<dependency>
<groupId>org.webjars</groupId>
<artifactId>sockjs-client</artifactId>
<version>1.1.2</version>
</dependency>
<!-- https://mvnrepository.com/artifact/org.webjars.bower/jquery -->
<dependency>
<groupId>org.webjars</groupId>
<artifactId>jquery</artifactId>
<version>3.4.1</version>
</dependency>
<!-- https://mvnrepository.com/artifact/org.webjars/stomp-websocket -->
<dependency>
<groupId>org.webjars</groupId>
<artifactId>stomp-websocket</artifactId>
<version>2.3.3</version>
</dependency>
<!-- https://mvnrepository.com/artifact/org.webjars/webjars-locator-core -->
<dependency>
<groupId>org.webjars</groupId>
<artifactId>webjars-locator-core</artifactId>
</dependency>
<dependency>
<groupId>org.springframework.boot</groupId>
<artifactId>spring-boot-starter-test</artifactId>
<scope>test</scope>
<exclusions>
<exclusion>
<groupId>org.junit.vintage</groupId>
<artifactId>junit-vintage-engine</artifactId>
</exclusion>
</exclusions>
</dependency>
创建 Message 类
public class Message {
private String name;
private String content;
public String getName() {
return name;
}
public void setName(String name) {
this.name = name;
}
public String getContent() {
return content;
}
public void setContent(String content) {
this.content = content;
}
}
创建WebSocketConfig 类
@Configuration
@EnableWebSocketMessageBroker //开启消息代理
public class WebSocketConfig implements WebSocketMessageBrokerConfigurer {
// 配置消息代理
@Override
public void configureMessageBroker(MessageBrokerRegistry registry) {
registry.enableSimpleBroker("/topic"); //表示消息代理的前缀
registry.setApplicationDestinationPrefixes("/app"); //表示配置一个或多个前缀
}
// 建立连接点
@Override
public void registerStompEndpoints(StompEndpointRegistry registry) {
registry.addEndpoint("/chat").withSockJS();
}
}
HelloController 类
@Controller
public class HelloController {
@MessageMapping("/hello")
@SendTo("/topic/greetings")
public Message greeting(Message message){
return message;
}
}
chat.html 页面
<!DOCTYPE html>
<html lang="en">
<head>
<meta charset="UTF-8">
<title>群聊</title>
<script src="/webjars/jquery/jquery.min.js"></script>
<script src="/webjars/sockjs-client/sockjs.min.js"></script>
<script src="/webjars/stomp-websocket/stomp.min.js"></script>
</head>
<body>
<table>
<tr>
<td>请输入用户名</td>
<td><input type="text" id="name"></td>
</tr>
<tr>
<td><input type="button" id="connect" value="连接"></td>
<td><input type="button" id="disconnect" disabled="disabled" value="断开连接"></td>
</tr>
</table>
<div id="chat" style="display: none">
<table>
<tr>
<td>请输入聊天内容</td>
<td><input type="text" id="content"></td>
<td><input type="button" id="send" value="发送"></td>
</tr>
</table>
<div id="conversation">群聊进行中...</div>
</div>
<script>
$(function () {
$("#connect").click(function () {
connect();
})
$("#disconnect").click(function () {
if (stompClient != null) {
stompClient.disconnect();
}
setConnected(false);
})
$("#send").click(function () {
stompClient.send('/app/hello',{},JSON.stringify({'name':$("#name").val(),'content':$("#content").val()}))
})
})
var stompClient = null;
function connect() {
if (!$("#name").val()) {
return;
}
var socket = new SockJS('/chat');
stompClient = Stomp.over(socket);
stompClient.connect({}, function (success) {
setConnected(true);
stompClient.subscribe('/topic/greetings', function (msg) {
showGreeting(JSON.parse(msg.body));
});
})
}
function showGreeting(msg) {
$("#conversation").append('' + msg.name + ':' + msg.content + '');
}
function setConnected(flag) {
$("#connect").prop("disabled", flag);
$("#disconnect").prop("disabled", !flag);
if (flag) {
$("#chat").show();
} else {
$("#chat").hide();
}
}
</script>
</body>
</html>
2. WebSocket 实现在线单聊
引入 security 的依赖
<dependency>
<groupId>org.springframework.boot</groupId>
<artifactId>spring-boot-starter-security</artifactId>
</dependency>
创建 Chat 实体类
public class Chat {
private String from;
private String content;
private String to;
@Override
public String toString() {
return "Chat{" +
"from='" + from + '\'' +
", content='" + content + '\'' +
", to='" + to + '\'' +
'}';
}
public String getFrom() {
return from;
}
public void setFrom(String from) {
this.from = from;
}
public String getContent() {
return content;
}
public void setContent(String content) {
this.content = content;
}
public String getTo() {
return to;
}
public void setTo(String to) {
this.to = to;
}
}
在

创建 ScurityConfig 类
@Configuration
public class ScurityConfig extends WebSecurityConfigurerAdapter {
@Bean
PasswordEncoder passwordEncoder(){
return NoOpPasswordEncoder.getInstance();
}
@Override
protected void configure(AuthenticationManagerBuilder auth) throws Exception {
auth.inMemoryAuthentication()
.withUser("javaboy")
.password("123")
.roles("admin")
.and()
.withUser("sang")
.password("123")
.roles("user");
}
@Override
protected void configure(HttpSecurity http) throws Exception {
http.authorizeRequests()
.anyRequest().authenticated()
.and()
.formLogin()
.permitAll();
}
}
HelloController 类
@Controller
public class HelloController {
@Autowired
SimpMessagingTemplate simpMessagingTemplate;
// @MessageMapping("/hello")
// @SendTo("/topic/greetings")
// public Message greeting(Message message){
//
// return message;
// }
@MessageMapping("/hello")
// 方法二
public void greeting(Message message){
simpMessagingTemplate.convertAndSend("/topic/greetings", message);
}
// 保存了用户的信息
@MessageMapping("/chat")
public void chat(Principal principal, Chat chat){
chat.setFrom(principal.getName());
simpMessagingTemplate.convertAndSendToUser(chat.getTo(), "/queue/chat", chat);
}
}
online.html 页面
<!DOCTYPE html>
<html lang="en">
<head>
<meta charset="UTF-8">
<title>群聊</title>
<script src="/webjars/jquery/jquery.min.js"></script>
<script src="/webjars/sockjs-client/sockjs.min.js"></script>
<script src="/webjars/stomp-websocket/stomp.min.js"></script>
</head>
<body>
<input type="button" id="connect" value="连接">
<input type="button" id="disconnect" disabled="disabled" value="断开连接">
<hr>
消息内容:<input type="text" id="content">目标用户:<input type="text" id="to"><input type="button" value="发送" id="send">
<div id="conversation"></div>
<script>
$(function () {
$("#connect").click(function () {
connect();
})
$("#disconnect").click(function () {
if (stompClient != null) {
stompClient.disconnect();
}
setConnected(false);
})
$("#send").click(function () {
stompClient.send('/app/chat', {}, JSON.stringify({
'to': $("#to").val(),
'content': $("#content").val()
}))
})
})
var stompClient = null;
function connect() {
var socket = new SockJS('/chat');
stompClient = Stomp.over(socket);
stompClient.connect({}, function (success) {
setConnected(true);
stompClient.subscribe('/user/queue/chat', function (msg) {
showGreeting(JSON.parse(msg.body));
});
})
}
function showGreeting(msg) {
$("#conversation").append('' + msg.from + ':' + msg.content + '');
}
function setConnected(flag) {
$("#connect").prop("disabled", flag);
$("#disconnect").prop("disabled", !flag);
if (flag) {
$("#chat").show();
} else {
$("#chat").hide();
}
}
</script>
</body>
</html>
第 12 章 消息服务
activeMQ下载地址:http://activemq.apache.org/components/classic/download/
1. ActiveMQ
一定要安装 jdk 。
解压之后在 bin 目录下启动:
启动命令:
./activemq start

停止的命令
./activemq stop

以上启动之后只能在本地linux系统的浏览器访问的到,修改conf 下的 jetty.xml 文件
将127.0.0.1 修改成0.0.0.0 即可

最后在本地电脑上访问即可,端口是8161,用户名和密码都是:admin

2. Spring Boot 整合 ActiveMQ
创建项目,整合依赖:
配值 activeMQ 的信息
spring.activemq.broker-url=tcp://45.32.15.186:61616
# 发送的消息可以是普通的字符串也可以是对象,如果是对象的话需要如下配置
spring.activemq.packages.trust-all=true
spring.activemq.user=admin
spring.activemq.password=admin
在启动类上添加 Queue
package org.javaboy.activemq;
import org.apache.activemq.command.ActiveMQQueue;
import org.springframework.boot.SpringApplication;
import org.springframework.boot.autoconfigure.SpringBootApplication;
import org.springframework.context.annotation.Bean;
import javax.jms.Queue;
@SpringBootApplication
public class ActivemqApplication {
public static void main(String[] args) {
SpringApplication.run(ActivemqApplication.class, args);
}
@Bean
Queue queue() {
return new ActiveMQQueue("hello.javaboy");
}
}
创建 Message 实体类
public class Message implements Serializable {
private String content;
private Date sendDate;
@Override
public String toString() {
return "Message{" +
"content='" + content + '\'' +
", sendDate=" + sendDate +
'}';
}
public String getContent() {
return content;
}
public void setContent(String content) {
this.content = content;
}
public Date getSendDate() {
return sendDate;
}
public void setSendDate(Date sendDate) {
this.sendDate = sendDate;
}
}
创建 JmsComponent 类,发送队列的消息
@Component
public class JmsComponent {
@Autowired
JmsMessagingTemplate jmsMessagingTemplate;
@Autowired
Queue queue;
public void send(Message message){
jmsMessagingTemplate.convertAndSend(queue, message);
}
@JmsListener(destination = "hello.javaboy")
public void receive(Message message){
System.out.println(message);
}
}
测试:
@SpringBootTest
class ActivemqApplicationTests {
@Autowired
JmsComponent jmsComponent;
@Test
void contextLoads() {
Message message = new Message();
message.setContent("hello javaboy!");
message.setSendDate(new Date());
jmsComponent.send(message);
jmsComponent.receive(message);
}
}


3. RabbitMQ 简介并安装
安装是在docker 上进行安装的


用户和密码均为:guest
4. Spring Boot 整合RabbitMQ
项目的目录结构:
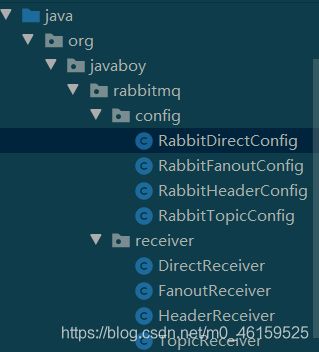
新建项目,注入依赖
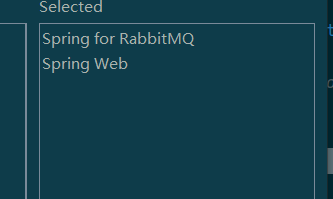
配置,连接 rabbitMQ
spring.rabbitmq.host=45.32.15.186
spring.rabbitmq.username=guest
spring.rabbitmq.password=guest
spring.rabbitmq.port=32773
第一种模式(Direct):
创建RabbitDirectConfig
@Configuration
public class RabbitDirectConfig {
public final static String DIRECTNAME="javaboy-direct";
@Bean
Queue queue(){
return new Queue("hello.javaboy");
}
@Bean
DirectExchange directExchange(){
return new DirectExchange(DIRECTNAME,true,false);
}
@Bean
Binding binding(){
// 把 对列和exchange进行绑定在一起
return BindingBuilder.bind(queue()).to(directExchange()).with("direct");
}
}
创建 DirectReceiver 类
@Component
public class DirectReceiver {
@RabbitListener(queues = "hello.javaboy")
public void handler1(String msg){
System.out.println("DirectReceiver.handler1>>>>>"+msg);
}
}
测试:
@SpringBootTest
class RabbitmqApplicationTests {
@Autowired
RabbitTemplate rabbitTemplate;
@Test
void contextLoads() {
rabbitTemplate.convertAndSend("hello.javaboy","卧槽无情");
}
}
结果:

第二种模式(Fanout):
创建RabbitFanoutConfig 类
@Configuration
public class RabbitFanoutConfig {
public static final String FANOUTNAME="javaboy-fanout";
@Bean
Queue queueOne(){
return new Queue("queue-one");
}
@Bean
Queue queueTwo(){
return new Queue("queue-two");
}
@Bean
FanoutExchange fanoutExchange(){
return new FanoutExchange(FANOUTNAME, true, false);
}
@Bean
Binding bindingOne(){
return BindingBuilder.bind(queueOne()).to(fanoutExchange());
}
@Bean
Binding bindingTwo(){
return BindingBuilder.bind(queueTwo()).to(fanoutExchange());
}
}
创建FanoutReceiver 类
@Component
public class FanoutReceiver {
@RabbitListener(queues = "queue-one")
public void handler1(String msg){
System.out.println("FanoutReceiver.handler1>>>"+msg);
}
@RabbitListener(queues = "queue-two")
public void handler2(String msg){
System.out.println("FanoutReceiver.handler2>>>>"+msg);
}
}
测试:
@Test
public void test1(){
rabbitTemplate.convertAndSend(RabbitFanoutConfig.FANOUTNAME,null,"hello javaboy");
}
结果:

第三种模式(Topic):
创建RabbitTopicConfig 类
@Configuration
public class RabbitTopicConfig {
public static final String TOPICNAME = "javaboy-topic";
@Bean
TopicExchange topicExchange() {
return new TopicExchange(TOPICNAME, true, false);
}
@Bean
Queue xiaomi() {
return new Queue("xiaomi");
}
@Bean
Queue huawei() {
return new Queue("huawei");
}
@Bean
Queue phone(){
return new Queue("phone");
}
@Bean
Binding xiaomiBinding(){
return BindingBuilder.bind(xiaomi()).to(topicExchange()).with("xiaomi.#");
}
@Bean
Binding huaweiBinding(){
return BindingBuilder.bind(huawei()).to(topicExchange()).with("huawei.#");
}
@Bean
Binding phoneBinding(){
return BindingBuilder.bind(phone()).to(topicExchange()).with("#.phone.#");
}
}
创建TopicReceiver 类
@Component
public class TopicReceiver {
@RabbitListener(queues = "xiaomi")
public void hander1(String msg) {
System.out.println("TopicReceiver.hander1>>>" + msg);
}
@RabbitListener(queues = "huawei")
public void hander2(String msg) {
System.out.println("TopicReceiver.hander2>>>" + msg);
}
@RabbitListener(queues = "phone")
public void hander3(String msg) {
System.out.println("TopicReceiver.hander3>>>" + msg);
}
}
测试:
@Test
public void test2(){
rabbitTemplate.convertAndSend(RabbitTopicConfig.TOPICNAME,"xiaomi","小米新闻");
rabbitTemplate.convertAndSend(RabbitTopicConfig.TOPICNAME,"vivo.phone","蓝厂手机");
rabbitTemplate.convertAndSend(RabbitTopicConfig.TOPICNAME,"huawei.phone","华为手机");
}
结果:
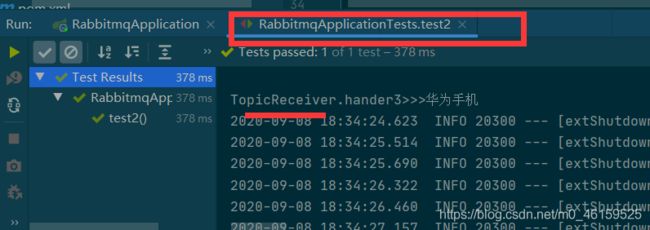

第四种模式(Header):
创建 RabbitHeaderConfig 类
@Configuration
public class RabbitHeaderConfig {
public static final String HEADERNAME="javaboy-header";
@Bean
HeadersExchange headersExchange(){
return new HeadersExchange(HEADERNAME,true,false);
}
@Bean
Queue queueName(){
return new Queue("name-queue");
}
@Bean
Queue queueAge(){
return new Queue("age-queue");
}
@Bean
Binding bindingName(){
// whereAny 表示消息中只要有一个 header 配置上map 就路由到上面
Map<String,Object> map=new HashMap<>();
map.put("name", "javaboy");
return BindingBuilder.bind(queueName()).to(headersExchange()).whereAny(map).match();
}
@Bean
Binding bindingAge(){
// 只要有 age 这个字段,就路由到 queue 上去
return BindingBuilder.bind(queueAge()).to(headersExchange()).where("age").exists();
}
}
创建HeaderReceiver 类
@Component
public class HeaderReceiver {
@RabbitListener(queues ="name-queue")
public void hander1(byte[]msg){
System.out.println("HeaderReceiver.hander1>>>"+new String(msg,0,msg.length));
}
@RabbitListener(queues ="age-queue")
public void hander2(String msg){
System.out.println("HeaderReceiver.hander2>>>"+msg);
}
}
测试:
@Test
public void test3(){
Message nameMessage = MessageBuilder.withBody("hello,javaboy".getBytes(