Android基本界面控件的使用、部分属性方法解析
一、View:
1.概述:
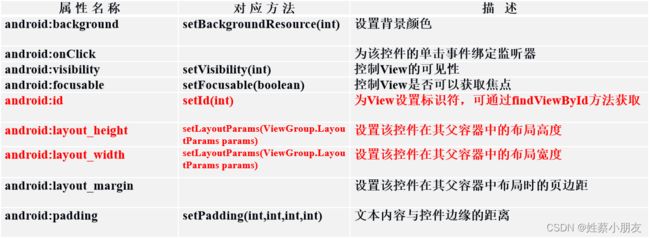
- View是构建用户界面控件(Button,Textfields等等)的父类,所有的用户界面可见控件以及布局类都是由View派生来的。
- 一个View占用了屏幕上的一个矩形区域并且负责界面绘制和事件处理,能够实现所占据区域的界面绘制、焦点变化和界面事件处理等功能。
- 绝大部份UI控件放在android.widget包及其子jar包,android.view包及其子jar包中。
2.View类常用属性及方法:
二、TextView:
1.概述:
- 文本类控件,主要包含TextView和EditText,它们都可以用来显示文本。最大的区别是:TextView不允许编辑文本内容,而EditText允许用户编辑文本内容。
- TextView控件的主要功能是向用户静态展现文字信息,相当于完成标签的显示功能。
- TextView直接继承View类,是EditText,Button两个控件的父类。
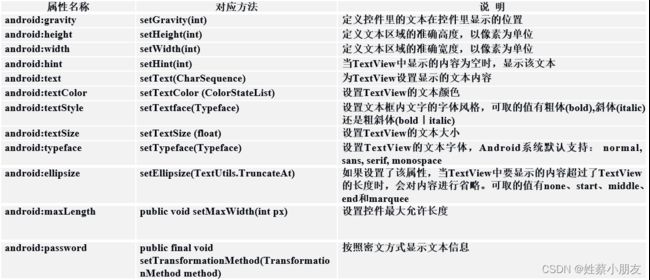
2.TextView类常用属性及方法:
3. 部分属性解析:
android:id:控件被分配一个资源id,便于以后可以直接在一个Activity程序中使用。+ 表示系统自动在R.java中生成相应的id。android:layout_width:定义控件宽度 。android:layout_height:定义控件高度。android:maxLength:控件显示内容的最大字符长度。android:gravity:控制文本在控件里的显示位置。android:textStyle:设置文字的显示风格 normal:正常;bold:粗体;italic:斜体。android:textSize:设置文字的大小。android:textColor:设置文字的颜色,十六进制表示。android:typeface:设置TextView的文本字体。android:padding:控件显示的文字内容与控件边界的距离。android:layout_margin:本控件与其它相邻控件及父控件上下左右的距离。android:drawableRight:图片文件名。文本框右边绘制图片。android:background:背景图片名。android:password:设置密码框 android:inputType=“textPassword” 也可以达到密码效果。android:shadowColor阴影颜色。android:shadowDx阴影的水平偏移量。android:shadowDy阴影的垂直偏移量。android:shadowRadius阴影的半径,即阴影的范围。android:autoLink设置是否当文本超链接。可选值(none/web/email/phone/map/all)。android:ellipsize当TextView中要显示的内容超过了TextView的长度时,会对内容进行省略,该属性设置显示的方式。start 省略号显示在开头;end 省略号显示在结尾;middle省略号显示在中间;android:lines=“1” 单行 ”marquee” 以跑马灯的方式显示(动画横向移动)。android:marqueeRepeatLimit在ellipsize指定marquee的情况下,设置重复滚动的次数,当设置为marquee_forever时表示无限次。android:focusableInTouchMode:是否在触摸模式下获得焦点,实现跑马灯效果时需要设置为true。android:focusable控件是否能够获取焦点,实现跑马灯效果时需要设置为true。
4.TextView在java代码中的使用方法:
//通过ID引用界面上的任何控件,只要该控件在XML文件中定义过ID即可
TextView textView = (TextView)findViewById(R.id.TextView01);
//调方法,设置TextView所显示的内容
textView.setText("用户名:");
三、使用样式表:
- 如果要在一个项目中定义多个文本控件,可能会存在许多重复的配置属性。我们可以使用样式表进行统一的属性配置。
1. 使用方法:
- 在values文件夹style.xml中定义一个样式。格式如下:
<resources>
<style name=“样式名称” parent=“父样式表”>
- 属性内容
style>
<style name=“样式名称” parent=“父样式表”>
style>
resources>
- 在布局文件需要使用样式表的控件属性中引用该样式表,格式如下:
style=“@style/样式名”
四、shape标签绘制简单形状:
1. 用法:
<shape xmlns:android=“http://schemas.android.com/apk/res/android”   >
  <corners   ... />
  <gradient    ... />
  <padding   ...  />
  <size   ...     />
  <solid android:color="color"  />
  <stroke   ...  />
shape>
2. 相关属性:
android:shape=["rectangle" | "oval" | "line" | "ring"]shape的形状,默认为矩形,可以设置为矩形、椭圆、线性、环形。android:innerRadius =“50dp”:尺寸,内环的半径。android:innerRadiusRatio:浮点型,内环的厚度比(一般不用)android:thickness =“100dp”:尺寸,环的厚度android:thicknessRatio:浮点型,环的厚度比(一般不用)android:useLevel =“false”:boolean值,一般为false,如果当做是LevelListDrawable使用时值为true.
3. shape的子标签:
- Shape的子标签包括: corners(圆角)、gradient(渐变)、
solid(填充)、 padding(内边距)、 stroke(描边)、size(大小)
(1)corners子标签:
(2)gradient子标签:
(3)stroke子标签:
五、EditText:
1.概述:
- EditText是用来输入和编辑字符串的控件,它是一个具有编辑功能的TextView。
- EditText类继承自TextView,所有TextView的属性方法EditText都适用。
- EditText和TextView最大的不同就是用户可以对EditText控件进行编辑、设置监听器,用来检测用户的输入是否合法等。
2.EditText类常用属性及方法:
3. 部分属性解析:
- android:maxLength: 限制输入字符数量。
- android:singleLine: 设置文本行数。
- android:maxLines: 设置最大的显示行数。
- android:minLines: 设置最小的显示行数。
- android:backgroud: =“@null”(可以去掉边框)。
- android:drawableLeft: 在EditText左边显示图片。
- android:drawableRight: 在EditText右边显示图片。
- android:inputType: 控制虚拟键盘显示的方式。比如,让模拟键盘只显示数字输入。

- android:hint: Text为空时显示的文字提示信息。
- android:selectAllOnFocus: 值为true,也就是默认全部选中。文本在初始状态时已经被默认全部选中了。
- android:enabled: 值为false,是不可以使用。
4.EditText设置监听:
(1) 方法一:
- 第一步:创建监听类,实现接口TextWatcher,并实现接口中的三个方法。
public void afterTextChanged(Editable s) {}
public void onTextChanged(CharSequence s, int start, int before, int count) {}
public void beforeTextChanged(CharSequence s, int start, int count, int after){}
- 第二步:为控件绑定监听。
//该方法位于监听类内的方法。
public void addTextChangedListener(TextWatcher watcher)
(2)方法二、方法三:见Button按钮
六、Button按钮控件:
1. 创建Button按钮:
<LinearLayout
	android:layout_width="fill_parent"
	android:layout_height="fill_parent">
	<Button
		android:layout_width="fill_parent"
		android:layout_height="wrap_content"
		android:text=“我爱Android"
		android:layout_marginTop="10px"
		android:maxLength="3"/>
LinearLayout>
2. 常用XML属性:
- android:text 属性在按钮上显示文字 (ImageButton不能有文字)
- android:background 可以给按钮指定背景图片或颜色。
- android:adjustViewBounds=“true” 调整边框以适应图片大小。
3. 实现按钮按下时换图片:
- 第一步:定义Drawable下的xml资源文件
 <selector xmlns:android="http://schemas.android.com/apk/res/android">
     <item android:state_pressed="true"
           android:drawable="@mipmap/btn_down" />

     <item android:drawable="@mipmap/btn_up" />
 selector>
- 第二步:在布局文件的background属性中引用该文件
android:background="@drawable/bt"
4. Button按钮事件监听:
(1)方法1:将监听器直接绑定到标签。
在布局文件中,为Button控件设置OnCilck属性,然后在代码中添加一个public void 属性值(View view){}方法,这个方法必须是public的,并且只有一个View参数。
- xml布局文件中:
(2)方法2:在代码中用方法setOnClickListener()绑定监听器OnClickListener,重写其方法。
EditText et=(EditText) findViewById(R.id.edit)
Button bt=(Button)findViewById(R.id.bn);
bt. setOnClickListener(new OnClickListener(){
	public void onClick(View v){
                	et.setText("Button Pressed: " + i);
               	i++;
            }
        });
(3)方法三:见EditText监听设置。
七、Toast:
1.概述:
- Toast是Android中用来显示信息的一种机制,是一个包含提醒用户的快捷短消息的窗口没有焦点,而且Toast显示的时间有限,过一定的时间就会自动消失。
- 其中Toast和AlertDialog直接在Java中创建,不需要在布局文件中创建。

2. 创建Toast的方式:调用Toast类的makeText静态方法
(1)第一种创建方式:
static Toast makeText(Context context, int resId, int duration)
context是toast显示在哪个作用域,通常是当前Activity;
resId指显示内容,使用string.xml中定义的显示的消息内容,通过R.java来引用;
duration指定显示时间,Toast默认有LENGTH_SHORT和LENGTH_LONG两常量,分别表示短时间显示和长时间显示。
(2)第二种创建方式:
static Toast makeText(Context context, CharSequence text, int duration)
参数context和duration与第一个方法相同,参数text是消息内容。
3. Toast的显示方式:
用上面任意方法创建Toast对象之后调用方法 show() 即可显示。
4. 设置Toast显示位置:
public void setGravity(int gravity, int xOffset, int yOffset)
三个参数分别表示(起点位置,水平向右位移,垂直向下位移)
例:
tsToast.setGravity(Gravity.CENTER, 0, 0);
八、CheckBox:
1.概述:
继承结构如下:
java.lang.Object
	   ↳	android.view.View
	 	   ↳	android.widget.TextView
	 	 	   ↳	android.widget.Button
	 	 	 	   ↳	android.widget.CompoundButton
	 	 	 	 	   ↳	android.widget.CheckBox
2.创建复选框:
<LinearLayout 				                    定义线型布局管理器
	xmlns:android="http://schemas.android.com/apk/res/android"
	android:orientation="vertical" 		所有组件垂直摆放
	android:layout_width="fill_parent"		布局管理器宽度为屏幕宽度
	android:layout_height="fill_parent">     布局管理器高度为屏幕高度
	<CheckBox				                     定义复选框
		android:id="@+id/url1"			此组件ID,程序中使用
		android:text="www.mldn.cn"		组件的显示文字
		android:layout_width=“fill_parent”	组件的宽度为父控件宽度
		android:layout_height="wrap_content"/> 组件的高度为文字高度
	<CheckBox				                    定义复选框
		android:id="@+id/url2"			此组件ID,程序中使用
		android:text="bbs.mldn.cn"		组件的显示文字
		android:layout_width=“fill_parent”	组件的宽度为父控件宽度
		android:layout_height="wrap_content"	组件的高度为文字高度
		android:checked="true" />		  设置为默认选中
LinearLayout>
3.Java中常用方法:
Java代码中的常用方法
public boolean isChecked():确定复选框是否被选中。
public void setChecked(boolean checked):设置默认选中
public void toggle():切换复选框的选中和未选中状态
4.CheckBox事件监听:
- CheckBox事件监听实现
OnCheckedChangeListener接口,实现回调方法onCheckedChanged ()。 - 第一个参数:状态发生改变的CompoundButton按钮
- 第二个参数checked,表示当前点击的CheckBox是否为选中(Checked)状态。
5.CheckBox事件绑定:
事件绑定方法:
public void setOnCheckedChangeListener (CompoundButton.OnCheckedChangeListener listener)
九、ImageView:
1.概述:
ImageView是一个图片控件,负责显示图片。
2.常用xml属性和java方法:
- 设置图片固定大小,又想保持图片宽高比,需要如下设置:
1) 设置setAdjustViewBounds为true;
2) 设置maxWidth、maxHeight;
3) 设置layout_width和layout_height为wrap_content。
十、RadioGroup&RadioButton:
1.概述:
- RadioGroup来定义单选钮控件的容器,继承结构如下:
java.lang.Object
	   ↳	android.view.View
		   ↳	android.view.ViewGroup
	 	 	   ↳	android.widget.LinearLayout
	 	 	 	   ↳	android.widget.RadioGroup
- RadioGroup提供的只是一个单选钮的容器,只有在此容器之中配置多个按钮组件之后才可以使用,而要想设置单选钮的内容,则需要使用RadioButton类,继承结构如下如下:
java.lang.Object
	   ↳	android.view.View
		   ↳	android.widget.TextView
	 	 	   ↳	android.widget.Button
	 	 	 	   ↳	android.widget.CompoundButton
	 	 	 	 	   ↳	android.widget.RadioButton
2.创建一组单选钮:
<LinearLayout 					定义线型布局管理器
	xmlns:android="http://schemas.android.com/apk/res/android"
	android:orientation="vertical" 		所有组件垂直摆放
	android:layout_width="fill_parent"		布局管理器宽度为屏幕宽度
	android:layout_height="fill_parent">		布局管理器高度为屏幕高度
	<RadioGroup					定义一个单选组
		android:id="@+id/encoding"		此单选组的ID,程序中使用
		android:layout_width="fill_parent"		此组单选钮宽度为屏幕宽度
		android:layout_height="wrap_content"	此组单选钮高度为文字高度
		android:orientation="vertical"		单选按钮为垂直排列
		android:checkedButton="@id/gbk">		默认选中ID为“gbk”的按钮
		<RadioButton				定义一个选项钮
			android:id="@+id/utf"		此选项钮的ID
			android:text="UTF编码"/>		此选项钮的显示文字
		<RadioButton				定义一个选项钮
			android:id="@+id/gbk"		此选项钮的ID
			android:text="GBK编码"/>		此选项钮的显示文字
	RadioGroup>
LinearLayout>
3.常用方法:
- public boolean isChecked():确定单选框是否被选中。
- public void setChecked(boolean checked):设置默认选中。
- public void toggle():切换单选框的选中和未选中状态。
4.RadioGroup事件监听:
- 对
RadioGroup添加监听事件, 实现接口 RadioGroup.OnCheckedChangeListener, 通过该接口来实现对一组RadioButton的监听工作,实现onCheckedChanged方法:
public void onCheckedChanged(RadioGroup group, int checkedId)
第一个参数:状态发生改变的RadioGroup
第二个参数checkedId,表示当前被选中的RadioButton的ID。
5.RadioGroup绑定监听:
绑定方法为:setOnCheckedChangeListener(RadioGroup.OnCheckedChangeListener)。
6.例子:
genderGroup.setOnCheckedChangeListener(new RadioGroup.OnCheckedChangeListener() {
   public void onCheckedChanged(RadioGroup group, int checkid) {
    if (checkid ==R.id.femaleRadio) {
      Toast.makeText(MyActivity.this, "I am female.", Toast.LENGTH_SHORT).show();
    } else if (checkid ==R.id.maleRadio) {
      Toast.makeText(MyActivity.this, "I am male.", Toast.LENGTH_SHORT).show();
    } else {
      Toast.makeText(MyActivity.this, "Unknown", Toast.LENGTH_SHORT).show();
    }
  }
});
十一、ImageButton:
1.概述:
- ImageButton(图片按钮)用以实现能够显示图像功能的控件按钮。
- 它与Button控件的不同之处只是在设置图片时有些区别。ImageButton控件继承自ImageView类,ImageButton控件与Button控件的主要区别是ImageButton中没有text属性,即按钮中将显示图片而不是文本。
2.常用方法:
ImageButton控件中,设置按钮显示的图片可以通过android:src属性,也可以通过setImageResource(int)方法来设置。
十二、ProgressBar:
1.概述:
进度条控件,有圆形进度条和水平进度条,继承结构如下:
java.lang.Object
   ↳	android.view.View
 	   ↳	android.widget.ProgressBar
2.创建进度条:
3.常用方法:
style="@android:style/Widget.ProgressBar.Small"        //小型圆形进度条
style="@android:style/Widget.ProgressBar.Small.Inverse"   //小型圆形进度条
style="@android:style/Widget.ProgressBar.Inverse"        //中型圆形进度条
style="@android:style/Widget.ProgressBar.Large"       //大型圆形进度条
style="@android:style/Widget.ProgressBar.Large.Inverse"  //大型圆形进度条
style="@android:style/Widget.ProgressBar.Horizontal"     //水平进度条

设置水平进度条
style="?android:attr/progressBarStyleHorizontal“
设置旋转进度条

style="?android:attr/progressBarStyleLarge“
style="?android:attr/progressBarStyle“
style="?android:attr/progressBarStyleSmall"
android:max:设置进度条的最大值
android:progress:定义缺省进度值,在0~MAX之间
android:secondaryProgress:定义第二进度值
android:visibility:设置进度条的可见性
View.VISIBLE:设置进度条可见
View.INVISIBLE:不可见,但这个View仍然会占用在xml文件中所分配的布局空间,不重新layout
View.GONE:设置进度条不可见,不占布局空间
int getMax():返回这个进度条的范围的上限
void setMax(int max):设置进度条的最大值
int getProgress():返回进度
viod setProgress(int progress):设置进度
int getSecondaryProgress():返回第二进度
void setSecondaryProgress(int secondaryProgress):设置第二进度
void incrementProgressBy(int diff):指定增加的进度
void setVisibility(int v):设置该进度条是否可视
十三、Spinner:
1.概述:
下拉列表框,继承结构如下:
java.lang.Object
	↳android.view.View
		↳android.view.ViewGroup
			↳android.widget.AdapterView<T extends android.widget.Adapter>
				↳android.widget.AbsSpinner
					↳android.widget.Spinner
2.创建下拉列表框:
方式一:直接通过资源文件配置。
Step1:在布局文件中定义一个空的Spinner;
Step2:在values文件夹中定义有关Spinner内容的资源文件,例:
Step3:在Spinner元素中增加属性entries。例: android:entries=“@array/city_label”
方式二:通过android.widget.ArrayAdapter类读取资源文件或指定具体设置的数据。(适配器)
3.常用方法:
4.Spinner事件监听:
- 实现OnItemSelectedListener接口,并实现其中的方法。
public void onItemSelected(AdapterView<?> parent, View view,int position, long id)//选项被选中时触发该方法
AdapterView:选项被选中的视图列表
view:当前选中的item选项
position:被选中的item选项在视图中的位置
id:被选中item选项的id
public void onNothingSelected(AdapterView<?> parent)//没有选项时触发
5.Spinner绑定监听:
Spinner类中绑定事件监听的方法:
setOnItemSelectedListener(OnItemSelectedListener)
十四、ArrayAdapter适配器:
1.作用:
为Spinner控件设置列表项。
2.常用方法:
3.使用方法:
方式一:读取资源文件中定义的列表项。
Step1:在values文件夹中定义数据文件;
Step2:将该数据文件封装进ArrayAdapter类的对象中;
Step3:将Spinner绑定该Adapter对象。
方式二:通过List集合或者数组设置列表项。
Step1:创建List集合对象,定义数据;
Step2:将该List对象封装进ArrayAdapter类的对象中;
Step3:将Spinner绑定该Adapter对象。
十五、DatePicker:
1.概述:
向用户提供包含年、月、日的日期数据并允许用户对其进行修改。
继承结构如下:
java.lang.Object
	   ↳android.view.View
	 	   ↳android.view.ViewGroup
	 	 	   ↳android.widget.FrameLayout
	 	 	 	   ↳android.widget.DatePicker
2.创建日期控件:
<LinearLayout 						定义线型布局管理器
	xmlns:android="http://schemas.android.com/apk/res/android"
	android:orientation="vertical" 			所有控件垂直摆放
	android:layout_width="fill_parent"			布局管理器宽度为屏幕宽度
	android:layout_height="fill_parent">			布局管理器高度为屏幕高度
	<DatePicker						定义日期选择器
		android:id="@+id/dp1"				控件ID,程序中使用
		android:layout_width="wrap_content"		控件宽度为显示宽度
		android:layout_height="wrap_content" />		控件高度为显示高度
	<DatePicker						定义日期选择器
		android:id="@+id/dp2"				控件ID,程序中使用
		android:layout_width="wrap_content"		控件宽度为显示宽度
		android:layout_height="wrap_content" />		控件高度为显示高度
LinearLayout>
public class MyDatePickerDemo extends Activity {
	private DatePicker mydp = null;
	public void onCreate(Bundle savedInstanceState) {
		super.onCreate(savedInstanceState);			super.setContentView(R.layout.main);
              this.mydp = (DatePicker) super.findViewById(R.id.dp2);//取得日期选择器
		this.mydp.updateDate(1998, 7, 27) ;	// 设置一个默认日期
	}
}
3.常用属性及方法:
- DatePicker有两种模式:calendar模式或spinner模式。
android:datePickerMode=“spinner”(或者calendar)如果是spinner,需要加属性:android:calendarViewShown="false"。
4.DatePicker事件监听:
需要为DatePicker添加onDateChangedListener监听器,实现OnDateChangeListner()方法。
public abstract void onDateChanged(DatePicker view, int year, int monthOfYear, int dayOfMonth)
//view 与监听器关联的视图。
//year 用户设置的年。
//monthOfYear 用户设置的月份(0-11),与Calendar兼容。
//dayOfMonth 用户设置的日期。
5.DatePicker绑定监听:
控件绑定监听器时使用init()方法。
public void init (int year, int monthOfYear, int dayOfMonth, DatePicker.OnDateChangedListener)
//year 初始年
//monthOfYear 初始月。
//dayOfMonth 初始日。
//onDateChangedListener:监听器对象,日期改变时通知用户的事件监听,负责监听日期数据的变化。
十六、TimePicker:
1.概述:
向用户显示一天中的时间(可以为24小时制,也可以为AM/PM),并允许用户进行选择。
继承结构如下:
java.lang.Object
   ↳android.view.View
 	   ↳android.view.ViewGroup
 	 	   ↳android.widget.FrameLayout
 	 	    	 	  ↳android.widget.TimePicker
2.创建时间控件:
<LinearLayout 					定义线型布局管理器
	xmlns:android="http://schemas.android.com/apk/res/android"
	android:orientation="vertical" 		所有控件垂直摆放
	android:layout_width="fill_parent"		布局管理器宽度为屏幕宽度
	android:layout_height="fill_parent">		布局管理器高度为屏幕高度
	<TimePicker				                    定义时间控件
		android:id="@+id/tp1"			定义控件ID,程序中使用
		android:layout_width="wrap_content"	控件宽度为显示宽度
		android:layout_height="wrap_content“       控件高度为显示高度
        android:timePickerMode="spinner"
    />
	LinearLayout>
3.常用方法:
4.TimePicker事件监听:
需要为TimePicker添加OnTimeChangedListener监听器,实现onTimeChanged()方法。
public abstract void onTimeChanged (TimePicker view, int hourOfDay, int minute)
//View:与监听相关的视图。
//hourOfDay:当前小时
//Minute:当前分钟
5.TimePicker绑定监听:
setOnTimeChangedListener(new TimePicker.OnTimeChangedListener() {
              public void onTimeChanged(TimePicker view, int hourOfDay, int minute) {
                      。。。。。。。
             }
    });
)
十七、AlertDialog:
1.概述:
消息弹框。
其中Toast和AlertDialog直接在Java中创建,不需要在布局文件中创建。
2.创建步骤:
- 创建AlertDialog.Builder对象。
- 调用Builder对象的setTitle方法设置标题,setIcon方法设置图标。
- 调用Builder相关方法如setMessage方法、setItems方法、setSingleChoiceItems方法、setMultiChoiceItems方法、setAdapter方法、setView方法设置不同类型的对话框内容。
- 调用setPositiveButton、setNegativeButton、setNeutralButton设置多个按钮。
- 调用Builder对象的create()方法创建AlertDialog对象。
- 调用AlertDialog对象的show()方法将对话框显示出来。
3.常用方法:
setPositiveButton(CharSequence text, DialogInterface.OnClickListener listener)这是一个相当于OK、确定操作的按钮setNegativeButton (CharSequence text, DialogInterface.OnClickListener listener)这是一个相当于取消操作的按钮。setNeutralButton (CharSequence text, DialogInterface.OnClickListener listener)这个是相当于一个忽略操作的按钮。
十八、ListView:
1.概述:
- ListView是一个列表控件,它以列表的形式展示具体内容,既可以方便的显示从系统中其他应用读取出来的数据,也可独立的为各行元素设置监听器。
- 每一行列表都是一个独立的元素。可以是一个字符串,也可以是一个组合控件。默认ListView中每个元素都是一个TextView。
- 继承结构如下:
java.lang.Object
   ↳android.view.View
 	   ↳android.view.ViewGroup
 	 	   ↳android.widget.AdapterView<T extends android.widget.Adapter>
 	 	 	   ↳android.widget.AbsListView
 	 	 	 	   ↳android.widget.ListView
2.常用属性:
3.ListView的创建:
ListView的创建方式有两种:
- 第一种:直接使用ListView创建:
- 直接使用资源文件给出列表项。
- 使用适配器(ArrayAdapter)提供列表项。
- 第二种:继承ListActivity。
- 直接使用资源文件给出列表项:
布局文件中:
android:entries="@array/books“
strings.xml中:
<string-array name="books">
	<item>疯狂Android讲义item>
	<item>疯狂Java讲义item>
	<item>疯狂J2EE讲义item>
string-array>
- 使用适配器提供列表项:
使用适配器完成一个ListView的创建需要3个元素:
(1)布局文件中的ListView:用来展示列表。
(2)数据源:填入ListView的数据或者图片等。
(3)连接数据与ListView的适配器,适配器是用来把数据映射到ListView上的中介。
public ArrayAdapter (Context context, int resource, T[] objects)
//第一个参数:上下文
//第二个参数:每行列表项(TextView)外观样式。Android为其提供如下属性样式,或者自己定义一个TextView的布局文件
//simple_list_item_1:每个列表项都是一个普通的textView
//simple_list_item_2:每个列表项都是一个普通的textView(字体略大)
//simple_list_item_checked:每个列表项都是一个已勾选的列表项
//simple_list_item_multiple_choice:每个列表项都是带多选框的文本
//simple_list_item_single_choice:每个列表项都是带单选框的文本
//第三个参数:数据源(如:数组)。
创建步骤:
- 第一步:在布局文件中定义一个空的ListView。
- 第二步:在Activity中:
根据id得到ListView
创建数据源,如:String str[]={“China”,”American”。。};
创建ArrayAdapter对象
将ListView和ArrayAdapter对象绑定:使用ListView中的方法:public void setAdapter (ListAdapter adapter)
- 继承ListActivity:
- 如果程序的窗口仅需要显示一个列表,可以直接让Activity继承ListActivity,无需调用setContentView()方法。
- 一个ListActivity必须包含一个ListView, 可以通过getListView()返回ListView对象。
- 如果想采用自定义xml布局文件,则在布局文件中应该含有一个id为
android:id=“@+id/android:list”的ListView。
4.案例:使用SimpleAdapter创建ListView
SimpleAdapter构造函数是:
public SimpleAdapter (Context context, List<? extends Map<String, ?>> data, int resource, String[] from, int[] to)
//第一个参数:context,SimpleAdapter所要运行关联到的视图,一般指当前的Activity;
//第二个参数:是个List集合对象,该集合中每个Map对象生成一个列表项;
//第三个参数:指定一个界面布局文件的id,即ListView里单个列表项的布局文件;
//第四个参数:是Map中键key,即当前的ListView里有几列(列名);
//第五个参数:第3个参数布局文件里ListView里需要显示的控件的id。
第一步:构建布局文件
根据每个列表项构建ListView里每一行的布局文件。
构建含ListView的布局文件。
在Activity文件中:
1.继承Activity
2.设定自定义的布局文件setContentView()
3.将ListView中每一行要显示的数据放入Map
4.创建一个List集合对象,集合元素是Map。
5.将Map对象放入List对象中list.add(map)
6.构建适配器 SimpleAdapter;
SimpleAdapter:可以自定义出各种效果。
构造函数是:
public SimpleAdapter (Context context, List<? extends Map<String, ?>> data, int resource, String[] from, int[] to)
//第一个参数:context,SimpleAdapter所要运行关联到的视图,一般指当前的Activity;
//第二个参数:是个List集合对象,该集合中每个Map对象生成一个列表项;
//第三个参数:指定一个界面布局的id,即ListView里的布局文件;
//第四个参数:是Map中键key,即当前的ListView里有几列(列名),String数组里就应该有几个元素;
//第五个参数:第3个参数布局文件里ListView里需要显示的控件的id。
7.把适配器 添加到ListView,并显示出来。
两种方式:
调用ListActivity里的方法:
public void setListAdapter (ListAdapter adapter)
或者
创建该ListView对象,该对象调用其setAdapter(ListAdapter adapter)
5.ListView事件监听:
OnItemClickListener:监听器在点击该项目的子项时触发。
OnItemLongClickListener:长按事件监听。
OnTouchListener:监听器在触碰到ListView时触发。
OnScrollListener:监听器在ListView滚动时触发。
OnItemClickListener:监听器在点击该项目的子项时触发。
public void onListItemClick(ListView lv,View v,int position,long id)
//该方法是从ListActivity中继承而来,点击列表中列表项时会触发该方法。
//ListView lv:被点击列表项属于哪个ListView
//View v:被点击的item对象
//int position:被点击的item对象的位置
//long id:被点击的item对象的id


