SpringBoot自定义注解
1. Java注解(Annotation)
Java注解是附加在代码中的一些元信息,用于一些工具在编译、
运行时进行解析和使用,起到说明、配置的功能。注解相关类都包含在java.lang.annotation包中。
2. Java注解分类
2.1 JDK基本注解
2.2 JDK元注解
2.3 自定义注解
3. JDK基本注解
3.1 @Override 重写
3.2 @Deprecated 已过时
3.3 @SuppressWarnings(value = "unchecked") 压制编辑器警告
4. JDK元注解
元注解用于修饰其他的注解(纪委:管干部的干部)
4.1 @Retention:定义注解的保留策略
@Retention(RetentionPolicy.SOURCE) //注解仅存在于源码中,在class字节码文件中不包含
@Retention(RetentionPolicy.CLASS) //默认的保留策略,注解会在class字节码文件中存在,但运行时无法获得,
@Retention(RetentionPolicy.RUNTIME) //注解会在class字节码文件中存在,在运行时可以通过反射获取到4.2 @Target:指定被修饰的Annotation可以放置的位置(被修饰的目标)
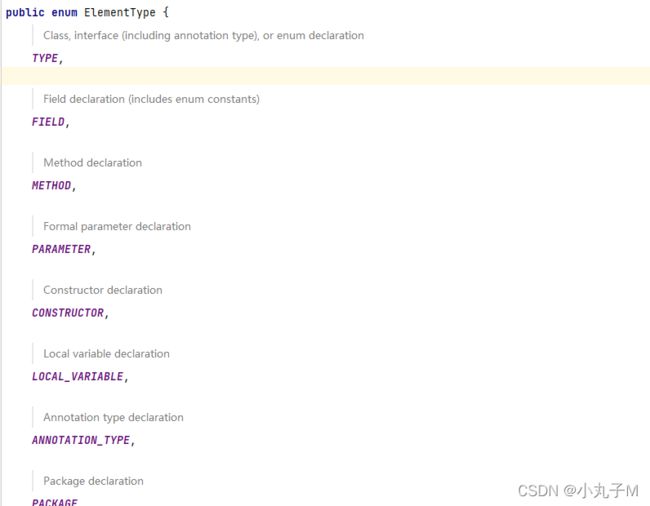
@Target(ElementType.TYPE) //接口、类
@Target(ElementType.FIELD) //属性
@Target(ElementType.METHOD) //方法
@Target(ElementType.PARAMETER) //方法参数
@Target(ElementType.CONSTRUCTOR) //构造函数
@Target(ElementType.LOCAL_VARIABLE) //局部变量
@Target(ElementType.ANNOTATION_TYPE) //注解
@Target(ElementType.PACKAGE) //包enum枚举类:里面定义的都是常量
注:可以指定多个位置,例如:
@Target({ElementType.METHOD, ElementType.TYPE}),也就是此注解可以在方法和类上面使用
4.3 @Inherited:指定被修饰的Annotation将具有继承性4.4 @Documented:指定被修饰的该Annotation可以被javadoc工具提取成文档.
5. 注解分类
根据Annotation是否包含成员变量,可以把Annotation分为两类:
5.1 标记Annotation:
没有成员变量的Annotation; 这种Annotation仅利用自身的存在与否来提供信息
5.2 元数据Annotation:
包含成员变量的Annotation; 它们可以接受(和提供)更多的元数据;6. 自定义注解开发
使用@interface关键字, 其定义过程与定义接口非常类似, 需要注意的是:
Annotation的成员变量在Annotation定义中是以无参的方法形式来声明的, 其方法名和返回值类型定义了该成员变量的名字和类型,
而且我们还可以使用default关键字为这个成员变量设定默认值,例如:
@Inherited@Retention(RetentionPolicy.RUNTIME)
@Target({ElementType.METHOD, ElementType.TYPE})
public @interface Tag {String name() default "该叫啥才好呢?";
String description() default "这家伙很懒, 啥也没留下...";}
注1:只有名字为“value”属性,赋值时可以省略属性名
7. 提取Annotation信息
使用AnnotatedElement接口中的方法提取注解中的数据,像 Class/Constructor/Field/Method/Package这些类都实现了AnnotatedElement接口
注:只有当定义Annotation时使用了@Retention(RetentionPolicy.RUNTIME)修饰,
JVM才会在装载class文件时提取保存在class文件中的Annotation,该Annotation才会在运行时可见,这样我们才能够解析8. 注解处理器
8.1 使用Annotation修饰了类/方法/成员变量等之后,这些Annotation不会自己生效,为了让程 序中的这些注解起作用,
必须由这些注解的开发者为这些注解提供一个注解处理器(Annotation Processor)。另 外,在编译期间,
JVM会自动运行注解处理器(当然,我们需要将其注册)8.2 创建注解处理器
自定义处理器都需要继承于AbstractProcessor
init(ProcessingEnvironment processingEnv):每一个注解处理器类都必须有一个空的构造函数。init()方法会被注解处理工具调用,并输入ProcessingEnviroment参数。ProcessingEnviroment提供很多有用的工具类Elements, Types和Filer。
process(Set annotations, RoundEnvironment
env):这是最重要的一个方法,你在这里写你的扫描、评估和处理注解的代码,以及生成Java文件。输入参数RoundEnviroment,可以让你查询出包含特定注解的被注解元素
getSupportedAnnotationTypes():该注解处理器是注册到哪些注解上。它的返回值是一个字符串的集合,包含本处理器想要处理的注解类型的合法全称。
getSupportedSourceVersion():用来指定你使用的Java版本。通常这里返回SourceVersion.latestSupported()。然而,如果你有足够的理由只支持Java 7的话,你也可以返回SourceVersion.RELEASE_7。
注1:在Java7还可以使用如下两个注解,而不用重写getSupportedAnnotationTypes()和getSupportedSourceVersion()
@SupportedSourceVersion(SourceVersion.latestSupported())
@SupportedAnnotationTypes({// 合法注解全名的集合})但要考虑代码兼容性的原因,特别是针对Android平台,我建议使用重载getSupportedAnnotationTypes()
和getSupportedSourceVersion()方法代替@SupportedAnnotationTypes和@SuppozrtedSourceVersion注2:init方法参数详解:ProcessingEnvironment
Elements elementUtils = processingEnv.getElementUtils(); //一个用来处理Element的工具类;
Types typeUtils = processingEnv.getTypeUtils(); //一个用来处理TypeMirror的工具类;
Filer filer = processingEnv.getFiler(); //正如这个名字所示,使用Filer你可以创建文件;
Messager messager = processingEnv.getMessager(); //一个用来处理消息的工具类,为了输出错误信息。
//因为在注解处理器里面不可以抛出Exception!
//为什么了?因为在编译阶段抛出错误后,注解处理器就不会运行完,
//也就没什么用了。 所以Message就是为了输出错误信息private void error(Element e, String msg, Object... args) {
messager.printMessage(
Diagnostic.Kind.ERROR,
String.format(msg, args),
e);
}
注3:Element代表的是源代码,它的子类有这些:
PackageElement:包名
TypeElement:类
VariableElement:变量
ExecutableElement:方法
详细见资料“Car.java”
注4:process方法返回true即是退出处理
return true; // 退出处理8.3 注册注解处理器(静态处理器,非AOP处理)
8.3.1 手动
在当前项目中的resources/META-INF/services目录需要新建一个特殊的文件javax.annotation.processing.Processor
javax.annotation.processing.Processor文件的内容是注解处理器的合法的全名列表,每一个元素换行分割
- META-INF
- - services
- - - javax.annotation.processing.Processor8.3.2 使用google的auto-service项目
1. 导入依赖
com.google.auto.service
auto-service
1.0-rc4
2. 在注解处理器上添加@AutoService(Processor.class)即可8.4 Maven打包(打包涵依赖jar包 )
MAVEN打AR包,注意还要将依赖打到Jar包中。详情见资料“test1-pom.xml”9. 动态注解处理器(spring aop方式)
附录一:本章英语单词
Retention:保留
Policy:策略
RUNTIME:运行时间
Annotation:注释@Service用于标注业务层组件
@Controller用于标注控制层组件(如struts中的action)
@Repository用于标注数据访问组件,即DAO组件
@Component泛指组件,当组件不好归类的时候,我们可以使用这个注解进行标注。
@Aspect//切面
@Pointcut//定义需要切面的地方,表达式参数(https://blog.csdn.net/elim168/article/details/78150438)
@annotation//当执行的方法上拥有指定的注解时生效。
@After
@Before
@Around
一、自定义注解
1、@Target:指定被修饰的Annotation可以放置的位置(被修饰的目标)
@Target(ElementType.TYPE) //接口、类
@Target(ElementType.FIELD) //属性
@Target(ElementType.METHOD) //方法
@Target(ElementType.PARAMETER) //方法参数
@Target(ElementType.CONSTRUCTOR) //构造函数
@Target(ElementType.LOCAL_VARIABLE) //局部变量
@Target(ElementType.ANNOTATION_TYPE) //注解
@Target(ElementType.PACKAGE) //包
只允许在类上面:
package com.mwy.annotation;
import java.lang.annotation.*;
//文档注释
@Documented
//注解放在类上面(ElementType.TYPE),注解放在方法上面(ElementType.METHOD)
@Target({ElementType.TYPE})
//继承,说明这个类的注解能力能被继承
@Inherited
//注解在运行时(RUNTIME)执行
@Retention(RetentionPolicy.RUNTIME)
public @interface  MyAnnotation {

    String value() default "";
    String message() default "aaa";

}
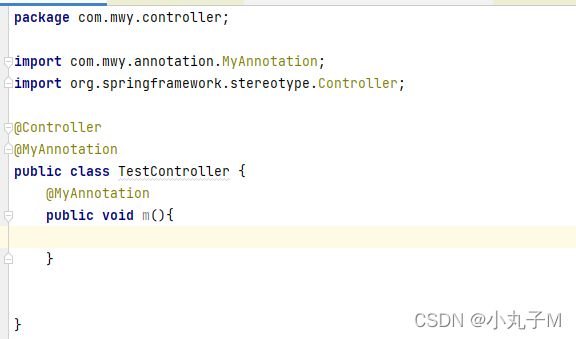
放在方法上面报错
2、@Retention:定义注解的保留策略
(1) @Retention(RetentionPolicy.SOURCE)
//注解仅存在于源码中,在class字节码文件中不包含
源代码:
只存在于源代码,因此运行后不会出现:
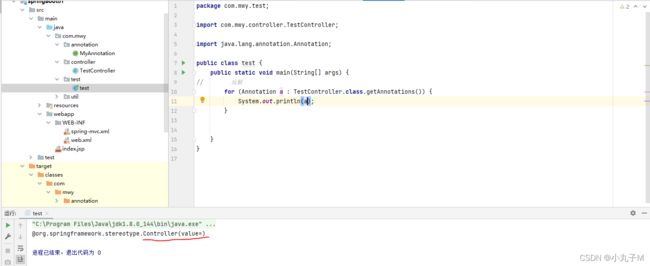
(2) @Retention(RetentionPolicy.CLASS)
//默认的保留策略,注解会在class字节码文件中存在,但运行时无法获得,
注解:使用CLASS:
打印结果只有controller的,然而MyAnnotation并没有;

 (3) @Retention(RetentionPolicy.RUNTIME)
//注解会在class字节码文件中存在,在运行时可以通过反射获取到
3、取注解中的属性值
value是默认属性
message是定义的
(一)取注解中的属性值方法一:
注解:MyAnnotation :
package com.mwy.annotation;
import java.lang.annotation.*;
//文档注释
@Documented
//注解放在类上面(ElementType.TYPE),注解放在方法上面(ElementType.METHOD)
@Target({ElementType.TYPE,ElementType.METHOD})
//继承,说明这个类的注解能力能被继承
@Inherited
//注解在运行时(RUNTIME)执行
@Retention(RetentionPolicy.RUNTIME)
public @interface  MyAnnotation {

    String value() default "";
    String message() default "aaa";
}
使用注解类:TestController:
package com.mwy.controller;
import com.mwy.annotation.MyAnnotation;
import org.springframework.stereotype.Controller;
@Controller
@MyAnnotation(message="mi")
public class TestController {
    @MyAnnotation
    public void m(){

    }
}
测试结果:
package com.mwy.test;
import com.mwy.annotation.MyAnnotation;
import com.mwy.controller.TestController;
import java.lang.annotation.Annotation;
public class test {
    public static void main(String[] args) {
//需要判断MyAnnotation有没有这个message注解属性才能打印
        for (Annotation a : TestController.class.getAnnotations()) {
            if(a instanceof MyAnnotation){
                System.out.println(((MyAnnotation) a).message());
            }
        }
    }
}
(二)取注解中的属性值方法二:
package com.mwy.test;
import com.mwy.annotation.MyAnnotation;
import com.mwy.controller.TestController;
import java.lang.annotation.Annotation;
public class test {
    public static void main(String[] args) {
        MyAnnotation myAnnotation = TestController.class.getAnnotation(MyAnnotation.class);
        if(myAnnotation!=null){
            System.out.println(myAnnotation.message());
        }
    }
}
二、完成切面日志操作
@Controller:正常返回@RestController:返回json
@RequestMapping("/insert")
public String insert(){
    System.out.println("xx增加了");
    System.out.println("xx增加成功了");
    return "yes";
}
如果上面是正常的增加,需要打印增加成功(后面有更多方法如删除需要打印删除成功...),这样就会很繁琐,如果忽然不需要还要去源码中删除,因此用 使用切面日志操作解决这个问题
1、定义切面类
如果某天不需要打印,直接将定义为切面类(@Aspect)的注解删掉即可
package com.mwy.aop;
import lombok.extern.slf4j.Slf4j;
import org.aspectj.lang.ProceedingJoinPoint;
import org.aspectj.lang.Signature;
import org.aspectj.lang.annotation.Around;
import org.aspectj.lang.annotation.Aspect;
import org.aspectj.lang.annotation.Pointcut;
import org.springframework.stereotype.Component;
//使这个类成为切面类
@Aspect
//使这个类成为一个组件
@Component
//输出日志
@Slf4j
public class LogAop {
    @Pointcut("execution(* com.mwy.controller.*controller.*(..))")
    public void logger(){

    }
    @Around("logger()")
    public Object around(ProceedingJoinPoint point){
//        获得方法名称
        Signature methodName = point.getSignature();
//        获得起始时间
        Long l1=System.currentTimeMillis();
//        日志输出
        log.info(methodName+"进来了");
//        让方法执行
        Object obj=null;
        try {
            obj=point.proceed(point.getArgs());
        } catch (Throwable throwable) {
            throwable.printStackTrace();
        }
//        日志输出+操作时间
        log.info(methodName+"走了"+"\t耗时"+(System.currentTimeMillis()-l1));
//        返回结果
        return obj;
    }
}
这样直接运行即可:
package com.mwy.controller;
import com.mwy.annotation.MyAnnotation;
import org.springframework.stereotype.Controller;
import org.springframework.web.bind.annotation.RequestMapping;
import org.springframework.web.bind.annotation.RestController;
@RestController
public class TestController {
    @RequestMapping("/insert")
    public String insert(){
        return "yes";
    }
    @RequestMapping("/del")
    public String del(){
        return "yes";
    }
    @RequestMapping("/upd")
    public String upd(){
        return "yes";
    }
    @RequestMapping("/list")
    public String list(){
        return "yes";
    }
}
2、使用注解开发Aop
他还有一个弊端:它是给所有的方法都谈日志,
但是,现实中,并不是所有方法都需要日志;
①新建注解类MyLog
package com.mwy.annotation;
import java.lang.annotation.*;
@Inherited
@Documented
@Target({ElementType.METHOD})
@Retention(RetentionPolicy.RUNTIME)
public @interface MyLog {

}
②、修改LogAop切面类
@Pointcut("@annotation(com.mwy.annotation.MyLog)")
③、直接方法上写注解即可
三、完成前端响应返回
res包下:ResultCode 、Result
1、 响应结果码枚举:ResultCode
枚举类的实例只能放在属性的上面,名字可以随便取,但是必须包含这两个属性 (code,message)
package com.mwy.response;

import java.io.Serializable;

/**
 * 响应结果码枚举
 *
 */

public enum ResultCode implements Serializable {

    /* 状态 */
    SUCCESS(100, "成功"),
    FAILURE(101, "失败"),
    UNKNOWN(102, "未知响应"),
    /**
     * 用户code范围: 200~300;
     */
    USER_ACCOUNT_NOT_FIND(201, "用户名不存在"),
    USER_ACCOUNT_DISABLED(202, "该用户已被禁用"),
    USER_PASSWORD_NOT_MATCH(203, "该用户密码不一致"),
    USER_PERMISSION_ERROR(204, "该用户不具备访问权限"),
    USER_STATE_OFF_LINE(205, "该用户未登录");

    private final Integer code;
    private final String message;

    ResultCode(Integer code, String message) {
        this.code = code;
        this.message = message;
    }

    public Integer getCode() {
        return code;
    }

    public String getMessage() {
        return message;
    }

    public static ResultCode queryCode(Integer code) {
        for (ResultCode value : values()) {
            if (code.equals(value.code)) {
                return value;
            }
        }
        return UNKNOWN;
    }

}2、响应对象封装类:Result类
除了传状态,还要传入数据
package com.mwy.response;

import java.io.Serializable;

/**
 * 响应结果码枚举
 */

public enum ResultCode implements Serializable {

    /* 状态 */
    SUCCESS(100, "成功"),
    FAILURE(101, "失败"),
    UNKNOWN(102, "未知响应"),
    /**
     * 用户code范围: 200~300;
     */
    USER_ACCOUNT_NOT_FIND(201, "用户名不存在"),
    USER_ACCOUNT_DISABLED(202, "该用户已被禁用"),
    USER_PASSWORD_NOT_MATCH(203, "该用户密码不一致"),
    USER_PERMISSION_ERROR(204, "该用户不具备访问权限"),
    USER_STATE_OFF_LINE(205, "该用户未登录");

    private final Integer code;
    private final String message;

    ResultCode(Integer code, String message) {
        this.code = code;
        this.message = message;
    }

    public Integer getCode() {
        return code;
    }

    public String getMessage() {
        return message;
    }

    public static ResultCode queryCode(Integer code) {
        for (ResultCode value : values()) {
            if (code.equals(value.code)) {
                return value;
            }
        }
        return UNKNOWN;
    }

}
3、注解:ResponseResult
package com.mwy.response;

import java.lang.annotation.*;

@Retention(value = RetentionPolicy.RUNTIME)
@Documented
@Target({ElementType.METHOD})
public @interface ResponseResult {

}
4、结果
TestController类:
登录成功:括号不填直接返回成功,括号填的话成功并带数据
@RequestMapping("/insert")
public Result insert(){
    return Result.success("yes");
}
登录失败:
@RequestMapping("/del")
public Result del(){
    return Result.failure(ResultCode.USER_ACCOUNT_NOT_FIND);
}
5、更加完善
想登录失败直接返回“201“,增加红色字体的那个注解增加处理类直接就可行
@RequestMapping("/del")
@ResponseResult
public Object del(){
    return 201;
}
有了处理类后,它会直接根据201找到“用户名不存在”
增加处理类:ResponseParse
package com.mwy.response;
import org.springframework.core.MethodParameter;
import org.springframework.http.MediaType;
import org.springframework.http.server.ServerHttpRequest;
import org.springframework.http.server.ServerHttpResponse;
import org.springframework.web.bind.annotation.RestControllerAdvice;
import org.springframework.web.servlet.mvc.method.annotation.ResponseBodyAdvice;
@RestControllerAdvice
public class ResponseParse implements ResponseBodyAdvice {

    @Override
    public boolean supports(MethodParameter methodParameter, Class aClass) {
        //返回值决定他是否需要进入beforeBodyWrite
        return methodParameter.getMethod().isAnnotationPresent(ResponseResult.class);
    }

    @Override
    public Object beforeBodyWrite(Object o, MethodParameter methodParameter, MediaType mediaType, Class aClass, ServerHttpRequest serverHttpRequest, ServerHttpResponse serverHttpResponse) {
        //更改返回值
        if (o == null) {
            return Result.success();
        }
        if (o instanceof Integer) {
            return Result.failure(ResultCode.queryCode((Integer) o));
        }
        if (o instanceof ResultCode) {
            return Result.failure((ResultCode) o);
        }
        if (o instanceof Result) {
            return o;
        }
        return null;
    }

}
以下这组形式也能解决:
@RequestMapping("/upd")
@ResponseResult
public Object upd(){
    return ResultCode.USER_ACCOUNT_NOT_FIND;
}
结束!!!


