C#热图生成(二)——with Silverlight
介绍
前文C#热图生成(一)——with .NET 2.0介绍了如何在.NET环境下生成Heat Map,然而对于网站来说,在服务器生成热图再以图片形式呈现不够灵活,性能也不佳。在Silverlight环境下,我们可以使用WriteableBitmap在客户端生成Heat Map。
WriteableBitmap继承自BitmapSource,是Silverlight 3起添加的类,它提供了以下功能:
- 支持直接操作位图,可以读写单个像素
- 在内存中创建指定大小的位图
- 将现有图像转换为位图,以按像素处理
- 通过设为任何图像控件如Image的Source,在界面上显示位图
- “快照”——对几乎任何UIElement“截图”,并可应用一个RenderTransform
最后一点使得WriteableBitmap尤为强大,可以用来实现控件的倒影效果。在SL中生成热图,也用到了这点特性。
方法
仍然使用前文介绍的先画灰度图后色彩化的方案,具体思路如下:
- 创建一个符合目标热图大小的容器,作为“截图”的对象,我选择了Canvas
- 根据热点的位置在容器中创建Ellipse
- 用WriteableBitmap“截图”,得到一幅位图
- 用预设的调色板将位图色彩化,得到热图
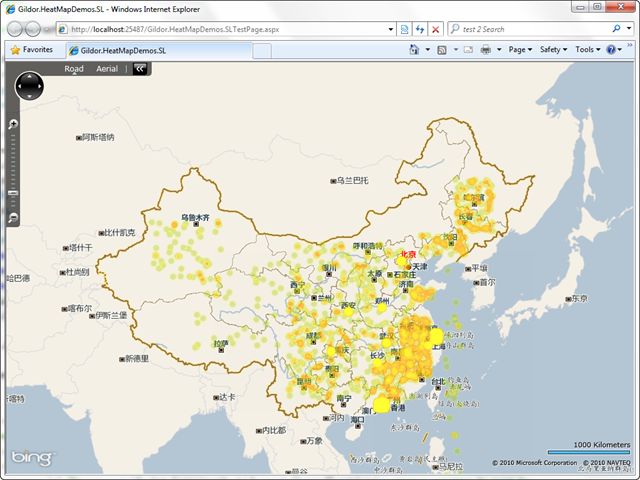
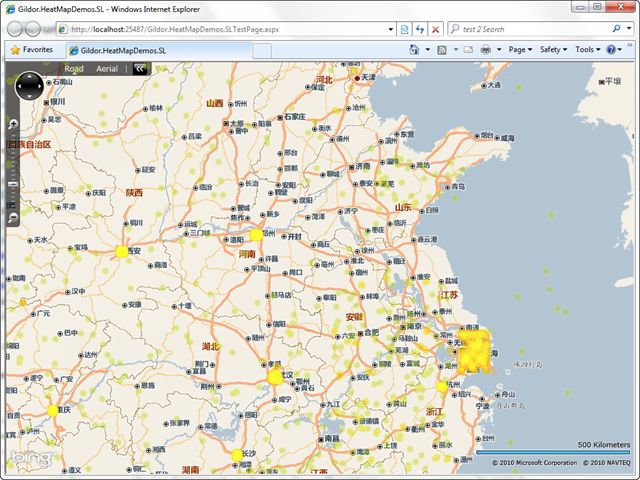
请看一下最终效果:
热图绘制
(如果您对这两节没有兴趣,可以跳到最后去下载源码。)
此功能封装在HeatMapGenerator类中,在类构造时指定绘制的调色板、Ellipse半径、GradientStop位置及中心浓度,这些可以用前文介绍的工具来确定。
加载调色板
如开头对WriteableBitmap的介绍,在Silverlight使用WriteableBitmap来取得调色板图片的像素值:
// Load the palatte.

var source = new BitmapImage (new Uri (
    "/Gildor.HeatMapDemos.SL;component/Palette/default.png", UriKind.Relative));

source.CreateOptions = BitmapCreateOptions.IgnoreImageCache;

var paletteBmp = new WriteableBitmap (source);

_palette = paletteBmp.Pixels;

_palette[255] = 0;
与前文一样,这里手动将最后一个像素设为透明。
创建绘制灰度图热点的Brush
放到XAML中寥寥数行的东西,在C#中就非常冗长了:
private RadialGradientBrush createBrushForEllipse ()

{

    var brush = new RadialGradientBrush ();


    brush.GradientStops.Add (new GradientStop ()

    {

        Color = Color.FromArgb (_intensity, 0x00, 0x00, 0x00),

        Offset = 0

    });


    brush.GradientStops.Add (new GradientStop ()

    {

        Color = Color.FromArgb (_intensity, 0x00, 0x00, 0x00),

        Offset = _heatMapGradientStop

    });


    brush.GradientStops.Add (new GradientStop ()

    {

        Color = Color.FromArgb (0x00, 0x00, 0x00, 0x00),

        Offset = 1

    });

    return brush;

}
创建容器
根据需要的热图大小来创建Canvas:
private Canvas createCanvas (Size canvasSize)

{

    return new Canvas ()

    {

        Height = canvasSize.Height,

        Width = canvasSize.Width

    };

}
绘制热点
对每个要绘制的热点,创建一个Ellipse,并设置其大小和填充:
private Ellipse createEllipse ()

{

    return new Ellipse ()

    {

        HorizontalAlignment = HorizontalAlignment.Left,

        VerticalAlignment = VerticalAlignment.Top,

        Height = 2 * _ellipseRadius,

        Width = 2 * _ellipseRadius,

        Fill = _ellipseBrush

    };

}

把它加入Canvas容器:
container.Children.Add (ellipse);
并设置它在容器中的位置:
private static void setEllipsePosition (Ellipse ellipse, Point position)

{

    Canvas.SetLeft (ellipse, position.X - ellipse.Width / 2);

    Canvas.SetTop (ellipse, position.Y - ellipse.Height / 2);

}
“截图”
使用WriteableBitmap的一个构造函数来完成这一功能,这里不需要RenderTransform,指定为null:
var bmp = new WriteableBitmap (container, null);
色彩化
根据调色板,对截图的每个像素做一次变换,这和前文介绍的方法是相同的,但为优化性能直接跳过了没有着色的像素:
// Colorize.

for (int i = 0; i < bmp.Pixels.Length; i++)

{

    if (bmp.Pixels[i] != 0)

    {

        bmp.Pixels[i] = _palette[(byte)~(((uint)bmp.Pixels[i]) >> 24)];

    }

}
到这里,bmp已经是一幅完整的热图,可以用来呈现在前台了。
热图呈现
我的热图呈现方案是在背景地图之上加一层Image,使它的大小和地图一致,并将IsHitVisible设为False。这样做比较简单,但也有一些弊端,后面我会讨论这些。
背景地图
我采用了微软的Bing Maps Silverlight Control SDK,不过这不是本文的重点,基于这个控件的开发,可以参考园子里Bēniaǒ的BingMaps系列文章。
我使用下面的代码加载了中文地图:
UriBuilder tileSourceUri = new UriBuilder (

    "http://r2.tiles.ditu.live.com/tiles/r{quadkey}.png?g=41");

MapTileLayer tileLayer = new MapTileLayer ();

LocationRectTileSource tileSource =

    new LocationRectTileSource (tileSourceUri.Uri.ToString (),

    new LocationRect (new Location (-90, -180), new Location (90, 180)),

    new Range<double> (1, 21));

tileLayer.TileSources.Add (tileSource);

map.Children.Add (tileLayer);
另外,Bing Maps SDK 的使用需要一个Key,请用您申请的Key替换MainPage.xmal中Map控件的CredentialsProvider属性。
绘制控制
我的做法是,在地图的视图变化时,将呈现热图的Image隐藏;在视图变化完成后,根据此时的地图,确定热点在屏幕上的位置,绘制热图,设为Image的Source,再将Image显示出来:
heatMap.Source = _heatMapGen.GenerateHeatMap (

    _heatPointLoader.Locations.Select (p =>

        map.LocationToViewportPoint (p)),

    new Size (map.ActualWidth, map.ActualHeight));
其中,_heatPointLoader是一个从xml文件加载测试数据并通过Locations属性提供热点坐标的对象;map控件的LocationToViewportPoint方法可以将实际物理坐标转换为在map控件上的位置。
问题讨论
虽然从功能上说,SL端绘制热图已经实现,但其实还是有一些问题值得讨论。
首先是性能问题,绘制热图要扫描位图所有像素,窗口越大,位图越大,可能会耗不少时间。因此我在地图视图改变完成后才开始绘图,而不是每一帧都绘图(我之前试过每帧都绘图,但真的卡死了,改为每数帧绘图效果也不好)。而且由于DependencyObject不能在后台线程中创建,也没法用多线程的方法来改进。
其次是,把热图放在地图之上的Image中,会把整个地图挡住,这样就包括了地图上的其他层(如pushpin等),看起来会非常怪异。虽然本例中没有用到,但可以看到,左上角的Navigation已经在heat map之下。有个想法是把heat map作为一个地图图层(MapLayer),也许可以解决这个问题,接下来准备试验一下。
------------
注:
- WriteableBitmap提供方法较少,使用比较困难,WriteableBitmapEx提供了更加强大的功能。
------------
源码下载:HeatMapDemos_src.zip (SL4, VS2010RTM)

