JavaWeb - 11 Thymeleaf
提示:文章写完后,目录可以自动生成,如何生成可参考右边的帮助文档
文章目录
- 1.Thymeleaf 介绍
-
- 1.1 官方文档的解释
- 1.2 逻辑视图与物理视图
- 1.3 解析thymeleaf指令模板
- 1.4 入门案例
- 2.Thymeleaf 基础语法(指令)
-
- 2.1 标准表达式语法
- 2.2 命名空间
- 2.3 标签内容-th:text
- 2.4 标签属性-th:属性名称
- 2.5 解析URL-@{}:
- 2.6 三大域对象
- 2.7 OGNL表达式
- 2.8 条件/分支渲染- th:if 、th:unless 、th:swithc
- 2.9 列表渲染 - th:each
- 3.ModelBaseServlet类
-
- 3.1 模板编写
- 3.2 案例演示
1.Thymeleaf 介绍
1.1 官方文档的解释
Thymeleaf is a modern server-side Java template engine for both web and standalone environments, capable of
processing HTML, XML, JavaScript, CSS and even plain text.
Thymeleaf是一个现代服务器的Java模板引擎,适用于web和独立的环境,能够处理HTML,XML,JavaScript, CSS以及纯文本内容。

The main goal of Thymeleaf is to provide an elegant and highly-maintainable way of creating templates. To achievethis, it builds on the concept of Natural Templates to inject its logic into template files in a way that doesn’t affect the template from being used as a design prototype. This improves communication of design and bridges the gap betweendesign and development teams.
Thymeleaf 的主要目标是提供一种优雅且高度可维护的模板创建方式。为了实现这一点,它建立在自然模板的概念之上,以不影响模板用作设计原型的方式将其逻辑注入模板文件。这改善了设计的沟通并弥合了设计和开发团队之间的差距。

Thymeleaf has also been designed from the beginning with Web Standards in mind – especially HTML5 – allowing you to create fully validating templates if that is a need for you.
Thymeleaf 的设计从一开始就考虑到了 Web 标准——尤其是 HTML5——允许您在需要时创建完全验证模板。
总结:
- Thymeleaf是一个现代服务器的Java模板引擎。
- Thymeleaf适用于web及独立环境,可以处理HTML,XML,JavaScript, CSS以及纯文本内容。
- Thymeleaf目标是提供一种优雅且高度可维护的模板创建方式。
- 允许您在需要时创建完全验证模板。
Thymeleaf的特点是开箱即用,Thymeleaf 允许您处理六种模板,每一种都称为模板模式:
- XML
- 有效的XML
- XHTML
- 有效的XHTML
- HTML5
- 旧版HTML5
有两种标记模板模式 (HTML和XML)、三种文本模板模式 (TEXT和JAVASCRIPT)CSS和无操作模板模式 ( RAW)。
模板模式将**HTML**允许任何类型的 HTML 输入,包括 HTML5、HTML 4 和 XHTML。不会执行验证或格式正确检查,并且在输出中将最大程度地尊重模板代码/结构。
1.2 逻辑视图与物理视图
物理视图
在Servlet中,请求转发到一个HTML页面文件时,使用完整的转发路径称为物理视图。
/pages/user/login_success.html
如果我们把所有的HTML页面都放在某个统一的目录下,那么转发地址就会呈现出明显的规律:
/pages/user/login.html
/pages/user/regist.html
/pages/user/regist_success.html
我们可以看出路径的规律:
开始路径是:/pages/user/
结束路径:.html
所以我们就称开始路径为前缀视图,结束路径为后缀视图
逻辑视图
物理视图=前缀视图+逻辑视图+后缀视图。
例如:
| 前缀视图 | 逻辑视图 | 后缀视图 | 物理视图 |
|---|---|---|---|
| /pages/user/ | login | .html | /pages/user/login.html |
| /pages/user/ | regist_success | .html | /pages/user/regist_success.html |
前缀视图与后缀视图的配置方式:在web.xml中进配置,格式如下
<context-param>
    <param-name>view-prefixparam-name>
    <param-value>前缀视图路径param-value>
context-param>
<context-param>
    <param-name>view-suffixparam-name>
    <param-value>后缀视图路径param-value>
context-param>
1.3 解析thymeleaf指令模板
这个类大家直接复制粘贴即可,将来使用框架后,这些代码都将被取代。
/**
 * 解析thymeleaf指令
 */
public class ViewBaseServlet extends HttpServlet {
    private TemplateEngine templateEngine;

    @Override
    public void init() throws ServletException {

        // 1.获取ServletContext对象
        ServletContext servletContext = this.getServletContext();

        // 2.创建Thymeleaf解析器对象
        ServletContextTemplateResolver templateResolver = new ServletContextTemplateResolver(servletContext);

        // 3.给解析器对象设置参数
        // ①HTML是默认模式,明确设置是为了代码更容易理解
        templateResolver.setTemplateMode(TemplateMode.HTML);

        // ②设置前缀
        String viewPrefix = servletContext.getInitParameter("view-prefix");

        templateResolver.setPrefix(viewPrefix);

        // ③设置后缀
        String viewSuffix = servletContext.getInitParameter("view-suffix");

        templateResolver.setSuffix(viewSuffix);

        // ④设置缓存过期时间(毫秒)
        templateResolver.setCacheTTLMs(60000L);

        // ⑤设置是否缓存
        templateResolver.setCacheable(true);

        // ⑥设置服务器端编码方式
        templateResolver.setCharacterEncoding("utf-8");

        // 4.创建模板引擎对象
        templateEngine = new TemplateEngine();

        // 5.给模板引擎对象设置模板解析器
        templateEngine.setTemplateResolver(templateResolver);

    }


    /**
     * 执行/渲染视图
     * @param templateName : 逻辑视图
     * @param req : 请求
     * @param resp : 响应
     * @throws IOException
     */
    protected void processTemplate(String templateName, HttpServletRequest req, HttpServletResponse resp) throws IOException {
        // 1.设置响应体内容类型和字符集
        resp.setContentType("text/html;charset=UTF-8");

        // 2.创建WebContext对象
        WebContext webContext = new WebContext(req, resp, getServletContext());

        // 3.渲染视图 : 解析html页面中的thymeleaf指令将服务器中的数据渲染到页面
        templateEngine.process(templateName, webContext, resp.getWriter());
    }
}
1.4 入门案例
将HelloWord通过Thymeleaf视图渲染技术,渲染到HTML页面中。
开发步骤:
- 导入Thymeleaf相关的jar包。
- 导入上述Thymeleaf的基础模板类ViewBaseServlet。
- 在web.xml中编写前缀与后缀名称。
- 定义一个Servlet类继承ViewBaseServlet,重写doGet和doPost方法,并编写渲染代码。
- 定义一个demo01.html文件,渲染数据,输出HelloWord。
代码演示:
-
1、导入Thymeleaf相关的jar包。
-
2、导入上述Thymeleaf的基础模板类ViewBaseServlet。
-
3、在web.xml中编写前缀与后缀名称。
<context-param> <param-name>view-prefixparam-name> <param-value>/WEB-INF/pages/param-value> context-param> <context-param> <param-name>view-suffixparam-name> <param-value>.htmlparam-value> context-param> -
4、定义一个Servlet类继承ViewBaseServlet,重写doGet和doPost方法,并编写渲染代码。
@WebServlet("/demo01") public class ServletDemo01 extends ViewBaseServlet { @Override protected void doGet(HttpServletRequest req, HttpServletResponse resp) throws ServletException, IOException { // 1.在与对象中设置共享数据 String msg = "HelloWord"; req.setAttribute("msg",msg); /** * 2.通过processTemplate方法来渲染数据,实际上是请求转发 * @param templateName : 逻辑视图 * @param req : 请求 * @param resp : 响应 */ processTemplate("demo01",req,resp); } @Override protected void doPost(HttpServletRequest req, HttpServletResponse resp) throws ServletException, IOException { doGet(req, resp); } } -
5、定义一个demo01.html文件,渲染数据,输出HelloWord。
DOCTYPE html> <html lang="en" xmlns:th="http://www.thymeleaf.org"> <head> <meta charset="UTF-8"> <title>入门案例title> head> <body> <span style="color: red;font-size: 30px;" th:text="${msg}">设置值span> body> html> -
6.启动服务器访问/demo01资源测试程序
注意事项:
1.为什么要放在WEB-INF目录下?
原因:WEB-INF目录不允许浏览器直接访问,所以我们的视图模板文件放在这个目录下,是一种保护。以免外界可以随意访问视图模板文件。

2.访问WEB-INF目录下的页面,都必须通过Servlet转发过来,简单说就是:不经过Servlet访问不了。
这样就方便我们在Servlet中检查当前用户是否有权限访问。

3.那放在WEB-INF目录下之后,重定向进不去怎么办?
重定向到Servlet,再通过Servlet转发到WEB-INF下。
2.Thymeleaf 基础语法(指令)
2.1 标准表达式语法
语法格式:
简单的表达:
	变量表达式:${...}
	选择变量表达式:*{...}
	消息表达式:#{...}
	链接 URL 表达式:@{...}
	片段表达式:~{...}
字面量
	文本字面量:'one text', 'Another one!',...
	数字文字:0, 34, 3.0, 12.3,...
	布尔文字:true,false
	空文字:null
	文字标记:one, sometext, main,…
	文字操作:
	字符串连接:+
	字面替换:|The name is ${name}|
算术运算:
	二元运算符:+, -, *, /,%
	减号(一元运算符):-
	布尔运算:
	二元运算符:and,or
	布尔否定(一元运算符)!:,not
	比较和平等:
	比较器:>, <, >=, <=( gt, lt, ge, le)
	等式运算符:==, !=( eq, ne)
条件运算符:
	如果-那么:(if) ? (then)
	如果-那么-否则:(if) ? (then) : (else)
	默认:(value) ?: (defaultvalue)
	特殊代币:
	无操作:_
2.2 命名空间
想要使用Thymeleaf 指令语法,就必须指定该命名空间
<html xmlns:th="http://www.thymeleaf.org">html>
2.3 标签内容-th:text
语法格式 :
<标签 th:text="标签体新值" >标签>
- 不经过服务器解析,直接用浏览器打开HTML文件,看到的是『标签体原始值』
- 经过服务器解析,Thymeleaf引擎根据th:text属性指定的『标签体新值』去替换『标签体原始值』
- 类似于Vue中v-text属性。
代码演示
html代码
DOCTYPE html>

<html lang="en" xmlns:th="http://www.thymeleaf.org">
    <head>
        <meta charset="UTF-8">
        <title>入门案例title>
    head>
    <body>

        <span style="color: red;font-size: 30px;" th:text="${msg}">设置值span>
    body>
html>
Java代码
@WebServlet("/demo01")
public class ServletDemo01 extends ViewBaseServlet {
    @Override
    protected void doGet(HttpServletRequest req, HttpServletResponse resp) throws ServletException, IOException {
        // 1.在与对象中设置共享数据
        String msg = "HelloWord";
        req.setAttribute("msg",msg);

        /**
         * 2.通过processTemplate方法来渲染数据,实际上是请求转发
         * @param templateName : 逻辑视图
         * @param req : 请求
         * @param resp : 响应
         */
        processTemplate("demo01",req,resp);
    }

    @Override
    protected void doPost(HttpServletRequest req, HttpServletResponse resp) throws ServletException, IOException {
        doGet(req, resp);
    }
}
2.4 标签属性-th:属性名称
语法格式
使用 th:属性 修改标签属性, 相当于vue的 v-bind:属性 或 :属性
<标签 th:属性名="${变量名}">标签>
代码演示 :
html代码
DOCTYPE html>
<html lang="en" xmlns:th="http://www.thymeleaf.org">
    <head>
        <meta charset="UTF-8">
        <title>修改属性值title>
    head>
    <body>

        <a th:href="${address}">百度一下a>
    body>
html>
Java代码
/**
 * 修改属性值
 */
@WebServlet("/demo02")
public class ServletDemo02 extends ViewBaseServlet {
    @Override
    protected void doGet(HttpServletRequest req, HttpServletResponse resp) throws ServletException, IOException {
        // 1.设置共享数据
        req.setAttribute("address","http://www.baidu.com");

        // 2.请求你转发
        processTemplate("demo02",req,resp);
    }

    @Override
    protected void doPost(HttpServletRequest req, HttpServletResponse resp) throws ServletException, IOException {
        doGet(req, resp);
    }
}
2.5 解析URL-@{}:
语法格式
- @{}的作用是在字符串前附加『上下文路径』
- 这个语法的好处是:实际开发过程中,项目在不同环境部署时,Web应用的名字有可能发生变化。所以上下文路径不能写死。而通过@{}动态获取上下文路径后,不管怎么变都不怕啦!
@{....}
<标签 href="@{资源路径}">标签>
<标签 src="@{资源路径}">标签>
代码演示
html代码
DOCTYPE html>
<html lang="en" xmlns:th="http://www.thymeleaf.org">
    <head>
        <meta charset="UTF-8">
        <title>解析URLtitle>
    head>
    <body>

        <a th:href="@{/demo01}">访问demo01.htmla>
    body>
html>
Java代码
/**
 * 解析URL
 */
@WebServlet("/demo03")
public class ServletDemo03 extends ViewBaseServlet {
    @Override
    protected void doGet(HttpServletRequest req, HttpServletResponse resp) throws ServletException, IOException {
        processTemplate("demo03",req,resp);
    }

    @Override
    protected void doPost(HttpServletRequest req, HttpServletResponse resp) throws ServletException, IOException {
        doGet(req, resp);
    }
}
2.6 三大域对象
域对象的概述
-
应用域对象:
ServletContext:应用域的范围是整个项目全局。 -
请求域对象:
ServletRequest:1.在请求转发的场景下,我们可以借助HttpServletRequest对象内部给我们提供的存储空间,帮助我们携带数据,把数据发送给转发的目标资源。 2.请求域:HttpServletRequest对象内部给我们提供的存储空间 -
会话域对象:
HttpSession:会话域的范围是一次会话(登录与登出为一次会话)。 -
我们通常的做法是,在Servlet中将数据存储到域对象中,而在使用了Thymeleaf的前端页面中取出域对象中的数据并展示
代码演示
html代码
DOCTYPE html>
<html lang="en" xmlns:th="http://www.thymeleaf.org">
    <head>
        <meta charset="UTF-8">
        <title>三大域对象title>
    head>
    <body>


        <span style="color: red;font-size: 30px;" th:text="${#servletContext.getAttribute('msg1')}">
            应用域对象取值
        span>
        <br>

        <span style="color: red;font-size: 30px;" th:text="${#httpServletRequest.getAttribute('msg2')}">
            请求域对象取值
        span>
        <br>

        <span style="color: red;font-size: 30px;" th:text="${#httpSession.getAttribute('msg3')}">
            会话域对象取值
        span>
    body>
html>
Java代码
@WebServlet("/demo04")
public class ServletDemo04 extends ViewBaseServlet {
    @Override
    protected void doGet(HttpServletRequest req, HttpServletResponse resp) throws ServletException, IOException {
        // 1.应用与对象设置值
        ServletContext servletContext = req.getServletContext();
        servletContext.setAttribute("msg1","应用域对象存储值");

        // 2.请求域对象设置值
        req.setAttribute("msg2","请求域对象存储值");

        // 3.会话域对象存储值
        HttpSession session = req.getSession();
        session.setAttribute("msg3","会话域存储对象");

        // 4.请求转发
        processTemplate("demo04",req,resp);
    }

    @Override
    protected void doPost(HttpServletRequest req, HttpServletResponse resp) throws ServletException, IOException {
        doGet(req, resp);
    }
}
2.7 OGNL表达式
概述
-
Object-Graph Navigation Language对象-图 导航语言
-
从根对象触发,通过特定的语法,逐层访问对象的各种属性。
1.起点
在Thymeleaf环境下,${}中的表达式可以从下列元素开始:
访问属性域的起点
	请求域属性名
	session
	application
	param
内置对象
	request
	session
	lists
	strings
2.属性访问语法
	访问对象属性:使用getXxx()、setXxx()方法定义的属性
	对象.属性名
3.访问List集合或数组
	集合或数组[下标]
	访问Map集合
	Map集合.key
	Map集合[‘key’]
代码演示
建立如图关系
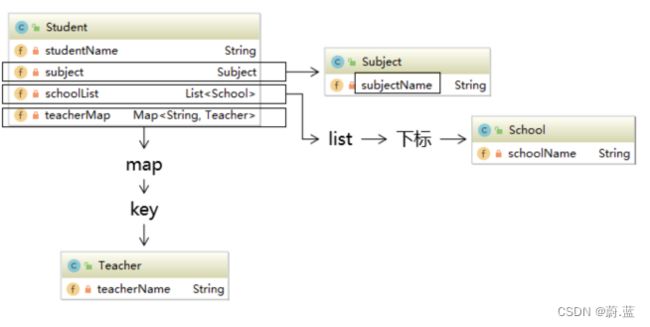
建立Teacher、Subject、School 、Student类
public class School {
    private String schoolName;
}
public class Teacher {
    private String teacherName;
}
public class Subject {
    private String subjectName;
}
public class Student {
    private String studentName;
    private Subject subject;
    private List<School> schoolList;
    private Map<String,Teacher> teacherMap;
}
// Getter And Setter 自行补充
HTML代码
DOCTYPE html>
<html lang="en" xmlns:th="http://www.thymeleaf.org">
    <head>
        <meta charset="UTF-8">
        <title>OGNL表达式title>
    head>
    <body>

        <div style="color: red;font-size: 30px;" th:text="${student.studentName}">获取姓名div>

        <div style="color: red;font-size: 30px;" th:text="${student.subject.subjectName}">获取学科div>

        <div style="color: red;font-size: 30px;" th:text="${student.schoolList[0].schoolName}">获取第一个学校div>

        <div style="color: red;font-size: 30px;" th:text="${student.teacherMap.数学.teacherName}">获取第一个老师div>
    body>
html>
Java代码
/**
 * OGNL表达式
 */
@WebServlet("/demo05")
public class ServletDemo05 extends ViewBaseServlet {
    @Override
    protected void doGet(HttpServletRequest req, HttpServletResponse resp) throws ServletException, IOException {
        // 组织关系
        // 创建学科
        Subject subject = new Subject("理科");

        // 创建老师
        Teacher teacher01 = new Teacher("张三");
        Teacher teacher02 = new Teacher("李四");
        Teacher teacher03 = new Teacher("王五");
        HashMap<String, Teacher> teacherMap = new HashMap<>();
        teacherMap.put("数学",teacher01);
        teacherMap.put("语文",teacher02);
        teacherMap.put("音乐",teacher03);

        // 创建学校
        School school01 = new School("小学");
        School school02 = new School("初中");
        School school03 = new School("高中");
        ArrayList<School> schoolList = new ArrayList<>();
        schoolList.add(school01);
        schoolList.add(school02);
        schoolList.add(school03);

        // 创建学生
        Student student = new Student("张无忌", subject, schoolList, teacherMap);

        // 将学生对象放入域对象中
        req.setAttribute("student",student);

        // 请求转发
        processTemplate("demo05",req,resp);
    }

    @Override
    protected void doPost(HttpServletRequest req, HttpServletResponse resp) throws ServletException, IOException {
        doGet(req, resp);
    }
}
2.8 条件/分支渲染- th:if 、th:unless 、th:swithc
概述:
- 使用 th:if 和 th:unless 进行条件渲染, 相当于vue的 v-if 和 v-else
- 使用 th:switch 指令进行分支渲染
语法格式:
<标签 th:if="表达式">标签>
<标签 th:usless="表达式">标签>


<标签 th:seitch="表达式">
	<子标签 th:case="值1">内容1子标签>
    ...
	<子标签 th:case="值n">内容n子标签>
标签>
代码演示
html代码
DOCTYPE html>
<html lang="en" xmlns:th="http://www.thymeleaf.org">
    <head>
        <meta charset="UTF-8">
        <title>条件分支渲染title>
    head>
    <body>

        <div style="color: red;font-size: 30px;" th:if="${msg==1}">
            值为2
        div>
        <div style="color: red;font-size: 30px;" th:unless="${msg==1}">
            值不为2
        div>


        <div  style="color: red;font-size: 30px;" th:switch="${msg}">
            <span th:case="1">周一span>
            <span th:case="2">周二span>
            <span th:case="3">周三span>
            <span th:case="4">周四span>
            <span th:case="5">周五span>
            <span th:case="6">周六span>
            <span th:case="7">周日span>
        div>
    body>
html>
Java代码
/**
 * 条件分支渲染
 */
@WebServlet("/demo06")
public class ServletDemo06 extends ViewBaseServlet {
    @Override
    protected void doGet(HttpServletRequest req, HttpServletResponse resp) throws ServletException, IOException {
        // 设置值
        req.setAttribute("msg",2);

        processTemplate("demo06",req,resp);
    }

    @Override
    protected void doPost(HttpServletRequest req, HttpServletResponse resp) throws ServletException, IOException {
        doGet(req, resp);
    }
}
2.9 列表渲染 - th:each
使用 th:each 进行列表渲染, 相当于vue的 v-for
语法格式
<标签 th:each = "item,stae : ${集合/数组}">
	...
标签>
代码演示
html代码
DOCTYPE html>
<html lang="en" xmlns:th="http://www.thymeleaf.org">
    <head>
        <meta charset="UTF-8">
        <title>列表渲染title>
    head>
    <body>
        <table>
            <th>
            <td>序号td>
            <td>名称td>
            th>
        <tr th:each="item,stats : ${studentList}">
            <td th:text="${stats.index}">td>
            <td th:text="${item}">td>
        table>
    body>
html>
Java代码
/**
 * 列表渲染
 */
@WebServlet("/demo07")
public class ServletDemo07 extends ViewBaseServlet {
    @Override
    protected void doGet(HttpServletRequest req, HttpServletResponse resp) throws ServletException, IOException {
        ArrayList<String> studentList = new ArrayList<>();
        studentList.add("张三丰");
        studentList.add("张无忌");
        studentList.add("周芷若");

        req.setAttribute("studentList",studentList);
        processTemplate("demo07",req,resp);
    }

    @Override
    protected void doPost(HttpServletRequest req, HttpServletResponse resp) throws ServletException, IOException {
        doGet(req, resp);
    }
}
3.ModelBaseServlet类
我们有没有发现一个问题,当我们每发送一个请求,就要写一个Servlet文件。例如增删改查的功能,光这四个就需要4个Servlet文件。这样到后期代码维护就变得非常困难。所以我们要将请求的功能方法化,通过一个ModelBaseServlet控制器来掌控请求调度。通过解析不同的请求来调度不同的方法执行响应的功能,返回响应。该调度器需要通过反射技术调度相应的方法。
3.1 模板编写
编写步骤
- 建立一个类ModelBaseServlet继承ViewBaseServlet类。
- 重写doGet、doPost方法。
- 在方法中获取前端传过来的method方法值
- 通过反射技术获取相应的method对象
- 掉用method对象中的invoke方法,执行相应的功能
代码演示
/**
 * ModelBaseServlet类
 */
public class ModelBaseServlet extends ViewBaseServlet {
    @Override
    protected void doGet(HttpServletRequest req, HttpServletResponse resp) throws ServletException, IOException {
        // 1. 在方法中获取前端传过来的method方法值
        String methodNmae = req.getParameter("method");


        try {
            //2. 通过反射技术获取相应的method对象
            Method method = this.getClass().getDeclaredMethod(methodNmae, HttpServletRequest.class, HttpServletResponse.class);

            //3. 掉用method对象中的invoke方法,执行相应的功能
            method.invoke(this,req,resp);
        }catch (Exception e){
            e.printStackTrace();
        }
    }

    @Override
    protected void doPost(HttpServletRequest req, HttpServletResponse resp) throws ServletException, IOException {
        doGet(req, resp);
    }
}
3.2 案例演示
案例描述
在HTML中 写4个标签,分别演示添加删除修改查找功能
代码演示
html代码
DOCTYPE html>
<html lang="en" xmlns:th="http://www.thymeleaf.org">
<head>
    <meta charset="UTF-8">
    <title>ModelBaseServlettitle>
head>
<body>
    <a th:href="@{/demo08?method=insert}">添加功能a>
    <a th:href="@{/demo08?method=delete}">删除功能a>
    <a th:href="@{/demo08?method=update}">修改功能a>
    <a th:href="@{/demo08?method=select}">查询功能a>
body>
html>
Java代码
@WebServlet("/demo08")
public class ServletDemo08 extends ModelBaseServlet {

    public void demo08(HttpServletRequest req,HttpServletResponse resp) throws IOException {
        processTemplate("demo08",req,resp);
    }

    public void insert(HttpServletRequest req,HttpServletResponse resp) throws Exception{
        System.out.println("insertMethod....");
    }
    public void delete(HttpServletRequest req,HttpServletResponse resp) throws Exception{
        System.out.println("deleteMethod....");
    }
    public void update(HttpServletRequest req,HttpServletResponse resp) throws Exception{
        System.out.println("updateMethod....");
    }
    public void select(HttpServletRequest req,HttpServletResponse resp) throws Exception{
        System.out.println("selectMethod....");
    }
}