Silverlight之WCF管道通信(双工通信)
双工服务将保留到 Silverlight 客户端的回调通道,它允许该服务对此客户端进行调用。双工服务具有许多应用程序,例如,包括用于即时消息传递的聊天服务程序或用于向客户端发送通知的监视服务---摘自MSDN
说白了,双工服务是实现了客户端和服务端的自动推送服务,实现了信息的及时传递和处理。
实现双工操作需要三大步骤:
一、创建svc.文件(Service)
二、编写Service代码
三、配置web.config(此步骤看似简单,一不小心楼主就差点崩解了)
首先,先来介绍双工通信需要创建的文件.
上边提到了是客户端和服务端的相互通信,故名思议,这里出现了客户端和服务端,通常的WCF是服务端,而我们的客户端(Silverlight Application),很显然WCF是无法访问Client的,所以首先需要的就是 服务端的 Service和客户端的Service,客户端的Service主要是用来实现推送数据的,下面开始创建Service。
需要三个Service,如下图:

第一个就是在Client访问的Service也就是主Service,第二个为第一个的接口Service,第三个为刚才提到的让服务端Service访问客户端的Service,实现数据的推送。
可能有同学疑问了,为什么一定要创建接口呢,不着急,下边会一一解答。
然后开始代码的实现:
为了使例子完整,在这里再创建一个实体类,Order,我们这个例子的逻辑就是前台输入OrderName和Quantiy,然后完成订单的处理,由受理到完成这样一个状态。
Order类很简单,如下:
枚举只是为了修改订单的状态,以便在前台进行区分。
  public enum OrderStatus
    {
        Processing,
        Completed
    }
    public class Order
    {
        public OrderStatus Status { get; set; }
        public List<string> Payload { get; set; }
    }
下面看下IDuplexService和IDuplexServiceClient的代码:
 [ServiceContract(Namespace="DuplexServiceApplication",CallbackContract=typeof(IDuplexServiceClient))]
    public interface IDuplexService
    {
        [OperationContract]
        void Order(string name,int quantity);
    }
 [ServiceContract]
    public  interface IDuplexServiceClient
    {
        //对于作为回调协定一部分的每个客户端方法,
        //IsOneWay 属性在 OperationContractAttribute 中也必须设置为 true。
        //此属性表示这些操作不返回答复消息
        [OperationContract(IsOneWay=true)]
        void Receive(Order order);
    }
大家可能会疑惑,为什么给IDuplexService指定CallbackContract=typeof(IDuplexServiceClient),哈哈,这个就是双工通道的原理所在,给服务端的Service指定一个
回调客户端的Service,同时也要注意IDuplexServiceClient方法的特性解释。
然后看下DuplexService的代码:
Order 操作模拟执行从在线商店订购商品的过程。接收到订单后,通常会执行服务范围之外的一系列后续操作(例如,检查商品的供应情况或者核对用户信用卡的信息)。完成这些操作后,该服务需要回调客户端(即,将信息“推”到客户端),以通知它订单已成功完成。为模拟此情况,我们使用一个 Timer(using System.Threading),它将在两个 5 秒的间隔后调用两次该服务。
使用 OperationContext.GetCallbackChannel(T) 方法来获得类型为 IDuplexClient 的回调通道,这可用于在实现和运行 Silverlight 客户端后联系该客户端
  public class DuplexService : IDuplexService
    {
        //定义回调客户端的Service对象
        IDuplexServiceClient client;
        //定义接收的参数变量
        string orderName;
        int orderQuantity;
        public void Order(string name, int quantity)
        {

            client = OperationContext.Current.GetCallbackChannel<IDuplexServiceClient>();
            orderName = name;
            orderQuantity = quantity;

            //使用Timer来分多次来访问方法
            using (Timer timer=new Timer (new TimerCallback(CallClient),null,5000,5000));
            {
                Thread.Sleep(11000);
            }
        }

        bool processed = false;
        private void CallClient(object o)
        {
            Order order = new Order();
            order.Payload = new List<string>();

            //修改Order的状态,然后返回
            if (processed)
            {
                while (orderQuantity-->0)
                {
                    order.Payload.Add(orderName+" "+orderQuantity);
                }
                order.Status = OrderStatus.Completed;
            }
            else
            {
                order.Status = OrderStatus.Processing;
                processed = true;
            }
            client.Receive(order);
        }
    }
调用该方法两次以模拟服务上的订单处理活动。第一次调用时,它将报告正在处理订单,第二次调用时,它将报告已完成订单并填充订单的 Payload 属性。
最后,来配置web.config.这一步很繁琐,也最容易出错:
由于要使用PollingDuplexHttpBinding来作为Service的endpoint的binding,所以需要对项目添加引用。右键项目,添加引用,选择浏览,然后关键的部分
Silverlight 版本 4 SDK 附带两个名为 System.ServiceModel.PollingDuplex.dll 的程序集。WCF 双工服务使用其中一个程序集(位于 %ProgramFiles%\Microsoft SDKs\Silverlight\v4.0\Libraries\Server\ 目录下),也就是我们要添加引用的程序集。另一个程序集(位于 %ProgramFiles%\Microsoft SDKs\Silverlight\v4.0\Libraries\Client\ 目录下)在 Silverlight 双工客户端中使用。
楼主的路径是C:\Program Files\Microsoft SDKs\Silverlight\v4.0\Libraries\Server
然后开始web.config的配置。
找到 <system.serviceModel>节点,如果没有则添加,在configuration的根节点添加然后写入一下代码:
<extensions>
      <bindingExtensions>
        <add
          name="pollingDuplexHttpBinding"
          type="System.ServiceModel.Configuration.PollingDuplexHttpBindingCollectionElement,
                      System.ServiceModel.PollingDuplex, Version=4.0.0.0, Culture=neutral,
                      PublicKeyToken=31bf3856ad364e35"/>
      </bindingExtensions>
    </extensions>
该步是必须的(name可以自定义,不过需要保证下边的binding使用的标签名字和这个一致),因为这一步是注册 Silverlight 4 SDK 中的pollingDuplexHttpBinding。
然后找到<system.serviceModel>的Bindings(如果没有则添加,直接在<system.serviceModel>中添加),写入以下代码:
    <pollingDuplexHttpBinding>
        <binding
           name="multipleMessagesPerPollPollingDuplexHttpBinding"
           duplexMode="MultipleMessagesPerPoll"
           maxOutputDelay="00:00:07"></binding>
      </pollingDuplexHttpBinding>
或者写入:
<pollingDuplexHttpBinding />
这一步的目的是,添加 pollingDuplexHttpBinding 元素以指定使用此绑定,节点的名字需要和上一步的name保持一致。
然后找到<system.serviceModel>的 <services>(如果不存在则添加),写入以下代码:
<service name="SilverlightDuplexApplication.Web.Services.DuplexService">
        <endpoint
          address=""
          binding="pollingDuplexHttpBinding"
          bindingConfiguration="multipleMessagesPerPollPollingDuplexHttpBinding"
          contract="SilverlightDuplexApplication.Web.Services.IDuplexService"></endpoint>
        <endpoint
             address="mex"
             binding="mexHttpBinding"
             contract="IMetadataExchange"/>
      </service>
service节点的name通常就是我们的webservice的完整路径,endpoint的binding为第一步bindingExtensions的name保持一致;bindingConfiguration和binding 的name属性保持一致;contract(必须设置正确,否则是不可能成功的),还记得在本文的最开头说的为什么一定要创建接口,没错,接口就是为了给contract指定的,在这里指定的就是服务端的IDuplexService,然后我们才可以在访问service的时候找到对应的回调服务(IDuplexServiceClient)。
好了,到此整个配置,以及服务端的工作都完成了,在客户端访问就和访问平常的WCF一样,访问这个主Service(DuplexService),调用Order方法,传递参数,得到resut,就完成了。
上边使用的是PollingDuplexHttpBinding 实现了双工,其实还有其他的方式,就是NetTcpBinding,先看下区别:
PollingDuplexHttpBinding 类:表示一种绑定,Silverlight 版本 4 客户端可用其配置可与 Windows Communication Foundation (WCF) 服务进行通信的终结点,其配置方式与轮询客户端对双工通信的配置方式相似。
NetTcpBinding :一种适合于跨计算机通信的安全可靠的绑定。
上边讲述了PollingDuplexHttpBinding 的配置,再看下NetTcpBinding 的配置方式:
1.在继续操作之前,确保您正在使用管理员特权运行 Visual Studio。
2.打开 Web.config 文件,添加一个 <netTcpBinding> 元素,该元素带有一个嵌套的 <security> 元素(其 mode 设置为 None)。当前版本的 Silverlight 不支持具有安 全性的NetTcpBinding。
 <bindings>
      <netTcpBinding>
        <binding name="tcpBindingNoSecurity">
          <security mode="None" />
        </binding>
      </netTcpBinding>
    </bindings>
由于 Silverlight 4 不支持具有安全性的 NetTcpBinding,因此使用此绑定配置发送的任何信息都未加密,并且可被第三方截获和修改。不要使用此绑定配置发送敏感信息。
3.在 <services> 节中指定服务终结点。
<services>
   <service name="DuplexService.OrderService">

      <!-- Specify the service endpoints. -->
      <endpoint
         address=""
         binding="netTcpBinding"
         bindingConfiguration="tcpBindingNoSecurity"
         contract="DuplexService.IDuplexService">
      </endpoint>
      <endpoint
         address="mex"
         binding="mexHttpBinding"
         contract="IMetadataExchange"/>
      </service>
   </services>
4.由于 Visual Studio Web 服务器不支持激活基于 TCP 的服务,该服务必须承载于 Internet Information Services (IIS) 中。
-
右击 DuplexServices 项目,然后选择“属性”。
-
单击左侧的“Web”选项卡,然后选择“使用本地 IIS Web 服务器”。(您可能需要向下滚动才能看到此选项。)此选项将会在“项目 URL”框中建议一条类似于 http://localhost/DuplexService 的路径,这是您应使用的值。
-
单击“项目 URL”框右侧的“创建虚拟目录”按钮以创建虚拟目录。
5.创建虚拟目录后,需要使用 IIS 管理器对该虚拟目录另外进行一些配置更改。
a.在“IIS 默认网站”中,使用绑定信息 4502:* 配置 net.tcp 绑定类型。
b.在 DuplexService 虚拟目录中,将 net.tcp 添加到已启用协议的列表中。
6.在 IIS 中承载该服务后,您仍需要在计算机上公开 Silverlight 4 HTTP 安全套接字策略文件;否则,所有尝试访问该服务的 Silverlight 4 客户端都将失败。
<?xml version="1.0" encoding ="utf-8"?>
<access-policy>
  <cross-domain-access>
    <policy>
      <allow-from>
        <domain uri="*" />
      </allow-from>
      <grant-to>
        <socket-resource port="4502" protocol="tcp" />
      </grant-to>
    </policy>
  </cross-domain-access>
</access-policy>
不支持端口 943 上基于 TCP 的套接字策略检索。使用 NetTcp 绑定时,无法切换到基于 TCP 的套接字策略检索。(参见 Silverlight 中的网络安全访问限制。)
7.现在已准备好,可以在 Visual Studio 中测试双工服务了。在“解决方案资源管理器”中选择并右击 Service1.svc 文件,然后选择“在浏览器中查看”(或按 Ctrl + F5)以显示该服务的测试页。您应会看到 OrderService 服务测试页,这样便可确定该服务可用。
以上的部分都是在服务端实现的代码,下面开始介绍在Client端来访问服务:
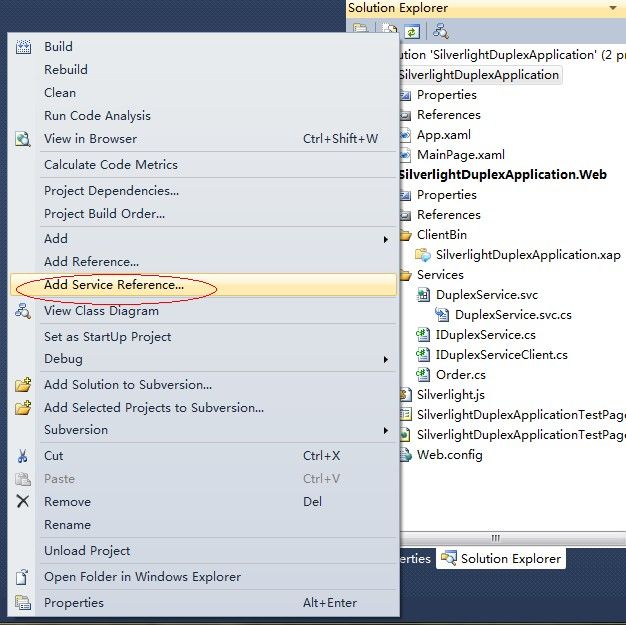
首先,右键Silverlight应用程序,选择添加服务引用:

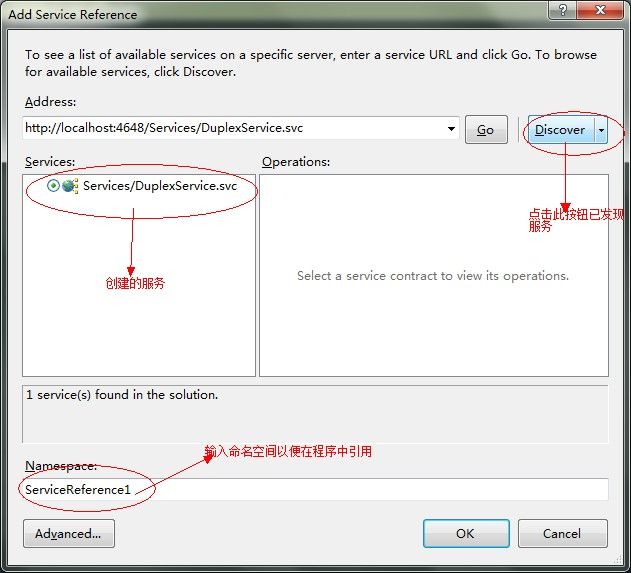
显示如下窗体,按照提示步骤,点击确定即可。

打开要访问Service的页面:
using System.ServiceModel;
using System.ServiceModel.Channels;
引用上边的命名空间,主要是用来创建服务对象的命名空间。
如果我们是使用PollingDuplexHttpBinding 生成服务,则下边代码就可以搞定
EndpointAddress address = new EndpointAddress("http://localhost:19021/DuplexService.svc");

PollingDuplexHttpBinding binding = new PollingDuplexHttpBinding(PollingDuplexMode.MultipleMessagesPerPoll);

DuplexServiceClient proxy = new DuplexServiceClient(binding, address);
服务的端口号可能有变化(不同电脑)。
如果是使用 NetTcpBinding ,则加入以下代码:
DuplexServiceClient proxy = new DuplexServiceClient();
下面是调用的代码:
            proxy.ReceiveReceived += new EventHandler<ReceiveReceivedEventArgs>(proxy_ReceiveReceived);
            proxy.OrderAsync("Widget", 3);
给ReceiveReceived绑定回调函数,然后调用方法OrderAsync
前台代码如下:
<UserControl x:Class="DuplexClient.MainPage"
    xmlns="http://schemas.microsoft.com/winfx/2006/xaml/presentation"
    xmlns:x="http://schemas.microsoft.com/winfx/2006/xaml"
    xmlns:d="http://schemas.microsoft.com/expression/blend/2008"
    xmlns:mc="http://schemas.openxmlformats.org/markup-compatibility/2006"
    mc:Ignorable="d"
    d:DesignHeight="300" d:DesignWidth="400">
    <TextBlock x:Name="reply" />
</UserControl>
使用了一个TextBlock显示得到的信息。
回调函数代码如下:
 void proxy_ReceiveReceived(object sender, ReceiveReceivedEventArgs e)
        {
            if (e.Error == null)
            {
                reply.Text += "Service reports Widget order is " + e.order.Status + "." + Environment.NewLine;

                if (e.order.Status == OrderStatus.Completed)
                {
                    reply.Text += "Here is the completed order:" + Environment.NewLine;

                    foreach (string order in e.order.Payload)
                    {
                        reply.Text += order + Environment.NewLine;
                    }
                }

            }
        }
-----------------------------------------------------------------------------------------------------------------------------------------------------------
以上的部分都是在服务端实现的代码,下面开始介绍在Client端来访问服务:
首先,右键Silverlight应用程序,选择添加服务引用:

显示如下窗体,按照提示步骤,点击确定即可。

打开要访问Service的页面:
using System.ServiceModel;
using System.ServiceModel.Channels;
引用上边的命名空间,主要是用来创建服务对象的命名空间。
如果我们是使用PollingDuplexHttpBinding 生成服务,则下边代码就可以搞定
EndpointAddress address = new EndpointAddress("http://localhost:19021/DuplexService.svc");

PollingDuplexHttpBinding binding = new PollingDuplexHttpBinding(PollingDuplexMode.MultipleMessagesPerPoll);

DuplexServiceClient proxy = new DuplexServiceClient(binding, address);
服务的端口号可能有变化(不同电脑)。
如果是使用 NetTcpBinding ,则加入以下代码:
DuplexServiceClient proxy = new DuplexServiceClient();
下面是调用的代码:
            proxy.ReceiveReceived += new EventHandler<ReceiveReceivedEventArgs>(proxy_ReceiveReceived);
            proxy.OrderAsync("Widget", 3);
给ReceiveReceived绑定回调函数,然后调用方法OrderAsync
前台代码如下:
<UserControl x:Class="DuplexClient.MainPage"
    xmlns="http://schemas.microsoft.com/winfx/2006/xaml/presentation"
    xmlns:x="http://schemas.microsoft.com/winfx/2006/xaml"
    xmlns:d="http://schemas.microsoft.com/expression/blend/2008"
    xmlns:mc="http://schemas.openxmlformats.org/markup-compatibility/2006"
    mc:Ignorable="d"
    d:DesignHeight="300" d:DesignWidth="400">
    <TextBlock x:Name="reply" />
</UserControl>
使用了一个TextBlock显示得到的信息。
回调函数代码如下:
 void proxy_ReceiveReceived(object sender, ReceiveReceivedEventArgs e)
        {
            if (e.Error == null)
            {
                reply.Text += "Service reports Widget order is " + e.order.Status + "." + Environment.NewLine;

                if (e.order.Status == OrderStatus.Completed)
                {
                    reply.Text += "Here is the completed order:" + Environment.NewLine;

                    foreach (string order in e.order.Payload)
                    {
                        reply.Text += order + Environment.NewLine;
                    }
                }

            }
        }
以上全部部分就是双工通信的内容,希望大家多多给意见.----(部分代码解释来源于MSDN)