【Seq2Seq】Attention is All You Need
大家好,我是Sonhhxg_柒,希望你看完之后,能对你有所帮助,不足请指正!共同学习交流
个人主页-Sonhhxg_柒的博客_CSDN博客
欢迎各位→点赞 + 收藏⭐️ + 留言
系列专栏 - 机器学习【ML】 自然语言处理【NLP】 深度学习【DL】
foreword
✔说明⇢本人讲解主要包括Python、机器学习(ML)、深度学习(DL)、自然语言处理(NLP)等内容。
如果你对这个系列感兴趣的话,可以关注订阅哟
文章目录
简介
准备数据
构建模型
编码器
多头注意层
Position-wise前馈层
解码器
解码器层
Seq2Seq
Training the Seq2Seq Model
推理
BLEU
在本笔记本中,我们将从 Attention is All You Need 中,本笔记本中的所有图像都将取自变形金刚论文。有关变压器的更多信息 see these three 文章。
简介
与卷积序列到序列模型类似,转换器不使用任何递归。它也不使用任何卷积层。相反,该模型完全由线性层,注意机制和归一化组成。
截至2020年1月,Transformer是NLP中的主要架构,用于为许多任务实现最先进的结果,并且似乎在不久的将来会出现。
最受欢迎的Transformer变体是BERT (Bidirectional Encoder Representations from Transformers)和预训练版本的BERT通常用于替换NLP模型中的嵌入层 - 如果不是更多的话。
处理预训练Transformer时使用的常用库是Transformers库,请参阅here以获取所有可用预训练模型的列表。
本笔记本中的实现与本文之间的区别在于:
- 我们使用学习的位置编码而不是静态编码
- 我们使用具有静态学习速率的标准 Adam 优化器,而不是具有热身和冷却步骤的优化器
- 我们不使用标签平滑
我们进行所有这些更改,因为它们密切遵循BERT的设置,并且大多数变压器变体都使用类似的设置。
准备数据
与往常一样,让我们导入所有必需的模块,并设置随机种子以实现可重复性。.
import torch
import torch.nn as nn
import torch.optim as optim

import torchtext
from torchtext.legacy.datasets import Multi30k
from torchtext.legacy.data import Field, BucketIterator

import matplotlib.pyplot as plt
import matplotlib.ticker as ticker

import spacy
import numpy as np

import random
import math
import time
SEED = 1234
random.seed(SEED)
np.random.seed(SEED)
torch.manual_seed(SEED)
torch.cuda.manual_seed(SEED)
torch.backends.cudnn.deterministic = True然后,我们将像以前一样创建我们的分词器。
spacy_de = spacy.load('de_core_news_sm')
spacy_en = spacy.load('en_core_web_sm')
def tokenize_de(text):
"""
将字符串中的德语文本标记化为字符串列表
"""
return [tok.text for tok in spacy_de.tokenizer(text)]
def tokenize_en(text):
"""
将字符串中的英语文本标记化为字符串列表
"""
return [tok.text for tok in spacy_en.tokenizer(text)]我们的字段与以前的笔记本相同。该模型期望数据首先与批处理维度一起输入,因此我们使用batch_first = True。
SRC = Field(tokenize = tokenize_de,
            init_token = '',
            eos_token = '',
            lower = True,
            batch_first = True)

TRG = Field(tokenize = tokenize_en,
            init_token = '',
            eos_token = '',
            lower = True,
            batch_first = True)
然后,我们加载 Multi30k 数据集并构建词汇表。
train_data, valid_data, test_data = Multi30k.splits(exts = ('.de', '.en'),
                                                    fields = (SRC, TRG))
SRC.build_vocab(train_data, min_freq = 2)
TRG.build_vocab(train_data, min_freq = 2)最后,我们定义设备和数据迭代器。
device = torch.device('cuda' if torch.cuda.is_available() else 'cpu')BATCH_SIZE = 128
train_iterator, valid_iterator, test_iterator = BucketIterator.splits(
(train_data, valid_data, test_data),
batch_size = BATCH_SIZE,
device = device)构建模型
接下来,我们将生成模型。像以前的笔记本一样,它由编码器和解码器组成,编码器将输入/源句子(德语)编码为上下文向量,解码器然后解码此上下文向量以输出我们的输出/目标句子(英语)。
编码器
与 ConvSeq2Seq 模型类似,变压器的编码器不会尝试压缩整个源句子,X = {x1,x2,...,xn},则转换为单个上下文向量 。相反,它产生一系列上下文向量Z = {z1,z2,...,zn},.因此,如果我们的输入序列是5个令牌长,我们将拥有Z = {z1,z2,z3,z4,z5}.为什么我们称之为上下文向量序列,而不是隐藏状态序列?RNN 中当时的隐藏状态只看到令牌 以及它之前的所有代币。但是,此处的每个上下文向量都已在输入序列中的所有位置看到所有标记。
首先,令牌通过标准嵌入层传递。接下来,由于模型没有重复,它不知道序列中令牌的顺序。我们通过使用称为位置嵌入层的第二个嵌入层来解决此问题。这是一个标准的嵌入层,其中输入不是令牌本身,而是令牌在序列中的位置,从位置 0 中的第一个令牌
来自“注意是所有你需要的”论文的原始变形金刚实现不学习位置嵌入。相反,它使用固定的静态嵌入。现代变形金刚架构(如BERT)使用位置嵌入代替,因此我们决定在这些教程中使用它们。查看此部分以阅读有关原始变形金刚模型中使用的位置嵌入的更多信息。
接下来,将令牌和位置嵌入按元素相加,得到一个向量,其中包含有关令牌及其在序列中的位置的信息。但是,在对它们求和之前,令牌嵌入乘以比例因子,该比例因子是√dmodel,在dmodel是隐藏的维度大小,hid_dim。这被认为减少了嵌入中的方差,并且没有这个比例因子,模型很难可靠地训练。然后,将辍学应用于组合嵌入。
然后,组合的嵌入通过编码器N层得到Z ,然后输出并可供解码器使用。
源掩码(src_mask)只是与源句子的形状相同,但当源句子中的标记不是标记时,其值为 1
class Encoder(nn.Module):
    def __init__(self,
                 input_dim,
                 hid_dim,
                 n_layers,
                 n_heads,
                 pf_dim,
                 dropout,
                 device,
                 max_length = 100):
        super().__init__()

        self.device = device
        self.tok_embedding = nn.Embedding(input_dim, hid_dim)
        self.pos_embedding = nn.Embedding(max_length, hid_dim)
        self.layers = nn.ModuleList([EncoderLayer(hid_dim,
                                                  n_heads,
                                                  pf_dim,
                                                  dropout,
                                                  device)
                                     for _ in range(n_layers)])
        self.dropout = nn.Dropout(dropout)
        self.scale = torch.sqrt(torch.FloatTensor([hid_dim])).to(device)

    def forward(self, src, src_mask):
        #src = [batch size, src len]
        #src_mask = [batch size, 1, 1, src len]
        batch_size = src.shape[0]
        src_len = src.shape[1]
        pos = torch.arange(0, src_len).unsqueeze(0).repeat(batch_size, 1).to(self.device)
        #pos = [batch size, src len]
        src = self.dropout((self.tok_embedding(src) * self.scale) + self.pos_embedding(pos))

        #src = [batch size, src len, hid dim]
        for layer in self.layers:
            src = layer(src, src_mask)

        #src = [batch size, src len, hid dim]
        return src
编码器层
编码器层是包含编码器所有“肉”的地方。我们首先将源句子及其掩码传递到多头注意层中,然后对其执行丢弃,应用残余连接并将其通过层归一化层。然后,我们将其传递给一个位置前馈层,然后,再次,应用 dropout,残余连接,然后进行层归一化,以获得该层的输出,该输出被馈入下一层。参数不在图层之间共享。
编码器层使用多头注意层来关注源句子,即它正在计算和应用注意力而不是另一个序列,因此我们称之为自我注意。
本文详细介绍了层归一化,但要点是它对特征的值进行归一化,即在隐藏维度上,因此每个特征的平均值为 0,标准差为 1。这使得具有更多层的神经网络(如变形金刚)更容易被训练。
class EncoderLayer(nn.Module):
    def __init__(self,
                 hid_dim,
                 n_heads,
                 pf_dim,
                 dropout,
                 device):
        super().__init__()

        self.self_attn_layer_norm = nn.LayerNorm(hid_dim)
        self.ff_layer_norm = nn.LayerNorm(hid_dim)
        self.self_attention = MultiHeadAttentionLayer(hid_dim, n_heads, dropout, device)
        self.positionwise_feedforward = PositionwiseFeedforwardLayer(hid_dim,
                                                                     pf_dim,
                                                                     dropout)
        self.dropout = nn.Dropout(dropout)

    def forward(self, src, src_mask):

        #src = [batch size, src len, hid dim]
        #src_mask = [batch size, 1, 1, src len]

        #self attention
        _src, _ = self.self_attention(src, src, src, src_mask)

        #dropout, residual connection and layer norm
        src = self.self_attn_layer_norm(src + self.dropout(_src))

        #src = [batch size, src len, hid dim]

        #positionwise feedforward
        _src = self.positionwise_feedforward(src)

        #dropout, residual and layer norm
        src = self.ff_layer_norm(src + self.dropout(_src))

        #src = [batch size, src len, hid dim]

        return src
多头注意层
Transformer论文引入的关键新颖概念之一是多头注意力层。
注意可以作为查询,键和值 - 其中查询与键一起使用以获取注意向量(通常是softmax操作的输出,并且具有0和1之间的所有值,总和为1),然后用于获取值的加权和。
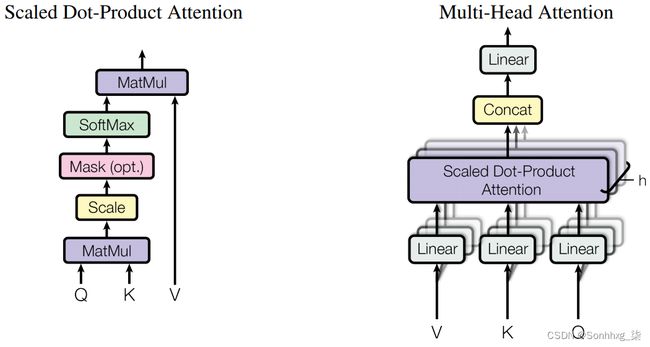
转换器使用缩放的点积注意,其中查询和键通过取它们之间的点积来组合,然后应用 softmax 操作并缩放依据dk 最后再乘以该值dk。 是头部维度,head_dim,我们很快就会进一步解释。![]()
这类似于标准的点积注意,但按比例dk这篇论文指出,它是用来阻止点积的结果变大,导致梯度变得太小。
然而,扩展的点积注意不仅仅应用于查询、键和值。与执行单个注意力应用程序不同,查询、键和值的hid_dim被分割为头部h,并在所有头部上并行计算缩放的点积注意力。这意味着,我们不是对一个应用关注一个概念h,而是关注。然后我们将头部重新组合到它们的hid_dim形状中,因此每个hid_dim可能关注不同的概念h。
W^O是应用在多头注意层末端的线性层,fc。W^Q,W^K,W^V是线性层fc_q, fc_k和fc_v。
遍历模块,首先QW^Q,KW^K,和VW^V,而且使用线性层fc_q, fc_k和fc_v,得到Q, K和v。接下来,我们使用.view将查询的hid_dim、键和值分割为n_heads,并正确排列它们,以便它们可以相乘。然后我们通过将Q和K相乘并乘以head_dim的平方根(即hid_dim // n_heads)来计算能量(非归一化注意力)。然后我们屏蔽能量,这样我们就不会注意序列中我们不应该注意的任何元素,然后应用softmax和dropout。然后,在将n_heads组合在一起之前,我们将注意力应用到值正面V上。最后乘以这个W^O,用fc_o表示。
注意,在我们的实现中,键和值的长度总是相同的,因此当矩阵乘以softmax的输出时attention,对于V,我们总是有矩阵乘法的有效维度大小。这个乘法是用torch.matmul,当两个张量都是二维的>时,对每个张量的最后两个维进行批量矩阵乘法。这将是一个[query len, key len] x [value len, head dim] 对批大小和每个头部的批量矩阵乘法,它提供[batch size, n heads, query len, head dim]结果。
一开始看起来很奇怪的一件事是dropout直接应用于注意。这意味着我们的注意力向量很可能不等于1,我们可能会完全关注一个标记,但通过dropout,对该标记的关注被设置为0。这在本文中没有解释,甚至没有提到,但是被官方实现和此后的每个Transformer实现使用,包括BERT。
class MultiHeadAttentionLayer(nn.Module):
    def __init__(self, hid_dim, n_heads, dropout, device):
        super().__init__()

        assert hid_dim % n_heads == 0
        self.hid_dim = hid_dim
        self.n_heads = n_heads
        self.head_dim = hid_dim // n_heads
        self.fc_q = nn.Linear(hid_dim, hid_dim)
        self.fc_k = nn.Linear(hid_dim, hid_dim)
        self.fc_v = nn.Linear(hid_dim, hid_dim)
        self.fc_o = nn.Linear(hid_dim, hid_dim)
        self.dropout = nn.Dropout(dropout)
        self.scale = torch.sqrt(torch.FloatTensor([self.head_dim])).to(device)

    def forward(self, query, key, value, mask = None):

        batch_size = query.shape[0]
        #query = [batch size, query len, hid dim]
        #key = [batch size, key len, hid dim]
        #value = [batch size, value len, hid dim]

        Q = self.fc_q(query)
        K = self.fc_k(key)
        V = self.fc_v(value)

        #Q = [batch size, query len, hid dim]
        #K = [batch size, key len, hid dim]
        #V = [batch size, value len, hid dim]

        Q = Q.view(batch_size, -1, self.n_heads, self.head_dim).permute(0, 2, 1, 3)
        K = K.view(batch_size, -1, self.n_heads, self.head_dim).permute(0, 2, 1, 3)
        V = V.view(batch_size, -1, self.n_heads, self.head_dim).permute(0, 2, 1, 3)

        #Q = [batch size, n heads, query len, head dim]
        #K = [batch size, n heads, key len, head dim]
        #V = [batch size, n heads, value len, head dim]
        energy = torch.matmul(Q, K.permute(0, 1, 3, 2)) / self.scale

        #energy = [batch size, n heads, query len, key len]

        if mask is not None:
            energy = energy.masked_fill(mask == 0, -1e10)

        attention = torch.softmax(energy, dim = -1)
        #attention = [batch size, n heads, query len, key len]
        x = torch.matmul(self.dropout(attention), V)

        #x = [batch size, n heads, query len, head dim]
        x = x.permute(0, 2, 1, 3).contiguous()

        #x = [batch size, query len, n heads, head dim]
        x = x.view(batch_size, -1, self.hid_dim)

        #x = [batch size, query len, hid dim]
        x = self.fc_o(x)

        #x = [batch size, query len, hid dim]
        return x, attention
Position-wise前馈层
编码器层内部的另一个主要块是位置前馈层,这与多头注意层相比相对简单。输入从hid_dim转换为pf_dim,其中pf_dim通常比hid_dim大得多。最初的Transformer使用的hid_dim为512,pf_dim为2048。在将其转换回hid_dim表示之前,将应用ReLU激活函数和dropout。
为什么要用这个?不幸的是,这篇论文从未解释过。
BERT采用GELU激活功能,只需开关电筒即可使用。relu F.gelu。他们为什么使用GELU?再一次,它从未被解释。
class PositionwiseFeedforwardLayer(nn.Module):
    def __init__(self, hid_dim, pf_dim, dropout):
        super().__init__()

        self.fc_1 = nn.Linear(hid_dim, pf_dim)
        self.fc_2 = nn.Linear(pf_dim, hid_dim)

        self.dropout = nn.Dropout(dropout)

    def forward(self, x):

        #x = [batch size, seq len, hid dim]

        x = self.dropout(torch.relu(self.fc_1(x)))

        #x = [batch size, seq len, pf dim]

        x = self.fc_2(x)

        #x = [batch size, seq len, hid dim]

        return x
解码器
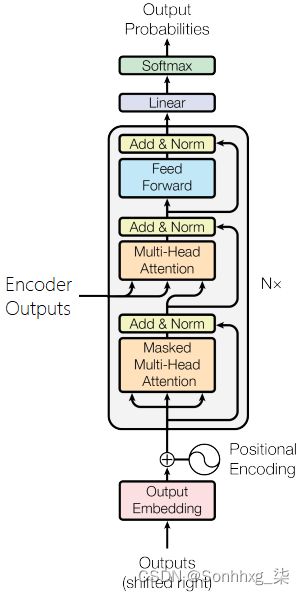
解码器的目标是将源句子的编码表示,Z,并将其转换为目标句子中的预测标记,Y^. 然后,我们比较Y^用目标句中的实际令牌,Y,来计算我们的损失,它将被用来计算我们的参数的梯度,然后使用我们的优化器更新我们的权重,以改进我们的预测。
解码器类似于编码器,但是它现在有两个多头注意层。目标序列上的掩码多头注意层,以及使用解码器表示作为查询,使用编码器表示作为键和值的多头注意层。
解码器使用位置嵌入并通过elementwise和将它们与缩放的嵌入目标标记结合,然后是dropout。同样,我们的位置编码有100个“词汇表”,这意味着它们可以接受长达100个标记的序列。如果需要,可以增加。
然后将组合嵌入与经过N层编码的源、enc_src以及源掩码和目标掩码一起通过解码器层进行传递。注意,编码器中的层数不必等于解码器中的层数,即使它们都用N。
之后的解码器表示N^th然后,该层通过一个线性层fc_out。在PyTorch中,softmax操作包含在损耗函数中,因此我们不需要显式地在这里使用softmax层。
除了使用源掩码(正如我们在编码器中所做的那样,以防止模型关注令牌),我们还使用了目标掩码。这将在Seq2Seq模型中进一步解释,该模型封装了编码器和解码器,但其要点是,它执行的操作与卷积序列对序列模型中的解码器填充类似。当我们同时并行地处理所有目标标记时,我们需要一种方法,通过简单地“查看”目标序列中的下一个标记是什么并输出它,来阻止解码器的“欺骗”。
我们的解码器层还输出规范化的注意值,这样我们就可以稍后绘制它们,以查看模型实际关注的是什么。
class Decoder(nn.Module):
    def __init__(self,
                 output_dim,
                 hid_dim,
                 n_layers,
                 n_heads,
                 pf_dim,
                 dropout,
                 device,
                 max_length = 100):
        super().__init__()
        self.device = device
        self.tok_embedding = nn.Embedding(output_dim, hid_dim)
        self.pos_embedding = nn.Embedding(max_length, hid_dim)

        self.layers = nn.ModuleList([DecoderLayer(hid_dim,
                                                  n_heads,
                                                  pf_dim,
                                                  dropout,
                                                  device)
                                     for _ in range(n_layers)])

        self.fc_out = nn.Linear(hid_dim, output_dim)

        self.dropout = nn.Dropout(dropout)

        self.scale = torch.sqrt(torch.FloatTensor([hid_dim])).to(device)

    def forward(self, trg, enc_src, trg_mask, src_mask):

        #trg = [batch size, trg len]
        #enc_src = [batch size, src len, hid dim]
        #trg_mask = [batch size, 1, trg len, trg len]
        #src_mask = [batch size, 1, 1, src len]

        batch_size = trg.shape[0]
        trg_len = trg.shape[1]

        pos = torch.arange(0, trg_len).unsqueeze(0).repeat(batch_size, 1).to(self.device)

        #pos = [batch size, trg len]

        trg = self.dropout((self.tok_embedding(trg) * self.scale) + self.pos_embedding(pos))

        #trg = [batch size, trg len, hid dim]

        for layer in self.layers:
            trg, attention = layer(trg, enc_src, trg_mask, src_mask)

        #trg = [batch size, trg len, hid dim]
        #attention = [batch size, n heads, trg len, src len]

        output = self.fc_out(trg)

        #output = [batch size, trg len, output dim]

        return output, attention
解码器层
如前所述,解码器层与编码器层相似,只是它现在有两个多头注意层,自注意和encoder_attention。
第一种方法执行自我注意,就像在编码器中一样,通过使用有关查询、键和值的解码器表示。接下来是dropout,残余连接和层归一化。这个自注意层使用目标序列掩码trg_mask,以防止解码器在并行处理目标句中的所有令牌时,通过注意当前正在处理的令牌的“前面”的令牌来“作弊”。
第二个问题是如何将编码后的源句enc_src输入到解码器中。在这个多头注意层中,查询是解码器表示形式,键和值是编码器表示形式。这里,源掩码src_mask用于防止多头注意层关注源句中的标记。然后是dropout,残差连接和层归一化层。
最后,我们通过位置前馈层和另一个dropout序列,剩余连接和层归一化。
解码器层没有引入任何新概念,只是以稍微不同的方式使用与编码器相同的层集。
class DecoderLayer(nn.Module):
    def __init__(self,
                 hid_dim,
                 n_heads,
                 pf_dim,
                 dropout,
                 device):
        super().__init__()

        self.self_attn_layer_norm = nn.LayerNorm(hid_dim)
        self.enc_attn_layer_norm = nn.LayerNorm(hid_dim)
        self.ff_layer_norm = nn.LayerNorm(hid_dim)
        self.self_attention = MultiHeadAttentionLayer(hid_dim, n_heads, dropout, device)
        self.encoder_attention = MultiHeadAttentionLayer(hid_dim, n_heads, dropout, device)
        self.positionwise_feedforward = PositionwiseFeedforwardLayer(hid_dim,
                                                                     pf_dim,
                                                                     dropout)
        self.dropout = nn.Dropout(dropout)

    def forward(self, trg, enc_src, trg_mask, src_mask):

        #trg = [batch size, trg len, hid dim]
        #enc_src = [batch size, src len, hid dim]
        #trg_mask = [batch size, 1, trg len, trg len]
        #src_mask = [batch size, 1, 1, src len]

        #self attention
        _trg, _ = self.self_attention(trg, trg, trg, trg_mask)

        #dropout, residual connection and layer norm
        trg = self.self_attn_layer_norm(trg + self.dropout(_trg))

        #trg = [batch size, trg len, hid dim]

        #encoder attention
        _trg, attention = self.encoder_attention(trg, enc_src, enc_src, src_mask)

        #dropout, residual connection and layer norm
        trg = self.enc_attn_layer_norm(trg + self.dropout(_trg))

        #trg = [batch size, trg len, hid dim]

        #positionwise feedforward
        _trg = self.positionwise_feedforward(trg)

        #dropout, residual and layer norm
        trg = self.ff_layer_norm(trg + self.dropout(_trg))

        #trg = [batch size, trg len, hid dim]
        #attention = [batch size, n heads, trg len, src len]

        return trg, attention
Seq2Seq
最后,我们有Seq2Seq模块,它封装编码器和解码器,以及处理掩码的创建。
通过检查源序列不等于令牌的位置来创建源掩码。当令牌不是令牌时为1,当令牌是令牌时为0。然后它被解压缩,这样它可以正确地广播时,应用掩模的能量,形状[batch size, n heads, seq len, seq len]。
目标掩码稍微复杂一些。首先,我们为令牌创建一个掩码,就像我们为源掩码所做的一样。接下来,我们使用torch.tril创建一个“后续”掩码trg_sub_mask。这就创建了一个对角线矩阵,其中对角线以上的元素将为零,对角线以下的元素将被设置为输入张量的任何值。在这种情况下,输入张量将是一个充满1的张量。这意味着我们的trg_sub_mask看起来像这样(对于有5个令牌的目标):
这显示了每个目标令牌(行)允许查看的内容(列)。第一个目标标记的掩码为[1,0,0,0,0],这意味着它只能查看第一个目标标记。第二个目标令牌的掩码为[1,1,0,0,0],这意味着它可以同时查看第一个和第二个目标令牌。
然后将“后续”掩码与填充掩码进行逻辑运算,这将组合这两个掩码,确保后续令牌和填充令牌都不能被处理。例如,如果最后两个令牌是令牌,掩码看起来像这样:
创建掩码后,将它们与编码器、解码器以及源句和目标句一起使用,以获得我们预测的目标句、输出以及解码器对源序列的注意。
class Seq2Seq(nn.Module):
    def __init__(self,
                 encoder,
                 decoder,
                 src_pad_idx,
                 trg_pad_idx,
                 device):
        super().__init__()

        self.encoder = encoder
        self.decoder = decoder
        self.src_pad_idx = src_pad_idx
        self.trg_pad_idx = trg_pad_idx
        self.device = device

    def make_src_mask(self, src):

        #src = [batch size, src len]

        src_mask = (src != self.src_pad_idx).unsqueeze(1).unsqueeze(2)

        #src_mask = [batch size, 1, 1, src len]

        return src_mask

    def make_trg_mask(self, trg):

        #trg = [batch size, trg len]

        trg_pad_mask = (trg != self.trg_pad_idx).unsqueeze(1).unsqueeze(2)

        #trg_pad_mask = [batch size, 1, 1, trg len]

        trg_len = trg.shape[1]

        trg_sub_mask = torch.tril(torch.ones((trg_len, trg_len), device = self.device)).bool()

        #trg_sub_mask = [trg len, trg len]

        trg_mask = trg_pad_mask & trg_sub_mask

        #trg_mask = [batch size, 1, trg len, trg len]

        return trg_mask

    def forward(self, src, trg):

        #src = [batch size, src len]
        #trg = [batch size, trg len]

        src_mask = self.make_src_mask(src)
        trg_mask = self.make_trg_mask(trg)

        #src_mask = [batch size, 1, 1, src len]
        #trg_mask = [batch size, 1, trg len, trg len]

        enc_src = self.encoder(src, src_mask)

        #enc_src = [batch size, src len, hid dim]

        output, attention = self.decoder(trg, enc_src, trg_mask, src_mask)

        #output = [batch size, trg len, output dim]
        #attention = [batch size, n heads, trg len, src len]

        return output, attention
Training the Seq2Seq Model
现在我们可以定义编码器和解码器了。这个模型比目前研究中使用的变形金刚要小得多,但能够在单个GPU上快速运行。
INPUT_DIM = len(SRC.vocab)
OUTPUT_DIM = len(TRG.vocab)
HID_DIM = 256
ENC_LAYERS = 3
DEC_LAYERS = 3
ENC_HEADS = 8
DEC_HEADS = 8
ENC_PF_DIM = 512
DEC_PF_DIM = 512
ENC_DROPOUT = 0.1
DEC_DROPOUT = 0.1

enc = Encoder(INPUT_DIM,
              HID_DIM,
              ENC_LAYERS,
              ENC_HEADS,
              ENC_PF_DIM,
              ENC_DROPOUT,
              device)

dec = Decoder(OUTPUT_DIM,
              HID_DIM,
              DEC_LAYERS,
              DEC_HEADS,
              DEC_PF_DIM,
              DEC_DROPOUT,
              device)
然后,使用它们来定义整个序列到序列的封装模型。
SRC_PAD_IDX = SRC.vocab.stoi[SRC.pad_token]
TRG_PAD_IDX = TRG.vocab.stoi[TRG.pad_token]

model = Seq2Seq(enc, dec, SRC_PAD_IDX, TRG_PAD_IDX, device).to(device)
我们可以检查参数的数量,注意到它明显小于卷积序列对序列模型的37M。
def count_parameters(model):
    return sum(p.numel() for p in model.parameters() if p.requires_grad)

print(f'The model has {count_parameters(model):,} trainable parameters')
The model has 9,038,341 trainable parameters
本文没有提到使用了哪种权重初始化方案,但是Xavier均匀似乎在Transformer模型中很常见,因此我们在这里使用它。
def initialize_weights(m):
    if hasattr(m, 'weight') and m.weight.dim() > 1:
nn.init.xavier_uniform_(m.weight.data)model.apply(initialize_weights);在最初的Transformer论文中使用的优化器使用Adam,其学习速率有一个“预热”和一个“冷却”期。BERT和其他Transformer模型以固定的学习率使用Adam,因此我们将实现它。查看此链接,了解有关原始Transformer学习速率计划的更多详细信息。
注意,学习速率需要低于Adam使用的默认值,否则学习是不稳定的。
LEARNING_RATE = 0.0005

optimizer = torch.optim.Adam(model.parameters(), lr = LEARNING_RATE)
接下来,我们定义损失函数,确保忽略
criterion = nn.CrossEntropyLoss(ignore_index = TRG_PAD_IDX)然后,我们将定义我们的训练循环。这与上一教程中使用的方法完全相同。
因为我们希望我们的模型预测
xi 表示实际的目标序列元素。然后,我们将其输入到模型中,以获得一个预测序列,该序列有望预测![]()
yi表示预测的目标序列元素。然后,我们使用原始 trg 张量计算损失,将
然后,我们计算损失并按标准更新参数。
def train(model, iterator, optimizer, criterion, clip):

    model.train()

    epoch_loss = 0

    for i, batch in enumerate(iterator):

        src = batch.src
        trg = batch.trg

        optimizer.zero_grad()

        output, _ = model(src, trg[:,:-1])

        #output = [batch size, trg len - 1, output dim]
        #trg = [batch size, trg len]

        output_dim = output.shape[-1]

        output = output.contiguous().view(-1, output_dim)
        trg = trg[:,1:].contiguous().view(-1)

        #output = [batch size * trg len - 1, output dim]
        #trg = [batch size * trg len - 1]

        loss = criterion(output, trg)

        loss.backward()

        torch.nn.utils.clip_grad_norm_(model.parameters(), clip)

        optimizer.step()

        epoch_loss += loss.item()

    return epoch_loss / len(iterator)
评估循环与训练循环相同,只是没有梯度计算和参数更新。
def evaluate(model, iterator, criterion):

    model.eval()

    epoch_loss = 0

    with torch.no_grad():

        for i, batch in enumerate(iterator):

            src = batch.src
            trg = batch.trg

            output, _ = model(src, trg[:,:-1])

            #output = [batch size, trg len - 1, output dim]
            #trg = [batch size, trg len]

            output_dim = output.shape[-1]

            output = output.contiguous().view(-1, output_dim)
            trg = trg[:,1:].contiguous().view(-1)

            #output = [batch size * trg len - 1, output dim]
            #trg = [batch size * trg len - 1]

            loss = criterion(output, trg)

            epoch_loss += loss.item()

    return epoch_loss / len(iterator)
然后,我们定义一个小函数,可以用来告诉我们一个epoch需要多长时间。
def epoch_time(start_time, end_time):
    elapsed_time = end_time - start_time
    elapsed_mins = int(elapsed_time / 60)
    elapsed_secs = int(elapsed_time - (elapsed_mins * 60))
    return elapsed_mins, elapsed_secs
最后,我们训练我们的实际模型。该模型比卷积序列到序列模型快近3倍,并且还实现了更低的验证困惑!
N_EPOCHS = 10
CLIP = 1

best_valid_loss = float('inf')

for epoch in range(N_EPOCHS):

    start_time = time.time()

    train_loss = train(model, train_iterator, optimizer, criterion, CLIP)
    valid_loss = evaluate(model, valid_iterator, criterion)

    end_time = time.time()

    epoch_mins, epoch_secs = epoch_time(start_time, end_time)

    if valid_loss < best_valid_loss:
        best_valid_loss = valid_loss
        torch.save(model.state_dict(), 'tut6-model.pt')

    print(f'Epoch: {epoch+1:02} | Time: {epoch_mins}m {epoch_secs}s')
    print(f'\tTrain Loss: {train_loss:.3f} | Train PPL: {math.exp(train_loss):7.3f}')
    print(f'\t Val. Loss: {valid_loss:.3f} |  Val. PPL: {math.exp(valid_loss):7.3f}')
Epoch: 01 | Time: 0m 13s Train Loss: 4.222 | Train PPL: 68.172 Val. Loss: 3.021 | Val. PPL: 20.516 Epoch: 02 | Time: 0m 13s Train Loss: 2.813 | Train PPL: 16.657 Val. Loss: 2.289 | Val. PPL: 9.866 Epoch: 03 | Time: 0m 13s Train Loss: 2.236 | Train PPL: 9.358 Val. Loss: 1.981 | Val. PPL: 7.252 Epoch: 04 | Time: 0m 13s Train Loss: 1.889 | Train PPL: 6.613 Val. Loss: 1.812 | Val. PPL: 6.123 Epoch: 05 | Time: 0m 13s Train Loss: 1.644 | Train PPL: 5.177 Val. Loss: 1.712 | Val. PPL: 5.538 Epoch: 06 | Time: 0m 14s Train Loss: 1.458 | Train PPL: 4.296 Val. Loss: 1.649 | Val. PPL: 5.201 Epoch: 07 | Time: 0m 13s Train Loss: 1.311 | Train PPL: 3.710 Val. Loss: 1.624 | Val. PPL: 5.072 Epoch: 08 | Time: 0m 13s Train Loss: 1.185 | Train PPL: 3.269 Val. Loss: 1.628 | Val. PPL: 5.095 Epoch: 09 | Time: 0m 14s Train Loss: 1.074 | Train PPL: 2.928 Val. Loss: 1.613 | Val. PPL: 5.016 Epoch: 10 | Time: 0m 14s Train Loss: 0.978 | Train PPL: 2.659 Val. Loss: 1.629 | Val. PPL: 5.098
我们加载“最佳”参数,并设法实现比以前所有型号更好的测试困惑。
model.load_state_dict(torch.load('tut6-model.pt'))

test_loss = evaluate(model, test_iterator, criterion)

print(f'| Test Loss: {test_loss:.3f} | Test PPL: {math.exp(test_loss):7.3f} |')
| Test Loss: 1.671 | Test PPL: 5.316 |
推理
现在我们可以使用下面的translate_sentence函数从我们的模型中进行翻译。
所采取的步骤如下:
- 如果源句子尚未标记化,则对其进行标记化(是字符串)
- 附加
和 标记 - 对源句子进行数值化
- 将其转换为张量并添加批处理维度
- 创建源句子掩码
- 将源句子和掩码馈送到编码器中
- 创建一个列表来保存输出句子,用
标记初始化 - 虽然我们没有达到最大长度
- 将当前输出句子预测转换为具有批处理维度的张量
- 创建目标句子掩码
- 将电流输出、编码器输出和两个掩码放入解码器中
- 从解码器获取下一个输出令牌预测以及注意力
- 将预测添加到当前输出句子预测
- 如果预测是令牌,则中断
- 将输出句子从索引转换为标记
- 返回输出句子(
删除标记)和来自最后一层的注意力
def translate_sentence(sentence, src_field, trg_field, model, device, max_len = 50):

    model.eval()

    if isinstance(sentence, str):
        nlp = spacy.load('de_core_news_sm')
        tokens = [token.text.lower() for token in nlp(sentence)]
    else:
        tokens = [token.lower() for token in sentence]

    tokens = [src_field.init_token] + tokens + [src_field.eos_token]

    src_indexes = [src_field.vocab.stoi[token] for token in tokens]

    src_tensor = torch.LongTensor(src_indexes).unsqueeze(0).to(device)

    src_mask = model.make_src_mask(src_tensor)

    with torch.no_grad():
        enc_src = model.encoder(src_tensor, src_mask)

    trg_indexes = [trg_field.vocab.stoi[trg_field.init_token]]

    for i in range(max_len):

        trg_tensor = torch.LongTensor(trg_indexes).unsqueeze(0).to(device)

        trg_mask = model.make_trg_mask(trg_tensor)

        with torch.no_grad():
            output, attention = model.decoder(trg_tensor, enc_src, trg_mask, src_mask)

        pred_token = output.argmax(2)[:,-1].item()

        trg_indexes.append(pred_token)

        if pred_token == trg_field.vocab.stoi[trg_field.eos_token]:
            break

    trg_tokens = [trg_field.vocab.itos[i] for i in trg_indexes]

    return trg_tokens[1:], attention
现在,我们将定义一个函数,该函数在解码的每个步骤中显示源句子上的注意力。由于此模型有8个头,因此我们的模型可以查看每个头的注意力。
def display_attention(sentence, translation, attention, n_heads = 8, n_rows = 4, n_cols = 2):

    assert n_rows * n_cols == n_heads

    fig = plt.figure(figsize=(15,25))

    for i in range(n_heads):

        ax = fig.add_subplot(n_rows, n_cols, i+1)

        _attention = attention.squeeze(0)[i].cpu().detach().numpy()

        cax = ax.matshow(_attention, cmap='bone')

        ax.tick_params(labelsize=12)
        ax.set_xticklabels(['']+['']+[t.lower() for t in sentence]+[''],
                           rotation=45)
        ax.set_yticklabels(['']+translation)

        ax.xaxis.set_major_locator(ticker.MultipleLocator(1))
        ax.yaxis.set_major_locator(ticker.MultipleLocator(1))

    plt.show()
    plt.close()
首先,我们将从训练集中获取一个示例。
example_idx = 8

src = vars(train_data.examples[example_idx])['src']
trg = vars(train_data.examples[example_idx])['trg']

print(f'src = {src}')
print(f'trg = {trg}')
src = ['eine', 'frau', 'mit', 'einer', 'großen', 'geldbörse', 'geht', 'an', 'einem', 'tor', 'vorbei', '.'] trg = ['a', 'woman', 'with', 'a', 'large', 'purse', 'is', 'walking', 'by', 'a', 'gate', '.']
我们的翻译看起来相当不错,尽管我们的模型更改是步行通过。意思还是一样的。
translation, attention = translate_sentence(src, SRC, TRG, model, device)

print(f'predicted trg = {translation}')
predicted trg = ['a', 'woman', 'with', 'a', 'large', 'purse', 'walks', 'by', 'a', 'gate', '.', '']
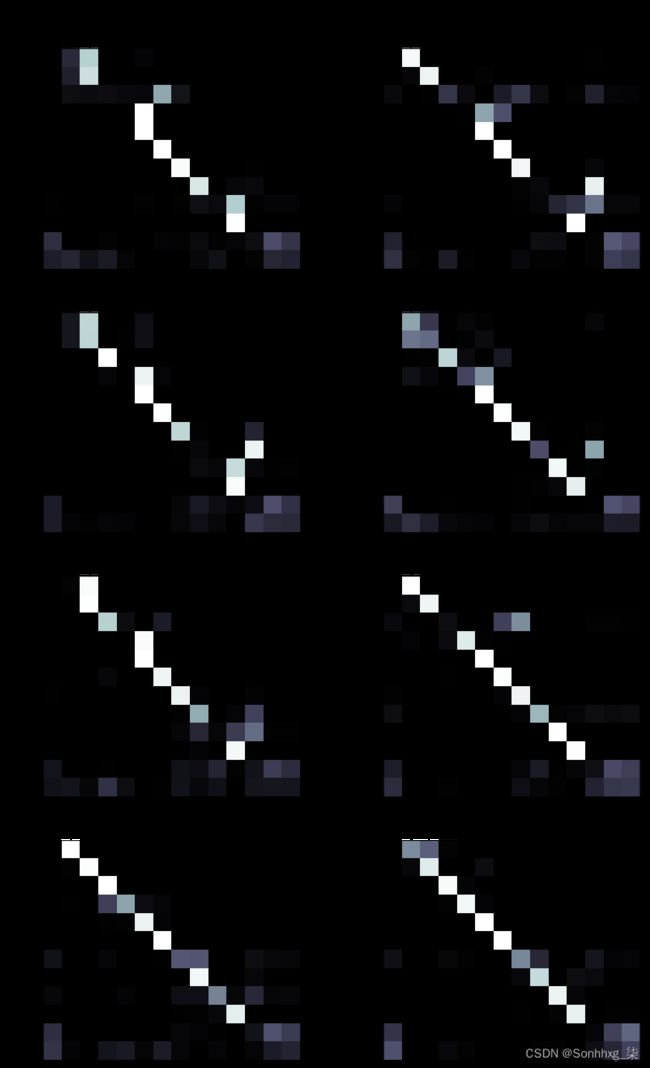
我们可以从下面的每个头部看到注意力。每个当然都是不同的,但很难(也许不可能)推理出头部实际上已经学会了注意什么。有些头在翻译“a”时会全神贯注“eine”,有些则根本不注意,有些则稍作关注。它们似乎都遵循类似的“向下楼梯”模式,输出最后两个令牌时的注意力平均分布在输入句子中的最后两个令牌上。
display_attention(src, translation, attention)接下来,让我们从验证集中获取模型尚未对其进行训练的示例。
example_idx = 6

src = vars(valid_data.examples[example_idx])['src']
trg = vars(valid_data.examples[example_idx])['trg']

print(f'src = {src}')
print(f'trg = {trg}')
src = ['ein', 'brauner', 'hund', 'rennt', 'dem', 'schwarzen', 'hund', 'hinterher', '.'] trg = ['a', 'brown', 'dog', 'is', 'running', 'after', 'the', 'black', 'dog', '.']
该模型通过切换“正在运行”将其转换为仅运行,但这是可接受的交换。
translation, attention = translate_sentence(src, SRC, TRG, model, device)

print(f'predicted trg = {translation}')
predicted trg = ['a', 'brown', 'dog', 'runs', 'after', 'the', 'black', 'dog', '.', '']
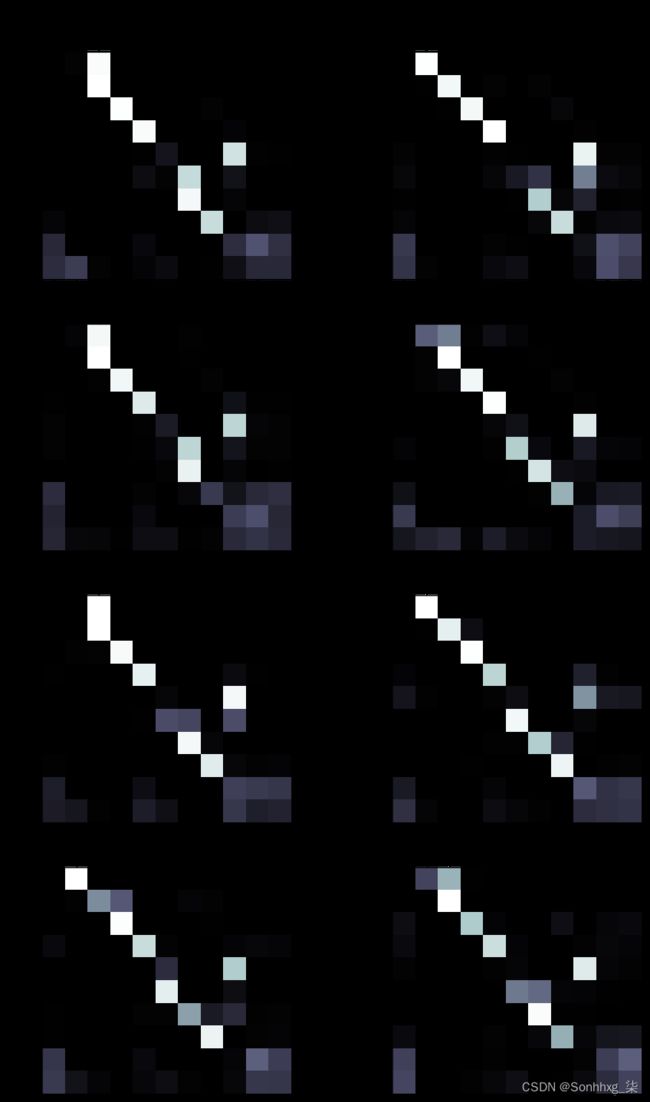
同样,有些人完全注意“ein”,而有些人则不注意它。同样,在输出预测目标句子中的句点和句号时,大多数头部似乎将注意力分散在
display_attention(src, translation, attention)最后,我们将从测试数据中看一个示例。
example_idx = 10

src = vars(test_data.examples[example_idx])['src']
trg = vars(test_data.examples[example_idx])['trg']

print(f'src = {src}')
print(f'trg = {trg}')
src = ['eine', 'mutter', 'und', 'ihr', 'kleiner', 'sohn', 'genießen', 'einen', 'schönen', 'tag', 'im', 'freien', '.'] trg = ['a', 'mother', 'and', 'her', 'young', 'song', 'enjoying', 'a', 'beautiful', 'day', 'outside', '.']
完美的翻译!
translation, attention = translate_sentence(src, SRC, TRG, model, device)

print(f'predicted trg = {translation}')
predicted trg = ['a', 'mother', 'and', 'her', 'young', 'son', 'enjoying', 'a', 'beautiful', 'day', 'outside', '.', '']
display_attention(src, translation, attention)BLEU
最后,我们计算Transformer的BLEU分数。
from torchtext.data.metrics import bleu_score

def calculate_bleu(data, src_field, trg_field, model, device, max_len = 50):

    trgs = []
    pred_trgs = []

    for datum in data:

        src = vars(datum)['src']
        trg = vars(datum)['trg']

        pred_trg, _ = translate_sentence(src, src_field, trg_field, model, device, max_len)

        #cut off  token
        pred_trg = pred_trg[:-1]

        pred_trgs.append(pred_trg)
        trgs.append([trg])

    return bleu_score(pred_trgs, trgs)
我们得到的BLEU分数为36.52,超过了卷积序列到序列模型的~34分和基于注意力的RNN模型的~28分。所有这一切都具有最少的参数和最快的训练时间!
bleu_score = calculate_bleu(test_data, SRC, TRG, model, device)

print(f'BLEU score = {bleu_score*100:.2f}')
BLEU score = 36.52
恭喜您完成了这些教程!我希望你觉得它们有用。
如果您发现任何错误或想对所使用的任何代码或解释提出任何问题,请随时提交GitHub问题,我会尽快纠正它。
def translate_sentence_vectorized(src_tensor, src_field, trg_field, model, device, max_len=50):
    assert isinstance(src_tensor, torch.Tensor)

    model.eval()
    src_mask = model.make_src_mask(src_tensor)

    with torch.no_grad():
        enc_src = model.encoder(src_tensor, src_mask)
    # enc_src = [batch_sz, src_len, hid_dim]

    trg_indexes = [[trg_field.vocab.stoi[trg_field.init_token]] for _ in range(len(src_tensor))]
    # Even though some examples might have been completed by producing a  token
    # we still need to feed them through the model because other are not yet finished
    # and all examples act as a batch. Once every single sentence prediction encounters
    #  token, then we can stop predicting.
    translations_done = [0] * len(src_tensor)
    for i in range(max_len):
        trg_tensor = torch.LongTensor(trg_indexes).to(device)
        trg_mask = model.make_trg_mask(trg_tensor)
        with torch.no_grad():
            output, attention = model.decoder(trg_tensor, enc_src, trg_mask, src_mask)
        pred_tokens = output.argmax(2)[:,-1]
        for i, pred_token_i in enumerate(pred_tokens):
            trg_indexes[i].append(pred_token_i)
            if pred_token_i == trg_field.vocab.stoi[trg_field.eos_token]:
                translations_done[i] = 1
        if all(translations_done):
            break

    # Iterate through each predicted example one by one;
    # Cut-off the portion including the after the  token
    pred_sentences = []
    for trg_sentence in trg_indexes:
        pred_sentence = []
        for i in range(1, len(trg_sentence)):
            if trg_sentence[i] == trg_field.vocab.stoi[trg_field.eos_token]:
                break
            pred_sentence.append(trg_field.vocab.itos[trg_sentence[i]])
        pred_sentences.append(pred_sentence)

    return pred_sentences, attention
from torchtext.data.metrics import bleu_score
def calculate_bleu_alt(iterator, src_field, trg_field, model, device, max_len = 50):
trgs = []
pred_trgs = []
with torch.no_grad():
for batch in iterator:
src = batch.src
trg = batch.trg
_trgs = []
for sentence in trg:
tmp = []
# Start from the first token which skips the token
for i in sentence[1:]:
# Targets are padded. So stop appending as soon as a padding or eos token is encountered
if i == trg_field.vocab.stoi[trg_field.eos_token] or i == trg_field.vocab.stoi[trg_field.pad_token]:
break
tmp.append(trg_field.vocab.itos[i])
_trgs.append([tmp])
trgs += _trgs
pred_trg, _ = translate_sentence_vectorized(src, src_field, trg_field, model, device)
pred_trgs += pred_trg
return pred_trgs, trgs, bleu_score(pred_trgs, trgs) 


