ssm整合流程(超级详细版保姆级别教程)
最近刚刚学完ssm框架整合,真正体会到了配置地狱的的感受!我们从mvc三层架构的思想入手,来一步一步搭建ssm的环境!
1、首先新建一个普通的maven项目,配置pom.xml文件:
<project xmlns="http://maven.apache.org/POM/4.0.0"
         xmlns:xsi="http://www.w3.org/2001/XMLSchema-instance"
         xsi:schemaLocation="http://maven.apache.org/POM/4.0.0 http://maven.apache.org/xsd/maven-4.0.0.xsd">
    <modelVersion>4.0.0modelVersion>

    <groupId>org.examplegroupId>
    <artifactId>SSMIntegartifactId>
    <version>1.0-SNAPSHOTversion>

    <properties>
        <maven.compiler.source>1.8maven.compiler.source>
        <maven.compiler.target>1.8maven.compiler.target>
    properties>

    <dependencies>

        <dependency>
            <groupId>junitgroupId>
            <artifactId>junitartifactId>
            <version>4.12version>
        dependency>

        <dependency>
            <groupId>mysqlgroupId>
            <artifactId>mysql-connector-javaartifactId>
            <version>8.0.27version>
        dependency>

        <dependency>
            <groupId>org.apache.tomcatgroupId>
            <artifactId>tomcat-catalinaartifactId>
            <version>9.0.62version>
        dependency>

        <dependency>
            <groupId>org.mybatisgroupId>
            <artifactId>mybatisartifactId>
            <version>3.5.2version>
        dependency>
        <dependency>
            <groupId>org.mybatisgroupId>
            <artifactId>mybatis-springartifactId>
            <version>2.0.2version>
        dependency>

        <dependency>
            <groupId>org.springframeworkgroupId>
            <artifactId>spring-webmvcartifactId>
            <version>5.1.9.RELEASEversion>
        dependency>
        <dependency>
            <groupId>org.springframeworkgroupId>
            <artifactId>spring-jdbcartifactId>
            <version>5.1.9.RELEASEversion>
        dependency>

        <dependency>
            <groupId>org.projectlombokgroupId>
            <artifactId>lombokartifactId>
            <version>1.18.12version>
        dependency>

        <dependency>
            <groupId>javax.servletgroupId>
            <artifactId>jstlartifactId>
            <version>1.2version>
        dependency>
    dependencies>

    <build>

        <resources>
            <resource>
                <directory>src/main/javadirectory>
                <includes>
                    <include>**/*.propertiesinclude>
                    <include>**/*.xmlinclude>
                includes>
                <filtering>falsefiltering>
            resource>
            <resource>
                <directory>src/main/resourcesdirectory>
                <includes>
                    <include>**/*.propertiesinclude>
                    <include>**/*.xmlinclude>
                includes>
                <filtering>falsefiltering>
            resource>
        resources>
    build>

project>
2、搭建包结构

3、准备数据库

4、数据库配置文件:
data.driver=com.mysql.cj.jdbc.Driver
data.url=jdbc:mysql://localhost:3306/datas?useSSL=true&useUnicode=true&characterEncoding=utf8
data.username=root
data.password=123123
5、配置实体类
import lombok.AllArgsConstructor;
import lombok.Data;
import lombok.NoArgsConstructor;

@Data
@AllArgsConstructor
@NoArgsConstructor
public class User {
    private String phone;
    private String ps;
}
6、配置mybatis主配置文件(由于我们要使用spring整合mybatis,所以只保留一个起别名的功能)
DOCTYPE configuration
        PUBLIC "-//mybatis.org//DTD Config 3.0//EN"
        "http://mybatis.org/dtd/mybatis-3-config.dtd">
<configuration>
    <typeAliases>
        <package name="com.qian.pojo"/>
    typeAliases>
configuration>
7、编写Usermapper接口
import com.qian.pojo.User;

import java.util.List;

public interface UserMapper {
    List<User> seleall();
}
8、编写UserMapper.xml文件
DOCTYPE mapper
        PUBLIC "-//mybatis.org//DTD Mapper 3.0//EN"
        "http://mybatis.org/dtd/mybatis-3-mapper.dtd">
<mapper namespace="com.qian.mapper.UserMapper">
    <select id="seleall" resultType="User">
        select * from userlog;
    select>
mapper>
9、编写spring-mapper文件(整合mybatis和spring)
<beans xmlns="http://www.springframework.org/schema/beans"
       xmlns:xsi="http://www.w3.org/2001/XMLSchema-instance"
       xmlns:context="http://www.springframework.org/schema/context"
       xsi:schemaLocation="http://www.springframework.org/schema/beans http://www.springframework.org/schema/beans/spring-beans.xsd http://www.springframework.org/schema/context https://www.springframework.org/schema/context/spring-context.xsd">


    <context:property-placeholder location="classpath:database.properties"/>


    <bean id="dataSource" class="org.springframework.jdbc.datasource.DriverManagerDataSource">
        <property name="driverClassName" value="${data.driver}"/>
        <property name="url" value="${data.url}"/>
        <property name="username" value="${data.username}"/>
        <property name="password" value="${data.password}"/>
    bean>


    <bean id="sessionFactory" class="org.mybatis.spring.SqlSessionFactoryBean">
        <property name="dataSource" ref="dataSource"/>
        <property name="configLocation" value="classpath:mybatis-config.xml"/>
    bean>


    <bean id="mapperScannerConfigurer" class="org.mybatis.spring.mapper.MapperScannerConfigurer">
        <property name="basePackage" value="com.qian.mapper"/>
    bean>

beans>
10、以上已经将mybatis和spring整合,现在我们来进行测试!
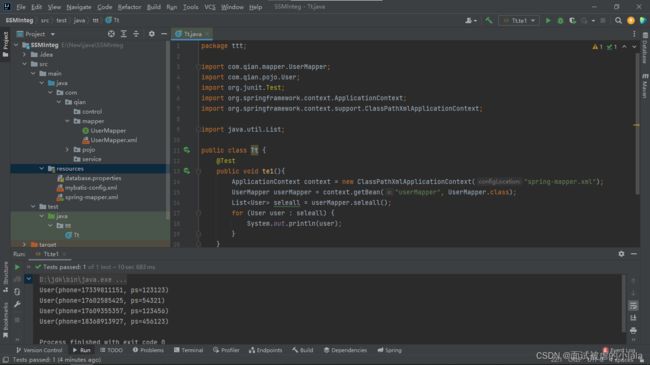
11、如果查出结果就进行springmvc的整合
12、更改项目类型并将依赖导入lib


13、编写service包下的接口及实现类(接口与mapper层的一样),实现类如下:
public class UserServiceImpl implements UserService{

    private UserMapper userMapper;

    public void setUserMapper(UserMapper userMapper) {
        this.userMapper = userMapper;
    }

    @Override
    public List<User> seleall() {
        return userMapper.seleall();
    }
}
14、编写service层的spring文件
<beans xmlns="http://www.springframework.org/schema/beans"
       xmlns:xsi="http://www.w3.org/2001/XMLSchema-instance"
       xmlns:context="http://www.springframework.org/schema/context"
       xsi:schemaLocation="http://www.springframework.org/schema/beans http://www.springframework.org/schema/beans/spring-beans.xsd http://www.springframework.org/schema/context https://www.springframework.org/schema/context/spring-context.xsd">

    <context:component-scan base-package="com.qian.service"/>

    <bean id="userServiceImpl" class="com.qian.service.UserServiceImpl">
        <property name="userMapper" ref="userMapper"/>
    bean>

    <bean class="org.springframework.jdbc.datasource.DataSourceTransactionManager">
        <property name="dataSource" ref="dataSource"/>
    bean>
beans>
15、配置spring-mvc配置文件
<beans xmlns="http://www.springframework.org/schema/beans"
       xmlns:xsi="http://www.w3.org/2001/XMLSchema-instance"
       xmlns:context="http://www.springframework.org/schema/context"
       xsi:schemaLocation="http://www.springframework.org/schema/beans http://www.springframework.org/schema/beans/spring-beans.xsd http://www.springframework.org/schema/context https://www.springframework.org/schema/context/spring-context.xsd">

    <context:component-scan base-package="com.qian.control"/>

    <bean class="org.springframework.web.servlet.view.InternalResourceViewResolver">
        <property name="prefix" value="/WEB-INF/jsp/"/>
        <property name="suffix" value=".jsp"/>
    bean>
beans>
16、编写控制类
import com.qian.pojo.User;
import com.qian.service.UserService;
import org.springframework.beans.factory.annotation.Autowired;
import org.springframework.beans.factory.annotation.Qualifier;
import org.springframework.stereotype.Controller;
import org.springframework.ui.Model;
import org.springframework.web.bind.annotation.RequestMapping;

import java.util.List;

@Controller
public class MyControl {
    @Autowired
    @Qualifier("userServiceImpl")
    private UserService userService;
    @RequestMapping("/one")
    public String t1(Model model){
        List<User> seleall = userService.seleall();
        model.addAttribute("list",seleall);
        return "tt";
    }
}
17、将spring文件整合到springConfig.xml中
<beans xmlns="http://www.springframework.org/schema/beans"
       xmlns:xsi="http://www.w3.org/2001/XMLSchema-instance"
       xsi:schemaLocation="http://www.springframework.org/schema/beans http://www.springframework.org/schema/beans/spring-beans.xsd">

    <import resource="classpath:spring-mapper.xml"/>
    <import resource="classpath:spring-service.xml"/>
    <import resource="classpath:spring-mvc.xml"/>
beans>
18、配置web.xml文件
<web-app xmlns="http://xmlns.jcp.org/xml/ns/javaee"
         xmlns:xsi="http://www.w3.org/2001/XMLSchema-instance"
         xsi:schemaLocation="http://xmlns.jcp.org/xml/ns/javaee http://xmlns.jcp.org/xml/ns/javaee/web-app_4_0.xsd"
         version="4.0">
    <servlet>
        <servlet-name>springservlet-name>
        <servlet-class>org.springframework.web.servlet.DispatcherServletservlet-class>
        <init-param>
            <param-name>contextConfigLocationparam-name>
            <param-value>classpath:springConfig.xmlparam-value>
        init-param>
    servlet>
    <servlet-mapping>
        <servlet-name>springservlet-name>
        <url-pattern>/url-pattern>
    servlet-mapping>
    <filter>
        <filter-name>charfilter-name>
        <filter-class>org.springframework.web.filter.CharacterEncodingFilterfilter-class>
        <init-param>
            <param-name>encodingparam-name>
            <param-value>UTF-8param-value>
        init-param>
        <init-param>
            <param-name>forceRequestEncodingparam-name>
            <param-value>trueparam-value>
        init-param>
        <init-param>
            <param-name>forceResponseEncodingparam-name>
            <param-value>trueparam-value>
        init-param>
    filter>
    <filter-mapping>
        <filter-name>charfilter-name>
        <url-pattern>/*url-pattern>
    filter-mapping>
web-app>
19、编写jsp文件
index.jsp
<%@ page contentType="text/html;charset=UTF-8" language="java" %>
<html>
  <head>
    <title>$Title$title>
  head>
  <body>
  <a href="${pageContext.request.contextPath}/one">测试a>
  body>
html>
tt.jsp
<%@ taglib prefix="c" uri="http://java.sun.com/jsp/jstl/core" %>
<%--
  Created by IntelliJ IDEA.
  User: QianSheng
  Date: 2022/4/23
  Time: 15:22
  To change this template use File | Settings | File Templates.
--%>
<%@ page contentType="text/html;charset=UTF-8" language="java" %>
<html>
<head>
    <title>Titletitle>
head>
<body>
<table>
    <tr>
        <td>手机号td>
        <td>密码td>
    tr>
    <c:forEach items="${list}" var="user">
        <tr>
            <td>${user.getPhone()}td>
            <td>${user.getPs()}td>
        tr>
    c:forEach>
table>
body>
html>
20、执行!结果如下:

ps:注意tomcat版本为9,如最后启动tomcat时失败,请再次执行12步