在Vue脚手架实现登录页面及跳转
一 编写登录页面
前提:全局安装element-ui
npm i element-ui -s并在main.js加上下段代码:
import ElementUI from 'element-ui'
import "element-ui/lib/theme-chalk/index.css";
Vue.use(ElementUI)
在views/login/login.vue页面添加如下代码
系统登录
登录
并在router/index.js引入login页面
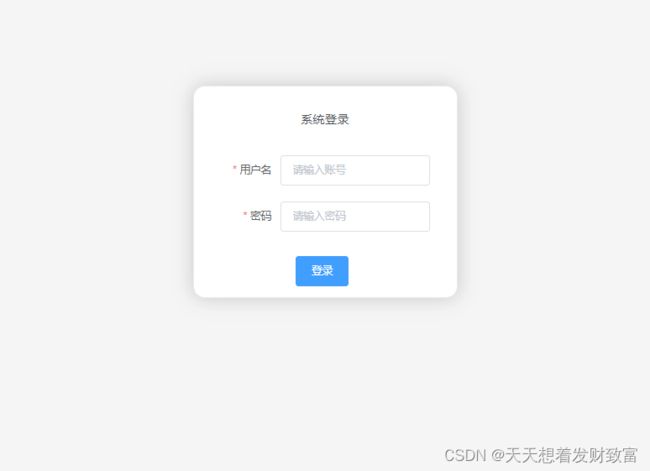
效果:
二 登录权限与导航守卫
(1)安装js-cookie:
npm i js-cookie(2)创立store文件夹
编写store/user.js页面
import Cookie from 'js-cookie'
export default{
    state:{
        token:''
    },
    mutations:{
//设置token
   setToken(state,val){
    state.token=val
    Cookie.set('token',val)
},
//清空token
clearToken(state){
  state.token=''
  Cookie.remove('token')
},
//获取token
getToken(state){
   state.token = state.token || Cookie.get('token')
}

    }
}
编写store/index.js页面:
import Vue from 'vue'
import Vuex from 'vuex'
import user from './user'
Vue.use(Vuex)
export default new Vuex.Store({
modules:{
    user
}
})
在main.js引入store并编写路由守卫
import Vue from 'vue'
import App from './App.vue'
import router from './router'
import "element-ui/lib/theme-chalk/index.css";
import store from "./store"
Vue.config.productionTip = false
router.beforeEach((to,from,next)=>{
//防止刷新时Cookie丢失
  store.commit('getToken')
  const token=store.state.user.token
  if(!token&&to.name!='login'){
   next({name:'login'})
  }else{
    next()
  }
})
new Vue({
  render: h => h(App),
  router:router,
  store,
}).$mount('#app')
在login页面引入mock(自行安装在main.js引入)并添加
import Mock from 'mockjs' methods:{
login(){
const taken=Mock.random.guid()
this.$store.commit('setToken',token)
this.$router.push({name:'home'})
}
}三 登录接口逻辑实现
在api/mockServerData/permission.js页面添加代码:
import Mock from 'mockjs'
export default {
  getMenu: config => {
 //接收username与password两个参数对应返回菜单数据
    const { username, password } = JSON.parse(config.body)
    // 先判断用户是否存在
    // 判断账号和密码是否对应
    if (username === 'admin' && password === 'admin') {
      return {
        code: 20000,
        data: {
          menu: [
            {
              path: '/home',
              name: 'home',
              label: '首页',
              icon: 's-home',
              url: 'home/index'
            },
            {
              path: '/mall',
              name: 'mall',
              label: '商品管理',
              icon: 'video-play',
              url: 'mall/index'
            },
            {
              path: '/user',
              name: 'user',
              label: '用户管理',
              icon: 'user',
              url: 'User/index'
            },
            {
              label: '其他',
              icon: 'location',
              children: [
                {
                  path: '/page1',
                  name: 'page1',
                  label: '页面1',
                  icon: 'setting',
                  url: 'other/pageOne.vue'
                },
                {
                  path: '/page2',
                  name: 'page2',
                  label: '页面2',
                  icon: 'setting',
                  url: 'other/pageTwo.vue'
                }
              ]
            }
          ],
          token: Mock.Random.guid(),
          message: '获取成功'
        }
      }
    } else if (username === 'xiaoxiao' && password === 'xiaoxiao') {
      return {
        code: 20000,
        data: {
          menu: [
            {
              path: '/',
              name: 'home',
              label: '首页',
              icon: 's-home',
              url: 'home/index'
            },
            {
              path: '/video',
              name: 'video',
              label: '商品管理',
              icon: 'video-play',
              url: 'mall/index'
            }
          ],
          token: Mock.Random.guid(),
          message: '获取成功'
        }
      }
    } else {
      return {
        code: -999,
        data: {
          message: '密码错误'
        }
      }
    }

  }
}
在mock.js定义getMenu的拦截器
import Mock from 'mockjs'
import permissionApi from './mockServerData/permission'
//          url地址        回调函数返回具体的数据
Mock.mock(/permission\/getMenu/,'post',permissionApi.getMenu)
定义api/config/index.js页面
export default{
    baseUrl:{
        dev:'/api/',//开发环境
        pro:'',//生产环境
    }
}
在api/axios.js对axios二次封装:
import axios from 'axios'
import config from '../config'

const baseUrl = process.env.NODE_ENV === 'development' ? config.baseUrl.dev : config.baseUrl.pro

class HttpRequest {
    constructor (baseUrl) {
        this.baseUrl = baseUrl
    }

    getInsideConfig() {
        const config = {
            baseUrl: this.baseUrl,
            header: {}
        }
        return config
    }
    interceptors (instance) {
        // 添加请求拦截器
        instance.interceptors.request.use(function (config) {
            // 在发送请求之前做些什么
            return config;
        }, function (error) {
            // 对请求错误做些什么
            return Promise.reject(error);
        });

        // 添加响应拦截器
        instance.interceptors.response.use(function (response) {
            // 对响应数据做点什么
            console.log(response)
            return response;
        }, function (error) {
            console.log(error, 'error')
            // 对响应错误做点什么
            return Promise.reject(error);
        });
    }
    request(options) {
        const instance =  axios.create()
        options = { ...this.getInsideConfig(), ...options }
        this.interceptors(instance)
        return instance(options)
    }
}

export default new HttpRequest(baseUrl)
在api/data.js定义接口请求
import axios from './axios'
export const getMenu=(param)=>{
    return axios.request({
        url:'/permission/getMenu',
        method:'post',
        data:param
    })
}
在login.vue引入接口
import {getMenu} from '../../../api/data.js'修改login.vue的login方法:
    methods:{
        login(){
            getMenu(this.form).then(({data:res})=>{
                if(res.code===20000){

                }else{
                    this.$message.warning(res.data.message)
                }
            })
              const taken=Mock.random.guid()
              this.$store.commit('setToken',token)
              this.$router.push({name:'home'})//进入主页
        }
    }
四 接口调用成功后菜单功能的实现
(1) 在router/tab.js页面输入代码:
import Cookie from 'js-cookie'
export default{
    state:{

        menu:[]

    },
    mutations:{
        setMenu(state,val){
            state.menu=val
           Cookie.set('menu',JSON.stringify(val))//将menu储存在cookie中避免刷新丢失数据
        },
        clearMenu(state){
            state.menu=[]
            Cookie.remove('menu')
        },
        addMenu(state,router){
            if(!Cookie.get('menu')){
                return
            }
            const menu=JSON.parse(Cookie.get('menu'))
            state.menu=menu
            const menuArray=[]
            menu.forEach(item=>{
                if(item.children){
                    item.children=item.children.map(item=>{
                        item.component=()=>import(`../views/${item.url}`)
                        return item
                    })
                     //当需要读取对象或数组中的元素或属性时,可以通过…来将其展开
                     menuArray.push(...item.children)
                }else{
                    item.component=()=>import(`../views/${item.url}`)
                    menuArray.push(item)
                }
            });
            //路由的动态添加
          menuArray.forEach(item=>{
            router.addRoute('Main',item)//将路由添加到Main的children,因为他是在Main页面上展示
          })
        }
    }
}
(2)在store/index.vue引入tab.js
import Vue from 'vue'
import Vuex from 'vuex'
import tab from './tab'
import user from './user'

Vue.use(Vuex)

export default new Vuex.Store({
    modules: {
        tab,
        user
    }
})
(3)补充完login页面的login方法
 methods:{
        login(){
            getMenu(this.form).then(({ data: res })=>{
                console.log(res,'res')
                if(res.code===20000){
                    this.$store.commit('clearMenu')
                    this.$store.commit('setMenu',res.data.menu)
                    this.$store.commit('setToken',res.data.token)
                     //动态添加路由
                    this.$store.commit('addMenu', this.$router)
                    //进行页面跳转
                    this.$router.push({ name: 'home' })

                }else{
                    this.$message.warning(res.data.message)
                }
            })
            //   const taken=Mock.random.guid()
            //   this.$store.commit('setToken',token)
            //   this.$router.push({name:'home'})
        }
    }
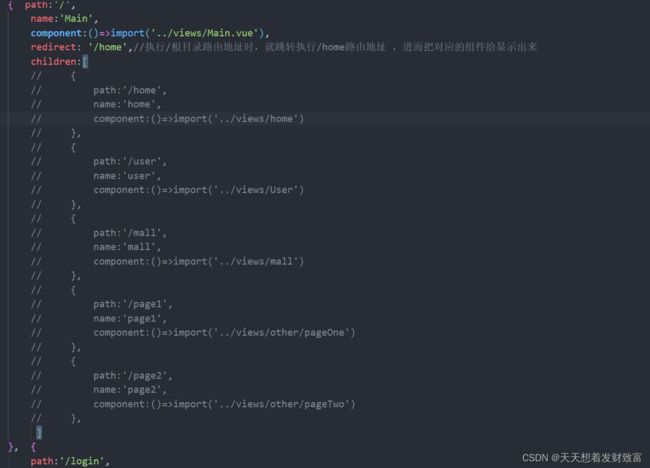
(4)注释掉router/index.vue中部分代码
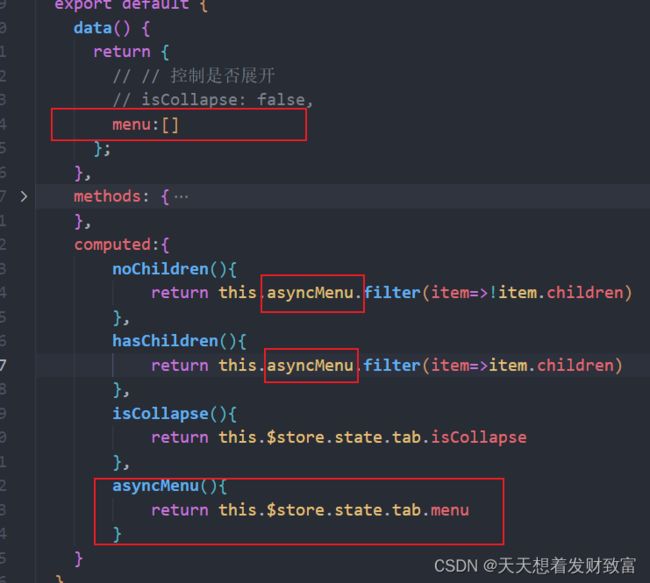
(5) 将commonAside页面的menu
运行时报了个错:addRoute不是一个函数
解决方法:
npm install [email protected]五 权限管理问题解决
(1) 刷新时出现页面白屏
原因:在页面刷新时没有进行动态路由设置
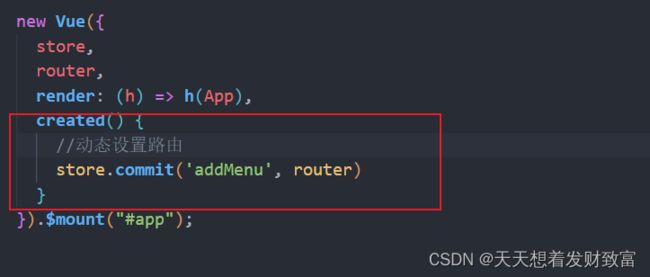
(2)当我们处于登录状态时不应访问到登录页
在main,js添加红框代码


