springboot新手项目从零开始搭建,涉及excel数据导出和邮箱发送(上)
项目创建
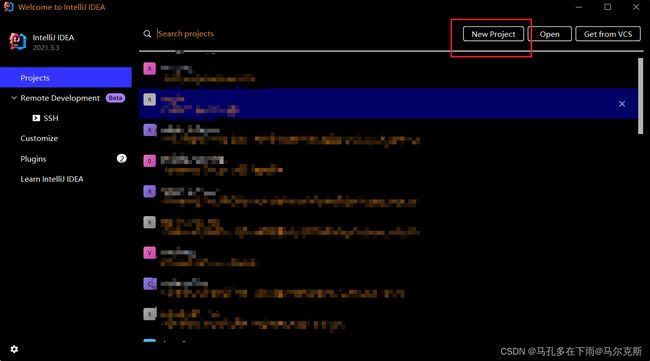
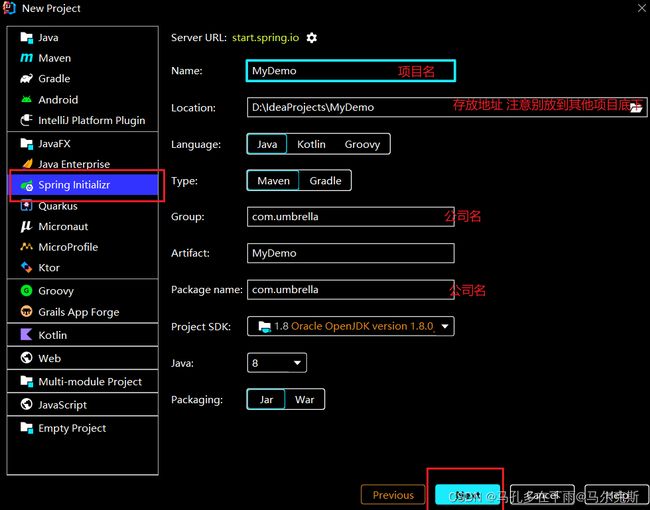
idea点击New Project 创建一个新项目
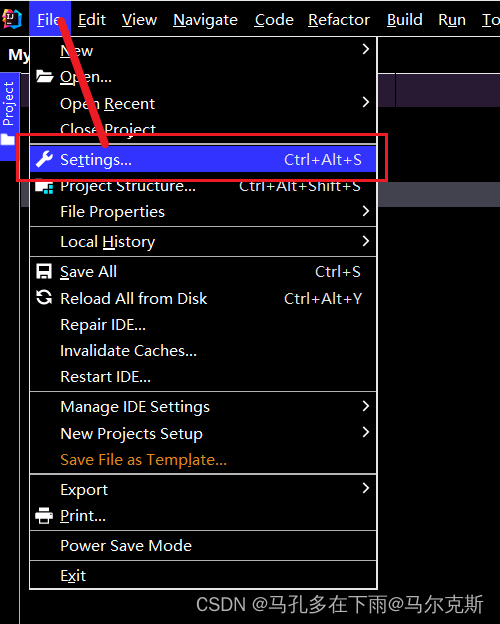
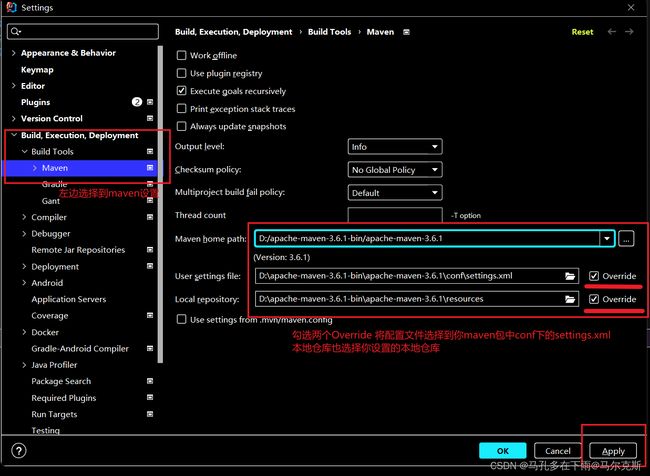
左上角打开点击File打开设置
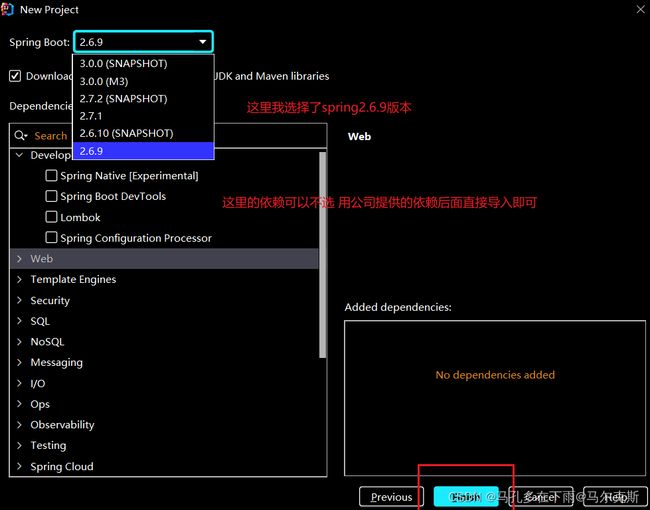
这样 我们的项目就创建完毕了
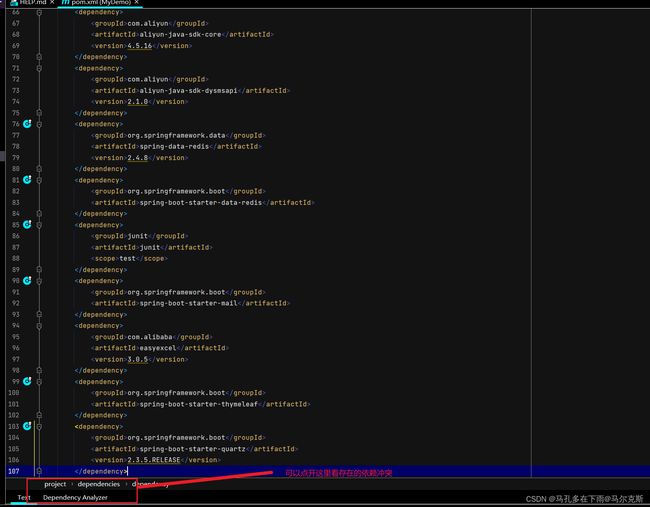
点开左边的pom文档 将提供的依赖导入
我之前就存在一个冲突 是easy excel 和spring版本的冲突
经过一天的排查, 我使用的easy excel 3.0.5 和spring 2.7.1 冲突 使用spring缓存数据会报如下错误
在将spring切换到 2.6.9 后正常 再次将spring切换成 2.7.1 后又莫名正常了 完全不知道是怎么回事所以在依赖处理上请不要自己乱修改依赖 用提供给你的依赖
接下来是配置我们的项目配置 如数据库的连接 spring的配置等等
idea默认提供的是properties文档 我们将其修改成yml即可
配置文件的设置
spring:     #多环境切换
  profiles:
    default: test  #指定当前使用的是test测试环境
---
spring:
  config:
    activate:
      on-profile: pro  #这是pro生产环境 即将项目部署到linux服务器上所使用的环境
  redis:               #redis缓存的配置
    host: localhost
    port: 6379
    password: 123456
    database: 0 #操作的是0号数据库
    jedis:
      #Redis连接池配置
      pool:
        max-active: 8 #最大连接数
        max-wait: 1ms #连接池最大阻塞等待时间
        max-idle: 4 #连接池中的最大空闲连接
        min-idle: 0 #连接池中的最小空闲连接


  mail:         #邮件系统的配置
    host: smtp.qq.com
    port: 587
    username: 填写你要发送邮件的邮箱
    password: 开启POP3/SMTP后获得的授权码
    default-encoding: UTF-8
    properties:
      mail:
        smtp:
          socketFactoryClass: javax.net.ssl.SSLSocketFactory
        debug: true
  application:
    #应用名称 , 可选
    name: umbrella
  datasource:                 #数据库连接 使用druid
    druid:
      driver-class-name: com.mysql.cj.jdbc.Driver
      url: jdbc:mysql://localhost:3306/umbrella?serverTimezone=Asia/Shanghai&useUnicode=true&characterEncoding=utf-8&zeroDateTimeBehavior=convertToNull&useSSL=false&allowPublicKeyRetrieval=true
      username: root
      password: root
server:                       #服务器运行的端口号
  port: 80
umbrella:                       #图片资源的缓存路径
  path: /usr/local/app/img/
---
spring:
  config:
    activate:
      on-profile: test
  redis:
    host: localhost
    port: 6379
    #password: 123456
    database: 0 #操作的是0号数据库
    time-to-live: 1800000   #设置缓存过期时间,可选
    jedis:
      #Redis连接池配置
      pool:
        max-active: 8 #最大连接数
        max-wait: 1ms #连接池最大阻塞等待时间
        max-idle: 4 #连接池中的最大空闲连接
        min-idle: 0 #连接池中的最小空闲连接
  mail:
    host: smtp.qq.com
    port: 587
    username:
    password:
    default-encoding: UTF-8
    properties:
      mail:
        smtp:
          socketFactoryClass: javax.net.ssl.SSLSocketFactory
        debug: true
  application:
    #应用名称 , 可选
    name: umbrella
  datasource:
    druid:
      driver-class-name: com.mysql.cj.jdbc.Driver
      url: jdbc:mysql://localhost:3306/umbrella?serverTimezone=Asia/Shanghai&useUnicode=true&characterEncoding=utf-8&zeroDateTimeBehavior=convertToNull&useSSL=false&allowPublicKeyRetrieval=true
      username: root
      password: 1234
server:
  port: 8080
umbrella:
  path: C:/Users/remedios/Desktop/Test/img/
---
#底下这里是公共全局配置 所有配置共享的内容
mybatis-plus:
  configuration:
    #在映射实体或者属性时,将数据库中表名和字段名中的下划线去掉,按照驼峰命名法映射 address_book ---> AddressBook
    map-underscore-to-camel-case: true
    #日志输出
#   log-impl: org.apache.ibatis.logging.stdout.StdOutImpl
  global-config:
    db-config:
      id-type: ASSIGN_ID   #设置类的id使用mybatis-plus的雪花算法生成
      logic-delete-field: isDeleted  #设置逻辑删除
      logic-not-delete-value: 0
      logic-delete-value: 1
这样我们就简单配置了一个由test和pro两种环境组成的配置文件
接着将前端的资源导入到resources包底下
这样,基本的环境搭建就算是完成了 接下来就是设置各种配置类
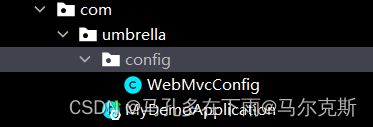
创建一个config包 存放配置类
创建配置类WebMvcConfig,设置静态资源映射
用于在Springboot项目中, 默认静态资源的存放目录为 : "classpath:/resources/", "classpath:/static/", "classpath:/public/" ; 而在我们的项目中静态资源存放在 backend, front 目录中, 那么这个时候要想访问到静态资源, 就需要设置静态资源映射。
package com.umbrella.config;
import lombok.extern.slf4j.Slf4j;
import org.springframework.context.annotation.Configuration;
import org.springframework.web.servlet.config.annotation.ResourceHandlerRegistry;
import org.springframework.web.servlet.config.annotation.WebMvcConfigurationSupport;

@Slf4j
@Configuration
public class WebMvcConfig extends WebMvcConfigurationSupport {
    /**
     * 设置静态资源映射
     * @param registry
     */
    @Override
    protected void addResourceHandlers(ResourceHandlerRegistry registry) {
        log.info("开始进行静态资源映射...");
        registry.addResourceHandler("/backend/**").addResourceLocations("classpath:/backend/");
        registry.addResourceHandler("/front/**").addResourceLocations("classpath:/front/");
    }
}
设置返回给前端的json数据序列化及反序列化时, LocalDateTime、LocalDate、LocalTime的处理方式, 以及BigInteger及Long类型数据,将其直接转换为字符串 确保其精度不会损失
在config下添加JacksonObjectMapper类
import com.fasterxml.jackson.databind.DeserializationFeature;
import com.fasterxml.jackson.databind.ObjectMapper;
import com.fasterxml.jackson.databind.module.SimpleModule;
import com.fasterxml.jackson.databind.ser.std.ToStringSerializer;
import com.fasterxml.jackson.datatype.jsr310.deser.LocalDateDeserializer;
import com.fasterxml.jackson.datatype.jsr310.deser.LocalDateTimeDeserializer;
import com.fasterxml.jackson.datatype.jsr310.deser.LocalTimeDeserializer;
import com.fasterxml.jackson.datatype.jsr310.ser.LocalDateSerializer;
import com.fasterxml.jackson.datatype.jsr310.ser.LocalDateTimeSerializer;
import com.fasterxml.jackson.datatype.jsr310.ser.LocalTimeSerializer;
import java.math.BigInteger;
import java.time.LocalDate;
import java.time.LocalDateTime;
import java.time.LocalTime;
import java.time.format.DateTimeFormatter;
import static com.fasterxml.jackson.databind.DeserializationFeature.FAIL_ON_UNKNOWN_PROPERTIES;

/**
 * 对象映射器:基于jackson将Java对象转为json,或者将json转为Java对象
 * 将JSON解析为Java对象的过程称为 [从JSON反序列化Java对象]
 * 从Java对象生成JSON的过程称为 [序列化Java对象到JSON]
 */
public class JacksonObjectMapper extends ObjectMapper {
    public static final String DEFAULT_DATE_FORMAT = "yyyy-MM-dd";
    public static final String DEFAULT_DATE_TIME_FORMAT = "yyyy-MM-dd HH:mm:ss";
    public static final String DEFAULT_TIME_FORMAT = "HH:mm:ss";
    public JacksonObjectMapper() {
        super();
        //收到未知属性时不报异常
        this.configure(FAIL_ON_UNKNOWN_PROPERTIES, false);
        //反序列化时,属性不存在的兼容处理
        this.getDeserializationConfig().withoutFeatures(DeserializationFeature.FAIL_ON_UNKNOWN_PROPERTIES);

        SimpleModule simpleModule = new SimpleModule()
                .addDeserializer(LocalDateTime.class, new LocalDateTimeDeserializer(DateTimeFormatter.ofPattern(DEFAULT_DATE_TIME_FORMAT)))
                .addDeserializer(LocalDate.class, new LocalDateDeserializer(DateTimeFormatter.ofPattern(DEFAULT_DATE_FORMAT)))
                .addDeserializer(LocalTime.class, new LocalTimeDeserializer(DateTimeFormatter.ofPattern(DEFAULT_TIME_FORMAT)))

                .addSerializer(BigInteger.class, ToStringSerializer.instance)
                .addSerializer(Long.class, ToStringSerializer.instance)

                .addSerializer(LocalDateTime.class, new LocalDateTimeSerializer(DateTimeFormatter.ofPattern(DEFAULT_DATE_TIME_FORMAT)))
                .addSerializer(LocalDate.class, new LocalDateSerializer(DateTimeFormatter.ofPattern(DEFAULT_DATE_FORMAT)))
                .addSerializer(LocalTime.class, new LocalTimeSerializer(DateTimeFormatter.ofPattern(DEFAULT_TIME_FORMAT)));
        //注册功能模块 例如,可以添加自定义序列化器和反序列化器
        this.registerModule(simpleModule);
    }
}修改WebMvcConfig 类
/**
 * 扩展mvc框架的消息转换器
 * @param converters
 */
@Override
protected void extendMessageConverters(List> converters) {
    log.info("扩展消息转换器...");
    //创建消息转换器对象
    MappingJackson2HttpMessageConverter messageConverter = new MappingJackson2HttpMessageConverter();
    //设置对象转换器,底层使用Jackson将Java对象转为json
    messageConverter.setObjectMapper(new JacksonObjectMapper());
    //将上面的消息转换器对象追加到mvc框架的转换器集合中
    converters.add(0,messageConverter);
}
这样 我们返回给前端的字段就不会出现精度损失问题了
公共字段自动填充
Mybatis Plus公共字段自动填充,也就是在插入或者更新的时候为指定字段赋予指定的值,使用它的好处就是可以统一对这些字段进行处理,避免了重复代码。在上述的问题分析中,我们提到有四个公共字段,需要在新增/更新中进行赋值操作, 具体情况如下:
| 字段名 | 赋值时机 | 说明 |
|---|---|---|
| createTime | 插入(INSERT) | 当前时间 |
| updateTime | 插入(INSERT) , 更新(UPDATE) | 当前时间 |
| createUser | 插入(INSERT) | 当前登录用户ID |
| updateUser | 插入(INSERT) , 更新(UPDATE) | 当前登录用户ID |
实现步骤:
1、在实体类的属性上加入@TableField注解,指定自动填充的策略。
2、按照框架要求编写元数据对象处理器,在此类中统一为公共字段赋值,此类需要实现MetaObjectHandler接口。
创建一个MyMetaObjecthandler类
import com.baomidou.mybatisplus.core.handlers.MetaObjectHandler;
import lombok.extern.slf4j.Slf4j;
import org.apache.ibatis.reflection.MetaObject;
import org.springframework.stereotype.Component;
import java.time.LocalDateTime;

/**
 * 自定义元数据对象处理器
 */
@Component
@Slf4j
public class MyMetaObjecthandler implements MetaObjectHandler {
    /**
     * 插入操作,自动填充
     * @param metaObject
     */
    @Override
    public void insertFill(MetaObject metaObject) {
        log.info("公共字段自动填充[insert]...");
        log.info(metaObject.toString());

        metaObject.setValue("createTime", LocalDateTime.now());
        metaObject.setValue("updateTime",LocalDateTime.now());

    }

    /**
     * 更新操作,自动填充
     * @param metaObject
     */
    @Override
    public void updateFill(MetaObject metaObject) {
        log.info("公共字段自动填充[update]...");
        log.info(metaObject.toString());

        metaObject.setValue("updateTime",LocalDateTime.now());
    }
}
文件上传下载功能
创建一个CommonController
编写文件上传的方法, 通过MultipartFile类型的参数即可接收上传的文件, 方法形参的名称需要与页面的file域的name属性一致。
上传逻辑:
1). 获取文件的原始文件名, 通过原始文件名获取文件后缀
2). 通过UUID重新声明文件名, 文件名称重复造成文件覆盖
3). 创建文件存放目录
4). 将上传的临时文件转存到指定位置
import com.itheima.reggie.common.R;
import lombok.extern.slf4j.Slf4j;
import org.springframework.beans.factory.annotation.Value;
import org.springframework.web.bind.annotation.*;
import org.springframework.web.multipart.MultipartFile;
import java.io.File;
import java.util.UUID;

/**
 * 文件上传和下载
 */
@RestController
@RequestMapping("/common")
@Slf4j
public class CommonController {
    @Value("${reggie.path}")
    private String basePath;
    /**
     * 文件上传
     * @param file
     * @return
     */
    @PostMapping("/upload")
    public R upload(MultipartFile file){
        //file是一个临时文件,需要转存到指定位置,否则本次请求完成后临时文件会删除
        log.info(file.toString());

        //原始文件名
        String originalFilename = file.getOriginalFilename();//abc.jpg
        String suffix = originalFilename.substring(originalFilename.lastIndexOf("."));

        //使用UUID重新生成文件名,防止文件名称重复造成文件覆盖
        String fileName = UUID.randomUUID().toString() + suffix;//dfsdfdfd.jpg

        //创建一个目录对象
        File dir = new File(basePath);
        //判断当前目录是否存在
        if(!dir.exists()){
            //目录不存在,需要创建
            dir.mkdirs();
        }

        try {
            //将临时文件转存到指定位置
            file.transferTo(new File(basePath + fileName));
        } catch (IOException e) {
            e.printStackTrace();
        }
        return R.success(fileName);
    }
}
下载实现
在 CommonController 中定义方法download,并接收页面传递的参数name,然后读取图片文件的数据,然后以流的形式写回浏览器。
具体逻辑如下:
1). 定义输入流,通过输入流读取文件内容
2). 通过response对象,获取到输出流
3). 通过response对象设置响应数据格式(image/jpeg)
4). 通过输入流读取文件数据,然后通过上述的输出流写回浏览器
5). 关闭资源
/**
 * 文件下载
 * @param name
 * @param response
 */
@GetMapping("/download")
public void download(String name, HttpServletResponse response){
    try {
        //输入流,通过输入流读取文件内容
        FileInputStream fileInputStream = new FileInputStream(new File(basePath + name));

        //输出流,通过输出流将文件写回浏览器
        ServletOutputStream outputStream = response.getOutputStream();

        response.setContentType("image/jpeg");

        int len = 0;
        byte[] bytes = new byte[1024];
        while ((len = fileInputStream.read(bytes)) != -1){
            outputStream.write(bytes,0,len);
            outputStream.flush();
        }

        //关闭资源
        outputStream.close();
        fileInputStream.close();
    } catch (Exception e) {
        e.printStackTrace();
    }
}
数据缓存 SpringCache
这里有个大坑,spring的cache在2.7.1版本似乎和easyexcel3.0.5出现了冲突 花费我整整一天都没能找到原因 只能将spring的版本降级到了2.6.9 这时候就兼容了 然后我再次将spring的版本切换到2.7.1 也兼容了 不知道什么原因
Spring Cache是一个框架,实现了基于注解的缓存功能,只需要简单地加一个注解,就能实现缓存功能,大大简化我们在业务中操作缓存的代码。
Spring Cache只是提供了一层抽象,底层可以切换不同的cache实现。具体就是通过CacheManager接口来统一不同的缓存技术。CacheManager是Spring提供的各种缓存技术抽象接口。
针对不同的缓存技术需要实现不同的CacheManager:
| CacheManager | 描述 |
|---|---|
| EhCacheCacheManager | 使用EhCache作为缓存技术 |
| GuavaCacheManager | 使用Google的GuavaCache作为缓存技术 |
| RedisCacheManager | 使用Redis作为缓存技术 |
4.2 注解
在SpringCache中提供了很多缓存操作的注解,常见的是以下的几个:
| 注解 | 说明 |
|---|---|
| @EnableCaching | 开启缓存注解功能 |
| @Cacheable | 在方法执行前spring先查看缓存中是否有数据,如果有数据,则直接返回缓存数据;若没有数据,调用方法并将方法返回值放到缓存中 |
| @CachePut | 将方法的返回值放到缓存中 |
| @CacheEvict | 将一条或多条数据从缓存中删除 |
在spring boot项目中,使用缓存技术只需在项目中导入相关缓存技术的依赖包,并在启动类上使用@EnableCaching开启缓存支持即可。
例如,使用Redis作为缓存技术,只需要导入Spring data Redis的maven坐标即可。
引导类上加@EnableCaching
@CachePut注解
@CachePut 说明:
作用: 将方法返回值,放入缓存
value: 缓存的名称, 每个缓存名称下面可以有很多key
key: 缓存的key ----------> 支持Spring的表达式语言SPEL语法
@CacheEvict注解
@CacheEvict 说明:
作用: 清理指定缓存
value: 缓存的名称,每个缓存名称下面可以有多个key
key: 缓存的key ----------> 支持Spring的表达式语言SPEL语法
@Cacheable注解
@Cacheable 说明:
作用: 在方法执行前,spring先查看缓存中是否有数据,如果有数据,则直接返回缓存数据;若没有数据,调用方法并将方法返回值放到缓存中
value: 缓存的名称,每个缓存名称下面可以有多个key
key: 缓存的key ----------> 支持Spring的表达式语言SPEL语法
缓存非null值
在@Cacheable注解中,提供了两个属性分别为: condition, unless 。
condition : 表示满足什么条件, 再进行缓存 ;
unless : 表示满足条件则不缓存 ; 与上述的condition是反向的
@Cacheable 会将方法的返回值缓存在Redis中,而在Redis中存储对象,该对象是需要被序列化的,而对象要想被成功的序列化,就必须得实现 Serializable 接口。
集成Redis
在使用上述默认的ConcurrentHashMap做缓存时,服务重启之后,之前缓存的数据就全部丢失了,操作起来并不友好。在项目中使用,我们会选择使用redis来做缓存,主要需要操作以下几步:
1). pom.xml
    org.springframework.boot
    spring-boot-starter-cache


    org.springframework.boot
    spring-boot-starter-data-redis
2). application.yml
spring:
  redis:
    host: localhost
    port: 6379
    password: 123456
    database: 0
  cache:
    redis:
      time-to-live: 1800000   #设置缓存过期时间,可选
至此 我们基本的配置就整完了 接下来就是git的基本使用 和如何实现邮件发送以及数据导出excel
