ssm框架整合(尚硅谷)
SSM—CRUD
一、项目介绍:
二、环境搭建
三、普通分页查询
四、优化Ajax分页查询
五、新增员工
六、修改员工
七、删除员工
八、条件查询

使用SSM框架搭建出一套简单的CRUD项目示例,包括分页查询、Ajax请求、数据校验等。

功能点
- 分页查询
- 数据校验:JQuery前端校验+JSR-303后端校验
- Ajax请求
- REST风格的URI:GET查询、POST新增、DELETE删除、PUT修改
技术点
- 基础框架-SSM(Spring+SpringMVC+Mybatis)
- 数据库-MySQL
- 前端框架-Bootstrap
- 依赖管理-Maven
- 分页查询-PageHelper
- 逆向工程-Mybatis Generator
相关配置文件的创建请见SSM整合配置模板,这里主要写下不同的地方。
1. 准备数据库ssm_crud
创建数据库ssm_crud,然后创建员工表tb_emp和部门表tb_dept,并插入一些数据。
tb_emp表:
[外链图片转存失败,源站可能有防盗链机制,建议将图片保存下来直接上传(img-kJvXVLSR-1657276618652)(https://secure2.wostatic.cn/static/3sSncx5bFnuYMvw86MiKfd/image.png)]
tb_dept表:
[外链图片转存失败,源站可能有防盗链机制,建议将图片保存下来直接上传(img-BgI6y0Ip-1657276618653)(https://secure2.wostatic.cn/static/9j1UJNrusqh9WK7bXVGPdN/image.png)]
2. 使用MBG自动生成mapper代码
使用MBG自动生成mapper代码(具体用法详见MBG (Mybatis Generator) ),配置文件如下:
DOCTYPE generatorConfiguration
        PUBLIC "-//mybatis.org//DTD MyBatis Generator Configuration 1.0//EN"
        "http://mybatis.org/dtd/mybatis-generator-config_1_0.dtd">

<generatorConfiguration>


    <context id="MyGenerator" targetRuntime="Mybatis3" defaultModelType="flat">

        <property name="autoDelimitKeywords" value="true"/>

        <property name="beginningDelimiter" value="`"/>

        <property name="endingDelimiter" value="`"/>

        <property name="javaFileEncoding" value="UTF-8"/>

        <property name="javaFormatter" value="org.mybatis.generator.api.dom.DefaultJavaFormatter"/>

        <property name="xmlFormatter" value="org.mybatis.generator.api.dom.DefaultXmlFormatter"/>


        <plugin type="org.mybatis.generator.plugins.UnmergeableXmlMappersPlugin"/>


        <plugin type="org.mybatis.generator.plugins.SerializablePlugin"/>

        <plugin type="org.mybatis.generator.plugins.ToStringPlugin"/>


        <commentGenerator>

            <property name="suppressAllComments" value="true"/>

            <property name="suppressDate" value="true"/>


        commentGenerator>


        <jdbcConnection driverClass="com.mysql.cj.jdbc.Driver"
                        connectionURL="jdbc:mysql://localhost:3306/ssm_crud?useUnicode=true&characterEncoding=utf8&serverTimezone=GMT%2B8"
                        userId="root"
                        password="mysql123">

            <property name="nullCatalogMeansCurrent" value="true"/>
        jdbcConnection>


        <javaTypeResolver>

            <property name="forceBigDecimals" value="false"/>

            <property name="useJSR310Types" value="false"/>
        javaTypeResolver>


        <javaModelGenerator targetPackage="pers.oneice.ssm.crud.pojo" targetProject="src/main/java">

            <property name="enableSubPackages" value="true"/>

            <property name="constructorBased" value="true"/>

            <property name="trimStrings" value="false"/>

            <property name="immutable" value="false"/>


        javaModelGenerator>


        <sqlMapGenerator targetPackage="mapper" targetProject="src/main/resources">
            <property name="enableSubPackages" value="true"/>
        sqlMapGenerator>


        <javaClientGenerator type="XMLMAPPER" targetPackage="pers.oneice.ssm.crud.dao" targetProject="src/main/java">
            <property name="enableSubPackages" value="true"/>
        javaClientGenerator>


        <table tableName="tb_dept" domainObjectName="Department">

            <generatedKey column="dept_id" identity="true" type="post" sqlStatement="MySql"/>


        table>

        <table tableName="tb_emp" domainObjectName="Employee">

            <generatedKey column="emp_id" identity="true" type="post" sqlStatement="MySql"/>

            <columnOverride property="gender" column="gender" javaType="java.lang.Integer"
                            jdbcType="TINYINT"/>
        table>

    context>

generatorConfiguration>
MBG自动生成的POJO并不完美,所以还需要我们手动完善一下,补充添加下面高亮的代码。
public class Employee implements Serializable {
    private Integer empId;

    private String empName;

    private Integer gender;

    private String email;

    private Integer dId;
    private Department department;

    private static final long serialVersionUID = 1L;

    public Employee() {
    }

    public Employee(Integer empId, String empName, Integer gender, String email, Integer dId) {
        this.empId = empId;
        this.empName = empName;
        this.gender = gender;
        this.email = email;
        this.dId = dId;
    }
public class Department implements Serializable {
    private Integer deptId;

    private String deptName;

    private static final long serialVersionUID = 1L;

    public Department() {
    }

    public Department(Integer deptId, String deptName) {
        this.deptId = deptId;
        this.deptName = deptName;
    }
为DepartmentMapper.xml和EmployeeMapper.xml添加全局缓存:
[外链图片转存失败,源站可能有防盗链机制,建议将图片保存下来直接上传(img-zIlklLVp-1657276618654)(https://secure2.wostatic.cn/static/skyppUD1CbYmEBb38ZoLRG/image.png)]
[外链图片转存失败,源站可能有防盗链机制,建议将图片保存下来直接上传(img-tg5Rbkwr-1657276618655)(https://secure2.wostatic.cn/static/6r4Wf7wJej9bT4w3HTJVR/image.png)]
3. 编写自定义mapper代码
MBG生成的mapper代码不包含关联查询,所以我还们需要编写一些关联查询的代码。为了尽量不破坏MBG生成的代码,这里采用继承mapper接口的方式进行拓展。
部门表相关:
@Resource
public interface DepartmentMapperExt extends DepartmentMapper {

}
员工表相关:
@Resource
public interface EmployeeMapperExt extends EmployeeMapper {

    /** 查询满足example条件的员工, 包括所属部门信息 */
    List<Employee> queryByExampleWithDept(EmployeeExample example);

    /** 根据员工id查询员工, 包括所属部门信息 */
    Employee queryByIdWithDept(int empId);
}
<?xml version="1.0" encoding="UTF-8" ?>
<!DOCTYPE mapper PUBLIC "-//mybatis.org//DTD Mapper 3.0//EN" "http://mybatis.org/dtd/mybatis-3-mapper.dtd" >
<mapper namespace="pers.oneice.ssm.crud.dao.EmployeeMapperExt">
    <cache-ref namespace="pers.oneice.ssm.crud.dao.EmployeeMapper"/>

    <!-- Employee的结果映射, 包括对内部的department属性的映射 -->
    <resultMap id="EmpResultMapWithDept" type="pers.oneice.ssm.crud.pojo.Employee"
               extends="pers.oneice.ssm.crud.dao.EmployeeMapper.BaseResultMap">
        <association property="department" resultMap="pers.oneice.ssm.crud.dao.DepartmentMapper.BaseResultMap"/>
    </resultMap>
    <!-- tb_emp表连接查询tb_dept表时, 要展示的字段列表 -->
    <sql id="Emp_With_Dept_Column_list">
        e.emp_id,
        e.emp_name,
        e.gender,
        e.email,
        e.d_id,
        d.dept_id,
        d.dept_name
    </sql>
    <!-- tb_emp表的where子句条件 -->
    <sql id="Example_Where_Clause">
        <where>
            <foreach collection="oredCriteria" item="criteria" separator="or">
                <if test="criteria.valid">
                    <trim prefix="(" prefixOverrides="and" suffix=")">
                        <foreach collection="criteria.criteria" item="criterion">
                            <choose>
                                <when test="criterion.noValue">
                                    and ${criterion.condition}
                                </when>
                                <when test="criterion.singleValue">
                                    and ${criterion.condition} #{criterion.value}
                                </when>
                                <when test="criterion.betweenValue">
                                    and ${criterion.condition} #{criterion.value} and #{criterion.secondValue}
                                </when>
                                <when test="criterion.listValue">
                                    and ${criterion.condition}
                                    <foreach close=")" collection="criterion.value" item="listItem" open="("
                                             separator=",">
                                        #{listItem}
                                    </foreach>
                                </when>
                            </choose>
                        </foreach>
                    </trim>
                </if>
            </foreach>
        </where>
    </sql>

    <select id="queryByExampleWithDept" parameterType="pers.oneice.ssm.crud.pojo.EmployeeExample"
            resultMap="EmpResultMapWithDept">
        select
        <if test="distinct">
            distinct
        </if>
        <include refid="Emp_With_Dept_Column_list"/>
        from tb_emp e
                     left join tb_dept d on e.d_id = d.dept_id
        <if test="_parameter != null">
            <include refid="Example_Where_Clause"/>
        </if>
        <if test="orderByClause != null">
            order by ${orderByClause}
        </if>
    </select>

    <select id="queryByIdWithDept" parameterType="java.lang.Integer" resultMap="EmpResultMapWithDept">
        select
        <include refid="Emp_With_Dept_Column_list"/>
        from tb_emp e
                     left join tb_dept d on e.d_id = d.dept_id
        where emp_id = #{empId,jdbcType=INTEGER}
    </select>
</mapper>
4. 在list.jsp页面中引入Bootstrap框架
基本上所有页面都需要引入Booststrap框架、Jquery库等,考虑将它们抽取到一个公共页面中,然后在需要的页面中使用jsp:include元素引入即可。
抽取页眉header.jsp:
<%@ page contentType="text/html; charset=UTF-8" pageEncoding="UTF-8" %>

<meta charset="utf-8">

<meta http-equiv="X-UA-Compatible" content="IE=edge">

<meta name="viewport" content="width=device-width, initial-scale=1">


<link href="https://cdn.staticfile.org/twitter-bootstrap/3.3.7/css/bootstrap.min.css" rel="stylesheet">


<script src="https://cdn.staticfile.org/jquery/2.1.1/jquery.min.js">script>


<script src="https://cdn.staticfile.org/twitter-bootstrap/3.3.7/js/bootstrap.min.js">script>

<%
    request.setAttribute("APP_PATH", request.getContextPath());
%>
抽取页脚footer.jsp:
<%@ page contentType="text/html; charset=UTF-8" pageEncoding="UTF-8" %>
在list.jsp页面中引入:
<%@ taglib prefix="c" uri="http://java.sun.com/jsp/jstl/core" %>
<%@ page contentType="text/html; charset=UTF-8" pageEncoding="UTF-8" %>
DOCTYPE html>
<html lang="zh-CN">
<head>
    <jsp:include page="/WEB-INF/views/common/header.jsp"/>
head>
<body>
<jsp:include page="/WEB-INF/views/common/footer.jsp"/>
body>
html>
因为我们最终是在list.jsp页面中进行展示,所以当用户访问主页index.jsp时,可以直接将请求转发到 “/emps”,由控制器private static final String PAGE_LIST = “list”; private EmployeeService employeeService;
/**
- 分页查询员工数据
- @param page 页码
- @param rows 记录数
- @return 转发至PAGE_LIST页面进行展示 */ @GetMapping(“/emps”) public String getEmps(@RequestParam(value = “page”, defaultValue = “1”) int page, @RequestParam(value = “rows”, defaultValue = “10”) int rows, Model model) { PageInfo pageInfo = employeeService.getEmps(page, rows); model.addAttribute(“pageInfo”, pageInfo); return PAGE_LIST; }查询第一页员工,然后跳转到list.jsp页面进行展示。
<%@ page contentType="text/html; charset=UTF-8" pageEncoding="UTF-8" %>
DOCTYPE html>
<html lang="zh-CN">
<head>
    <meta charset="utf-8">
head>
<body>
<jsp:forward page="/emps"/>
body>
html>
至此,基础环境就搭建好了。

查询步骤:
URI:/emps?page=xxx&rows=xxx GET
1、访问index.jsp页面
2、index.jsp页面发送Ajax查询员工列表的请求
4、转发到list.jsp页面进行展示
1. 引入PageHelper分页插件
接下来在 Spring 配置文件中配置该分页插件。
2. 服务端处理分页请求
EmployeeController根据请求参数中的page和rows,分页查询员工数据,然后转发至list.jsp页面进行展示。
EmployeeController#getEmps:
private static final String PAGE_LIST = "list";
private EmployeeService employeeService;

/**
 * 分页查询员工数据
 * @param page 页码
 * @param rows 记录数
 * @return 转发至PAGE_LIST页面进行展示
 */
@GetMapping("/emps")
public String getEmps(@RequestParam(value = "page", defaultValue = "1") int page,
                      @RequestParam(value = "rows", defaultValue = "10") int rows,
                      Model model) {
    PageInfo pageInfo = employeeService.getEmps(page, rows);
    model.addAttribute("pageInfo", pageInfo);
    return PAGE_LIST;
}
EmployeeService#getEmps:
private EmployeeMapperExt employeeMapper;

/**
 * 根据要查询的页码和页大小, 分页查询员工数据
 * @param page  当前页码
 * @param rows 当前页大小, 即查询多少条记录
 * @return 所有员工信息
 */
public PageInfo<Employee> getEmps(int page, int rows) {
    PageHelper.startPage(page, rows);
    List<Employee> emps = employeeMapper.queryByExampleWithDept(null);
    return new PageInfo<>(emps, 5);
}
EmployeeMapperExt:
@Resource
public interface EmployeeMapperExt extends EmployeeMapper {

    /** 查询满足example条件的员工, 包括所属部门信息 */
    List<Employee> queryByExampleWithDept(EmployeeExample example);

    /** 根据员工id查询员工, 包括所属部门信息 */
    Employee queryByIdWithDept(int empId);
}
<?xml version="1.0" encoding="UTF-8" ?>
<!DOCTYPE mapper PUBLIC "-//mybatis.org//DTD Mapper 3.0//EN" "http://mybatis.org/dtd/mybatis-3-mapper.dtd" >
<mapper namespace="pers.oneice.ssm.crud.dao.EmployeeMapperExt">
    <cache-ref namespace="pers.oneice.ssm.crud.dao.EmployeeMapper"/>

    <!-- Employee的结果映射, 包括对内部的department属性的映射 -->
    <resultMap id="EmpResultMapWithDept" type="pers.oneice.ssm.crud.pojo.Employee"
               extends="pers.oneice.ssm.crud.dao.EmployeeMapper.BaseResultMap">
        <association property="department" resultMap="pers.oneice.ssm.crud.dao.DepartmentMapper.BaseResultMap"/>
    </resultMap>
    <!-- tb_emp表连接查询tb_dept表时, 要展示的字段列表 -->
    <sql id="Emp_With_Dept_Column_list">
        e.emp_id,
        e.emp_name,
        e.gender,
        e.email,
        e.d_id,
        d.dept_id,
        d.dept_name
    </sql>
    <!-- tb_emp表的where子句条件 -->
    <sql id="Example_Where_Clause">
        <where>
            <foreach collection="oredCriteria" item="criteria" separator="or">
                <if test="criteria.valid">
                    <trim prefix="(" prefixOverrides="and" suffix=")">
                        <foreach collection="criteria.criteria" item="criterion">
                            <choose>
                                <when test="criterion.noValue">
                                    and ${criterion.condition}
                                </when>
                                <when test="criterion.singleValue">
                                    and ${criterion.condition} #{criterion.value}
                                </when>
                                <when test="criterion.betweenValue">
                                    and ${criterion.condition} #{criterion.value} and #{criterion.secondValue}
                                </when>
                                <when test="criterion.listValue">
                                    and ${criterion.condition}
                                    <foreach close=")" collection="criterion.value" item="listItem" open="("
                                             separator=",">
                                        #{listItem}
                                    </foreach>
                                </when>
                            </choose>
                        </foreach>
                    </trim>
                </if>
            </foreach>
        </where>
    </sql>

    <select id="queryByExampleWithDept" parameterType="pers.oneice.ssm.crud.pojo.EmployeeExample"
            resultMap="EmpResultMapWithDept">
        select
        <if test="distinct">
            distinct
        </if>
        <include refid="Emp_With_Dept_Column_list"/>
        from tb_emp e
                     left join tb_dept d on e.d_id = d.dept_id
        <if test="_parameter != null">
            <include refid="Example_Where_Clause"/>
        </if>
        <if test="orderByClause != null">
            order by ${orderByClause}
        </if>
    </select>

    <select id="queryByIdWithDept" parameterType="java.lang.Integer" resultMap="EmpResultMapWithDept">
        select
        <include refid="Emp_With_Dept_Column_list"/>
        from tb_emp e
                     left join tb_dept d on e.d_id = d.dept_id
        where emp_id = #{empId,jdbcType=INTEGER}
    </select>
</mapper>
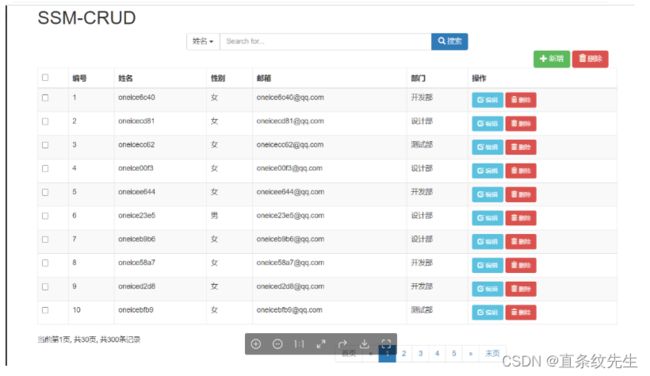
3. list.jsp页面展示数据
- 在list.jsp页面中取出
pageInfo域数据 - 用
c:foreach元素遍历出每条记录,进行展示 - 导航条采用Bootstrap提供的
nav元素,详见
<%@ taglib prefix="c" uri="http://java.sun.com/jsp/jstl/core" %>
<%@ page contentType="text/html; charset=UTF-8" pageEncoding="UTF-8" %>
SSM-CRUD
<%-- 查询行 --%>
<%-- 新增/删除行 --%>
<%-- 移到最右边 --%>
<%-- 表格行 --%>
<%-- 占满整行 --%>
编号
姓名
性别
邮箱
部门
操作
<%-- 遍历出当前页的员工数据 --%>
${emp.empId}
${emp.empName}
${emp.gender==1?"男":"女"}
${emp.email}
${emp.department.deptName}
<%-- 分页信息 --%>
<%-- 基本文字说明 --%>
当前第${pageInfo.pageNum}页, 共${pageInfo.pages}页, 共${pageInfo.total}条记录
<%-- 导航条 --%>
最终效果如下:
这样我们就实现了分页查询的功能。但实际开发中我们不会这么做,因为每次切换页面都要刷新页面,用户体验并不是很好,更优的方案是用JS发送Ajax请求,获取Json数据,使用JS解析Json数据并显示到页面上。ok,接下来我们就来一波优化—优化-Ajax分页查询。
优化-Ajax分页查询
Ajax请求的优点是:避免客户端多次刷新,同时也更好地兼容多平台。所以本文采用Ajax请求对前面《普通分页查询》进行优化,大致步骤是:用JS发送Ajax请求,服务端返回Json数据,客户端用JS解析Json数据并显示到页面上。
后端
1. 引入Jackson依赖
对于Ajax请求通常是返回Json数据,这里我们使用Jackson实现。在pom.xml中添加如下依赖:
2. 创建一个通用的【返回信息】Msg类
我们返回的Json数据通常不只是包含分页信息,还要包括错误码和说明信息等。为此,我们可以创建一个通用的【返回信息】类Msg,如下所示:
/**
 * 这是一个通用的【返回信息】类
 * @author OneIce
 * @since 2021/3/22 22:45
 */
public class Msg {

    /** 错误码 */
    private ErrorCodeEnum errorCode;
    /** 要返回给用户的数据 */
    private Map<String, Object> dataMap = new HashMap<>();

    public Msg(ErrorCodeEnum errorCode) {
        this.errorCode = errorCode;
    }

    /** 方便地获取一个表示"OK"的Msg对象 */
    public static Msg success() {
        Msg msg = new Msg(ErrorCodeEnum.OK);
        return msg;
    }

    /**
     * 添加返回数据
     * @param name  数据的名称
     * @param value 数据的内容
     * @return this本身
     */
    public Msg add(String name, Object value) {
        dataMap.put(name, value);
        return this;
    }

    public ErrorCodeEnum getErrorCode() {
        return errorCode;
    }

    public void setErrorCode(ErrorCodeEnum errorCode) {
        this.errorCode = errorCode;
    }

    public Map<String, Object> getDataMap() {
        return dataMap;
    }

    public void setDataMap(Map<String, Object> dataMap) {
        this.dataMap = dataMap;
    }

    @Override
    public String toString() {
        return "Msg{" +
                "errorCode=" + errorCode +
                ", dataMap=" + dataMap +
                '}';
    }
}
其中ErrorCodeEnum是个枚举类,封装了错误码和描述信息。
/**
 * 封装了错误码和错误描述信息
 * @author OneIce
 * @since 2021/3/22 23:10
 */
@JsonFormat(shape = JsonFormat.Shape.OBJECT)
public enum ErrorCodeEnum {
    OK("00000", "一切正确"),
    USER_ERROR("A0001", "用户端错误"),
    USER_REQUEST_PARAM_ERROR("A0400", "用户请求参数错误");

    /** 错误码 */
    private String value;
    /** 错误描述信息 */
    private String desc;

    ErrorCodeEnum(String value, String desc) {
        this.value = value;
        this.desc = desc;
    }

    @Override
    public String toString() {
        return "[" + value + "]" + desc;
    }

    public String getValue() {
        return value;
    }

    public String getDesc() {
        return desc;
    }
}
3. 控制器查询分页数据, 返回Msg对象
在控制器方法上声明@ResponseBody注解,然后将查询到的分页数据添加到Msg对象中并返回。
EmployeeController#getEmpsWithJson:
/**
 * 分页查询员工信息, 返回Json数据
 * @param page 页码
 * @param rows 记录数
 * @return 分页数据(包含查询到的员工数据), 由MappingJackson2CborHttpMessageConverter解析成Json字符串
 */
@ResponseBody
@GetMapping("/emps")
public Msg getEmpsWithJson(@RequestParam(value = "page", defaultValue = "1") int page,
                           @RequestParam(value = "rows", defaultValue = "10") int rows) {
    PageInfo<Employee> pageInfo = employeeService.getEmps(page, rows);
    Msg msg = Msg.success();
    msg.add("pageInfo", pageInfo);
    return msg;
}
要注意的是@ResponseBody注解必不可少,这样SpringMVC才会使用
RequestResponseBodyProcessor这个返回值处理器来处理Msg对象,它会选取一个适当的HttpMessageConverter—MappingJackson2CborHttpMessageConverter,将返回值转换成Json字符串,然后输出到HTTP响应流中。详见SpringMVC如何解析方法参数和返回值?。
前端
普通的分页查询已经写在list.jsp中了,所以我们将Ajax分页查询直接写在index.jsp里好了。
1. 页面一加载好就发送Ajax查询请求
//页面一加载好就请求一次分页数据
$(function () {
    toPage(1, 10)
})

//发送Ajax请求, 请求分页数据
function toPage(page, rows) { //页码, 记录数
    $.ajax({
        type: "GET",
        url: "${APP_PATH}/emps",
        data: {"page": page, "rows": rows},
        dataType: "json",
        success: function (result) {
            //构建员工列表
            buildEmpsTable(result.dataMap.pageInfo.list)
            //构建分页基本信息
            buildPageInfo(result.dataMap.pageInfo)
            //构建导航条
            buildPageNavigate(result.dataMap.pageInfo)
        }
    })
}
2. 解析Json数据, 构建员工列表和导航条
//构建员工表格
function buildEmpsTable(list) {
//清空原表格数据
$("#emp_table tbody").empty()
//获取每个员工信息, 追加到表格中显示
$.each(list, function () {
var empTr = $("
").addClass("pagination")
//首页和上一页
var firstPageLi = $("").append($("").attr("href", "#").append("首页"))
var prePageLi = $("").append($("").attr("href", "#").append("«"))
//没有上一页时禁用掉按钮
if (!pageInfo.hasPreviousPage) {
firstPageLi.addClass("disabled")
prePageLi.addClass("disabled")
}
ul.append(firstPageLi).append(prePageLi)
//遍历中间页码
$.each(pageInfo.navigatepageNums, function () {
var pageNumLi = $("").append($("").attr("href", "#").append(this))
//高亮当前页的页码
if (pageInfo.pageNum == this) {
pageNumLi.addClass("active")
}
ul.append(pageNumLi)
})
//下一页和末页
var nextPageLi = $("").append($("").attr("href", "#").append("»"))
var lastPageLi = $("").append($("").attr("href", "#").append("末页"))
//没有下一页时禁用掉按钮
if (!pageInfo.hasNextPage) {
nextPageLi.addClass("disabled")
lastPageLi.addClass("disabled")
}
ul.append(nextPageLi).append(lastPageLi)
//创建导航条, 显示到页面上
var nav = $("").append(ul)
$("#page_navigate_area").append(nav)
}
3. 为导航条页码绑定单击事件 (发送Ajax请求)
//构建导航条
function buildPageNavigate(pageInfo) {
$("#page_navigate_area").empty() //清空原导航条
var ul = $("
").addClass("pagination")
//首页和上一页
var firstPageLi = $("").append($("").attr("href", "#").append("首页"))
var prePageLi = $("").append($("").attr("href", "#").append("«"))
//没有上一页时禁用掉按钮
if (!pageInfo.hasPreviousPage) {
firstPageLi.addClass("disabled")
prePageLi.addClass("disabled")
}
//绑定单击事件
clickToPage(firstPageLi, 1, pageInfo.pageSize)
clickToPage(prePageLi, pageInfo.prePage, pageInfo.pageSize)
ul.append(firstPageLi).append(prePageLi)
//遍历中间页码
$.each(pageInfo.navigatepageNums, function () {
var pageNumLi = $("").append($("").attr("href", "#").append(this))
//高亮当前页的页码
if (pageInfo.pageNum == this) {
pageNumLi.addClass("active")
}
//绑定单击事件
clickToPage(pageNumLi, this, pageInfo.pageSize)
ul.append(pageNumLi)
})
//下一页和末页
var nextPageLi = $("").append($("").attr("href", "#").append("»"))
var lastPageLi = $("").append($("").attr("href", "#").append("末页"))
//绑定单击事件
clickToPage(nextPageLi, pageInfo.nextPage, pageInfo.pageSize)
clickToPage(lastPageLi, pageInfo.pages, pageInfo.pageSize)
//没有下一页时禁用掉按钮
if (!pageInfo.hasNextPage) {
nextPageLi.addClass("disabled")
lastPageLi.addClass("disabled")
}
ul.append(nextPageLi).append(lastPageLi)
//创建导航条, 显示到页面上
var nav = $("").append(ul)
$("#page_navigate_area").append(nav)
}
//为导航条页码绑定单击事件
function clickToPage(obj, page, rows) { //按钮对象, 页码, 记录数
$(obj).click(function () {
if (!$(this).hasClass("disabled") && !$(this).hasClass("active")) {
toPage(page, rows)
}
return false
})
}
4. 效果演示

现在切换页码时不再会刷新页面了,浏览器后台会偷偷发送Ajax请求,然后更新页面数据。
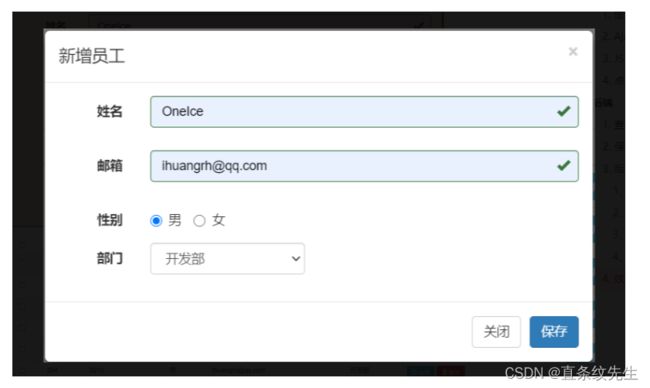
新增员工

新增步骤:
URI:/emps POST
- 在index.jsp页面点击“新增”按钮
- 发送Ajax请求去查询部门列表,显示在对话框上
- 弹出新增对话框
- 用户输入数据,点击“保存”按钮
- 进行前端校验:JS校验+Ajax用户名校验
- 发送Ajax新增请求给服务端
- 服务端使用JSR 303校验注解进行完整校验
- 保存员工并返回Json数据,如有错误则显示错误信息
前端
1. 定义员工新增的模态框
根据Bootstrap模态框改一改:
2. Ajax查询部门列表, 弹出新增模态框
//点击"新增"按钮, 弹出"新增"模态框
$("#add_emp_btn").click(function () {
    resetForm("#add_emp_form")//重置表单(内容+样式)
    getDepts() //查询所有部门信息显示在模态框上
    $("#add_emp_modal").modal() //展示模态框
})

//查询所有部门信息, 显示在"新增"模态框的下拉列表中
function getDepts() {
    $("#emp_dept_select").empty()
    $.ajax({
        type: "GET",
        url: "${APP_PATH}/depts",
        dataType: "json",
        success: function (result) {
            $.each(result.dataMap.depts, function () {
                var option = $("").attr("value", this.deptId).append(this.deptName)
                $("#emp_dept_select").append(option)
            })
        }
    })
}

//点击"关闭"按钮, 清空下拉列表的部门信息
$("#emp_close_btn").click(function () {
    $("#emp_dept_select").empty()
})
3. JS前端校验+Ajax用户名校验
//重置表单(内容+样式), 避免再次打开时跳过校验
function resetForm(selector) {
    //重置表单内容
    $(selector)[0].reset()
    //重置表单样式
    $(selector).find("*").removeClass("has-error has-success")
    $(selector).find(".glyphicon").removeClass("glyphicon-remove glyphicon-ok")
    $(selector).find(".help-block").text("")
    //禁用保存按钮
    $("#emp_save_btn").prop("disabled", true)
}

//校验新增表单的姓名和邮箱
function validateAddForm() {
    //校验姓名
    var empName = $("#emp_name_input").val()
    var regName = /(^[a-zA-Z0-9_-]{3,16}$)|(^[\u2E80-\u9FFF]{2,8}$)/ //匹配2-8位中文, 或3-16字母下划线数字
    if (regName.test(empName)) { //姓名格式正确
        //Ajax再校验姓名是否存在
        $.ajax({
            type: "GET",
            url: "${APP_PATH}/checkEmpName",
            data: $("#emp_name_input").serialize(),
            dateType: "json",
            success: function (result) {
                if (result.errorCode.value == "00000") {
                    showValidateMsg("#emp_name_input", "success", "")
                } else if (result.errorCode.value == "A0111") { //姓名已存在
                    showValidateMsg("#emp_name_input", "error", "该员工姓名已存在, 请重新输入")
                } else {
                    showValidateMsg("#emp_name_input", "error", "姓名错误, 请重新输入")
                }
            }
        })
    } else { //姓名格式错误
        showValidateMsg("#emp_name_input", "error", "姓名格式错误, 必须是2-8位中文, 或3-16字母下划线数字")
        return false
    }

    //校验邮箱
    var empEmail = $("#emp_email_input").val()
    var regEmail = /^([a-z0-9_\.-]+)@([\da-z\.-]+)\.([a-z\.]{2,6})$/ //匹配电子邮箱
    if (regEmail.test(empEmail)) { //邮箱格式正确
        showValidateMsg("#emp_email_input", "success", "")
    } else { //邮箱格式错误
        showValidateMsg("#emp_email_input", "error", "邮箱格式错误")
        return false
    }
    //完全正确
    return true
}

//内容一改变就进行校验
$("#emp_name_input,#emp_email_input").change(function () {
    if (validateAddForm()) {
        $("#emp_save_btn").prop("disabled", false)
    } else { //无效时禁用按钮
        $("#emp_save_btn").prop("disabled", true)
    }
})

//显示校验结果信息
function showValidateMsg(selector, status, msg) { //选择器, 结果状态, 结果信息
    //初始化状态
    $(selector).parent().removeClass("has-error has-success")
    $(selector).nextAll(".glyphicon").removeClass("glyphicon-remove glyphicon-ok")
    $(selector).nextAll(".help-block").text("")
    if (status == "success") {
        $(selector).parent().addClass("has-success") //颜色
        $(selector).nextAll(".glyphicon").addClass("glyphicon-ok") //图标
        $(selector).nextAll(".help-block").text(msg) //提示信息
    } else if (status == "error") {
        $(selector).parent().addClass("has-error")
        $(selector).nextAll(".glyphicon").addClass("glyphicon-remove")
        $(selector).nextAll(".help-block").text(msg)
    }
}
4. 点击保存按钮, Ajax保存员工
//点击"保存"按钮:
//1. 发送Ajax新增员工的请求
//2. 关闭模态框
//3. 收到返回数据后, 跳转至末页
$("#emp_save_btn").click(function () {
    //保存前再校验一遍
    if (!validateAddForm()) {
        return false
    }
    //发送Ajax请求, 新增员工
    $.ajax({
        type: "POST",
        url: "${APP_PATH}/emps",
        data: $("#add_emp_form").serialize(),
        dataType: "json",
        success: function (result) {
            if (result.errorCode.value === "00000") {
                //关闭模态框
                $("#add_emp_modal").modal("hide")
                //跳转至最后一页
                toPage(total, rows) //将总记录数当作页码, 保证能跳到最后一页
            } else { //添加失败, 显示错误消息
                if (result.dataMap.empName) { //带有empName这个错误
                    showValidateMsg("#emp_name_input", "error", result.dataMap.empName);
                }
                if (result.dataMap.email) { //带有email这个错误
                    showValidateMsg("#emp_email_input", "error", result.dataMap.empName);
                }
            }
        }
    })
})
后端
1. 查询部门列表
DepartmentController#getDepts:
/** 查询部门列表 */
@GetMapping("/depts")
@ResponseBody
public Msg getDepts() {
    List depts = departmentService.getDepts();
    Msg msg = Msg.success();
    msg.add("depts", depts);
    return msg;
}
DepartmentService#getDepts:
/** 查询所有部门 */
public List getDepts() {
    return departmentMapper.selectByExample(null);
}
2. 保存员工
EmployeeController#saveEmp:
/** 保存员工 */
@PostMapping("/emps")
@ResponseBody
public Msg saveEmp(@Valid Employee employee, BindingResult result) {
    if (result.hasErrors()) { //校验有错误, 将错误存到Msg中, 返回给客户端
        Msg msg = new Msg(ErrorCodeEnum.REQUEST_PARAM_ERROR);
        for (FieldError fieldError : result.getFieldErrors()) {
            msg.add(fieldError.getField(), fieldError.getDefaultMessage());
        }
        return msg;
    } else { //没错误, 才保存员工
        employeeService.saveEmp(employee);
        return Msg.success();
    }
}
EmployeeService#saveEmp:
/** 保存员工 */
public void saveEmp(Employee employee) {
    if (!StringUtils.hasLength(employee.getEmpName())) {
        throw new BusinessException(ErrorCodeEnum.REQUIRED_REQUEST_PARAM_EMPTY);
    }
    employee.setEmpId(null);
    employeeMapper.insertSelective(employee);
}
3. 后端***JSR 303***数据校验
前端JS校验只能防君子,不防小人,所以后端需要重新进行一遍完整的校验。
1、首先引入hibernate-validator依赖:
    org.hibernate.validator
    hibernate-validator
    6.2.0.Final
注意:不要导入7.0以上的版本,否则会报错我也不知道为什么…
2、在 springmvc.xml 文件中配置校验器**HibernateValidator****:**
3、给**Employee*和*Department**类的相应属性添加校验注解:
public class Employee implements Serializable {
    private static final long serialVersionUID = 1L;
    private Integer empId;

    @NotNull(message = "员工姓名不能为空")
    @Pattern(regexp = "(^[a-zA-Z0-9_-]{3,16}$)|(^[\\u2E80-\\u9FFF]{2,8}$)", message = "姓名必须是2-8位中文, 或3-16字母下划线数字")
    private String empName;

    @Range(min = 1, max = 2, message = "性别只能为男或女")
    private Integer gender;

    @Email(message = "邮箱格式错误")
    private String email;
    private Integer dId;
    private Department department;
public class Department implements Serializable {
    private static final long serialVersionUID = 1L;
    private Integer deptId;
    @NotBlank
    private String deptName;
注意,这些校验注解仅仅会在Controller层创建入参对象的时候生效,对于Service或Dao层中的对象是无效的。
4、通过BindingResult入参获取校验结果
/** 保存员工 */
@PostMapping("/emps")
@ResponseBody
public Msg saveEmp(@Valid Employee employee, BindingResult result) {
    if (result.hasErrors()) { //校验有错误, 将错误存到Msg中, 返回给客户端
        Msg msg = new Msg(ErrorCodeEnum.REQUEST_PARAM_ERROR);
        for (FieldError fieldError : result.getFieldErrors()) {
            msg.add(fieldError.getField(), fieldError.getDefaultMessage());
        }
        return msg;
    } else { //没错误, 才保存员工
        employeeService.saveEmp(employee);
        return Msg.success();
    }
}
4. 效果演示
点击 “新增” 按钮,输入员工信息,点击保存。

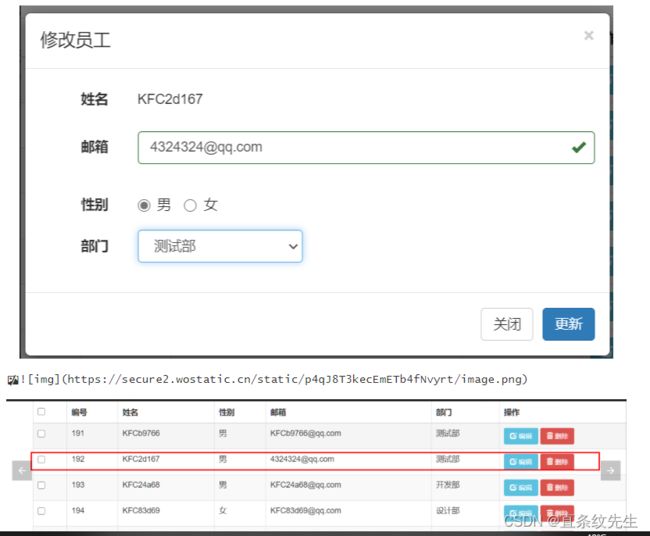
修改员工

- 点击“编辑”按钮
- 弹出员工修改的模态框(显示员工信息)
- 用户输入数据,点击“更新”按钮
- 对数据进行校验,然后发送Ajax修改请求,完成用户修改
- 关闭模态框,重新请求当前页码,以显示修改后的数据
前端实现
1. 单击编辑按钮, 弹出员工修改的模态框
//点击"编辑"按钮, 弹出"修改员工"模态框
//因为编辑按钮是未来创建的, 所以需要委托给#emp_table
$("#emp_table").on("click", ".edit_btn", function () {
    //重置表单(内容+样式)
    resetForm("#update_emp_form")
    //将编辑按钮上的员工id传递到更新按钮上
    $("#emp_update_btn").attr("emp_id", $(this).attr("emp_id"))
    //查询所有部门信息显示在模态框上
    var defered = getDepts("#update_emp_dept_select")
    //查询该员工信息并显示在模态框上
    var editBtn = $(this)
    defered.done(function () {
        getEmp(editBtn.attr("emp_id"), "#update_emp_form")
    })
    //展示模态框
    $("#update_emp_modal").modal()
    return false //阻止事件继续冒泡
})
为了便于后面获取员工的id,我们可以在构建员工表格的时候,为“编辑”和“删除”按钮添加一个自定义属性emp_id来存放员工的id。
[外链图片转存失败,源站可能有防盗链机制,建议将图片保存下来直接上传(img-28SXSqAa-1657276618662)(https://secure2.wostatic.cn/static/vrsoVaU36UcyBAENnuN174/image.png)]
[外链图片转存失败,源站可能有防盗链机制,建议将图片保存下来直接上传(img-BEvvgWJH-1657276618662)(C:\Users\lenovo\AppData\Roaming\Typora\typora-user-images\image-20220708182759774.png)]
2. Ajax查询所有部门信息并显示在模态框上
//查询所有部门信息, 显示在selector所指定的下拉列表中
function getDepts(selector) {
    $(selector).empty()
    return $.ajax({
        type: "GET",
        url: "${APP_PATH}/depts",
        dataType: "json",
        success: function (result) {
            $.each(result.dataMap.depts, function () {
                var option = $("").attr("value", this.deptId).append(this.deptName)
                $(selector).append(option)
            })
        }
    })
}
3. Ajax查询该员工信息并显示在模态框上
//Ajax查询该员工信息并显示在模态框上
function getEmp(empId, selector) { //员工id, 表单选择器
    $.ajax({
        type: "GET",
        url: "${APP_PATH}/emps/" + empId,
        dataType: "json",
        success: function (result) {
            //将员工数据显示到"修改员工"的模态框上
            var $form = $(selector)
            $form.find(".form-control-static").text(result.dataMap.emp.empName)
            console.log($form.find(":text[name=email]"))
            $form.find(":input[name=email]").val(result.dataMap.emp.email)
            $form.find(":radio[name=gender]").val([result.dataMap.emp.gender])
            $form.find("select[name=dId]").val([result.dataMap.emp.dId])
        }
    })
}
4. 校验【更新表单】
//校验【更新表单】
function validateUpdateForm() {
    var empEmail = $("#update_emp_email_input").val()
    var regEmail = /^([a-z0-9_\.-]+)@([\da-z\.-]+)\.([a-z\.]{2,6})$/ //匹配电子邮箱
    if (regEmail.test(empEmail)) { //邮箱格式正确
        showValidateMsg("#update_emp_email_input", "success", "")
        return true
    } else { //邮箱格式错误
        showValidateMsg("#update_emp_email_input", "error", "邮箱格式错误")
        return false
    }
}

//内容一改变就进行校验
$("#update_emp_email_input").change(function () {
    validateUpdateForm()
})
5. 点击更新, Ajax更新员工信息
//点击更新, Ajax更新员工信息
$("#emp_update_btn").click(function () {
    //校验【更新表单】
    if (!validateUpdateForm()) {
        return false
    }
    //Ajax更新员工信息
    $.ajax({
        type: "POST",
        url: "${APP_PATH}/emps/" + $(this).attr("emp_id"),
        data: $("#update_emp_form").serialize() + "&_method=PUT",
        dataType: "json",
        success: function (result) {
            if (result.errorCode.value == "00000") { //更新成功
                //关闭模态框
                $("#update_emp_modal").modal("hide")
                //重新请求当前页码, 获得更新后的员工信息
                toPage(pageNum, rows)
            } else {
                if (result.dataMap.email) { //带有email这个错误
                    showValidateMsg("#update_emp_email_input", "error", result.dataMap.email);
                }
            }
        }
    })
})
后端实现
1. 根据员工id查询员工
EmployeeController#getEmp:
/** 根据员工id查询员工 */
@GetMapping(value = "/emps/{id}")
@ResponseBody
public Msg getEmp(@PathVariable("id") int id) {
    Employee employee = employeeService.getEmpById(id);
    return Msg.success().add("emp", employee);
}
EmployeeService#getEmpById:
/** 根据员工id查询员工 */
public Employee getEmpById(int id) {
    EmployeeExample example = new EmployeeExample();
    example.createCriteria().andEmpIdEqualTo(id);
    return employeeMapper.queryByExampleWithDept(example).get(0);
}
2. 更新员工
EmployeeController#updateEmp:
/** 更新员工 */
//路径变量写成{empId}可以保证数据绑定器能正确将{empId}注入到Employee入参的empId属性中
@PutMapping(value = "/emps/{empId}")
@ResponseBody
public Msg updateEmp(Employee employee) {
    employeeService.updateEmp(employee);
    return Msg.success();
}
EmployeeService#updateEmp:
/** 更新员工 */
public void updateEmp(Employee employee) {
    if (employeeMapper.updateByPrimaryKeySelective(employee) != 1) {
        throw new BusinessException(ErrorCodeEnum.SYSTEM_EXECUTION_ERROR);
    }
}
3. 效果演示
点击“编辑”,输入数据,点击“更新”。
删除员工
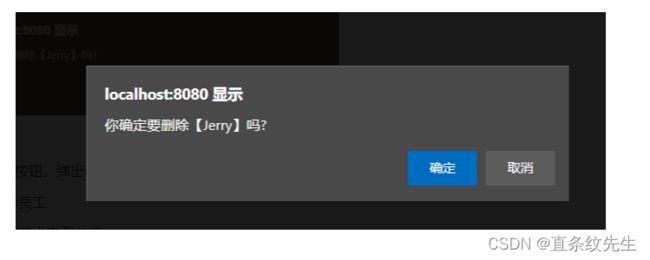
删除步骤:
1、点击删除按钮,弹出确认框
2、Ajax删除员工
3、Ajax重新请求本页数据
前端—点击删除按钮,Ajax删除员工
//点击删除按钮, 弹出员工删除确认框, 确认后发送员工删除请求
$("#emp_table").on("click", ".delete_btn", function () {
    var empId = $(this).attr("emp_id")
    var empName = $(this).parents("tr").find("td:eq(2)").text()

    if (confirm("你确定要删除【" + empName + "】吗?")) {
        //Ajax发送员工删除请求
        $.ajax({
            type: "POST",
            url: "${APP_PATH}/emps/" + empId,
            data: "" + "_method=DELETE",
            dataType: "json",
            success: function (result) {
                if (result.errorCode.value == "00000") { //删除成功, 刷新页面
                    toPage(pageNum, rows)
                } else { //删除失败, 显示错误信息
                    //懒得写了...
                }
            }
        })
    }
    return false
})
后端—根据员工id删除员工
EmployeeController#deleteEmp:
/** 根据员工id删除员工 */
@DeleteMapping(value = "/emps/{empId}")
@ResponseBody
public Msg deleteEmp(@PathVariable("empId") int empId) {
    employeeService.deleteEmp(empId);
    return Msg.success();
}
EmployeeService#deleteEmp:
/** 根据员工id删除员工 */
public void deleteEmp(int empId) {
    if (employeeMapper.deleteByPrimaryKey(empId) != 1) {
        throw new BusinessException(ErrorCodeEnum.SYSTEM_EXECUTION_ERROR);
    }
}
批量删除
删除步骤:
1、用户勾选需要删除的条目
2、点击删除按钮,弹出确认框
3、发送Ajax批量删除请求
4、Ajax刷新当前页面
前端
1. 实现全选/全不选的复选框逻辑
//实现全选/全不选的复选框逻辑

//为全选框绑定单击事件
$("#check_all").click(function () {
    //这里必须用prop(), attr()只能获取显式指定的属性值
    var flag = $(this).prop("checked")
    $(".check_item").prop("checked", flag)
})

//为每个复选框绑定单击事件
$("#emp_table").on("click", ".check_item", function () {
    //获取当前的选中个数
    var checkCount = $(".check_item:checked").length
    //如果选中个数和复选框总个数相等, 就把全选框勾上, 否则划掉
    var flag = checkCount == $(".check_item").length;
    if (flag) {
        $("#check_all").prop("checked", true)
    } else {
        $("#check_all").prop("checked", false)
    }
})
参考全选/全不选/反选。
2. 点击删除,发送Ajax批量删除请求
//点击删除, 发送Ajax批量删除请求
$("#delete_all_check").click(function () {
    //如果没有一个选中的, 则直接返回
    if ($(".check_item:checked").length == 0) {
        alert("请勾选要删除的条目!")
        return false
    }

    var empNames = "";
    var ids = ""
    $.each($(".check_item:checked"), function () {
        empNames += $(this).parents("tr").find("td:eq(2)").text() + ", " //拼接要删除的员工姓名
        ids += $(this).parents("tr").find("td:eq(1)").text() + "-" //拼接要删除的员工id
    })
    empNames = empNames.substring(0, empNames.length - 2) //去掉最后一个", "
    ids = ids.substring(0, ids.length - 1) //去掉最后一个"-"
    //弹出确认框
    if (confirm("你确定要删除【" + empNames + "】吗?")) {
        //发送Ajax批量删除请求
        $.ajax({
            type: "POST",
            url: "${APP_PATH}/emps/" + ids,
            data: "_method=DELETE",
            dataType: "json",
            success: function (result) {
                if (result.errorCode.value == "00000") { //删除成功, Ajax刷新页面
                    toPage(pageNum, rows)
                } else { //删除失败, 显示错误信息

                }
            }
        })
    }
})
后端
1. 处理批量删除请求
EmployeeController#deleteEmp:
对前面的*/** 根据员工id删除员工 */ @DeleteMapping(value = “/emps/{empId}”) @ResponseBody public Msg deleteEmp(@PathVariable(“empId”) int empId) { employeeService.deleteEmp(empId); return Msg.success(); }*进行改造,使其支持单个删除和批量删除。
/**
 * 根据员工id删除员工, 支持批量删除
 * 单个删除: /emps/id1
 * 批量删除: /emps/id1-id2-id3...
 */
@DeleteMapping(value = "/emps/{empIds}")
@ResponseBody
public Msg deleteEmp(@PathVariable("empIds") String empIds) {
    if (empIds.contains("-")) { //批量删除
        ArrayList<Integer> idList = new ArrayList<>();
        for (String id : empIds.split("-")) {
            idList.add(Integer.parseInt(id));
        }
        employeeService.deleteBatch(idList);
    } else { //单个删除
        int id = Integer.parseInt(empIds);
        employeeService.deleteEmp(id);
    }
    return Msg.success();
}
EmployeeService#deleteBatch:
/** 批量删除员工 */
public void deleteBatch(List ids) {
    EmployeeExample example = new EmployeeExample();
    example.createCriteria().andEmpIdIn(ids);
    employeeMapper.deleteByExample(example);
}
上面的/**
- 根据员工id删除员工, 支持批量删除
- 单个删除: /emps/id1
- 批量删除: /emps/id1-id2-id3… */ @DeleteMapping(value = “/emps/{empIds}”) @ResponseBody public Msg deleteEmp(@PathVariable(“empIds”) String empIds) { if (empIds.contains(“-”)) { //批量删除 ArrayList idList = new ArrayList<>(); for (String id : empIds.split(“-”)) { idList.add(Integer.parseInt(id)); } employeeService.deleteBatch(idList); } else { //单个删除 int id = Integer.parseInt(empIds); employeeService.deleteEmp(id); } return Msg.success(); }还可以再优化!!我们可以将拆分路径变量的过程封装起来,即自定义Converter (类型转换器)。这样未来如果需要重复应用这个转换逻辑时,我们就不必再写一遍了。
自定义的Converter代码如下:
/**
 * Spring到List的转换器
 * @author OneIce
 * @since 2021/3/28 20:19
 */
public class StringToIntegerListConverter implements Converter<String, List<Integer>> {
    private String delimiter = "-";

    public StringToIntegerListConverter() {
    }

    public StringToIntegerListConverter(String delimiter) {
        this.delimiter = delimiter;
    }

    @Override
    public List<Integer> convert(String source) {
        ArrayList<Integer> list = new ArrayList<>();
        if (source.contains(delimiter)) {
            String[] params = source.split(delimiter);
            for (String param : params) {
                list.add(Integer.parseInt(param));
            }
        } else {
            list.add(Integer.parseInt(source));
        }
        return list;
    }
}
然后在springmvc.xml注册这个转换器:
<mvc:annotation-driven validator="validator"
conversion-service="conversionService"/>


<bean id="conversionService" class="org.springframework.format.support.FormattingConversionServiceFactoryBean">

    <property name="converters">
        <set>
            <bean class="pers.oneice.ssm.crud.converter.StringToIntegerListConverter"/>
        set>
    property>
bean>
现在deleteEmp() 方法可以精简成下面这样:
/**
 * 根据员工id删除员工, 支持批量删除
 * 单个删除: /emps/id1
 * 批量删除: /emps/id1-id2-id3...
 */
@DeleteMapping(value = "/emps/{empIds}")
@ResponseBody
public Msg deleteEmp(@PathVariable("empIds") List<Integer> ids) {
    if (ids.size() == 1) { //单个删除
        employeeService.deleteEmp(ids.get(0));
    } else { //批量删除
        employeeService.deleteBatch(ids);
    }
    return Msg.success();
}
2. 效果演示
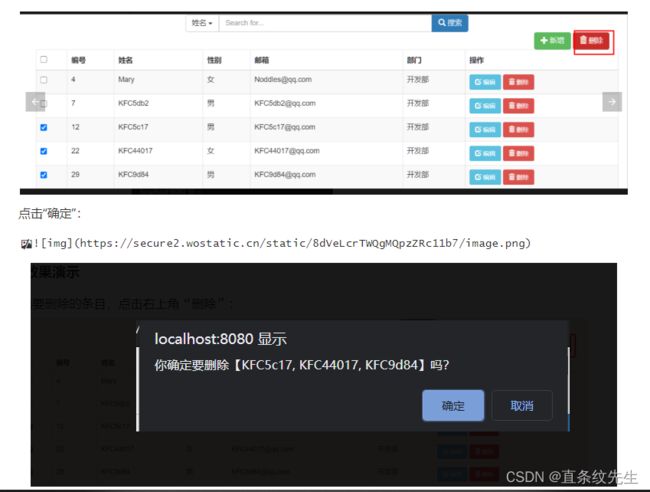
勾选要删除的条目,点击右上角“删除”:
[外链图片转存失败,源站可能有防盗链机制,建议将图片保存下来直接上传(img-eqFlWpHV-1657276618664)(https://secure2.wostatic.cn/static/sREEL4uJphad6VQYtZEfu2/image.png)]
[外链图片转存失败,源站可能有防盗链机制,建议将图片保存下来直接上传(img-x23T0eGI-1657276618665)(C:\Users\lenovo\AppData\Roaming\Typora\typora-user-images\image-20220708183033131.png)]
点击“确定”:
[外链图片转存失败,源站可能有防盗链机制,建议将图片保存下来直接上传(img-bRXPNXoM-1657276618665)(https://secure2.wostatic.cn/static/8dVeLcrTWQgMQpzZRc11b7/image.png)]
[外链图片转存失败,源站可能有防盗链机制,建议将图片保存下来直接上传(img-qRMYl0PJ-1657276618665)(C:\Users\lenovo\AppData\Roaming\Typora\typora-user-images\image-20220708183046960.png)]
消失不见了~
[外链图片转存失败,源站可能有防盗链机制,建议将图片保存下来直接上传(img-fbDQ8A17-1657276618666)(https://secure2.wostatic.cn/static/3uU2r4pHVxyaduFZBi9Ehs/image.png)]
[外链图片转存失败,源站可能有防盗链机制,建议将图片保存下来直接上传(img-ovq3Jops-1657276618666)(C:\Users\lenovo\AppData\Roaming\Typora\typora-user-images\image-20220708183102750.png)]
条件查询
[外链图片转存失败,源站可能有防盗链机制,建议将图片保存下来直接上传(img-rGJhoZr6-1657276618667)(C:\Users\lenovo\AppData\Roaming\Typora\typora-user-images\image-20220708183151646.png)]
闲着没事,想尝试自己实现一个条件查询的功能。大致步骤如下:
- 编写一个输入框组,包含一个表单(查询条件+关键字)
- 当用户点击“搜索”时,发送Ajax条件查询请求
- 构建员工列表、分页信息、导航条
前端
为了重用之前写过的优化-Ajax分页查询代码,我增加了一个全局变量queryUrl,用来记录上一次查询时的url。每次Ajax查询时就使用这个queryUrl作为请求地址。queryUrl初始值是"${APP_PATH}/emps",在进行条件查询前,该变量会被赋为"${APP_PATH}/emps?type=xxx"。这样在切换页码的时候,就会继续按上一次的条件进行分页查询了。
[外链图片转存失败,源站可能有防盗链机制,建议将图片保存下来直接上传(img-HAGVQOJj-1657276618667)(https://secure2.wostatic.cn/static/734PoZskrxM237EPK3pVDU/image.png)]
[外链图片转存失败,源站可能有防盗链机制,建议将图片保存下来直接上传(img-hZkOFnsD-1657276618667)(C:\Users\lenovo\AppData\Roaming\Typora\typora-user-images\image-20220708183238321.png)]
[外链图片转存失败,源站可能有防盗链机制,建议将图片保存下来直接上传(img-74mnHm8n-1657276618667)(https://secure2.wostatic.cn/static/cTFDd8WjdPprWZEunLfz6m/image.png)]
[外链图片转存失败,源站可能有防盗链机制,建议将图片保存下来直接上传(img-VvPMC1AY-1657276618668)(C:\Users\lenovo\AppData\Roaming\Typora\typora-user-images\image-20220708183253072.png)]
诚然,这种方式不太优雅。暂时我也想不到更好的法子了,凑合用吧!
接下来前端这里只需要编写一个输入框组,让用户输入搜索词。
<%-- 输入框组, 用于条件查询 --%>
然后点击“搜索”后,发送Ajax条件查询请求。
//点击下拉列表时, 修改表单隐藏域的value值
$("#search_form .dropdown-menu a").click(function () {
    var text = $(this).text()
    var name = $(this).attr("name")
    $("#type_btn").html(text + ' ')
    $("#search_form input[name=type]").val(name)
})

//点击"搜索", 发送Ajax查询请求
$("#search_form").submit(function () {
    //修改用于查询的url
    queryUrl = "${APP_PATH}/emps?" + $(this).serialize()
    //发送Ajax查询请求
    toPage(1, rows)
    return false
})
后端
至于后端,我对原本的/**
- 分页查询员工信息, 返回Json数据
- @param page 页码
- @param rows 记录数
- @return 分页数据(包含查询到的员工数据), 由MappingJackson2CborHttpMessageConverter解析成Json字符串 */ @ResponseBody @GetMapping(“/emps”) public Msg getEmpsWithJson(@RequestParam(value = “page”, defaultValue = “1”) int page, @RequestParam(value = “rows”, defaultValue = “10”) int rows) { PageInfo pageInfo = employeeService.getEmps(page, rows); Msg msg = Msg.success(); msg.add(“pageInfo”, pageInfo); return msg; }进行了改造,增加了两个参数用于接收查询条件。
EmployeeController#getEmpsWithJson:
/**
 * 分页查询员工信息, 返回Json数据
 * @param page    页码
 * @param rows    记录数
 * @param type    查询条件, 可以为null
 * @param keyword 搜索词, 可以为null
 * @return 分页数据(包含查询到的员工数据), 由MappingJackson2CborHttpMessageConverter解析成Json字符串
 */
@ResponseBody
@GetMapping("/emps")
public Msg getEmpsWithJson(@RequestParam(value = "page", defaultValue = "1") int page,
                           @RequestParam(value = "rows", defaultValue = "10") int rows,
                           @RequestParam(value = "type", required = false) String type,
                           @RequestParam(value = "keyword", required = false) String keyword) {
    PageInfo<Employee> pageInfo = employeeService.getEmps(page, rows, type, keyword);
    Msg msg = Msg.success();
    msg.add("pageInfo", pageInfo);
    return msg;
}
同样的,EmployeeService也要修改一下,主要就是增加了一个查询条件的判断逻辑,使之能根据查询条件来执行不同的SQL。EmployeeService#getEmps:
  /**
   * 根据要查询的页码和页大小, 分页查询员工数据
   * @param page    当前页码
   * @param rows    当前页大小, 即查询多少条记录
   * @param type    查询条件, 可以为null
   * @param keyword 搜索词, 可以为null
   * @return 所有员工信息
   */
  public PageInfo<Employee> getEmps(int page, int rows, String type, String keyword) {
      PageHelper.startPage(page, rows);
      EmployeeExample example = new EmployeeExample();
      if (StringUtils.hasLength(type) && StringUtils.hasLength(keyword)) {
          if (type.equals("byEmpName")) {
              example.createCriteria().andEmpNameLike("%" + keyword + "%");
          } else if (type.equals("byEmail")) {
              example.createCriteria().andEmailLike("%" +keyword + "%");
          } else if (type.equals("byId")) {
              example.createCriteria().andEmpIdEqualTo(Integer.parseInt(keyword));
          }
      }
      List<Employee> emps = employeeMapper.queryByExampleWithDept(example);
      return new PageInfo<>(emps, 5);
  }
效果演示