Spring Boot系列(七)、SpringBoot整合PageHelper分页组件以及前端js分页插件
七、SpringBoot整合pageHelper分页组件以及前端js分页插件
-
- 1、PageHelper简介
- 2、PageHelper支持物理分页的数据库
- 3、SpringBoot集成PageHelper
- 4、配置datasource和thymeleaf
- 5、选用SystemUserinfo和SystemRole数据库表
- 6、[mybatis逆向工程](https://blog.csdn.net/qq_52596258/article/details/119360678)
- 7、==编写service业务逻辑层接口及实现类(关键)==
- 8、==编写Controller控制层(关键)==
- 9、编写前端视图页面list.html
- 10、==前端js分页插件==
1、PageHelper简介
我们知道mysql实现分页查询,要使用limit分页公式:curPage是当前第几页;pageSize是一页多少条记录,limit (curPage-1)*pageSize,pageSize;
select * from dept order by deptno desc limit m,n;
Oracle实现分页查询,内层不排序的情况下至少需要两层嵌套子查询:
--查询第6-9条数据(嵌套子查询-)
select * from (select e.*,rownum r from emp2 e where rownum<=9) where r>=5;
由上述可知,无论是mysql还是Oracle,要么是使用内置函数,要么是限制SQL查询语句,当然可以实现分页查询,但是在效率上存在一定的低能耗时,而且不易于与前端页面的整合,所以后者就引入了PageHelper分页组件的使用。
PageHelper是一款基于MyBatis开源的分页插件,使用非常方便,支持各种复杂的单表、多表分页查询,让你在写sql时无需考虑分页问题,只需查询出所有数据即可,剩下的PageHelper帮你搞定。
我们将简单介绍PageHelper的基本使用和配置参数的含义,重点分析PageHelper作为Mybatis分页插件的实现原理。PageHelper官网

2、PageHelper支持物理分页的数据库
- Oracle
- Mysql
- MariaDB
- SQLite
- Hsqldb
- PostgreSQL
- DB2
- SqlServer(2005,2008)
- Informix
- H2
- SqlServer2012
- Derby
- Phoenix
3、SpringBoot集成PageHelper
1、先引入pageHelper相关依赖:
        <dependency>
            <groupId>com.github.pagehelpergroupId>
            <artifactId>pagehelper-spring-boot-starterartifactId>
            <version>1.3.0version>
        dependency>
2、导入oracle数据库依赖驱动和mybatis依赖驱动
        <dependency>
            <groupId>com.oraclegroupId>
            <artifactId>ojdbc6artifactId>
            <version>11.2.0.2.0version>
        dependency>


        <dependency>
            <groupId>org.mybatis.spring.bootgroupId>
            <artifactId>mybatis-spring-boot-starterartifactId>
            <version>2.1.2version>
        dependency>
4、配置datasource和thymeleaf
#配置Thymeleaf视图配置
spring:
  thymeleaf:
    prefix: classpath:/templates/  #默认视图模板路径
    suffix: .html  #默认解析视图后缀
    mode: HTML5 #使用非严格 HTML(LEGACYHTML5)
    encoding: UTF-8 #编码格式
    cache: false #是否开启缓存
    check-template-location: true
  datasource:
    url: jdbc:oracle:thin:localhost:1521:orcl
    driver-class-name: oracle.jdbc.OracleDriver
    username: ebuy
    password: 123456
    tomcat:
      max-active: 20
      max-wait: 60000
      min-idle: 2
      initial-size: 1
5、选用SystemUserinfo和SystemRole数据库表
--system_userinfo表
create table SYSTEM_USERINFO
(
  userinfo_uid      VARCHAR2(11) not null,
  userinfo_loginid  VARCHAR2(20) not null,
  userinfo_name     VARCHAR2(50) not null,
  userinfo_password VARCHAR2(64) not null,
  userinfo_sex      CHAR(3),
  userinfo_email    VARCHAR2(100),
  userinfo_mobile   VARCHAR2(20),
  userinfo_status   NUMBER(1),
  userinfo_roleid   VARCHAR2(20)
)
--system_role表
create table SYSTEM_ROLE
(
  role_id          VARCHAR2(20) not null,
  role_name        VARCHAR2(50) not null,
  role_code        VARCHAR2(40),
  role_description VARCHAR2(100)
)
存入一些相关数据:

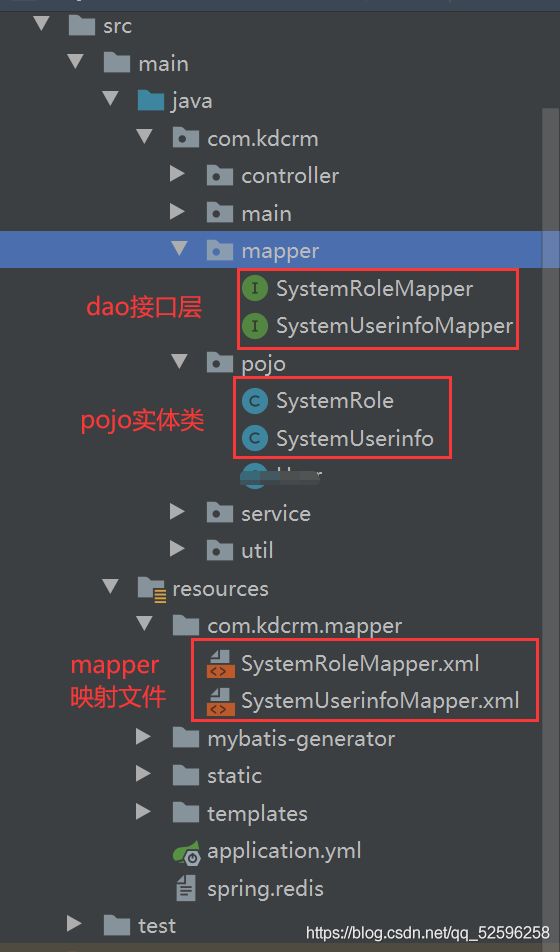
6、mybatis逆向工程
使用mybatis插件和驱动依赖为我们自动创建pojo层实体类、dao层接口、mapper层映射文件,以及自动帮我们创建好常用的增删改查等数据库操作方法,还为我们自动做好实体类属性与数据库表字段的映射关系,用起来贼six!
SystemUserinfoMapper接口(dao层):
package com.kdcrm.mapper;

import com.kdcrm.pojo.SystemUserinfo;
import org.apache.ibatis.annotations.Param;

import java.util.List;

public interface SystemUserinfoMapper {


    SystemUserinfo login(SystemUserinfo systemUserinfo);

    int deleteByPrimaryKey(String userinfoUid);

    int insert(SystemUserinfo record);

    SystemUserinfo selectByPrimaryKey(String userinfoUid);

    List<SystemUserinfo> selectAll(SystemUserinfo systemUserinfo);

    int updateByPrimaryKey(SystemUserinfo record);
}
 SystemRoleMapper接口(dao层):
package com.kdcrm.mapper;

import com.kdcrm.pojo.SystemRole;
import java.util.List;

public interface SystemRoleMapper {

    int deleteByPrimaryKey(String roleId);

    int insert(SystemRole record);

    SystemRole selectByPrimaryKey(String roleId);

    List<SystemRole> selectAll();

    int updateByPrimaryKey(SystemRole record);
}

7、编写service业务逻辑层接口及实现类(关键)
我们主要是为了演示分页,为了观看体验,我们只写selectAll方法:
SystemUserinfoService接口:
package com.kdcrm.service;

import com.github.pagehelper.PageInfo;
import com.kdcrm.pojo.SystemUserinfo;
import org.apache.ibatis.annotations.Param;

import java.util.List;

public interface SystemUserinfoService {

    /**
     * pageHelper分页
     * @param pageNum 当前页
     * @param pageSize  每页显示条数
     * @return
     */
    PageInfo<SystemUserinfo> selectAll(SystemUserinfo systemUserinfo,int pageNum,int pageSize);


}
SystemUserinfoServiceImpl实现类:
package com.kdcrm.service.impl;
/**
* @author 一宿君(CSDN : qq_52596258)
* @date 2021-08-03 10:37:38
*/
@Service
@SuppressWarnings("all")
public class SystemUserinfoServiceImpl implements SystemUserinfoService {
@Autowired
SystemUserinfoMapper systemUserinfoMapper;
@Autowired
RedisTemplate redisTemplate;
@Override
public PageInfo<SystemUserinfo> selectAll(SystemUserinfo systemUserinfo,int pageNum,int pageSize) {
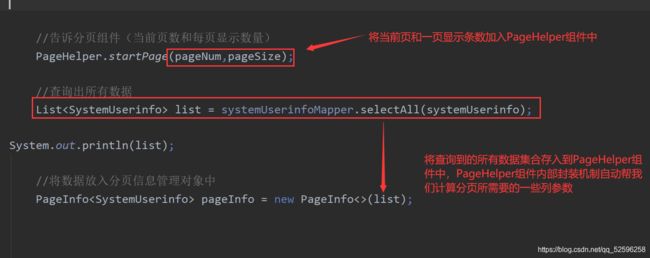
//告诉分页组件(当前页数和每页显示数量)
PageHelper.startPage(pageNum,pageSize);
//查询出所有数据
List<SystemUserinfo> list = systemUserinfoMapper.selectAll(systemUserinfo);
//将数据放入分页信息管理对象中
PageInfo<SystemUserinfo> pageInfo = new PageInfo<>(list);
return pageInfo;
}
}
我们进入PageHelper源码中查看封装属性:
public static final int DEFAULT_NAVIGATE_PAGES = 8;
    private int pageNum;  //当前页码
    private int pageSize;  //每页数量
    private int size;   //当前页数量
    private long startRow; //当前页面第一行数据在数据表中的行号
    private long endRow; //当前页面最后一行数据在数据表中的行号
    private int pages; //首页
    private int prePage; //上一页
    private int nextPage; //下一页
    private boolean isFirstPage; //是否是第一页
    private boolean isLastPage; //是否是最后一页
    private boolean hasPreviousPage; //是否有上一页
    private boolean hasNextPage; //是否有下一页
    private int navigatePages;//导航页码数
    private int[] navigatepageNums; //所有导航页号
    private int navigateFirstPage; //首页
    private int navigateLastPage; //尾页
8、编写Controller控制层(关键)
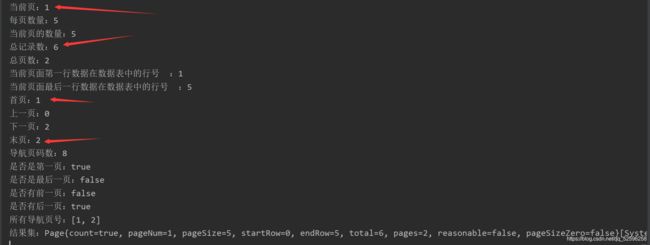
我们可以在控制层将PageHelper组件的内置封装属性全部打印出来:
package com.kdcrm.controller;


/**
 * @author 一宿君(CSDN : qq_52596258)
 * @date 2021-08-03 10:45:07
 */
@Controller
public class SystemUserInfoController {

    @Autowired
    SystemUserinfoService systemUserinfoService;

    @Autowired
    SystemRoleService systemRoleService;

    /**
     *
     * @param systemUserinfo 用于接收前端表单数据
     * @param request
     * @param pageNum 当前页,如果没有传入该值,则默认为1
     * @param pageSize  每页显示数量 默认为5
     * @return
     */
    @RequestMapping("/selectAll")
    public String selectAll(SystemUserinfo systemUserinfo,HttpServletRequest request, @RequestParam(name = "pageNum",defaultValue = "1")int pageNum,@RequestParam(name = "pageSize",defaultValue = "5")int pageSize)
    {

        //分页组件
        PageInfo<SystemUserinfo> pageinfo = systemUserinfoService.selectAll(systemUserinfo,pageNum,pageSize);

		//所有角色集合
        List<SystemRole> roleList = systemRoleService.selectAll();

       System.out.println("当前页:" + pageinfo.getPageNum());
        System.out.println("每页数量:" +pageinfo.getPageSize());
        System.out.println("当前页的数量:" +pageinfo.getSize());
        System.out.println("总记录数:" + pageinfo.getTotal());
        System.out.println("总页数:" + pageinfo.getPages());

        System.out.println("当前页面第一行数据在数据表中的行号  :" + pageinfo.getStartRow());
        System.out.println("当前页面最后一行数据在数据表中的行号  :" + pageinfo.getEndRow());

        System.out.println("首页:" + pageinfo.getNavigateFirstPage());
        System.out.println("上一页:" + pageinfo.getPrePage());
        System.out.println("下一页:" + pageinfo.getNextPage());
        System.out.println("末页:" + pageinfo.getNavigateLastPage());


        System.out.println("导航页码数:" + pageinfo.getNavigatePages());

        System.out.println("是否是第一页:" + pageinfo.isIsFirstPage());
        System.out.println("是否是最后一页:" + pageinfo.isIsLastPage());
        System.out.println("是否有前一页:" + pageinfo.isHasPreviousPage());
        System.out.println("是否有后一页:" + pageinfo.isHasNextPage());

        System.out.println("所有导航页号:" + Arrays.toString(pageinfo.getNavigatepageNums()));
        System.out.println("结果集:" + pageinfo.getList());

        if(pageinfo != null && roleList != null) {
            request.setAttribute("roleList",roleList);
            request.setAttribute("systemUserinfo", systemUserinfo);
            request.setAttribute("pageInfo", pageinfo);
        }

        return "list";
   }

}
9、编写前端视图页面list.html
DOCTYPE html>
<html xmlns:th="http://www.thymeleaf.org" lang="en" >
<head>
    <meta charset="UTF-8">
    <title>Titletitle>
head>
<body>


<form method="post" action="/selectAll" id="userForm" th:align="center" style="margin-top: 50px">
    <input type="hidden" id="pageNum" name="pageNum"/>
   登录名:<input type="text" id="userinfoLoginid" name="userinfoLoginid" th:value="${systemUserinfo.userinfoLoginid}" /><br/>
    性别:<input type="radio" name="userinfoSex" th:checked="${systemUserinfo.userinfoSex == '男'}"  value="男"/>男
         <input type="radio" name="userinfoSex" th:checked="${systemUserinfo.userinfoSex == '女'}" value="女"/>女
    <br/>
    邮箱:<input type="text" id="userinfoEmail" name="userinfoEmail" th:value="${systemUserinfo.userinfoEmail}" /><br/>
    电话:<input type="text" id="userinfoMobile" name="userinfoMobile" th:value="${systemUserinfo.userinfoMobile}"/><br/>
    角色:<select id="sel" name="userinfoRoleid">
            <option value="">--请选择--option>
            <option th:selected="${systemUserinfo.userinfoRoleid == role.roleId}" th:each="role:${roleList}" th:text="${role.roleName}" th:value="${role.roleId}" >option>
         select>
    <input type="submit" value="查询"/>
form>
<br/>

<table border="1" cellspacing="0" cellpadding="0"  style="width:70%;margin-left: auto;margin-right: auto" >
    <tr th:align="center">
        <td colspan="8">
            <input type="button" value="添加" onclick="location.href = 'toAddUser'"/>
        td>
    tr>
    <tr>
         <th>编号th>
         <th>登录名th>
         <th>姓名th>
         <th>角色th>
         <th>性别th>
         <th>邮箱th>
         <th>电话th>
         <th width="100">操作th>
     tr>

    <tr th:each="user:${pageInfo.list}" align="center" >
        <td th:text="${user.userinfoUid}">td>
        <td th:text="${user.userinfoLoginid}">td>
        <td th:text="${user.userinfoName}">td>
        <td th:text="${user.systemRole.roleName}">td>
        <td th:text="${user.userinfoSex}">td>
        <td th:text="${user.userinfoEmail}">td>
        <td th:text="${user.userinfoMobile}">td>
        <td ><a th:href="@{/toUpdateUser(userinfoUid=${user.userinfoUid})}">修改a> <a th:href="@{/delUser(userinfoUid=${user.userinfoUid})}">删除a>td>
    tr>

    <tr>
        <td colspan="6" align="center">
            当前页:<span th:text="${pageInfo.pageNum}">span>
            当前页数量:<span th:text="${pageInfo.size}">span>
            总页数:<span th:text="${pageInfo.pages}">span>
            总记录数:<span th:text="${pageInfo.total}">span>
            <br/>

            <span th:if="${pageInfo.isFirstPage}">
                  <a th:href="@{/selectAll(pageNum=${pageInfo.nextPage})}">下一页a>
                  <a th:href="@{/selectAll(pageNum=${pageInfo.navigateLastPage})}">末页a>
            span>
            <span th:if="${pageInfo.isLastPage}">
                <a th:href="@{/selectAll(pageNum=1)}">首页a>
                <a th:href="@{/selectAll(pageNum=${pageInfo.prePage})}">上一页a>
            span>
            <span th:if="${pageInfo.isHasPreviousPage} and ${pageInfo.hasNextPage}">
                <a th:href="@{/selectAll(pageNum=1)}">首页a>
                <a th:href="@{/selectAll(pageNum=${pageInfo.prePage})}">上一页a>
                <a th:href="@{/selectAll(pageNum=${pageInfo.nextPage})}">下一页a>
                <a th:href="@{/selectAll(pageNum=${pageInfo.navigateLastPage})}">末页a>
            span>

        td>
    tr>
table>
<br/>

body>
html>

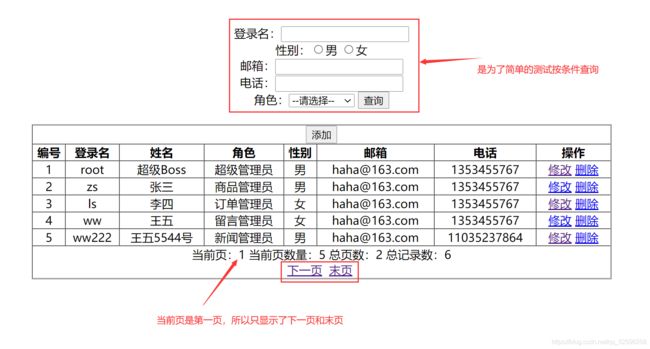
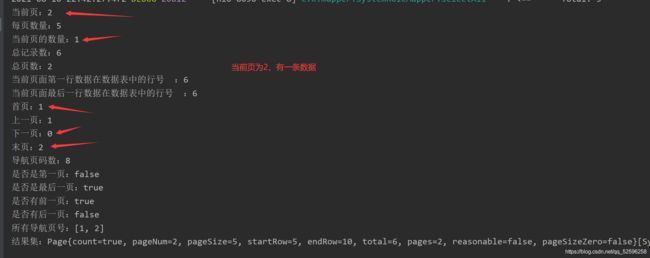
查看控制台输出的pagehelper各属性值:
点击下一页:
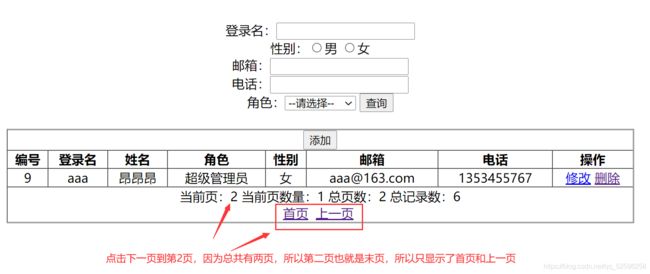
那啥不管咋说整体的功能是绝对实现了,相比较mysql和Oracle的限制SQL语句的分页查询,优势还是很大的,其次效率也是提高了很多,方便管理。
10、前端js分页插件
我们上述也感受到了PageHelper的封装的强大性,但是总有一点感觉还不是很完美,没错其实就是界面不够美观,而且操作首尾页,以及上一页下一页的逻辑判断仔细看来,真的很low,做为一名后端程序员,虽然前端学的不尽人意,但是咱们要学会用别人的插件,来美化自己的界面,不管你会不会前端,只要你用的好,那就是你的(狗头保命)!
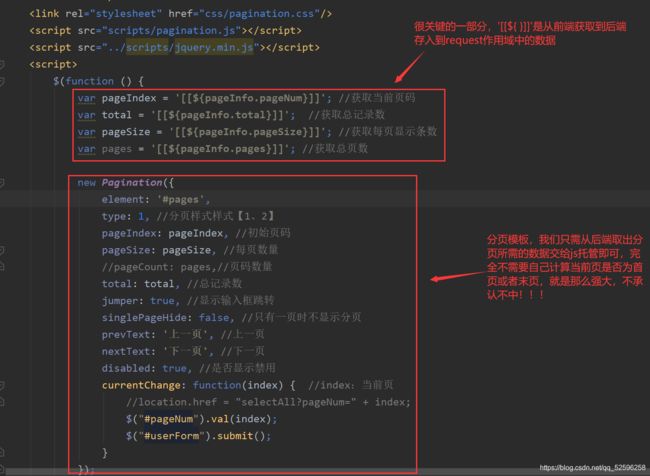
1)、引入前端分页插件的css和js文件

2)、改造前端list.html分页界面
DOCTYPE html>
<html xmlns:th="http://www.thymeleaf.org" lang="en" >
<head>
    <meta charset="UTF-8">
    <title>Titletitle>
    <link rel="stylesheet" href="css/pagination.css"/>
    <script src="scripts/pagination.js">script>
    <script src="../scripts/jquery.min.js">script>
    <script>
        $(function () {
            var pageIndex = '[[${pageInfo.pageNum}]]'; //获取当前页码
            var total = '[[${pageInfo.total}]]';  //获取总记录数
            var pageSize = '[[${pageInfo.pageSize}]]'; //获取每页显示条数
            var pages = '[[${pageInfo.pages}]]'; //获取总页数

            new Pagination({
                element: '#pages',
                type: 1, //分页样式样式【1、2】
                pageIndex: pageIndex, //初始页码
                pageSize: pageSize, //每页数量
                //pageCount: pages,//页码数量
                total: total, //总记录数
                jumper: true, //显示输入框跳转
                singlePageHide: false, //只有一页时不显示分页
                prevText: '上一页', //上一页
                nextText: '下一页', //下一页
                disabled: true, //是否显示禁用
                currentChange: function(index) {  //index:当前页
                    //location.href = "selectAll?pageNum=" + index;
                    $("#pageNum").val(index);
                    $("#userForm").submit();
                }
            });
        })

        function resetForm() {
            $('#userinfoLoginid').val('');//置空登录id
            $('input[name=userinfoSex]:checked').attr('checked',false);//取消性别选中
            $('#userinfoEmail').val('');
            $('#userinfoMobile').val('');
            $("option:first").attr("selected",true).siblings("option").attr("selected",false);
        }

    script>

head>
<body>


<form method="post" action="/selectAll" id="userForm" th:align="center" style="margin-top: 50px">
    <input type="hidden" id="pageNum" name="pageNum"/>
   登录名:<input type="text" id="userinfoLoginid" name="userinfoLoginid" th:value="${systemUserinfo.userinfoLoginid}" /><br/>
    性别:<input type="radio" name="userinfoSex" th:checked="${systemUserinfo.userinfoSex == '男'}"  value="男"/>男
         <input type="radio" name="userinfoSex" th:checked="${systemUserinfo.userinfoSex == '女'}" value="女"/>女
    <br/>
    邮箱:<input type="text" id="userinfoEmail" name="userinfoEmail" th:value="${systemUserinfo.userinfoEmail}" /><br/>
    电话:<input type="text" id="userinfoMobile" name="userinfoMobile" th:value="${systemUserinfo.userinfoMobile}"/><br/>
    角色:<select id="sel" name="userinfoRoleid">
            <option value="">--请选择--option>
            <option th:selected="${systemUserinfo.userinfoRoleid == role.roleId}" th:each="role:${roleList}" th:text="${role.roleName}" th:value="${role.roleId}" >option>
         select>
    <input type="submit" value="查询"/>

form>
<br/>

<table border="1" cellspacing="0" cellpadding="0"  style="width:70%;margin-left: auto;margin-right: auto" >
    <tr th:align="center">
        <td colspan="8">
            <input type="button" value="添加" onclick="location.href = 'toAddUser'"/>
        td>
    tr>
    <tr>
         <th>编号th>
         <th>登录名th>
         <th>姓名th>
         <th>角色th>
         <th>性别th>
         <th>邮箱th>
         <th>电话th>
         <th width="100">操作th>
     tr>

    <tr th:each="user:${pageInfo.list}" align="center" >
        <td th:text="${user.userinfoUid}">td>
        <td th:text="${user.userinfoLoginid}">td>
        <td th:text="${user.userinfoName}">td>
        <td th:text="${user.systemRole.roleName}">td>
        <td th:text="${user.userinfoSex}">td>
        <td th:text="${user.userinfoEmail}">td>
        <td th:text="${user.userinfoMobile}">td>
        <td ><a th:href="@{/toUpdateUser(userinfoUid=${user.userinfoUid})}">修改a> <a th:href="@{/delUser(userinfoUid=${user.userinfoUid})}">删除a>td>
    tr>

table>
<br/>


<div id="pages">div>

body>
html>
4)、查看当前页效果图:

没办法就是那么强大!!!