SparkSQL项目
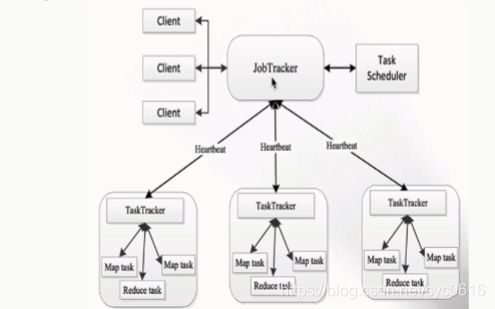
YARN产生背景
MapReduce1.X的问题:
JobTracker的压力太大了;
YARN的产生
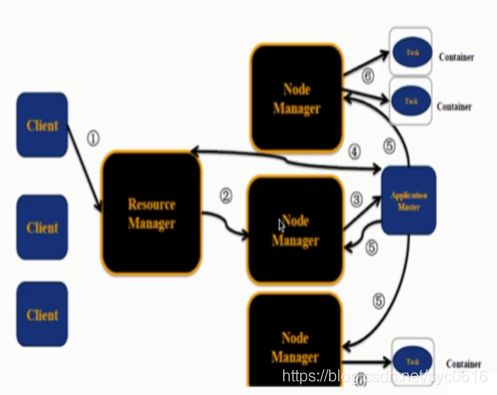
YARN的架构
1个RM(ResourceManager)+N个(NodeManager)
ResourceManager的职责:一个集群的active状态的RM只有一个,负责整个集群的资源管理和调度;
1.处理客户端的请求(启动/杀死)任务;
2.启动/监控ApplicationMaster(一个作业对应一个AM);
3.监控NM;
4.系统的资源分配和调度;
NodeManager:整个集群中有N个,负责单个节点的资源管理和使用,以及task的运行情况;
1.定期向RM汇报本节点的资源使用请求和各个Container的运行状态;
2.接收并处理RM的Container启动的各种命令;
3.单个节点的资源管理和任务管理;
ApplicationMaster:每个应用/作业对应一个,负责应用程序的管理;
1.数据切分;
2.为应用程序向RM申请资源(container),并分配给内部任务;
3.与NM通信以启停task,task时运行在container中的;
4.task的监控和容错;
Container:
对任务运行情况的描述:CPU、Memory、环境变量
YARN的执行流程
1.用户向YARN提交作业;
2.RM为该作业分配第一个container(AM);
3.RM会与对应的NM通信,要求NM在这个container上启动应用程序的AM;
4.AM首先向RM注册,然后AM将为各个任务申请资源,并监控运行情况;
5.AM采用轮询的方式通过RPC协议向RM申请和领取资源;
6.AM申请到资源以后,便和相应的NM通信,要求NM启动任务;
7.NM启动我们作业对应的task;
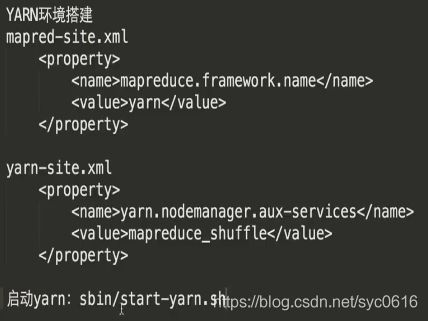
验证是否成功:有两个进程ResourceManager,NodeManager
大数据仓库Hive
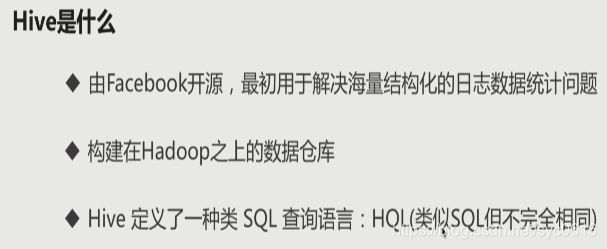
Hive产生背景:
MapReduce编程的不便性;
HDFS上的文件缺少Schema;
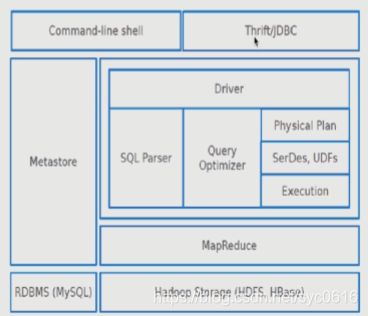
Hive体系结构
客户端:Command-line shell、Thrift/JDBC
Hive部署架构--测试环境
Hive部署架构--生产环境
MySQL主、备:保证hive元数据的正确
为什么要使用Hive
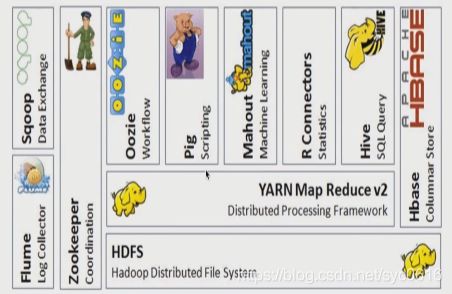
Hive在Hadoop生态中的位置
Hive环境搭建
配置hive.xml文件
4)拷贝MySQL驱动到hive/lib
![]()
5)启动Hive
hive/bin/hive
Hive基本操作
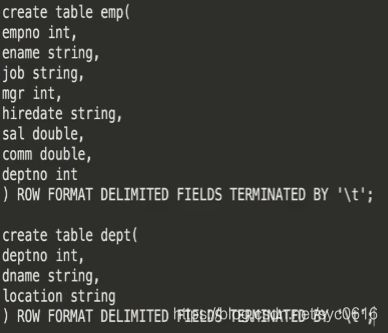
创建表
查看表的元数据
加载数据到hive表
编写HSQL
![]()
![]()
例子:
创建表
加载数据
求每个部门的人数
![]()
Spark大数据处理框架
Hadoop生态系统
Spark生态系统
![]()
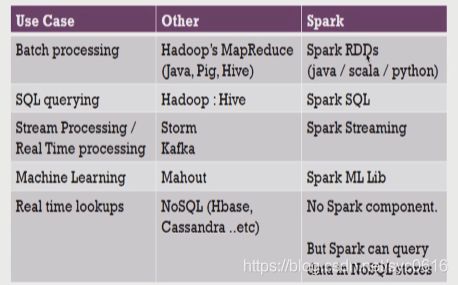
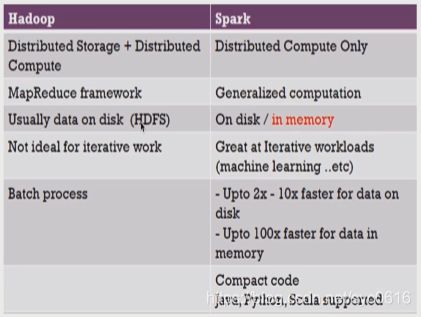
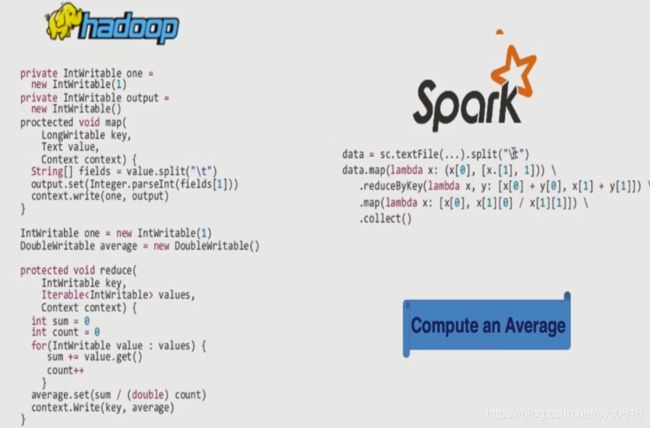
Spark与hadoop生态圈对比
Spark与hadoop比较
Spark与MapReduce对比
Spark项目实战
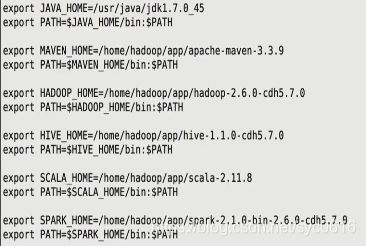
安装Spark
配置环境变量
验证Spark
spark-shell --master local[2]
Standalone模式
启动
spark-shell --master spark://hadoop001:7077
SparkSQL 概述
1.SQL on hadoop常用框架
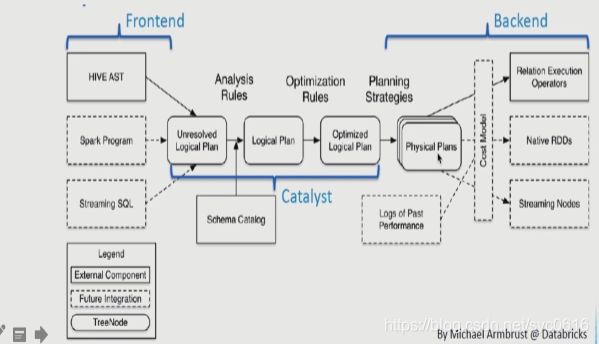
2.SparkSQL架构
SparkSQL使用
1.SQLContext/HiveContext/SparkSession的使用
1.SQLContext
SparkSQL处理步骤:
//1)创建相应的Context
val sparkConf = new SparkConf()//在测试或者生产中,AppName和Master我们是通过脚本进行指定
//sparkConf.setAppName("SQLContextApp").setMaster("local[2]")val sc = new SparkContext(sparkConf)
val sqlContext = new SQLContext(sc)//2)相关的处理: json
val people = sqlContext.read.format("json").load(path)
people.printSchema()
people.show()//3)关闭资源
sc.stop()
提交SparkSQL任务到集群
2.HiveContext
//1)创建相应的Context
val sparkConf = new SparkConf()//在测试或者生产中,AppName和Master我们是通过脚本进行指定
//sparkConf.setAppName("HiveContextApp").setMaster("local[2]")val sc = new SparkContext(sparkConf)
val hiveContext = new HiveContext(sc)//2)相关的处理:读取hive中的表
hiveContext.table("emp").show//3)关闭资源
sc.stop()
3.SparkSession
val spark = SparkSession.builder().appName("SparkSessionApp")
.master("local[2]").getOrCreate()val people = spark.read.json("file:///Users/rocky/data/people.json")
people.show()spark.stop()
spark-shell&spark-sql的使用
1.使用spark-shell
./spark-shell --master local[2]
spark访问hive需要把hive-site.xml拷贝到spark/conf/目录下;
需要MySQL的驱动包:
--jars mysql-connector-javaxxxx.jar
2.使用spark-sql
./spark-sql --master local[2] --jars mysql-connector-javaxxxx.jar
查看执行计划
逻辑计划、优化、物理计划
![]()
2.thriftserver/beeline的使用
1.启动thriftserver服务
默认端口:10000
2.使用beeline
beeline -u jadbc:hive2://localhost:10000 -n hadoop (这台机器用户名)
总结
thriftserver和普通的spark-shell/spark-sql有什么区别?
所以thriftserver优点比较多
3.jdbc方式编程访问
添加依赖:org.spark-project.hive#hive-jdbc
开发代码连接thriftserver
//jdbc驱动名
Class.forName("org.apache.hive.jdbc.HiveDriver")
//url就是beeline客户端连接的命令
val conn = DriverManager.getConnection("jdbc:hive2://hadoop001:14000","hadoop","")
val pstmt = conn.prepareStatement("select empno, ename, sal from emp")
val rs = pstmt.executeQuery()
while (rs.next()) {
println("empno:" + rs.getInt("empno") +
" , ename:" + rs.getString("ename") +
" , sal:" + rs.getDouble("sal"))}
rs.close()
pstmt.close()
conn.close()
DataFrame&DataSet概念及使用
1.DataFrame概述
DataSet是一个分布式的数据集;
DataFrame是一个DataSet;
DataFrame是以列(列名、列的类型、列值)的形式构成的分布式数据集,安装列赋予不同的名称;
DataFrame是一张表;
DataFrame可以从文本文件,一张表(hive)等创建;
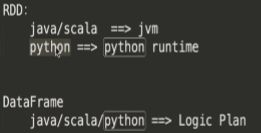
DataFrame对比RDD
DataFrame是有schema的;RDD没有表的结构;
2.DataFrame基本API常用操作
1.Create DataFrame
多种数据源创建一个dataframe
sparksession.read.format("jason").load(path)
2.printSchema
输出dataframe对应的schema信息
3.show
输出记录
4.select
查询某列所有的数据
peopleDF.select("name").show()
// 查询某几列所有的数据,并对列进行计算
peopleDF.select(peopleDF.col("name"), (peopleDF.col("age") + 10).as("age2")).show()
5.filter
//根据某一列的值进行过滤
peopleDF.filter(peopleDF.col("age") > 19).show()
6.groupBy
//根据某一列进行分组,然后再进行聚合操作
peopleDF.groupBy("age").count().show()
DataFrame与RDD相互操作
1.反射方式
推导出Schema的信息,当已知道Schema的组成;
caseclass保存Schema的信息
def inferReflection(spark: SparkSession) {
// RDD ==> DataFrame
val rdd = spark.sparkContext.textFile("file:///Users/rocky/data/infos.txt")//注意:需要导入隐式转换
import spark.implicits._
val infoDF = rdd.map(_.split(",")).map(line => Info(line(0).toInt, line(1), line(2).toInt)).toDF()infoDF.show()
//操作DataFrame
infoDF.filter(infoDF.col("age") > 30).show
//注册临时表
infoDF.createOrReplaceTempView("infos")
//采用SQL方式
spark.sql("select * from infos where age > 30").show()
}// DataFrame转RDD的样例类与Schema对应
case class Info(id: Int, name: String, age: Int)
2.编程方式
当Schema事先不知道时(即样例类不能提前定义时),在运行的时候才能确定;
- Create an RDD of
Rows from the original RDD;- Create the schema represented by a
StructTypematching the structure ofRows in the RDD created in Step 1.- Apply the schema to the RDD of
Rows viacreateDataFramemethod provided bySparkSession.
def program(spark: SparkSession): Unit = {
// RDD ==> DataFrame
val rdd = spark.sparkContext.textFile("file:///Users/rocky/data/infos.txt")val infoRDD = rdd.map(_.split(",")).map(line => Row(line(0).toInt, line(1), line(2).toInt))
// 定义一个StructType
val structType = StructType(Array(StructField("id", IntegerType, true),
StructField("name", StringType, true),
StructField("age", IntegerType, true)))val infoDF = spark.createDataFrame(infoRDD,structType)
infoDF.printSchema()
infoDF.show()
//通过df的api进行操作
infoDF.filter(infoDF.col("age") > 30).show//通过sql的方式进行操作
infoDF.createOrReplaceTempView("infos")
spark.sql("select * from infos where age > 30").show()
}
DataFrame API操作
// RDD ==> DataFrame
val rdd = spark.sparkContext.textFile("file:///Users/rocky/data/student.data")//注意:需要导入隐式转换
import spark.implicits._
//注意:转义字符val studentDF = rdd.map(_.split("\\|")).map(line => Student(line(0).toInt, line(1), line(2), line(3))).toDF()
// 所有的字段都全部展示,不管是多长;
studentDF.show(30, false)
show、take、first(一个数据)、head、filter
studentDF.filter("name=''").show
studentDF.filter("name='' OR name='NULL'").show//name以M开头的人
studentDF.filter("SUBSTR(name,0,1)='M'").showval studentDF2 = rdd.map(_.split("\\|")).map(line => Student(line(0).toInt, line(1), line(2), line(3))).toDF()
排序
studentDF.sort(studentDF("name").asc, studentDF("id").desc).show
连接
studentDF.join(studentDF2, studentDF.col("id") === studentDF2.col("id")).show
样例类
case class Student(id: Int, name: String, phone: String, email: String)
DataSet概述
静态类型(Static-typing)和运行时类型安全(runtime type-safety)
//注意:需要导入隐式转换
import spark.implicits._val path = "file:///Users/rocky/data/sales.csv"
//spark如何解析csv文件?
val df = spark.read.option("header","true").option("inferSchema","true").csv(path)
df.showval ds = df.as[Sales]
ds.map(line => line.itemId).show
spark.sql("seletc name from person").show//df.seletc("name")
df.select("nname")ds.map(line => line.itemId)
spark.stop()
}case class Sales(transactionId:Int,customerId:Int,itemId:Int,amountPaid:Double)
SparkSQL多外部数据源
目标
1)开发人员:不需要将代码合并到Spark中
--jars 即可以
2)用户
spark.read.format(format)
json,parquet,jdbc
1.操作Jason文件
//1)创建相应的Context
val sparkConf = new SparkConf()//在测试或者生产中,AppName和Master我们是通过脚本进行指定
//sparkConf.setAppName("SQLContextApp").setMaster("local[2]")val sc = new SparkContext(sparkConf)
val sqlContext = new SQLContext(sc)//2)相关的处理: json
val people = sqlContext.read.format("json").load(path)
people.printSchema()
people.show()df.write.format("json").save(path)
//3)关闭资源
sc.stop()
2.操作Parquet文件
1.SparkCore代码
val spark = SparkSession.builder().appName("SparkSessionApp")
.master("local[2]").getOrCreate()
/**
* spark.read.format("parquet").load 这是标准写法
*/
val userDF = spark.read.format("parquet").load("file:///home/hadoop/app/spark-2.1.0-bin-2.6.0-cdh5.7.0/examples/src/main/resources/users.parquet")userDF.printSchema()
userDF.show()userDF.select("name","favorite_color").show
userDF.select("name","favorite_color").write.format("json").save("file:///home/hadoop/tmp/jsonout")
spark.read.load("file:///home/hadoop/app/spark-2.1.0-bin-2.6.0-cdh5.7.0/examples/src/main/resources/users.parquet").show
//会报错,因为sparksql默认处理的format就是parquet
spark.read.load("file:///home/hadoop/app/spark-2.1.0-bin-2.6.0-cdh5.7.0/examples/src/main/resources/people.json").showspark.read.format("parquet").option("path","file:///home/hadoop/app/spark-2.1.0-bin-2.6.0-cdh5.7.0/examples/src/main/resources/users.parquet").load().show
spark.stop()
2.SQL用法:
指定using org.apache.spark.sql.parquet
CREATE TEMPORARY VIEW parquetTable
USING org.apache.spark.sql.parquet
OPTIONS (
  path "examples/src/main/resources/people.parquet"
)

SELECT * FROM parquetTable
3.操作Hive表数据
重命名hive中的表;
设置SparkSQL中的分区数:默认是200
![]()
case class Record(key: Int, value: String)

val warehouseLocation = new File("spark-warehouse").getAbsolutePath

val spark = SparkSession
  .builder()
  .appName("Spark Hive Example")
  .config("spark.sql.warehouse.dir", warehouseLocation)
  .enableHiveSupport()
  .getOrCreate()

import spark.implicits._
import spark.sql

// create table
sql("CREATE TABLE IF NOT EXISTS src (key INT, value STRING) USING hive")
// load data into table
sql("LOAD DATA LOCAL INPATH 'examples/src/main/resources/kv1.txt' INTO TABLE src")

// Queries are expressed in HiveQL
sql("SELECT * FROM src").show()


// The results of SQL queries are themselves DataFrames and support all normal functions.
val sqlDF = sql("SELECT key, value FROM src WHERE key < 10 ORDER BY key")

// The items in DataFrames are of type Row, which allows you to access each column by ordinal.
val stringsDS = sqlDF.map {
  case Row(key: Int, value: String) => s"Key: $key, Value: $value"
}


// You can also use DataFrames to create temporary views within a SparkSession.
val recordsDF = spark.createDataFrame((1 to 100).map(i => Record(i, s"val_$i")))
recordsDF.createOrReplaceTempView("records")


// Queries can then join DataFrame data with data stored in Hive.
sql("SELECT * FROM records r JOIN src s ON r.key = s.key").show()


// Create a Hive managed Parquet table, with HQL syntax instead of the Spark SQL native syntax
// `USING hive`
sql("CREATE TABLE hive_records(key int, value string) STORED AS PARQUET")
// Save DataFrame to the Hive managed table
val df = spark.table("src")
df.write.mode(SaveMode.Overwrite).saveAsTable("hive_records")
// After insertion, the Hive managed table has data now
sql("SELECT * FROM hive_records").show()


// Prepare a Parquet data directory
val dataDir = "/tmp/parquet_data"
spark.range(10).write.parquet(dataDir)
// Create a Hive external Parquet table
sql(s"CREATE EXTERNAL TABLE hive_bigints(id bigint) STORED AS PARQUET LOCATION '$dataDir'")
// The Hive external table should already have data
sql("SELECT * FROM hive_bigints").show()


// Turn on flag for Hive Dynamic Partitioning
spark.sqlContext.setConf("hive.exec.dynamic.partition", "true")
spark.sqlContext.setConf("hive.exec.dynamic.partition.mode", "nonstrict")
// Create a Hive partitioned table using DataFrame API
df.write.partitionBy("key").format("hive").saveAsTable("hive_part_tbl")
// Partitioned column `key` will be moved to the end of the schema.
sql("SELECT * FROM hive_part_tbl").show()
4.操作MySQL表数据
// Note: JDBC loading and saving can be achieved via either the load/save or jdbc methods
// Loading data from a JDBC source
val jdbcDF = spark.read
  .format("jdbc")
  .option("url", "jdbc:postgresql:dbserver")
  .option("dbtable", "schema.tablename")
  .option("user", "username")
  .option("password", "password")
  .load()

val connectionProperties = new Properties()
connectionProperties.put("user", "username")
connectionProperties.put("password", "password")
val jdbcDF2 = spark.read
  .jdbc("jdbc:postgresql:dbserver", "schema.tablename", connectionProperties)
// Specifying the custom data types of the read schema
connectionProperties.put("customSchema", "id DECIMAL(38, 0), name STRING")
val jdbcDF3 = spark.read
  .jdbc("jdbc:postgresql:dbserver", "schema.tablename", connectionProperties)

// Saving data to a JDBC source
jdbcDF.write
  .format("jdbc")
  .option("url", "jdbc:postgresql:dbserver")
  .option("dbtable", "schema.tablename")
  .option("user", "username")
  .option("password", "password")
  .save()

jdbcDF2.write
  .jdbc("jdbc:postgresql:dbserver", "schema.tablename", connectionProperties)

// Specifying create table column data types on write
jdbcDF.write
  .option("createTableColumnTypes", "name CHAR(64), comments VARCHAR(1024)")
  .jdbc("jdbc:postgresql:dbserver", "schema.tablename", connectionProperties)
1.read
spark.read
.format("jdbc")
.option("url", "jdbc:postgresql:dbserver")
.option("dbtable", "schema.tablename")
.option("user", "username")
.option("password", "password")
.load()
2.jdbc
val connectionProperties = new Properties()
connectionProperties.put("user", "username")
connectionProperties.put("password", "password")
val jdbcDF2 = spark.read
.jdbc("jdbc:postgresql:dbserver", "schema.tablename", connectionProperties)
// Specifying the custom data types of the read schema
connectionProperties.put("customSchema", "id DECIMAL(38, 0), name STRING")
val jdbcDF3 = spark.read
.jdbc("jdbc:postgresql:dbserver", "schema.tablename", connectionProperties)
使用外部数据源综合查询Hive和MySQL的表数据
val spark = SparkSession.builder().appName("HiveMySQLApp")
.master("local[2]").getOrCreate()// 加载Hive表数据
val hiveDF = spark.table("emp")// 加载MySQL表数据
val mysqlDF = spark.read.format("jdbc").option("url", "jdbc:mysql://localhost:3306").option("dbtable", "spark.DEPT").option("user", "root").option("password", "root").option("driver", "com.mysql.jdbc.Driver").load()// JOIN
val resultDF = hiveDF.join(mysqlDF, hiveDF.col("deptno") === mysqlDF.col("DEPTNO"))
resultDF.show
resultDF.select(hiveDF.col("empno"),hiveDF.col("ename"),
mysqlDF.col("deptno"), mysqlDF.col("dname")).showspark.stop()
Spark SQL的愿景
1.少的代码
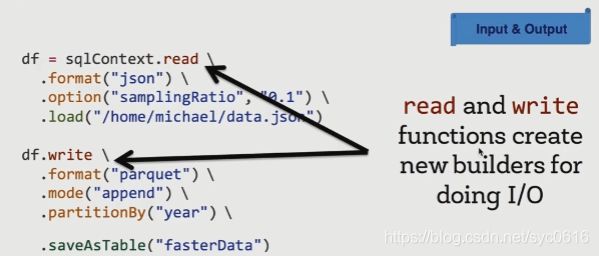
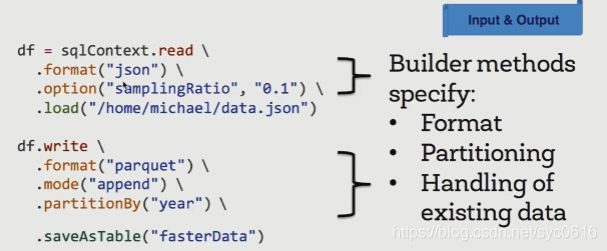
2.同一输入和输出
3.自定义数据源
![]()
4.合并Schema
但性能开销比较大;
- setting data source option
mergeSchematotruewhen reading Parquet files (as shown in the examples below), or - setting the global SQL option
spark.sql.parquet.mergeSchematotrue.
5.自动分区探测
spark.sql.sources.partitionColumnTypeInference.enabled
请注意,分区列的数据类型是自动推断的。目前,支持数字数据类型、日期、时间戳和字符串类型。有时用户可能不想自动推断分区列的数据类型。对于这些用例,可以通过 配置自动类型推断spark.sql.sources.partitionColumnTypeInference.enabled,默认为true。当类型推断被禁用时,字符串类型将用于分区列。
从 Spark 1.6.0 开始,分区发现默认只查找给定路径下的分区。对于上面的示例,如果用户传递path/to/table/gender=male给 SparkSession.read.parquet或SparkSession.read.load,gender则不会被视为分区列。如果用户需要指定分区发现应该从哪个基本路径开始,他们可以basePath在数据源选项中设置。例如,当path/to/table/gender=male是数据和用户的路径设置basePath为 时path/to/table/,gender将是一个分区列。
6.运行速度对比
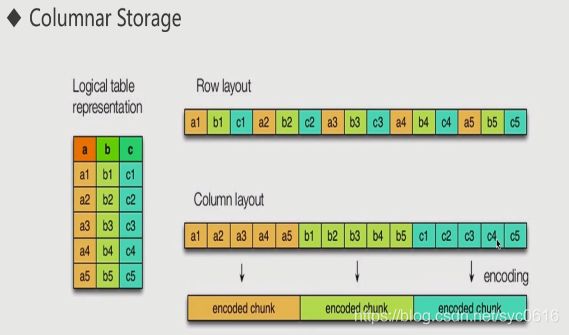
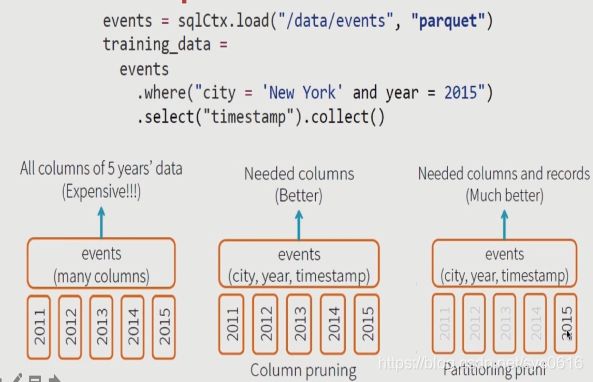
7.读更少的数据
![]()
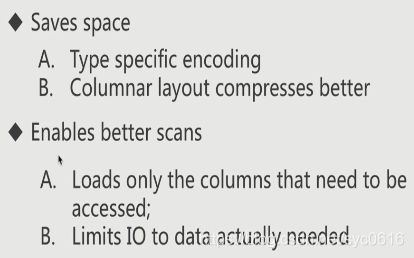
A.列式存储,只读取有用的列;
B.使用分区加载;
C.忽略min/max,这些一般在表中的静态变量中存储;
D.将一些条件信息,提前已过滤掉不必要的数据;
列式存储
减少空间,更方便查询
8.底层优化
1列优化;2分区优化
Join优化:
1.先过滤,在加载
2.列式优化,只加载有用的列
日志分析实战
1.记录用户行为日志
网站页面的访问量
网站的粘性;
推荐;
2.用户日志生成
Nginx、Ajax
3.用户行为日志内容
4.用户行为日志分析的意义
网站的眼睛
网站的神经
网站的大脑
离线数据处理架构
1.数据采集
Flume:web日志写入到HDFS;
2.数据清洗
脏数据:
Spark、hive、MapReduce或其他的一些分布式计算框架,清洗完之后的数据可存放在HDFS(Hive/SparkSQL)
3.数据处理
按需要进行相应业务的统计和分析;
Spark、hive、MapReduce或其他的一些分布式计算框架
4.数据结果入库
可以苍颜白发在RDBMS、NoSQL数据库中;
5.数据的可视化
通过图形化展示的方式展现出来:饼图、柱状图、地图、折线图
ECharts、HUE、Zeppelin
需求一:统计immoc主站最受欢迎的课程/收集TopN访问次数
//最受欢迎的TopN课程
def videoAccessTopNStat(spark: SparkSession, accessDF:DataFrame, day:String): Unit = {/**
* 使用DataFrame的方式进行统计
*/
import spark.implicits._val videoAccessTopNDF = accessDF.filter($"day" === day && $"cmsType" === "video")
.groupBy("day","cmsId").agg(count("cmsId").as("times")).orderBy($"times".desc)videoAccessTopNDF.show(false)
//使用SQL的方式进行统计
// accessDF.createOrReplaceTempView("access_logs")
// val videoAccessTopNDF = spark.sql("select day,cmsId, count(1) as times from access_logs " +
// "where day='20170511' and cmsType='video' " +
// "group by day,cmsId order by times desc")
//
// videoAccessTopNDF.show(false)
//将统计结果写入到MySQL中
try {
videoAccessTopNDF.foreachPartition(partitionOfRecords => {
val list = new ListBuffer[DayVideoAccessStat]partitionOfRecords.foreach(info => {
val day = info.getAs[String]("day")
val cmsId = info.getAs[Long]("cmsId")
val times = info.getAs[Long]("times")/**
* 不建议大家在此处进行数据库的数据插入
*/list.append(DayVideoAccessStat(day, cmsId, times))
})StatDAO.insertDayVideoAccessTopN(list)
})
} catch {
case e:Exception => e.printStackTrace()
}}
需求二:按地市统计immoc主站最受欢迎的课程/收集TopN访问次数
根据IP日志提取出城市信息
窗口函数在SparkSQL使用
def cityTopN(spark: SparkSession, df: DataFrame, day: String) = {
// 使用DateFrame方式统计
import spark.implicits._
val cityTopDF = df.filter($"day" === day && $"courseType" === "article")
.groupBy("day", "courseId", "city")
.agg(count("courseId").as("times"))
val top3 = cityTopDF.select(
cityTopDF("day"),
cityTopDF("courseId"),
cityTopDF("city"),
cityTopDF("times"),
row_number().over(Window.partitionBy(cityTopDF("city")).orderBy(cityTopDF("times").desc)).as("timesRank")
).filter("timesRank<=3")
// top3.show(false)// 将结果写入mysql
top3.foreachPartition(partition => {
val list = new ListBuffer[CityTop]
partition.foreach(record => {
val day = record.getAs[String]("day")
val courseId = record.getAs[Long]("courseId")
val city = record.getAs[String]("city")
val times = record.getAs[Long]("times")
val timesRank = record.getAs[Int]("timesRank")
list.append(CityTop(day, courseId, city, times, timesRank))
})
Dao.insertCityTop(list)
})}
agg的作用
- 正常情况下,当我们使用了聚合算子,后面就无法在使用其他聚合算子
- 而agg可以使我们同时获取多个聚合运算结果
//同样也可以这样写
//stuDF.groupBy("gender").agg(max("age"),min("age"),avg("age"),count("id")).show()
stuDF.groupBy("gender").agg("age"->"max","age"->"min","age"->"avg","id"->"count").show()
/*
+------+--------+--------+------------------+---------+
|gender|max(age)|min(age)| avg(age)|count(id)|
+------+--------+--------+------------------+---------+
| F| 23| 20|21.333333333333332| 3|
| M| 22| 16| 19.5| 4|
+------+--------+--------+------------------+---------+
*/
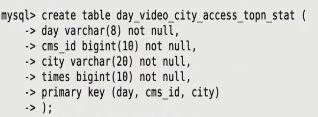
创建MySQL表
样例类
case class CityTop(day: String, courseId: Long, city: String, times: Long, timesRank: Int)
创建DAO
def insertCityTop(list: ListBuffer[CityTop]) = {
var con: Connection = null
var state: PreparedStatement = null
try {
con = MySQLUtil.getConnection()
con.setAutoCommit(false)
val sql = "insert into city_top(day,courseId,city,times,timesRank) values(?,?,?,?,?)"
state = con.prepareStatement(sql)
for(ele <- list) {
state.setString(1, ele.day)
state.setLong(2, ele.courseId)
state.setString(3, ele.city)
state.setLong(4, ele.times)
state.setInt(5, ele.timesRank)
state.addBatch()
}
state.executeBatch()
con.commit()
} catch {
case e: Exception => e.printStackTrace()
} finally {
MySQLUtil.release(con, state)
}
}
TOPN并入库
def cityTopN(spark: SparkSession, df: DataFrame, day: String) = {
// 使用DateFrame方式统计
import spark.implicits._
val cityTopDF = df.filter($"day" === day && $"courseType" === "article")
.groupBy("day", "courseId", "city")
.agg(count("courseId").as("times"))
val top3 = cityTopDF.select(
cityTopDF("day"),
cityTopDF("courseId"),
cityTopDF("city"),
cityTopDF("times"),
row_number().over(Window.partitionBy(cityTopDF("city")).orderBy(cityTopDF("times").desc)).as("timesRank")
).filter("timesRank<=3")
// top3.show(false)// 将结果写入mysql
top3.foreachPartition(partition => {
val list = new ListBuffer[CityTop]
partition.foreach(record => {
val day = record.getAs[String]("day")
val courseId = record.getAs[Long]("courseId")
val city = record.getAs[String]("city")
val times = record.getAs[Long]("times")
val timesRank = record.getAs[Int]("timesRank")
list.append(CityTop(day, courseId, city, times, timesRank))
})
Dao.insertCityTop(list)
})}
需求三:按流量统计imooc主站最受欢迎的课程/收集TopN访问次数
def trafficTopN(spark: SparkSession, df: DataFrame, day: String) = {
// 使用DateFrame方式统计
import spark.implicits._
val trafficTopDF = df.filter($"day" === day && $"courseType" === "article")
.groupBy("day","courseId").agg(sum("traffic").as("traffics"))
.orderBy($"traffics".desc)
//.show(false)// 将结果写入mysql
trafficTopDF.foreachPartition(partition => {
val list = new ListBuffer[TrafficTop]
partition.foreach(record => {
val day = record.getAs[String]("day")
val courseId = record.getAs[Long]("courseId")
val traffics = record.getAs[Long]("traffics")
list.append(TrafficTop(day, courseId, traffics))
})
Dao.insertTrafficTop(list)
})}
创建MySQL表
日志内容
访问时间、访问过程耗费流量、访问URL、访问IP地址
//访问日志转换(输入==>输出)工具类
object AccessConvertUtil {//定义的输出的字段
val struct = StructType(
Array(
StructField("url",StringType),
StructField("cmsType",StringType),
StructField("cmsId",LongType),
StructField("traffic",LongType),
StructField("ip",StringType),
StructField("city",StringType),
StructField("time",StringType),
StructField("day",StringType)
)
)/
数据清洗
第一步清洗:抽取出我们所需要的指定列的数据
val spark = SparkSession.builder().master("local[2]").appName("FormatSpark").getOrCreate()
val access = spark.sparkContext.textFile("E:/ImoocData/init.log")
access.take(10).foreach(println)
// 218.75.35.226 - - [11/05/2017:08:07:35 +0800] "POST /api3/getadv HTTP/1.1" 200 407 "http://www.imooc.com/article/17891" "-" cid=0×tamp=1455254555&uid=5844555
access.map(line => {
val splits = line.split(" ")
val ip = splits(0)
val time = splits(3) + " " + splits(4)
val traffic = splits(9)
val url = splits(10).replace("\"", "")
DateUtil.parse(time) + "\t" + url + "\t" + traffic + "\t" + ip
// 2017-05-11 08:07:35 http://www.imooc.com/article/17891 407 218.75.35.226
}).saveAsTextFile("E:/ImoocData/format")//.take(10).foreach(println)spark.stop()
第二步清洗
val accessRDD = spark.sparkContext.textFile("/Users/rocky/data/imooc/access.log")
//accessRDD.take(10).foreach(println)
//RDD ==> DF
val accessDF = spark.createDataFrame(accessRDD.map(x => AccessConvertUtil.parseLog(x)), AccessConvertUtil.struct)// accessDF.printSchema()
// accessDF.show(false)accessDF.coalesce(1).write.format("parquet").mode(SaveMode.Overwrite)
.partitionBy("day").save("/Users/rocky/data/imooc/clean2")
使用SparkSQL解析访问日志
解析出课程编号、类型
根据IP解析出城市信息
![]()
添加依赖文件:
操作MySQL
// MySQL操作工具类
object MySQLUtils {/**
* 获取数据库连接
*/
def getConnection() = {
DriverManager.getConnection("jdbc:mysql://localhost:3306/imooc_project?user=root&password=root")
}/**
* 释放数据库连接等资源
* @param connection
* @param pstmt
*/
def release(connection: Connection, pstmt: PreparedStatement): Unit = {
try {
if (pstmt != null) {
pstmt.close()
}
} catch {
case e: Exception => e.printStackTrace()
} finally {
if (connection != null) {
connection.close()
}
}
}}
创建MySQL表
def insertDayTop(list: ListBuffer[DayTop]) = {
var con: Connection = null
var state: PreparedStatement = null
try {
con = MySQLUtil.getConnection()
// 关闭自动提交
con.setAutoCommit(false)
val sql = "insert into day_top(day,courseId,times) values(?,?,?)"
state = con.prepareStatement(sql)
for(ele <- list) {
state.setString(1, ele.day)
state.setLong(2, ele.courseId)
state.setLong(3, ele.times)
// 加入批量
state.addBatch()
}
// 批量提交
state.executeBatch()
con.commit()
} catch {
case e: Exception => e.printStackTrace()
} finally {
MySQLUtil.release(con, state)
}
}
删除指定日期的数据
def deleteData(day: String) = {
val tables = Array("day_top", "city_top", "traffic_top")
var con: Connection = null
var state: PreparedStatement = null
try {
con = MySQLUtil.getConnection()
for(table <- tables) {
val deleteSQL = s"delete from $table where day=?"
val state = con.prepareStatement(deleteSQL)
state.setString(1, day)
state.executeUpdate()
}
} catch {
case e: Exception => e.printStackTrace()
} finally {
MySQLUtil.release(con, state)
}
}
调优:
1.控制文件输出大小:coalesce;
2.分区字段的数据类型调整:spark.sql.sources.partitionColumnTypeInference.enabled=false
这样所有的数据就都是字符串类型;
