在线教育项目技术笔记2
文章目录
-
- 一、对象存储OSS
-
-
- 1.阿里云OSS控制台使用
- 2.阿里云OSS开发准备
- 3.实现代码上传文件到阿里云OSS
-
- 二、nginx
-
-
- 1.nginx的启动安装
- 2.nginx配置项目请求转发
-
- 三、excel的导入导出
-
-
- 1.应用场景
- 2.EasyExcel特点
- 3.EasyExcel实现读写操作
-
- 四、路由跳转和二级联动
- 五、富文本编辑
- 六、路由监听
- 七、级联删除
- 八、maven加载机制和xml映射
- 九、阿里云的视频点播
-
-
- 1.阿里云视频点播的配置
- 2.阿里云视频点播的代码编写
- 3.整合阿里云播放器
-
- 十、阿里云ECS
- 十一、整合微服务
-
-
- 1.微服务和springcloud
- 2.nacos
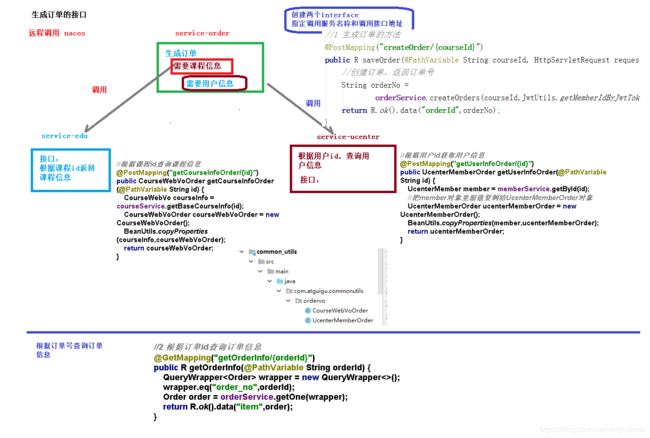
- 3.服务调用
- 4.springcloud调用接口过程
- 5.springcloud的熔断器
-
- 十二、NUXT框架
-
-
- 1.nuxt目录结构
- 2.nuxt页面加载过程
- 3.整合首页内容
- 4.nuxt路由
-
- 十三、Redis
-
-
- 1.Spring缓存注解
- 2.连接redis服务可能遇到的问题
-
- 十四、单点登录
-
-
- 1.单点登录的常用三种方式
- 2.JWT(token的生成规则)
- 3.OAuth2和微信登录
-
- 十五、阿里云短信服务
- 十六、微信支付功能
- 十七、定时任务和统计分析(Echarts图表)
-
-
- 1.定时任务:
- 2.统计分析ECharts:
-
- 十八、数据同步工具Canal
- 十八、SpringCloud组件Gateway网关
- 十九、SpringSecurity
- 二十、Nacos配置中心
- 二十一、持续化部署工具jenkins
一、对象存储OSS
为了解决海量数据存储与弹性扩容,项目中我们采用云存储的解决方案- 阿里云OSS。
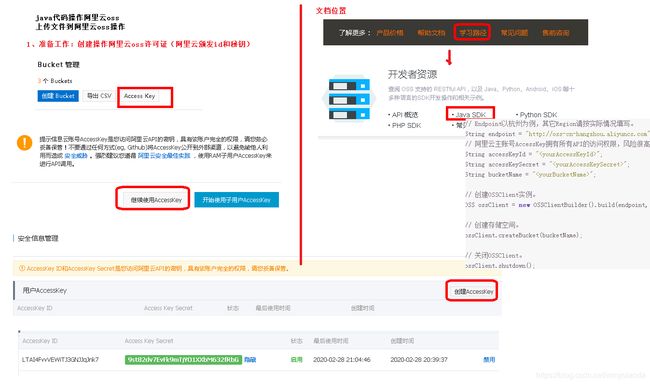
1.阿里云OSS控制台使用

2.阿里云OSS开发准备
3.实现代码上传文件到阿里云OSS
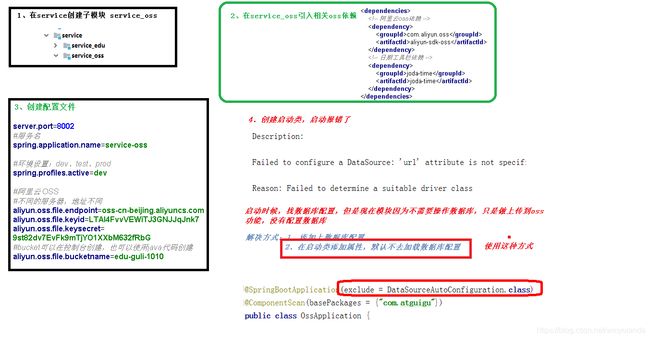
1.pom依赖:
<dependencies>
    <!-- 阿里云oss依赖 -->
    <dependency>
        <groupId>com.aliyun.oss</groupId>
        <artifactId>aliyun-sdk-oss</artifactId>
        <version>2.8.3</version>
    <!-- 日期工具栏依赖 -->
    <dependency>
        <groupId>junit</groupId>
        <artifactId>junit</artifactId>
        <version>4.12</version>
    </dependency>
</dependencies>
2.application.properties:
#服务端口
server.port=8002
#服务名
spring.application.name=service-oss

#环境设置:dev、test、prod
spring.profiles.active=dev

#阿里云 OSS
#不同的服务器,地址不同
aliyun.oss.file.endpoint=oss-cn-shanghai.aliyuncs.com
aliyun.oss.file.keyid=LTAI4GEPgn6u6g2uF65RMQ1g
aliyun.oss.file.keysecret=GOKuD5d9qQwbvZhUwAmOn7vxcTRYlD
#bucket可以在控制台创建,也可以使用java代码创建
aliyun.oss.file.bucketname=edu-wmy
nginx.conf文件的server中添加相应的代理配置:
	location ~ /eduoss/ {
          proxy_pass  http://localhost:8002;
       }
3.启动类:
@SpringBootApplication(exclude = DataSourceAutoConfiguration.class)
@ComponentScan(basePackages = {"com.wmyao"})
public class OssApplication {

    public static void main(String[] args) {
        SpringApplication.run(OssApplication.class, args);
    }
}
阿里云 OSS的参数位置:
aliyun.oss.file.endpoint:
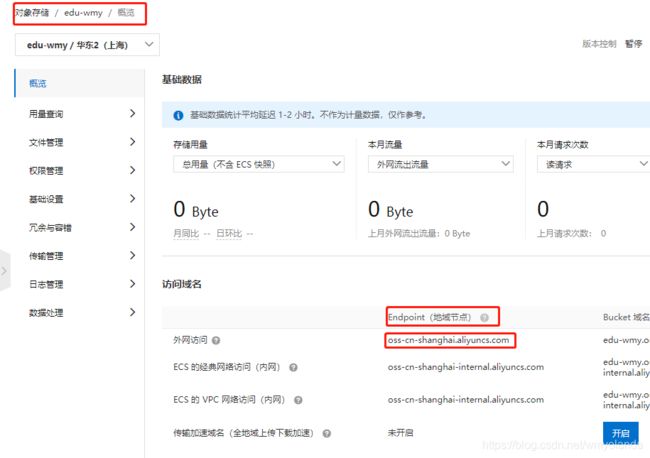
aliyun.oss.file.keyid、aliyun.oss.file.keysecret:
对象存储—概览—Access Key

aliyun.oss.file.bucketname:

4.在项目中获取OSS信息,定义常量类:
import org.springframework.beans.factory.InitializingBean;
import org.springframework.beans.factory.annotation.Value;
import org.springframework.stereotype.Component;

//当项目已启动,spring接口,spring加载之后,执行接口一个方法
@Component
public class ConstantPropertiesUtils implements InitializingBean {

    //读取配置文件内容
    @Value("${aliyun.oss.file.endpoint}")
    private String endpoint;

    @Value("${aliyun.oss.file.keyid}")
    private String keyId;

    @Value("${aliyun.oss.file.keysecret}")
    private String keySecret;

    @Value("${aliyun.oss.file.bucketname}")
    private String bucketName;

    //定义公开静态常量
    public static String END_POIND;
    public static String ACCESS_KEY_ID;
    public static String ACCESS_KEY_SECRET;
    public static String BUCKET_NAME;

    @Override
    public void afterPropertiesSet() throws Exception {
        END_POIND = endpoint;
        ACCESS_KEY_ID = keyId;
        ACCESS_KEY_SECRET = keySecret;
        BUCKET_NAME = bucketName;
    }
}
5.controller类:
import com.wmyao.commonutils.R;
import com.wmyao.oss.service.OssService;
import org.springframework.beans.factory.annotation.Autowired;
import org.springframework.web.bind.annotation.CrossOrigin;
import org.springframework.web.bind.annotation.PostMapping;
import org.springframework.web.bind.annotation.RequestMapping;
import org.springframework.web.bind.annotation.RestController;
import org.springframework.web.multipart.MultipartFile;

@RestController
@RequestMapping("/eduoss/fileoss")
@CrossOrigin
public class OssController {

    @Autowired
    private OssService ossService;

    //上传头像的方法
    @PostMapping
    public R uploadOssFile(MultipartFile file) {
        //获取上传文件  MultipartFile
        //返回上传到oss的路径
        String url = ossService.uploadFileAvatar(file);
        return R.ok().data("url",url);
    }
}
6.service实现类:
import com.aliyun.oss.OSS;
import com.aliyun.oss.OSSClientBuilder;
import com.wmyao.oss.service.OssService;
import com.wmyao.oss.utils.ConstantPropertiesUtils;
import org.joda.time.DateTime;
import org.springframework.stereotype.Service;
import org.springframework.web.multipart.MultipartFile;

import java.io.InputStream;
import java.util.UUID;

@Service
public class OssServiceImpl implements OssService {

    //上传头像到oss
    @Override
    public String uploadFileAvatar(MultipartFile file) {
        // 工具类获取值
        String endpoint = ConstantPropertiesUtils.END_POIND;
        String accessKeyId = ConstantPropertiesUtils.ACCESS_KEY_ID;
        String accessKeySecret = ConstantPropertiesUtils.ACCESS_KEY_SECRET;
        String bucketName = ConstantPropertiesUtils.BUCKET_NAME;

        try {
            // 创建OSS实例。
            OSS ossClient = new OSSClientBuilder().build(endpoint, accessKeyId, accessKeySecret);

            //获取上传文件输入流
            InputStream inputStream = file.getInputStream();
            //获取文件名称
            String fileName = file.getOriginalFilename();

            //1 在文件名称里面添加随机唯一的值
            String uuid = UUID.randomUUID().toString().replaceAll("-","");
            // yuy76t5rew01.jpg
            fileName = uuid+fileName;

            //2 把文件按照日期进行分类
            //获取当前日期
            //   2019/11/12
            String datePath = new DateTime().toString("yyyy/MM/dd");
            //拼接
            //  2019/11/12/ewtqr313401.jpg
            fileName = datePath+"/"+fileName;

            //调用oss方法实现上传
            //第一个参数  Bucket名称
            //第二个参数  上传到oss文件路径和文件名称   aa/bb/1.jpg
            //第三个参数  上传文件输入流
            ossClient.putObject(bucketName,fileName , inputStream);

            // 关闭OSSClient。
            ossClient.shutdown();

            //把上传之后文件路径返回
            //需要把上传到阿里云oss路径手动拼接出来
            //  https://edu-guli-1010.oss-cn-beijing.aliyuncs.com/01.jpg
            String url = "https://"+bucketName+"."+endpoint+"/"+fileName;
            return url;
        }catch(Exception e) {
            e.printStackTrace();
            return null;
        }
    }
}
二、nginx
1.nginx的启动安装
nginx的window版本官方下载解压:http://nginx.org/
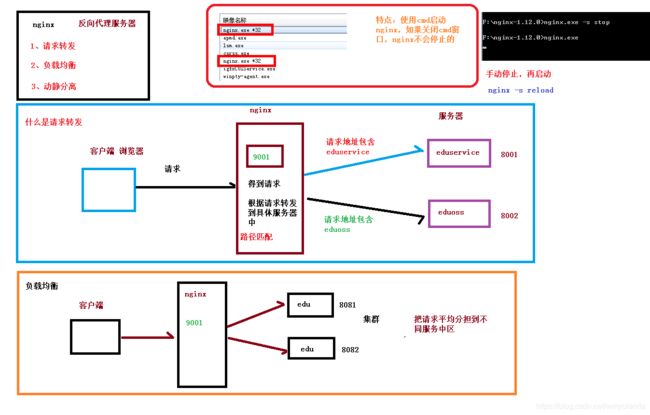
启动报错:nginx.exe

原因:默认的80 端口被占用了
解决:
方法1.关掉占用80端口的服务,再重启,使用命令查看占用的服务:netstat -aon | findstr :80(Windows环境)或者 netstat -an | grep 80(Linux环境)
方法2.修改配置文件里的默认端口号

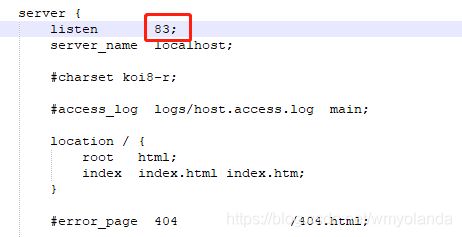
关闭Linux:nginx.exe -s stop
2.nginx配置项目请求转发
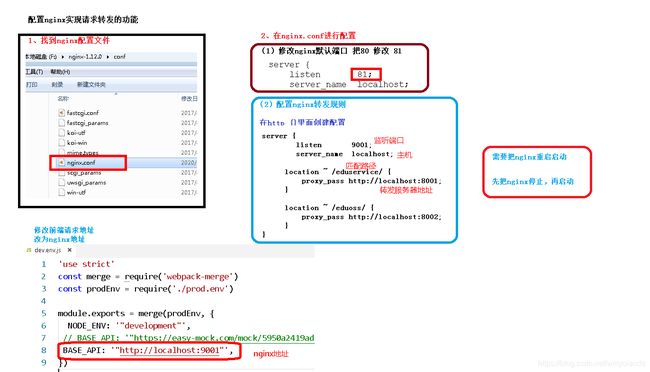
端口号改为:9001
nginx.conf文件的server中添加配置:
		location ~ /edu/ {
           proxy_pass  http://localhost:8001;
        }
		location ~ /eduoss/ {
           proxy_pass  http://localhost:8002;
        }
三、excel的导入导出

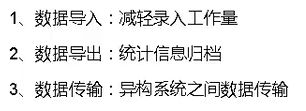
1.应用场景
2.EasyExcel特点

3.EasyExcel实现读写操作
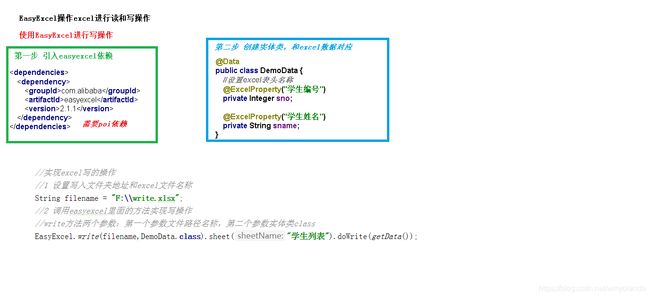
pom依赖:
     <!-- https://mvnrepository.com/artifact/com.alibaba/easyexcel -->
     <dependency>
            <groupId>com.alibaba</groupId>
            <artifactId>easyexcel</artifactId>
            <version>2.1.1</version>
    </dependency>
        <!--xls-->
	<dependency>
  	<groupId>org.apache.poi</groupId>
  	<artifactId>poi</artifactId>
  	<version>3.17</version>
	</dependency>
	<dependency>
  	<groupId>org.apache.poi</groupId>
  	<artifactId>poi-ooxml</artifactId>
  	<version>3.17</version>
	</dependency>
excel对应的实体类:
import com.alibaba.excel.annotation.ExcelProperty;
import lombok.Data;

@Data
public class DemoData {
    //设置excel表头名称
    @ExcelProperty(value = "学生编号",index = 0)
    private Integer sno;
    @ExcelProperty(value = "学生姓名",index = 1)
    private String sname;
}
读excel的监听器类:
import com.alibaba.excel.context.AnalysisContext;
import com.alibaba.excel.event.AnalysisEventListener;

import java.util.Map;

public class ExcelListener extends AnalysisEventListener<DemoData> {
    //一行一行读取excel内容
    @Override
    public void invoke(DemoData data, AnalysisContext analysisContext) {
        System.out.println("****"+data);
    }
    //读取表头内容
    @Override
    public void invokeHeadMap(Map<Integer, String> headMap, AnalysisContext context) {
        System.out.println("表头:"+headMap);
    }
    //读取完成之后
    @Override
    public void doAfterAllAnalysed(AnalysisContext analysisContext) { }
}
测试读写:
import com.alibaba.excel.EasyExcel;

import java.util.ArrayList;
import java.util.List;

public class TestEasyExcel {

    public static void main(String[] args) {
        //实现excel写的操作
        //1 设置写入文件夹地址和excel文件名称
        String filename = "D:\\write.xlsx";
        //2 调用easyexcel里面的方法实现写操作
        //write方法两个参数:第一个参数文件路径名称,第二个参数实体类class
        EasyExcel.write(filename,DemoData.class).sheet("学生列表").doWrite(getData());


        //实现excel读操作
//        String filename = "D:\\write.xlsx";
//        EasyExcel.read(filename,DemoData.class,new ExcelListener()).sheet().doRead();
    }

    //创建方法返回list集合
    private static List<DemoData> getData() {
        List<DemoData> list = new ArrayList<>();
        for (int i = 0; i < 10; i++) {
            DemoData data = new DemoData();
            data.setSno(i);
            data.setSname("lucy"+i);
            list.add(data);
        }
        return list;
    }
}
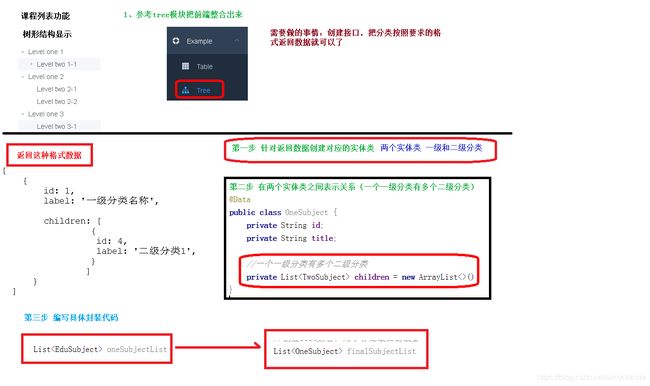
四、路由跳转和二级联动
课程分类列表树形显示:
课程发布流程说明:
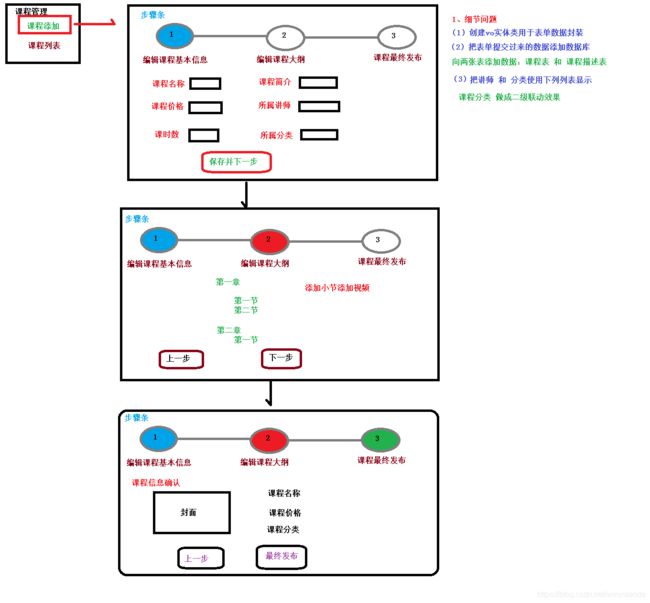
课程相关表关系:

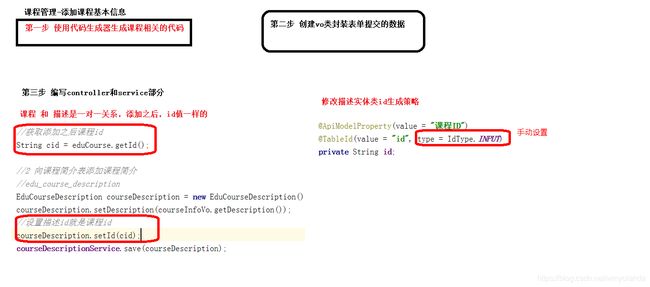
添加课程基本信息接口:
添加课程基本信息前端:

  saveOrUpdate() {
            course.addCourseInfo(this.courseInfo)
                .then(response => {
                    //提示
                    this.$message({
                        type: 'success',
                        message: '添加课程信息成功!'
                    });
                    //跳转到第二步
                    this.$router.push({path:'/course/chapter/'+response.data.courseId})
                })
        }
讲师下拉列表显示:
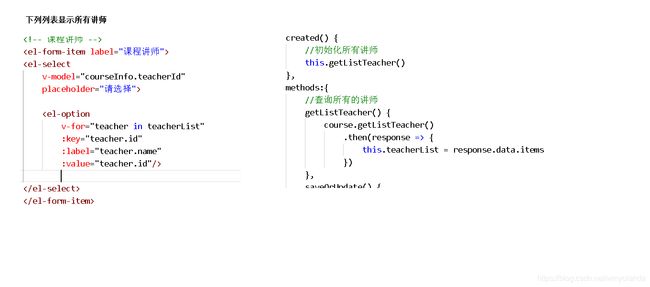
<el-form-item label="课程讲师">
        <el-select
            v-model="courseInfo.teacherId"
            placeholder="请选择">

            <el-option
                v-for="teacher in teacherList"
                :key="teacher.id"
                :label="teacher.name"
                :value="teacher.id"/>

        </el-select>
        </el-form-item>
 //查询所有的讲师
        getListTeacher() {
            course.getListTeacher()
                .then(response => {
                    this.teacherList = response.data.items
                })
        }
课程分类二级联动:

 //点击某个一级分类,触发change,显示对应二级分类
        subjectLevelOneChanged(value) {
            //value就是一级分类id值
            //遍历所有的分类,包含一级和二级
            for(var i=0;i<this.subjectOneList.length;i++) {
                //每个一级分类
                var oneSubject = this.subjectOneList[i]
                //判断:所有一级分类id 和 点击一级分类id是否一样
                if(value === oneSubject.id) {
                    //从一级分类获取里面所有的二级分类
                    this.subjectTwoList = oneSubject.children
                    //把二级分类id值清空
                    this.courseInfo.subjectId = ''
                }
            }
        }
五、富文本编辑

在build—Webpack.dev.conf.js中 new HtmlWebpackPlugin里加上配置:
  templateParameters: {
        BASE_URL: config.dev.assetsPublicPath + config.dev.assetsSubDirectory
     }
index.html引入组件的js:
 <script src=<%= BASE_URL %>/tinymce4.7.5/tinymce.min.js></script>
 <script src=<%= BASE_URL %>/tinymce4.7.5/langs/zh_CN.js></script>
组件的声明和引用:
import Tinymce from '@/components/Tinymce' //引入组件
export default {
    //声明组件
    components:{Tinymce}
    }
页面引用组件:
 <!-- 课程简介 TODO -->
        <el-form-item label="课程简介">
            <!-- <el-input v-model="courseInfo.description" placeholder=" "/> -->
             <tinymce :height="300" v-model="courseInfo.description" placeholder=" "/>
        </el-form-item>
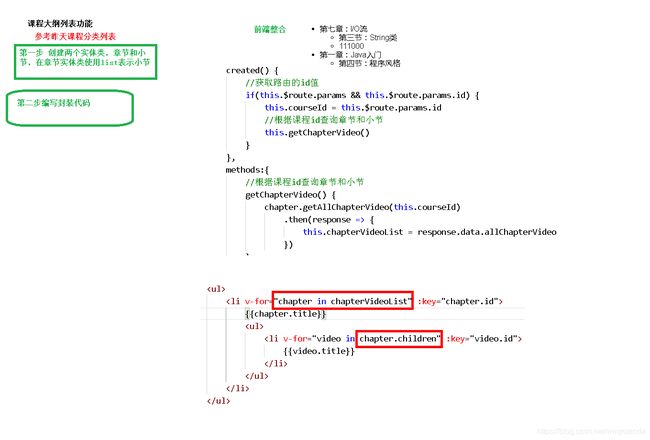
章节和小节的嵌套查询:
 //课程大纲列表,根据课程id进行查询
    @Override
    public List<ChapterVo> getChapterVideoByCourseId(String courseId) {

        //1 根据课程id查询课程里面所有的章节
        QueryWrapper<EduChapter> wrapperChapter = new QueryWrapper<>();
        wrapperChapter.eq("course_id",courseId);
        List<EduChapter> eduChapterList = baseMapper.selectList(wrapperChapter);

        //2 根据课程id查询课程里面所有的小节
        QueryWrapper<EduVideo> wrapperVideo = new QueryWrapper<>();
        wrapperVideo.eq("course_id",courseId);
        List<EduVideo> eduVideoList = videoService.list(wrapperVideo);

        //创建list集合,用于最终封装数据
        List<ChapterVo> finalList = new ArrayList<>();

        //3 遍历查询章节list集合进行封装
        //遍历查询章节list集合
        for (int i = 0; i < eduChapterList.size(); i++) {
            //每个章节
            EduChapter eduChapter = eduChapterList.get(i);
            //eduChapter对象值复制到ChapterVo里面
            ChapterVo chapterVo = new ChapterVo();
            BeanUtils.copyProperties(eduChapter,chapterVo);
            //把chapterVo放到最终list集合
            finalList.add(chapterVo);

            //创建集合,用于封装章节的小节
            List<VideoVo> videoList = new ArrayList<>();

            //4 遍历查询小节list集合,进行封装
            for (int m = 0; m < eduVideoList.size(); m++) {
                //得到每个小节
                EduVideo eduVideo = eduVideoList.get(m);
                //判断:小节里面chapterid和章节里面id是否一样
                if(eduVideo.getChapterId().equals(eduChapter.getId())) {
                    //进行封装
                    VideoVo videoVo = new VideoVo();
                    BeanUtils.copyProperties(eduVideo,videoVo);
                    //放到小节封装集合
                    videoList.add(videoVo);
                }
            }
            //把封装之后小节list集合,放到章节对象里面
            chapterVo.setChildren(videoList);
        }
        return finalList;
    }
六、路由监听

  watch: {  //监听
        $route(to, from) { //路由变化方式,路由发生变化,方法就会执行
            this.init()
        }
    },
    methods:{
        init(){
            //获取路由id值
            if(this.$route.params && this.$route.params.id) {
                this.courseId = this.$route.params.id
                //调用根据id查询课程的方法
                this.getInfo()

            } else {
                //初始化所有讲师
                this.getListTeacher()
                //初始化一级分类
                this.getOneSubject()
            }
        },
        //根据课程id查询,数据回显
        getInfo() {
            course.getCourseInfoId(this.courseId)
                .then(response => {
                    //在courseInfo课程基本信息,包含 一级分类id 和 二级分类id
                    this.courseInfo = response.data.courseInfoVo
                    //1 查询所有的分类,包含一级和二级
                    subject.getSubjectList()
                        .then(response => {
                            //2 获取所有一级分类
                            this.subjectOneList = response.data.list
                            //3 把所有的一级分类数组进行遍历,
                            for(var i=0;i<this.subjectOneList.length;i++) {
                                //获取每个一级分类
                                var oneSubject = this.subjectOneList[i]
                                //比较当前courseInfo里面一级分类id和所有的一级分类id
                                if(this.courseInfo.subjectParentId == oneSubject.id) {
                                    //获取一级分类所有的二级分类
                                    this.subjectTwoList = oneSubject.children
                                }
                            }
                        })
                        //初始化所有讲师
                        this.getListTeacher()
                })
        }
    }
七、级联删除
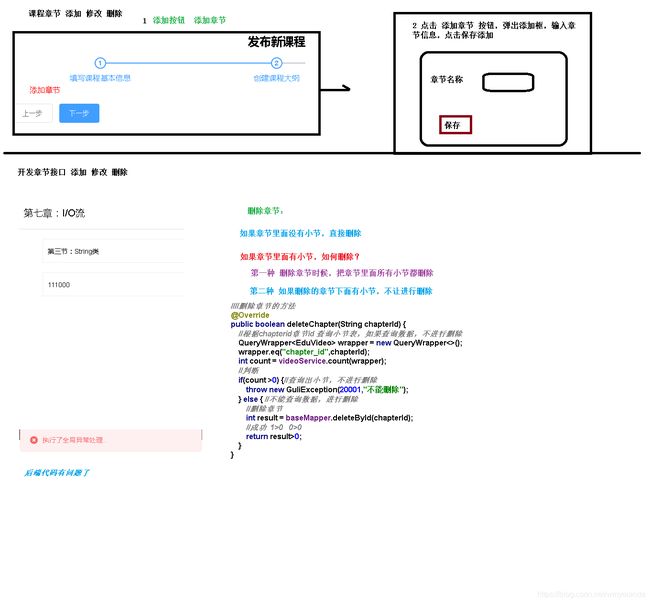
 //删除章节的方法
    @Override
    public boolean deleteChapter(String chapterId) {
        //根据chapterid章节id 查询小节表,如果查询数据,不进行删除
        QueryWrapper<EduVideo> wrapper = new QueryWrapper<>();
        wrapper.eq("chapter_id",chapterId);
        int count = videoService.count(wrapper);
        //判断
        if(count >0) {//查询出小节,不进行删除
            throw new GuliException(20001,"不能删除");
        } else { //不能查询数据,进行删除
            //删除章节
            int result = baseMapper.deleteById(chapterId);
            //成功  1>0   0>0
            return result>0;
        }
    }

 //删除课程
    @Override
    public void removeCourse(String courseId) {
        //1 根据课程id删除小节
        eduVideoService.removeVideoByCourseId(courseId);

        //2 根据课程id删除章节
        chapterService.removeChapterByCourseId(courseId);

        //3 根据课程id删除描述
        courseDescriptionService.removeById(courseId);

        //4 根据课程id删除课程本身
        int result = baseMapper.deleteById(courseId);
        if(result == 0) { //失败返回
            throw new GuliException(20001,"删除失败");
        }
    }
八、maven加载机制和xml映射
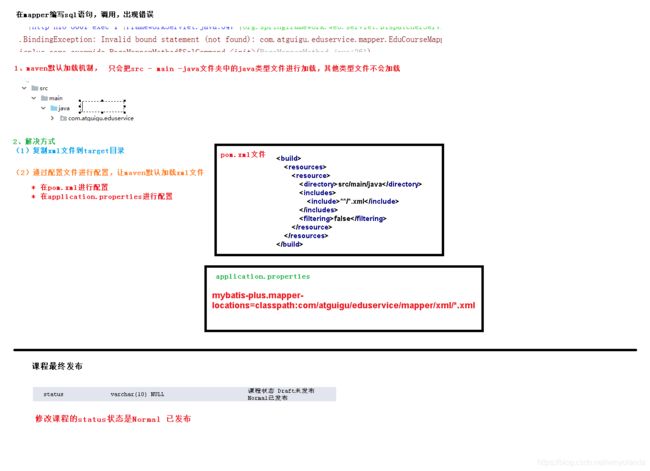

连表查询sql:
<!--sql语句:根据课程id查询课程确认信息-->
    <select id="getPublishCourseInfo" resultType="com.atguigu.eduservice.entity.vo.CoursePublishVo">
        SELECT ec.id,ec.title,ec.price,ec.lesson_num AS lessonNum,ec.cover,
               et.name AS teacherName,
               es1.title AS subjectLevelOne,
               es2.title AS subjectLevelTwo
        FROM edu_course ec LEFT OUTER JOIN edu_course_description ecd ON ec.id=ecd.id
                           LEFT OUTER JOIN edu_teacher et ON ec.teacher_id=et.id
                           LEFT OUTER JOIN edu_subject es1 ON ec.subject_parent_id=es1.id
                   LEFT OUTER JOIN edu_subject es2 ON ec.subject_id=es2.id
        WHERE ec.id=#{courseId}
    </select>
九、阿里云的视频点播
1.阿里云视频点播的配置

2.阿里云视频点播的代码编写
所有依赖包版本:
<properties>
        <java.version>1.8</java.version>
        <guli.version>0.0.1-SNAPSHOT</guli.version>
        <mybatis-plus.version>3.0.5</mybatis-plus.version>
        <velocity.version>2.0</velocity.version>
        <swagger.version>2.7.0</swagger.version>
        <aliyun.oss.version>2.8.3</aliyun.oss.version>
        <jodatime.version>2.10.1</jodatime.version>
        <poi.version>3.17</poi.version>
        <commons-fileupload.version>1.3.1</commons-fileupload.version>
        <commons-io.version>2.6</commons-io.version>
        <httpclient.version>4.5.1</httpclient.version>
        <jwt.version>0.7.0</jwt.version>
        <aliyun-java-sdk-core.version>4.3.3</aliyun-java-sdk-core.version>
        <aliyun-sdk-oss.version>3.1.0</aliyun-sdk-oss.version>
        <aliyun-java-sdk-vod.version>2.15.2</aliyun-java-sdk-vod.version>
        <aliyun-java-vod-upload.version>1.4.11</aliyun-java-vod-upload.version>
        <aliyun-sdk-vod-upload.version>1.4.11</aliyun-sdk-vod-upload.version>
        <fastjson.version>1.2.28</fastjson.version>
        <gson.version>2.8.2</gson.version>
        <json.version>20170516</json.version>
        <commons-dbutils.version>1.7</commons-dbutils.version>
        <canal.client.version>1.1.0</canal.client.version>
        <docker.image.prefix>zx</docker.image.prefix>
        <cloud-alibaba.version>0.2.2.RELEASE</cloud-alibaba.version>
    </properties>
1.pom依赖:
 <!--视频点播依赖-->
        <dependency>
            <groupId>com.aliyun</groupId>
            <artifactId>aliyun-java-sdk-core</artifactId>
        </dependency>
        <dependency>
            <groupId>com.aliyun.oss</groupId>
            <artifactId>aliyun-sdk-oss</artifactId>
        </dependency>
        <dependency>
            <groupId>com.aliyun</groupId>
            <artifactId>aliyun-java-sdk-vod</artifactId>
        </dependency>
        <dependency>
            <groupId>com.aliyun</groupId>
            <artifactId>aliyun-sdk-vod-upload</artifactId>
        </dependency>
        <dependency>
            <groupId>com.alibaba</groupId>
            <artifactId>fastjson</artifactId>
        </dependency>
        <dependency>
            <groupId>org.json</groupId>
            <artifactId>json</artifactId>
        </dependency>
        <dependency>
            <groupId>com.google.code.gson</groupId>
            <artifactId>gson</artifactId>
        </dependency>

        <dependency>
            <groupId>joda-time</groupId>
            <artifactId>joda-time</artifactId>
        </dependency>
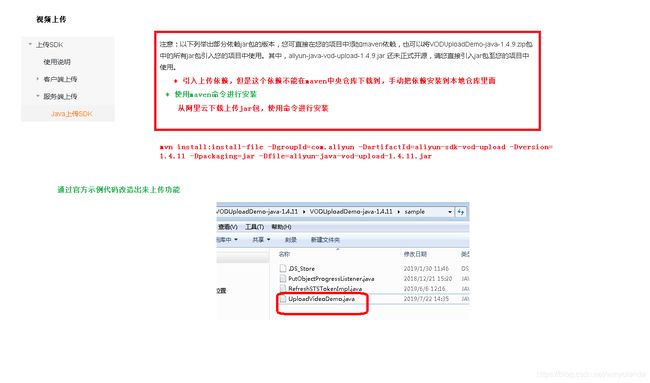
aliyun-sdk-vod-upload依赖引入和报错解决办法:
https://blog.csdn.net/weixin_48826306/article/details/113783508
2.application.properties:
# 服务端口
server.port=8003
# 服务名
spring.application.name=service-vod
# 环境设置:dev、test、prod
spring.profiles.active=dev
#阿里云 vod
#不同的服务器,地址不同
aliyun.vod.file.keyid=LTAI4GEPgn6u6g2uF65RMQ1g
aliyun.vod.file.keysecret=GOKuD5d9qQwbvZhUwAmOn7vxcTRYlD
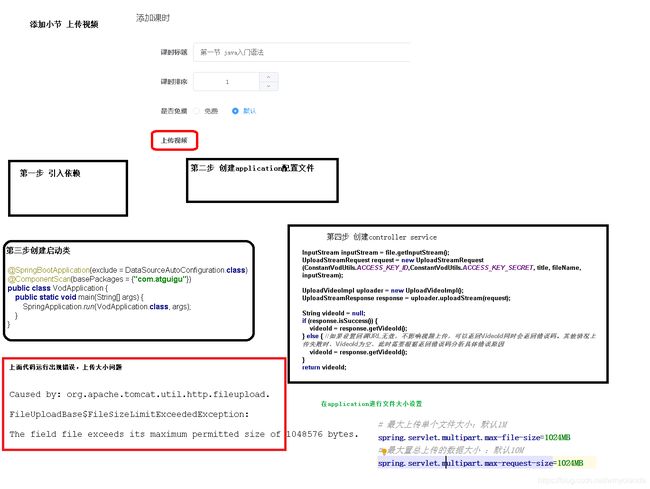
# 最大上传单个文件大小:默认1M
spring.servlet.multipart.max-file-size=1024MB
# 最大置总上传的数据大小 :默认10M
spring.servlet.multipart.max-request-size=1024MB
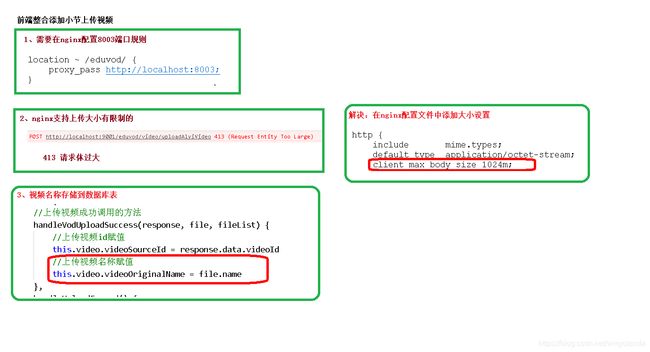
nginx.conf文件的sever添加相应的代理配置:
	location ~ /eduvod/ {
          proxy_pass  http://localhost:8003;
     }
nginx.conf文件的http添加文件的大小配置:
	#nginx默认上传文件1m
	client_max_body_size 1024m;
3.主启动:
@SpringBootApplication(exclude = DataSourceAutoConfiguration.class)
@ComponentScan(basePackages = {"com.wmyao"})
public class VodApplication {

    public static void main(String[] args) {
        SpringApplication.run(VodApplication.class, args);
    }
}
4.controller类:
import com.aliyuncs.DefaultAcsClient;
import com.aliyuncs.vod.model.v20170321.DeleteVideoRequest;
import com.wmyao.commonutils.R;
import com.wmyao.servicebase.exceptionhandler.GuliException;
import com.wmyao.vod.Utils.ConstantVodUtils;
import com.wmyao.vod.Utils.InitVodCilent;
import com.wmyao.vod.service.VodService;
import org.springframework.beans.factory.annotation.Autowired;
import org.springframework.web.bind.annotation.*;
import org.springframework.web.multipart.MultipartFile;

import java.util.List;

@RestController
@RequestMapping("/eduvod/video")
@CrossOrigin
public class VodController {

    @Autowired
    private VodService vodService;

    //上传视频到阿里云
    @PostMapping("uploadAlyiVideo")
    public R uploadAlyiVideo(MultipartFile file) {
        //返回上传视频id
        String videoId = vodService.uploadVideoAly(file);
        return R.ok().data("videoId",videoId);
    }

    //根据视频id删除阿里云视频
    @DeleteMapping("removeAlyVideo/{id}")
    public R removeAlyVideo(@PathVariable String id) {
        try {
            //初始化对象
            DefaultAcsClient client = InitVodCilent.initVodClient(ConstantVodUtils.ACCESS_KEY_ID, ConstantVodUtils.ACCESS_KEY_SECRET);
            //创建删除视频request对象
            DeleteVideoRequest request = new DeleteVideoRequest();
            //向request设置视频id
            request.setVideoIds(id);
            //调用初始化对象的方法实现删除
            client.getAcsResponse(request);
            return R.ok();
        }catch(Exception e) {
            e.printStackTrace();
            throw new GuliException(20001,"删除视频失败");
        }
    }

    //删除多个阿里云视频的方法
    //参数多个视频id  List videoIdList
    @DeleteMapping("delete-batch")
    public R deleteBatch(@RequestParam("videoIdList") List<String> videoIdList) {
        vodService.removeMoreAlyVideo(videoIdList);
        return R.ok();
    }
}
5.service实现类:
 import com.aliyun.vod.upload.impl.UploadVideoImpl;
import com.aliyun.vod.upload.req.UploadStreamRequest;
import com.aliyun.vod.upload.resp.UploadStreamResponse;
import com.aliyuncs.DefaultAcsClient;
import com.aliyuncs.vod.model.v20170321.DeleteVideoRequest;
import com.wmyao.servicebase.exceptionhandler.GuliException;
import com.wmyao.vod.Utils.ConstantVodUtils;
import com.wmyao.vod.Utils.InitVodCilent;
import com.wmyao.vod.service.VodService;
import org.apache.commons.lang3.StringUtils;
import org.springframework.stereotype.Service;
import org.springframework.web.multipart.MultipartFile;

import java.io.InputStream;
import java.util.ArrayList;
import java.util.List;

@Service
public class VodServiceImpl implements VodService {

    @Override
    public String uploadVideoAly(MultipartFile file) {

        try {
            //accessKeyId, accessKeySecret
            //fileName:上传文件原始名称
            // 01.03.09.mp4
            String fileName = file.getOriginalFilename();
            //title:上传之后显示名称
            String title = fileName.substring(0, fileName.lastIndexOf("."));
            //inputStream:上传文件输入流
            InputStream inputStream = file.getInputStream();
            UploadStreamRequest request = new UploadStreamRequest(ConstantVodUtils.ACCESS_KEY_ID,ConstantVodUtils.ACCESS_KEY_SECRET, title, fileName, inputStream);

            UploadVideoImpl uploader = new UploadVideoImpl();
            UploadStreamResponse response = uploader.uploadStream(request);

            String videoId = null;
            if (response.isSuccess()) {
                videoId = response.getVideoId();
            } else { //如果设置回调URL无效,不影响视频上传,可以返回VideoId同时会返回错误码。其他情况上传失败时,VideoId为空,此时需要根据返回错误码分析具体错误原因
                videoId = response.getVideoId();
            }
            return videoId;
        }catch(Exception e) {
            e.printStackTrace();
            return null;
        }

    }

    @Override
    public void removeMoreAlyVideo(List videoIdList) {
        try {
            //初始化对象
            DefaultAcsClient client = InitVodCilent.initVodClient(ConstantVodUtils.ACCESS_KEY_ID, ConstantVodUtils.ACCESS_KEY_SECRET);
            //创建删除视频request对象
            DeleteVideoRequest request = new DeleteVideoRequest();

            //videoIdList值转换成 1,2,3
            String videoIds = StringUtils.join(videoIdList.toArray(), ",");

            //向request设置视频id
            request.setVideoIds(videoIds);
            //调用初始化对象的方法实现删除
            client.getAcsResponse(request);
        }catch(Exception e) {
            e.printStackTrace();
            throw new GuliException(20001,"删除视频失败");
        }
    }

    public static void main(String[] args) {
        List<String> list = new ArrayList<>();
        list.add("11");
        list.add("22");
        list.add("33");
        // 11,22,33
        String join = StringUtils.join(list.toArray(), ",");
        System.out.println(join);
    }
}
6.定义常量类:
import org.springframework.beans.factory.InitializingBean;
import org.springframework.beans.factory.annotation.Value;
import org.springframework.stereotype.Component;

@Component
public class ConstantVodUtils implements InitializingBean {

    @Value("${aliyun.vod.file.keyid}")
    private String keyid;

    @Value("${aliyun.vod.file.keysecret}")
    private String keysecret;

    public static String ACCESS_KEY_SECRET;
    public static String ACCESS_KEY_ID;

    @Override
    public void afterPropertiesSet() throws Exception {
        ACCESS_KEY_ID = keyid;
        ACCESS_KEY_SECRET = keysecret;
    }
}
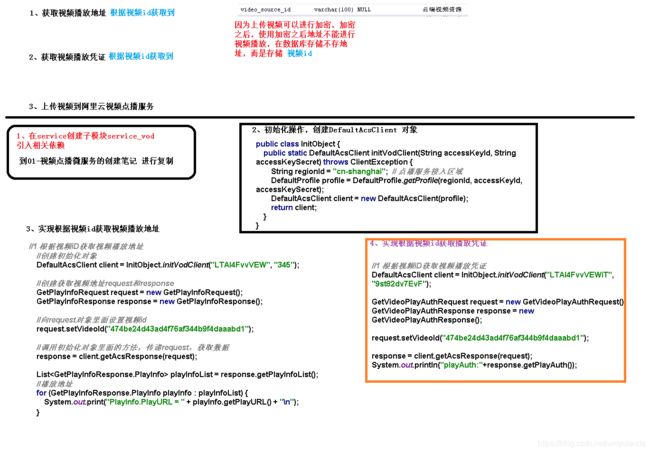
7.视频点播客户端初始化类:
import com.aliyun.oss.ClientException;
import com.aliyuncs.DefaultAcsClient;
import com.aliyuncs.profile.DefaultProfile;

public class InitVodCilent {

    public static DefaultAcsClient initVodClient(String accessKeyId, String accessKeySecret) throws ClientException {
        String regionId = "cn-shanghai";  // 点播服务接入区域
        DefaultProfile profile = DefaultProfile.getProfile(regionId, accessKeyId, accessKeySecret);
        DefaultAcsClient client = new DefaultAcsClient(profile);
        return client;
    }
}
3.整合阿里云播放器
_vid.vue:
<template>
  <div>

    <!-- 阿里云视频播放器样式 -->
    <link rel="stylesheet" href="https://g.alicdn.com/de/prismplayer/2.8.1/skins/default/aliplayer-min.css" >
    <!-- 阿里云视频播放器脚本 -->
    <script charset="utf-8" type="text/javascript" src="https://g.alicdn.com/de/prismplayer/2.8.1/aliplayer-min.js" />

    <!-- 定义播放器dom -->
    <div id="J_prismPlayer" class="prism-player" />
  </div>
</template>
<script>
import vod from '@/api/vod'

export default {
    layout: 'video',//应用video布局
    asyncData({ params, error }) {
       return vod.getPlayAuth(params.vid)
        .then(response => {
            return {
                playAuth: response.data.data.playAuth,
                vid: params.vid
            }
        })
    },
    mounted() { //页面渲染之后  created
        new Aliplayer({
            id: 'J_prismPlayer',
            vid: this.vid, // 视频id
            playauth: this.playAuth, // 播放凭证
            encryptType: '1', // 如果播放加密视频,则需设置encryptType=1,非加密视频无需设置此项
            width: '100%',
            height: '500px',
            // 以下可选设置
            cover: 'http://guli.shop/photo/banner/1525939573202.jpg', // 封面
            qualitySort: 'asc', // 清晰度排序

            mediaType: 'video', // 返回音频还是视频
            autoplay: false, // 自动播放
            isLive: false, // 直播
            rePlay: false, // 循环播放
            preload: true,
            controlBarVisibility: 'hover', // 控制条的显示方式:鼠标悬停
            useH5Prism: true, // 播放器类型:html5
        }, function(player) {
            console.log('播放器创建成功')
        })
    }

}
</script>
vod.js:
import request from '@/utils/request'
export default {
  getPlayAuth(vid) {
    return request({
      url: `/eduvod/video/getPlayAuth/${vid}`,
      method: 'get'
    })
  }

}
request.js:
import axios from 'axios'
import cookie from 'js-cookie'

// 创建axios实例
const service = axios.create({
  baseURL: 'http://localhost:9001', // api的base_url
  timeout: 20000 // 请求超时时间
})

// 拦截器:每次请求中使用拦截器
service.interceptors.request.use(
  config=>{
      if(cookie.get('guli_token')){
        //把获取的cookie值放到header里面
        config.headers['token']=cookie.get('guli_token');
      }
      return config
  },
  err=>{
    return Promise.reject(err)
  }
)
export default service
后端接口:
 //根据视频id获取视频凭证
    @GetMapping("getPlayAuth/{id}")
    public R getPlayAuth(@PathVariable String id) {
        try {
            //创建初始化对象
            DefaultAcsClient client =
                    InitVodCilent.initVodClient(ConstantVodUtils.ACCESS_KEY_ID, ConstantVodUtils.ACCESS_KEY_SECRET);
            //创建获取凭证request和response对象
            GetVideoPlayAuthRequest request = new GetVideoPlayAuthRequest();
            //向request设置视频id
            request.setVideoId(id);
            //调用方法得到凭证
            GetVideoPlayAuthResponse response = client.getAcsResponse(request);
            String playAuth = response.getPlayAuth();
            return R.ok().data("playAuth",playAuth);
        }catch(Exception e) {
            throw new GuliException(20001,"获取凭证失败");
        }
    }
十、阿里云ECS
shell命令窗口编写:https://blog.csdn.net/sdksdk0/article/details/51166756
Linux防火墙端口开放:https://www.cnblogs.com/66w66/p/12618005.html
Linux的tomcat安装:
https://w.cnblogs.com/proper128/p/11181760.html
阿里云ECS:
https://blog.csdn.net/longqizhanshen/article/details/106962721
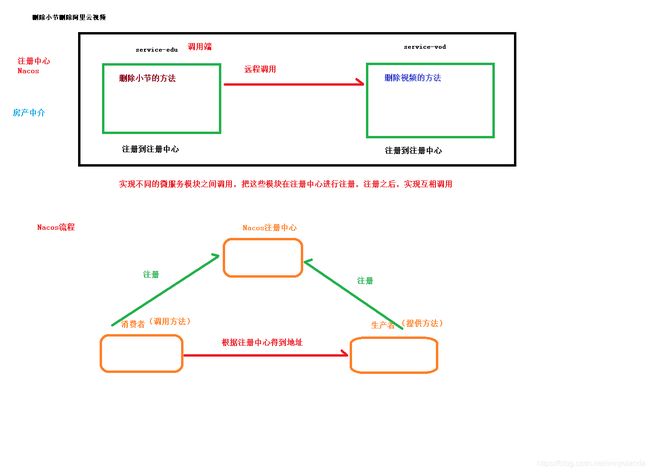
十一、整合微服务
1.微服务和springcloud
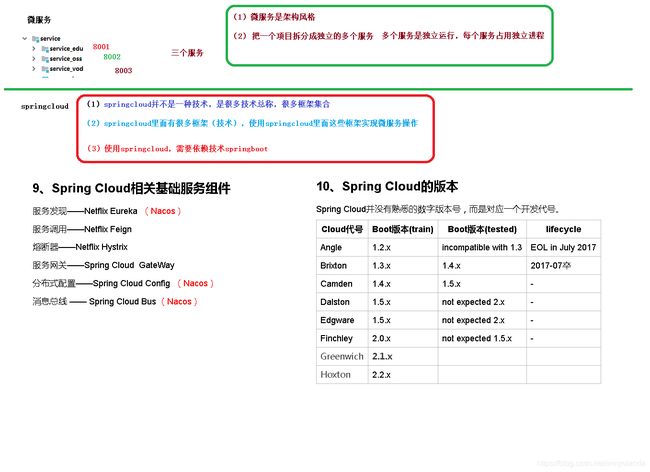
2.nacos
pom:
		<!--服务注册-->
        <dependency>
             <groupId>org.springframework.cloud</groupId>
             <artifactId>spring-cloud-starter-alibaba-nacos-discovery</artifactId>
         </dependency>
application.properties:
#nacos服务地址
spring.cloud.nacos.discovery.server-addr=127.0.0.1:8848
启动类添加注解:@EnableDiscoveryClient
3.服务调用


4.springcloud调用接口过程

5.springcloud的熔断器

#开启熔断机制
feign.hystrix.enabled=true
import com.wmyao.commonutils.R;
import com.wmyao.edu.client.VodFileDegradeFeignClient;
import org.springframework.cloud.openfeign.FeignClient;
import org.springframework.stereotype.Component;
import org.springframework.web.bind.annotation.DeleteMapping;
import org.springframework.web.bind.annotation.PathVariable;
import org.springframework.web.bind.annotation.RequestParam;

import java.util.List;

@FeignClient(name = "service-vod",fallback = VodFileDegradeFeignClient.class) //调用的服务名称
@Component
public interface VodClient {

    //定义调用的方法路径
    //根据视频id删除阿里云视频
    //@PathVariable注解一定要指定参数名称,否则出错
    @DeleteMapping("/eduvod/video/removeAlyVideo/{id}")
    public R removeAlyVideo(@PathVariable("id") String id);

    //定义调用删除多个视频的方法
    //删除多个阿里云视频的方法
    //参数多个视频id  List videoIdList
    @DeleteMapping("/eduvod/video/delete-batch")
    public R deleteBatch(@RequestParam("videoIdList") List<String> videoIdList);
}
十二、NUXT框架
NUXT是nodejs里的框架
SEO: 综合查询,可以查到该网站在各大搜索引擎的信息,包括收录,反链及关键词排名,也可以一目了然的看到该域名的相关信息,比如域名年龄相关备案等等,及时调整网站优化。
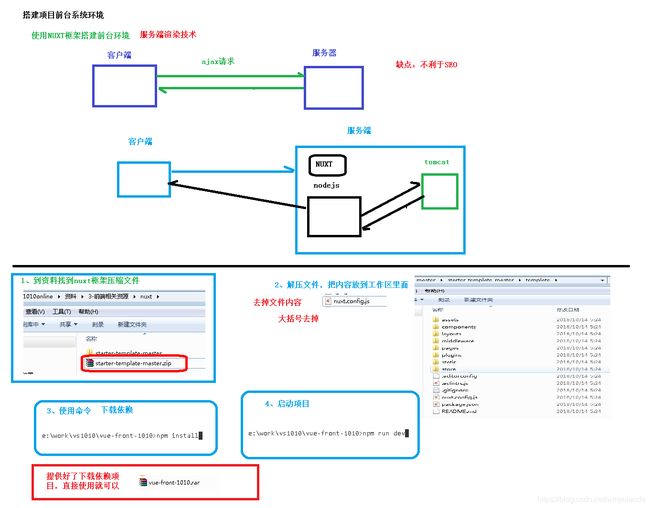
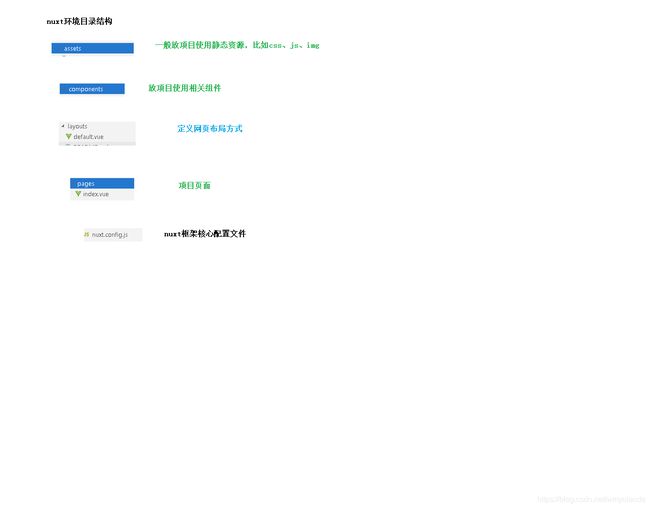
1.nuxt目录结构
2.nuxt页面加载过程

3.整合首页内容
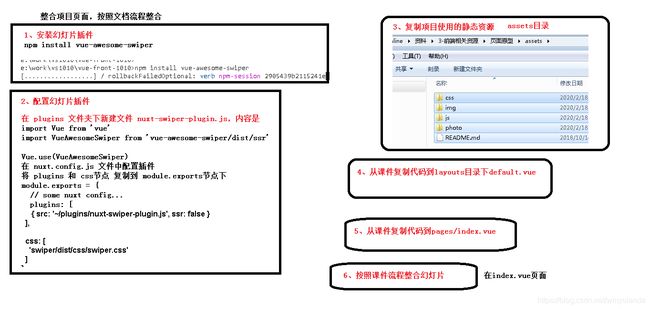
npm install vue-awesome-swiper
在plugins下新建文件nuxt-swiper-plugin.js:
import Vue from 'vue'
import VueAwesomeSwiper from 'vue-awesome-swiper/dist/ssr'

Vue.use(VueAwesomeSwiper)
在配置文件nuxt.config.js里添加:
 plugins: [
    { src: '~/plugins/nuxt-swiper-plugin.js', ssr: false }
  ],

  css: [
    'swiper/dist/css/swiper.css'
  ]
版本问题:Module not found: Error: Can’t resolve ‘swiper/dist/css/swiper.css’
本地执行 npm install 命令时,下载的vue-awesome-swiper版本不一致,直接下载的是最新版5.3.,项目中使用的是3.13版本的。
解决:
// 先卸载掉当前版本的swiper
npm uninstall swiper
// 再安装指定版本的swiper降低一下版本就可以了
npm install vue-awesome-swiper@3.1.3
4.nuxt路由

下载axios: npm install --save axios
使用request.js:
import axios from 'axios'
// 创建axios实例
const service = axios.create({
  baseURL: 'http://localhost:9001', // api的base_url
  timeout: 20000 // 请求超时时间
})
export default service
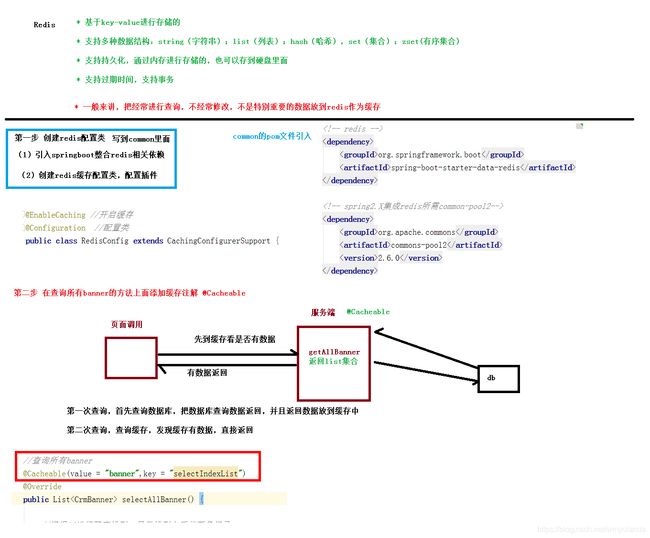
十三、Redis
Redis是当前比较热门的NOSQL系统之一,它是一个开源的使用ANSI c语言编写的key-value存储系统(区别于MySQL的二维表格的形式存储。)。和Memcache类似,但很大程度补偿了Memcache的不足。和Memcache一样,Redis数据都是缓存在计算机内存中,不同的是,Memcache只能将数据缓存到内存中,无法自动定期写入硬盘,这就表示,一断电或重启,内存清空,数据丢失。所以Memcache的应用场景适用于缓存无需持久化的数据。而Redis不同的是它会周期性的把更新的数据写入磁盘或者把修改操作写入追加的记录文件,实现数据的持久化。
Redis的特点:
1,Redis读取的速度是110000次/s,写的速度是81000次/s;
2,原子 。Redis的所有操作都是原子性的,同时Redis还支持对几个操作全并后的原子性执行。
3,支持多种数据结构:string(字符串);list(列表);hash(哈希),set(集合);zset(有序集合)
4,持久化,集群部署
5,支持过期时间,支持事务,消息订阅

pom.xml依赖:
<!-- redis -->
<dependency>
    <groupId>org.springframework.boot</groupId>
    <artifactId>spring-boot-starter-data-redis</artifactId></dependency>
<!-- spring2.X集成redis所需common-pool2-->
<dependency>
    <groupId>org.apache.commons</groupId>
    <artifactId>commons-pool2</artifactId>
    <version>2.6.0</version>
</dependency>
redis配置:
spring.redis.host=192.168.44.132
spring.redis.port=6379
spring.redis.database= 0
spring.redis.timeout=1800000
spring.redis.lettuce.pool.max-active=20
spring.redis.lettuce.pool.max-wait=-1
#最大阻塞等待时间(负数表示没限制)
spring.redis.lettuce.pool.max-idle=5
spring.redis.lettuce.pool.min-idle=0
RedisConfig.java:
import com.fasterxml.jackson.annotation.JsonAutoDetect;
import com.fasterxml.jackson.annotation.PropertyAccessor;
import com.fasterxml.jackson.databind.ObjectMapper;
import org.springframework.cache.CacheManager;
import org.springframework.cache.annotation.CachingConfigurerSupport;
import org.springframework.cache.annotation.EnableCaching;
import org.springframework.context.annotation.Bean;
import org.springframework.context.annotation.Configuration;
import org.springframework.data.redis.cache.RedisCacheConfiguration;
import org.springframework.data.redis.cache.RedisCacheManager;
import org.springframework.data.redis.connection.RedisConnectionFactory;
import org.springframework.data.redis.core.RedisTemplate;
import org.springframework.data.redis.serializer.Jackson2JsonRedisSerializer;
import org.springframework.data.redis.serializer.RedisSerializationContext;
import org.springframework.data.redis.serializer.RedisSerializer;
import org.springframework.data.redis.serializer.StringRedisSerializer;

import java.time.Duration;

@EnableCaching //开启缓存
@Configuration  //配置类
public class RedisConfig extends CachingConfigurerSupport {

    @Bean
    public RedisTemplate<String, Object> redisTemplate(RedisConnectionFactory factory) {
        RedisTemplate<String, Object> template = new RedisTemplate<>();
        RedisSerializer<String> redisSerializer = new StringRedisSerializer();
        Jackson2JsonRedisSerializer jackson2JsonRedisSerializer = new Jackson2JsonRedisSerializer(Object.class);
        ObjectMapper om = new ObjectMapper();
        om.setVisibility(PropertyAccessor.ALL, JsonAutoDetect.Visibility.ANY);
        om.enableDefaultTyping(ObjectMapper.DefaultTyping.NON_FINAL);
        jackson2JsonRedisSerializer.setObjectMapper(om);
        template.setConnectionFactory(factory);
        //key序列化方式
        template.setKeySerializer(redisSerializer);
        //value序列化
        template.setValueSerializer(jackson2JsonRedisSerializer);
        //value hashmap序列化
        template.setHashValueSerializer(jackson2JsonRedisSerializer);
        return template;
    }

    @Bean
    public CacheManager cacheManager(RedisConnectionFactory factory) {
        RedisSerializer<String> redisSerializer = new StringRedisSerializer();
        Jackson2JsonRedisSerializer jackson2JsonRedisSerializer = new Jackson2JsonRedisSerializer(Object.class);
        //解决查询缓存转换异常的问题
        ObjectMapper om = new ObjectMapper();
        om.setVisibility(PropertyAccessor.ALL, JsonAutoDetect.Visibility.ANY);
        om.enableDefaultTyping(ObjectMapper.DefaultTyping.NON_FINAL);
        jackson2JsonRedisSerializer.setObjectMapper(om);
        // 配置序列化(解决乱码的问题),过期时间600秒
        RedisCacheConfiguration config = RedisCacheConfiguration.defaultCacheConfig()
                .entryTtl(Duration.ofSeconds(600))
                .serializeKeysWith(RedisSerializationContext.SerializationPair.fromSerializer(redisSerializer))
                .serializeValuesWith(RedisSerializationContext.SerializationPair.fromSerializer(jackson2JsonRedisSerializer))
                .disableCachingNullValues();
        RedisCacheManager cacheManager = RedisCacheManager.builder(factory)
                .cacheDefaults(config)
                .build();
        return cacheManager;
    }
}
1.Spring缓存注解
参考链接:https://www.cnblogs.com/kingsonfu/p/10409596.html
(1)缓存@Cacheable
根据方法对其返回结果进行缓存,下次请求时,如果缓存存在,则直接读取缓存数据返回;如果缓存不存在,则执行方法,并把返回的结果存入缓存中。一般用在查询方法上。
查看源码,属性值如下:
| 属性/方法名 | 解释 |
|---|---|
| value | 缓存名,必填,它指定了你的缓存存放在哪块命名空间 |
| cacheNames | 与 value 差不多,二选一即可 |
| key | 可选属性,可以使用 SpEL 标签自定义缓存的key |
(2)缓存@CachePut
使用该注解标志的方法,每次都会执行,并将结果存入指定的缓存中。其他方法可以直接从响应的缓存中读取缓存数据,而不需要再去查询数据库。一般用在新增方法上。
查看源码,属性值如下:
| 属性/方法名 | 解释 |
|---|---|
| value | 缓存名,必填,它指定了你的缓存存放在哪块命名空间 |
| cacheNames | 与 value 差不多,二选一即可 |
| key | 可选属性,可以使用 SpEL 标签自定义缓存的key |
(3)缓存@CacheEvict
使用该注解标志的方法,会清空指定的缓存。一般用在更新或者删除方法上
查看源码,属性值如下:
| 属性/方法名 | 解释 |
|---|---|
| value | 缓存名,必填,它指定了你的缓存存放在哪块命名空间 |
| cacheNames | 与 value 差不多,二选一即可 |
| key | 可选属性,可以使用 SpEL 标签自定义缓存的key |
| allEntries | 是否清空所有缓存,默认为 false。如果指定为 true,则方法调用后将立即清空所有的缓存 |
| beforeInvocation | 是否在方法执行前就清空,默认为 false。如果指定为 true,则在方法执行前就会清空缓存 |
实例:
	//查询所有banner
    @Cacheable(value = "banner",key = "'selectIndexList'")
    @Override
    public List<CrmBanner> selectAllBanner() {

        //根据id进行降序排列,显示排列之后前两条记录
        QueryWrapper<CrmBanner> wrapper = new QueryWrapper<>();
        wrapper.orderByDesc("id");
        //last方法,拼接sql语句
        wrapper.last("limit 2");
        List<CrmBanner> list = baseMapper.selectList(null);
        return list;
    }
2.连接redis服务可能遇到的问题
(1)关闭liunx防火墙
(2)找到redis配置文件, 注释一行配置:#bind 127.0.0.1
(3)如果出现下面错误提示:...because protected mode is enabled
修改:protected-mode yes 为:protected-mode no
十四、单点登录
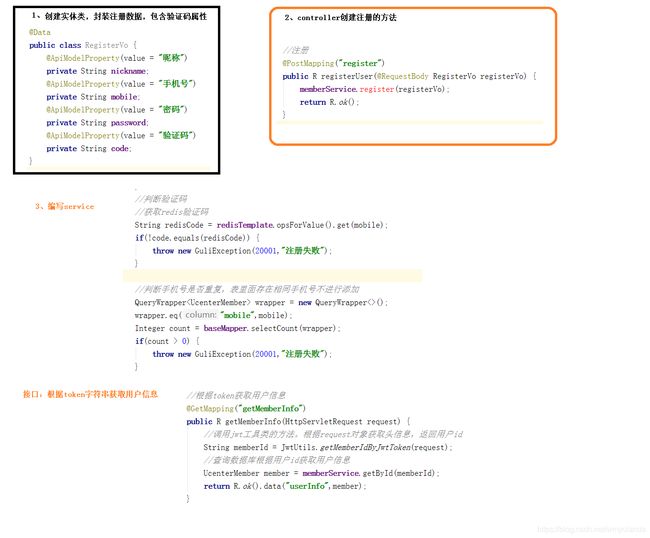
1.单点登录的常用三种方式

2.JWT(token的生成规则)

pom依赖:
    <dependencies>
        <!-- JWT-->
        <dependency>
            <groupId>io.jsonwebtoken</groupId>
            <artifactId>jjwt</artifactId>
        </dependency>
    </dependencies>
JWTutil.java:
import io.jsonwebtoken.Claims;
import io.jsonwebtoken.Jws;
import io.jsonwebtoken.Jwts;
import io.jsonwebtoken.SignatureAlgorithm;
import org.springframework.util.StringUtils;
import javax.servlet.http.HttpServletRequest;
import java.util.Date;

public class JwtUtils {

    //常量
    public static final long EXPIRE = 1000 * 60 * 60 * 24; //token过期时间
    public static final String APP_SECRET = "ukc8BDbRigUDaY6pZFfWus2jZWLPHO"; //秘钥

    //生成token字符串的方法
    public static String getJwtToken(String id, String nickname){

        String JwtToken = Jwts.builder()
                .setHeaderParam("typ", "JWT")
                .setHeaderParam("alg", "HS256")

                .setSubject("guli-user")
                .setIssuedAt(new Date())
                .setExpiration(new Date(System.currentTimeMillis() + EXPIRE))

                .claim("id", id)  //设置token主体部分 ,存储用户信息
                .claim("nickname", nickname)

                .signWith(SignatureAlgorithm.HS256, APP_SECRET)
                .compact();

        return JwtToken;
    }

    /**
     * 判断token是否存在与有效
     * @param jwtToken
     * @return
     */
    public static boolean checkToken(String jwtToken) {
        if(StringUtils.isEmpty(jwtToken)) return false;
        try {
            Jwts.parser().setSigningKey(APP_SECRET).parseClaimsJws(jwtToken);
        } catch (Exception e) {
            e.printStackTrace();
            return false;
        }
        return true;
    }

    /**
     * 判断token是否存在与有效
     * @param request
     * @return
     */
    public static boolean checkToken(HttpServletRequest request) {
        try {
            String jwtToken = request.getHeader("token");
            if(StringUtils.isEmpty(jwtToken)) return false;
            Jwts.parser().setSigningKey(APP_SECRET).parseClaimsJws(jwtToken);
        } catch (Exception e) {
            e.printStackTrace();
            return false;
        }
        return true;
    }

    /**
     * 根据token字符串获取会员id
     * @param request
     * @return
     */
    public static String getMemberIdByJwtToken(HttpServletRequest request) {
        String jwtToken = request.getHeader("token");
        if(StringUtils.isEmpty(jwtToken)) return "";
        Jws<Claims> claimsJws = Jwts.parser().setSigningKey(APP_SECRET).parseClaimsJws(jwtToken);
        Claims claims = claimsJws.getBody();
        return (String)claims.get("id");
    }
}
token方式的单点登录:


安装组件:
npm install element-ui
npm install vue-qriously
nuxt-swiper-plugin.js:
import Vue from 'vue'
import VueAwesomeSwiper from 'vue-awesome-swiper/dist/ssr'
import VueQriously from 'vue-qriously'
import ElementUI from 'element-ui' //element-ui的全部组件
import 'element-ui/lib/theme-chalk/index.css'//element-ui的css
Vue.use(ElementUI) //使用elementUI
Vue.use(VueQriously)
Vue.use(VueAwesomeSwiper)

安装组件:
npm install js-cookie
request.js里面添加拦截器:
import axios from 'axios'
import cookie from 'js-cookie'

// 创建axios实例
const service = axios.create({
  baseURL: 'http://localhost:9001', // api的base_url
  timeout: 20000 // 请求超时时间
})

// 拦截器:每次请求中使用拦截器
service.interceptors.request.use(
  config=>{
      if(cookie.get('guli_token')){
        //把获取的cookie值放到header里面
        config.headers['token']=cookie.get('guli_token');
      }
      return config
  },
  err=>{
    return Promise.reject(err)
  }
)
export default service
登录方法:
 //登录的方法
      submitLogin() {
        //第一步 调用接口进行登录,返回token字符串
        loginApi.submitLoginUser(this.user)
           .then(response => {
             //第二步 获取token字符串放到cookie里面
             //第一个参数cookie名称,第二个参数值,第三个参数作用范围
             cookie.set('guli_token',response.data.data.token,{domain: 'localhost'})

              //第四步 调用接口 根据token获取用户信息,为了首页面显示
              loginApi.getLoginUserInfo()
                .then(response => {
                  this.loginInfo = response.data.data.userInfo
                  //获取返回用户信息,放到cookie里面
                  cookie.set('guli_ucenter',this.loginInfo,{domain: 'localhost'})

                  //跳转页面
                  window.location.href = "/";
                })
           })
      }
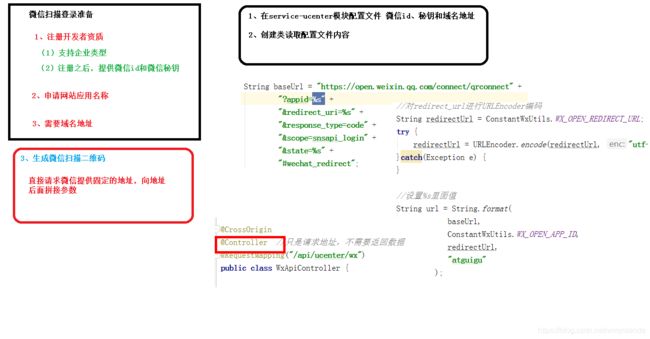
3.OAuth2和微信登录
OAuth2:
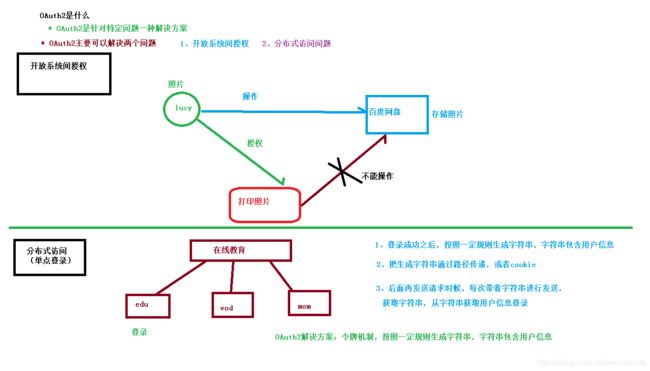
微信登录:


| json转换工具 | 特性 |
|---|---|
| jackson | 反射+反射缓存、良好的stream支持、高效的内存管理 |
| fastjson | jvm虚拟机:通过ASM库运行时生成parser字节码,支持的field不能超过200个。 参考:FastJson使用ASM反序列化。android虚拟机:反射的方式。 |
| gson | 反射+反射缓存、支持部分stream、内存性能较差(gc问题) |
pom依赖:
 <!--httpclient-->
        <dependency>
            <groupId>org.apache.httpcomponents</groupId>
            <artifactId>httpclient</artifactId>
        </dependency>
        <!--commons-io-->
        <dependency>
            <groupId>commons-io</groupId>
            <artifactId>commons-io</artifactId>
        </dependency>
        <!--gson-->
        <dependency>
            <groupId>com.google.code.gson</groupId>
            <artifactId>gson</artifactId>
        </dependency>
    </dependencies>
微信扫码请求接口:
import com.wmyao.commonutils.JwtUtils;
import com.wmyao.educenter.entity.UcenterMember;
import com.wmyao.educenter.service.UcenterMemberService;
import com.wmyao.educenter.utils.ConstantWxUtils;
import com.wmyao.educenter.utils.HttpClientUtils;
import com.wmyao.servicebase.exceptionhandler.GuliException;
import com.google.gson.Gson;
import org.springframework.beans.factory.annotation.Autowired;
import org.springframework.stereotype.Controller;
import org.springframework.web.bind.annotation.*;

import java.net.URLEncoder;
import java.util.HashMap;

@CrossOrigin
@Controller  //只是请求地址,不需要返回数据
@RequestMapping("/api/ucenter/wx")
public class WxApiController {

    @Autowired
    private UcenterMemberService memberService;

    //2 获取扫描人信息,添加数据
    @GetMapping("callback")
    public String callback(String code, String state) {
        try {
            //1 获取code值,临时票据,类似于验证码
            //2 拿着code请求 微信固定的地址,得到两个值 accsess_token 和 openid
            String baseAccessTokenUrl = "https://api.weixin.qq.com/sns/oauth2/access_token" +
                    "?appid=%s" +
                    "&secret=%s" +
                    "&code=%s" +
                    "&grant_type=authorization_code";
            //拼接三个参数 :id  秘钥 和 code值
            String accessTokenUrl = String.format(
                    baseAccessTokenUrl,
                    ConstantWxUtils.WX_OPEN_APP_ID,
                    ConstantWxUtils.WX_OPEN_APP_SECRET,
                    code
            );
            //请求这个拼接好的地址,得到返回两个值 accsess_token 和 openid
            //使用httpclient发送请求,得到返回结果
            String accessTokenInfo = HttpClientUtils.get(accessTokenUrl);

            //从accessTokenInfo字符串获取出来两个值 accsess_token 和 openid
            //把accessTokenInfo字符串转换map集合,根据map里面key获取对应值
            //使用json转换工具 Gson
            Gson gson = new Gson();
            HashMap mapAccessToken = gson.fromJson(accessTokenInfo, HashMap.class);
            String access_token = (String)mapAccessToken.get("access_token");
            String openid = (String)mapAccessToken.get("openid");

            //把扫描人信息添加数据库里面
            //判断数据表里面是否存在相同微信信息,根据openid判断
            UcenterMember member = memberService.getOpenIdMember(openid);
            if(member == null) {//memeber是空,表没有相同微信数据,进行添加

                //3 拿着得到accsess_token 和 openid,再去请求微信提供固定的地址,获取到扫描人信息
                //访问微信的资源服务器,获取用户信息
                String baseUserInfoUrl = "https://api.weixin.qq.com/sns/userinfo" +
                        "?access_token=%s" +
                        "&openid=%s";
                //拼接两个参数
                String userInfoUrl = String.format(
                        baseUserInfoUrl,
                        access_token,
                        openid
                );
                //发送请求
                String userInfo = HttpClientUtils.get(userInfoUrl);
                //获取返回userinfo字符串扫描人信息
                HashMap userInfoMap = gson.fromJson(userInfo, HashMap.class);
                String nickname = (String)userInfoMap.get("nickname");//昵称
                String headimgurl = (String)userInfoMap.get("headimgurl");//头像

                member = new UcenterMember();
                member.setOpenid(openid);
                member.setNickname(nickname);
                member.setAvatar(headimgurl);
                memberService.save(member);
            }

            //使用jwt根据member对象生成token字符串
            String jwtToken = JwtUtils.getJwtToken(member.getId(), member.getNickname());
            //最后:返回首页面,通过路径传递token字符串
            return "redirect:http://localhost:3000?token="+jwtToken;
        }catch(Exception e) {
            throw new GuliException(20001,"登录失败");
        }
    }

    //1 生成微信扫描二维码
    @GetMapping("login")
    public String getWxCode() {
        //固定地址,后面拼接参数
//        String url = "https://open.weixin.qq.com/" +
//                "connect/qrconnect?appid="+ ConstantWxUtils.WX_OPEN_APP_ID+"&response_type=code";

        // 微信开放平台授权baseUrl  %s相当于?代表占位符
        String baseUrl = "https://open.weixin.qq.com/connect/qrconnect" +
                "?appid=%s" +
                "&redirect_uri=%s" +
                "&response_type=code" +
                "&scope=snsapi_login" +
                "&state=%s" +
                "#wechat_redirect";

        //对redirect_url进行URLEncoder编码
        String redirectUrl = ConstantWxUtils.WX_OPEN_REDIRECT_URL;
        try {
            redirectUrl = URLEncoder.encode(redirectUrl, "utf-8");
        }catch(Exception e) {
        }

        //设置%s里面值
        String url = String.format(
                    baseUrl,
                    ConstantWxUtils.WX_OPEN_APP_ID,
                    redirectUrl,
                    "wmyao"
                 );

        //重定向到请求微信地址里面
        return "redirect:"+url;
    }
}


十五、阿里云短信服务
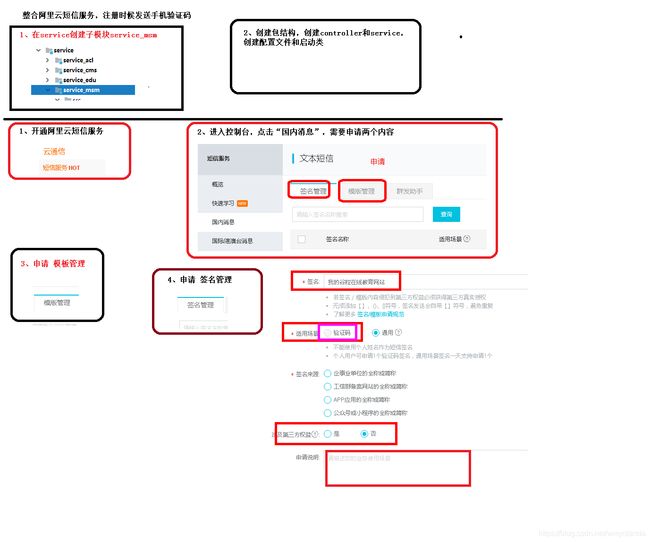

pom.xml依赖:
    <dependency>
         <groupId>com.alibaba</groupId>
         <artifactId>fastjson</artifactId>
     </dependency>
     <dependency>
         <groupId>com.aliyun</groupId>
         <artifactId>aliyun-java-sdk-core</artifactId>
     </dependency>
短信发送实现类:
import com.alibaba.fastjson.JSONObject;
import com.aliyuncs.CommonRequest;
import com.aliyuncs.CommonResponse;
import com.aliyuncs.DefaultAcsClient;
import com.aliyuncs.IAcsClient;
import com.aliyuncs.http.MethodType;
import com.aliyuncs.profile.DefaultProfile;
import com.wmyao.msmservice.service.MsmService;
import org.springframework.stereotype.Service;
import org.springframework.util.StringUtils;

import java.util.Map;

@Service
public class MsmServiceImpl implements MsmService {

    //发送短信的方法
    @Override
    public boolean send(Map<String, Object> param, String phone) {
        if(StringUtils.isEmpty(phone)) return false;

        DefaultProfile profile =
                DefaultProfile.getProfile("default", "LTAI4FvvVEWiTJ3GNJJqJnk7", "9st82dv7EvFk9mTjYO1XXbM632fRbG");
        IAcsClient client = new DefaultAcsClient(profile);

        //设置相关固定的参数
        CommonRequest request = new CommonRequest();
        //request.setProtocol(ProtocolType.HTTPS);
        request.setMethod(MethodType.POST);
        request.setDomain("dysmsapi.aliyuncs.com");
        request.setVersion("2017-05-25");
        request.setAction("SendSms");

        //设置发送相关的参数
        request.putQueryParameter("PhoneNumbers",phone); //手机号
        request.putQueryParameter("SignName","我的谷粒在线教育网站"); //申请阿里云 签名名称
        request.putQueryParameter("TemplateCode","SMS_180051135"); //申请阿里云 模板code
        request.putQueryParameter("TemplateParam", JSONObject.toJSONString(param)); //验证码数据,转换json数据传递

        try {
            //最终发送
            CommonResponse response = client.getCommonResponse(request);
            boolean success = response.getHttpResponse().isSuccess();
            return success;
        }catch(Exception e) {
            e.printStackTrace();
            return false;
        }

    }
}
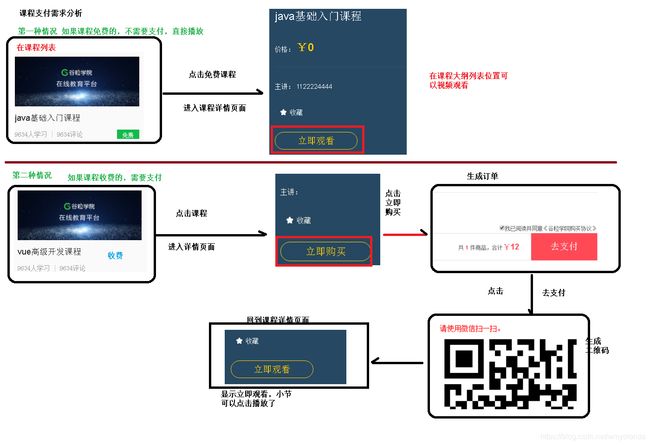
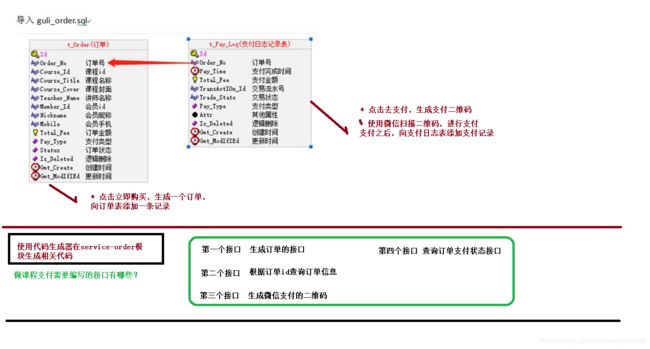
十六、微信支付功能
支付功能的流程:

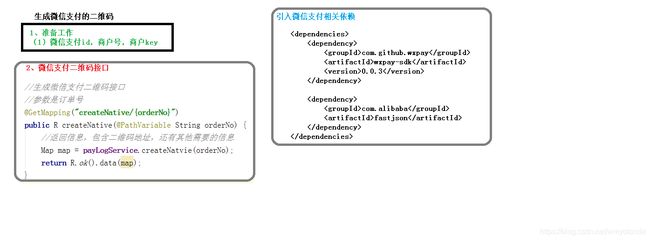
pom依赖:
 		<dependency>
            <groupId>com.github.wxpay</groupId>
            <artifactId>wxpay-sdk</artifactId>
            <version>0.0.3</version>
        </dependency>

        <dependency>
            <groupId>com.alibaba</groupId>
            <artifactId>fastjson</artifactId>
        </dependency>
支付接口实现类:
import com.alibaba.fastjson.JSONObject;
import com.wmyao.eduorder.entity.Order;
import com.wmyao.eduorder.entity.PayLog;
import com.wmyao.eduorder.mapper.PayLogMapper;
import com.wmyao.eduorder.service.OrderService;
import com.wmyao.eduorder.service.PayLogService;
import com.wmyao.eduorder.utils.HttpClient;
import com.wmyao.servicebase.exceptionhandler.GuliException;
import com.baomidou.mybatisplus.core.conditions.query.QueryWrapper;
import com.baomidou.mybatisplus.extension.service.impl.ServiceImpl;
import com.github.wxpay.sdk.WXPayUtil;
import org.springframework.beans.factory.annotation.Autowired;
import org.springframework.stereotype.Service;

import java.math.BigDecimal;
import java.util.Date;
import java.util.HashMap;
import java.util.Map;

/**
 *
 * 支付日志表 服务实现类
 *
 *
 * @author testjava
 * @since 2020-03-13
 */
@Service
public class PayLogServiceImpl extends ServiceImpl<PayLogMapper, PayLog> implements PayLogService {

    @Autowired
    private OrderService orderService;
    //生成微信支付二维码接口
    @Override
    public Map createNatvie(String orderNo) {
        try {
            //1 根据订单号查询订单信息
            QueryWrapper<Order> wrapper = new QueryWrapper<>();
            wrapper.eq("order_no",orderNo);
            Order order = orderService.getOne(wrapper);

            //2 使用map设置生成二维码需要参数
            Map m = new HashMap();
            m.put("appid","wx74862e0dfcf69954");
            m.put("mch_id", "1558950191");
            m.put("nonce_str", WXPayUtil.generateNonceStr());
            m.put("body", order.getCourseTitle()); //课程标题
            m.put("out_trade_no", orderNo); //订单号
            m.put("total_fee", order.getTotalFee().multiply(new BigDecimal("100")).longValue()+"");
            m.put("spbill_create_ip", "127.0.0.1");
            m.put("notify_url", "http://guli.shop/api/order/weixinPay/weixinNotify\n");
            m.put("trade_type", "NATIVE");

            //3 发送httpclient请求,传递参数xml格式,微信支付提供的固定的地址
            HttpClient client = new HttpClient("https://api.mch.weixin.qq.com/pay/unifiedorder");
            //设置xml格式的参数
            client.setXmlParam(WXPayUtil.generateSignedXml(m,"T6m9iK73b0kn9g5v426MKfHQH7X8rKwb"));
            client.setHttps(true);
            //执行post请求发送
            client.post();

            //4 得到发送请求返回结果
            //返回内容,是使用xml格式返回
            String xml = client.getContent();

            //把xml格式转换map集合,把map集合返回
            Map<String,String> resultMap = WXPayUtil.xmlToMap(xml);

            //最终返回数据 的封装
            Map map = new HashMap();
            map.put("out_trade_no", orderNo);
            map.put("course_id", order.getCourseId());
            map.put("total_fee", order.getTotalFee());
            map.put("result_code", resultMap.get("result_code"));  //返回二维码操作状态码
            map.put("code_url", resultMap.get("code_url"));        //二维码地址

            return map;
        }catch(Exception e) {
            throw new GuliException(20001,"生成二维码失败");
        }

    }

    //查询订单支付状态
    @Override
    public Map<String, String> queryPayStatus(String orderNo) {
        try {
            //1、封装参数
            Map m = new HashMap<>();
            m.put("appid", "wx74862e0dfcf69954");
            m.put("mch_id", "1558950191");
            m.put("out_trade_no", orderNo);
            m.put("nonce_str", WXPayUtil.generateNonceStr());

            //2 发送httpclient
            HttpClient client = new HttpClient("https://api.mch.weixin.qq.com/pay/orderquery");
            client.setXmlParam(WXPayUtil.generateSignedXml(m,"T6m9iK73b0kn9g5v426MKfHQH7X8rKwb"));
            client.setHttps(true);
            client.post();

            //3 得到请求返回内容
            String xml = client.getContent();
            Map<String, String> resultMap = WXPayUtil.xmlToMap(xml);
            //6、转成Map再返回
            return resultMap;
        }catch(Exception e) {
            return null;
        }
    }

    //添加支付记录和更新订单状态
    @Override
    public void updateOrdersStatus(Map<String, String> map) {
        //从map获取订单号
        String orderNo = map.get("out_trade_no");
        //根据订单号查询订单信息
        QueryWrapper<Order> wrapper = new QueryWrapper<>();
        wrapper.eq("order_no",orderNo);
        Order order = orderService.getOne(wrapper);

        //更新订单表订单状态
        if(order.getStatus().intValue() == 1) { return; }
        order.setStatus(1);//1代表已经支付
        orderService.updateById(order);

        //向支付表添加支付记录
        PayLog payLog = new PayLog();
        payLog.setOrderNo(orderNo);  //订单号
        payLog.setPayTime(new Date()); //订单完成时间
        payLog.setPayType(1);//支付类型 1微信
        payLog.setTotalFee(order.getTotalFee());//总金额(分)

        payLog.setTradeState(map.get("trade_state"));//支付状态
        payLog.setTransactionId(map.get("transaction_id")); //流水号
        payLog.setAttr(JSONObject.toJSONString(map));

        baseMapper.insert(payLog);
    }
}
HttpClient.java工具类:
import org.apache.http.Consts;
import org.apache.http.HttpEntity;
import org.apache.http.NameValuePair;
import org.apache.http.client.ClientProtocolException;
import org.apache.http.client.entity.UrlEncodedFormEntity;
import org.apache.http.client.methods.*;
import org.apache.http.conn.ssl.SSLConnectionSocketFactory;
import org.apache.http.conn.ssl.SSLContextBuilder;
import org.apache.http.conn.ssl.TrustStrategy;
import org.apache.http.entity.StringEntity;
import org.apache.http.impl.client.CloseableHttpClient;
import org.apache.http.impl.client.HttpClients;
import org.apache.http.message.BasicNameValuePair;
import org.apache.http.util.EntityUtils;

import javax.net.ssl.SSLContext;
import java.io.IOException;
import java.security.cert.CertificateException;
import java.security.cert.X509Certificate;
import java.text.ParseException;
import java.util.HashMap;
import java.util.LinkedList;
import java.util.List;
import java.util.Map;

/**
 * http请求客户端
 *
 * @author qy
 *
 */
public class HttpClient {
	private String url;
	private Map<String, String> param;
	private int statusCode;
	private String content;
	private String xmlParam;
	private boolean isHttps;

	public boolean isHttps() {
		return isHttps;
	}

	public void setHttps(boolean isHttps) {
		this.isHttps = isHttps;
	}

	public String getXmlParam() {
		return xmlParam;
	}

	public void setXmlParam(String xmlParam) {
		this.xmlParam = xmlParam;
	}

	public HttpClient(String url, Map<String, String> param) {
		this.url = url;
		this.param = param;
	}

	public HttpClient(String url) {
		this.url = url;
	}

	public void setParameter(Map<String, String> map) {
		param = map;
	}

	public void addParameter(String key, String value) {
		if (param == null)
			param = new HashMap<String, String>();
		param.put(key, value);
	}

	public void post() throws ClientProtocolException, IOException {
		HttpPost http = new HttpPost(url);
		setEntity(http);
		execute(http);
	}

	public void put() throws ClientProtocolException, IOException {
		HttpPut http = new HttpPut(url);
		setEntity(http);
		execute(http);
	}

	public void get() throws ClientProtocolException, IOException {
		if (param != null) {
			StringBuilder url = new StringBuilder(this.url);
			boolean isFirst = true;
			for (String key : param.keySet()) {
				if (isFirst)
					url.append("?");
				else
					url.append("&");
				url.append(key).append("=").append(param.get(key));
			}
			this.url = url.toString();
		}
		HttpGet http = new HttpGet(url);
		execute(http);
	}

	/**
	 * set http post,put param
	 */
	private void setEntity(HttpEntityEnclosingRequestBase http) {
		if (param != null) {
			List<NameValuePair> nvps = new LinkedList<NameValuePair>();
			for (String key : param.keySet())
				nvps.add(new BasicNameValuePair(key, param.get(key))); // 参数
			http.setEntity(new UrlEncodedFormEntity(nvps, Consts.UTF_8)); // 设置参数
		}
		if (xmlParam != null) {
			http.setEntity(new StringEntity(xmlParam, Consts.UTF_8));
		}
	}

	private void execute(HttpUriRequest http) throws ClientProtocolException,
			IOException {
		CloseableHttpClient httpClient = null;
		try {
			if (isHttps) {
				SSLContext sslContext = new SSLContextBuilder()
						.loadTrustMaterial(null, new TrustStrategy() {
							// 信任所有
							public boolean isTrusted(X509Certificate[] chain,
									String authType)
									throws CertificateException {
								return true;
							}
						}).build();
				SSLConnectionSocketFactory sslsf = new SSLConnectionSocketFactory(
						sslContext);
				httpClient = HttpClients.custom().setSSLSocketFactory(sslsf)
						.build();
			} else {
				httpClient = HttpClients.createDefault();
			}
			CloseableHttpResponse response = httpClient.execute(http);
			try {
				if (response != null) {
					if (response.getStatusLine() != null)
						statusCode = response.getStatusLine().getStatusCode();
					HttpEntity entity = response.getEntity();
					// 响应内容
					content = EntityUtils.toString(entity, Consts.UTF_8);
				}
			} finally {
				response.close();
			}
		} catch (Exception e) {
			e.printStackTrace();
		} finally {
			httpClient.close();
		}
	}

	public int getStatusCode() {
		return statusCode;
	}

	public String getContent() throws ParseException, IOException {
		return content;
	}

}
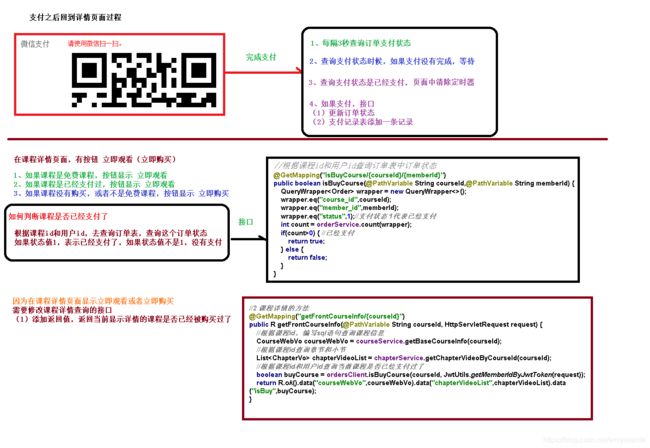
十七、定时任务和统计分析(Echarts图表)
1.定时任务:
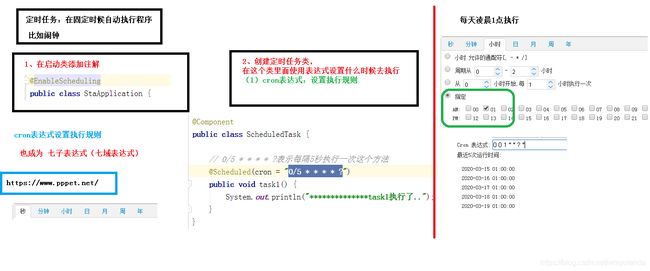
启动类添加注解:@EnableScheduling
在线生成cron表达式:http://cron.qqe2.com/
2.统计分析ECharts:
ECharts是百度的一个项目,后来百度把Echart捐给apache,用于图表展示,提供了常规的折线图、柱状图、散点图、饼图、K线图,用于统计的盒形图,用于地理数据可视化的地图、热力图、线图,用于关系数据可视化的关系图、treemap、旭日图,多维数据可视化的平行坐标,还有用于 BI 的漏斗图,仪表盘,并且支持图与图之间的混搭。
官方网站:https://echarts.apache.org/zh/index.html
安装依赖:npm install --save [email protected]


实例参考:官网->实例->官方实例:折线图
1.引入ECharts:
<!-- 引入 ECharts 文件 -->
<script src="echarts.min.js"></script>
2.定义图表区域:
<!-- 为ECharts准备一个具备大小(宽高)的Dom -->
<div id="main" style="width: 600px;height:400px;"></div>
3.渲染图表:
<script>
    var myChart = echarts.init(document.getElementById('main'));
    var option = {
        //x轴是类目轴(离散数据),必须通过data设置类目数据
        xAxis: {
            type: 'category',
            data: ['Mon', 'Tue', 'Wed', 'Thu', 'Fri', 'Sat', 'Sun']
        },
        //y轴是数据轴(连续数据)
        yAxis: {
            type: 'value'
        },
        //系列列表。每个系列通过 type 决定自己的图表类型
        series: [{
            //系列中的数据内容数组
            data: [820, 932, 901, 934, 1290, 1330, 1320],
            //折线图
            type: 'line'
        }]
    };
    myChart.setOption(option);
</script>
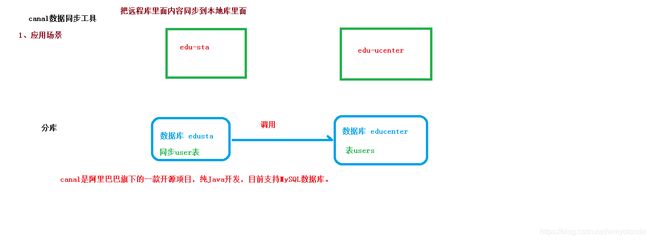
十八、数据同步工具Canal
下载和安装:https://blog.csdn.net/qq_43046055/article/details/106632313

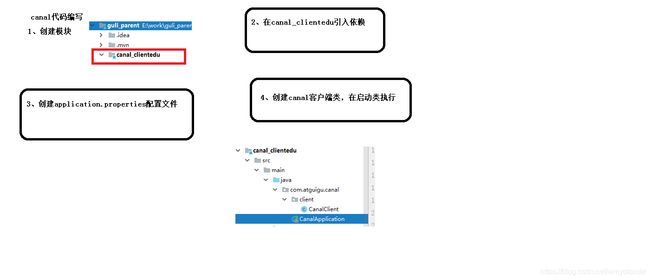
pom依赖:
<dependency>
            <groupId>org.springframework.boot</groupId>
            <artifactId>spring-boot-starter-web</artifactId>
        </dependency>

        <!--mysql-->
        <dependency>
            <groupId>mysql</groupId>
            <artifactId>mysql-connector-java</artifactId>
        </dependency>

        <dependency>
            <groupId>commons-dbutils</groupId>
            <artifactId>commons-dbutils</artifactId>
        </dependency>

        <dependency>
            <groupId>org.springframework.boot</groupId>
            <artifactId>spring-boot-starter-jdbc</artifactId>
        </dependency>

        <dependency>
            <groupId>com.alibaba.otter</groupId>
            <artifactId>canal.client</artifactId>
        </dependency>
配置文件:
# 服务端口
server.port=10000
# 服务名
spring.application.name=canal-client

# 环境设置:dev、test、prod
spring.profiles.active=dev

# mysql数据库连接
spring.datasource.driver-class-name=com.mysql.cj.jdbc.Driver
spring.datasource.url=jdbc:mysql://localhost:3306/guli?serverTimezone=GMT%2B8
spring.datasource.username=root
spring.datasource.password=123456
CanalClient.java:
import com.alibaba.otter.canal.client.CanalConnector;
import com.alibaba.otter.canal.client.CanalConnectors;
import com.alibaba.otter.canal.protocol.CanalEntry.*;
import com.alibaba.otter.canal.protocol.Message;
import com.google.protobuf.InvalidProtocolBufferException;
import org.apache.commons.dbutils.DbUtils;
import org.apache.commons.dbutils.QueryRunner;
import org.springframework.stereotype.Component;

import javax.annotation.Resource;
import javax.sql.DataSource;
import java.net.InetSocketAddress;
import java.sql.Connection;
import java.sql.SQLException;
import java.util.Iterator;
import java.util.List;
import java.util.Queue;
import java.util.concurrent.ConcurrentLinkedQueue;

@Component
public class CanalClient {

    //sql队列
    private Queue<String> SQL_QUEUE = new ConcurrentLinkedQueue<>();

    @Resource
    private DataSource dataSource;

    /**
     * canal入库方法
     */
    public void run() {

        CanalConnector connector = CanalConnectors.newSingleConnector(new InetSocketAddress("192.168.44.132",
                11111), "example", "", "");
        int batchSize = 1000;
        try {
            connector.connect();
            connector.subscribe(".*\\..*");
            connector.rollback();
            try {
                while (true) {
                    //尝试从master那边拉去数据batchSize条记录,有多少取多少
                    Message message = connector.getWithoutAck(batchSize);
                    long batchId = message.getId();
                    int size = message.getEntries().size();
                    if (batchId == -1 || size == 0) {
                        Thread.sleep(1000);
                    } else {
                        dataHandle(message.getEntries());
                    }
                    connector.ack(batchId);

                    //当队列里面堆积的sql大于一定数值的时候就模拟执行
                    if (SQL_QUEUE.size() >= 1) {
                        executeQueueSql();
                    }
                }
            } catch (InterruptedException e) {
                e.printStackTrace();
            } catch (InvalidProtocolBufferException e) {
                e.printStackTrace();
            }
        } finally {
            connector.disconnect();
        }
    }

    /**
     * 模拟执行队列里面的sql语句
     */
    public void executeQueueSql() {
        int size = SQL_QUEUE.size();
        for (int i = 0; i < size; i++) {
            String sql = SQL_QUEUE.poll();
            System.out.println("[sql]----> " + sql);

            this.execute(sql.toString());
        }
    }

    /**
     * 数据处理
     *
     * @param entrys
     */
    private void dataHandle(List<Entry> entrys) throws InvalidProtocolBufferException {
        for (Entry entry : entrys) {
            if (EntryType.ROWDATA == entry.getEntryType()) {
                RowChange rowChange = RowChange.parseFrom(entry.getStoreValue());
                EventType eventType = rowChange.getEventType();
                if (eventType == EventType.DELETE) {
                    saveDeleteSql(entry);
                } else if (eventType == EventType.UPDATE) {
                    saveUpdateSql(entry);
                } else if (eventType == EventType.INSERT) {
                    saveInsertSql(entry);
                }
            }
        }
    }

    /**
     * 保存更新语句
     *
     * @param entry
     */
    private void saveUpdateSql(Entry entry) {
        try {
            RowChange rowChange = RowChange.parseFrom(entry.getStoreValue());
            List<RowData> rowDatasList = rowChange.getRowDatasList();
            for (RowData rowData : rowDatasList) {
                List<Column> newColumnList = rowData.getAfterColumnsList();
                StringBuffer sql = new StringBuffer("update " + entry.getHeader().getTableName() + " set ");
                for (int i = 0; i < newColumnList.size(); i++) {
                    sql.append(" " + newColumnList.get(i).getName()
                            + " = '" + newColumnList.get(i).getValue() + "'");
                    if (i != newColumnList.size() - 1) {
                        sql.append(",");
                    }
                }
                sql.append(" where ");
                List<Column> oldColumnList = rowData.getBeforeColumnsList();
                for (Column column : oldColumnList) {
                    if (column.getIsKey()) {
                        //暂时只支持单一主键
                        sql.append(column.getName() + "=" + column.getValue());
                        break;
                    }
                }
                SQL_QUEUE.add(sql.toString());
            }
        } catch (InvalidProtocolBufferException e) {
            e.printStackTrace();
        }
    }

    /**
     * 保存删除语句
     *
     * @param entry
     */
    private void saveDeleteSql(Entry entry) {
        try {
            RowChange rowChange = RowChange.parseFrom(entry.getStoreValue());
            List<RowData> rowDatasList = rowChange.getRowDatasList();
            for (RowData rowData : rowDatasList) {
                List<Column> columnList = rowData.getBeforeColumnsList();
                StringBuffer sql = new StringBuffer("delete from " + entry.getHeader().getTableName() + " where ");
                for (Column column : columnList) {
                    if (column.getIsKey()) {
                        //暂时只支持单一主键
                        sql.append(column.getName() + "=" + column.getValue());
                        break;
                    }
                }
                SQL_QUEUE.add(sql.toString());
            }
        } catch (InvalidProtocolBufferException e) {
            e.printStackTrace();
        }
    }

    /**
     * 保存插入语句
     *
     * @param entry
     */
    private void saveInsertSql(Entry entry) {
        try {
            RowChange rowChange = RowChange.parseFrom(entry.getStoreValue());
            List<RowData> rowDatasList = rowChange.getRowDatasList();
            for (RowData rowData : rowDatasList) {
                List<Column> columnList = rowData.getAfterColumnsList();
                StringBuffer sql = new StringBuffer("insert into " + entry.getHeader().getTableName() + " (");
                for (int i = 0; i < columnList.size(); i++) {
                    sql.append(columnList.get(i).getName());
                    if (i != columnList.size() - 1) {
                        sql.append(",");
                    }
                }
                sql.append(") VALUES (");
                for (int i = 0; i < columnList.size(); i++) {
                    sql.append("'" + columnList.get(i).getValue() + "'");
                    if (i != columnList.size() - 1) {
                        sql.append(",");
                    }
                }
                sql.append(")");
                SQL_QUEUE.add(sql.toString());
            }
        } catch (InvalidProtocolBufferException e) {
            e.printStackTrace();
        }
    }

    /**
     * 入库
     * @param sql
     */
    public void execute(String sql) {
        Connection con = null;
        try {
            if(null == sql) return;
            con = dataSource.getConnection();
            QueryRunner qr = new QueryRunner();
            int row = qr.execute(con, sql);
            System.out.println("update: "+ row);
        } catch (SQLException e) {
            e.printStackTrace();
        } finally {
            DbUtils.closeQuietly(con);
        }
    }
}
十八、SpringCloud组件Gateway网关


依赖:
   		<dependency>
            <groupId>com.wmyao</groupId>
            <artifactId>common_utils</artifactId>
            <version>0.0.1-SNAPSHOT</version>
        </dependency>

        <dependency>
            <groupId>org.springframework.cloud</groupId>
            <artifactId>spring-cloud-starter-alibaba-nacos-discovery</artifactId>
        </dependency>

        <dependency>
            <groupId>org.springframework.cloud</groupId>
            <artifactId>spring-cloud-starter-gateway</artifactId>
        </dependency>

        <!--gson-->
        <dependency>
            <groupId>com.google.code.gson</groupId>
            <artifactId>gson</artifactId>
        </dependency>

        <!--服务调用-->
        <dependency>
            <groupId>org.springframework.cloud</groupId>
            <artifactId>spring-cloud-starter-openfeign</artifactId>
        </dependency>
配置:
# 服务端口
server.port=8222
# 服务名
spring.application.name=service-gateway
# nacos服务地址
spring.cloud.nacos.discovery.server-addr=127.0.0.1:8848

#使用服务发现路由
spring.cloud.gateway.discovery.locator.enabled=true

#设置路由id
spring.cloud.gateway.routes[0].id=service-acl
#设置路由的uri   lb://nacos注册服务名称
spring.cloud.gateway.routes[0].uri=lb://service-acl
#设置路由断言,代理servicerId为auth-service的/auth/路径
spring.cloud.gateway.routes[0].predicates= Path=/*/acl/**

#配置service-edu服务
spring.cloud.gateway.routes[1].id=service-edu
spring.cloud.gateway.routes[1].uri=lb://service-edu
spring.cloud.gateway.routes[1].predicates= Path=/eduservice/**

#配置service-edu服务
spring.cloud.gateway.routes[2].id=service-msm
spring.cloud.gateway.routes[2].uri=lb://service-msm
spring.cloud.gateway.routes[2].predicates= Path=/edumsm/**
跨域配置类:
import org.springframework.context.annotation.Bean;
import org.springframework.context.annotation.Configuration;
import org.springframework.web.cors.CorsConfiguration;
import org.springframework.web.cors.reactive.CorsWebFilter;
import org.springframework.web.cors.reactive.UrlBasedCorsConfigurationSource;
import org.springframework.web.util.pattern.PathPatternParser;
/**
 *
 * 处理跨域
 *
 */
@Configuration
public class CorsConfig {
    //解决跨域问题
    @Bean
    public CorsWebFilter corsFilter() {
        CorsConfiguration config = new CorsConfiguration();
        config.addAllowedMethod("*");
        config.addAllowedOrigin("*");
        config.addAllowedHeader("*");

        UrlBasedCorsConfigurationSource source = new UrlBasedCorsConfigurationSource(new PathPatternParser());
        source.registerCorsConfiguration("/**", config);

        return new CorsWebFilter(source);
    }
}
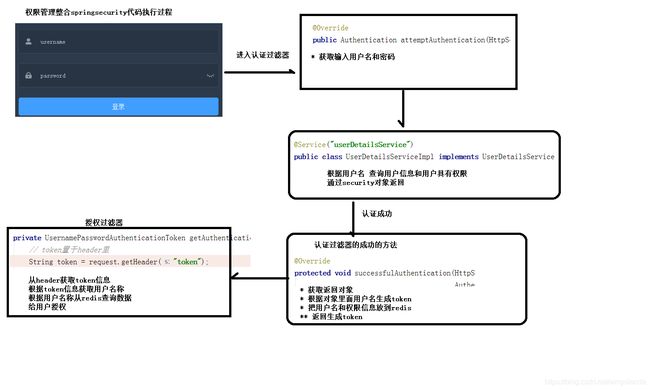
十九、SpringSecurity
1、Spring Security主要包含有两部分:用户认证 和 用户授权
(1)用户认证:
进入用户登录时候,输入用户名和密码,查询数据库,输入用户名和密码是否正确,如果正确的话,认证成功了
(2)用户授权:
登录了系统,登录用户可能是不同的角色,比如现在登录的用户是管理员,管理员操作所有功能,比如登录用户普通用户,操作功能肯定比管理员少很多
2、Spring Security本质上就是过滤器Filter,对请求进行过滤
3、认证与授权实现思路

4、Spring Security模块引入相关依赖
<dependencies>
    <dependency>
        <groupId>com.atguigu</groupId>
        <artifactId>common_utils</artifactId>
        <version>0.0.1-SNAPSHOT</version>
    </dependency>
    <!-- Spring Security依赖 -->
    <dependency>
        <groupId>org.springframework.boot</groupId>
        <artifactId>spring-boot-starter-security</artifactId>
    </dependency>
    <dependency>
        <groupId>io.jsonwebtoken</groupId>
        <artifactId>jjwt</artifactId>
    </dependency>
</dependencies>
前端依赖:npm install --save vuex-persistedstate
出现问题 :invalid host …
1.pakage.json:
"dev": "webpack-dev-server --disable-host-check"
2.vue.config.js
devServer: {
    disableHostCheck: true
  }
5、Spring Security代码执行过程
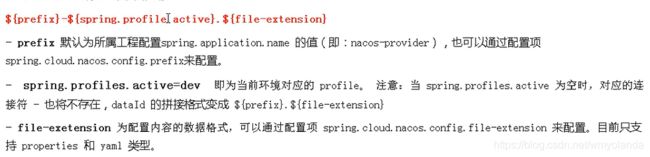
二十、Nacos配置中心
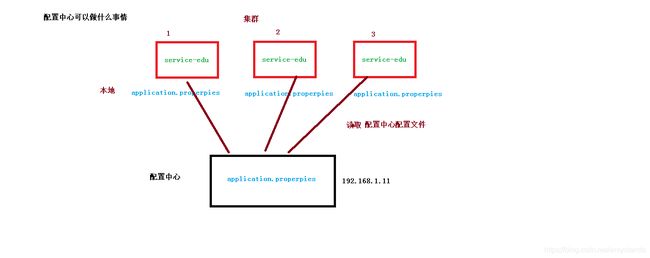
spring加载文件的顺序:

bootstrap.properties:
server:
  port: 8081
spring:
  #数据库连接配置
  datasource:
    driver-class-name: com.mysql.jdbc.Driver
    url: jdbc:mysql://localhost:3306/study?characterEncoding=utf-8&useSSL=false
    username: root
    password: 123456

#mybatis的相关配置
mybatis:
  #mapper配置文件
  mapper-locations: classpath:com/wmyao/common/mapper/xml/*.xml
  type-aliases-package: com.wmyao.common.entity
  #开启驼峰命名
  configuration:
    map-underscore-to-camel-case: true
    #设置超时时间:数据库超过300秒仍未响应则超时
    default-statement-timeout: 300
#    #打印查询语句
    log-impl: org.apache.ibatis.logging.stdout.StdOutImpl
二十一、持续化部署工具jenkins
手动打包:当前项目路径下cmd执行命令mvn clean package打包。
下载安装:https://blog.csdn.net/qq_39659876/article/details/88594009