springboot+mybatisplus前后端分离——纯后端(万字)开发流程
java前后端分离项目经验总结
软件开发的流程
需求分析——设计——编码——测试——上线运维
[外链图片转存失败,源站可能有防盗链机制,建议将图片保存下来直接上传(img-ZXlciP7A-1659410345395)(C:\Users\Lenovo\AppData\Roaming\Typora\typora-user-images\image-20220518124126543.png)]
配置类
修改静态资源映射
使用配置类,指定收到请求的静态资源映射
@Slf4j
@Configuration
public class WebConfig extends WebMvcConfigurationSupport {
    /**
     * 设置访问静态资源的映射
     * @param registry
     */
    @Override
    protected void addResourceHandlers(ResourceHandlerRegistry registry) {
        log.info("静态资源映射。。。。");
        registry.addResourceHandler("/backend/**")
                .addResourceLocations("classpath:/backend/");
        registry.addResourceHandler("/front/**")
                .addResourceLocations("classpath:/front/");
    }
}
功能模块开发
登录功能开发
需求分析——
在前端输入用户名和密码,点击登录之后会经过MVC进行处理,经过controller
调用service,进而调用mapper
分析
因为前端页面不是自己写的,所以需要打开登录页面,输入信息之后点击登录,然后查看network查看该请求,发送到了哪里
以及发送的参数
进而可以知道,在后台服务端,建立哪些类以及接收什么数据
然后在前端页面需要看一下,后端需要给前端返回什么数据,——json格式
这里就需要后端返回给前端的数据中包括code,data以及错误信息
综上:可以知道,需要employee实体及其对应的三层结构、以及所需要返回的结果
————导入实体,创建分层结构‘、
mapper
注意,当mapper层采用mybatis—plus时
只需创建一个mapper接口,继承basemapper《实体类名》,即可实现基本的增删改查的方法
这些都是mp中自带的,嘎嘎好用,别忘了使用@mapper注解,标注这是一个mapper
service
首先编写service接口,继承Iservice 泛型为填写的实体
然后编写实现类——继承MP中的serviceImpl 泛型为对应的mapper接口,以及实体类,
当然了,也要实现service的接口
controller
处理所有的employee开头的请求,并且返回结果为json字符串格式的
统一返回结果类——R
json封装类
这个类就是一个通用的类,服务器端响应的所有结果最终都会包装成此种结果
至此基本结构已经完成,下边正式编写逻辑代码
controller逻辑代码
流程分析
注意前端传过来的数据是json形式,所以在参数中,要使用@RequestBody进行标注,并且这里将传递的数据,封装成用户对应的实体
而且会使用到session,所以需要使用httpservletrequest,
将id存储到session中,————request.getSession().setAttribute(“employee”,emp.getId());
注意MP的使用————需要在学习学习
使用条件构造器,构造原本mp中不存在函数
//首先封装查询条件
LambdaQueryWrapper<Employee> queryWrapper = new LambdaQueryWrapper<>();
queryWrapper.eq(Employee::getUsername,employee.getUsername());
Employee emp = employeeService.getOne(queryWrapper);
@Slf4j
@RestController
@RequestMapping("/employee")
public class EmployeeController {

    @Autowired
    private EmployeeServiceImpl employeeService;

    /**
     * 进行登录的验证
     * @param request
     * @param employee
     * @return
     */
    @PostMapping("/login")
    public R<Employee> login(HttpServletRequest request, @RequestBody Employee employee){
        //首先将表单传递来的密码进行md5加密处理
        String password = employee.getPassword();
        password=DigestUtils.md5DigestAsHex(password.getBytes());

        //根据用户提交的用户名查询数据库
        //首先封装查询条件
        LambdaQueryWrapper<Employee> queryWrapper = new LambdaQueryWrapper<>();
        queryWrapper.eq(Employee::getUsername,employee.getUsername());
        Employee emp = employeeService.getOne(queryWrapper);

        //先判断用户是否存在
        if (emp==null){
            R<Employee> r = R.error("用户名不存在");
            return r;
        }
        //进行密码的比对
        if (!emp.getPassword().equals(password)){
            //则说明密码不匹配,封装结果,并返回
            R<Employee> r = R.error("用户名或密码错误");
            return r;
        }
            //密码匹配,检验用户的状态是否禁用
        if (emp.getStatus()!=1){
                R<Employee> r = R.error("当前用户已被禁用,请联系管理员");
                return r;
        }
        //说明用户登录成功,将用户的id 存储到session中
        request.getSession().setAttribute("employee",emp.getId());
        //将密码请空
        emp.setPassword("");
        return R.success(emp);
    }
}
退出功能开发
首先分析点击退出按钮之后,前端发送的是什么请求,并且查看是否携带参数
然后结合前端代码,判断返回数据
只要返回的结果为1,就可以成功的退出
注意,退出之后,要清理session,
/**
 * 退出请求,清理session
 * @return
 */
@PostMapping("/logout")
public R<String> logout(HttpServletRequest request){
    request.getSession().removeAttribute("employee");
    return R.success("退出成功");
}
完善登录功能
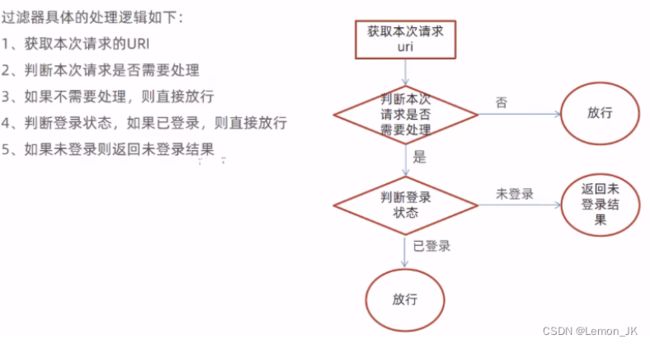
通过添加过滤器,或者拦截器对网页的请求做一个拦截过滤,没有不含登录信息的请求都给过滤掉,并且转发到登录页面
方式一:过滤器
自定义一个loginCheckFilter,
并且在启动类上添加@servletComponentScan注解——开启扫描
-
获取请求的url:需要通过HttpServletRequest来进行获取
-
放行:通过filterChain转发的HttpServletResponse和HttpServletRequest对象
-
可以使用AntpathMatcher来进行路径的匹配
@Slf4j
@WebFilter(filterName = "loginCheckFilter",urlPatterns = "/*")
public class LoginCheckFilter implements Filter {
//    路径适配器,支持通配符
    public static final AntPathMatcher PATH_MATCHER=new AntPathMatcher();

    @Override
    public void doFilter(ServletRequest servletRequest, ServletResponse servletResponse, FilterChain filterChain) throws IOException, ServletException {
        HttpServletRequest request= (HttpServletRequest) servletRequest;
        HttpServletResponse response= (HttpServletResponse) servletResponse;

        //设置白名单————不需要拦截的请求,如首页,静态资源等
        String[] urls=new String[]{
                "/employee/login",
                "/employee/logout",
                "/backend/**",
                "/front/**"
        };
        //检测当前的强求路径是否为白名单中的路径
        //获取当前路径
        String requestURL = request.getRequestURI();
        boolean check = check(urls, requestURL);

        if (check){
            //表名请求为白名单中的路径,放行
            filterChain.doFilter(request,response);
            log.info("白名单,不需要处理:{}",requestURL);
            return;
        }
        //说明需要判断——通过session
        Object session = request.getSession().getAttribute("employee");

        if (session!=null){
            //sesiion中包含指定的信息,说明该用户已经登录过了,放行
            filterChain.doFilter(request,response);
            return;
        }
        log.info("需要处理:{}",requestURL);
        //session为空,则说明未登录,返回json格式的错误信息,交给前端拦截器
        response.getWriter().write(JSON.toJSONString(R.error("NOTLOGIN")));
        return;
    }

    /**
     * 检测当前的请求路径是否在白名单中
     * @param urls
     * @param requestUrl
     * @return
     */
    public boolean check(String [] urls,String requestUrl){
        for (String url : urls) {
            boolean match = PATH_MATCHER.match(url,requestUrl);
            if (match){
                return true;
            }
        }
        return false;
    }

}
方式二:拦截器
方式三:使用Security安全框架
菜单开发
添加信息模块
普通添加-单表操作
点击添加跳转到指定的页面,输入表单信息之后,点击保存可以将信息添加到数据库中
注意这里添加的信息,要录入到对应的数据库中——这时就需要判断表中是否存在唯一字段,例如id,用户名等
前端代码分析:
- 页面发送ajax请求,将表单中输入的信息以json形式提交到服务端
- 在接收端,形参前需要使用@RequestBody进行标注
- 可以将这些信息封装到添加对应信息的实体中
- 例如添加员工信息,可以将表单数据封装到employee中
- 后端根据前端的请求路径编写对应的controller,然后调用对应的service层
- service调用mapper操作数据库,进而保存数据
- 还需要结合前端接收到返回的结果中,根据什么数据来判断添加成功,添加失败,进而返回数据
EG:
@PostMapping
public R<String> add(HttpServletRequest request,@RequestBody Employee employee){
    //首先需要判断用户名是否已经存在了_即根据用户名查询数据库
    //根据用户提交的用户名查询数据库
    //首先封装查询条件
    LambdaQueryWrapper<Employee> queryWrapper = new LambdaQueryWrapper<>();
    queryWrapper.eq(Employee::getUsername,employee.getUsername());
    Employee emp = employeeService.getOne(queryWrapper);

    if (emp!=null){
        return R.error("用户名已存在");
    }
    //设置初始密码123456_且需要进行md5加密
    employee.setPassword(DigestUtils.md5DigestAsHex("123456".getBytes()));
    employee.setCreateTime(LocalDateTime.now());
    employee.setUpdateTime(LocalDateTime.now());

    //创建用户更新用户————从session中获取用户id_这里需要强转,因为从session中获取的值统一为Object类型
    Long empId = (Long) request.getSession().getAttribute("employee");

    //设置创建用户
    employee.setCreateUser(empId);
    //设置更新用户的id
    employee.setUpdateUser(empId);

    //说明可以可以存储直接调用service方法
    employeeService.save(employee);
    return R.success("添加成功");
}
注意:送session中获取的数据一般都需要进行一个强制转换,因为,获取的数据默认是Object类型的
而且添加时,需要结合表的结构,进行判断哪些字段是可以为空,哪些不能为空,哪些有默认值,进而更好的补充数据
添加操作——涉及多表
多表操作一定要开启事务
即当进行添加操作的时候,添加的数据,和其他得表有关联,这就会涉及到多表的操作,
这时前端传递过来的数据不再单单是一个实体类的属性,且传递的数据无法使用一个类来接收的时候,
可以选择创建一个新的实体类,可以包含所有的信息,
例如
这里添加菜品时,传递的数据,包含了flavors这个属性,但是,菜品这个实体类中,没有该属性,
又不能直接改变菜品dish类,一旦修改,会导致与数据库不匹配,无法正常使用,这时
就可以创建一个新的实体类,可以将所有属性都包含的实体类
如
[外链图片转存失败,源站可能有防盗链机制,建议将图片保存下来直接上传(img-8kdCI4XG-1659410345401)(C:\Users\Lenovo\AppData\Roaming\Typora\typora-user-images\image-20220520154656737.png)]
这种实体类一般称为dto
这里是继承dish类,就有了dish的所有属性,然后在其基础之上添加了一个dishflavor的list集合,
因为dishflavor,并不一定是一个
添加的逻辑——需要在service中完成
@Service
public class DishServiceImpl extends ServiceImpl<DishMapper, Dish>
        implements DishService {
    @Autowired
    private DishFlavorService dishFlavorService;
    /**
     *增加新的菜品,同时保存对应的口味——多表操作
     * @param dishDto
     */
    @Override
    @Transactional//开启事务
    public void saveWithFlavor(DishDto dishDto) {
       //先保存dish
        this.save(dishDto);
        //保存之后,this就有了id的睡醒_通过子类dishdto来获取
        Long dishId = dishDto.getId();
        //将dishId添加到flavor属性中
        List<DishFlavor> flavors = dishDto.getFlavors();
        for (DishFlavor flavor : flavors) {
            flavor.setDishId(dishId);
        }
//        然后将保存flavors
        dishFlavorService.saveBatch(flavors);
    }
}
查询信息模块
当数据量比较多的时候,可以采用分页查询,进而使数据展示显得更加的清晰
分页查询
- 前端页面发送ajax的请求中会携带查询的参数(如,page,pagesize,name等)提交到后端的服务器
- 服务器接收到数据,controller调用service
- service调用mapper操作数据库,进行分页查询
- 最终由controller将数据返回给前端
- 前端页面,将收到的的数据通过ELmentUI的table组件,将数据展示到页面上
普通分页查询
分为两步:
首先编写分页的配置类
@Configuration
public class MybatisPlusConfig {
    @Bean
    public MybatisPlusInterceptor mybatisPlusInterceptor(){
        MybatisPlusInterceptor mybatisPlusInterceptor = new MybatisPlusInterceptor();
        mybatisPlusInterceptor.addInnerInterceptor(new PaginationInnerInterceptor());
        return mybatisPlusInterceptor;
    }
}
然后编写controller中的方法
注意 这里的返回值泛型要填写page类,其中包含了所有的前端需要的分页属性,已经被封装好了,直接使用即可
然后编写分页构造器,——就是传入分页的参数
- 条件构造器-——
- 添加过滤的条件采用模糊like查询,且当第一个参数的结果为false时,不执行,
- 然后是数据的排序条件
最后执行查询,直接调用service中的方法即可,
最终,将分页构造器返回
    /**
     * 员工信息的分页查询
     * 会从前端发送page,pagesize,name三个参数
     * @param page
     * @param pageSize
     * @param name
     * @return
     */
    @GetMapping("/page")
    public R<Page> page(int page,int pageSize,String name){
        log.info("当前页数:{},每页显示多少数据:{},指定name查询:{}",page,pageSize,name);

        //构造分页构造器
        Page pageInfo = new Page(page, pageSize);

//        构造条件构造器
        LambdaQueryWrapper<Employee> queryWrapper = new LambdaQueryWrapper<>();
//        添加过滤条件
        queryWrapper.like(StringUtils.isNotEmpty(name),Employee::getName,name);
//        添加排序条件
        queryWrapper.orderByDesc(Employee::getUpdateTime);
//        执行查询---这里会将查询过后的结果封装pageinfo中
        employeeService.page(pageInfo,queryWrapper);

        return  R.success(pageInfo);
    }
涉及到多表信息的分页查询
多表一定要开启事务
将多个表的信息都封装到一个dto中
- 先构造一个主分页构造器pageinfo,
- 即需要回显较多信息的主类,——且表中有与其他表进行连接查询的值
- 进行分页查询,执行之后,
- 会将所有的信息封装到pageinfo中,
但是此时要回显的信息不完整,不能直接返回,
构造一个dto类的分页构造器,注意这就是最终返回的分页构造器
将records之外的所有信息拷贝到该分页构造器中
下面需要进行的是对回显信息的补充完整,
将records取出,遍历获取表连接的条件,调用对应的service层,查询获取数据,并将数据封装到dto中
最后将数据收集封装成一个list集合
并将此集合封装到dto类的分页构造器中
最终返回dto分页构造器就完成了
 @GetMapping("/page")
    public R<Page> page(int page,int pageSize,String name){
//        构造分页构造器
        Page<Dish> pageInfo = new Page(page, pageSize);
        Page<DishDto> dishDtoPage = new Page<>();
        //条件构造器
        LambdaQueryWrapper<Dish> dishLambdaQueryWrapper = new LambdaQueryWrapper<>();
//        添加过滤条件
        dishLambdaQueryWrapper.like(StringUtils.isNotEmpty(name),Dish::getName,name);
//        添加排序条件
        dishLambdaQueryWrapper.orderByAsc(Dish::getUpdateTime);
//        执行
        dishService.page(pageInfo,dishLambdaQueryWrapper);

        //进行对象间指定类型数据的拷贝——这里忽略records这个list集合,
        // 因为这是真正要显示的数据,正是因为要回回显的数据不一样才这样做的
//        所以要剔除records而复制其他的属性
        BeanUtils.copyProperties(pageInfo,dishDtoPage,"records");

        List<Dish> records = pageInfo.getRecords();
        //将修改之后的结果收集起来,。封装为一个list集合
        List<DishDto> list= records.stream().map((item)->{
            DishDto dishDto = new DishDto();

            BeanUtils.copyProperties(item,dishDto);
            //从item中获取categoryId,进而获取实体类,获取name属性
            Long categoryId = item.getCategoryId();
            Category category = categoryService.getById(categoryId);
            String name1 = category.getName();
            dishDto.setCategoryName(name1);

            return dishDto;
        }).collect(Collectors.toList());

        dishDtoPage.setRecords(list);

        return R.success(dishDtoPage);
    }
修改信息模块
在点击按钮之后,会在aiax请求中传递id status等参数,交给后端
交给后端的controller调用service,调用mapper
可以将前端的数据整体封装成功一个实体对象,
然后在controller控制器中,set需要手动更新的值,然后调用MP中的updateById方法,
- 该方法传入的是一个实体,然后根据传入实体的id更新需要更新的地方
- 即两个实体中不相同的地方都需要更新
前端js解析long类型数据丢失精度
js只能保证前16位的数据,无法保证全部的数据精度,会导致提交的数据和数据库的数据不一致
所以在展示的时候可以将long类型的数据转换为String字符串类型的
解决方法
在后端向前端发起响应的json数据时,可以将long;类型的数据统一转换为String字符串
首先创建一个转换格式的类,然后将该类添加到mvc配置类中
可以完成java对象和json格式之间的一个转换——序列化
/**
 * 对象映射器:基于jackson将Java对象转为json,或者将json转为Java对象
 * 将JSON解析为Java对象的过程称为 [从JSON反序列化Java对象]
 * 从Java对象生成JSON的过程称为 [序列化Java对象到JSON]
 */
public class JacksonObjectMapper extends ObjectMapper {

    public static final String DEFAULT_DATE_FORMAT = "yyyy-MM-dd";
    public static final String DEFAULT_DATE_TIME_FORMAT = "yyyy-MM-dd HH:mm:ss";
    public static final String DEFAULT_TIME_FORMAT = "HH:mm:ss";

    public JacksonObjectMapper() {
        super();
        //收到未知属性时不报异常
        this.configure(FAIL_ON_UNKNOWN_PROPERTIES, false);

        //反序列化时,属性不存在的兼容处理
        this.getDeserializationConfig().withoutFeatures(DeserializationFeature.FAIL_ON_UNKNOWN_PROPERTIES);


        SimpleModule simpleModule = new SimpleModule()
                .addDeserializer(LocalDateTime.class, new LocalDateTimeDeserializer(DateTimeFormatter.ofPattern(DEFAULT_DATE_TIME_FORMAT)))
                .addDeserializer(LocalDate.class, new LocalDateDeserializer(DateTimeFormatter.ofPattern(DEFAULT_DATE_FORMAT)))
                .addDeserializer(LocalTime.class, new LocalTimeDeserializer(DateTimeFormatter.ofPattern(DEFAULT_TIME_FORMAT)))

                .addSerializer(BigInteger.class, ToStringSerializer.instance)
                .addSerializer(Long.class, ToStringSerializer.instance)
                .addSerializer(LocalDateTime.class, new LocalDateTimeSerializer(DateTimeFormatter.ofPattern(DEFAULT_DATE_TIME_FORMAT)))
                .addSerializer(LocalDate.class, new LocalDateSerializer(DateTimeFormatter.ofPattern(DEFAULT_DATE_FORMAT)))
                .addSerializer(LocalTime.class, new LocalTimeSerializer(DateTimeFormatter.ofPattern(DEFAULT_TIME_FORMAT)));

        //注册功能模块 例如,可以添加自定义序列化器和反序列化器
        this.registerModule(simpleModule);
    }
}
修改webmvc的配置类
/**
 * 拓展mvc框架的消息转换器
 * @param converters
 */
@Override
protected void extendMessageConverters(List<HttpMessageConverter<?>> converters) {
    //创建消息转换器对象
    MappingJackson2HttpMessageConverter messageConverter = new MappingJackson2HttpMessageConverter();
    //设置对象转换器,使用jackson价格java对象转为json
    messageConverter.setObjectMapper(new JacksonObjectMapper());
    //将消息转换器对象,追加到mvc框架的转换器集合中
        converters.add(0,messageConverter);
}
Controller——请求路径中没有参数
/**
 * 修改员工信息
 * @param request
 * @param employee
 * @return
 */
@PutMapping
public R<String> update(HttpServletRequest request,@RequestBody Employee employee){
    //首先获取当前操作的id,
    Long empid = (Long) request.getSession().getAttribute("employee");

    employee.setUpdateUser(empid);
    employee.setUpdateTime(LocalDateTime.now());

    //然后更新员工信息
    employeeService.updateById(employee);

    return R.success("员工信息修改成功");
}
controller——请求路径含有参数
controller中接收请求路径中的参数
@getMapping(“/{参数名}”)
形参需要使用@pathVariable 参数类型 参数名,来接收
且
@GetMapping("/{id}")
public R<Employee> getById(@PathVariable Long id){
    return R.success(employeeService.getById(id));
}
删除信息模块
当删除时,首先需要根据前端传递来的id 来判断当前选中的实体是否与其他的实体有关联,
例如当需要删除一个菜系分类时,
- 如果这是一个空的菜系分类,可以直接删除
- 如果包含其他的菜品,则不能直接删除,因为会直接删除掉,其关联的子菜单,需要逻辑上的判断
- 查看该分类包含了其他的实体类——菜系中包含了菜名
确认该分类下是否有其他的子信息,即是否与其他的表有关联
可以在该分类对应的service模块中填充判断逻辑
例如:
注意需要先在service中添加方法,然后在serviceimpl中实现方法
@Service
public class CategoryServiceImpl extends ServiceImpl<CategoryMapper, Category>
    implements CategoryService {

    @Autowired
    private DishService dishService;

    @Autowired
    private SetMealService setMealService;

    /**
     * 根据id删除记录
     * @param id
     */
    @Override
    public void remove(Long id) {
//        构造条件构造器
        LambdaQueryWrapper<Dish> dishLambdaQueryWrapper = new LambdaQueryWrapper<>();
//        添加查询条件————根据id进行查询
        dishLambdaQueryWrapper.eq(Dish::getCategoryId,id);
//        执行
        int count = dishService.count(dishLambdaQueryWrapper);
//        查看当前分类是否关联了其他的菜品。如果关联了,就抛出一个异常
        if (count>0){
            //抛出异常,删除失败
            throw new CustomException("当前分类下关联了菜品,不能删除");
        }
//        查看当前分类是否关联了其他的套餐,如果已经关联了,就抛出一个业务异常
        LambdaQueryWrapper<Setmeal> setmealLambdaQueryWrapper = new LambdaQueryWrapper<>();
        setmealLambdaQueryWrapper.eq(Setmeal::getCategoryId,id);
        int count1 = setMealService.count(setmealLambdaQueryWrapper);
        if (count1>0){
            //抛出异常
            throw new CustomException("当前分类下关联了套餐,不能删除");
        }
//        正常删除即可
        super.removeById(id);
    }
}
cotroller
@GetMapping("/download")public class CommonController {

    @Value("${reggie.path}")
    private String basePath;

    /**
     * 注意这里的参数名必须与前端传入的数据保持一致
     * @param file
     * @return
     */
    @PostMapping("/upload")
    public R<String> upload(MultipartFile file){

        log.info(file.toString());

        //截取文件后缀
        String originalFilename = file.getOriginalFilename();
        String suffix = originalFilename.substring(originalFilename.lastIndexOf("."));

        //使用uuid动态的生成数据
        String filename = UUID.randomUUID().toString()+ suffix;

        //判断当前的文件夹是否存在,如果不存在就创建
        File dir = new File(basePath);
        if (!dir.exists()){
            dir.mkdirs();
        }

        try {
//            将临时文件传输到指定的位置
            file.transferTo(new File(basePath+filename));
        } catch (IOException e) {
            e.printStackTrace();
        }

        return R.success(filename);
    }

    @GetMapping("/download")
    public void  download(String name, HttpServletResponse response){
        try {
            //输入流读取数据,获得文件内容
            FileInputStream fileInputStream = new FileInputStream(new File(basePath + name));
            //输出流,展示文件内容
            ServletOutputStream outputStream = response.getOutputStream();

            //指定文件的格式
            response.setContentType("image/jpeg");

            int len=0;
            byte [] bytes=new  byte[1024];
            while ((len=fileInputStream.read(bytes))!=-1){
                outputStream.write(bytes,0,len);
                outputStream.flush();
            }

            //关闭流
            outputStream.close();
            fileInputStream.close();

        } catch (Exception e) {
            e.printStackTrace();
        }
    }


}
public void  download(String name, HttpServletResponse response){
    try {
        //输入流读取数据,获得文件内容
        FileInputStream fileInputStream = new FileInputStream(new File(basePath + name));
        //输出流,展示文件内容
        ServletOutputStream outputStream = response.getOutputStream();

        //指定文件的格式
        response.setContentType("image/jpeg");

        int len=0;
        byte [] bytes=new  byte[1024];
        while ((len=fileInputStream.read(bytes))!=-1){
            outputStream.write(bytes,0,len);
            outputStream.flush();
        }

        //关闭流
        outputStream.close();
        fileInputStream.close();

    } catch (Exception e) {
        e.printStackTrace();
    }
}
MP公共字段自动填充
在不同的sql表中,可能会存在大量的相同的字段,例如创建时间,修改时间,等,这样在修改数据的时候,会出现大量的相同的代码,即冗余代码
MP就提供了这种公共字段自动填充的功能,
- 在更新或者修改数据时,为指定字段添加值,将这些重复的代码进行统一的管理,避免重复的代码
实现步骤
-
在实体类的属性上添加@tableFIled注解,同时指定自动填充策略
-
@TableField(fill = FieldFill.INSERT)//插入的时候填充值
private Long createUser;
@TableField(fill = FieldFill.INSERT_UPDATE)//插入和更新的时候填充值
private Long updateUser;
-
-
编写数据对象处理器,在此类中统一的为公共字段进行赋值,该类需要实现MetaObjectHandler接口
封装threadLocal类
/**
 * 基于threadlocal封装工具类,获取当前线程的用户的id
 * @author jiaok
 * @date 2022/5/19 - 16:25
 */
public class BaseContext {
    private static ThreadLocal<Long> threadLocal=new ThreadLocal<>();

    public static void setCurrentId(Long id){
        threadLocal.set(id);
    }

    public static Long getCurrentId(){
        return threadLocal.get();
    }
}
在过滤器的登陆成功代码处添加id
因为所有的请求,都会先经过过滤器进行处理,这里是处理一个请求的开端,
在这里添加之后,处理该请求的线程就有了该属性
自动填充公共代码
@Slf4j
@Component
public class MyMeteObjectHandler implements MetaObjectHandler {
    /**
     * 插入操作时,自动填充
     * @param metaObject
     */
    @Override
    public void insertFill(MetaObject metaObject) {
        Long id=BaseContext.getCurrentId();
        //创建时间,自动填充
        metaObject.setValue("createTime", LocalDateTime.now());
        //首次创建就是修改时间
        metaObject.setValue("updateTime",LocalDateTime.now());
        //创建人id,这里先写死
        metaObject.setValue("createUser",id);
        //首次创建等于修改
        metaObject.setValue("updateUser",id);

    }

    /**
     * 更新操作时,自动填充
     * @param metaObject
     */
    @Override
    public void updateFill(MetaObject metaObject) {
        Long id=BaseContext.getCurrentId();

        metaObject.setValue("updateTime",LocalDateTime.now());
        metaObject.setValue("updateUser",id);

    }
}
信息发送
只需要对接运营商,注册成其会员并按照提供的开发文档开发,进行调用就可以发送短信
但是一般短信服务都是收费的
阿里云短信服务
收费
项目优化
redis缓存优化
加入redis——步骤:
- 添加maven坐标
- 在项目的配置文件中添加redis的相关配置
- 添加配置列,指定序列化的方式
配置类:
/**
 * 如果不自己创建的话,springboot也会自动配置
 * 这里是指定序列化的模板类型
 * @author jiaok
 * @date 2022/5/27 - 14:55
 */
@Configuration
public class RedisConfig extends CachingConfigurerSupport {

    @Bean
    public RedisTemplate<Object, Object> redisTemplate(RedisConnectionFactory connectionFactory) {
        RedisTemplate<Object, Object> redisTemplate = new RedisTemplate<>();

        //默认的Key序列化器为:JdkSerializationRedisSerializer
        redisTemplate.setKeySerializer(new StringRedisSerializer()); // key序列化
        //redisTemplate.setValueSerializer(new GenericJackson2JsonRedisSerializer()); // value序列化

        redisTemplate.setConnectionFactory(connectionFactory);
        return redisTemplate;

    }
}
缓存短信验证码:
实现思路:将原本存在session中的验证码存储在redis中
- 在服务端Controller中注入redisTemplate对象,用于操作redis
- 在Controller中的发送验证码的方法中,将生成的验证码缓存到redis中,并设置有效时间
- 在登录或者其他需要使用验证码的地方,从redis中获取验证码,
- 并与输入的验证码进行一个比对
- 一致,就会操作成功,此时应该将redis中缓存的验证码清除
- 不一致,就抛出提示
- 并与输入的验证码进行一个比对
缓存频繁查询的表单
在前端发送进行查询对应表单数据时,会经过controller控制器,进行一系列的操作,进而获取指定的表单数据,这里的优化就是在此处进行优化操作
-
在控制器中,先从redis中,获取所查询的表单数据
- 如果查询成功,直接将结果返回,无序访问数据库
- 如果查询失败,就调用service进行查询,进而在数据库中进行查询 ,并且将最终的查询结果封装到redis中。
-
注意这里需要对所有的 有关查询表单数据的操作进行优化,例如保存,更新,删除的controller等,因为需要保证数据的一致和完整
-
使用缓存的过程中,要保证数据库中的数据和缓存中的数据一致,如果数据发生变化,就一定要及时的清理缓存中的数据——————防止脏数据
spring Cache
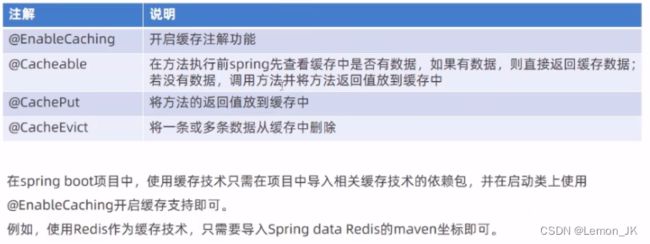
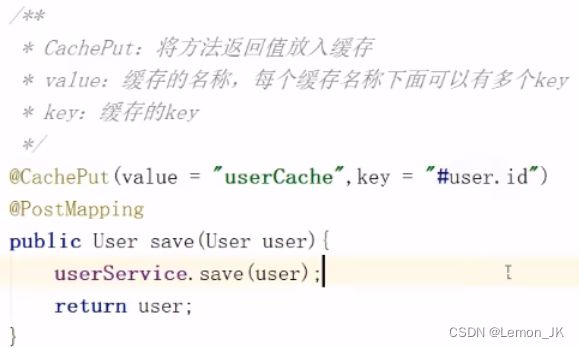
基于注解实现缓存功能的技术框架,只需要使用注解就可实现缓存的操作
他提供了一层抽象,底层可以切换多种不同的cache实现,具体可以通过CacheManager接口来统一不同的缓存技术
其中,CacheManager是spring提供的各种缓存技术的抽象接口。

常用的注解
Mysql的主从复制
对数据做出变更的操作,如 增删改, 的操作,交由master数据库进行操作,查询操作在slave数据库上进行操作,以此来减轻数据库的压力
有关异常
全局异常的捕获
配置异常处理机制,返回一个友好简单的格式给前端
- 使用@controllerAdvice来进行统一处理异常
- 表示定义全局异常控制器异常处理
- 注意 异步接口需要时使用@restControllerAdvice
- @ExceptionHandler(value =RuntimeException.class )来指定捕获的异常类型,所有经过控制器发生的指定类型异常都会跑到这里来处理
- 针对性异常处理
@Slf4j
@RestControllerAdvice
public class GlobalExceptionHandler {
    /**
     *   捕获运行时异常
     *   回显一个请求的状态码
     * @param e
     * @return
     */
   @ResponseStatus(HttpStatus.BAD_REQUEST)
   @ExceptionHandler(value = RuntimeException.class)
   public Result handler(RuntimeException e){
       //打印日志
       log.error("运行时异常--------{}",e.getMessage());
       return Result.fail(e.getMessage());
   }
}
自定义异常类
public class CustomException extends RuntimeException {
    public  CustomException(String message){
        super(message);
    }
}
Spring Security安全框架
在该框架中,一个请求大概分为三部分
- 客户端发起一个请求并经过一系列的过滤器之后首先检测是否为登出的请求
- 如果是则交给登出请求对应的处理来处理,最终登出成功
- 如果不是登出请求,检测是否自定义了登录的页面,因为该框架提供了一个简易的登录页面
- 若自定义了登录页,就走自定义,否则走默认
- 然后检测是否为登录请求,
- 如果是,经过权限过滤器和权限认证管理器认证
- 认证成功就交给认证成功对应的处理器,
- 认证失败,就交给失败对应的处理器
- 如果是,经过权限过滤器和权限认证管理器认证
- 如果不是登录请求即为正常请求,
- 首先会经过对缓存信息处理的一个过滤器
- 然后对请求的上下文进行一个封装
- 然后会经过会话处理的一个过滤器
- 然后会对传递的异常进行一个处理
- 进行判断异常的一个类型,权限不足异常或是其他类型,然后交给对应的处理器控制器来处理
- 然后经过过滤器出口之后会进入一个投票管理器
- 就是请求进入Controller之前会有一个权限的认证,检测请求的资源是否具有权限
- 投票结果大于0就是具有权限,然后交给对应的处理器来进行一个处理
- 否则就是没有权限,交给无权限的处理
[外链图片转存失败,源站可能有防盗链机制,建议将图片保存下来直接上传(img-2dCjILvV-1659410345405)(C:\Users\Lenovo\Desktop\学习记录\Spring Security工作流程.png)]
注意加入该安全框架之后,若为指定登录页面会自动生成一个登录页面,用户名默认为user,密码会在项目启动的时候回显到控制台
当然也可以在配合文件中写死用户名和密码
spring:
  security:
    user:
      name: user
      password: 111111
security配置类
想要使用security安全框架还需要添加security对应的配置类
@Configuration
@EnableGlobalMethodSecurity(prePostEnabled = true)
@EnableWebSecurity
public class SecurityConfig extends WebSecurityConfigurerAdapter {

    @Autowired
    LoginFailureHandler loginFailureHandler;

    @Autowired
    LoginSuccessHandler loginSuccessHandler;


    /**
     * 请求白名单
     */
    private static final String[] URL_WHITELIST={
      "/login",
      "/logout",
      "/captcha",
      "/favicon.ico"
    };

    /**
     * security的配置
     *
     * 这里就需要参考,security的工作流程了
     * @param http
     * @throws Exception
     */

    protected void configure(HttpSecurity http) throws Exception {
        http.cors().and().csrf().disable()
                //登录配置
        .formLogin()
                .successHandler(loginSuccessHandler)
                .failureHandler(loginFailureHandler)

//       禁用session
        .and()
                .sessionManagement()
                .sessionCreationPolicy(SessionCreationPolicy.STATELESS)
//        配置拦截器规则
        .and()
                .authorizeRequests()
                .antMatchers(URL_WHITELIST).permitAll()
                .anyRequest().authenticated();
//        异常处理器

//         配置自定义的过滤器

    }


}
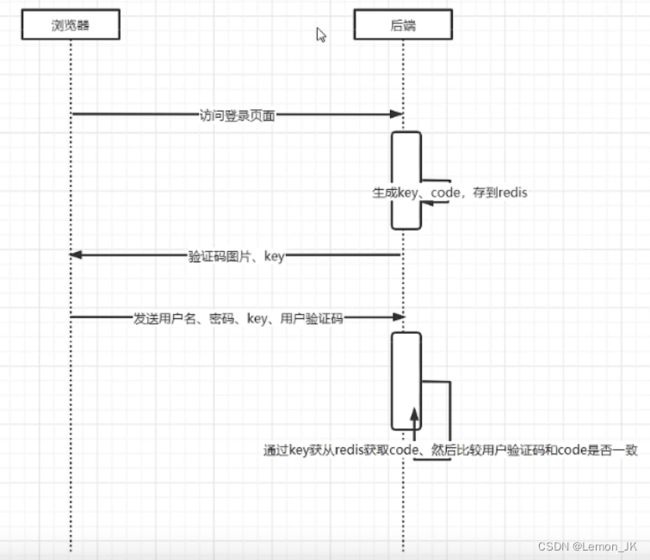
用户登录验证码逻辑分析
前端登录时,会输入用户名密码和验证码,但是spring security安全管理框架中没有检验验码的逻辑,需要我们手动的去写一个
后端在生成验证码code并将code存到redis中时,需要生成一个key供后边验证时使用
后端向前端发送数据,需要发送的有验证码图片,以及其对应验证码code 的key
然后前端填写登录表单之后,将信息传递到后端,在后端根据从redis中的key来获取code,然后比较用户名输入的验证码和生成的验证码code是否相同
验证码验证成功之后才会验证用户名和密码是否正确
验证码图片生成
利用kaptcha依赖来生成
还需要来配置一个验证码的配置类,来指定的所生成的验证码图片的属性
@Configuration
public class KaptchaConfig {

    /**
     * 指定验证码的属性,
     * 创建一个config实例,并将属性作为参数传递进去
     * 然后创建一个验证码,将config作为参数传递进去
     * 返回验证码
     * @return
     */
    @Bean
    DefaultKaptcha producer(){
        Properties properties = new Properties();

        properties.put("kaptcha.border", "no");
        properties.put("kaptcha.textproducer.font.color", "black");
        properties.put("kaptcha.textproducer.char.space", "4");
        properties.put("kaptcha.image.height", "40");
        properties.put("kaptcha.image.width", "120");
        properties.put("kaptcha.textproducer.font.size", "30");

        Config config = new Config(properties);
        DefaultKaptcha defaultKaptcha = new DefaultKaptcha();
        defaultKaptcha.setConfig(config);

        return defaultKaptcha;
    }
}
配置好属性之后需要去写验证码生成的逻辑——即controller
@RestController
public class AuthController extends BaseController {

    @Autowired
    Producer producer;

    @GetMapping("/captcha")
    public Result captcha() throws IOException {

        //生成验证码的key
        String key = UUID.randomUUID().toString();
        //验证码——需要借助producer
        String code = producer.createText();

        //根据code生成image
        BufferedImage image = producer.createImage(code);
        //将图片按照流的形式输出
        ByteArrayOutputStream outputStream = new ByteArrayOutputStream();
        ImageIO.write(image,"jpg",outputStream);

        //验证码的编码格式
        BASE64Encoder encoder = new BASE64Encoder();
        String str="data:image/jpeg;base64";

        String base64Img= str + encoder.encode(outputStream.toByteArray());

        redisUtil.hset(Const.CAPTCHA_KEY,key,code,120);

        return Result.succ(
                MapUtil.builder()
                .put("token",key)
                .put("captchaImg",base64Img)
                .build()
        );
    }
}
security安全框架带来的跨域问题
产生原因
前后端分离,后端服务器对接收到的请求进行了限制和区分,因此就出现了接收不到数据的问题
什么是跨域:
当协议、域名、端口号,有一个或多个不同时,前端请求后端服务器接口的情况称为跨域访问
同源策略限制下,可以访问到后台服务器的数据,后台服务器会正常返回数据,而被浏览器给拦截了。
解决方案
@Configuration
public class CorsConfig implements WebMvcConfigurer {
    @Override
    public void addCorsMappings(CorsRegistry registry) {
        registry.addMapping("/**")
                .allowedOriginPatterns("*")
                .allowedHeaders("*")
                .allowedMethods("*")
                .allowCredentials(true)
                .maxAge(3600);
    }
}
用户登录成功或者失败的处理器
在security安全框架中,根据security的工作流程图可知,无论用户登陆成功或者失败都有对应的处理器来进行相应的逻辑操作
所以想要实现登录操作,就需要先完成处理器的定义
登录失败处理器
@Component
public class LoginFailureHandler implements AuthenticationFailureHandler {
    @Override
    public void onAuthenticationFailure(HttpServletRequest request, HttpServletResponse response, AuthenticationException e) throws IOException, ServletException {

        response.setContentType("application/json;charset=UTF-8");
        //将响应转换成流的形式
        ServletOutputStream outputStream = response.getOutputStream();

        Result result = Result.fail(e.getMessage());
        //将结果按照流的形式输出_且按照json格式
        outputStream.write(JSONUtil.toJsonStr(result).getBytes("UtF-8"));

        //将流输出
        outputStream.flush();
        //关闭流
        outputStream.close();


    }
}
登陆成功处理器
@Component
public class LoginSuccessHandler implements AuthenticationSuccessHandler {
    @Override
    public void onAuthenticationSuccess(HttpServletRequest request, HttpServletResponse response, Authentication authentication) throws IOException, ServletException {
        response.setContentType("application/json;charset=UTF-8");
        //将响应转换成流的形式
        ServletOutputStream outputStream = response.getOutputStream();

        //这里的succ中要填入生成的jwt, 并放置到请求头中

        Result result = Result.succ("");
        //将结果按照流的形式输出_且按照json格式
        outputStream.write(JSONUtil.toJsonStr(result).getBytes("UtF-8"));

        //将流输出
        outputStream.flush();
        //关闭流
        outputStream.close();
    }
}
并将处理器添加到security的配置类的对应的处理器中
因为正常的验证流程,是应该先检验验证码是否正确,所以需要添加captcha过滤器,
在检验用户名密码之前检测验证码
@Component
public class CaptchaFilter extends OncePerRequestFilter {
    @Autowired
    RedisUtil redisUtil;

    @Autowired
    LoginFailureHandler loginFailureHandler;
    @Override
    protected void doFilterInternal(HttpServletRequest httpServletRequest, HttpServletResponse httpServletResponse, FilterChain filterChain) throws ServletException, IOException {

        //首先获取请求的连接
        String url = httpServletRequest.getRequestURI();
        //检验请求是否为登录请求,且为post请求
        if("/login".equals(url) && httpServletRequest.getMethod().equals("POST")){
            //检验验证码
            try {
                validate(httpServletRequest);
            } catch (Exception e) {
                //如果不正确,就跳转到认证失败的处理器
                loginFailureHandler.onAuthenticationFailure(httpServletRequest,httpServletResponse, (AuthenticationException) e);
            }
        }

        filterChain.doFilter(httpServletRequest,httpServletResponse);
    }

    /**
     * 检验验证码
     * @param httpServletRequest
     */
    private void validate(HttpServletRequest httpServletRequest) {

        String code=httpServletRequest.getParameter("code");
        String key=httpServletRequest.getParameter("token");

        if (StringUtils.isBlank(code) || StringUtils.isBlank(key)){
            throw new CaptchaException("验证码错误");
        }

        if(!code.equals(redisUtil.hget(Const.CAPTCHA_KEY,key))){
            throw new CaptchaException("验证码错误");
        }

        //一次性使用
        redisUtil.hdel(Const.CAPTCHA_KEY,key);

    }
}
还需要添加异常的处理类
主要分为两个异常——权限不足异常,以及拒绝登录的异常,
权限不足,分配的权限不满足所访问的资源,请求
拒绝登录:填写的用户名密码或其他的信息错误,导致登录的不成功
@Component
public class JwtAccessDeniedHandler implements AccessDeniedHandler {
    @Override
    public void handle(HttpServletRequest httpServletRequest, HttpServletResponse response, AccessDeniedException e) throws IOException, ServletException {
        response.setContentType("application/json;charset=UTF-8");
        response.setStatus(HttpServletResponse.SC_FORBIDDEN);

        ServletOutputStream outputStream = response.getOutputStream();

        Result result = Result.fail(e.getMessage());

        outputStream.write(JSONUtil.toJsonStr(result).getBytes("UTF-8"));

        outputStream.flush();
        outputStream.close();
    }
}
@Component
public class JwtAuthenticationEntryPoint implements AuthenticationEntryPoint {
    @Override
    public void commence(HttpServletRequest httpServletRequest, HttpServletResponse response, AuthenticationException e) throws IOException, ServletException {
        response.setContentType("application/json;charset=UTF-8");
        response.setStatus(HttpServletResponse.SC_UNAUTHORIZED);
        ServletOutputStream outputStream = response.getOutputStream();

        Result result = Result.fail("请先登录");

        outputStream.write(JSONUtil.toJsonStr(result).getBytes("UTF-8"));

        outputStream.flush();
        outputStream.close();
    }
}
注意,全程围绕spring security安全框架的开发,所以整个一个业务逻辑,需要按照security的工作流程来完成,且需要将定义的组件——(过滤器,异常,处理器等)全部注册到security 的配置类中
登录信息的认证
security安全框架中,在登录过程中需要将表单数据和数据库中的进行对比,
而security提供了多种认证的方式,
比对数据库中的数据,使用的是委托的方式,即走的是委托这条线,
由UserdetailService来完成userDetail和数据库数据的对比
比对用户的信息,重写用户细节——UserDetailsService接口,重写其中的方法,调用用户的userservice根据用户名来查询记录,然后呢判断查询到的结果是否为空,
- 为空就抛出异常
- 否则就返回具体的实例,这里返回的实例可以是userdetail但是如果需要返回的用户信息中拥有特殊的字段,这里就需要,构造一个类,实现userDetails接口 输入需要的属性信息,
权限部分
权限是security的一个重要功能,当用户认证成功之后,需要判断是谁在访问接口,还需要知道用户有哪些权限,
以及哪些用户具有哪些权限,
只有这样,security才能做出权限判断
关于权限的判断
通过判断用户有没有操作此菜单或者操作的权限——先获取用户有哪些角色,然后获取该角色有哪些操作的的权限——即查询用户表的角色字段,然后通过该字段与权限表进行一个表连接,从而获取该用户可以操作的权限判断
那么随之带来的有两个问题
-
在哪里进行用户权限的赋值?
- 赋值权限
- 用户登录——在登录时,调用UserDetailsService接口时返回用户信息时,返回的用户信息细节中需要包含权限信息
- 接口调用身份认证过滤器时——也需要返回用户的权限信息
- 赋值权限
-
在哪判断操作该接口是什么权限——即调用该接口需要什么操作
-
使用security的内置注解来进行
- @PreAuthorize:方法执行前进行权限检查
- @PostAuthorize:方法执行后进行权限检查
- @Secured:类似于 @PreAuthorize
-
这几个注解添加到controller之上用于声明,进入该controller需要什么权限
-
比如需要admin权限
-
@PreAuthorize("hasRole('admin')")
-
-
检验权限的一个流程
- 在登陆或者调用接口时获取用户的权限信息
- 使用注解表示Controller控制器需要什么权限或者是角色来进行操作
- Security通过FilterSecurityInterceptor匹配请求的链接URL和权限是否匹配
- 有权限就正常访问接口
- 没有就交给拒绝访问的操作类来进行处理
小技巧
前后端传递参数名相同时,可以不使用注解进行标注
多表操作时,需要开启事务
在执行多表操作的方法上@Transactional//开启事务
并且在启动类上@EnableTransactionManagement(proxyTargetClass = true)
使用mp时要注意
在每个mapper接口上使用@mapper注解
在每个service实现类上使用@service
ThreadLocal
前端发送来的一次请求,在后端处理的过程中,无论调用了多少方法,这些方法都是共用一个线程的,
即一个请求,对应一个线程,
这也就说明了,如果有必要,可以将某些变量存储在thread中,在其他的方法中,直接通过thread来获取指定的变量
注意
threadLocal并不是一个线程,而是一个thread线程的局部变量,其内部可以存储一些变量的副本,
而且,每一个线程对应一份threadlocal提供的存储空间,这样也就具有线程之间的隔离性,从而保证的数据的安全
常用的方法
public void set (T value);设置当前线程的局部变量
public T get():返回当前线程对应的局部变量
将信息添加到redis缓存中
前后端分离的项目是没有session的,需要将信息放置到redis中
导入redis依赖
添加redis的工具类
自定义配置类指定序列化方式——(序列化,将对象以流的形式输出方便数据的传递)
菜单的开发
首先——每个用户用拥有的权限不同,可以操作的菜单也不同,所以在前端页面中显示的菜单也不同
所以这里用到了三个表,用户表,角色表,菜单表,通过表的连接来获取不同用户可以操作的菜单项,已到达在前端页面菜单正常显示的需求
前端需要什么东西 ,就返回什么东西


