Vue3 之 Vue - Router
目录
一、历史进程
1. 后端路由阶段
2. 前后端分离阶段
3. 单页面富应用(SPA)
二、路由跳转的方式
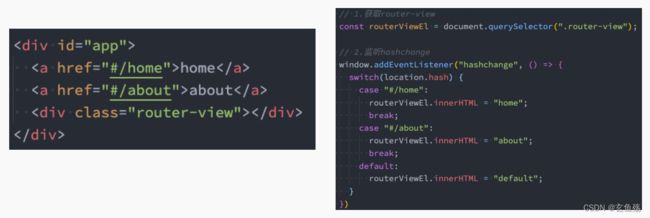
1. URL的hash
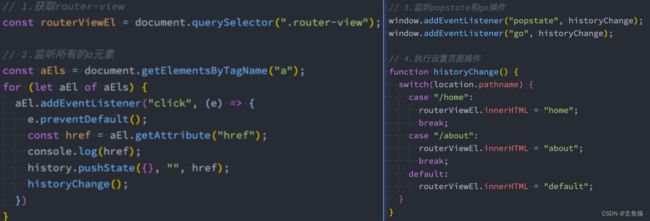
2. HTML5的History
3. 区别
三、Vue-Router基本使用
1. 概念
2. 安装
3. 路由的使用步骤
01 - 创建映射组件
02 - 创建路由对象
03 - 在 main.js 中导入
04 - 在App.vue文件中设置
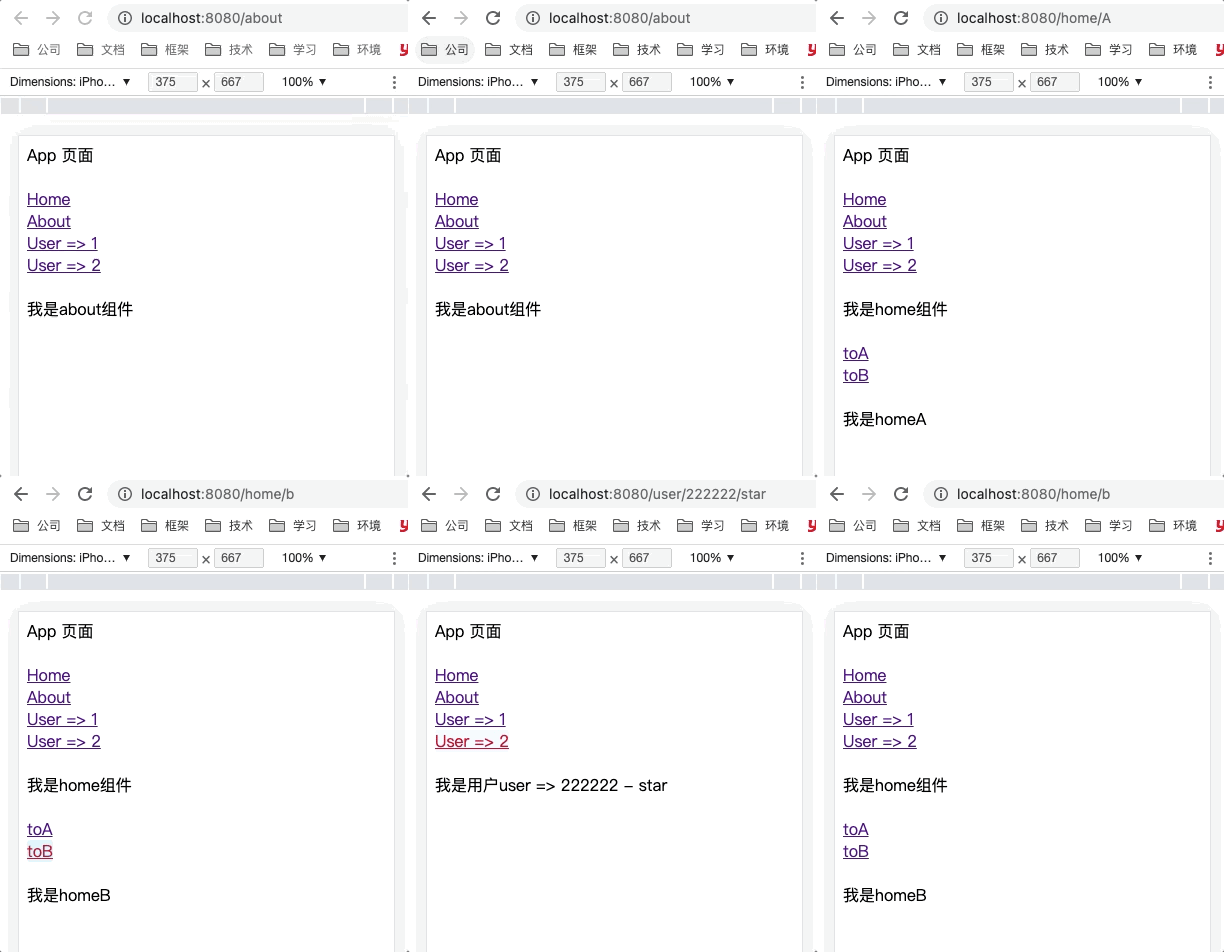
05 - 效果
4. 路由的默认路径
5. 使用history模式
6. router路由的属性
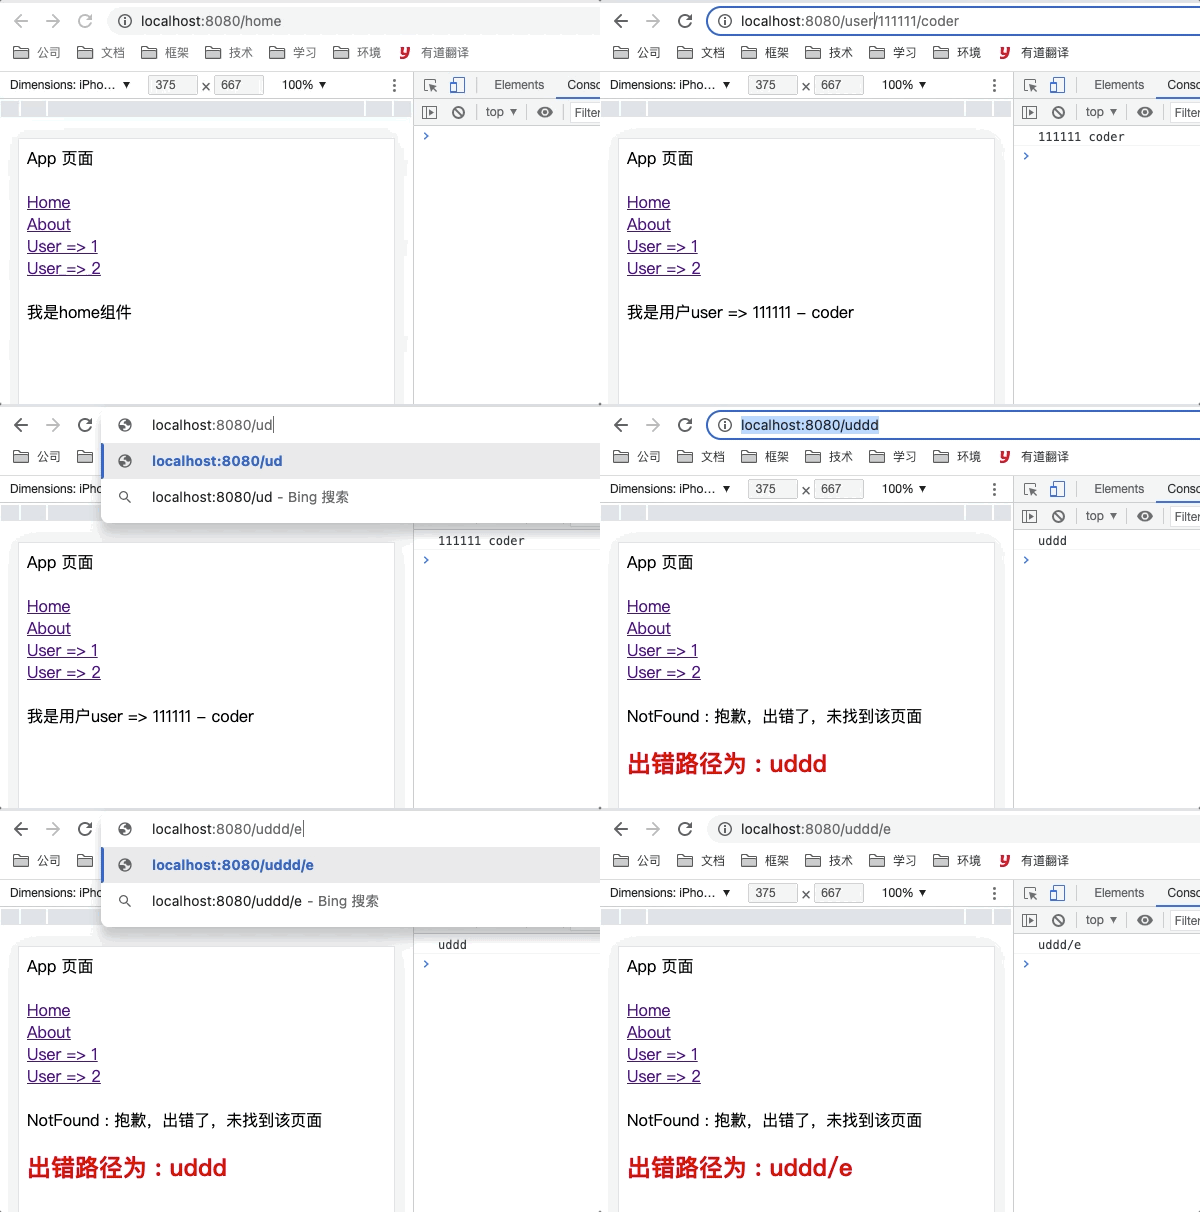
7. notFound
01 - 路由设置
02 - 组件代码
03 - 效果
8. router-link
01 - to属性
02 - replace属性
03 - active-class属性
默认
设置
04 - exact-active-class属性
四、路由懒加载分包处理
1. 路由懒加载
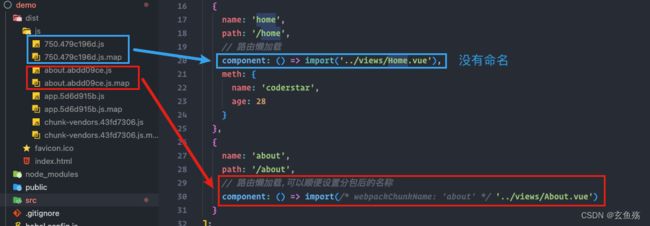
2. 分包处理
五、动态路由
1. 设置路由
2. 跳转设置
3. 组件中获取值
4. 效果
六、路由嵌套
1. 子组件创建
2. 路由设置
3. 组件设置
4. 效果
5. exact-active-class属性
七、路由的编程式导航,代码的页面跳转
1. 简单使用
代码
效果
2. 跳转方式
01 - 通过 name 跳转并传递参数
设置
传递
获取
效果
缺点
02 - 通过 path 跳转并传递参数
设置
传递
获取
效果
3. 前进后退
back
forward
go
4. push | replace
01 - push
02 - replace
八、动态管理路由对象
1. 添加路由
01 - 添加顶层路由
02 - 添加次级路由
03 - 添加三级路由
2. 删除路由
01 - 方式一
02 - 方式二
03 - 方式三
3. 检查路由
4. 获取所有路由
九、路由导航守卫钩子
1. 全局的前置守卫
01 - 参数
02 - 返回值
03 - 登录守卫功能栗子
router.js代码
login组件代码
效果
2. 其他的导航守卫 导航守卫 | Vue Router
3. 完整的导航解析流程
一、历史进程
路由的概念在软件工程中出现,最早是在后端路由中实现的 :
- 后端路由阶段
- 前后端分离阶段
- 单页面富应用(SPA)
1. 后端路由阶段
早期的网站开发整个HTML页面是由服务器来渲染的,服务器直接生产渲染好对应的HTML页面, 返回给客户端进行展示
多页面服务器如何处理 :
- 一个页面有自己对应的网址, 也就是URL
- URL会发送到服务器, 服务器会通过正则对该URL进行匹配, 并且最后交给一个Controller进行处理
- Controller进行各种处理, 最终生成HTML或者数据, 返回给前端
上面的这种操作, 就是后端路由 :
- 当我们页面中需要请求不同的路径内容时, 交给服务器来进行处理, 服务器渲染好整个页面, 并且将页面返回给客户端
- 这种情况下渲染好的页面, 不需要单独加载任何的js和css, 可以直接交给浏览器展示, 这样也有利于SEO的优化
后端路由的缺点 :
- 一种情况是整个页面的模块由后端人员来编写和维护的
- 另一种情况是前端开发人员如果要开发页面, 需要通过PHP和Java等语言来编写页面代码
- 而且通常情况下HTML代码和数据以及对应的逻辑会混在一起, 编写和维护都是非常糟糕的事情
2. 前后端分离阶段
前端渲染的理解 :
- 每次请求涉及到的静态资源都会从静态资源服务器获取,这些资源包括HTML+CSS+JS,然后在前端对这些请求回来的资源进行渲染
- 需要注意的是,客户端的每一次请求,都会从静态资源服务器请求文件
- 同时可以看到,和之前的后端路由不同,这时后端只是负责提供API了
前后端分离阶段 :
- 随着Ajax的出现, 有了前后端分离的开发模式
- 后端只提供API来返回数据,前端通过Ajax获取数据,并且可以通过JavaScript将数据渲染到页面中
- 这样做最大的优点就是前后端责任的清晰,后端专注于数据上,前端专注于交互和可视化上
- 并且当移动端(iOS/Android)出现后,后端不需要进行任何处理,依然使用之前的一套API即可
- 目前比较少的网站采用这种模式开发
3. 单页面富应用(SPA)
单页面富应用阶段 :
- 其实SPA最主要的特点就是在前后端分离的基础上加了一层前端路由
- 也就是前端来维护一套路由规则
- 前端路由的核心是 => 改变URL,但是页面不进行整体的刷新
二、路由跳转的方式
1. URL的hash
- URL的hash也就是锚点(#), 本质上是改变window.location的href属性
- 可以通过直接赋值location.hash来改变href, 但是页面不发生刷新
- hash的优势就是兼容性更好,在老版IE中都可以运行,但是缺陷是有一个#,显得不像一个真实的路径
2. HTML5的History
history接口是HTML5新增的, 它有六种模式改变URL而不刷新页面
- replaceState : 替换原来的路径
- pushState : 使用新的路径
- popState : 路径的回退
- go : 向前或向后改变路径
- forward : 向前改变路径
- back : 向后改变路径
3. 区别
- hash模式带#号比较丑,history模式比较优雅
- hash兼容IE8以上,history兼容IE10以上
- hash无需后端配合,history模式需要后端配合保持路径一致,否则刷新可能会404
- hash的传参是基于url的,如果传递复杂的数据回有体积的限制
- history模式不仅可以在url里放参数,还可以将数据存放在一个特定的对象中
三、Vue-Router基本使用
1. 概念
目前前端流行的三大框架, 都有自己的路由实现 :
- Angular => ngRouter
- React => ReactRouter
- Vue => vue-router
Vue Router :
- Vue.js 的官方路由
- 让用 Vue.js 构建单页应用(SPA)变得非常容易
- vue-router是基于路由和组件的
- 路由用于设定访问路径, 将路径和组件映射起来
- 在vue-router的单页面应用中, 页面的路径的改变就是组件的切换
2. 安装
npm install vue-router3. 路由的使用步骤
- 第一步:创建路由需要映射的组件(打算显示的页面)
- 第二步:通过createRouter创建路由对象,并且传入routes和history模式
- 配置路由映射: 组件和路径映射关系的routes数组
- 创建基于hash或者history的模式
- 第三步:使用app注册路由对象(use方法)
- 第四步:路由使用: 通过
和
01 - 创建映射组件
02 - 创建路由对象
在根目录下创建router文件夹,并在其中创建index.js
// 1. 导入创建路由对象 和 创建hash对象
import { createRouter, createWebHashHistory } from 'vue-router';

// 2. 导入组件
import Home from '../views/Home.vue';
import About from '../views/About.vue';

// 3. 配置路由映射关系表
const routes = [
  // 路径和组件映射起来
  { path: '/home', component: Home },
  { path: '/about', component: About }
];

// 4. 创建路由对象
const router = new createRouter({
  // 5. 配置路由跳转模式,这里使用 hash 模式
  history: createWebHashHistory(),
  // 把映射表放入
  routes
});

// 5. 导出
export default router;
03 - 在 main.js 中导入
import { createApp } from 'vue';
import App from './App.vue';

// 1. 导入路由对象
import router from './router';

// 2. 使用use调用一下
createApp(App).use(router).mount('#app');
04 - 在App.vue文件中设置
router-link => 跳转链接
router-view => 组件显示的位置
    App 页面


    Home


    About
05 - 效果
4. 路由的默认路径
以让路径默认跳到到首页
path配置的是根路径: / => redirect是重定向
const routes = [
  // 默认显示的页面  =>  home
  { path: '/', redirect: '/home' },
  { path: '/home', component: Home },
  { path: '/about', component: About }
];
5. 使用history模式
// 1. 导入创建路由对象
/**
 * createWebHashHistory : hash模式
 * createWebHistory : history模式
 */
import { createRouter, createWebHashHistory, createWebHistory } from 'vue-router';

import Home from '../views/Home.vue';
import About from '../views/About.vue';

const routes = [
  { path: '/', redirect: '/home' },
  { path: '/home', component: Home },
  { path: '/about', component: About }
];

const router = new createRouter({
  // 使用history模式
  history: createWebHistory(),
  routes
});

// 5. 导出
export default router;
6. router路由的属性
- path : 指定跳转的路由地址
- conponent : 指定路由地址对应的组件
- name : 路由记录独一无二的名称
- 可用来跳转
- 可用来配置动态路由时给某个路由增加子路由
- meta : 自定义一些数据
const routes = [
  {
    path: '/',
    redirect: '/home'
  },
  {
    name: 'home',
    path: '/home',
    component: Home,
    meth: {
      name: 'coderstar',
      age: 28
    }
  },
  {
    name: 'about',
    path: '/about',
    component: About
  }
];
7. notFound
对于哪些没有匹配到的路由,通常会匹配到固定的某个页面
01 - 路由设置
// 如果匹配到任何一个不存在的路径,就显示这个组件
{
  name: 'notFound',
  path: '/:pathMatch(.*)', // => 地址一样的显示出来  => abc/erfsdf/gsa/e
  path: '/:pathMatch(.*)*', // => 如果遇到分级,会解析 / ,变成一个数组 => ['abc','erfsdf','gsa','e']
  component: () => import('../views/NotFound.vue')
}
02 - 组件代码
NotFound : 抱歉,出错了,未找到该页面
出错路径为 : {{ $route.params.pathMatch }}
03 - 效果
8. router-link
router-link => 有很多属性可以配置
01 - to属性
to : 是一个字符串,或者是一个对象
指定跳转到哪个组件
Home


Home
02 - replace属性
不设置的时候
使用的是 router.push() ,可以点击浏览器的返回,回到上一次记录页面
设置的时候
使用的是router.replace(),无法返回到上一次记录页面
Home


About
03 - active-class属性
设置激活a元素后应用的class,默认是router-link-active
默认
设置
Home


About
04 - exact-active-class属性
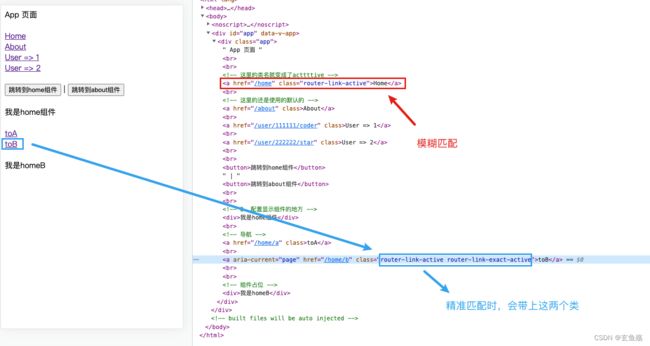
链接精准激活时,应用于渲染的 的 class,默认是router-link-exact-active
ps : 精准定位路由,用于嵌套路由中
四、路由懒加载分包处理
1. 路由懒加载
当打包构建应用时,JavaScript 包会变得非常大,影响页面加载
- 如果能把不同路由对应的组件分割成不同的代码块,然后当路由被访问的时候才加载对应组件,这样就会更加高效,也可以提高首屏的渲染效率
- Vue Router默认支持动态来导入组件
- component可以传入一个组件,也可以接收一个函数,该函数需要放回一个Promise
- import函数就是返回一个Promise
const routes = [
  {
    path: '/',
    redirect: '/home'
  },
  {
    name: 'home',
    path: '/home',
    // 路由懒加载
    component: () => import('../views/Home.vue'),
    meth: {
      name: 'coderstar',
      age: 28
    }
  },
  {
    name: 'about',
    path: '/about',
    // 路由懒加载
    component: () => import('../views/About.vue')
  }
];
2. 分包处理
webpack从3.x开始支持对分包进行命名(chunk name)
const routes = [
  {
    path: '/',
    redirect: '/home'
  },
  {
    name: 'home',
    path: '/home',
    // 路由懒加载
    component: () => import('../views/Home.vue'),
    meth: {
      name: 'coderstar',
      age: 28
    }
  },
  {
    name: 'about',
    path: '/about',
    // 路由懒加载,可以顺便设置分包后的名称
    component: () => import(/* webpackChunkName: 'about' */ '../views/About.vue')
  }
];
五、动态路由
很多时候需要将给定匹配模式的路由映射到同一个组件
- 例如,有一个 User 组件,它应该对所有用户进行渲染,但是用户的ID是不同的
- 在Vue Router中,可以在路径中使用一个动态字段来实现,称之为 路径参数
1. 设置路由
{
  name: 'user',
  // 动态设定 id 和 name
  path: '/user/:id/:name',
  component: () => import('../views/User.vue')
}
2. 跳转设置
User => 1


User => 2
3. 组件中获取值
我是用户user => {{ $route.params.id }} - {{ $route.params.name }}
4. 效果
六、路由嵌套
路由嵌套 : 组件的内部可能有多个组件来回切换
1. 子组件创建
2. 路由设置
const routes = [
  {
    path: '/',
    redirect: '/home'
  },
  {
    name: 'home',
    path: '/home',
    component: () => import('../views/Home.vue'),
    meth: {
      name: 'coderstar',
      age: 28
    },
    // 配置子路由
    children: [
      {
        // 配置重定向,默认进去 home组件 中的 A组件
        path: '/home',
        redirect: '/home/A'
      },
      {
        // 注 : 这里不需要写全称  =>  /home/a
        path: 'a',
        component: () => import('../views/HomeA.vue')
      },
      {
        // 注 : 这里不需要写全称  =>  /home/b
        path: 'b',
        component: () => import('../views/HomeB.vue')
      }
    ]
  },
  {
    name: 'about',
    path: '/about',
    component: () => import('../views/About.vue')
  },
  {
    name: 'user',
    path: '/user/:id/:name',
    component: () => import('../views/User.vue')
  },
  {
    name: 'notFound',
    path: '/:pathMatch(.*)',
    component: () => import('../views/NotFound.vue')
  }
];
3. 组件设置
  我是home组件


  toA


  toB
4. 效果
5. exact-active-class属性
七、路由的编程式导航,代码的页面跳转
1. 简单使用
代码
|
效果
2. 跳转方式
01 - 通过 name 跳转并传递参数
设置
{
  name: 'home', // 用name这个属性来跳转
  path: '/home',
  component: () => import('../views/Home.vue'),
  meth: {
    name: 'coderstar',
    age: 28
  },
  children: [
    {
      path: '/home',
      redirect: '/home/A'
    },
    {
      path: 'a',
      component: () => import('../views/HomeA.vue')
    },
    {
      path: 'b',
      component: () => import('../views/HomeB.vue')
    }
  ]
},
{
  name: 'about', // 用name这个属性来跳转
  path: '/about',
  component: () => import('../views/About.vue')
}
传递
|
获取
我是about组件
{{ $route.query }}
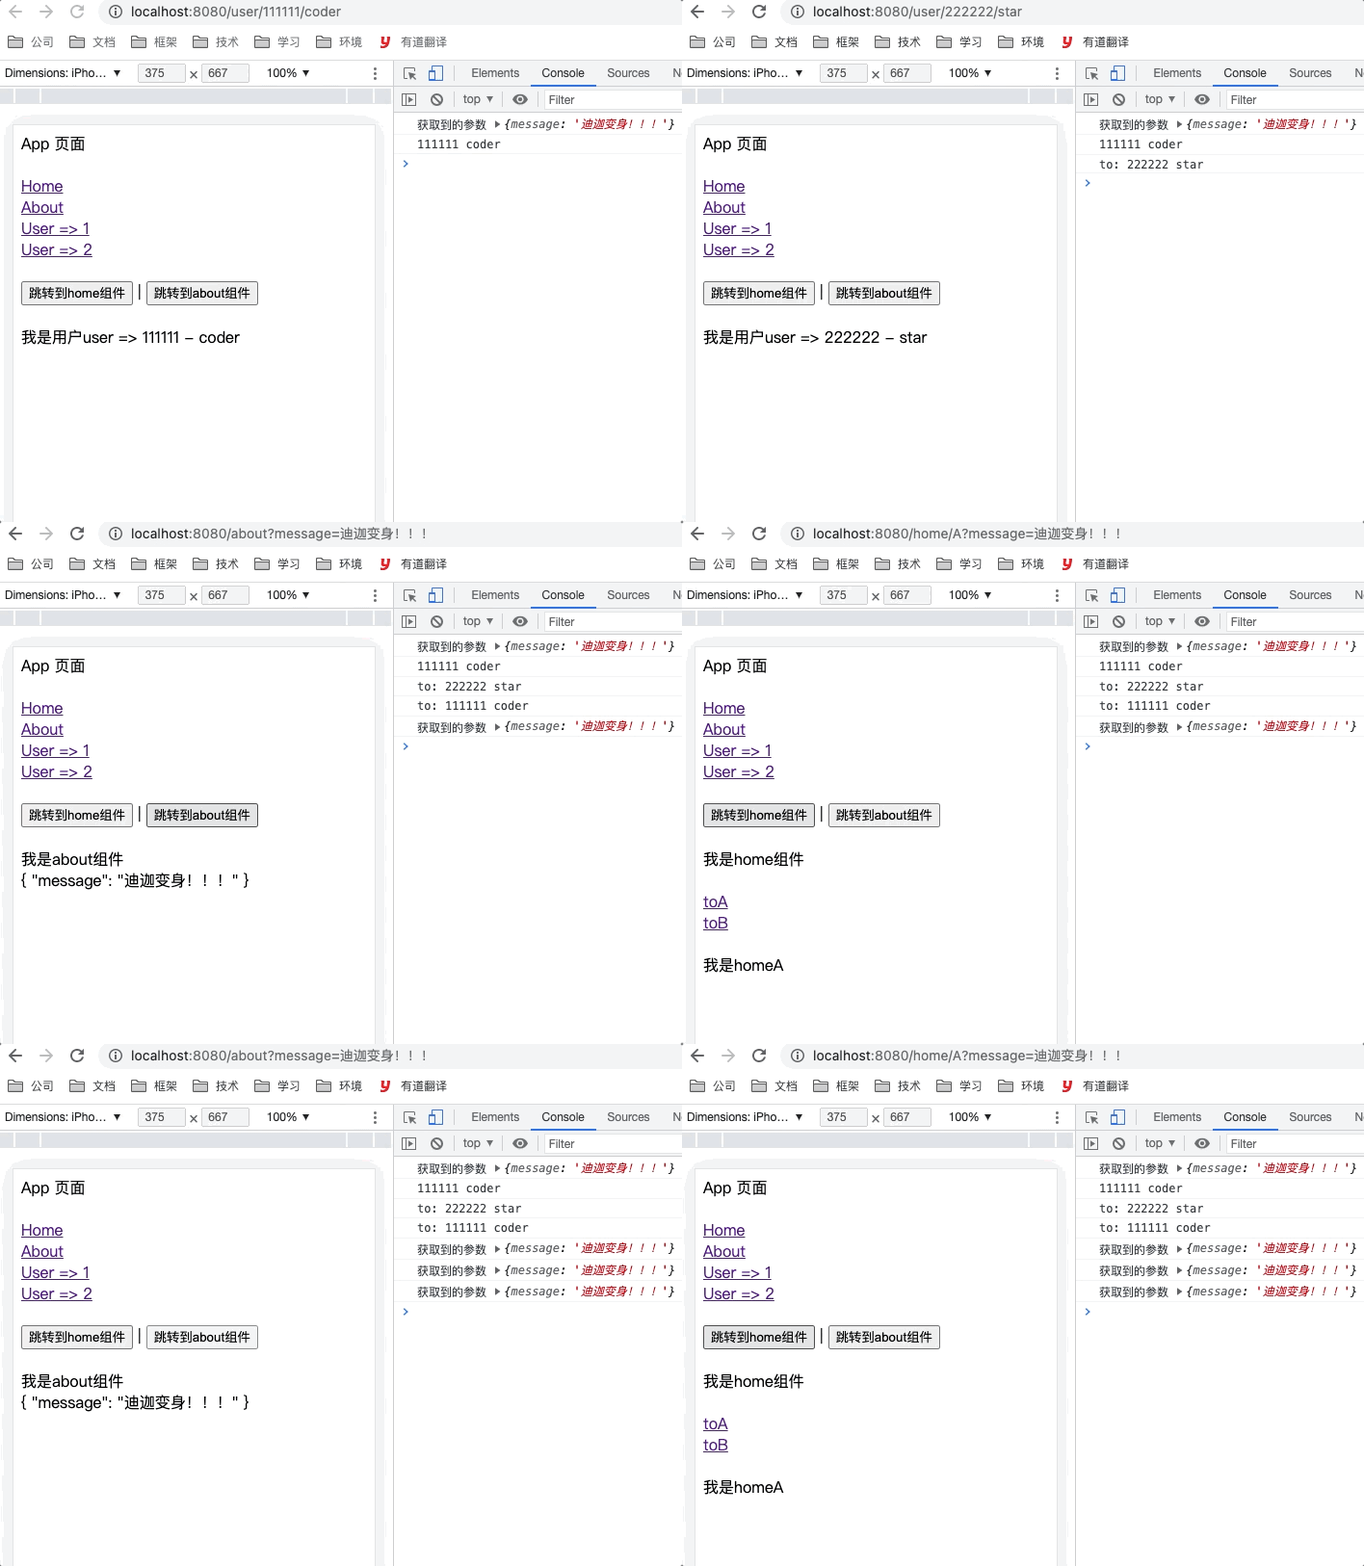
效果
缺点
子路由的重定向路由会失效,看看上方home组件的即可知道
02 - 通过 path 跳转并传递参数
设置
{
  name: 'home',
  path: '/home', // 用path这个属性来跳转
  component: () => import('../views/Home.vue'),
  meth: {
    name: 'coderstar',
    age: 28
  },
  children: [
    {
      path: '/home',
      redirect: '/home/A'
    },
    {
      path: 'a',
      component: () => import('../views/HomeA.vue')
    },
    {
      path: 'b',
      component: () => import('../views/HomeB.vue')
    }
  ]
},
{
  name: 'about',
  path: '/about', // 用path这个属性来跳转
  component: () => import('../views/About.vue')
},
传递
|
获取
我是about组件
{{ $route.query }}
效果
3. 前进后退
back
back => 想后回退
About: {{ $route.query }}
forward
forward => 想前进步
About: {{ $route.query }}
4. push | replace
01 - push
02 - replace
八、动态管理路由对象
某些情况下可能需要动态的来添加路由
根据用户不同的权限,注册不同的路由
1. 添加路由
01 - 添加顶层路由
// 添加顶层路由
let isAdmin = true;
if (isAdmin) {
  router.addRoute({
    name: 'admin',
    path: '/admin',
    component: () => import('../views/Admin.vue')
  });
}

// 5. 导出
export default router;
02 - 添加次级路由
// 添加次级路由
let isAdmin = true;
if (isAdmin) {
  // 第一个参数传 父级的name
  router.addRoute('home', {
    name: 'home-a1',
    path: 'a1', // 实际上是 /home/a1
    component: () => import('../views/HomeA1.vue')
  });
}

// 5. 导出
export default router;
03 - 添加三级路由
let isAdmin = true;
if (isAdmin) {
  router.addRoute('home', {
    name: 'home-a1',
    path: 'a1',
    component: () => import('../views/HomeA1.vue')
  });

  // 三级路由,需要在 home-a1 中加上 router-view 哦
  router.addRoute('home-a1', {
    name: 'home-a2',
    path: 'a2', // 实际上是 /home/a1/a2
    component: () => import('../views/HomeA2.vue')
  });
}

// 5. 导出
export default router;
2. 删除路由
01 - 方式一
添加一个name相同的路由
新添加的路由,会把之前同名的路由给覆盖掉,因为name属性是唯一的
router.addRoute({
  name: 'home-a1',
  path: 'a1', // '/a1'
  component: () => import('../views/HomeA1.vue')
});

// 会覆盖掉上面的
router.addRoute({
  name: 'home-a1',
  path: 'a999999', // '/a999999'
  component: () => import('../views/HomeA2.vue')
});
02 - 方式二
通过removeRoute方法,传入路由的名称
router.addRoute({
  name: 'home-a1',
  path: '/a1',
  component: () => import('../views/HomeA1.vue')
});

// 删除路由
router.removeRoute('home-a1');
03 - 方式三
通过addRoute方法的返回值回调
// 1. 增加路由后,会有一个返回值方法
const removeA1 = router.addRoute({
  name: 'home-a1',
  path: '/a1',
  component: () => import('../views/HomeA1.vue')
});

// 2. 调用该返回值方法,即可删除路由
removeA1();
3. 检查路由
router.hasRoute() => 检查路由是否存在
console.log(router.hasRoute('about')); // true

router.removeRoute('about');

console.log(router.hasRoute('about')); // false
4. 获取所有路由
router.getRoutes():获取一个包含所有路由记录的数组
console.log(router.getRoutes()); // 一个路由数组九、路由导航守卫钩子
vue-router 提供的导航守卫主要用来通过跳转或取消的方式守卫导航
1. 全局的前置守卫
全局的前置守卫 beforeEach 是在导航触发时会被回调的
进行任何的路由跳转之前, 传入的beforeEach中的函数都会被回调
01 - 参数
- to : 即将进入的路由Route对象
- from : 即将离开的路由Route对象
- next ( 可选 ) : 不推荐使用
- Vue2中是通过next函数来决定如何进行跳转的
- Vue3中是通过返回值来控制的,不再推荐使用next函数,这是因为开发中很容易调用多次next
02 - 返回值
- false : 取消当前导航 => 不跳转
- 不返回或者undefined : 进行默认导航 => 该去哪去哪
- 返回一个路由地址 => 指定跳去哪
- 可以是一个string类型的路径
- 可以是一个对象,对象中包含path、query、params等信息
03 - 登录守卫功能栗子
router.js代码
// 路由导航首位
/**
 * to : 去哪个路由
 * from : 从哪里来
 */

// 1. 设定需要登录才能进的页面
const needLoginRoutePath = ['/about', '/user/222222/star'];

router.beforeEach((to, from) => {
  // 2. 判断是否进入需要登录后才能进的页面
  if (needLoginRoutePath.includes(to.path)) {
    // 3. 获取登录状态
    const token = sessionStorage.getItem('token');
    // 4. 判断 => 如果没登录,跳转到登录页面
    if (!token) {
      // 01. 返回登录页面的路径即可
      // return '/login';
      // 02. 同时传递数据过去
      return {
        path: '/login',
        query: {
          toPath: to.path
        }
      };
    }
  }
});

// 5. 导出
export default router;
login组件代码
Login页面
账号 :
密码 :
效果
2. 其他的导航守卫 导航守卫 | Vue Router
3. 完整的导航解析流程

