yolo能用matlab实现,使用 YOLO v2 深度学习进行目标检测
下载预训练的检测器
下载预训练的检测器,避免在训练上花费时间。如果要训练检测器,请将 doTraining 变量设置为 true。
doTraining = false;
if ~doTraining && ~exist('yolov2ResNet50VehicleExample_19b.mat','file')
disp('Downloading pretrained detector (98 MB)...');
pretrainedURL = 'https://www.mathworks.com/supportfiles/vision/data/yolov2ResNet50VehicleExample_19b.mat';
websave('yolov2ResNet50VehicleExample_19b.mat',pretrainedURL);
end
加载数据集
此示例使用包含 295 个图像的小型车辆数据集。每个图像包含一个或两个带标签的车辆实例。小型数据集适用于探查 YOLO v2 训练过程,但在实践中,需要更多带标签的图像来训练稳健的检测器。解压缩车辆图像并加载车辆真实值数据。
unzip vehicleDatasetImages.zip
data = load('vehicleDatasetGroundTruth.mat');
vehicleDataset = data.vehicleDataset;
车辆数据存储在一个包含两列的表中,其中第一列包含图像文件路径,第二列包含车辆边界框。
% Display first few rows of the data set.
vehicleDataset(1:4,:)
ans=4×2 table
imageFilename vehicle
_________________________________ ____________
{'vehicleImages/image_00001.jpg'} {1×4 double}
{'vehicleImages/image_00002.jpg'} {1×4 double}
{'vehicleImages/image_00003.jpg'} {1×4 double}
{'vehicleImages/image_00004.jpg'} {1×4 double}
% Add the fullpath to the local vehicle data folder.
vehicleDataset.imageFilename = fullfile(pwd,vehicleDataset.imageFilename);
将数据集分成训练集、验证集和测试集。选择 60% 的数据用于训练,10% 用于验证,其余用于测试经过训练的检测器。
rng(0);
shuffledIndices = randperm(height(vehicleDataset));
idx = floor(0.6 * length(shuffledIndices) );
trainingIdx = 1:idx;
trainingDataTbl = vehicleDataset(shuffledIndices(trainingIdx),:);
validationIdx = idx+1 : idx + 1 + floor(0.1 * length(shuffledIndices) );
validationDataTbl = vehicleDataset(shuffledIndices(validationIdx),:);
testIdx = validationIdx(end)+1 : length(shuffledIndices);
testDataTbl = vehicleDataset(shuffledIndices(testIdx),:);
使用 imageDatastore 和 boxLabelDatastore 创建数据存储,以便在训练和评估期间加载图像和标签数据。
imdsTrain = imageDatastore(trainingDataTbl{:,'imageFilename'});
bldsTrain = boxLabelDatastore(trainingDataTbl(:,'vehicle'));
imdsValidation = imageDatastore(validationDataTbl{:,'imageFilename'});
bldsValidation = boxLabelDatastore(validationDataTbl(:,'vehicle'));
imdsTest = imageDatastore(testDataTbl{:,'imageFilename'});
bldsTest = boxLabelDatastore(testDataTbl(:,'vehicle'));
组合图像和边界框标签数据存储。
trainingData = combine(imdsTrain,bldsTrain);
validationData = combine(imdsValidation,bldsValidation);
testData = combine(imdsTest,bldsTest);
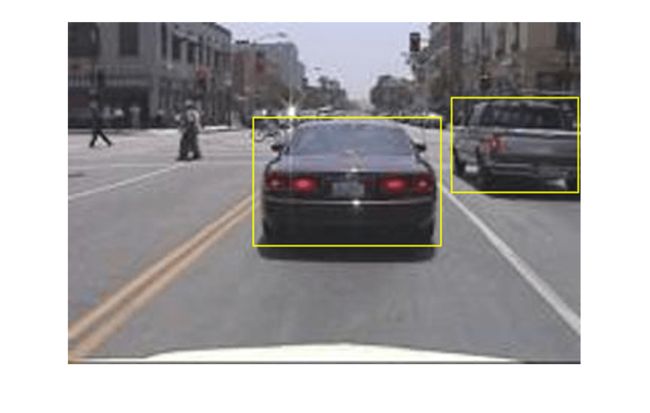
显示其中一个训练图像和边界框标签。
data = read(trainingData);
I = data{1};
bbox = data{2};
annotatedImage = insertShape(I,'Rectangle',bbox);
annotatedImage = imresize(annotatedImage,2);
figure
imshow(annotatedImage)
创建 YOLO v2 目标检测网络
YOLO v2 目标检测网络由两个子网络组成。一个特征提取网络,后跟一个检测网络。特征提取网络通常是一个预训练的 CNN(有关详细信息,请参阅预训练的深度神经网络)。此示例使用 ResNet-50 进行特征提取。根据应用要求,也可以使用其他预训练网络,如 MobileNet v2 或 ResNet-18。与特征提取网络相比,检测子网络是小型 CNN,它由几个卷积层和特定于 YOLO v2 的层组成。
使用 yolov2Layers(Computer Vision Toolbox) 函数自动根据预训练的 ResNet-50 特征提取网络创建 YOLO v2 目标检测网络。yolov2Layers 要求您指定几个用于参数化 YOLO v2 网络的输入:
网络输入大小
锚框
特征提取网络
首先,指定网络输入大小和类的数量。选择网络输入大小时,请考虑网络本身所需的最低大小、训练图像的大小以及基于所选大小处理数据所产生的计算成本。如果可行,请选择接近训练图像大小且大于网络所需输入大小的网络输入大小。为了降低运行示例的计算成本,请指定网络输入大小为 [224 224 3],这是运行网络所需的最低大小。
inputSize = [224 224 3];
定义要检测的目标类的数量。
numClasses = width(vehicleDataset)-1;
请注意,此示例中使用的训练图像大于 224×224,并且大小不同,因此您必须在训练前的预处理步骤中调整图像的大小。
接下来,使用 estimateAnchorBoxes(Computer Vision Toolbox) 根据训练数据中目标的大小来估计锚框。考虑到训练前会对图像大小进行调整,用来估计锚框的训练数据的大小也要调整。使用 transform 预处理训练数据,然后定义锚框数量并估计锚框。使用支持函数 preprocessData 将训练数据的大小调整为网络的输入图像大小。
trainingDataForEstimation = transform(trainingData,@(data)preprocessData(data,inputSize));
numAnchors = 7;
[anchorBoxes, meanIoU] = estimateAnchorBoxes(trainingDataForEstimation, numAnchors)
anchorBoxes = 7×2
145 126
91 86
161 132
41 34
67 64
136 111
33 23
meanIoU = 0.8651
有关选择锚框的详细信息,请参阅Estimate Anchor Boxes From Training Data(Computer Vision Toolbox) (Computer Vision Toolbox™) 和Anchor Boxes for Object Detection(Computer Vision Toolbox)。
现在,使用 resnet50 加载预训练的 ResNet-50 模型。
featureExtractionNetwork = resnet50;
选择 'activation_40_relu' 作为特征提取层,以将 'activation_40_relu' 后面的层替换为检测子网络。此特征提取层输出以 16 为因子的下采样特征图。该下采样量是空间分辨率和提取特征强度之间一个很好的折中,因为在网络更深层提取的特征能够对更强的图像特征进行编码,但以空间分辨率为代价。选择最佳特征提取层需要依靠经验分析。
featureLayer = 'activation_40_relu';
创建 YOLO v2 目标检测网络。
lgraph = yolov2Layers(inputSize,numClasses,anchorBoxes,featureExtractionNetwork,featureLayer);
您可以使用 analyzeNetwork 或 Deep Learning Toolbox™ 中的深度网络设计器来可视化网络。
如果需要对 YOLO v2 网络架构进行更多控制,请使用深度网络设计器手动设计 YOLO v2 检测网络。有关详细信息,请参阅Design a YOLO v2 Detection Network(Computer Vision Toolbox)。
数据增强
数据增强可通过在训练期间随机变换原始数据来提高网络准确度。通过使用数据增强,您可以为训练数据添加更多变化,但又不必增加已标注训练样本的数量。
使用 transform 通过随机水平翻转图像和相关边界框标签来增强训练数据。请注意,数据增强不适用于测试数据和验证数据。理想情况下,测试数据和验证数据应代表原始数据并且保持不变,以便进行无偏置的评估。
augmentedTrainingData = transform(trainingData,@augmentData);
多次读取同一图像,并显示增强的训练数据。
% Visualize the augmented images.
augmentedData = cell(4,1);
for k = 1:4
data = read(augmentedTrainingData);
augmentedData{k} = insertShape(data{1},'Rectangle',data{2});
reset(augmentedTrainingData);
end
figure
montage(augmentedData,'BorderSize',10)
预处理训练数据
预处理增强的训练数据和验证数据以准备进行训练。
preprocessedTrainingData = transform(augmentedTrainingData,@(data)preprocessData(data,inputSize));
preprocessedValidationData = transform(validationData,@(data)preprocessData(data,inputSize));
读取预处理的训练数据。
data = read(preprocessedTrainingData);
显示图像和边界框。
I = data{1};
bbox = data{2};
annotatedImage = insertShape(I,'Rectangle',bbox);
annotatedImage = imresize(annotatedImage,2);
figure
imshow(annotatedImage)
训练 YOLO v2 目标检测器
使用 trainingOptions 指定网络训练选项。将 'ValidationData' 设置为经过预处理的验证数据。将 'CheckpointPath' 设置为临时位置。这样可在训练过程中保存经过部分训练的检测器。如果由于停电或系统故障等原因导致训练中断,您可以从保存的检查点继续训练。
options = trainingOptions('sgdm', ...
'MiniBatchSize',16, ....
'InitialLearnRate',1e-3, ...
'MaxEpochs',20,...
'CheckpointPath',tempdir, ...
'ValidationData',preprocessedValidationData);
如果 doTraining 为 true,使用 trainYOLOv2ObjectDetector(Computer Vision Toolbox) 函数训练 YOLO v2 目标检测器。否则,加载预训练的网络。
if doTraining
% Train the YOLO v2 detector.
[detector,info] = trainYOLOv2ObjectDetector(preprocessedTrainingData,lgraph,options);
else
% Load pretrained detector for the example.
pretrained = load('yolov2ResNet50VehicleExample_19b.mat');
detector = pretrained.detector;
end
此示例在具有 12 GB 内存的 NVIDIA™ Titan X GPU 上进行了验证。如果您的 GPU 内存较少,则可能内存不足。如果出现这种情况,请使用 trainingOptions 函数降低 'MiniBatchSize'。使用此设置训练此网络大约需要 7 分钟。具体训练时间因您使用的硬件而异。
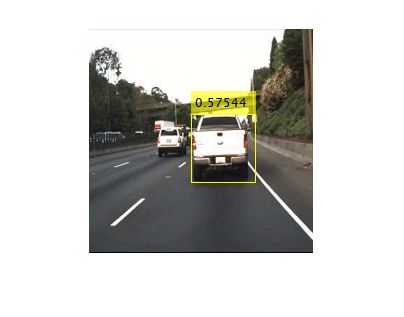
为了快速测试,对一张测试图像运行检测器。确保将图像的大小调整为与训练图像相同。
I = imread('highway.png');
I = imresize(I,inputSize(1:2));
[bboxes,scores] = detect(detector,I);
显示结果。
I = insertObjectAnnotation(I,'rectangle',bboxes,scores);
figure
imshow(I)
使用测试集评估检测器
基于大量图像评估经过训练的目标检测器以测量其性能。Computer Vision Toolbox™ 提供目标检测器评估函数,用于测量常见指标,如平均精确率 (evaluateDetectionPrecision) 和对数平均泄漏检率 (evaluateDetectionMissRate)。对于此示例,使用平均精确率指标来评估性能。平均准确率提供单一数字,该数字综合反映了检测器进行正确分类的能力(精确率)和检测器找到所有相关对象的能力(召回率)。
将应用于训练数据的同一预处理变换应用于测试数据。请注意,数据增强不适用于测试数据。测试数据应代表原始数据并且保持不变,以便进行无偏置的评估。
preprocessedTestData = transform(testData,@(data)preprocessData(data,inputSize));
对所有测试图像运行检测器。
detectionResults = detect(detector, preprocessedTestData);
使用平均精确率指标评估目标检测器。
[ap,recall,precision] = evaluateDetectionPrecision(detectionResults, preprocessedTestData);
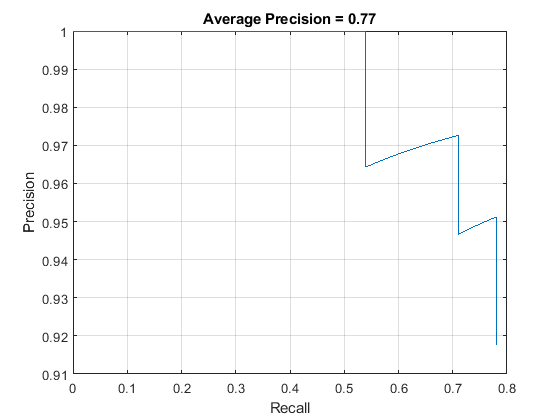
精确率/召回率 (PR) 曲线强调检测器在不同召回水平下的精确程度。理想情况下,所有召回水平的精确率均为 1。使用更多数据有助于提高平均精确率,但可能需要更多训练时间。绘制 PR 曲线。
figure
plot(recall,precision)
xlabel('Recall')
ylabel('Precision')
grid on
title(sprintf('Average Precision = %.2f',ap))
代码生成
一旦检测器经过训练和评估,您就可以使用 GPU Coder™ 为 yolov2ObjectDetector 生成代码。有关详细信息,请参阅Code Generation for Object Detection by Using YOLO v2(GPU Coder) 示例。
支持函数
function B = augmentData(A)
% Apply random horizontal flipping, and random X/Y scaling. Boxes that get
% scaled outside the bounds are clipped if the overlap is above 0.25. Also,
% jitter image color.
B = cell(size(A));
I = A{1};
sz = size(I);
if numel(sz)==3 && sz(3) == 3
I = jitterColorHSV(I,...
'Contrast',0.2,...
'Hue',0,...
'Saturation',0.1,...
'Brightness',0.2);
end
% Randomly flip and scale image.
tform = randomAffine2d('XReflection',true,'Scale',[1 1.1]);
rout = affineOutputView(sz,tform,'BoundsStyle','CenterOutput');
B{1} = imwarp(I,tform,'OutputView',rout);
% Apply same transform to boxes.
[B{2},indices] = bboxwarp(A{2},tform,rout,'OverlapThreshold',0.25);
B{3} = A{3}(indices);
% Return original data only when all boxes are removed by warping.
if isempty(indices)
B = A;
end
end
function data = preprocessData(data,targetSize)
% Resize image and bounding boxes to the targetSize.
scale = targetSize(1:2)./size(data{1},[1 2]);
data{1} = imresize(data{1},targetSize(1:2));
data{2} = bboxresize(data{2},scale);
end
参考资料
[1] Redmon, Joseph, and Ali Farhadi."YOLO9000:Better, Faster, Stronger."2017 IEEE Conference on Computer Vision and Pattern Recognition (CVPR).IEEE, 2017.


