SpringBoot热部署和属性文件高级配置及测试
▶ 热部署
▶ 配置高级
▶ 测试
热部署
- 手动启动热部署
- 自动启动热部署
- 热部署范围配置
- 关闭热部署
● 开启开发者工具
<dependency>
			<groupId>org.springframework.bootgroupId>
			<artifactId>spring-boot-devtoolsartifactId>
			<optional>trueoptional>
dependency>
● 激活热部署 Ctrl+F9
- 关于热部署
- 重启(Restart):自定义开发代码,包含类、页面、配置文件等,加载位置restart类加载器
- 重载(Reload):jar包,加载位置base类加载器
1.开启开发者工具后启用热部署
2.使用构建项目操作启动热部署(Ctrl+F9)
3.热部署仅仅加载当前开发者自定义开发的资源,不加载jar资源
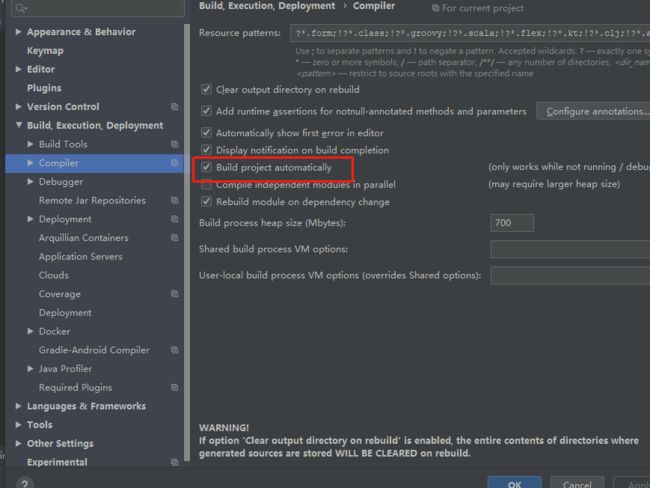
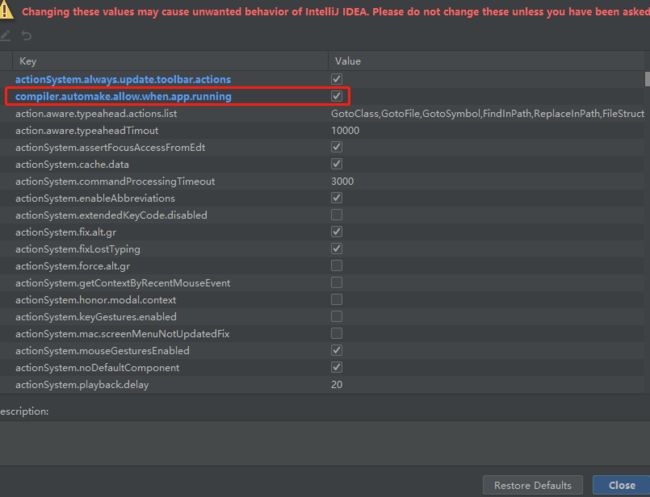
● 设置自动构建项目

调出Maintenance(快捷键ctrl+shift+alt+/)

热部署范围配置
- 默认不触发重启的目录列表
- /META-INF/maven
- /META-INF/resources
- /resources
- /static
- /public
- /templates
● 自定义不参与重启排除项
devtools:
    restart:
      #设置不参与热部署的文件或者文件夹
      exclude: static/**,public/**,config/appliction.yml
● 关闭热部署
- 第一种:配置文件方式禁用热部署
devtools:
    restart:
      #设置不参与热部署的文件或者文件夹
      exclude: static/**,public/**,config/appliction.yml
      enabled: false
- 第二种:设置高优先级属性禁用热部署
	public static void main(String[] args) {
		  System.setProperty("spring.devtools.restart.enabled","false");
		  SpringApplication.run(SSMPApplication.class, args);
	}
配置高级
- @ConfigurationProperties
- 宽松绑定/松散绑定
- 常用计量单位绑定
- 数据校验
● @ConfigurationProperties
①使用@ConfigurationProperties为第三方属性绑定属性
    @Bean
    @ConfigurationProperties(prefix = "datasource")
    public DruidDataSource druidDataSource(){
        DruidDataSource ds = new DruidDataSource();
        return ds;
    }
绑定前缀名命名规范:仅能使用纯小写字母、数字、下划线作为合法的字符
datasource:
  driverClassName: com.mysql.jdbc.Driver234
● @EnableConfigurationProperties
② @EnableConfigurationProperties注解可以将使用@ConfigurationProperties注解对应的类加入Spring容器
@SpringBootApplication
@EnableConfigurationProperties(ServerConfig.class)
public class Springboot13ConfigurationApplication {
}
//@Component
@Data
@ConfigurationProperties(prefix = "servers")
public class ServerConfig {
 }
@EnableConfigurationProperties与@Conponent不能同时使用
● 解除使用@ConfigurationProperties注释警告

<dependency>
      <groupId>org.springframework.bootgroupId>
      <artifactId>spring-boot-configuration-processorartifactId>
      <optional>trueoptional>
dependency>
● @ConfigurationProperties绑定属性支持属性名松散绑定
public class ServerConfig {
    private String ipAddress;
    private int port;
    private long timeOut;
}
servers:
#  ipAddress: 192.168.0.1  驼峰
#  ipAddress: 192.168.0.1
#  ip_address: 192.168.0.1 unLine
#  ip-address: 192.168.0.1  烤肉串模式
#  IPADDRESS: 192.168.0.1
#  IP_ADDRESS: 192.168.0.1 常量
#  IP—A_DD-R_ESS: 192.168.0.1
  port: 2345
  timeOut: -1
  ip_address: 192.168.0.1
宽松绑定不支持注解@Value引用单个属性的方式
常用计量单位
● SpringBoot支持JDK8提供的时间与空间计量单位
//@Component
@Data
@ConfigurationProperties(prefix = "servers")
public class ServerConfig {
    private String ipAddress;
    private int port;
    private long timeOut;
    @DurationUnit(ChronoUnit.HOURS)
    private Duration serverTimeOut;
    @DataSizeUnit(DataUnit.MEGABYTES)
    private DataSize dataSize;
}
数据校验
开启bean的数据校验
① 添加JSR303规范坐标与Hibernate校验框架对应坐标(不需要带版本)
        <dependency>
            <groupId>javax.validationgroupId>
            <artifactId>validation-apiartifactId>
        dependency>

        <dependency>
            <groupId>org.hibernate.validatorgroupId>
            <artifactId>hibernate-validatorartifactId>
        dependency>
② 对bean开启校验功能
//@Component
@Data
@ConfigurationProperties(prefix = "servers")
//2.开启对当前bean的属性注入校验
@Validated
public class ServerConfig {
}
③ 设置校验规则
//@Component
@Data
@ConfigurationProperties(prefix = "servers")
//2.开启对当前bean的属性注入校验
@Validated
public class ServerConfig {
    private String ipAddress;
    //3.设置具体的规则
    @Max(value = 8888,message = "最大值不能超过8888")
//    @Min(value = 202,message = "最小值不能低于202")
    private int port;
   }
启用bean属性校验
1.导入JSR303与Hibernate校验框架坐标
2.使用@Validated注解启用校验功能
3.使用具体校验规则规范数据校验格式
yml语法规则
boolean: true                       #TRUE,True,true,FALSE,False,false均可
float: 3.14                         #6.8523015e+5 #支持科学计数法
int: 123                            #ob1010_0111_0100_1010 #支持二进制、八进制、十六进制
null: ~                             #使用~表示null
String: HelloWorld                  #字符串可以直接书写
String2: "Hello world"              #可以使用双引号包裹特殊字符
date: 2018-02-17                    #日期必须使用yyyy_MM_dd格式
datetime: 2018-02-17T15:02:31+08:00 #时间和日期之间使用T连接,最后使用+代表时区
datasource:
  driverClassName: com.mysql.jdbc.Driver234
  #若是数字0127默认按照数值进行解析,八进制转十进制
  password: "0127"
# 0(0-7)
#0x(0-9,a-f)
@SpringBootTest
class Springboot13ConfigurationApplicationTests {
    @Value("${datasource.password}")
    private String password;
    @Test
    void contextLoads() {
        System.out.println(password);
    }
}
测试①当
datasource:
  password: 0127
datasource:
  password: "0127"
测试
- 加载测试专用属性
- 加载测试专用配置
- Web环境模拟测试
- 数据层测试回滚
- 测试用例数据设定
● 加载测试专用属性
① 在启动测试环境时可以通过propertise参数设置测试环境专用的属性
//properties属性可以为当前测试用例添加临时的属性配置
@SpringBootTest(properties = {"test.prop=testValue1"})
public class PropertiesAndArgsTest {
    @Value("${test.prop}")
    private String msg;
    @Test
    void testProperties(){
        System.out.println(msg);
    }
}
◆ 优势:比多环境开发中的测试环境影响范围更小,仅对当前测试类有效
② 在启动测试环境时可以通过args参数设置测试环境专用的属性
//args属性可以为当前测试用例添加临时的命令行参数
//@SpringBootTest(args = {"--test.prop=testValue2"})
public class PropertiesAndArgsTest {
    @Value("${test.prop}")
    private String msg;
    @Test
    void testProperties(){
        System.out.println(msg);
    }
}
● 使用@Import注解加载当前测试类专用的配置
@SpringBootTest
@Import(MsConfig.class)
public class ConfigurationTest {
    @Autowired
    private String msg;
    @Test
    public void testConfiguration(){
        System.out.println(msg);
    }
}
加载测试范围配置应用于小范围测试环境
web环境模拟测试
● 模拟端口
@SpringBootTest(webEnvironment = SpringBootTest.WebEnvironment.RANDOM_PORT)
public class WebTest {
    @Test
    void test(){
    }
}
@SpringBootTest(webEnvironment = SpringBootTest.WebEnvironment.RANDOM_PORT)
//开启虚拟MVC调用
@AutoConfigureMockMvc
public class WebTest {
    @Test
    void testRandomPort(){
    }
    @Test
    void testWeb(@Autowired MockMvc mvc) throws Exception {
        //创建虚拟请求,当前访问/books
        MockHttpServletRequestBuilder builder = MockMvcRequestBuilders.get("/books");
        //执行对应的请求
        mvc.perform(builder);
    }
}
● 虚拟请求状态匹配
    @Test
    void testStatus(@Autowired MockMvc mvc) throws Exception {
        //创建虚拟请求,当前访问/books
        MockHttpServletRequestBuilder builder = MockMvcRequestBuilders.get("/books");
        //执行对应的请求
        ResultActions actions = mvc.perform(builder);

        //设定预期值与真实值进行比较,成功测试通过,失败测试失败
        //定义本次调用的预期值
        StatusResultMatchers status = MockMvcResultMatchers.status();
        //预计本次调用的结果时成功的,状态200
        ResultMatcher ok = status.isOk();
        //添加预计值到本次调用过程中进行匹配
        actions.andExpect(ok);
    }
● 虚拟请求体匹配
    @Test
    void testBody(@Autowired MockMvc mvc) throws Exception {
        //创建虚拟请求,当前访问/books
        MockHttpServletRequestBuilder builder = MockMvcRequestBuilders.get("/books");
        //执行对应的请求
        ResultActions actions = mvc.perform(builder);

        //设定预期值与真实值进行比较,成功测试通过,失败测试失败
        //定义本次调用的预期值
        ContentResultMatchers content = MockMvcResultMatchers.content();
        ResultMatcher result = content.string("spring boot");
        //添加预计值到本次调用过程中进行匹配
        actions.andExpect(result);
    }
● 虚拟请求体(JSON)匹配
    @Test
    void testJson(@Autowired MockMvc mvc) throws Exception {
        //创建虚拟请求,当前访问/books
        MockHttpServletRequestBuilder builder = MockMvcRequestBuilders.get("/books");
        //执行对应的请求
        ResultActions actions = mvc.perform(builder);

        //设定预期值与真实值进行比较,成功测试通过,失败测试失败
        //定义本次调用的预期值
        ContentResultMatchers content = MockMvcResultMatchers.content();
        ResultMatcher result = content.json("{\"id\":1,\"name\":\"springboot\",\"type\":\"springboot\",\"description\":\"springboot\"}");
        //添加预计值到本次调用过程中进行匹配
        actions.andExpect(result);
    }
● 数据层测试事务回滚
① 为测试用例添加事务,SpringBoot会对测试用例对应的事务提交操作进行回滚
@Transactional
public class DaoTest {
    @Autowired
    private BookService bookService;
}
② 如果想在测试用例中提交事务,可以通过@Rollback注解设置
@Transactional
@Rollback(false)
  public class DaoTest {
}
测试用例数据设定
● 测试用例数据通常采用随机值进行测试,使用SpringBoot提供的随机数为其赋值
testCase:
  book:
    id: ${random.int}          #随机数
    id2: ${random.int(10)}     #10以内随机数
    type: ${random.int(10,20)} #10到20随机数
    name: ${random.value}      #随机uuid
    uuid: ${random.uuid}       #随机字符串,MD5字符串,32位
    publishTime: ${random.long} #随机整数long范围
${random.int}表示随机整数${random.int(10)}表示10以内的随机数${random.int(10,20)}表示10到20的随机数- 其中()可以是任意字符,例如[],!!均可


