【开源】一款PyQT+Pyserial开发的串口调试工具
【开源】PyQT+Pyserial开发的串口调试工具
串口调试工具是我们做嵌入式开发常用的工具,市面上已经有很多串口调试工具了,博主写这款串口调试工具一方面是为了学习Python PyQT Pyserial 相关的知识,另一方面是也是可以为后续基于此设计更多的串口自动化工具。所以本文会详细介绍如何使用PyQT+Pyserial实现一款串口调试工具。
1. 安装开发环境
首先安装Python 3 环境,然后使用pip安装pyqt5 pyserial pyside2等需要的库
pip install pyqt5 pyserial PySide2
2. 设计UI
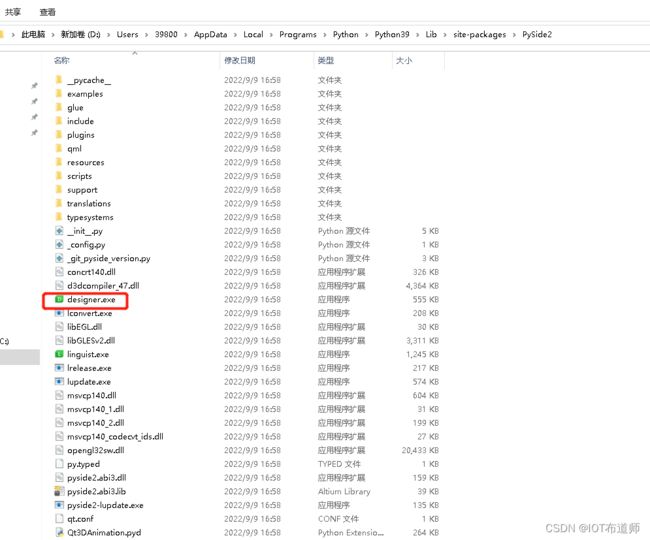
开发环境安装完成后,就可以进行GUI设计了,首先进入PySide2库的本地安装路径下
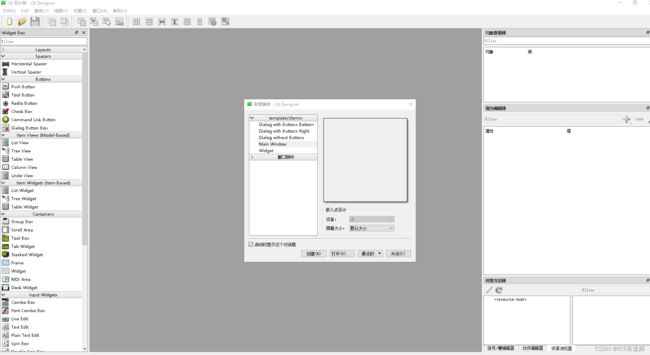
双击designer.exe文件,打开QT设计师
选择Main Window 或者Widget都可以。
接下来绘制QT界面,这部分不过多介绍,就是QT的常规使用。下面附上我的QT界面ui文件
https://download.csdn.net/download/hesuping/86750748
完成ui文件后,需要使用pyuic5命令将ui文件转化成python文件,这样才可以被python调用,转化的方式也很简单。PyQt 5安装成功后,pyuic5命令默认安装在Python安装包目录Scripts文件下, 执行如下命令,就可以将uart_ui.ui文件妆花成python文件uart_ui.py。
pyuic5 -o uart_ui.py uart_ui.ui
3. 串口逻辑实现
3.1 实例化类
使用面向对象思想,创建一个串口的类,并进行实例化。
if __name__ == '__main__':

	app = QApplication(sys.argv)

	ex = SerialTool()

	ex.show()

	sys.exit(app.exec_())
3.2 初始化程序
在SerialTool 类中的初始化中,分别执行初始化UI界面,刷新并初始化串口, 关键UI事件等操作,并创建定时发送的定时器。
	def __init__(self):
		super().__init__()

		self.setupUi(self)
		self.refreshPort()
		tmp = open('logo.png', 'wb')
		tmp.write(base64.b64decode(img))
		tmp.close()

		self.setWindowIcon(QIcon('logo.png'))
		os.remove('logo.png')

		self.InitUIEvent()
		self.initCOM()

		self.signalRecieve.connect(self.uart_receive_display)

		# #创建定时发送定时器
		self.timer_send= QTimer(self)
		self.timer_send.timeout.connect(self.UartSend)
3.3 串口刷新程序
	def refreshPort(self):
		self.com_list = []
		port_list = list(serial.tools.list_ports.comports())
		self.Combo_COM.clear()
		if len(port_list) > 0:
			for port_com in port_list:
				port_serial = list(port_com)[0]
				self.Combo_COM.addItem(port_serial)
				self.com_list.append(port_serial)
		else:
			self.Combo_COM.addItem('')
3.4 串口初始化程序
	def initCOM(self):
		self.l_serial = serial.Serial()
		if(len(self.com_list)):
			self.l_serial.port = self.com_list[0]
		self.l_serial.baudrate = int(self.Combo_Baudrate.currentText())
		self.l_serial.bytesize = int(self.Combo_Data_bit.currentText())
		self.l_serial.stopbits = int(self.Combo_Stop_bit.currentText())
		self.l_serial.parity = self.Combo_Parity.currentText()
		# serial.PARITY_NONE
		self.l_serial.timeout = 0.2
3.5 打开/关闭串口程序
	def StartComActivated(self):

		if self.l_serial.isOpen():
			self.timer_send.stop()
			# self.thread_read.join()
			self.l_serial.close()
			self.Button_Onoff_com.setText("打开串口")

			self.Combo_COM.setEnabled(True)
			self.Combo_Baudrate.setEnabled(True)
			self.Combo_Data_bit.setEnabled(True)
			self.Combo_Stop_bit.setEnabled(True)
			self.Combo_Parity.setEnabled(True)
		else:
			self.l_serial.open()
			self.Button_Onoff_com.setText("关闭串口")

			self.Combo_COM.setEnabled(False)
			self.Combo_Baudrate.setEnabled(False)
			self.Combo_Data_bit.setEnabled(False)
			self.Combo_Stop_bit.setEnabled(False)
			self.Combo_Parity.setEnabled(False)

			self.thread_read = None
			self.thread_read = threading.Thread(target=self.UartRead)
			self.thread_read.setDaemon(True)
			self.thread_read.start()
3.6 串口读取程序
	def UartRead(self):
		while self.l_serial.isOpen():
			num = self.l_serial.inWaiting()
			if num:
				self.data = self.l_serial.read(num)
				if self.Box_Display_hex.checkState():        # 16进制接收
					hex_data=''
					for i in range(0, len(self.data)):
						hex_data = hex_data + '{:02X}'.format(self.data[i]) + ' '
					# self.Textbrowser_Receive.append(hex_data.strip())
					self.signalRecieve.emit(hex_data)
				else :
					# self.Textbrowser_Receive.append(data.decode().strip())
					# self.Textbrowser_Receive.insertPlainText(data.decode('utf-8',"ignore"))
					self.signalRecieve.emit(self.data)

			time.sleep(0.1)
3.7 串口显示程序
	def uart_receive_display(self,obj):
		now_time = datetime.now()  # 获取当前时间
		new_time = now_time.strftime('[%H:%M:%S:%f]')
		if self.Box_Display_hex.checkState():         # hex显示
			if(self.Box_Display_time.checkState()):   # 显示时间
				self.recv_data = '\r\n'+ new_time + obj.strip()
			else:
				self.recv_data = obj.strip()
			if self.Box_Display_send.checkState():    # 显示发送
				self.recv_data = '\r\n' + '[Receive]:' + self.recv_data

			if self.Box_Auto_wrap.checkState():
				self.Textbrowser_Receive.append(self.recv_data)
			else:
				self.Textbrowser_Receive.insertPlainText(self.recv_data)
				# self.Textbrowser_Receive.append(self.recv_data)
		else:
			if self.Box_Display_time.checkState():
				self.recv_data = '\r\n' + new_time + obj.decode('utf-8',"ignore")
			else:
				self.recv_data = obj.decode('utf-8',"ignore")

			if self.Box_Display_send.checkState():
				self.recv_data = '\r\n' + '[Receive]:' + self.recv_data

			if self.Box_Auto_wrap.checkState():
				self.Textbrowser_Receive.append(self.recv_data)
			else:
				self.Textbrowser_Receive.insertPlainText(self.recv_data)

		self.Textbrowser_Receive.moveCursor(self.Textbrowser_Receive.textCursor().End)  #文本框显示到底部
3.8 串口发送程序
	def UartSend(self):
		InputStr = self.TextEdit_Send.toPlainText()
		if InputStr == "":
			return

		if self.Box_Display_send.checkState():
			self.recv_data = '[Send]:'+ InputStr
			self.Textbrowser_Receive.append(self.recv_data)

		if self.Box_Hex_send.checkState():
			#发送十六进制数据
			InputStr = InputStr.strip() #删除前后的空格
			send_list=[]
			while InputStr != '':
				try:
					num = int(InputStr[0:2], 16)

				except ValueError:
					QMessageBox.critical(self, 'pycom','请输入十六进制数据,以空格分开!')
					return None

				InputStr = InputStr[2:]
				InputStr = InputStr.strip()

				#添加到发送列表中
				send_list.append(num)
			InputStr = bytes(send_list)

			self.l_serial.write(InputStr)
		else :
			self.l_serial.write(InputStr.encode())
4. 串口工具
完成后的串口工具如下图:
界面中显示的功能都已经完成,其他的功能还在陆续开发中。 欢迎大家关注及提意见。 目前该工具功能还很基础和粗糙,但是很适合用于学习。工具的全部源码我也已经放在了github中,欢迎STAR及留言。
github地址: https://github.com/HESUPING/IOT_COM
安装包:https://github.com/HESUPING/IOT_COM/releases/download/V1.0/IOT_COM.exe


