多级缓存2
多级缓存
文章目录
- 多级缓存
- 使用OpenResty返回响应数据
- OpenResty获取请求参数
- 查询Tomcat
- Tomcat集群的负载均衡
- 加入Redis缓存
-
- 冷启动与缓存预热
- 查询Redis缓存
-
-
- 封装Redis工具
- 实现Redis查询
- 本地缓存API
- 实现本地缓存查询
-
使用OpenResty返回响应数据
启动nginx
带有静态资源的item.html
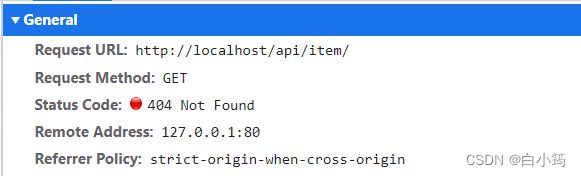
访问http://localhost/item.html

页面会发送请求数据
接下来我们使用OpenResty来返回数据
修改/usr/local/openresty/nginx/conf下的nginx.conf
1、加载OpenResty的lua模块:
#lua 模块
lua_package_path "/usr/local/openresty/lualib/?.lua;;";
#c模块
lua_package_cpath "/usr/local/openresty/lualib/?.so;;";
2、在nginx.conf的server下面,添加对/api/item这个路径的监听
        location /api/item{
        #默认的响应类型
        default_type application/json;
        #响应结果由lua/item.lua文件决定
        content_by_lua_file lua/item.lua;

        }
创建文件nginx/lua/item.lua文件
返回假数据
ngx.say('{"id":10001,"name":"SALSA AIR","title":"RIMOWA 26寸托运箱拉杆箱 SALSA AIR系列果绿色 820.70.36.4","price":17900,"image":"https://m.360buyimg.com/mobilecms/s720x720_jfs/t6934/364/1195375010/84676/e9f2c55f/597ece38N0ddcbc77.jpg!q70.jpg.webp","category":"拉杆箱","brand":"RIMOWA","spec":"","status":1,"createTime":"2019-04-30T16:00:00.000+00:00","updateTime":"2019-04-30T16:00:00.000+00:00","stock":2999,"sold":31290}')
重新加载nginx的配置文件
nginx -s reload
页面查看,发现数据发生变化,请求数据成功

OpenResty获取请求参数
OpenResty提供了各种API用来获取不通过类型的请求参数
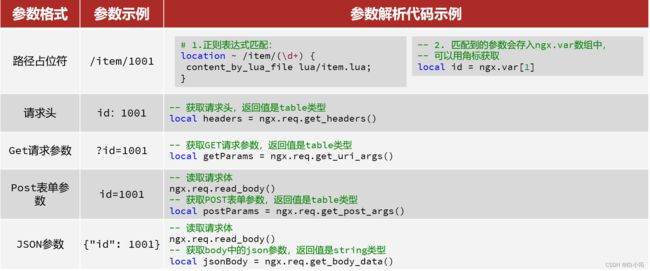
这里我们采用路径占位符获取
接受路径参数
其中(\d+)表示至少一个数字
修改配置文件/usr/local/openresty/nginx/conf下的nginx.conf
       location ~ /api/item/(\d+){
        #默认的响应类型
        default_type  application/json;
        #响应结果由lua/item.lua文件决定
        content_by_lua_file   lua/item.lua;
        }
修改lua文件
local id=ngx.var[1]

ngx.say('{"id":'..id..',"name":"SALSA AIR","title":"RIMOWA 26寸托运箱拉杆箱 SALSA AIR系列果绿色 820.70.36.4","price":17900,"image":"https://m.360buyimg.com/mobilecms/s720x720_jfs/t6934/364/1195375010/84676/e9f2c55f/597ece38N0ddcbc77.jpg!q70.jpg.webp","category":"拉杆箱","brand":"RIMOWA","spec":"","status":1,"createTime":"2019-04-30T16:00:00.000+00:00","updateTime":"2019-04-30T16:00:00.000+00:00","stock":2999,"sold":31290}')
就能够获取请求路径中的参数了
查询Tomcat

多级缓存需求
先实现从OpenResty到Tomcate
案例:
这里要修改item.lua,满足下面的需求:
1.获取请求参数中的id
2.根据id向Tomcat服务发送请求,查询商品信息
3.根据id向Tomcat服务发送请求,查询库存信息
4.组装商品信息、库存信息,序列化为JSON格式并返回
编写反向代理将/item的请求转发到本机下的8081端口
        location /item{
        #这里是windows电脑的ip和java服务端口
        proxy_pass http://192.168.205.1:8081;
        }
我们可以把http查询的请求封装为一个函数,放到OpenResty函数库中,方便后期使用。
1.在/usr/local/openresty/lualib目录下创建common.lua文件:
vi /usr/local/openresty/lualib/common.lua
2.在common.lua中封装http查询的函数
-- 封装函数,发送http请求,并解析响应
local function read_http(path, params)
    local resp = ngx.location.capture(path,{
        method = ngx.HTTP_GET,
        args = params,
    })
    if not resp then
        -- 记录错误信息,返回404
        ngx.log(ngx.ERR, "http not found, path: ", path , ", args: ", args)
        ngx.exit(404)
    end
    return resp.body
end
-- 将方法导出
local _M = {
    read_http = read_http
}
return _M
修改item.lua文件
/usr/local/openresty/nginx/lua
--导入common函数库
local common= require('common')

--拿到函数
local read_http=common.read_http

--导入cjson库
local cjson=require('cjson')


--获取路径参数
local id=ngx.var[1]

--查询商品信息
local itemJSON=read_http("/item/" ..id,nil)

--查询库存信息
local stockJSON=read_http("/item/stock/" .. id,nil)

--JSON转换为lua的table
local item=cjson.decode(itemJSON)

--JSON转换为lua的table
local stock=cjson.decode(stockJSON)


--组合数据
item.stock=stock.stock
item.sold=stock.sold

--序列化为JSON


--返回结果
ngx.say(cjson.encode(item))
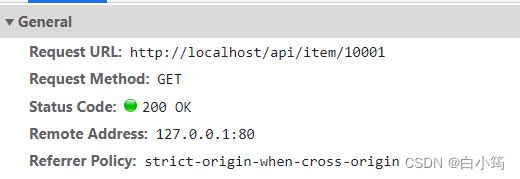
通过访问http://localhost:8081/item/10001能查询商品信息
http://localhost:8081/item/stock/10001 能查询到商品库存
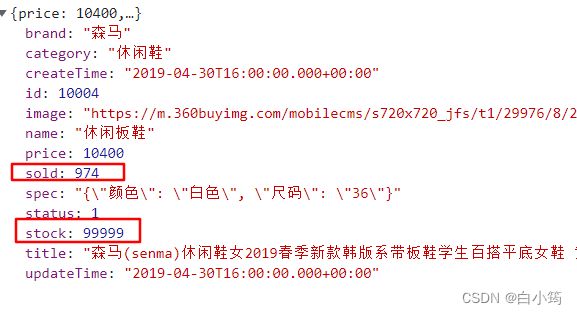
访问http://localhost/item.html?id=10004
就能返回
全部的nginx.conf
#user  nobody;
worker_processes  1;
error_log  logs/error.log;

events {
    worker_connections  1024;
}

http {
    include       mime.types;
    default_type  application/octet-stream;
    sendfile        on;
    keepalive_timeout  65;

 #lua 模块
lua_package_path "/usr/local/openresty/lualib/?.lua;;";
#c模块
lua_package_cpath "/usr/local/openresty/lualib/?.so;;";


    server {
        listen       8081;
        server_name  localhost;

         location /item{
        #这里是windows电脑的ip和java服务端口
           proxy_pass http://192.168.205.1:8081;
        }

       location ~ /api/item/(\d+){
        #默认的响应类型
        default_type  application/json;
        #响应结果由lua/item.lua文件决定
        content_by_lua_file   lua/item.lua;
        }


        location / {
            root   html;
            index  index.html index.htm;
        }


        error_page   500 502 503 504  /50x.html;
        location = /50x.html {
            root   html;
        }
    }
}
Tomcat集群的负载均衡

修改nginx的配置文件
upstream tomcat-cluster{

hash $request_uri;//修改负载均衡算法,对参数取余
server 192.168.205.1:8081;
server 192.168.205.1:8082;

}

    server {
        listen       8081;
        server_name  localhost;
        location /item{

        proxy_pass http://tomcat-cluster;
        }
重新加载nginx
nginx -s reload
可以在复制一份Tomcat进行测试
修改端口为8082

访问
http://localhost/item.html?id=10001
只要访问的id不修改,访问的tomcat是同一台
加入Redis缓存

冷启动与缓存预热
冷启动:服务刚刚启动时,Redis中并没有缓存,如果所有商品数据都在第一次查询时添加缓存,可能会给数据库带来较大压力。
缓存预热:在实际开发中,我们可以利用大数据统计用户访问的热点数据,在项目启动时将这些热点数据提前查询并保存到Redis中。
因为我们数据量较少,可以在启动时将所有数据都放入缓存中。
1、利用Docker安装Redis
docker run --name redis -p 6379:6379 -d redis redis-server --appendonly yes
2、在item-service服务中引入Redis依赖
    org.springframework.boot
    spring-boot-stater-data-redis
3、配置Redis地址
spring:
 redis:
   host: 192.168.205.128
4、编写初始化类
实现InitializingBean重写afterPropertiesSet方法
在项目创建完之后就能将数据放入redis中
@Component
public class RedisHandler implements InitializingBean {
@Autowired
private StringRedisTemplate redisTemplate;
@Autowired
private IItemService itemService;
@Autowired
private IItemStockService stockService;
//默认的json处理工具
private static final ObjectMapper MAPPER=new ObjectMapper();
@Override
//会在bean创建完@Autowired执行后去执行
public void afterPropertiesSet() throws Exception {
//初始化缓存
//1.查询商品信息
List- list = itemService.list();
//2.放入缓存
for (Item item : list) {
String json = MAPPER.writeValueAsString(item);
//存入redis
//商品信息
redisTemplate.opsForValue().set("item:id:"+item.getId(),json);
//库存信息
List
list1 = stockService.list();
for (ItemStock itemStock : list1) {
String json1 = MAPPER.writeValueAsString(itemStock);
redisTemplate.opsForValue().set("item:stock:id:"+item.getId(),json1);
}
}
}
}
其中使用了Spring的默认处理工具
private static final ObjectMapper MAPPER=new ObjectMapper();

查询Redis缓存
封装Redis工具
OpenResty提供了操作Redis的模块,我们只要引入该模块就能直接使用。但是为了方便,我们将Redis操作封装到之前的common.lua工具库中。
修改/usr/local/openresty/lualib/common.lua文件:
1)引入Redis模块,并初始化Redis对象
-- 导入redis
local redis = require('resty.redis')
-- 初始化redis
local red = redis:new()
-- 设置redis的超时时间
red:set_timeouts(1000, 1000, 1000)
2)封装函数,用来释放Redis连接,其实是放入连接池
-- 关闭redis连接的工具方法,其实是放入连接池
local function close_redis(red)
    local pool_max_idle_time = 10000 -- 连接的空闲时间,单位是毫秒
    local pool_size = 100 --连接池大小
    local ok, err = red:set_keepalive(pool_max_idle_time, pool_size)
    if not ok then
        ngx.log(ngx.ERR, "放入redis连接池失败: ", err)
    end
end
3)封装函数,根据key查询Redis数据
-- 查询redis的方法 ip和port是redis地址,key是查询的key
local function read_redis(ip, port, key)
    -- 获取一个连接
    local ok, err = red:connect(ip, port)
    if not ok then
        ngx.log(ngx.ERR, "连接redis失败 : ", err)
        return nil
    end
    -- 查询redis
    local resp, err = red:get(key)
    -- 查询失败处理
    if not resp then
        ngx.log(ngx.ERR, "查询Redis失败: ", err, ", key = " , key)
    end
    --得到的数据为空处理
    if resp == ngx.null then
        resp = nil
        ngx.log(ngx.ERR, "查询Redis数据为空, key = ", key)
    end
    close_redis(red)
    return resp
end
4)将方法导出
-- 将方法导出
local _M = {
    read_http = read_http,
    read_redis = read_redis
}
return _M
完整的common.lua:
-- 导入redis
local redis = require('resty.redis')
-- 初始化redis
local red = redis:new()
red:set_timeouts(1000, 1000, 1000)

-- 关闭redis连接的工具方法,其实是放入连接池
local function close_redis(red)
    local pool_max_idle_time = 10000 -- 连接的空闲时间,单位是毫秒
    local pool_size = 100 --连接池大小
    local ok, err = red:set_keepalive(pool_max_idle_time, pool_size)
    if not ok then
        ngx.log(ngx.ERR, "放入redis连接池失败: ", err)
    end
end

-- 查询redis的方法 ip和port是redis地址,key是查询的key
local function read_redis(ip, port, key)
    -- 获取一个连接
    local ok, err = red:connect(ip, port)
    if not ok then
        ngx.log(ngx.ERR, "连接redis失败 : ", err)
        return nil
    end
    -- 查询redis
    local resp, err = red:get(key)
    -- 查询失败处理
    if not resp then
        ngx.log(ngx.ERR, "查询Redis失败: ", err, ", key = " , key)
    end
    --得到的数据为空处理
    if resp == ngx.null then
        resp = nil
        ngx.log(ngx.ERR, "查询Redis数据为空, key = ", key)
    end
    close_redis(red)
    return resp
end

-- 封装函数,发送http请求,并解析响应
local function read_http(path, params)
    local resp = ngx.location.capture(path,{
        method = ngx.HTTP_GET,
        args = params,
    })
    if not resp then
        -- 记录错误信息,返回404
        ngx.log(ngx.ERR, "http查询失败, path: ", path , ", args: ", args)
        ngx.exit(404)
    end
    return resp.body
end
-- 将方法导出
local _M = {
    read_http = read_http,
    read_redis = read_redis
}
return _M
实现Redis查询
接下来,我们就可以去修改item.lua文件,实现对Redis的查询了。
查询逻辑是:
- 根据id查询Redis
- 如果查询失败则继续查询Tomcat
- 将查询结果返回
1)修改/usr/local/openresty/nginx/lua/item.lua文件,添加一个查询函数:
-- 导入common函数库
local common = require('common')
local read_http = common.read_http
local read_redis = common.read_redis
-- 封装查询函数
function read_data(key, path, params)
    -- 查询本地缓存
    local val = read_redis("127.0.0.1", 6379, key)
    -- 判断查询结果
    if not val then
        ngx.log(ngx.ERR, "redis查询失败,尝试查询http, key: ", key)
        -- redis查询失败,去查询http
        val = read_http(path, params)
    end
    -- 返回数据
    return val
end
2)然后修改商品查询、库存查询的业务:
修改为redis中的key的格式

3)完整的item.lua代码:
-- 导入common函数库
local common = require('common')
local read_http = common.read_http
local read_redis = common.read_redis
-- 导入cjson库
local cjson = require('cjson')


-- 封装查询函数
function read_data(key, path, params)
    -- 查询本地缓存
    local val = read_redis("127.0.0.1", 6379, key)
    -- 判断查询结果
    if not val then
        ngx.log(ngx.ERR, "redis查询失败,尝试查询http, key: ", key)
        -- redis查询失败,去查询http
        val = read_http(path, params)
    end
    -- 返回数据
    return val
end


-- 获取路径参数
local id = ngx.var[1]

-- 查询商品信息
local itemJSON = read_data("item:id:" .. id,  "/item/" .. id, nil)
-- 查询库存信息
local stockJSON = read_data("item:stock:id:" .. id, "/item/stock/" .. id, nil)

-- JSON转化为lua的table
local item = cjson.decode(itemJSON)
local stock = cjson.decode(stockJSON)
-- 组合数据
item.stock = stock.stock
item.sold = stock.sold

-- 把item序列化为json 返回结果
ngx.say(cjson.encode(item))
将tomcat服务停止,仍然可以查询数据
现在,整个多级缓存中只差最后一环,也就是nginx的本地缓存了。如图:

本地缓存API
OpenResty为Nginx提供了shard dict的功能,可以在nginx的多个worker之间共享数据,实现缓存功能。
1)开启共享字典,在nginx.conf的http下添加配置:
 # 共享字典,也就是本地缓存,名称叫做:item_cache,大小150m
 lua_shared_dict item_cache 150m;
2)操作共享字典:
-- 获取本地缓存对象
local item_cache = ngx.shared.item_cache
-- 存储, 指定key、value、过期时间,单位s,默认为0代表永不过期
item_cache:set('key', 'value', 1000)
-- 读取
local val = item_cache:get('key')
实现本地缓存查询
1)修改/usr/local/openresty/nginx/lua/item.lua文件,修改read_data查询函数,添加本地缓存逻辑:
-- 导入共享词典,本地缓存
local item_cache = ngx.shared.item_cache

-- 封装查询函数
function read_data(key, expire, path, params)
    -- 查询本地缓存
    local val = item_cache:get(key)
    if not val then
        ngx.log(ngx.ERR, "本地缓存查询失败,尝试查询Redis, key: ", key)
        -- 查询redis
        val = read_redis("127.0.0.1", 6379, key)
        -- 判断查询结果
        if not val then
            ngx.log(ngx.ERR, "redis查询失败,尝试查询http, key: ", key)
            -- redis查询失败,去查询http
            val = read_http(path, params)
        end
    end
    -- 查询成功,把数据写入本地缓存
    item_cache:set(key, val, expire)
    -- 返回数据
    return val
end
2)修改item.lua中查询商品和库存的业务,实现最新的read_data函数:

其实就是多了缓存时间参数,过期后nginx缓存会自动删除,下次访问即可更新缓存。
这里给商品基本信息设置超时时间为30分钟,库存为1分钟。
因为库存更新频率较高,如果缓存时间过长,可能与数据库差异较大。
3)完整的item.lua文件:
-- 导入common函数库
local common = require('common')
local read_http = common.read_http
local read_redis = common.read_redis
-- 导入cjson库
local cjson = require('cjson')
-- 导入共享词典,本地缓存
local item_cache = ngx.shared.item_cache

-- 封装查询函数
function read_data(key, expire, path, params)
    -- 查询本地缓存
    local val = item_cache:get(key)
    if not val then
        ngx.log(ngx.ERR, "本地缓存查询失败,尝试查询Redis, key: ", key)
        -- 查询redis
        val = read_redis("127.0.0.1", 6379, key)
        -- 判断查询结果
        if not val then
            ngx.log(ngx.ERR, "redis查询失败,尝试查询http, key: ", key)
            -- redis查询失败,去查询http
            val = read_http(path, params)
        end
    end
    -- 查询成功,把数据写入本地缓存
    item_cache:set(key, val, expire)
    -- 返回数据
    return val
end

-- 获取路径参数
local id = ngx.var[1]

-- 查询商品信息
local itemJSON = read_data("item:id:" .. id, 1800,  "/item/" .. id, nil)
-- 查询库存信息
local stockJSON = read_data("item:stock:id:" .. id, 60, "/item/stock/" .. id, nil)

-- JSON转化为lua的table
local item = cjson.decode(itemJSON)
local stock = cjson.decode(stockJSON)
-- 组合数据
item.stock = stock.stock
item.sold = stock.sold

-- 把item序列化为json 返回结果
ngx.say(cjson.encode(item))
查看日志
在这里插入图片描述
在重新查询1004会发现没有日志报错,通过本地缓存查询1004