用Tensorflow实现卷积神经网络(CNN)
参考博客:https://www.cnblogs.com/further-further-further/p/10737065.html
目录
1.踩过的坑(tensorflow)
2.tensorboard
3.代码实现(python3.5)
4.运行结果以及分析
1.踩过的坑(tensorflow)
上一章CNN中各个算法都是纯手工实现的,可能存在一些难以发现的问题,这也是准确率不高的一个原因,这章主要利用tensorflow框架来实现卷积神经网络,数据源还是cifar(具体下载见上一章)
在利用tensorflow框架实现CNN时,需要注意以下几点:
1.输入数据定义时,x只是起到占位符的作用(看不到真实值,只是为了能够运行代码,获取相应的tensor节点,这一点跟我们之前代码流程完全相反, 真正数据流的执行在session会话里)
x:输入数据,y_: 标签数据,keep_prob: 概率因子,防止过拟合。
定义,且是全局变量。
x = tf.placeholder(tf.float32, [None, 3072], name='x')
y_ = tf.placeholder(tf.float32, [None, 10], name='y_')
keep_prob = tf.placeholder(tf.float32)
后面在session里必须要初始化
train_accuracy = accuracy.eval(feed_dict={
                    x: batch[0], y_: batch[1], keep_prob: 1.0})
在session run时必须要传得到该tensor节点含有参数值(x, y_, keep_prob)
sess.run(tf.global_variables_initializer())
2.原始数据集标签要向量化;
例如cifar有10个类别,如果类别标签是 6 对应向量[0,0,0,0,0,1,0,0,0,0]
3.知道每一步操作的数据大小的变化,不然,报错的时候很难定位(个人认为这也是tensorflow的弊端,无法实时追踪定位);
注意padding = 'SAME’和’VALID’的区别
padding = ‘SAME’ => Height_后 = Height_前/Strides 跟padding无关 向上取整
padding = ‘VALID’=> Height_后 = (Height_前 - Filter + 1)/Strides 向上取整
4.打印tensorboard流程图,可以直观看到每步操作数据大小的变化;
- tensorboard
tensorboard就是一个数据结构流程图的可视化工具,通过tensorboard流程图,可以直观看到神经网络的每一步操作以及数据流的变化。
操作步骤:
- 在session会话里加入如下代码,打印结果会在当前代码文件相同路径的tensorboard文件下,默认是
start.py
tf.summary.FileWriter("tensorboard/", sess.graph)
- 在运行里输入cmd,然后输入(前提是安装好了tensorboard => pip install tensorboard)
tensorboard --logdir=D:\Project\python\myProject\CNN\tensorflow\captchaIdentify\tensorboard --host=127.0.0.1
‘D:\Project\python\myProject\CNN\tensorflow\captchaIdentify\tensorboard’ 是我生成的tensorboard文件的绝对路径,你替换成你自己的就可以了。
正确运行后会显示 ‘Tensorboard at http://127.0.0.1:6006’,说明tensorboard服务已经起来了,在浏览器页面输入
http://127.0.0.1:6006即可显示流程图。
3.代码实现(python3.6)
代码逻辑实现相对比较简单,在一些重要逻辑实现上,我已做了注释,如果大家有什么疑义,可以留言给我,我们一起交流。
因为原始图片数据集太大,不好上传,大家可以直接在http://www.cs.toronto.edu/~kriz/cifar.html下载CIFAR-10 python version,
有163M,放在代码文件同路径下即可。
cifar放置路径

# co
ding=utf-8
# Disable linter warnings to maintain consistency with tutorial.
# pylint: disable=invalid-name
# pylint: disable=g-bad-import-order
from __future__ import absolute_import
from __future__ import division
from __future__ import print_function
import argparse
import sys
import tempfile
#from tensorflow.examples.tutorials.mnist import input_data
import tensorflow as tf
'''
卷积神经网络实现10类(airplane, automobile, bird, cat, deer, dog, frog, horse, ship, truck)
60000张图片的识别
5000次,准确率有 58%;
20000次,准确率有 68.89%;
相比mnist数字图片识别准确度低,原因有:
mnist训练图片是灰度图片,纹理简单,数字的可变性小,而cifar是彩色图片,纹理复杂,动物可变性大;
'''
#导入数据库
try:
from . import datesets
except Exception:
import datesets
FLAGS = None
def deepnn(x):
with tf.name_scope('reshape'):
x_image = tf.reshape(x, [-1, 32, 32, 3])#-1 表示不知道该填什么数字合适的情况下
## 第一层卷积操作 ##
with tf.name_scope('conv1'):
W_conv1 = weight_variable([5, 5, 3, 32])
b_conv1 = bias_variable([32])
h_conv1 = tf.nn.relu(conv2d(x_image, W_conv1) + b_conv1)
#tf.nn.conv2d(input_data, filter_data, strides = [1, 1, 1, 1], padding = 'SAME')
#input是一个4d输入[batch_size, in_height, in_width, n_channels],表示图片的批数,大小和通道。
#filter是一个4d输入[filter_height, filter_width, in_channels, out_channels],表示kernel的大小,输入通道数和输出通道数,其中输出通道数表示从上一层提取多少特征。
#strides是一个1d输入,长度为4,其中stride[0]和stride[3]必须为1,一般格式为[1, stride[1], stride[2], 1],在大部分情况下,因为在height和width上的步进设为一样,因此通常为[1, stride, stride, 1]。
#padding是一个字符串输入,分为SAME和VALID分别表示是否需要填充,因为卷积完之后因为周围的像素没有卷积到,因此一般是会出现卷积完的输出尺寸小于输入的现象的.
with tf.name_scope('pool1'):
h_pool1 = max_pool_2x2(h_conv1)
# Second convolutional layer -- maps 32 feature maps to 64.
## 第二层卷积操作 ##
with tf.name_scope('conv2'):
W_conv2 = weight_variable([5, 5, 32, 64])
b_conv2 = bias_variable([64])
h_conv2 = tf.nn.relu(conv2d(h_pool1, W_conv2) + b_conv2)
with tf.name_scope('pool2'):
h_pool2 = max_pool_2x2(h_conv2)
## 第三层全连接操作 ##
with tf.name_scope('fc1'):
W_fc1 = weight_variable([8 * 8 * 64, 1024])
b_fc1 = bias_variable([1024])
h_pool2_flat = tf.reshape(h_pool2, [-1, 8 * 8 * 64])#-1 表示不知道该填什么数字合适的情况下
h_fc1 = tf.nn.relu(tf.matmul(h_pool2_flat, W_fc1) + b_fc1)
#tf.matmul(h_pool2_flat, W_fc1)代表h_pool2_flat * W_fc1
with tf.name_scope('dropout'):
keep_prob = tf.placeholder(tf.float32)
#placeholder()函数是在神经网络构建graph的时候在模型中的占位,此时并没有把要输入的数据传入模型,它只会分配必要的内存。等建立session,在会话中,运行模型的时候通过feed_dict()函数向占位符喂入数据。
h_fc1_drop = tf.nn.dropout(h_fc1, keep_prob)
#tf.nn.dropout()是tensorflow里面为了防止或减轻过拟合而使用的函数,它一般用在全连接层,
#tf.nn.dropout(x, keep_prob, noise_shape=None, seed=None, name=None)
#x:指输入,输入tensor
#keep_prob: float类型,每个元素被保留下来的概率,设置神经元被选中的概率,在初始化时keep_prob是一个占位符, keep_prob = tf.placeholder(tf.float32) 。tensorflow在run时设置keep_prob具体的值,例如keep_prob: 0.5
#noise_shape : 一个1维的int32张量,代表了随机产生“保留/丢弃”标志的shape。
#seed : 整形变量,随机数种子。
#name:指定该操作的名字
## 第四层输出操作 ##
with tf.name_scope('fc2'):
W_fc2 = weight_variable([1024, 10])
b_fc2 = bias_variable([10])
y_conv = tf.matmul(h_fc1_drop, W_fc2) + b_fc2
return y_conv, keep_prob
def conv2d(x, W):
return tf.nn.conv2d(x, W, strides=[1, 1, 1, 1], padding='SAME')
def max_pool_2x2(x):
return tf.nn.max_pool(x, ksize=[1, 2, 2, 1],
strides=[1, 2, 2, 1], padding='SAME')
#tf.nn.max_pool(value, ksize, strides, padding, name=None)
#参数是四个,和卷积很类似:
参数value:需要池化的输入,一般池化层接在卷积层后面,所以输入通常是 feature map ,是[batch, height, width, channels] 这样的 shape
参数 ksize:池化窗口的大小,取一个四维向量,一般是 [1, height, width, 1],因为我们不想在 batch和 channels 上做池化,所以这两个维度设为了1
参数 strides:和卷积类似,窗口在每一个维度上滑动的步长,一般也是 [1, stride,stride, 1]
参数 padding:和卷积类似,可以取 'VALID' 或者 'SAME'
def weight_variable(shape):
initial = tf.truncated_normal(shape, stddev=0.1)
return tf.Variable(initial)
#c = tf.truncated_normal(shape=[2,3], mean=0, stddev=1)
#shape,生成张量的维度
#mean,均值
#stddev,标准差
def bias_variable(shape):
initial = tf.constant(0.1, shape=shape)
return tf.Variable(initial)
#tf.constant(value, dtype=None, shape=None, name='Const', verify_shape=False)
#value:是一个必须的值,可以是一个数值,也可以是一个列表;可以是一维的,也可以是多维的。
#dtype:数据类型,一般可以是tf.float32, tf.float64等
#shape:表示张量的“形状”,即维数以及每一维的大小
#name: 可以是任何内容,只要是字符串就行
#verify_shape:默认为False,如果修改为True的话表示检查value的形状与shape是否相符,如果不符会报错。
def main(_):
# Import data
mnist = datesets.read_data_sets(train_dir = '.\\cifar-10-batches-py\\', one_hot=True)
# Create the model
# 声明一个占位符,None表示输入图片的数量不定,28*28图片分辨率
x = tf.placeholder(tf.float32, [None, 3072], name='x')
#tf.placeholder(
dtype,
shape=None,
name=None
)
#
dtype:数据类型。常用的是tf.float32,tf.float64等数值类型
shape:数据形状。默认是None,就是一维值,也可以是多维(比如[2,3], [None, 3]表示列是3,行不定)
name:名称
# 类别是0-9总共10个类别,对应输出分类结果
y_ = tf.placeholder(tf.float32, [None, 10], name='y_')
y_conv, keep_prob = deepnn(x)
# 通过softmax-loss求交叉熵
with tf.name_scope('loss'):
cross_entropy = tf.nn.softmax_cross_entropy_with_logits(labels=y_, logits=y_conv)
# 求均值
cross_entropy = tf.reduce_mean(cross_entropy)
# 计算梯度,更新参数值
with tf.name_scope('adam_optimizer'):
train_step = tf.train.AdamOptimizer(1e-4).minimize(cross_entropy)
with tf.name_scope('accuracy'):
correct_prediction = tf.equal(tf.argmax(y_conv, 1), tf.argmax(y_, 1))
#tf.argmax(input,axis)axis=1的时候,将每一行最大元素所在的索引记录下来,最后返回每一行最大元素所在的索引数组。
#equal(x, y, name=None)equal,相等的意思。顾名思义,就是判断,x, y 是不是相等,它的判断方法不是整体判断,
correct_prediction = tf.cast(correct_prediction, tf.float32)
#cast(x, dtype, name=None) tf.cast()函数的作用是执行 tensorflow 中张量数据类型转换,比如读入的图片如果是int8类型的,一般在要在训练前把图像的数据格式转换为float32。
accuracy = tf.reduce_mean(correct_prediction)
#tf.reduce_mean 函数用于计算张量tensor沿着指定的数轴(tensor的某一维度)上的的平均值,主要用作降维或者计算tensor(图像)的平均值。第二个参数axis: 指定的轴,如果不指定,则计算所有元素的均值;
# graph_location = tempfile.mkdtemp()
# print('Saving graph to: %s' % graph_location)
# train_writer.add_graph(tf.get_default_graph())
with tf.Session() as sess:
# 打印流程图
writer = tf.summary.FileWriter("tensorboard/", sess.graph)
#train_writer = tf.summary.FileWriter(dir,sess.graph) #定义一个写入summary的目标文件,dir为写入文件地址
sess.run(tf.global_variables_initializer())
for i in range(20000):
batch = mnist.train.next_batch(50)
if i % 1000 == 0:
train_accuracy = accuracy.eval(feed_dict={
x: batch[0], y_: batch[1], keep_prob: 1.0})
print('step %d, training accuracy %g' % (i, train_accuracy))
train_step.run(feed_dict={x: batch[0], y_: batch[1], keep_prob: 0.5})
print('test accuracy %g' % accuracy.eval(feed_dict={
x: mnist.test.images, y_: mnist.test.labels, keep_prob: 1.0}))
if __name__ == '__main__':
parser = argparse.ArgumentParser()
parser.add_argument('--data_dir', type=str,
default='/tmp/tensorflow/mnist/input_data',
help='Directory for storing input data')
FLAGS, unparsed = parser.parse_known_args()
tf.app.run(main=main, argv=[sys.argv[0]] + unparsed)
datasets.py
import numpy
from tensorflow.python.framework import dtypes
from tensorflow.python.framework import random_seed
from six.moves import xrange
from tensorflow.contrib.learn.python.learn.datasets import base
import pickle
import os

class DataSet(object):
    """Container class for a dataset (deprecated).

    THIS CLASS IS DEPRECATED. See
    [contrib/learn/README.md](https://www.tensorflow.org/code/tensorflow/contrib/learn/README.md)
    for general migration instructions.
    """
    def __init__(self,
                 images,
                 labels,
                 fake_data=False,
                 one_hot=False,
                 dtype=dtypes.float32,
                 reshape=True,
                 seed=None):
        """Construct a DataSet.
        one_hot arg is used only if fake_data is true.  `dtype` can be either
        `uint8` to leave the input as `[0, 255]`, or `float32` to rescale into
        `[0, 1]`.  Seed arg provides for convenient deterministic testing.
        """
        seed1, seed2 = random_seed.get_seed(seed)
        # If op level seed is not set, use whatever graph level seed is returned
        numpy.random.seed(seed1 if seed is None else seed2)
        dtype = dtypes.as_dtype(dtype).base_dtype
        if dtype not in (dtypes.uint8, dtypes.float32):
            raise TypeError(
                'Invalid image dtype %r, expected uint8 or float32' % dtype)
        if fake_data:
            self._num_examples = 10000
            self.one_hot = one_hot
        else:
            assert images.shape[0] == labels.shape[0], (
                'images.shape: %s labels.shape: %s' % (images.shape, labels.shape))
            self._num_examples = images.shape[0]

            # Convert shape from [num examples, rows, columns, depth]
            # to [num examples, rows*columns] (assuming depth == 1)
            if reshape:
                assert images.shape[3] == 3
                images = images.reshape(images.shape[0],
                                        images.shape[1] * images.shape[2] * images.shape[3])
            if dtype == dtypes.float32:
                # Convert from [0, 255] -> [0.0, 1.0].
                images = images.astype(numpy.float32)
                images = numpy.multiply(images, 1.0 / 255.0)
        self._images = images
        self._labels = labels
        self._epochs_completed = 0
        self._index_in_epoch = 0

    @property
    def images(self):
        return self._images

    @property
    def labels(self):
        return self._labels

    @property
    def num_examples(self):
        return self._num_examples

    @property
    def epochs_completed(self):
        return self._epochs_completed

    def next_batch(self, batch_size, fake_data=False, shuffle=True):
        """Return the next `batch_size` examples from this data set."""
        if fake_data:
            fake_image = [1] * 784
            if self.one_hot:
                fake_label = [1] + [0] * 9
            else:
                fake_label = 0
            return [fake_image for _ in xrange(batch_size)], [
                fake_label for _ in xrange(batch_size)
            ]
        start = self._index_in_epoch
        # Shuffle for the first epoch
        if self._epochs_completed == 0 and start == 0 and shuffle:
            perm0 = numpy.arange(self._num_examples)
            numpy.random.shuffle(perm0)
            self._images = self.images[perm0]
            self._labels = self.labels[perm0]
        # Go to the next epoch
        if start + batch_size > self._num_examples:
            # Finished epoch
            self._epochs_completed += 1
            # Get the rest examples in this epoch
            rest_num_examples = self._num_examples - start
            images_rest_part = self._images[start:self._num_examples]
            labels_rest_part = self._labels[start:self._num_examples]
            # Shuffle the data
            if shuffle:
                perm = numpy.arange(self._num_examples)
                numpy.random.shuffle(perm)
                self._images = self.images[perm]
                self._labels = self.labels[perm]
            # Start next epoch
            start = 0
            self._index_in_epoch = batch_size - rest_num_examples
            end = self._index_in_epoch
            images_new_part = self._images[start:end]
            labels_new_part = self._labels[start:end]
            return numpy.concatenate(
                (images_rest_part, images_new_part), axis=0), numpy.concatenate(
                (labels_rest_part, labels_new_part), axis=0)
        else:
            self._index_in_epoch += batch_size
            end = self._index_in_epoch
            return self._images[start:end], self._labels[start:end]

def read_data_sets(train_dir,
                   one_hot=False,
                   dtype=dtypes.float32,
                   reshape=True,
                   validation_size=5000,
                   seed=None):


    train_images,train_labels,test_images,test_labels = load_CIFAR10(train_dir)
    if not 0 <= validation_size <= len(train_images):
        raise ValueError('Validation size should be between 0 and {}. Received: {}.'
                         .format(len(train_images), validation_size))

    validation_images = train_images[:validation_size]
    validation_labels = train_labels[:validation_size]
    validation_labels = dense_to_one_hot(validation_labels, 10)
    train_images = train_images[validation_size:]
    train_labels = train_labels[validation_size:]
    train_labels = dense_to_one_hot(train_labels, 10)

    test_labels = dense_to_one_hot(test_labels, 10)

    options = dict(dtype=dtype, reshape=reshape, seed=seed)
    train = DataSet(train_images, train_labels, **options)
    validation = DataSet(validation_images, validation_labels, **options)
    test = DataSet(test_images, test_labels, **options)

    return base.Datasets(train=train, validation=validation, test=test)


def load_CIFAR_batch(filename):
    """ load single batch of cifar """
    with open(filename, 'rb') as f:
        datadict = pickle.load(f, encoding='bytes')
        X = datadict[b'data']
        Y = datadict[b'labels']
        X = X.reshape(10000, 3, 32, 32).transpose(0,2,3,1).astype("float")
        Y = numpy.array(Y)
        return X, Y

def load_CIFAR10(ROOT):
    """ load all of cifar """
    xs = []
    ys = []
    for b in range(1,6):
        f = os.path.join(ROOT, 'data_batch_%d' % (b, ))
        X, Y = load_CIFAR_batch(f)
        xs.append(X)
        ys.append(Y)
    Xtr = numpy.concatenate(xs)
    Ytr = numpy.concatenate(ys)
    del X, Y
    Xte, Yte = load_CIFAR_batch(os.path.join(ROOT, 'test_batch'))
    return Xtr, Ytr, Xte, Yte

def dense_to_one_hot(labels_dense, num_classes):
    """Convert class labels from scalars to one-hot vectors."""
    num_labels = labels_dense.shape[0]
    index_offset = numpy.arange(num_labels) * num_classes
    labels_one_hot = numpy.zeros((num_labels, num_classes))
    labels_one_hot.flat[index_offset + labels_dense.ravel()] = 1
    return labels_one_hot
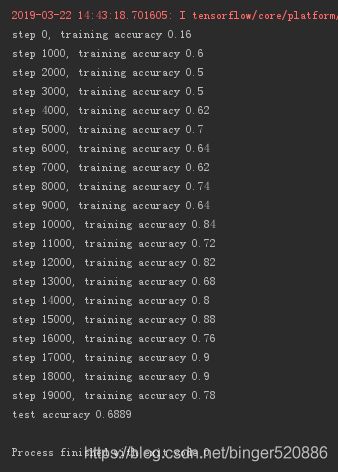
4.运行结果以及分析
这里选取55000张图片作为训练样本,测试样本选取5000张。
tensorboard可视流程图

运行5000次,测试准确率:58%

运行20000次,测试准确率:68.89%
运行40000次,测试准确率71.95%
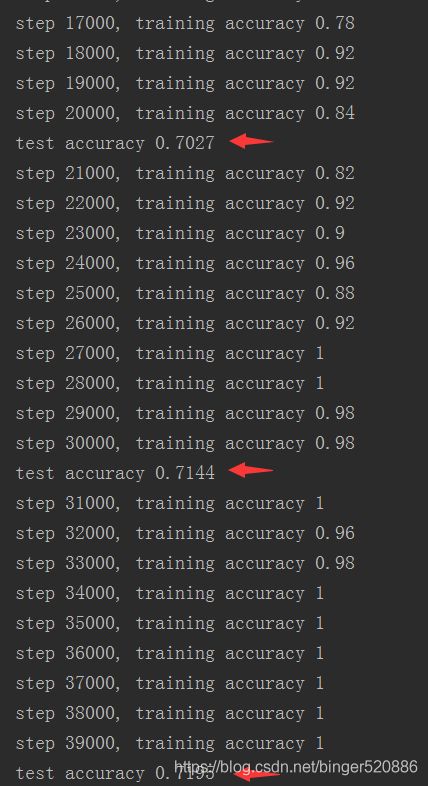
分析:由最后一张图片可以看出,20000 - 30000次时测试准确率=> 70.27% ->71.44%,30000 - 40000次时=> 71.44% -> 71.95%
而训练准确率已经达到100%,说明测试准确率已经趋于一个稳定值,再增加训练次数,测试准确率提高的可能性不大。
如果想要继续提高测试准确率,就只能增加训练样本。