electron入门(16.0版本亲测可用)
根据业务需求,开始学习electron跨桌面应用框架。
记录~~~~~
创建一个electron项目
在node环境的支持下,新建文件夹
npm init -y 	//创建一个基础package
npm i electron
npm i electron/remote		//由于新版本,需要使用这个package来使用remote模块
这样子,一个基础目录就准备好了,接下来需要准备一个主进程js文件和html主进程界面,并在main.js中写入:
const { app, BrowserWindow, ipcMain } = require('electron');

//主进程启动文件
app.on('ready',function(){
    const mainWindow = new BrowserWindow({
        height:500,
        width:800,
        webPreferences:{
            // 开启node
            nodeIntegration: true,
            contextIsolation: false,
            // 开启remote
            enableRemoteModule:true,
        }
    });
    //主进程关闭,退出
    mainWindow.on('close',() => {
		if (process.platform != 'darwin') {
	        app.quit();
	    }
	}
})
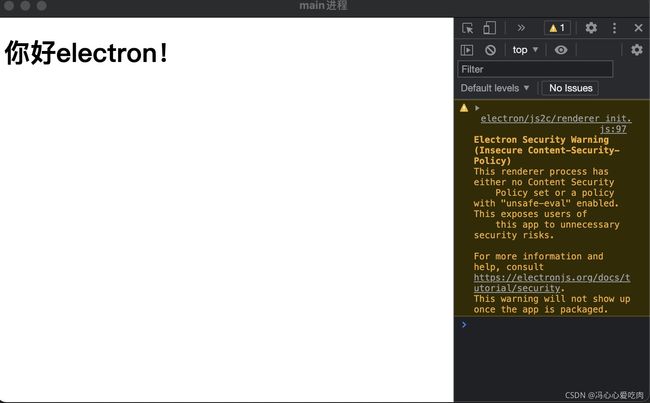
开启后效果如图所示:

控制台是默认不显示的,通过以下命令可以开启当前进程的控制台:
mainWindow.webContents.openDevTools();
electron应用的热重载
每次修改完代码需要手动关闭再electron .很麻烦,可以通过安装electron-reloader包进行热重载,类似于webpack的devServer。
yarn add @electron-reloader		//安装

//在入口文件(主进程中)加入代码
try {
        require('electron-reloader')(module);
} catch (_) { }
remote创建渲染进程
可以通过remote模块实现主进程下的渲染进程创建,如点击主进程的某个button开启一个新的进程,因此需要一个渲染进程的对应html、js文件。
main.js
const { app, BrowserWindow, ipcMain } = require('electron');

//主进程启动文件
app.on('ready',function(){
    const mainWindow = new BrowserWindow({
        height:500,
        width:800,
        webPreferences:{
            // 开启node
            nodeIntegration: true,
            contextIsolation: false,
            // 开启remote
            enableRemoteModule:true,
        }
    });

    //引入remote进程模块
    require('@electron/remote/main').initialize()
	require('@electron/remote/main').enable(mainWindow.webContents)
	mainWindow.webContents.openDevTools();

    //主进程关闭,退出
    mainWindow.on('close',() => {
		if (process.platform != 'darwin') {
	        app.quit();
	    }
	}
})
render.js
const {BrowserWindow} = require('@electron/remote')
const {ipcRenderer} = require('electron')
const open_new = document.querySelector('span');


window.onload = function(){
    open_new.onclick = ()=>{
        var newBroswer = new BrowserWindow({
            width:400,
            height:400,
            webPreferences:{
                // 开启node
                nodeIntegration: true,
                contextIsolation: false,
            }
        });
        newBroswer.loadFile('render.html')
        newBroswer.webContents.openDevTools();
        newBroswer.on('close',function(){
            newBroswer = null;
        })
    }
}
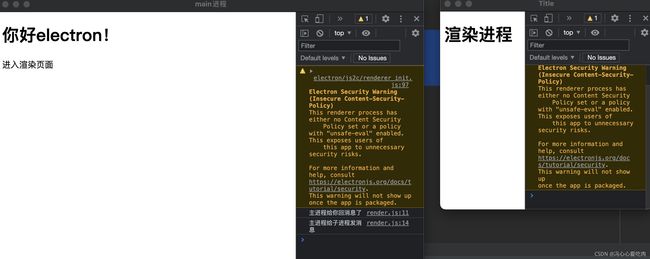
最后将render.js渲染进程的脚本引入index.html(主进程的页面),就可以触发,效果如下:

主进程与渲染进程的通信
其实和vue/react的send,on很相似,进程也是相对应了其中的父子组件。
主进程借助了ipcMain模块;渲染进程借助了ipcRenderer模块,大体语法如下:
发送事件:
ipcMain/ipcRenderer.send(eventName, data)
接受事件:
ipcMain/ipcRenderer.on(eventName, ((event, avg) => {
	console.log(event)		//事件的对象信息
	console.log(avg)		//具体的传递数据
}))
最常用的其实就是按钮点击或者进程加载进行发射和接受,整体代码如下:
main.js
const { app, BrowserWindow, ipcMain } = require('electron');

app.on('ready',function(){
    const mainWindow = new BrowserWindow({
        height:500,
        width:800,
        webPreferences:{
            // 开启node
            nodeIntegration: true,
            contextIsolation: false,
            // 开启remote
            enableRemoteModule:true,
        }
    });

    require('@electron/remote/main').initialize()
    require('@electron/remote/main').enable(mainWindow.webContents)


    mainWindow.loadFile('index.html');
    mainWindow.webContents.openDevTools();

    //主进程接受事件
    ipcMain.on('childToMain', (event, arg) => {
    	//接受后的回复事件
        event.reply('replyChildToMain', '主进程给你回消息了')
        console.log( arg)
    })
    //主进程发射事件
    setTimeout(() => {
        mainWindow.webContents.send('mainToChild', '主进程给子进程发消息')
    }, 3000)


})
// 当所有窗口被关闭了,退出。
app.on('window-all-closed', function() {
    if (process.platform != 'darwin') {
        app.quit();
    }
});
render.js
const {BrowserWindow} = require('@electron/remote')
const {ipcRenderer} = require('electron')
const open_new = document.querySelector('span');


window.onload = function(){
    //子进程发射事件
    ipcRenderer.send('childToMain', '子进程给父进程发消息')
    //子进程接受事件
    ipcRenderer.on('replyChildToMain', (event, arg) => {
        console.log(arg)
    })
    ipcRenderer.on('mainToChild', (event, arg) => {
        console.log(arg)
    })
    open_new.onclick = ()=>{
        var newBroswer = new BrowserWindow({
            width:400,
            height:400,
            webPreferences:{
                // 开启node
                nodeIntegration: true,
                contextIsolation: false,
            }

        });

        newBroswer.loadFile('render.html')
        newBroswer.webContents.openDevTools();
        newBroswer.on('close',function(){
            newBroswer = null;
        })
    }
}
在渲染进程中点击button触发的发射事件:
render.html
<!DOCTYPE html>
<html lang="en">
<head>
    <meta charset="UTF-8">
    <title>Title</title>
</head>
<body>
    <h1>渲染进程</h1>
    <button class = "sendBtn">发送消息给main进程</button>
<script>
    const {ipcRenderer} = require('electron')
    const sendBtn = document.querySelector('.sendBtn')
    sendBtn.onclick = () => {
        console.log(111)
        ipcRenderer.send('childToMain', '子进程通过按钮给父进程发消息')
    }
</script>
</body>
</html>
自定义Menu菜单
通过引入electron中Menu函数解析模板可以自定义导航栏部分
const  { Menu } = require('electron');
const Menus = [
    {
        label:'Files',
        submenu:[
            {
                label: '网页版',
                role: 'help',
                submenu: [{
                    label: '网页版',
                    click: function () {
                        electron.shell.openExternal('https://www.jianshu.com/u/1699a0673cfe')
                    }
                }]
            },
            {
                label: '帮助',
                role: 'help',
                submenu: [{
                    label: '帮助文档',
                    click: function () {
                        electron.shell.openExternal('https://www.jianshu.com/u/1699a0673cfe')
                    }
                }]
            }
        ]
    }
];
//编译Menu
const mainMenu = Menu.buildFromTemplate(Menus);
Menu.setApplicationMenu(mainMenu);
当然,也可以通过进程中的frame: false,隐藏窗体的导航栏,通过html自己写点击事件和导航栏模板。
在css中加入-webkit-app-region: drag;可以实现拖拽。
打开文件列表/消息弹窗
打开文件列表使用到了electron中Dialog函数,可以通过Dialog打开文件列表以及消息弹窗等等,与Antd/ElementUi的Dialog弹窗组件类似。
		dialog.showOpenDialog({
            //openFile 允许选择文件
            //openDirectory 允许选择文件夹
            //multiSelections 允许多选
            //showHiddenFiles  显示隐藏文件
            //createDirectory  允许创建文件夹
            properties: ["openFile", "multiSelections", "openDirectory", "showHiddenFiles", "createDirectory"]
        }).then(res => {
            console.log(res)
        })```
打开消息弹窗通常在关闭APP时会弹出一个二次确认的弹窗,可以在主进程的关闭事件中写入
mainWindow.on('close', () =>{
        dialog.showMessageBox({
            title: '关闭',
            message: '是否要关闭?',
            type: 'warning',
            buttons: ["关闭", "取消"]
        }).then(res => {
            if(res.response === 1) {
                app.exit()
            }
        })
    })
由于electron迭代更新比较快,网上的很多博客方法都已淘汰(集中于remote模块的使用和配置),因此在不适用旧版本的情况下以上是博主所总结出来的一份,感谢关注。