dockerfile
1、基于基础镜像centos:7
[root@localhost ~]# vim Dockerfile
 FROM centos:7
2、维护者信息
MAINTAINER renweiwei@example.com
3、添加Centos-7仓库
ADD Centos-7.repo /etc/yum.repos.d/
4、添加epel-7仓库
ADD epel-7.repo /etc/yum.repos.d/
5、安装nginx软件包
RUN yum -y install nginx
6、暴露指定端口80
EXPOSE 80
CMD ["/usr/sbin/nginx","-g","daemon off;"]
7、构建镜像,镜像名称为nginx:v1
[root@localhost ~]# docker build -t nginx:v1 .
Sending build context to Docker daemon  73.88MB
Step 1/7 : FROM centos:7
 ---> eeb6ee3f44bd
Step 2/7 : MAINTAINER renweiwei@example.com
 ---> Running in 014482fe92f4
Removing intermediate container 014482fe92f4
 ---> 5cead95e0897
Step 3/7 : ADD Centos-7.repo /etc/yum.repos.d/
 ---> 5f930fea9725
Step 4/7 : ADD epel-7.repo /etc/yum.repos.d/
 ---> eee72966ed25
Step 5/7 : RUN yum -y install nginx
 ---> Running in 2ff6dc088303
Loaded plugins: fastestmirror, ovl
[root@localhost ~]# docker images
REPOSITORY   TAG       IMAGE ID       CREATED         SIZE
nginx        v1        9834d41efa5f   7 minutes ago   459MB
centoscy     latest    e2f07109ba1f   4 hours ago     402MB
nginx        latest    2b7d6430f78d   7 days ago      142MB
8、运行容器,容器名称为自己名字的全拼,映射端口88:80
[root@localhost ~]# docker run -d --name renweiwei -p 88:80 nginx:v1
e00d5b3e320b6daa18519fc8eba36cbc2ba3450ece2d60ec31269d07111e09ba
[root@localhost ~]# docker ps
CONTAINER ID   IMAGE      COMMAND                  CREATED          STATUS          PORTS                               NAMES
e00d5b3e320b   nginx:v1   "/usr/sbin/nginx -g …"   22 seconds ago   Up 21 seconds   0.0.0.0:88->80/tcp, :::88->80/tcp   renweiwei
9、进入容器,删除默认网页,写入新的默认网页,网页内容为你们自己名字的全拼
[root@localhost ~]# docker exec -it renweiwei /bin/bash
[root@e00d5b3e320b /]# cd /usr/share/nginx/
[root@e00d5b3e320b nginx]# cd html/
[root@e00d5b3e320b html]# ls
404.html  50x.html  en-US  icons  img  index.html  nginx-logo.png  poweredby.png
[root@e00d5b3e320b html]# rm -rf index.html
[root@e00d5b3e320b html]# echo renweiwei > index.html
[root@e00d5b3e320b html]# ls
404.html  50x.html  en-US  icons  img  index.html  nginx-logo.png  poweredby.png
10、通过浏览器,能够正常访问nginx

一、扫雷案例
1、所需软件包和环境
Centos-7.repo epel-7.repo saolei.zip
server1:部署docker扫雷案例
server2:部署apache,将saolei.zip软件包上传上去
[root@server2 ~]# dnf -y install httpd
]上次元数据过期检查:3:59:44 前,执行于 2022年08月30日 星期二 11时32分04秒。
软件包 httpd-2.4.37-47.module_el8.6.0+1111+ce6f4ceb.1.x86_64 已安装。
依赖关系解决。
无需任何处理。
完毕!
[root@server2 ~]# cd /var/www/html/
[root@server2 html]# ls
saolei.zip
[root@server2 html]# systemctl disable firewalld
[root@server2 html]# vi /etc/selinux/config
SELINUX=disabled
2、编辑Dockerfile,使用基础镜像centos:7
server1:
[root@server1 ~]# vim Dockerfile
FROM centos:7
MAINTAINER renweiwei@example.com
ADD Centos-7.repo /etc/yum.repos.d/
ADD epel-7.repo /etc/yum.repos.d/
RUN yum -y install tomcat
WORKDIR /var/lib/tomcat/webapps/
RUN curl -O  http://192.168.253.148/saolei.zip && \
unzip saolei.zip && \
RUN mv saolei ROOT
ADD init.sh /init.sh
EXPOSE 8080
CMD ["/bin/bash","/init.sh"]

~

[root@server1 ~]# cat init.sh
#!/bin/bash
/usr/libexec/tomcat/server start
3、构建镜像saolei:v1
[root@server1 ~]# docker build -t saolei:v1 .
Removing intermediate container 5e909dbd0574
 ---> bd96e6bf7af3
Step 6/11 : WORKDIR /var/lib/tomcat/webapps/
 ---> Running in 028f778c851e
Removing intermediate container 028f778c851e
 ---> 9c3fcec19dd6
Step 7/11 : ADD saolei.tar.gz .
 ---> b8923ffbbdea
Step 8/11 : RUN mv saolei ROOT
 ---> Running in c647e3a2abde
Removing intermediate container c647e3a2abde
 ---> 38209f151da8
Step 9/11 : ADD init.sh /init.sh
 ---> 132e157de7a9
Step 10/11 : EXPOSE 8080
 ---> Running in 1dc935d73d67
Removing intermediate container 1dc935d73d67
 ---> 6a496c8b3b3e
Step 11/11 : CMD ["/bin/bash","/init.sh"]
 ---> Running in a7a7f7a6b919
Removing intermediate container a7a7f7a6b919
 ---> c332e39ad4e7
Successfully built c332e39ad4e7
Successfully tagged saolei:v1
[root@server1 ~]# docker images
REPOSITORY   TAG       IMAGE ID       CREATED          SIZE
saolei       v1        c332e39ad4e7   55 seconds ago   639MB
<none>       <none>    0e8b7b55964a   11 minutes ago   639MB
nginx        v1        0992e35831b6   18 minutes ago   459MB
centos       7         eeb6ee3f44bd   11 months ago    204MB
 .
4、运行容器,指定映射端口8081:8080,容器名为自己名字的全拼
[root@server1 ~]# docker run --name renweiwei -d -p 8081:8080 saolei:v1
04dcb3ce536e6b73ee4f3d0823ee38db9a25f2d21a0e4be8854646b6fd7c938b
[root@server1 ~]# docker ps
CONTAINER ID   IMAGE       COMMAND                  CREATED          STATUS          PORTS                                       NAMES
04dcb3ce536e   saolei:v1   "/bin/bash /init.sh"     29 seconds ago   Up 26 seconds   0.0.0.0:8081->8080/tcp, :::8081->8080/tcp   renweiwei
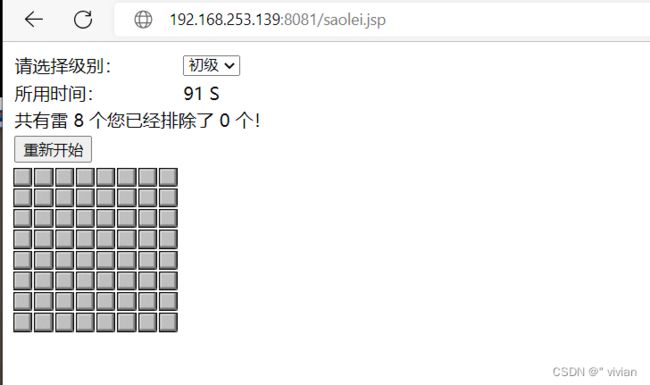
5、使用浏览器访问http://自己docker服务器的ip/saolei.jsp,能够实现扫雷游戏的使用
二、可道云案例
1、所需软件包
Centos-7.repo epel-7.repo kodexplorer4.40.zip nginx.conf
2、创建/opt/dockerfile/kod目录,将所需的软件包和文件放置该目录下
[root@localhost ~]# cd /opt/dockerfile/kod/
[root@localhost kod]# ls
[root@localhost kod]# ls
Centos-7.repo  epel-7.repo  kodexplorer4.40.zip  nginx.txt
[root@localhost kod]# mv nginx.txt nginx.conf
[root@localhost kod]# ls
Centos-7.repo  epel-7.repo  kodexplorer4.40.zip  nginx.conf
[root@localhost kod]# cat nginx.conf
worker_processes 1;
events {
	worker_connections 1024;
}
http {
	include mime.types;
	default_type application/octet-stream;
	sendfile on;
	keepalive_timeout 65;
	server {
		listen 80;
		server_name localhost;
		location / {
			root /code;
			index index.php index.html index.htm;
		}
		location ~ \.php$ {
			root /code;
			fastcgi_pass 127.0.0.1:9000;
			fastcgi_index index.php;
			fastcgi_param SCRIPT_FILENAME /code$fastcgi_script_name;
			include fastcgi_params;
		}
	}
}
3、在该目录下编辑dockerfile,使用基础镜像centos:7
[root@localhost kod]# vim dockerfile
FROM centos:7
ADD Centos-7.repo /etc/yum.repos.d/
ADD epel-7.repo /etc/yum.repos.d/
RUN yum -y install nginx php-fpm php-gd php-mbstring unzip
RUN sed -i '/^user/c user=nginx' /etc/php-fpm.d/www.conf
RUN sed -i '/^group/c group=nginx' /etc/php-fpm.d/www.conf
COPY nginx.conf /etc/nginx/nginx.conf
RUN mkdir /code
WORKDIR /code
COPY kodexplorer4.40.zip .
RUN unzip kodexplorer4.40.zip
RUN chown -R nginx.nginx .
ADD init.sh /init.sh
EXPOSE 80
ENTRYPOINT ["/bin/bash","/init.sh"]
[root@localhost kod]# cat init.sh
#!/bin/bash
php-fpm -D
echo "$1" >> /etc/nginx/nginx.conf
nginx -g 'daemon off;'
4、构建镜像kod:v1
[root@localhost kod]# docker build -t kod:v1 .
Removing intermediate container 4c6947fb079e
 ---> c6066d8d3644
Step 12/15 : RUN chown -R nginx.nginx .
 ---> Running in 696a0f9b165a
Removing intermediate container 696a0f9b165a
 ---> 12f6067340e8
Step 13/15 : ADD init.sh /init.sh
 ---> 413e2e2d07d7
Step 14/15 : EXPOSE 80
 ---> Running in 9c86fae282c1
Removing intermediate container 9c86fae282c1
 ---> 3ac55a829c64
Step 15/15 : ENTRYPOINT ["/bin/bash","/init.sh"]
 ---> Running in 8fa129adafd3
Removing intermediate container 8fa129adafd3
 ---> 95a350fe5acf
Successfully built 95a350fe5acf
Successfully tagged kod:v1
5、运行容器,指定映射端口80:80,容器名为自己名字的全拼
[root@localhost kod]#  docker run --name renweiwei -d -p 80:80 kod:v1 '#runtime'
04808c5c8f235753c9ffbedc8872b6d5fc5007c6c42a4287cb109ab9cb8dda76
[root@localhost kod]# docker exec -it renweiwei /bin/bash
[root@04808c5c8f23 code]# tail -1 /etc/nginx/nginx.conf
#runtime
6、使用浏览器访问http://自己docker服务器的ip/index.php,能够实现可道云的使用
