springboot+vue jwt校验token 单点登录
SSO(Single Sign On)模式
CAS单点登录、OAuth2

分布式,SSO(single sign on)模式:单点登录英文全称Single Sign On,简称就是SSO。它的解释是:在多个应用系统中,只需要登录一次,就可以访问其他相互信任的应用系统。
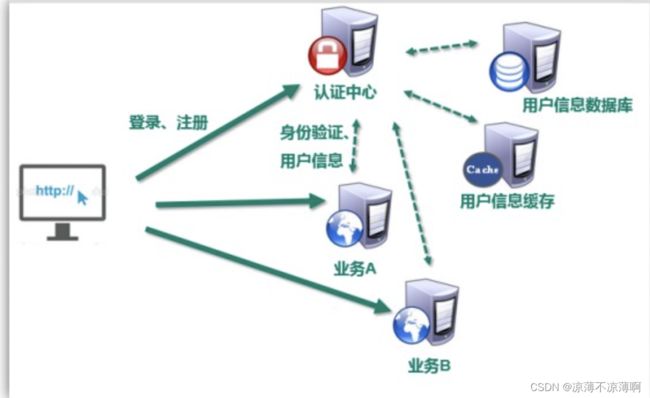
如图所示,图中有3个系统,分别是业务A、业务B、和SSO。
业务A、业务B没有登录模块。
而SSO只有登录模块,没有其他的业务模块。
一般过程如下:
当业务A、业务B需要登录时,将跳到SSO系统。
SSO从用户信息数据库中获取用户信息并校验用户信息,SSO系统完成登录。
然后将用户信息存入缓存(例如redis)。
当用户访问业务A或业务B,需要判断用户是否登录时,将跳转到SSO系统中进行用户身份验证,SSO判断缓存中是否存在用户身份信息。
这样,只要其中一个系统完成登录,其他的应用系统也就随之登录了。这就是单点登录(SSO)的定义。
优点 :
用户身份信息独立管理,更好的分布式管理。可以自己扩展安全策略
缺点:
认证服务器访问压力较大。
Token模式
优点:
- 无状态: token是无状态,session是有状态的
- 基于标准化:你的API可以采用标准化的 JSON Web Token (JWT)
缺点:
- 占用带宽
- 无法在服务器端销毁
访问令牌的类型
JWT令牌
JWT是JSON Web Token的缩写,即JSON Web令牌,是一种自包含令牌。
JWT的使用场景:
- 一种情况是webapi,类似之前的阿里云播放凭证的功能
- 另一种情况是多web服务器下实现无状态分布式身份验证
- JWT的作用:
JWT 最重要的作用就是对 token信息的防伪作用
- JWT的原理:
一个JWT由三个部分组成:JWT头、有效载荷、签名哈希
最后由这三者组合进行base64编码得到JWT
JWT令牌的组成
jwt令牌为一个很长的字符串,字符之间通过"."分隔符分为三个子串。
每一个子串表示了一个功能块,总共有以下三个部分:JWT头、有效载荷和签名
JWT头
JWT头部分是一个描述JWT元数据的JSON对象,通常如下所示。
{
  "alg": "HS256",
  "typ": "JWT"
}
在上面的代码中,alg属性表示签名使用的算法,默认为HMAC SHA256(写为HS256);typ属性表示令牌的类型,JWT令牌统一写为JWT。最后,使用Base64 URL算法将上述JSON对象转换为字符串保存。
有效载荷
有效载荷部分,是JWT的主体内容部分,也是一个JSON对象,包含需要传递的数据。 JWT指定七个默认字段供选择。
- sub: 主题
- iss: jwt签发者
- aud: 接收jwt的一方
- iat: jwt的签发时间
- exp: jwt的过期时间,这个过期时间必须要大于签发时间
- nbf: 定义在什么时间之前,该jwt都是不可用的.
- jti: jwt的唯一身份标识,主要用来作为一次性token,从而回避重放攻击。
除以上默认字段外,我们还可以自定义私有字段,如下例:
{
  "name": "Helen",
  "admin": true,
  "avatar": "helen.jpg"
}
请注意,默认情况下JWT是未加密的,任何人都可以解读其内容,因此不要构建隐私信息字段,存放保密信息,以防止信息泄露。
JSON对象也使用Base64 URL算法转换为字符串保存。
签名哈希
签名哈希部分是对上面两部分数据签名,通过指定的算法生成哈希,以确保数据不会被篡改。
首先,需要指定一个密码(secret)。该密码仅仅为保存在服务器中,并且不能向用户公开。然后,使用标头中指定的签名算法(默认情况下为HMAC SHA256)根据以下公式生成签名
HMACSHA256(base64UrlEncode(header) + “.” + base64UrlEncode(claims),
secret) ==> 签名hash
在计算出签名哈希后,JWT头,有效载荷和签名哈希的三个部分组合成一个字符串,每个部分用"."分隔,就构成整个JWT对象。
Base64URL算法
如前所述,JWT头和有效载荷序列化的算法都用到了Base64URL。该算法和常见Base64算法类似,稍有差别。
作为令牌的JWT可以放在URL中(例如api.example/?token=xxx)。 Base64中用的三个字符是"+“,”/“和”=“,由于在URL中有特殊含义,因此Base64URL中对他们做了替换:”=“去掉,”+“用”-“替换,”/“用”_"替换,这就是Base64URL算法。
注意:base64编码,并不是加密,只是把明文信息变成了不可见的字符串。但是其实只要用一些工具就可以把base64编码解成明文,所以不要在JWT中放入涉及私密的信息。
JWT的用法
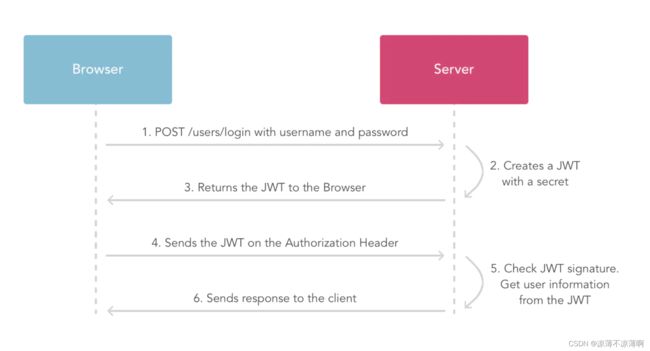
客户端接收服务器返回的JWT,将其存储在Cookie或localStorage中。
此后,客户端将在与服务器交互中都会带JWT。如果将它存储在Cookie中,就可以自动发送,但是不会跨域,因此一般是将它放入HTTP请求的Header Authorization字段中。
当跨域时,也可以将JWT放置于POST请求的数据主体中。
使用jwt
导入依赖
    <dependency>
        <groupId>io.jsonwebtokengroupId>
        <artifactId>jjwtartifactId>
        <version>0.7.0version>
    dependency>
创建jwt工具类
@Component
public class JwtUntil {
    @Autowired
    private RedisCache redisCache;
    //有效时间,单位:秒
    public static final Long JWT_EXPIRE_TIME=3600*2L;
    public static final String JWT_HEADER="Authorization";
    public static final String JWT_SECRET="liangbo260";

    public  String createToken(Long userId, String username){
        Date date = new Date();
        String token = Jwts.builder()
                //jwt内置信息
                .setSubject("SRB-USER")
                .claim("userId", userId)
                .claim("username", username)
                //jwt加密方式和秘钥
                .signWith(SignatureAlgorithm.HS256, JWT_SECRET)
                //签发日期
                .setIssuedAt(date)
                //过期时间
                .setExpiration(new Date(date.getTime()+(JWT_EXPIRE_TIME*1000)))
                //压缩方式
                .compressWith(CompressionCodecs.GZIP)
                .compact();
        //将token存入缓存中
        redisCache.setCacheObject(RedisProperties.REDIS_TOKEN+userId,token,JWT_EXPIRE_TIME.intValue()*1000, TimeUnit.SECONDS);
        return token;
    }

    /**
     * 校验token是否合法
     * @param token
     * @return
     */
    public boolean validateToken(String token){
        Claims claims = parserToken(token);
        if(claims.getExpiration().before(new Date())){
            throw new TokenException("402");
        }
        Object cacheObject = redisCache.getCacheObject(RedisProperties.REDIS_TOKEN + claims.get("userId"));
        if(cacheObject==null){
            throw new TokenException("401");
        }
        else{
            if(!cacheObject.toString().equals(token)){
                throw new TokenException("405");
            }
            return true;
        }
    }

    public Long getIdByToken(String token){
        Claims claims = parserToken(token);
         return (Long) claims.get("userId");
    }

    /**
     * 解析token
     * @param token
     * @return
     */
    public Claims parserToken(String token){
      try {
          return Jwts.parser()
                  .setSigningKey(JWT_SECRET)
                  .parseClaimsJws(token)
                  .getBody();
      }catch (ExpiredJwtException e){
          return e.getClaims();
      }catch (Exception e){
          throw new TokenException("406");
      }
    }

    /**
     * 刷新token
     * @param token
     * @return
     */
    public String freshExpireTime(String token){
        Claims claims = parserToken(token);
        if(claims.getExpiration().getTime()-System.currentTimeMillis()<(20*60000)){
            token = createToken((Long) claims.get("userId"), claims.get("username").toString());
        }
        return token;
    }
}
用户申请登录后,将jwt放在respone头部返回
    @ApiOperation("用户登录")
    @PostMapping("/login")
    public AjaxResult userLogin(@Validated @RequestBody LoginUserDto loginUserDto, HttpServletRequest httpServletRequest, HttpServletResponse response){
        UserInfoDto userInfoDto = userInfoService.userLogin(loginUserDto, httpServletRequest);
        response.setHeader(JwtUntil.JWT_HEADER,userInfoDto.getToken());
        return AjaxResult.success(userInfoDto);
    }
vue则需要创建axios拦截器
import { Message } from 'element-ui'
import cookie from 'js-cookie'

export default function({ $axios, redirect }) {
  $axios.onRequest((config) => {
    let userInfo = cookie.get('userInfo')
    if (userInfo) {
      // debugger
      userInfo = JSON.parse(userInfo)
      config.headers['Authorization'] = userInfo.token
    }
    console.log('Making request to ' + config.url)
  })

  $axios.onRequestError((error) => {
    console.log('onRequestError', error) // for debug
  })

  $axios.onResponse((response) => {
    console.log('Reciving resposne', response)
    if (response.data.code === 200) {
      if(response.headers['Authorization']){
        let userInfo = cookie.get('userInfo')
        if(userInfo){
          userInfo = JSON.parse(userInfo)
          userInfo.token=response.headers['Authorization']
          cookie.set('userInfo',userInfo)
        }
      }
      return response
    } else if (response.data.code === 401||response.data.code===402||response.data.code==405||response.data.code===406) {
      console.log(response)
      Message.error(response.data.msg)
      // debugger
      cookie.set('userInfo', '')
      window.location.href = '/'
    } else {
      Message({
        message: response.data.msg,
        type: 'error',
        duration: 5 * 1000,
      })
      return Promise.reject(response)
    }
  })

  //通信失败
  $axios.onResponseError((error) => {
    console.log('onResponseError', error) // for debug
  })
}
登录成功后,将返回的信息存入cookie。然后用来配置请求头。
