编译时注解学习二之 注解处理器初探AbstractProcessor
1注解处理器介绍
使用注解可以方便开发,因为编译期注解处理器会根据注解自动帮使用者完成很多重复性操作。什么叫编译期注解呢,编译期注解是只在编译期有效的注解,注解处理器根据注解会帮我们生成操作所需的工具类,完成相应操作。类似的框架有黄油刀,EventBus3等。
注解处理器Annotation Processor会在编译项目时获取相应的注解,APT(Annotation Process Tool),是一种在代码编译时处理注解,然后根据规则生成相应的java文件的工具(开始官方没有由个人提供,后台官方也提供了相应工具)。

主要方法:

2 如何自定义注解处理器
如何生成注解处理器呢?
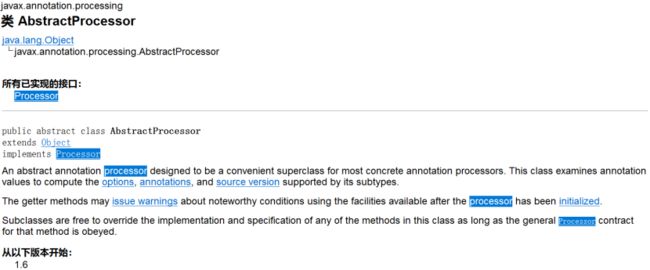
首先需要建立一个javalib的项目(一定是一个java的lib),而不是一个android的module的项目(openJdk不包括AbstractProcessor),注解处理器都要继承于AbstractProcessor。
2.1 重写方法
要自己实现注解处理器一般需要重写实现以下方法:
getSupportedAnnotationTypes
getSupportedAnnotationTypes,作用是返回支持的注解类型,返回值是一个Set,内部包含需要支持的注解的全类名。如果不想实现这个方法,也可以利用@SupportedAnnotationTypes(“com.ldx.processor_lib.BindView”)注解实现。
@Override
public Set getSupportedAnnotationTypes() {
Set annotations = new LinkedHashSet<>();
annotations.add(BindView.class.getCanonicalName());
return annotations;
}
或者
@SupportedAnnotationTypes(“com.ldx.annotationlib.BindView”)
getSupportedSourceVersion
getSupportedSourceVersion()作用是返回支持的jdk版本,一般返回SourceVersion.latestSupported()就可以,也可以通过注解@SupportedSourceVersion(SourceVersion.RELEASE_7)指定。
@Override
public SourceVersion getSupportedSourceVersion() {
return SourceVersion.latestSupported();
}
或者
@SupportedSourceVersion(SourceVersion.RELEASE_7)
init方法
init(ProcessingEnvironment processingEnv)方法内部参数为ProcessingEnvironment ,通过ProcessingEnvironment 可以获取很多有用的工具。
public class AptProcessor2 extends AbstractProcessor {

    private Filer mFilerUtils;       // 文件管理工具类,可以用于生成java源文件
    private Types mTypesUtils;    // 类型处理工具类,
    private Elements mElementsUtils;  // Element处理工具类,获取Element的信息
    private Messager mMessager;  //用于打印信息

    @Override
    public synchronized void init(ProcessingEnvironment processingEnvironment) {
        super.init(processingEnvironment);
        mFilerUtils = processingEnv.getFiler();
        mTypesUtils = processingEnv.getTypeUtils();
        mElementsUtils = processingEnv.getElementUtils();
        mMessager = processingEnv.getMessager();
    }
process方法
boolean process(Set annotations, RoundEnvironment roundEnv)是必须实现的方法,所有的处理逻辑都在process方法中实现(获取Element,生成文件),可以利用roundEnv获取到特定注解的Element的信息,为生成java文件做准备。
roundEnv.getElementsAnnotatedWith可以获取到特定注解对应的Element,下面代码展示如何从element中获取相应信息,Element为一个成员变量的注解。
 @Override
    public boolean process(Set<? extends TypeElement> set, RoundEnvironment roundEnvironment) {
        if (set != null && set.size() > 0){

            Set<? extends Element>  elements = roundEnvironment.getElementsAnnotatedWith(BindView.class);
            for (Element element : elements) {
            	//已知是一个成员变量的注解,所以可以直接强转
                VariableElement variableElement = (VariableElement) element;
                //3.获取注解的成员变量名
                String bindViewFiledName = variableElement.getSimpleName().toString();
                //3.获取注解的成员变量类型
                String bindViewFiledClassType = variableElement.asType().toString();

                //变量名
                mMessager.printMessage(Diagnostic.Kind.NOTE,"aptprocessor     "+variableElement.getSimpleName());
                //是字段类型
                mMessager.printMessage(Diagnostic.Kind.NOTE,"aptprocessor     "+variableElement.getKind().toString());
                BindView bindAnnotation = variableElement.getAnnotation(BindView.class);
                //此处是id值
                mMessager.printMessage(Diagnostic.Kind.NOTE,"aptprocessor     "+bindAnnotation.value()+"");

                TypeElement enclosingElement = (TypeElement) variableElement.getEnclosingElement();

                //类名
                mMessager.printMessage(Diagnostic.Kind.NOTE,"aptprocessor     "+enclosingElement.getSimpleName());
                //全类名
                mMessager.printMessage(Diagnostic.Kind.NOTE,"aptprocessor     "+enclosingElement.getQualifiedName());
                //Class
                mMessager.printMessage(Diagnostic.Kind.NOTE,"aptprocessor     "+enclosingElement.getKind().toString());
                //包名
                mMessager.printMessage(Diagnostic.Kind.NOTE,"aptprocessor     "+mElementsUtils.getPackageOf(enclosingElement).asType().toString());
                createFile(enclosingElement, bindViewFiledClassType, bindViewFiledName, bindAnnotation.value());
            }

            return true;
        }
        return false;
    }
注册Processor
注册Processor,自定义的Processor需要将它注册给java编译器,编译期在编译时才能识别。
在src/main目录下创建resources/META-INF/services/javax.annotation.processing.Processor文件(即创建resources目录,在resources目录下创建META-INF目录,继续在META-INF目录下创建services目录,最后在services目录下创建javax.annotation.processing.Processor文件)。
在javax.annotation.processing.Processor中写入自定义的Processor的全名,如果有多个Processor的话,每一行写一个。
完成后 javax.annotation.processing.Processor 内容如下
com.demo.xxx.MyProcessor

自动注册:
使用Auto-Service来自动注册APT
这是谷歌官方出品的一个开源库,可以省去注册APT的步骤,只需要一行注释
先在apt-compiler模块中添加依赖
dependencies {
…
implementation 'com.google.auto.service:auto-service:1.0-rc2'
}
然后添加注释即可
@AutoService(Processor.class)
public class MyProcessor extends AbstractProcessor {
…
注意:我自己添加之后好像没有起作用,还在查找原因
3 项目中使用
如何在项目中使用:
import com.google.auto.service.AutoService;
import com.ldx.annotationlib.BindView;

import java.io.IOException;
import java.io.Writer;
import java.util.Set;

import javax.annotation.processing.AbstractProcessor;
import javax.annotation.processing.Filer;
import javax.annotation.processing.Messager;
import javax.annotation.processing.ProcessingEnvironment;
import javax.annotation.processing.Processor;
import javax.annotation.processing.RoundEnvironment;
import javax.annotation.processing.SupportedAnnotationTypes;
import javax.annotation.processing.SupportedSourceVersion;
import javax.lang.model.SourceVersion;
import javax.lang.model.element.Element;
import javax.lang.model.element.TypeElement;
import javax.lang.model.element.VariableElement;
import javax.lang.model.util.Elements;
import javax.lang.model.util.Types;
import javax.tools.Diagnostic;
import javax.tools.JavaFileObject;

@SupportedAnnotationTypes("com.ldx.annotationlib.BindView")
@SupportedSourceVersion(SourceVersion.RELEASE_7)
//@AutoService(Processor.class)
public class AptProcessor extends AbstractProcessor {

    private Filer mFilerUtils;
    private Types mTypesUtils;
    private Elements mElementsUtils;
    private Messager mMessager;

    @Override
    public synchronized void init(ProcessingEnvironment processingEnvironment) {
        super.init(processingEnvironment);
        mFilerUtils = processingEnv.getFiler();
        mTypesUtils = processingEnv.getTypeUtils();
        mElementsUtils = processingEnv.getElementUtils();
        mMessager = processingEnv.getMessager();
    }

  /*  @Override
    public Set getSupportedAnnotationTypes() {
        Set annotations = new LinkedHashSet<>();
        annotations.add(BindView.class.getCanonicalName());
        return annotations;
    }

    @Override
    public SourceVersion getSupportedSourceVersion() {
        return SourceVersion.latestSupported();
    }*/

    @Override
    public boolean process(Set<? extends TypeElement> set, RoundEnvironment roundEnvironment) {
        if (set != null && set.size() > 0){

            Set<? extends Element>  elements = roundEnvironment.getElementsAnnotatedWith(BindView.class);
            for (Element element : elements) {
                VariableElement variableElement = (VariableElement) element;
                //3.获取注解的成员变量名
                String bindViewFiledName = variableElement.getSimpleName().toString();
                //3.获取注解的成员变量类型
                String bindViewFiledClassType = variableElement.asType().toString();

                //变量名
                mMessager.printMessage(Diagnostic.Kind.NOTE,"aptprocessor     "+variableElement.getSimpleName());
                //是字段类型
                mMessager.printMessage(Diagnostic.Kind.NOTE,"aptprocessor     "+variableElement.getKind().toString());
                BindView bindAnnotation = variableElement.getAnnotation(BindView.class);
                //此处是id值
                mMessager.printMessage(Diagnostic.Kind.NOTE,"aptprocessor     "+bindAnnotation.value()+"");

                TypeElement enclosingElement = (TypeElement) variableElement.getEnclosingElement();

                //类名
                mMessager.printMessage(Diagnostic.Kind.NOTE,"aptprocessor     "+enclosingElement.getSimpleName());
                //全类名
                mMessager.printMessage(Diagnostic.Kind.NOTE,"aptprocessor     "+enclosingElement.getQualifiedName());
                //Class
                mMessager.printMessage(Diagnostic.Kind.NOTE,"aptprocessor     "+enclosingElement.getKind().toString());
                //包名
                mMessager.printMessage(Diagnostic.Kind.NOTE,"aptprocessor     "+mElementsUtils.getPackageOf(enclosingElement).asType().toString());
                createFile(enclosingElement, bindViewFiledClassType, bindViewFiledName, bindAnnotation.value());
            }

            return true;
        }
        return false;
    }

    private void createFile(TypeElement enclosingElement, String bindViewFiledClassType, String bindViewFiledName, int id) {
        String pkName = mElementsUtils.getPackageOf(enclosingElement).getQualifiedName().toString();
        String packName = mElementsUtils.getPackageOf(enclosingElement).asType().toString();
        String className = enclosingElement.getSimpleName().toString();
        try {
            JavaFileObject jfo = mFilerUtils.createSourceFile(pkName + "."+className+ "$ViewBinding", new Element[]{});
            Writer writer = jfo.openWriter();
            writer.write(brewCode(className,pkName, bindViewFiledClassType, bindViewFiledName, id));
            writer.flush();
            writer.close();
        } catch (IOException e) {
            e.printStackTrace();
        }

    }

    private String brewCode(String className,String pkName, String bindViewFiledClassType, String bindViewFiledName, int id) {
        StringBuilder builder = new StringBuilder();
        builder.append("package " + pkName + ";\n\n");
        builder.append("public class " + className + "$ViewBinding { \n\n");
        builder.append("public static void main(String[] args){ \n\n");
        String info = String.format("%s %s = findViewById(%d)", bindViewFiledClassType, bindViewFiledName, id);
        builder.append("System.out.println(\"" + info + "\");\n\n");
        builder.append("}\n\n");
        builder.append("}");
        return builder.toString();
    }

}
注解:
import java.lang.annotation.ElementType;
import java.lang.annotation.Retention;
import java.lang.annotation.RetentionPolicy;
import java.lang.annotation.Target;

@Target(ElementType.FIELD)
@Retention(RetentionPolicy.CLASS)
public @interface BindView {
    int value() default 0;
}
package com.ldx.canvasdrawdemo.activity;

import android.support.v7.app.AppCompatActivity;
import android.os.Bundle;
import android.widget.TextView;

import com.ldx.annotationlib.BindView;
import com.ldx.canvasdrawdemo.R;

public class BindViewActivity extends AppCompatActivity {
    @BindView(R.id.textview1)
    private TextView textView1;
    @BindView(R.id.textview2)
    private TextView textView2;
    @BindView(R.id.textview3)
    private TextView textView3;
    @Override
    protected void onCreate(Bundle savedInstanceState) {
        super.onCreate(savedInstanceState);
        setContentView(R.layout.activity_bind_view);
    }
}
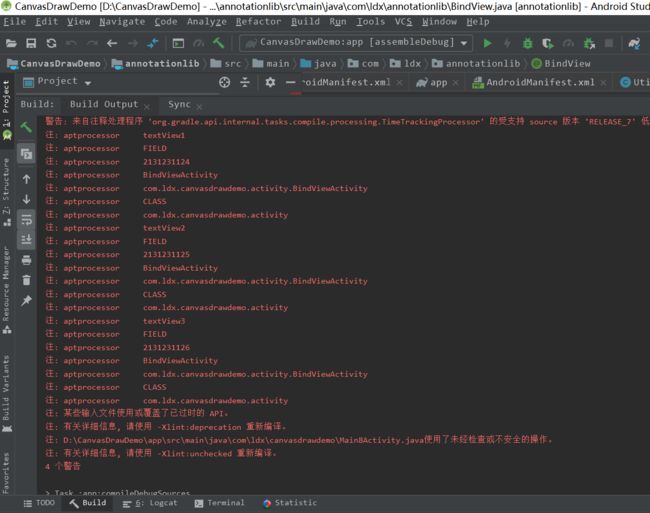
运行Rebuild project 可以获取打印的log(在build窗口中)

最终会在项目build-》generated目录下生成相应的文件。

如果有错误可能还需要添加:
javaCompileOptions{
annotationProcessorOptions.includeCompileClasspath = true
}
引入方式:
需要用annotationProcessor 而不是implementation。
编译时注解学习一之 Element元素
编译时注解学习二之 注解处理器初探AbstractProcessor
编译时注解学习三之 注解处理器AbstractProcessor工具和Element属性简述
编译期注解学习四 简单的view注入框架
编译期注解学习五 - ElementKind,TypeKind,不同Element类型判断
编译期注解学习六- 生成java文件javapoet
编译期注解学习七-如何进行调试
编译时注解学习八 -模板文件读取