CH6- JS UI前端开发
文章目录
- 前言
- 目标
- 1.JS前端开发基础
-
- JS FA的使用
-
- AceAbility
- 如何加载JS FA
- JS FA开发目录
- 2.—个典型JS FA应用开发
-
- 构建页面结构
- 构建页面样式
- 构建页面逻辑
- 适配设备类型
- 3.构建用户界面
-
- 组件通用特性
-
- 组件通用属性
- 组件通用样式
- 组件通用事件
-
- list组件
- **tabs组件**
- dialog组件
- form组件
- 4.动画
-
- 静态动画
- 连续动画
- 5.用户交互
-
- 手势事件
-
- 触摸
- 按键事件
- 多模输入
- 处理按钮事件
- 6.自定义组件
-
- 构建
- 引用
- 运行结果
- 7.JS FA调用PA
-
- 两种PA调用方式
- FA调用PA常见问题
- 示例:
-
- JS端
- PA端(Ability方式)
- 本章总结
-
-
- PA端(Ability方式)
-
- 本章总结
前言
- 随着移动端开发技术的不断发展,传统的复杂代码开发(Java、C)方式已经无法满足现今的快速代码开发和迭代的需求,而
JavaScript做为一种轻量级,解释型的即时编译型的编程语言在移动应用开发中得到了开发者的青睐,其在微信小程序开发和uni-App开发中得到了较多使用。不同与小程序,HarmonyOs Js框架拥有独特的代码优化模式,JS代码可以在HarmonyOs系统中快速运行。
目标
- 掌握利用JS UI开发HarmonyOS前端界面的方法,包括
开发复杂页面布局,掌握常用组件、容器组件和自定义组件的用法,学会使用JS FA访问PA的方法。
1.JS前端开发基础
- JS UI框架是一种
跨设备的高性能UI开发框架,支持声明式编程和跨设备多态UI。需要掌握以下基础知识:- HTML5
- CSS
- JavaScript
基础能力
- 声明式编程JS UI框架
采用类HTML和CSS声明式编程语言作为页面布局和页面样式的开发语言,页面业务逻辑则支持ECMAScript规范的JavaScript语言。JS UI框架提供的声明式编程,可以让开发者避免编写UI状态切换的代码,视图配置信息更加直观。 - 跨设备开发框架架构上
支持UI跨设备显示能力,运行时自动映射到不同设备类型,开发者无感知,降低开发者多设备适配成本。 - 高性能开发框架包含了许多核心的控件,如
列表、图片和各类容器组件等,针对声明式语法进行了渲染流程的优化。
整体架构
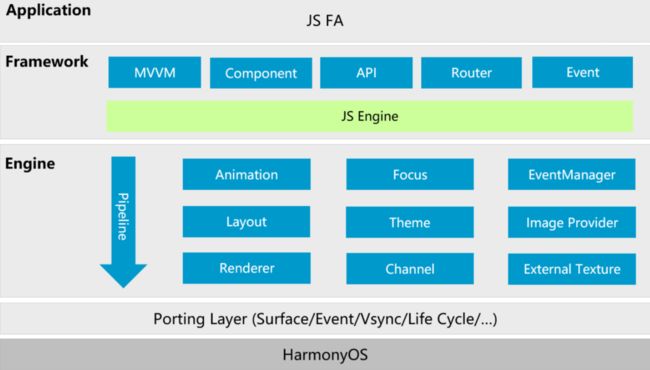
- JS uI框架包括
应用层(Application )、前端框架层(Framework )、引擎层(Engine )和平台适配层(Porting Layer) 。 - Application应用层表示开发者使用JS UI框架开发的FA应用,这里的FA应用特指JS FA应用。
- Framework前端框架层主要完成
前端页面解析,以及提供MVVM ( Model-View-ViewModel)开发模式、页面路由机制和自定义组件等能力。
引擎层&适配层
- Engine引擎层主要提供
动画解析、DOM ( Documen Object Model)树构建、布局计算、渲染命令构建与绘制、事件管理等能力。 - Porting Layer适配层主要完成
对平台层进行抽象,提供抽象接口,可以对接到系统平台。比如:事件对接、渲染管线对接和系统生命周期对接等。
JS FA的使用
AceAbility
AceAbility类是JS FA在HarmonyOS上运行环境的基类,继承自Ability。开发者的应用运行入口类应该从该类派生。
public class MainAbility extends AceAbility {
    @Override
    public void onStart(Intent intent){
    	super.onStart(intent);
    }
    @Override
    public void onStop() {
    	super.onStop();
    }
}
如何加载JS FA
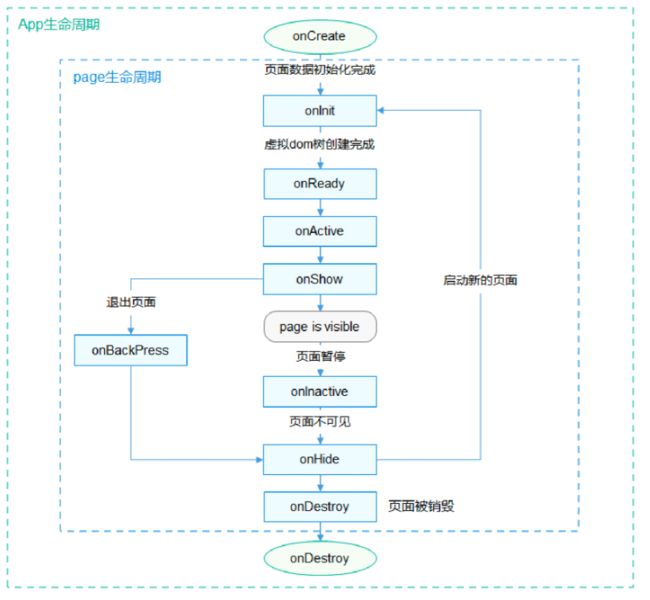
- JS FA生命周期事件分为
应用生命周期和页面生命周期,应用通过AceAbility类中setInstanceName()接口设置该Ability的实例资源,并通过AceAbility窗口进行显示以及全局应用生命周期管理。 - setIlnstanceName(String name)的
参数"name"指实例名称,实例名称与config.json文件中module.js.name的值对应。 - 若开发者未修改实例名,而使用了缺省值default,则无需调用此接口。若开发者修改了实例名,则需在应用Ability实例的onStart()中调用此接口,并将参数"name"设置为修改后的实例名称。
生命周期
加载主页面
- setInstanceName()接口使用方法:在MainAbility的onStart()中的super.onStart()前调用此接口.
public class MainAbility extends AceAbility {
    @Override
    public void onStart(Intent intent){
        setInstanceName("ISComponentName"); // config.json配置文件中module.js.name的标签值。
        super.onStart(intent);
}
JS FA开发目录
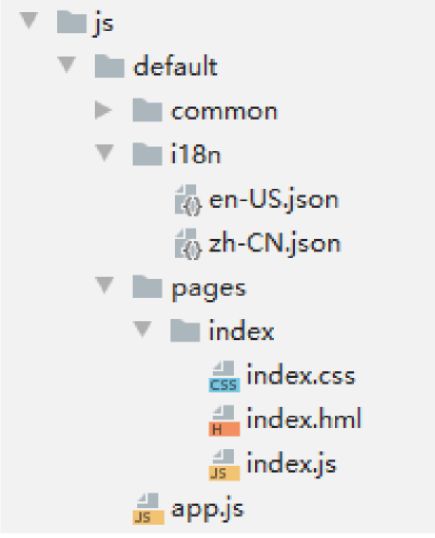
- 在工程目录中: common文件夹主要存放公共资源,如图片、视频等
- i18n下存放多语言的json文件
- pages文件夹下存放多个页面,每个页面由.hml、.css和.js文件组成。
限定词文件
- main > js > default > i18n > en-US.json:
- 此文件定义了在
英文模式下页面显示的变量内容。同理,zh-CN.json中定义了中文模式下的页面内容。
{
    "strings": {
        "hello": "Hello",
        "world": "World"
    },
    "files": {}
}
页面结构.hml文件
- main > is > default > pages > index > index.hml:
- 此文件定义了
index页面的结构、index页面中用到的组件,以及这些组件的层级关系。例如: index.hml文件中包含了一个text组件,内容为“Hello World”文本。
<div class ="container">
    <text class ="title">
		{{ $t('strings.hello') }{ftitle}}
    text>
div>
页面样式.css文件
- main > js > default > pages > index > index.css:
- 此文件定义了index
页面的样式。例如:index.css文件定义了“container”和“title”的样式。
.container {
    flex-direction: column;
    justify-content: center;
    align-items: center;
}
.title {
    font-size: 100px;
}
页面交互.js文件
- main > js > default > pages > index > index.js:
- 此文件定义了
index页面的业务逻辑,比如数据绑定、事件处理等。例如:变量“title”赋值为字符串“world”。
export default {
    data: {
        title: ",
    },
    onlnit() {
    	this.title = this.$t('strings.world');
    },
}
2.—个典型JS FA应用开发
构建页面结构
- 首先在index.hml文件中
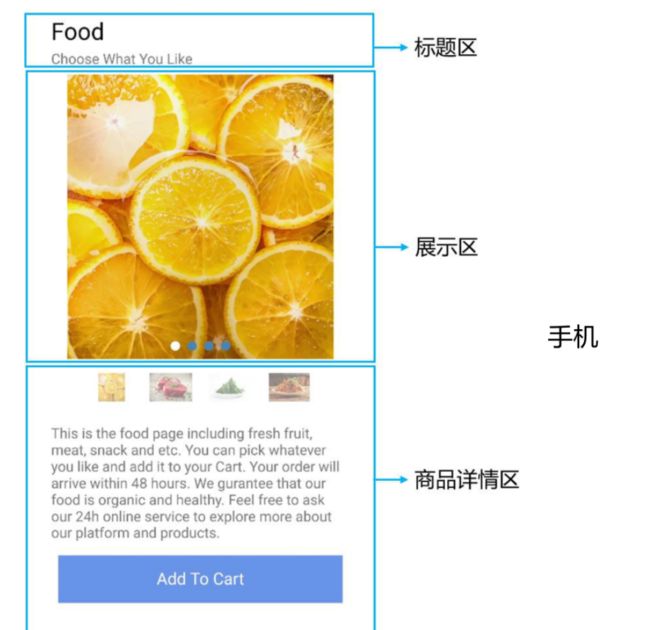
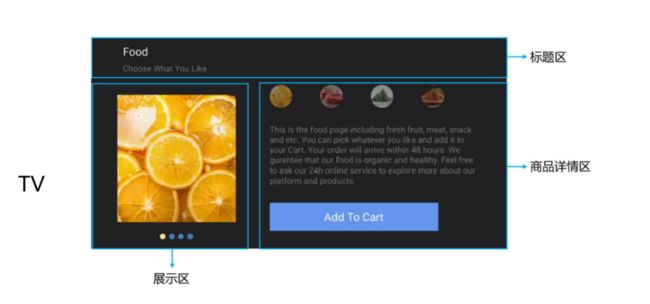
构建页面结构。在进行代码开发之前,首先要对页面结构进行分析,将页面分解为不同的部分,用容器组件来承载。 - 根据JSFA应用效果图,此页面一共分成三个部分:
标题区、展示区和详情区。根据此分区,可以确定根节点的子节点应按列排列。
结构分析
- 标题区是
由两个按列排列的text组件实现。 - 展示区和详情区由
按行排列的swiper组件和div组件组成,如下图所示:- 第一部分是展示区:由一个
容器组件swiper,包含了四个image组件构成;- 其中四个image组件
通过for指令来循环创建
- 其中四个image组件
- 第二部分是详情区∶由一个
容器组件div,包含了一个text组件和四个画布组件canvas绘制的圆形构成。swiper组件里展示的图片需要放在与pages目录同级的common目录下
- 第一部分是展示区:由一个
<div class="container">

    <div class="title">
        <text class="name"> Food text>
        <text class="sub-title"> Choose What You Like text>
    div>


    <div class="dispaly-style">

        <swiper id="swiperImage" class="swiper-style">
            <image src="{i$item}}" class="image-mode" focusable="true" for="{{imageList}}">image>
        swiper>
    div>


    <div class="container">
        <div class="selection-bar-container">

            <div class="selection-bar">
                <image src="{{$item}}" class="option-mode" onfocus="swipeTolndex({{$idx}})" onclick="swipeTolndex([{$idx]})" for="{fimageListl}">image>
            div>

            <div class="description-first-paragraph">
    			<text class="description">{{descriptionFirstParagraph}}text>
			div>

            <div class="cart">
    			<text class="{{cartStyle}}" onclick="addCart" onfocus="getFocus" onblur="lostFocus" focusable="true">{{cartText}}text>
            div>

        div>
    div>
div>
构建页面样式
- index.css文件中通过
media query管控手机和TV不同页面样式,页面样式还采用了css伪类的写法,当点击时或者焦点移动到image组件上,image组件由半透明变成不透明。
.container {
    flex-direction: column;
}
/*tv */
@media screen and (device-type: tv) {
    .title {
        align-items:flex-start;
        flex-direction: column;
        padding-left: 60px;padding-right: 160px;
        margin-top:15px;
    }
	.swiper-style {
        height: 300px;
        width: 350px;
        indicator-color: #4682b4;
        indicator-selected-color:#fOe68c;
        indicator-size: 10px;
        margin-left: 50px;
    }

/* phone */
@media screen and(device-type: phone){
    .title {
        align-items:flex-start;
        flex-direction: column;
        padding-left: 60px;padding-right: 160px;
        padding-top: 20px;
    }
    .option-mode {
        height: 40px;
        width: 40px;
		margin-left: 50px;
        opacity: 0.5;
		border-radius: 20px;
    }
    .cart-text {
		font-size: 20px;
        text-align: center;
        width: 300px;height: 50px;
        background-color: #6495ed;
        color: white;
    }
	.cart-text-focus {
        font-size: 20px;
        text-align: center;
        width: 300px;
        height: 50px;
        background-color: #4169e1;
        color: white;
    }
    .add-cart-text {
        font-size: 20px;
        text-align: center;
        width: 300px;
        height: 50px;
        background-color: #ffd700;
        color: white;
    }
	.option-mode:focus {	/*伪类,聚焦时透明度变化*/
        opacity: 1;
    }
}
构建页面逻辑
- 在index.js文件中
构建页面逻辑,主要实现的是两个逻辑功能:- 当点击时或者
焦点移动到不同的缩略图,swiper滑动到相应的图片; - 当
焦点移动到购物车区时,“Add To Cart”背景颜色从浅蓝变成深蓝,点击后文字变化为“Cart + 1”,背景颜色由深蓝色变成黄色。添加购物车不可重复操作。
- 当点击时或者
export default {
    data: {
        cartText: 'Add To Cart',
        cartStyle: 'cart-text',
        isCartEmpty: true,
        descriptionFirstParagraph:'This is the food page including fresh fruit, meat,snack and etc. You can pickwhatever you like and addit to your Cart. Your orderwill arrive within 48 hours. ',
		imageList:['/common/food_000.JPG',
                   '/common/food_001.JPG',
                   '/common/food_002.JPG',
                   '/common/food_003.JPG'],
    },

    swipeTolndex(index){
        this.$element('swiperImage').swipeTo({index: index});
    },

    addCart() {
        if (this.isCartEmpty){
            this.cartText = 'Cart + 1';
            this.cartStyle = 'add-cart-text';
        	this.isCartEmpty = false;
        }
    },

    getFocus() {
        if (this.isCartEmpty){
        	this.cartStyle = 'cart-text-focus';
        }
    },

    lostFocus(){
        if (this.isCartEmpty){
        	this.cartStyle = 'cart-text';
        }
    },
}
适配设备类型
- 在
config.json的“deciceType”字段中添加手机和TV的设备类型:
{
    "module": {
   		"deviceType": ["phone","tv"],
    }
}
3.构建用户界面
组件介绍
- 组件(Component)是构建页面的核心,每个组件通过对数据和方法的简单封装,实现独立的可视、可交互功能单元。组件之间相互独立,随取随用,也可以在需求相同的地方重复使用。开发者还可以通过组件间合理的搭配定义满足业务需求的新组件。
组件分类
组件通用特性
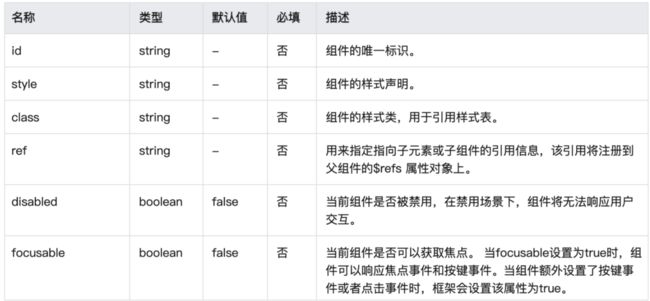
组件通用属性
通用属性包含常规属性和渲染属性。
- 常规属性指的是组件普遍支持的用来
设置组件基本标识和外观显示特征的属性。
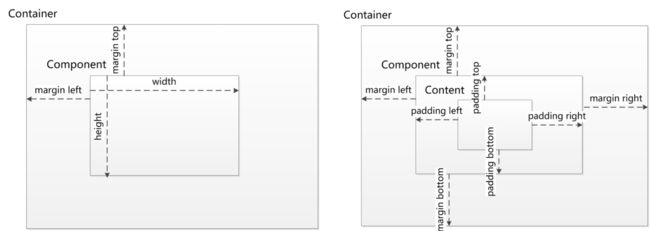
组件通用样式
- 在前端设计中组件最关键的问题是
如何将组件在屏幕中显示出来,就是要定义它的大小和位置关系。
组件通用事件
- ``事件绑定在组件上
,当组件达到事件触发条件时,会执行JS中对应的事件回调函数,实现页面uI视图和页面JS逻辑层的交互。对HarmonyOS系统来说,事件主要为手势事件和按键事件`。- 手势事件主要用于
智能穿戴等具有触摸屏的设备, - 按键事件主要用于
智慧屏设备。
- 手势事件主要用于
布局说明
- JS UI框架中
手机和智慧屏以720px( px指逻辑像素,非物理像素)为基准宽度,根据实际屏幕宽度进行缩放,例如当width设为100px时,在宽度为1440物理像素的屏幕上,实际显示的宽度为200物理像素。智能穿戴的基准宽度为454px,换算逻辑同理。
页面元素
- 一个页面的基本元素包含
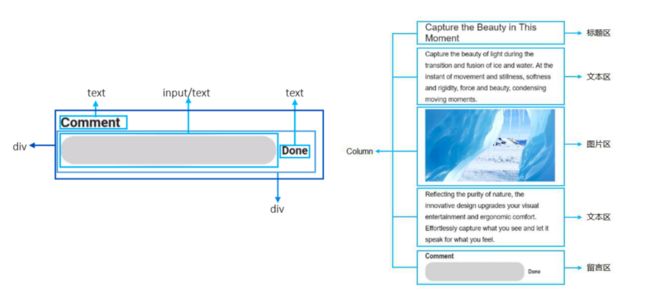
标题区域、文本区域、图片区域等,每个基本元素内还可以包含多个子元素,开发者根据需求还可以添加按钮、开关、进度条等组件。在构建页面布局时,需要对每个基本元素思考以下几个问题:- 该元素的尺寸和排列位置;
- 是否有重叠的元素;
- 是否需要设置对齐、内间距或者边界;
- 是否包含子元素及其排列位置;
- 是否需要容器组件及其类型。
页面分解
- 将
页面中的元素分解之后再对每个基本元素按顺序实现,可以减少多层嵌套造成的视觉混乱和逻辑混乱,提高代码的可读性,方便对页面做后续的调整。以下图为例进行分解:
定义文档结构
实现标题和文本区域最常用的是基础组件text。text组件用于展示文本,可以设置不同的属性和样式,文本内容需要写在标签内容区,在页面中插入标题和文本区域的示例如下:
<div class="container">
    <text class="title-text">{{headTitle}}text>
    <text class="paragraph-text">{{paragraphFirst}}text>
    <text class="paragraph-text">{{paragraphSecond}}text>
div>
定义文档样式
/*xxx.cSS*/
.container {
	flex-direction: column;
    margin-top: 20px;
    margin-left: 30px;
}
.title-text {
	color: #1a1a1a;
    font-size: 50px;
    margin-top: 40px;
    margin-bottom: 20px;
}
.paragraph-text {
    color: #000000;
    font-size: 35px;
    line-height: 60px;
}
动态内容和交互
// xxx.js
export default {
    data: {
        headTitle: 'Capture the Beauty in This Moment',
        paragraphFirst: 'Capture the beauty of light during the transition and fusion ofice and water. At the instant of movement and stillness, softness and rigidity,force and beauty, condensing moving moments.',
        paragraphSecond: 'Reflecting the purity of nature, the innovative designupgrades your visual entertainment and ergonomic comfort. Effortlessly capturewhat you see and let it speak for what you feel.',
    },
}
添加图片区域
- 实现图片区域通常用
image组件来实现,使用的方法和text组件类似。 - 图片资源放在与pages目录同级的
common目录下
<image class="img" src="{{middlelmage}}">image>
/*xxx.cSS*/
.img {
	margin-top: 30px;
    margin-bottom: 30px;
    height: 385px;
}
// xxx.js
export default {
    data: {
		middlelmage: '/common/ice.png',
    },
}
添加留言区域
- 留言框的功能为∶
用户输入留言后点击完成,留言区域即显示留言内容;用户点击右侧的删除按钮可删除当前留言内容重新输入。 - 留言区域由div、text、input
关联click事件实现。开发者可以使用input组件实现输入留言的部分,- 使用
text组件实现留言显示部分, - 使用
commentText的状态标记此时显示的组件(通过if属性控制)。 - 在
包含文本“完成”和“删除”的text组件中关联click事件, 更新commentText状态和inputValue的内容。
留言区实现
- 页面结构
<div class="container">
    <text class="comment-title">Commenttext>
    <div if="{{commentText}}">
        <input class="comment" value="{{finputValuel}]" onchange="updateValue()">input>
        <text class="comment-key" onclick="update" focusable="true">Donetext>
    div>
    <div if="{{commentText}}">
    	<text class="comment-text" focusable="true">{{inputValue}}text>
        <text class="comment-key" onclick="update" focusable="true">Deletetext>
	div>
div>
- 样式
/*xxx.csS */
.container {
	margin-top: 24px;
	background-color: #ffffff;
}
.comment-title {
    font-size: 40px;
    color: #1a1a1a;
    font-weight: bold;
    margin-top: 40px;
    margin-bottom: 10px;
}
.comment {
    width: 550px;
    height: 100px;
    background-color: lightgrey;
}
.comment-key {
    width: 150px;
    height: 100px;
    margin-left: 20px;
    font-size: 32px;
    color: #1a1a1a;
    font-weight: bold;
}
.comment-key:focus {
    color: #007dff;
}
.comment-text {
    width: 550px;
    height: 100px;
    text-align: left;
    line-height: 35px;
    font-size: 30px;
    color: #O00000;
    border-bottom-color: #bcbcbc;
    border-bottom-width: 0.5px;
}
- 交互
//xxx.js
export default {
    data: {
        inputValue:"",
        commentText: false,
    },
    update(){
        this.commentText = !this.commentText;
    },
    updateValue(e){
        this.inputValue = e.text;
    },
}
添加容器
- 要将页面的
基本元素组装在一起,需要使用容器组件。在页面布局中常用到三种容器组件,分别是div、list、tabs、dialog和form。在页面结构相对简单时,可以直接用div作为容器,因为div作为单纯的布局容器,使用起来更为方便,可以支持多种子组件。
list组件
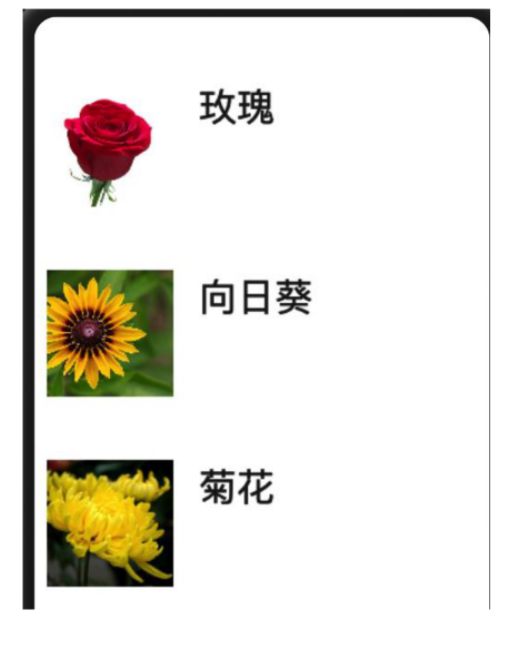
- 当页面结构较为复杂时,如果使用div循环渲染,容易出现卡顿,因此推荐
使用list组件代替div组件实现长列表布局,从而实现更加流畅的列表滚动体验。但是,list组件仅支持list-item作为子组件,因此使用list时需要留意list-item的注意事项。示例如下:
<list class="list">
    <list-item type="listltem" for="{{textList}}">
        <text class="desc-text">{{$item.value}}text>
    list-item>
list>
/*xxx.cSS*/
.desc-text {
	width: 683.3px;
    font-size: 35.4px;
}
// xxx.js
export default {
    data: {
		textList: [[value: 'JS FA']],
    },
}
实现效果
- 以上示例的list中只包含一个list-item,list-item中只有一个text组件。在实际应用中可以在list中
加入多个list-item,同时list-item下可以包含多个其他子组件。
tabs组件
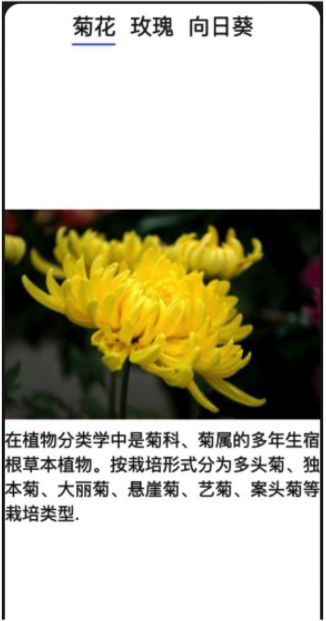
- 当
页面经常需要动态加载时,推荐使用tabs组件。tabs组件支持change事件,在页签切换后触发。tabs组件仅支持一个tab-bar和一个tab-content。具体的使用示例如下:
<tabs>
    <tab-bar>
    	<text>Hometext>
        <text>Indextext>
        <text>Detailtext>
    tab-bar>

    <tab-content>
    	<image src="{{homeImage}">image>
        <image src="{{indexImagel}">image>
        <image src="{{detailImage}}">image>
    tab-content>
tabs>
// xxx.js
export default {
    data: {
		homelmage: '/common/home.png',
        indexlmage: '/common/index.png',
        detaillmage: '/common/detail.png',
    },
}
dialog组件
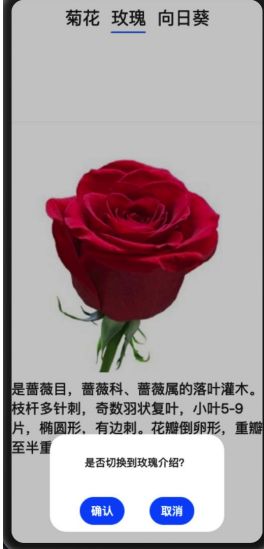
- dialog组件是
容器组件,支持用户自定义弹窗的格式和内容,该容器组件仅支持单子件。也就是说如果需要在dialog中定义复杂元素,则这能将这些负责子组件放在其他容 器如div中。- 当弹窗组件显示时,用户
点击非dialog区域来取消弹窗时会触发cancel事件; - 此外dialog组件有两个特定方法,show和close,分别为显示对话框和删除对话框。
- 当弹窗组件显示时,用户
<dialog id="simpledialog" class="dialog-main" oncancel="cancelDialog">
    <div class="dialog-div">
        <div class="inner-txt">
            <text class="txt">是否切换到玫瑰介绍?text>
        div>
        <div class="inner-btn">
            <button
                type="capsule"
                value="确认"
                onclick="setSchedule"
                class="btn-txt"
            >button>
            <button
                type="capsule"
                value="取消"
                onclick="cancelSchedule"
                class="btn-txt"
            >button>
        div>
    div>
dialog>
dialog组件运行效果
change(e) {
    if (e.index == 1)
    this.$element('simpledialog').show()
},
cancelDialog(e) {
    prompt.showToast({message: '离开'})
},
cancelSchedule(e) {
    this.$element('simpledialog').close()
    prompt.showToast({message: '确认取消'})
},
form组件
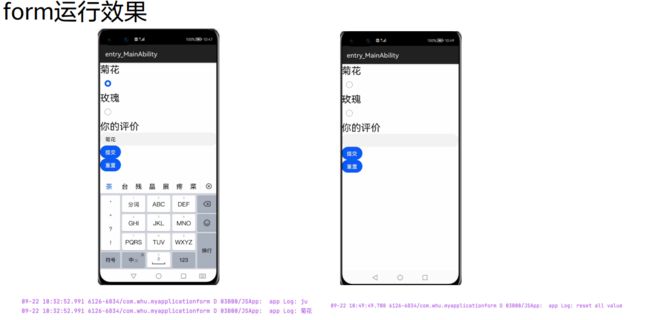
- form组件容器提供了一种方便地方式来
提交输入信息,支持容器内input元素的内容提交 和重置。
<form onsubmit="onSubmit" onreset="onReset">
    <label>菊花label>
    <input type="radio" name="radioGroup" value="ju">input>
    <label>玫瑰label>
    <input type="radio" name="radioGroup" value="rose">input>
    <text>你的评价text>
    <input type="text" name="user">input>
    <input type="submit">提交input>
    <input type="reset">重置input>
form>
export default {
    onSubmit(result) {
        console.log(result.value.radioGroup);
        console.log(result.value.user);
    },
    onReset() {
        console.log("reset all value");
    },
};
添加交互
添加交互通过在组件上关联事件实现。本节将介绍如何用div、text、image组件关联 click事件,构建一个如下图所示的点赞按钮。 - 点赞按钮通过
一个div组件关联click事件实现。div组件包含一个image组件和一个text组件: - image组件用于
显示未点赞和点赞的效果。click事件函数会交替更新点赞和未点赞图片的路径。 - text组件用于
显示点赞数,点赞数会在click事件的函数中同步更新
- image组件用于
点赞效果页面结构
- click事件作为一个函数
定义在js文件中,可以更改isPressed的状态,从而更新显示的 image组件。*- 如果isPressed为真,则点赞数加1。该函数在.hml文件中对应的div组件上 生效,点赞按钮各子组件的样式设置在.css文件当中。具体的实现示例如下:
<div>
    <div class="like" onclick="likeClick">
        <image class="like-img" src="{{likeImage}}" focusable="true">image>
        <text class="like-num" focusable="true">{{total}}text>
    div>
div>
点赞效果样式和交互
/* xxx.css */
.like {
    width: 104px;
    height: 54px;
    border: 2px solid #bcbcbc;
    justify-content: space-between;
    align-items: center;
    margin-left: 72px;
    border-radius: 8px;
}
.like-img {
    width: 33px;
    height: 33px;
    margin-left: 14px;
}
.like-num {
    color: #bcbcbc;
    font-size: 20px;
    margin-right: 17px;
}
// xxx.js
export default {
    data: {
        likeImage: "/common/unLike.png",
        isPressed: false,
        total: 20,
    },
    likeClick() {
        var temp;
        if (!this.isPressed) {
            temp = this.total + 1;
            this.likeImage = "/common/like.png";
        } else {
            temp = this.total - 1;
            this.likeImage = "/common/unLike.png";
        }
        this.total = temp;
        this.isPressed = !this.isPressed;
    },
};
页面路由
- 很多应用由多个页面组成,比如用户可以从音乐列表页面点击歌曲,跳转到该歌曲的播 放界面。开发者需要通过页面路由·
将这些页面串联起来,按需实现跳转。 页面路由router根据页面的uri来找到目标页面,从而实现跳转。以最基础的两个页面之 间的跳转为例,具体实现步骤如下: - 在“Project”窗口,打开“entry > src > main > js > default”,右键点击 “pages”文件夹, 选择“New > JS Page”,创建一个详情页。
- 调用router.push()路由到详情页。
- 调用router.back()回到首页。
构建页面结构
- index和detail这两个页面均包含一个text组件和button组件:
- text组件用来指明当前页面,
- button组件用来实现两个页面之间的相互跳转。
- hml文件代码示例如下:
<div class="container">
    <text class="title">This is the index page.text>
    <button
        type="capsule"
        value="Go to the second
page"
        class="button"
        onclick="launch"
    >button>
div>


<div class="container">
    <text class="title">This is the detail page.text>
    <button
        type="capsule"
        value="Go back"
        class="button"
        onclick="launch"
    >button>
div>
构建页面样式
- 构建
index和detail页面的页面样式:- text组件和button组件居中显示,两个组件之间间距 为50px。
- css代码如下(两个页面样式代码一致)
/* index.css */ /* detail.css */
.container {
    flex-direction: column;
    justify-content: center;
    align-items: center;
}
.title {
    font-size: 50px;
    margin-bottom: 50px;
}
实现跳转
- 为了使
button组件的launch方法生效,需要在页面的.js文件中实现跳转逻辑。 - ·
调用 router.push()接口将uri指定的页面添加到路由栈中,即跳转到uri指定的页面。 - 在调用 router方法之前,需要导入router模块。代码示例如下:
// index.js
import router from "@system.router";
export default {
    launch() {
        router.push({
            uri: "pages/detail/detail",
        });
    },
};
// detail.js
import router from "@system.router";
export default {
    launch() {
        router.back();
    },
};
焦点逻辑
- 焦点移动是
智慧屏的主要交互方式,焦点逻辑的主要规则是: - 容器组件
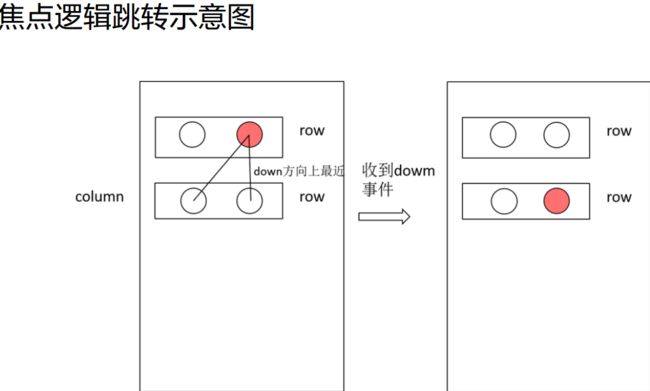
焦点分发逻辑:容器组件在第一次获焦时焦点一般都落在第一个可获焦的子组件上, 再次获焦时焦点落在上一次失去焦点时获焦的子组件上。容器组件一般都有特定的焦点分发逻 辑,以下分别说明常用容器组件的焦点分发逻辑。 - div组件通过
按键移动获焦时,焦点会移动到在移动方向上与当前获焦组件布局中心距离最近的可获焦叶子节点上。如图中焦点在上方的横向div的第二个子组件上,当点击down按键时, 焦点要移动到下方的横向div中。这时下方的横向div中的子组件会与当前焦点所在的子组件进 行布局中心距离的计算,其中距离最近的子组件获焦。
- 容器组件
各种组件的焦点获得
- list组件包含
list-item与list-item-group,list组件每次获焦时会使第一个可获焦的item获焦。list-item-group为特殊的list-item,且两者都与div的焦点逻辑相同。 - stack组件只能
由自顶而下的第一个可获焦的子组件获焦。 - swiper的每个页面和refresh的页面的焦点逻辑都
与div的相同。 - tabs组件包含
tab-bar与tab-content,tab-bar中的子组件默认都能获焦,与是否有可获焦的叶子结点无关。tab-bar与tab-content的每个页面都与div的焦点逻辑相同。 - dialog的
button可获焦,若有多个button,默认初始焦点落在第二个button上。 popup无法获焦
focusable属性使用
通用属性focusable主要用于控制组件能否获焦,本身不支持焦点的组件在设置此属性后 可以拥有获取焦点的能力。如text组件本身不能获焦,焦点无法移动到它上面,设置text 的focusable属性为true后,text组件便可以获焦。特别的是,如果在没有使用focusable 属性的情况下,使用了focus,blur或key事件,会默认添加focusable属性为true。 - 容器组件是否可获焦
依赖于是否拥有可获焦的子组件。如果容器组件内没有可以获焦的 子组件,即使设置了focusable为true,依然不能获焦。当容器组件focusable属性设置为 false,则它本身和它所包含的所有组件都不可获焦。
4.动画
静态动画
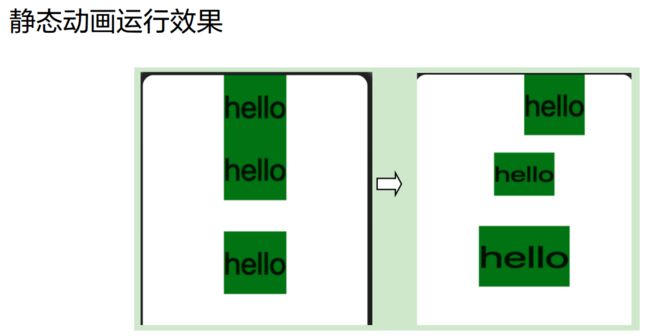
- 静态动画的核心是
transform样式,主要可以实现以下三种变换类型,一次样式设置只能实现一种类型变换。 - translate:
沿水平或垂直方向将指定组件移动所需距离; - scale:
横向或纵向将指定组件缩小或放大到所需比例; - rotate:将指定组件沿横轴或纵轴或中心点
旋转指定的角度。
- translate:
<div class="container">
    <text class="translate">hellotext>
    <text class="rotate">hellotext>
    <text class="scale">hellotext>
div>
/* xxx.css */
.container {
    flex-direction: column;
    align-items: center;
}
.translate {
    height: 150px;
    width: 300px;
    font-size: 50px;
    background-color: #008000;
    transform: translate(200px);
}
.rotate {
    height: 150px;
    width: 300px;
    font-size: 50px;
    background-color: #008000;
    transform-origin: 200px 100px;
    transform: rotateX(45deg);
}
.scale {
    height: 150px;
    width: 300px;
    font-size: 50px;
    background-color: #008000;
    transform: scaleX(1.5);
}
连续动画
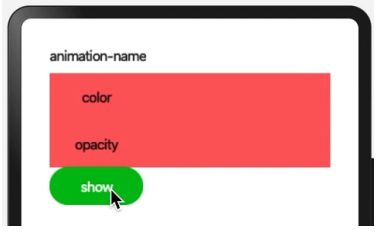
静态动画只有开始状态和结束状态,没有中间状态,如果需要设置中间的过渡状态和转换效果,需要使用连续动画实现。 - 连续动画的核心是
animation样式,它定义了动画的开始状态、结束状态以及时间和速度的变化曲线。通过animation样式可以实现的效果有: - animation-name:设置动画执行后应用到组件上的
背景颜色、透明度、宽高和变换类型; - animation-delay和animation-duration:分别设置动画执行后
元素延迟和持续的时间; - animation-timing-function:描述动画执行的
速度曲线,使动画更加平滑; - animation-iteration-count:定义
动画播放的次数; - animation-fill-mode:指定动画执行
结束后是否恢复初始状态。
- animation-name:设置动画执行后应用到组件上的
连续动画页面结构
- animation样式需要在
css文件中先定义keyframe,在keyframe中设置动画的过渡效果, 并通过一个样式类型在hml文件中调用。animation-name的使用示例如下:
<div class="item-container">
    <text class="header">animation-nametext>
    <div class="item {{colorParam}}">
        <text class="txt">colortext>
    div>
    <div class="item {{opacityParam}}">
        <text class="txt">opacitytext>
    div>
    <input
        class="button"
        type="button"
        name=""
        value="show"
        onclick="showAnimation"
    />
div>
连续动画页面样式
/* xxx.css */
.item-container {
    margin-right: 60px;
    margin-left: 60px;
    flex-direction: column;
}
.header {
    margin-bottom: 20px;
}
.item {
    background-color: #f76160;
}
.txt {
    text-align: center;
    width: 200px;
    height: 100px;
}
.button {
    width: 200px;
    font-size: 30px;
    background-color: #09ba07;
}
.color {
    animation-name: Color;
    animation-duration: 8000ms;
}
.opacity {
    animation-name: Opacity;
    animation-duration: 8000ms;
}
@keyframes Color {
    from {
        background-color: #f76160;
    }
    to {
        background-color: #09ba07;
    }
}
@keyframes Opacity {
    from {
        opacity: 0.9;
    }
    to {
        opacity: 0.1;
    }
}
连续动画交互逻辑
// xxx.js
export default {
    data: {
        colorParam: "",
        opacityParam: "",
    },
    showAnimation: function () {
        this.colorParam = "";
        this.opacityParam = "";
        this.colorParam = "color";
        this.opacityParam = "opacity";
    },
};
5.用户交互
- 事件主要包括
手势事件和按键事件。- 手势事件主要用于
智能穿戴等具有触摸屏的设备, - 按键事件主要用于
智慧屏设备
- 手势事件主要用于
手势事件
- 手势表示
由单个或多个事件识别的语义动作(例如:点击、拖动和长按)。一个完整的 手势也可能由多个事件组成,对应手势的生命周期。JS UI框架支持的手势事件有: 触摸 点击 长按
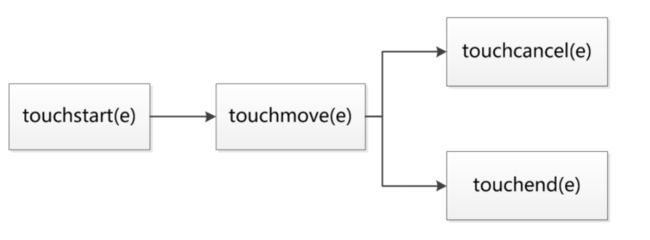
触摸
- touchstart:手指触摸动作开始。
- touchmove:手指触摸后移动。
- touchcancel:手指触摸动作被打断,如来电提醒、弹窗。
- touchend:手指触摸动作结束。
- 点击-click:用户快速轻敲屏幕。
- 长按-longpress:用户在相同位置长时间保持与屏幕接触
触摸事件示例
页面结构
<div class="container">
    <div class="text-container" onclick="click">
        <text class="text-style">{{onClick}}text>
    div>
    <div class="text-container" ontouchstart="touchStart">
        <text class="text-style">{{touchstart}}text>
    div>
    <div class="text-container" ontouchmove="touchMove">
        <text class="text-style">{{touchmove}}text>
    div>
    <div class="text-container" ontouchend="touchEnd">
        <text class="text-style">{{touchend}}text>
    div>
    <div class="text-container" ontouchcancel="touchCancel">
        <text class="text-style">{{touchcancel}}text>
    div>
    <div class="text-container" onlongpress="longPress">
        <text class="text-style">{{onLongPress}}text>
    div>
div>
样式
/* xxx.css */
.container {
    flex-direction: column;
    justify-content: center;
    align-items: center;
}
.text-container {
    margin-top: 10px;
    flex-direction: column;
    width: 750px;
    height: 50px;
    background-color: #09ba07;
}
.text-style {
    width: 100%;
    line-height: 50px;
    text-align: center;
    font-size: 24px;
    color: #ffffff;
}
交互逻辑
// xxx.js
export default {
    data: {
        touchstart: "touchstart",
        touchmove: "touchmove",
        touchend: "touchend",
        touchcancel: "touchcancel",
        onClick: "onclick",
        onLongPress: "onlongpress",
    },
    touchCancel: function (event) {
        this.touchcancel = "canceled";
    },
    touchEnd: function (event) {
        this.touchend = "ended";
    },
    touchMove: function (event) {
        this.touchmove = "moved";
    },
    touchStart: function (event) {
        this.touchstart = "touched";
    },
    longPress: function () {
        this.onLongPress = "longpressed";
    },
    click: function () {
        this.onClick = "clicked";
    },
};
按键事件
- 按键事件是
智慧屏上特有的手势事件,当用户操作遥控器按键时触发。- 用户点击一个遥 控器按键,通常会触发两次key事件:先触发action为0,再触发action为1,即先触发按 下事件,再触发抬起事件。
- action为2的场景比较少见,
一般为用户按下按键且不松开, 此时repeatCount将返回次数。每个物理按键对应各自的按键值(keycode)以实现不同 的功能
按键事件示例
按键示例页面结构和样式
<div class="card-box">
    <div class="content-box">
        <text
            class="content-text"
            onkey="keyUp"
            onfocus="focusUp"
            onblur="blurUp"
            >{{up}}text
        >
    div>
    <div class="content-box">
        <text
            class="content-text"
            onkey="keyDown"
            onfocus="focusDown"
            onblur="blurDown"
            >{{down}}text
        >
    div>
div>
/* xxx.css */
.card-box {
    flex-direction: column;
    justify-content: center;
}
.content-box {
    align-items: center;
    height: 200px;
    flex-direction: column;
    margin-left: 200px;
    margin-right: 200px;
}
.content-text {
    font-size: 40px;
    text-align: center;
}
按键事件处理
- 按键事件通过
获焦事件向下分发,因此示例中使用了focus事件和blur事件明确当前焦点 的位置。 点按上下键选中up或down按键,即相应的focused状态,失去焦点的按键恢复 正常的up或down按键文本。按确认键后该按键变为keyed状态。
// xxx.js
export default {
    data: {
        up: 'up',
        down: 'down',
    },
    focusUp: function() {
        this.up = 'up focused';
    },
    blurUp: function() {
        this.up = 'up';
    },
    keyUp: function() {
        this.up = 'up keyed';
    },
    focusDown: function() {
        this.down = 'down focused';
    },
    blurDown: function() {
        this.down = 'down';
    },
    keyDown: function() {
        this.down = 'down keyed';
    },
}
多模输入
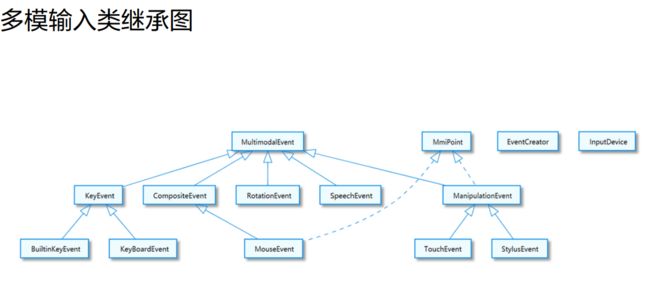
多模输入使HarmonyOS的UI控件能够响应多种输入事件,事件来源于用户的按键、点击、 触屏、语音等。提供创建事件能力和获取输入设备信息能力。 - 多模输入的接口设计是基于
多模事件基类(MultimodalEvent),派生出操作事件(ManipulationEvent)、按键事件类(KeyEvent)、语音事件(SpeechEvent)等,另 外提供创建事件类和获取输入设备信息类
处理按钮事件
- 参考HarmonyOS的Component的API
创建KeyEventListener; - 重写实现KeyEventListener类中的
onKeyEvent(Component component, KeyEvent event) 方法; - 开发者根据自身需求处理按键被按下以及 KEY_DPAD_CENTER、KEY_DPAD_LEFT等按键 被按下后的具体实现。
private Component.KeyEventListener onKeyEvent = new Component.KeyEventListener()
{
    @Override
    public boolean onKeyEvent(Component component, KeyEvent keyEvent) {
        if (keyEvent.isKeyDown()) {}
    }
}
6.自定义组件
- JS UI框架支持
自定义组件,用户可根据业务需求将已有的组件进行扩展,增加自定义的 私有属性和事件,封装成新的组件,方便在工程中多次调用,提高页面布局代码的可读 性。具体的封装方法示例如下
构建
子组件页面结构和样式
<div class="item">
    <text class="title-style">{{title}}text>
    <text class="text-style"
          onclick="childClicked" focusable="true">
        点击这里查看隐藏文本text>
    <text class="text-style"
          if="{{showObj}}">hello worldtext>
div>
/* comp.css */
.item {
    width: 700px;
    flex-direction: column;
    height: 300px;
    align-items: center;
    margin-top: 100px;
}
.text-style {
    width: 100%;
    text-align: center;
    font-weight: 500;
    font-family: Courier;
    font-size: 36px;
}
.title-style {
    font-weight: 500;
    font-family: Courier;
    font-size: 50px;
    color: #483d8b;
}
// comp.js
export default {
    props: {
        title: {
            default: 'title',
        },
        showObject: {},
    },
    data() {
        return {
            showObj: this.showObject,
        };},
    childClicked () {
        this.$emit('eventType1', {text: '收到子组件参数'});
        this.showObj = !this.showObj;
    },
}
引用
父组件代码
<element name='comp'
         src='../../common/component/comp.hml'>element>
<div class="container">
    <text>父组件:{{text}}text>
    <comp title="自定义组件" show-object="{{isShow}}"
          @event-type1="textClicked">comp>
div>
/* xxx.css */
.container {
    background-color: #f8f8ff;
    flex: 1;
    flex-direction: column;
    align-content: center;
}
// xxx.js
export default {
    data: {
        text: '开始',
        isShow: false,
    },
    textClicked (e) {
        this.text = e.detail.text;
    },
}
运行结果
- 本示例中父组件通过
添加自定义属性向子组件传递了名称为title的参数,- 子组件在
props 中接收,同时子组件也通过事件绑定向上传递了参数text, 接收时通过e.detail获取,要 绑定子组件事件,父组件事件命名必须遵循事件绑定规则。自定义组件效果如下图所示:
- 子组件在
7.JS FA调用PA
- FA调用PA接口
- FA调用PA常见问题
- 示例参考
两种PA调用方式
- JS UI框架提供了
JS FA(Feature Ability)调用Java PA(Particle Ability)的机制,该机 制提供了一种通道来传递方法调用、数据返回以及订阅事件上报。 - 当前提供
Ability和Internal Ability两种调用方式,开发者可以根据业务场景选择合适的调用方式进行开发。 - Ability:拥有独立的Ability生命周期,FA使用
远端进程通信拉起并请求PA服务,适用于基本服务供多FA调用或者服务在后台独立运行的场景; - Internal Ability:与FA共进程,采用
内部函数调用的方式和FA进行通信,适用于对服务响应时延要求较高的场景。该方式下PA不支持其他FA访问调用
- Ability:拥有独立的Ability生命周期,FA使用
交互流程
- JS端与Java端通过
bundleName和abilityName来进行关联。在系统收到JS调用请求后, 根据开发者在JS接口中设置的参数来选择对应的处理方式。开发者在onRemoteRequest()中实现PA提供的业务逻辑
FA调用PA接口
FA端提供以下三个JS接口:
- FeatureAbility.callAbility(OBJECT):调用PA能力;
- FeatureAbility.subscribeAbilityEvent(OBJECT, Function):订阅PA能力;
- FeatureAbility.unsubscribeAbilityEvent(OBJECT):取消订阅PA能力。
两类接口
PA端提供以下两类接口:
- IRemoteObject.onRemoteRequest(int, MessageParcel, MessageParcel, MessageOption):
- Ability调用方式,FA使用
远端进程通信拉起并请求PA服务; - AceInternalAbility.AceInternalAbilityHandler.onRemoteRequest(int, MessageParcel, MessageParcel, MessageOption):
- Internal Ability调用方式,采用
内部函数调用的方式 和FA进行通信
- Internal Ability调用方式,采用
FA调用PA常见问题
callAbility返回报错:"Internal ability not register."返回该错误说明JS接口调用请求未在系统中找到对应的InternalAbilityHandler进行处理,因此需要检查以下几点是否正确执行: - 在AceAbility继承类中对AceInternalAbility继承类
执行了register方法; - JS侧填写的
bundleName和abilityName与AceInternalAbility继承类构造函数中填写的名 称保持相同,大小写敏感; - 检查JS端填写的
abilityType(0:Ability; 1:Internal Ability),确保没有将abilityType 缺省或误填写为Ability方式
- 在AceAbility继承类中对AceInternalAbility继承类
Ability和Internal Ability的区别
- Ability和Internal Ability是两种不同的FA调用PA的方式。下表列举了在开发时各方面的 差异,避免开发时将两者混淆使用
同步参数
- FeatureAbility.callAbility中syncOption参数说明:
- 对于JS FA侧,·
返回的结果都是Promise对象,因此无论该参数取何值,都采用异步方式等待PA 侧响应; - 对于JAVA PA侧,在Internal Ability方式下收到FA的请求后,根据该参数的取值来选择:
通过 同步的方式获取结果后返回;或者异步执行PA逻辑,获取结果后使用 remoteObject.sendRequest的方式将结果返回FA。
- 对于JS FA侧,·
- 使用await方式调用时IDE编译报错,需引入babel-runtime/regenerator
示例:
JS端
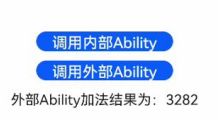
JS端调用FeatureAbility接口,传入两个Number参数,Java端接收后返回两个数的和。
var actionData = {};
actionData.firstNum = 1234;
actionData.secondNum = 2048;
var action = {};
action.bundleName = 'com.huawei.hiaceservice';
action.abilityName = 'com.huawei.hiaceservice.ComputeServiceAbility';
action.messageCode = ACTION_MESSAGE_CODE_PLUS;
action.data = actionData;
action.abilityType = ABILITY_TYPE_EXTERNAL;
action.syncOption = ACTION_SYNC;
var result = await FeatureAbility.callAbility(action);
var ret = JSON.parse(result);
if (ret.code == 0) {
    console.info('plus result is:' + JSON.stringify(ret.abilityResult));
}
PA端(Ability方式)
public class ComputeServiceAbility extends Ability {
    private static final String TAG = "ComputeServiceAbility";
    private MyRemote remote = new MyRemote();
    // FA在请求PA服务时会调用AbilityconnectAbility连接PA,连接成功后,需要在onConnect返回一个remote对象,
    供FA向PA发送消息
        @Override
        protected IRemoteObject onConnect(Intent intent) {
        super.onConnect(intent);
        return remote.asObject();
    }
    class MyRemote extends RemoteObject implements IRemoteBroker {
        @Override
        public boolean onRemoteRequest(int code, MessageParcel data, MessageParcel reply, MessageOption option) {
            @Override
            public IRemoteObject asObject() {
                return this;
            }
        }
    }
}
本章总结
- 本章主要介绍基于JS UI框架的前端界面开发。JS UI框架的构成 和JS项目的生命周期;
- 接着对JS UI框架中的核心概念-组件进行了详细描述,包 括组件的通用特性,样式和交互,核心组件容器等;
- 在深入理解组件功能的基 础上,进行了进阶内容如自定义组件和JS FA调用PA等探讨
Number参数,Java端接收后返回两个数的和。
var actionData = {};
actionData.firstNum = 1234;
actionData.secondNum = 2048;
var action = {};
action.bundleName = 'com.huawei.hiaceservice';
action.abilityName = 'com.huawei.hiaceservice.ComputeServiceAbility';
action.messageCode = ACTION_MESSAGE_CODE_PLUS;
action.data = actionData;
action.abilityType = ABILITY_TYPE_EXTERNAL;
action.syncOption = ACTION_SYNC;
var result = await FeatureAbility.callAbility(action);
var ret = JSON.parse(result);
if (ret.code == 0) {
    console.info('plus result is:' + JSON.stringify(ret.abilityResult));
}
[外链图片转存中…(img-xfpZfeWQ-1642927376083)]
PA端(Ability方式)
public class ComputeServiceAbility extends Ability {
    private static final String TAG = "ComputeServiceAbility";
    private MyRemote remote = new MyRemote();
    // FA在请求PA服务时会调用AbilityconnectAbility连接PA,连接成功后,需要在onConnect返回一个remote对象,
    供FA向PA发送消息
        @Override
        protected IRemoteObject onConnect(Intent intent) {
        super.onConnect(intent);
        return remote.asObject();
    }
    class MyRemote extends RemoteObject implements IRemoteBroker {
        @Override
        public boolean onRemoteRequest(int code, MessageParcel data, MessageParcel reply, MessageOption option) {
            @Override
            public IRemoteObject asObject() {
                return this;
            }
        }
    }
}
本章总结
- 本章主要介绍基于JS UI框架的前端界面开发。JS UI框架的构成 和JS项目的生命周期;
- 接着对JS UI框架中的核心概念-组件进行了详细描述,包 括组件的通用特性,样式和交互,核心组件容器等;
- 在深入理解组件功能的基 础上,进行了进阶内容如自定义组件和JS FA调用PA等探讨
