Netty应用之粘包半包问题
文章目录
-
- 1.粘包现象演示
- 2.半包现象演示
- 3.粘包半包现象分析
-
- 3.1 粘包
- 3.2 半包
- 4.粘包半包解决方案
-
- 4.1短连接
- 4.2 定长解码器
- 4.3 行解码器
- 4.4 LengthFieldBasedFrameDecoder
- 4.5 LengthFieldBasedFrameDecoder演示
参考黑马程序员
1.粘包现象演示
我们通过一段代码演示一个这个粘包现象,首先我们来看服务端
    void start() {
        NioEventLoopGroup boss = new NioEventLoopGroup();
        NioEventLoopGroup worker = new NioEventLoopGroup();
        try {
            ServerBootstrap serverBootstrap = new ServerBootstrap();
            serverBootstrap.channel(NioServerSocketChannel.class);
            serverBootstrap.group(boss, worker);
            serverBootstrap.childHandler(new ChannelInitializer<SocketChannel>() {
                @Override
                protected void initChannel(SocketChannel ch) throws Exception {
                    ch.pipeline().addLast(new LoggingHandler(LogLevel.DEBUG));
                }
            });
            ChannelFuture channelFuture = serverBootstrap.bind(8080).sync();
            channelFuture.channel().closeFuture().sync();
        } catch (InterruptedException e) {
            log.error("server error", e);
        } finally {
            boss.shutdownGracefully();
            worker.shutdownGracefully();
        }
    }

    public static void main(String[] args) {
        new Server1().start();
    }
服务端这块我们首先创建两个EventLoopGroup,一个是boss就是专门负责建立连接的,另一个是worker专门处理业务逻辑的。然后把这两个EventLoopGroup放到group中,然后再handler中我们就放一个打印日志的handler。然后绑定端口8080,。
客户端
    static final Logger log = LoggerFactory.getLogger(Client1.class);

    public static void main(String[] args) {
        send();
        System.out.println("finish");
    }

    private static void send() {
        NioEventLoopGroup worker = new NioEventLoopGroup();
        try {
            Bootstrap bootstrap = new Bootstrap();
            bootstrap.channel(NioSocketChannel.class);
            bootstrap.group(worker);
            bootstrap.handler(new ChannelInitializer<SocketChannel>() {
                @Override
                protected void initChannel(SocketChannel ch) {
                    ch.pipeline().addLast(new ChannelInboundHandlerAdapter() {
                        // 会在连接 channel 建立成功后,会触发 active 事件
                        @Override
                        public void channelActive(ChannelHandlerContext ctx) {
                            for (int i = 0;i < 10;i++) {
                                ByteBuf buf = ctx.alloc().buffer(16);
                                buf.writeBytes(new byte[]{0, 1, 2, 3, 4, 5, 6, 7, 8, 9, 10, 11, 12, 13, 14, 15});
                                ctx.writeAndFlush(buf);
                            }
                        }
                    });
                }
            });
            ChannelFuture channelFuture = bootstrap.connect("127.0.0.1", 8080).sync();
            channelFuture.channel().closeFuture().sync();
        } catch (InterruptedException e) {
            log.error("client error", e);
        } finally {
            worker.shutdownGracefully();
        }
    }
客户端这边我们就用worker就行了当连接建立的时候客户端会循环发送bytebuf给服务端,发10次,然后我们看一下结果。
如图所示我这边服务端一次性的接收到了160B的bytebuf,我本来是想让他分着接收,但是他一次性的全给我接收了。这就是粘包现象。
2.半包现象演示
现在我给服务端的接收缓冲区调小,然后我们再看看结果。
serverBootstrap.option(ChannelOption.SO_RCVBUF, 10);
如图所示很明显的最后一个接收的是4B之前的是40B,这很明显出现了半包。
3.粘包半包现象分析
3.1 粘包
- 现象,发送 abc def,接收 abcdef
- 原因
- 应用层:接收方 ByteBuf 设置太大(Netty 默认 1024)
- 滑动窗口:假设发送方 256 bytes 表示一个完整报文,但由于接收方处理不及时且窗口大小足够大,这 256 bytes 字节就会缓冲在接收方的滑动窗口中,当滑动窗口中缓冲了多个报文就会粘包
- Nagle 算法:即使发送一个字节,也需要加入 tcp 头和 ip 头,也就是总字节数会使用 41 bytes,非常不经济。因此为了提高网络利用率,tcp 希望尽可能发送足够大的数据,这就是 Nagle 算法产生的缘由。该算法是指发送端即使还有应该发送的数据,但如果这部分数据很少的话,则进行延迟发送
- 如果 SO_SNDBUF 的数据达到 MSS,则需要发送
- 如果 SO_SNDBUF 中含有 FIN(表示需要连接关闭)这时将剩余数据发送,再关闭
- 如果 TCP_NODELAY = true,则需要发送
- 已发送的数据都收到 ack 时,则需要发送
- 上述条件不满足,但发生超时(一般为 200ms)则需要发送
- 除上述情况,延迟发送
3.2 半包
- 现象,发送 abcdef,接收 abc def
- 原因
- 应用层:接收方 ByteBuf 小于实际发送数据量
- 滑动窗口:假设接收方的窗口只剩了 128 bytes,发送方的报文大小是 256 bytes,这时放不下了,只能先发送前 128 bytes,等待 ack 后才能发送剩余部分,这就造成了半包
- MSS 限制:当发送的数据超过 MSS 限制后,会将数据切分发送,就会造成半包,MSS 是最大段长度(maximum segment size),它是 MTU 刨去 tcp 头和 ip 头后剩余能够作为数据传输的字节数,链路层对一次能够发送的最大数据有限制,不同的链路设备的 MTU 值也有所不同。以太网的 MTU 是 1500,本地回环地址的 MTU 是 65535 - 本地测试不走网卡。
4.粘包半包解决方案
4.1短连接
既然我们消息的发送是流式发送,没有消息边界。但是我们可以人为为他创造边界,即在每次消息发送之后我都断开连接,下次再发送时再重新建立连接,这样的话就不会出现粘包现象了。
解决粘包的客户端代码
    public static void main(String[] args) {
        for (int i = 0; i < 10; i++) {
            send();
        }
        System.out.println("finish");
    }

    private static void send() {
        NioEventLoopGroup worker = new NioEventLoopGroup();
        try {
            Bootstrap bootstrap = new Bootstrap();
            bootstrap.channel(NioSocketChannel.class);
            bootstrap.group(worker);
            bootstrap.handler(new ChannelInitializer<SocketChannel>() {
                @Override
                protected void initChannel(SocketChannel ch) {
                    ch.pipeline().addLast(new ChannelInboundHandlerAdapter() {
                        // 会在连接 channel 建立成功后,会触发 active 事件
                        @Override
                        public void channelActive(ChannelHandlerContext ctx) {
                            ByteBuf buf = ctx.alloc().buffer(16);
                            buf.writeBytes(new byte[]{0, 1, 2, 3, 4, 5, 6, 7, 8, 9, 10, 11, 12, 13, 14, 15});
                            ctx.writeAndFlush(buf);
                            ctx.channel().close();
                        }
                    });
                }
            });
            ChannelFuture channelFuture = bootstrap.connect("127.0.0.1", 8080).sync();
            channelFuture.channel().closeFuture().sync();
        } catch (InterruptedException e) {
            log.error("client error", e);
        } finally {
            worker.shutdownGracefully();
        }
    }
然后我们看一下结果
当我们采用短连接的方式连接服务器时,数据会被明显的分开,这样粘包问题就得到了非常有效的解决。但是这种方式频繁的建立断开连接本身比较奇葩同时它并没有办法去解决半包问题,假如说我把服务端的接收缓冲区设置为16B,我这边客户端发送改成17B,这样肯定会出现半包,我们来演示一下看看结果。
服务端设置缓冲区代码
serverBootstrap.childOption(ChannelOption.RCVBUF_ALLOCATOR, new AdaptiveRecvByteBufAllocator(16, 16, 16));
运行结果
如图所示短连接并没有解决半包问题。
4.2 定长解码器
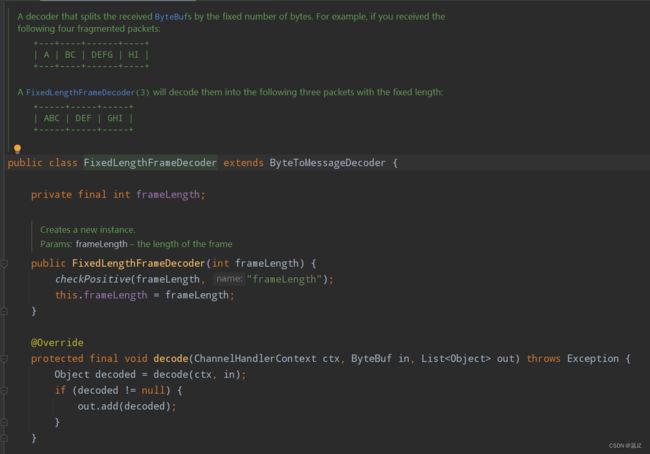
如图所示这就是定长解码器,他会把接收到的数据,定长的分割。然后看看定长处理器怎么解决粘包问题。
客户端
    static final Logger log = LoggerFactory.getLogger(Client1.class);

    public static void main(String[] args) {
        send();
        System.out.println("finish");
    }

    public static byte[] fill10Bytes(char c, int len) {
        byte[] bytes = new byte[10];
        Arrays.fill(bytes, (byte) '_');
        for (int i = 0; i < len; i++) {
            bytes[i] = (byte) c;
        }
        System.out.println(new String(bytes));
        return bytes;
    }

    private static void send() {
        NioEventLoopGroup worker = new NioEventLoopGroup();
        try {
            Bootstrap bootstrap = new Bootstrap();
            bootstrap.channel(NioSocketChannel.class);
            bootstrap.group(worker);
            bootstrap.handler(new ChannelInitializer<SocketChannel>() {
                @Override
                protected void initChannel(SocketChannel ch) {
                    ch.pipeline().addLast(new LoggingHandler(LogLevel.DEBUG));
                    ch.pipeline().addLast(new ChannelInboundHandlerAdapter() {
                        // 会在连接 channel 建立成功后,会触发 active 事件
                        @Override
                        public void channelActive(ChannelHandlerContext ctx) {
                            ByteBuf buf = ctx.alloc().buffer();
                            char c = '0';
                            Random r = new Random();
                            for (int i = 0; i < 10; i++) {
                                byte[] bytes = fill10Bytes(c, r.nextInt(10) + 1);
                                c++;
                                buf.writeBytes(bytes);
                            }
                            ctx.writeAndFlush(buf);
                        }
                    });
                }
            });
            ChannelFuture channelFuture = bootstrap.connect("127.0.0.1", 8080).sync();
            channelFuture.channel().closeFuture().sync();
        } catch (InterruptedException e) {
            log.error("client error", e);
        } finally {
            worker.shutdownGracefully();
        }
    }
假如说我规定每10B是一个有效的数据,所以我客户端都会发送10B的数据,通过fill10Bytes来创建一个定长的10B的数据大小,然后填入1~10随机长度的字符,如果小于10用’_'占位。发送10次。由于我要观察在客户端这块是否发生了粘包,所以我得添加一个LoggingHandler来打印日志。
服务端
    void start() {
        NioEventLoopGroup boss = new NioEventLoopGroup();
        NioEventLoopGroup worker = new NioEventLoopGroup();
        try {
            ServerBootstrap serverBootstrap = new ServerBootstrap();
            serverBootstrap.channel(NioServerSocketChannel.class);
            // 调整系统的接收缓冲区(滑动窗口)
//            serverBootstrap.option(ChannelOption.SO_RCVBUF, 10);
            // 调整 netty 的接收缓冲区(byteBuf)
            serverBootstrap.childOption(ChannelOption.RCVBUF_ALLOCATOR, new AdaptiveRecvByteBufAllocator(16, 16, 16));
            serverBootstrap.group(boss, worker);
            serverBootstrap.childHandler(new ChannelInitializer<SocketChannel>() {
                @Override
                protected void initChannel(SocketChannel ch) throws Exception {
                    ch.pipeline().addLast(new FixedLengthFrameDecoder(10));
                    ch.pipeline().addLast(new LoggingHandler(LogLevel.DEBUG));
                }
            });
            ChannelFuture channelFuture = serverBootstrap.bind(8080).sync();
            channelFuture.channel().closeFuture().sync();
        } catch (InterruptedException e) {
            log.error("server error", e);
        } finally {
            boss.shutdownGracefully();
            worker.shutdownGracefully();
        }
    }

    public static void main(String[] args) {
        new Server2().start();
    }
运行一下看看客户端在发送的过程中已经粘包了。然后我们看看服务端接收的情况如何。
客户端虽然发送来了粘包的数据,但是通过定长解码器服务端正确的接收到了消息。虽然这种方式能正确解决粘包问题,但是我们收到了很多无用的’_'数据实际上也是一种浪费。
4.3 行解码器
我们可以通过节点分隔符来解决粘包半包问题。Netty为我们提供了两种行解码器,如下图所示。
第一种是LinedBasedFrameDecoder,这个就是指当遇到换行符的时候就分割。
第二种就是这个DelimiterBasedFrameDecoder,这个你可以自己指定分隔符。下面我们可以演示一下这个LinedBasedFrameDecoder。
客户端
    static final Logger log = LoggerFactory.getLogger(Client1.class);

    public static void main(String[] args) {
        send();
        System.out.println("finish");
    }

    public static StringBuilder makeString(char c, int len) {
        StringBuilder sb = new StringBuilder(len + 2);
        for (int i = 0; i < len; i++) {
            sb.append(c);
        }
        sb.append("\n");
        return sb;
    }

    private static void send() {
        NioEventLoopGroup worker = new NioEventLoopGroup();
        try {
            Bootstrap bootstrap = new Bootstrap();
            bootstrap.channel(NioSocketChannel.class);
            bootstrap.group(worker);
            bootstrap.handler(new ChannelInitializer<SocketChannel>() {
                @Override
                protected void initChannel(SocketChannel ch) {
                    ch.pipeline().addLast(new LoggingHandler(LogLevel.DEBUG));
                    ch.pipeline().addLast(new ChannelInboundHandlerAdapter() {
                        // 会在连接 channel 建立成功后,会触发 active 事件
                        @Override
                        public void channelActive(ChannelHandlerContext ctx) {
                            ByteBuf buf = ctx.alloc().buffer();
                            char c = '0';
                            Random r = new Random();
                            for (int i = 0; i < 10; i++) {
                                StringBuilder sb = makeString(c, r.nextInt(256) + 1);
                                c++;
                                buf.writeBytes(sb.toString().getBytes());
                            }
                            ctx.writeAndFlush(buf);
                        }
                    });
                }
            });
            ChannelFuture channelFuture = bootstrap.connect("127.0.0.1", 8080).sync();
            channelFuture.channel().closeFuture().sync();
        } catch (InterruptedException e) {
            log.error("client error", e);
        } finally {
            worker.shutdownGracefully();
        }
    }
makeString方法就是将传进来的字符转化为字符串,然后再返回之前向字符串末尾添加"\n"。然后我们在handler中随机生成1~256长度的字符串发送给服务端。
服务端
    void start() {
        NioEventLoopGroup boss = new NioEventLoopGroup();
        NioEventLoopGroup worker = new NioEventLoopGroup();
        try {
            ServerBootstrap serverBootstrap = new ServerBootstrap();
            serverBootstrap.channel(NioServerSocketChannel.class);
            serverBootstrap.childOption(ChannelOption.RCVBUF_ALLOCATOR, new AdaptiveRecvByteBufAllocator(16, 16, 16));
            serverBootstrap.group(boss, worker);
            serverBootstrap.childHandler(new ChannelInitializer<SocketChannel>() {
                @Override
                protected void initChannel(SocketChannel ch) throws Exception {
                    ch.pipeline().addLast(new LineBasedFrameDecoder(1024));
                    ch.pipeline().addLast(new LoggingHandler(LogLevel.DEBUG));
                }
            });
            ChannelFuture channelFuture = serverBootstrap.bind(8080).sync();
            channelFuture.channel().closeFuture().sync();
        } catch (InterruptedException e) {
            log.error("server error", e);
        } finally {
            boss.shutdownGracefully();
            worker.shutdownGracefully();
        }
    }

    public static void main(String[] args) {
        new Server3().start();
    }
在handler当中我们添加LinedBasedFrameDecoder,然后设置最大长度为1024,如果超过1024个长度还没有遇到换行符的话,就说明你这个数据传过来有问题,会抛一个异常。
4.4 LengthFieldBasedFrameDecoder
    public LengthFieldBasedFrameDecoder(
            int maxFrameLength,
            int lengthFieldOffset, int lengthFieldLength,
            int lengthAdjustment, int initialBytesToStrip) {
        this(
                maxFrameLength,
                lengthFieldOffset, lengthFieldLength, lengthAdjustment,
                initialBytesToStrip, true);
    }
这个解码器一共有5个参数我们通过一个例子来看看这5个参数都是啥意思。
- maxFrameLength:最大帧长,如果超过了这个最大帧长报错。
- lengthFieldOffset:长度偏移量,这个是数据发送的时候从第几个字节开始是数据标识长度的字段。
- lengthFieldLength:数据中标识真正数据长度的字节数。
- lengthAdjustment:数据的length部分和真正的数据部分之间的数据长度。
- initialBytesToStrip:对接收的数据切掉最前面的字节数。
由于本人不善言辞,性格内向,表达能力欠缺,所以上述参数的描述可能不太准确所以我们接下来通过几个例子来更加深刻的理解这些参数。下面例子只针对最后四个参数,第一个参数嘴再笨也能讲明白了。
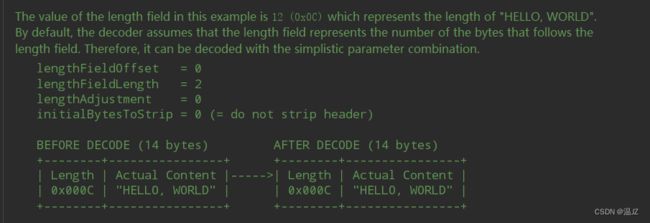
如图所示lengthFieldLength为2,说明在解码之前接收到的数据中由两部分组成第一部分是Length代表了真实数据的长度,第二部分就是真实数据,我们这个例子当中真实数据一共是12bytes,所以Length也是0x000C,也是12。接收到之后他一看真实数据是12bytes,所以他就会接收后12bytes的真实数据。
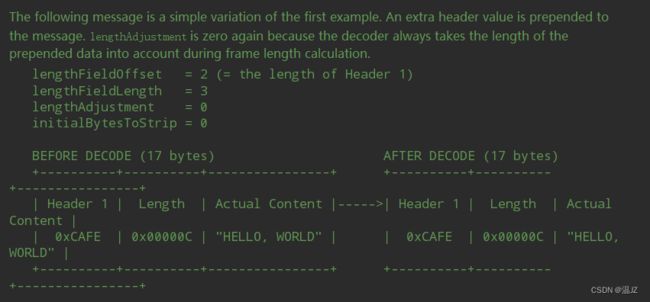
lengthFieldOffset为2,也就是说从数据开始的地方向后移动两个字节才能到Length部分,lengthFieldLength为3说明Length为2字节0x00000C。
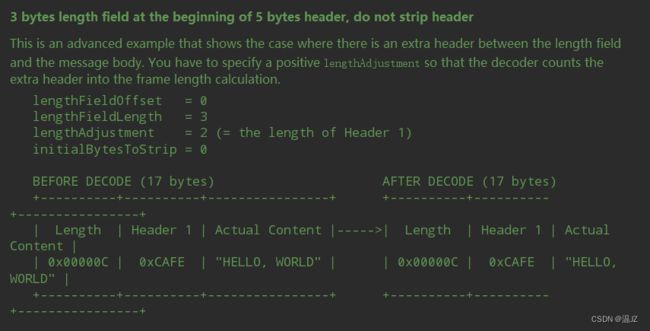
lengthAdjustment就是以长度字段为基准还有几个字节是真实数据。如图所示,该参数为2,然后Head1就是夹在Length和Actual之间的,正好是两个字节。
如图所示,0xCA1字节在1字节之后是Length部分所以lengthFieldOffset为1,然后Length为0x000C是2字节所以lengthFieldLength为2,0xFE在Length和Actual之间1字节,所以lengthAdjustment为1。由于解码之后前面3字节的数据都被截取掉了所以initialBytesToStrip为3字节,因此这个initalBytesToStrip是解码之后要从前面切掉的字节数。
4.5 LengthFieldBasedFrameDecoder演示
这次我们使用EmbeddedChannel来进行演示好处就是不用写服务端和客户端了。
    public static void main(String[] args) {
        EmbeddedChannel channel = new EmbeddedChannel(
                new LengthFieldBasedFrameDecoder(
                        1024, 0, 4, 0, 4),
                new LoggingHandler(LogLevel.DEBUG)
        );

        //  4 个字节的内容长度, 实际内容
        ByteBuf buffer = ByteBufAllocator.DEFAULT.buffer();
        send(buffer, "Hello, world");
        send(buffer, "Hi!");
        channel.writeInbound(buffer);
    }

    private static void send(ByteBuf buffer, String content) {
        byte[] bytes = content.getBytes(); // 实际内容
        int length = bytes.length; // 实际内容长度
        buffer.writeInt(length);
        buffer.writeBytes(bytes);
    }
如图所示我们客户端也就是send这个函数,负责准备发送数据,将要发送的数据写入buffer当中,然后通过channel.writeInbound(buffer)。发送给服务端。服务端handler就是LengthFieldBasedFrameDecoder和LoggingHandler,然后LengthFieldBasedFrameDecoder的参数分别是最大数据长度1024超过就抛异常,由于我的buffer上来就先写长度所以长度之前没有东西,所以lengthFieldOffset为0,然后Length为int型4字节,所以lengthFieldLength为4,length与实际内容之间不需要填充字节,所以lengthAdjustment为0,然后就是实际内容了,由于我们要对解码后数据的前4字节的长度单位做切割,所以initialBytesToStrip为4。
最后结果如图所示不多不少,正正好好。


