Vue路由高级用法及案例
目录
- Vue中路由跳转的方式
-
- router-link
- this.$router
- this.$route
- 路由重定向
- 动态路由
- 嵌套路由
- 路由导航的两种方式
Vue中路由跳转的方式
router-link
是实现跳转最简单的方法,又叫做标签式导航。
<router-link to='需要跳转到的页面的路径'>文本<router-link>
浏览器在解析时,将它解析成一个类似于 的标签。
(1)不带参数
<router-link :to="{name:'home'}"><router-link>
<router-link :to="{path:'/home'}"> //name,path都行, 建议用name
注意:router-link中链接如果是’/‘开始就是从根路由开始,如果开始不带’/’,则从当前路由开始。
(2)带参数
方式一:
<router-link :to="{name:'home',params:{id:1}}"><router-link>
- 使用params传参数,类似于使用post方式向后台发起请求。
- 路由配置 path: “/home/:id” 或者 path: “/home:id”
- html取参:$route.params.id
- script取参:this.$route.params.id
方式二:
<router-link :to="{name:'home', query: {id:1}}">
- 使用query传参数,类似于get请求向后台发起请求
- html取参:$route.query.id
- script取参:this.$route.query.id
this.$router
表示全局路由器对象,又叫做编程式导航。
项目中通过router路由参数注入路由之后,在任何一个页面都可以通过此属性获取到路由器对象,并调用其push()、go()等方法。
(1)this.$router.push()
在函数里面调用,又称为函数式路由。
- 不带参数
this.$router.push('/home')
this.$router.push({name:'home'})
this.$router.push({path:'/home'})
- query传参(get请求)
this.$router.push({name:'home',query: {id:'1'}})
this.$router.push({path:'/home',query: {id:'1'}})
html 取参 $route.query.id
script 取参 this.$route.query.id
- params传参(post请求)
this.$router.push({name:'home',params: {id:'1'}}) // 只能用 name
路由配置 path: “/home/:id” 或者 path: “/home:id”
html 取参 $route.params.id
script 取参 this.$route.params.id
- query和params区别
query类似于get请求,跳转之后页面url后面会拼接参数,类似?id=1,非重要性的可以这样传,如果是密码之类的还是用params。刷新页面id还在。
params类似于post,跳转后页面url后面不会拼接参数,但是刷新页面id会消失。
(2)this.$router.replace() 用法同上push
(3)this.$router.go(n)
向前或向后跳转n个页面。n可以为正整数或负整数。
(4)三者区别
-
this.$router.push:跳转到指定url路径,并向history栈中添加一个记录,点击后退会返回到上一个页面 -
this.$router.replace:跳转到指定url路径,但是history栈中不会有记录,点击返回会跳转到上上个页面 (就是直接替换了当前页面) -
this.$router.go(n):向前或者向后跳转n个页面,n可为正整数或负整数
this.$route
表示当前正在用于跳转的路由对象,可以访问其name、path、query、params等属性。
例子:组件之间的参数传递
(1)请求组件ResoureVue.vue
<template>
  <button @click="change">验证路由传参button>
template>
<script>
export default {
  name: "ResoureVue",
  data(){
    return {
      id:11
    }
  },
  methods:{
    change(){
      this.$router.push({
        path:'/select',
        query:{
          id:this.id
        }
      })
    }
  }
}
script>
(2)接收请求组件select.vue
<template>
  <select>
    <option value="1" selected="selected">草莓option>
    <option value="2">柠檬option>
  select>
template>

<script>
export default {
  name: "Select",
  data(){
    return {
      id:''
    }
  },
  created() {
    this.id=this.$route.query.id,
        console.log(this.id)
  }
}
script>
(3)router文件夹创建路由文件index.js
import Vue from "vue";
import VueRouter from 'vue-router';
import ResourceVue from "@/components/ResoureVue";
import Select from "@/components/Select";

Vue.use(VueRouter)

const router = new VueRouter({    //创建路由器
    routes:[      //路由表
        {
            path:'/res',
            name:'ResourceVue',
            component:ResourceVue
        },
        {
            path:'/select',
            name:'select',
            component:Select
        },
        {
            path:'/',    //地址后面是'/'时,显示ResourceVue内容
            name:'ResourceVue',
            component:ResourceVue
        },
        {
            path:'',   //地址后面是''时,显示ResourceVue内容
            name:'ResourceVue',
            component:ResourceVue
        }
    ],
    mode:'history'
})
export default router;
(4)入口文件导入路由器
import Vue from 'vue'
import App from './App.vue'
import router from "./router/index"   //导入路由文件

Vue.config.productionTip = false
new Vue({
  render: h => h(App),
  router
}).$mount('#app')
(5)App.js文件中配置导航
<template>
  <div id="app">
    <router-link to="/res">发送请求组件router-link>
    <br><br>
    <router-link to="/select">接收请求组件router-link>
    <br><br>
    <router-view>router-view>
  div>
template>

<script>
export default {
  name: 'App',
  components: {
  }
}
script>
路由重定向
路由重定向:指用户在访问地址A的时候,强制用户跳转到地址C,从而展示特定的组件页面。
通过路由规则的redirect属性,指定一个新的路由地址,可以很方便的设置路由的重定向。
如:上面的例子中可以写成:
const router = new VueRouter({    //创建路由器
    routes:[      //路由表
        {
            path:'/res',  //路径
            name:'ResourceVue',
            component:ResourceVue    //组件
        },
        {
            path:'/select',
            name:'select',
            component:Select
        },
        {     //配置重定向
            path:'',
            redirect:'/res'   //路由地址
            // redirect:'res'
        },
        {   //重新写个路径为空的路由
            path:'',
            name:'ResourceVue',
            component:ResourceVue
        },
    ],
    mode:'history'
})
动态路由
动态路由是指:把Hash地址中可变的部分定义为参数项,从而提高路由规则的复用性。
方法:
{
	path:'/page/:name',
	component:Page
}
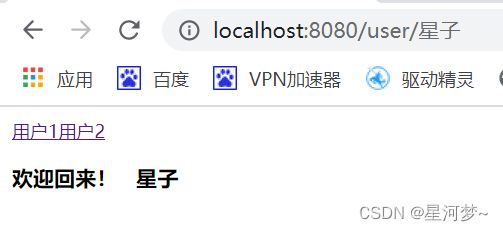
例子:实现首页欢迎用户回来显示。
User组件:

路由文件user.js:
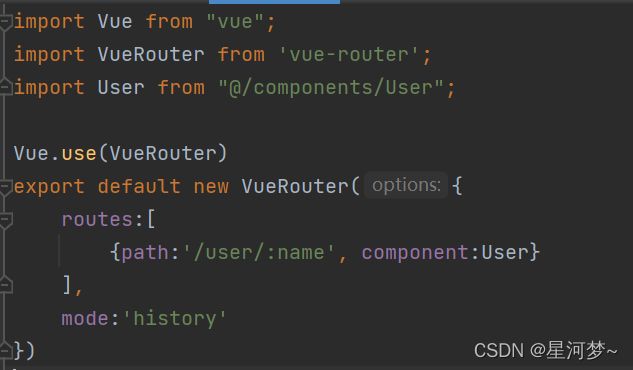
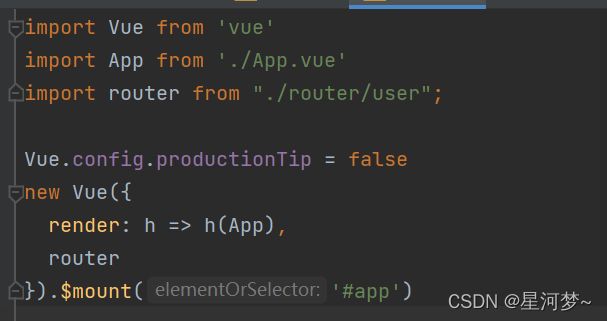
入口文件导入路由器:
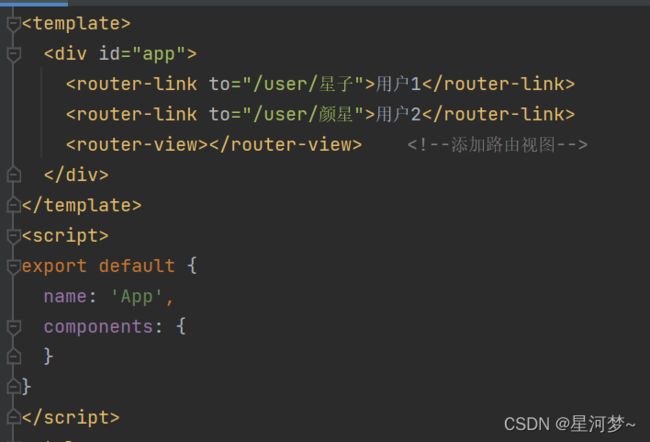
App.vue配置导航:
效果:
嵌套路由
通过路由实现组件的嵌套展示,叫做嵌套路由。
官方文档中给我们提供了一个children属性,这个属性是一个数组类型,里面实际放着一组路由。
这个时候父子关系结构就出来了——children属性里面的是路由相对来说是children属性外部路由的子路由。
const routes = [
    {
        path: '/page1',
        component: page1,
        children:[
            {
                path: 'phone',
                component: phone,
            },
            {
                path :'computer',
                component: computer
            }
        ]
    },
    {
        path: '/page2',
        component: page2
    },
    //页面重定向
    {
        path: '',
        redirect: 'page1'
    }
]
路由导航的两种方式
(1)标签导航
//跳转到名为user路由,并传递参数userId
<router-link :to="{ name: 'user', params: { userId: 123 }}">Userrouter-link>
(2)编程式导航
this.$router.push({ name: 'user', params: { userId: 123 }})