混淆矩阵画图
2019/07/17
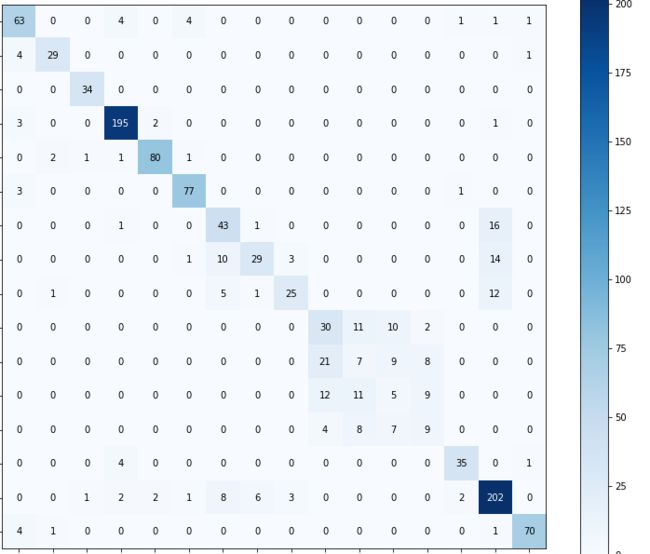
以往都是直接使用了混淆矩阵直接查看数据,没有具体看过到底是什么样子,今天想起了kaggle上他们使用图形的方式来展现这部分内容。
这部分的代码是直接使用了官网这部分的示例,将原来的代码稍加修改就可以了。
但是因为画出来的图非常小,所以就直接在subplot中添加了figsize=(12,10)的参数。
一开始的时候,添加的是(10,12),导致的结果就是颜色条非常高,很不协调,之后改成了上面的参数,就有了上图。
具体的关于颜色条的编程可以看文献[2],目前还没有具体看,不过我感觉应该是非常详细的对这部分进行控制的。
2019/07/17
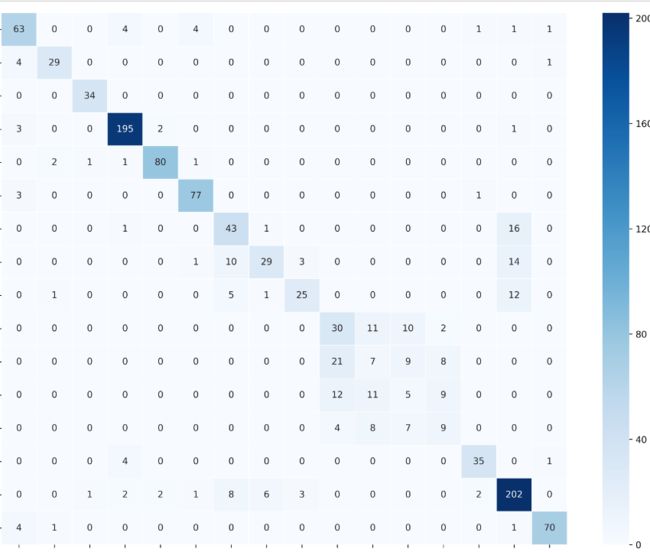
想起来了之前用过sns对这部分绘画,sns.heatmap(cm,annot=True,cmap="BuPu",fmt="d")其中cm就是函数直接输出的混淆矩阵。但是因为没有标签,全都是数字,看到其起一个参数可以为df,然后名字会自动采用index/columns,所以把这个东西转化为df。df_cm = pd.DataFrame(cm, index = enc.classes_, columns =enc.classes_),enc为之前进行编码得到的一个编码器。
然后横轴标签默认是竖直的字符串,再使用fig.autofmt_xdate()进行自动优化。
这样基本上一个图就算完成了。
对于这部分的内容的话,可以参考流量里面的feature Explore,里面包括官方和自己的两个实现都有,后面自己的实现也调整了DPI。
主要参考了[3][4][5]
Plot a Confusion Matrix
混淆矩阵的图片
import numpy as np


def plot_confusion_matrix(cm,
                          target_names,
                          title='Confusion matrix',
                          cmap=None,
                          normalize=True):
    """
    given a sklearn confusion matrix (cm), make a nice plot

    Arguments
    ---------
    cm:           confusion matrix from sklearn.metrics.confusion_matrix

    target_names: given classification classes such as [0, 1, 2]
                  the class names, for example: ['high', 'medium', 'low']

    title:        the text to display at the top of the matrix

    cmap:         the gradient of the values displayed from matplotlib.pyplot.cm
                  see http://matplotlib.org/examples/color/colormaps_reference.html
                  plt.get_cmap('jet') or plt.cm.Blues

    normalize:    If False, plot the raw numbers
                  If True, plot the proportions

    Usage
    -----
    plot_confusion_matrix(cm           = cm,                  # confusion matrix created by
                                                              # sklearn.metrics.confusion_matrix
                          normalize    = True,                # show proportions
                          target_names = y_labels_vals,       # list of names of the classes
                          title        = best_estimator_name) # title of graph

    Citiation
    ---------
    http://scikit-learn.org/stable/auto_examples/model_selection/plot_confusion_matrix.html

    """
    import matplotlib.pyplot as plt
    import numpy as np
    import itertools

    accuracy = np.trace(cm) / float(np.sum(cm))
    misclass = 1 - accuracy

    if cmap is None:
        cmap = plt.get_cmap('Blues')

    plt.figure(figsize=(8, 6))
    plt.imshow(cm, interpolation='nearest', cmap=cmap)
    plt.title(title)
    plt.colorbar()

    if target_names is not None:
        tick_marks = np.arange(len(target_names))
        plt.xticks(tick_marks, target_names, rotation=45)
        plt.yticks(tick_marks, target_names)

    if normalize:
        cm = cm.astype('float') / cm.sum(axis=1)[:, np.newaxis]


    thresh = cm.max() / 1.5 if normalize else cm.max() / 2
    for i, j in itertools.product(range(cm.shape[0]), range(cm.shape[1])):
        if normalize:
            plt.text(j, i, "{:0.4f}".format(cm[i, j]),
                     horizontalalignment="center",
                     color="white" if cm[i, j] > thresh else "black")
        else:
            plt.text(j, i, "{:,}".format(cm[i, j]),
                     horizontalalignment="center",
                     color="white" if cm[i, j] > thresh else "black")


    plt.tight_layout()
    plt.ylabel('True label')
    plt.xlabel('Predicted label\naccuracy={:0.4f}; misclass={:0.4f}'.format(accuracy, misclass))
    plt.show()
参考文献
[1]Confusion matrix
[2]解决python画图中colorbar设置刻度和标签字体大小
[3]seaborn.heatmap
[4]混淆矩阵的绘制(Plot a confusion matrix)(看它的参考资料)
[5]how-can-i-plot-a-confusion-matrix

