L4W2RN作业 残差网络
残差网络
欢迎来到本周的第二项作业!你将学习如何使用残差网络(ResNets)构建非常深的卷积网络。理论上讲,更深的网络可以表现更复杂的特征。但实际上,它们很难训练。He et al.引入的残差网络使你可以训练比以前实际可行的深层网络。
在此作业中,你将:
- 实现ResNets的基本构建块。
- 将这些模块放在一起,以实现和训练用于图像分类的最新神经网络。
这项作业将使用Keras完成。
在跳入问题之前,让我们运行下面的单元格以加载所需的包。
In [4]:
cd /home/kesci/input/deeplearning86820
/home/kesci/input/deeplearning86820
In [5]:
import numpy as np
import tensorflow as tf
from keras import layers
from keras.layers import Input, Add, Dense, Activation, ZeroPadding2D, BatchNormalization, Flatten, Conv2D, AveragePooling2D, MaxPooling2D, GlobalMaxPooling2D
from keras.models import Model, load_model
from keras.utils import image_utils as image
from keras.utils import layer_utils
from keras.utils.data_utils import get_file
from keras.applications.imagenet_utils import preprocess_input
import pydot
from IPython.display import SVG
from keras.utils.vis_utils import model_to_dot
from keras.utils import plot_model
from resnets_utils import *
from keras.initializers import glorot_uniform
import scipy.misc
from matplotlib.pyplot import imshow
%matplotlib inline

import keras.backend as K
K.set_image_data_format('channels_last')
K.set_learning_phase(1)
1 深层神经网络带来的问题
上周,你构建了第一个卷积神经网络。近年来,神经网络变得越来越深,网络已经从最初的几层(例如AlexNet)扩展到了一百多层。
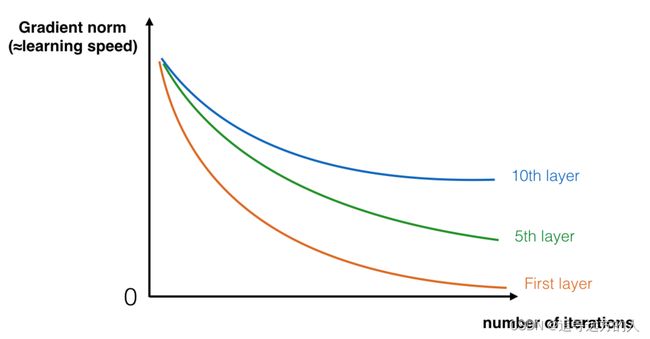
深层网络的主要好处是可以表示非常复杂的特征。它还可以学习许多不同抽象级别的特征,从边缘(较低层)到非常复杂的特征(较深层)。但是,使用更深的网络并不总是好的。训练它们的一个巨大障碍是梯度的消失:非常深的网络通常具有迅速变为零的梯度信号,因此使梯度下降的速度令人难以忍受。更具体地说,在梯度下降过程中,当你从最后一层反向传播回第一层时,你需要在每一步上乘以权重矩阵,因此,梯度可以快速指数下降至零(或者在极少数情况下呈指数增长并“爆炸”为非常大的值)。
因此,在训练过程中,随着训练的进行,你可能会看到较早层的梯度的大小(或范数)非常快地减小到零:
图1 :梯度消失
随着训练,网络学习的速度开始迅速下降
你现在将通过构建残差网络来解决此问题!
2 建立残差网络
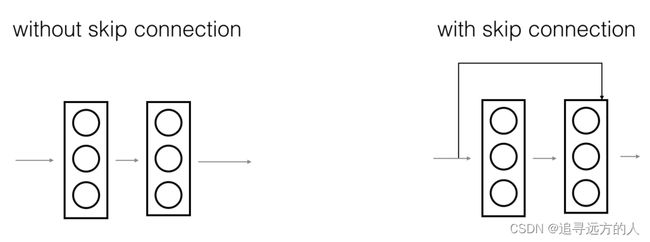
在ResNets中,“shortcut” 或者 "skip connection"允许将梯度直接反向传播到较早的层:
图2:显示skip connection的残差块
左图显示了通过网络的“主要路径”。右图为主路径添加了shortcut。通过将这些ResNet块彼此堆叠,可以形成一个非常深的网络。
我们在教程中还看到,使用带有shortcut的ResNet块可以非常容易学习标识功能。这意味着你可以堆叠在其他ResNet块上,而几乎不会损害训练集性能。(还有一些证据表明,学习标识功能甚至比skip connections有助于解决梯度消失问题–也说明了ResNets的出色性能。)
ResNet中主要使用两种类型的块,这主要取决于输入/输出尺寸是相同还是不同。你将要在作业中实现两者。
2.1 The identity block
The identity block是ResNets中使用的标准块,它对应于输入激活(例如 a [ l ] a^{[l]} a[l])与输出激活(例如 a [ l + 2 ] a^{[l+2]} a[l+2])。为了充实ResNet标识块中发生的不同步骤,下面是显示各个步骤的替代图:
图3 :标识块 skips over2层
上部路径是“shortcut path”。下部路径是“main path”。在此图中,我们还明确了每一层中的CONV2D和ReLU步骤。为了加快训练速度,我们还添加了BatchNorm步骤。不必担心实现起来很复杂-你会看到BatchNorm只需Keras中的一行代码!
在本练习中,你实际上将实现此识别块的功能稍强的版本,其中跳过连接将"skips over"3个隐藏层而不是2个。看起来像这样:
图4 :标识块 skips over3层。
下面是各个步骤:
主路径的第一部分:
- 第一个CONV2D具有形状为(1,1)和步幅为(1,1)的 F 1 F_1 F1个滤波器。其填充为“valid”,其名称应为
conv_name_base + '2a'。使用0作为随机初始化的种子。 - 第一个BatchNorm标准化通道轴。它的名字应该是
bn_name_base + '2a'。 - 然后应用ReLU激活函数。
主路径的第二部分:
- 第二个CONV2D具有形状为(f,f) 的步幅为(1,1)的 F 2 F_2 F2个滤波器。其填充为“same”,其名称应为
conv_name_base + '2b'。使用0作为随机初始化的种子。 - 第二个BatchNorm标准化通道轴。它的名字应该是
bn_name_base + '2b'。 - 然后应用ReLU激活函数。
主路径的第三部分:
- 第三个CONV2D具有形状为(1,1)和步幅为(1,1)的 F 3 F_3 F3个滤波器。其填充为“valid”,其名称应为
conv_name_base + '2c'。使用0作为随机初始化的种子。 - 第三个BatchNorm标准化通道轴。它的名字应该是
bn_name_base + '2c'。请注意,此组件中没有ReLU激活函数。
最后一步:
- 将shortcut和输入添加在一起。
- 然后应用ReLU激活函数。
练习:实现ResNet的identity block。我们已经实现了主路径的第一部分,请仔细阅读此内容,以确保你知道它在做什么。你应该执行其余的工作。
- 要实现Conv2D步骤:See reference
- 要实现BatchNorm: See reference(axis:整数,需要标准化的轴(通常是通道轴) )
- 对于激活,请使用:
Activation('relu')(X) - 要添加shortcut传递的值:See reference
In [6]:
# GRADED FUNCTION: identity_block

def identity_block(X, f, filters, stage, block):
    """
    Implementation of the identity block as defined in Figure 4

    Arguments:
    X -- input tensor of shape (m, n_H_prev, n_W_prev, n_C_prev)
    f -- integer, specifying the shape of the middle CONV's window for the main path
    filters -- python list of integers, defining the number of filters in the CONV layers of the main path
    stage -- integer, used to name the layers, depending on their position in the network
    block -- string/character, used to name the layers, depending on their position in the network

    Returns:
    X -- output of the identity block, tensor of shape (n_H, n_W, n_C)
    """

    # defining name basis
    conv_name_base = 'res' + str(stage) + block + '_branch'
    bn_name_base = 'bn' + str(stage) + block + '_branch'

    # Retrieve Filters
    F1, F2, F3 = filters

    # Save the input value. You'll need this later to add back to the main path.
    X_shortcut = X

    # First component of main path
    X = Conv2D(filters = F1, kernel_size = (1, 1), strides = (1,1), padding = 'valid', name = conv_name_base + '2a', kernel_initializer = glorot_uniform(seed=0))(X)
    X = BatchNormalization(axis = 3, name = bn_name_base + '2a')(X)
    X = Activation('relu')(X)

    ### START CODE HERE ###

    # Second component of main path (≈3 lines)
    X = Conv2D(filters = F2, kernel_size = (f, f), strides = (1,1), padding = 'same', name = conv_name_base + '2b', kernel_initializer = glorot_uniform(seed=0))(X)
    X = BatchNormalization(axis=3, name = bn_name_base + '2b')(X)
    X = Activation('relu')(X)

    # Third component of main path (≈2 lines)
    X = Conv2D(filters = F3, kernel_size = (1, 1), strides = (1,1), padding = 'valid', name = conv_name_base + '2c', kernel_initializer = glorot_uniform(seed=0))(X)
    X = BatchNormalization(axis=3, name = bn_name_base + '2c')(X)

    # Final step: Add shortcut value to main path, and pass it through a RELU activation (≈2 lines)
    X = layers.add([X, X_shortcut])
    X = Activation('relu')(X)

    ### END CODE HERE ###

    return X
In [7]:
tf.reset_default_graph()

with tf.Session() as test:
    np.random.seed(1)
    A_prev = tf.placeholder("float", [3, 4, 4, 6])
    X = np.random.randn(3, 4, 4, 6)
    A = identity_block(A_prev, f = 2, filters = [2, 4, 6], stage = 1, block = 'a')
    test.run(tf.global_variables_initializer())
    out = test.run([A], feed_dict={A_prev: X, K.learning_phase(): 0})
    print("out = " + str(out[0][1][1][0]))
WARNING:tensorflow:From /opt/conda/lib/python3.6/site-packages/tensorflow/python/framework/op_def_library.py:263: colocate_with (from tensorflow.python.framework.ops) is deprecated and will be removed in a future version.
Instructions for updating:
Colocations handled automatically by placer.
out = [0.19716819 0.         1.3561226  2.1713073  0.         1.3324987 ]
预期输出:
out = [0.19716819 0. 1.3561226 2.1713073 0. 1.3324987 ]
2.2 The convolutional block
你已经实现了ResNet中的识别块。接下来,ResNet“卷积块”是另一种类型的块。当输入和输出尺寸不匹配时,可以使用这种类型的块。与标识块的区别在于,shortcut路径中有一个CONV2D层:
图4 :卷积块
shortcut路径中的CONV2D层用于将输入x调整为另一个维度的大小,以便维度与最终需要添加到shortcut主路径所用的维度匹配。(这与讲座中讨论的矩阵 W s W_s Ws起到类似的作用。)例如,要将激活尺寸的高度和宽度减小2倍,可以使用步幅为2的1x1卷积。CONV2D层位于shortcut路径不使用任何非线性激活函数。它的主要作用是仅应用(学习的)线性函数来减小输入的维度,以使维度与之后的步骤匹配。
卷积块的细节如下:
主路径的第一部分:
- 第一个CONV2D具有形状为(1,1)和步幅为(s,s)的 F 1 F_1 F1个滤波器。其填充为"valid",其名称应为
conv_name_base + '2a'。 - 第一个BatchNorm标准化通道轴。其名字是
bn_name_base + '2a'。 - 然后应用ReLU激活函数。
主路径的第二部分:
- 第二个CONV2D具有(f,f)的 F 2 F_2 F2滤波器和(1,1)的步幅。其填充为"same",并且名称应为
conv_name_base + '2b'。 - 第二个BatchNorm标准化通道轴。它的名字应该是
bn_name_base + '2b'。 - 然后应用ReLU激活函数。
主路径的第三部分:
- 第三个CONV2D的 F 3 F_3 F3滤波器为(1,1),步幅为(1,1)。其填充为"valid",其名称应为
conv_name_base + '2c'。 - 第三个BatchNorm标准化通道轴。它的名字应该是
bn_name_base + '2c'。请注意,此组件中没有ReLU激活函数。
Shortcut path:
- CONV2D具有形状为(1,1)和步幅为(s,s)的 F 3 F_3 F3个滤波器。其填充为"valid",其名称应为
conv_name_base + '1'。 - BatchNorm标准化通道轴。它的名字应该是
bn_name_base + '1'。
最后一步:
- 将Shortcut路径和主路径添加在一起。
- 然后应用ReLU激活函数。
练习:实现卷积模块。我们已经实现了主路径的第一部分;你应该执行其余的工作。和之前一样,使用0作为随机初始化的种子,以确保与评分器的一致性。
- Conv Hint
- BatchNorm Hint (axis:整数,需要标准化的轴(通常是特征轴))
- 激活函数请使用:
Activation('relu')(X) - Addition Hint
In [8]:
# GRADED FUNCTION: convolutional_block

def convolutional_block(X, f, filters, stage, block, s = 2):
    """
    Implementation of the convolutional block as defined in Figure 4

    Arguments:
    X -- input tensor of shape (m, n_H_prev, n_W_prev, n_C_prev)
    f -- integer, specifying the shape of the middle CONV's window for the main path
    filters -- python list of integers, defining the number of filters in the CONV layers of the main path
    stage -- integer, used to name the layers, depending on their position in the network
    block -- string/character, used to name the layers, depending on their position in the network
    s -- Integer, specifying the stride to be used

    Returns:
    X -- output of the convolutional block, tensor of shape (n_H, n_W, n_C)
    """

    # defining name basis
    conv_name_base = 'res' + str(stage) + block + '_branch'
    bn_name_base = 'bn' + str(stage) + block + '_branch'

    # Retrieve Filters
    F1, F2, F3 = filters

    # Save the input value
    X_shortcut = X


    ##### MAIN PATH #####
    # First component of main path
    X = Conv2D(F1, (1, 1), strides = (s,s), name = conv_name_base + '2a', padding='valid', kernel_initializer = glorot_uniform(seed=0))(X)
    X = BatchNormalization(axis = 3, name = bn_name_base + '2a')(X)
    X = Activation('relu')(X)

    ### START CODE HERE ###

    # Second component of main path (≈3 lines)
    X = Conv2D(F2, (f, f), strides = (1, 1), name = conv_name_base + '2b',padding='same', kernel_initializer = glorot_uniform(seed=0))(X)
    X = BatchNormalization(axis = 3, name = bn_name_base + '2b')(X)
    X = Activation('relu')(X)

    # Third component of main path (≈2 lines)
    X = Conv2D(F3, (1, 1), strides = (1, 1), name = conv_name_base + '2c',padding='valid', kernel_initializer = glorot_uniform(seed=0))(X)
    X = BatchNormalization(axis = 3, name = bn_name_base + '2c')(X)

    ##### SHORTCUT PATH #### (≈2 lines)
    X_shortcut = Conv2D(F3, (1, 1), strides = (s, s), name = conv_name_base + '1',padding='valid', kernel_initializer = glorot_uniform(seed=0))(X_shortcut)
    X_shortcut = BatchNormalization(axis = 3, name = bn_name_base + '1')(X_shortcut)

    # Final step: Add shortcut value to main path, and pass it through a RELU activation (≈2 lines)
    X = layers.add([X, X_shortcut])
    X = Activation('relu')(X)

    ### END CODE HERE ###

    return X
In [9]:
tf.reset_default_graph()

with tf.Session() as test:
    np.random.seed(1)
    A_prev = tf.placeholder("float", [3, 4, 4, 6])
    X = np.random.randn(3, 4, 4, 6)
    A = convolutional_block(A_prev, f = 2, filters = [2, 4, 6], stage = 1, block = 'a')
    test.run(tf.global_variables_initializer())
    out = test.run([A], feed_dict={A_prev: X, K.learning_phase(): 0})
    print("out = " + str(out[0][1][1][0]))
out = [0.09018463 1.2348979  0.46822023 0.03671762 0.         0.65516603]
预期输出:
out = [0.09018463 1.2348979 0.46822023 0.03671762 0. 0.65516603]
3 建立你的第一个ResNet模型(50层)
现在,你具有构建非常深的ResNet的必要块。下图详细描述了此神经网络的体系结构。图中的“ID BLOCK”代表“识别块”,“ID BLOCK x3”表示你应该将3个识别块堆叠在一起。
图5 :ResNet50 模型
此ResNet-50模型的详细结构是:
- 零填充填充(3,3)的输入
- 阶段1:
- 2D卷积具有64个形状为(7,7)的滤波器,并使用(2,2)步幅,名称是“conv1”。
- BatchNorm应用于输入的通道轴。
- MaxPooling使用(3,3)窗口和(2,2)步幅。 - 阶段2:
- 卷积块使用三组大小为[64,64,256]的滤波器,“f”为3,“s”为1,块为“a”。
- 2个标识块使用三组大小为[64,64,256]的滤波器,“f”为3,块为“b”和“c”。 - 阶段3:
- 卷积块使用三组大小为[128,128,512]的滤波器,“f”为3,“s”为2,块为“a”。
- 3个标识块使用三组大小为[128,128,512]的滤波器,“f”为3,块为“b”,“c”和“d”。 - 阶段4:
- 卷积块使用三组大小为[256、256、1024]的滤波器,“f”为3,“s”为2,块为“a”。
- 5个标识块使用三组大小为[256、256、1024]的滤波器,“f”为3,块为“b”,“c”,“d”,“e”和“f”。 - 阶段5:
- 卷积块使用三组大小为[512、512、2048]的滤波器,“f”为3,“s”为2,块为“a”。
- 2个标识块使用三组大小为[256、256、2048]的滤波器,“f”为3,块为“b”和“c”。 - 2D平均池使用形状为(2,2)的窗口,其名称为“avg_pool”。
- Flatten层没有任何超参数或名称。
- 全连接(密集)层使用softmax激活将其输入减少为类数。名字是
'fc' + str(classes)。
练习:使用上图中的描述实现50层的ResNet。我们已经执行了第一阶段和第二阶段。请执行其余的步骤。(实现阶段3-5的语法应与阶段2的语法相似)请确保遵循上面文本中的命名。
你需要使用以下函数:
- Average pooling see reference
这是我们在以下代码中使用的其他函数:
- Conv2D: See reference
- BatchNorm: See reference (axis: Integer, the axis that should be normalized (typically the features axis))
- Zero padding: See reference
- Max pooling: See reference
- Fully conected layer: See reference
- Addition: See reference
In [10]:
# GRADED FUNCTION: ResNet50

def ResNet50(input_shape = (64, 64, 3), classes = 6):
    """
    Implementation of the popular ResNet50 the following architecture:
    CONV2D -> BATCHNORM -> RELU -> MAXPOOL -> CONVBLOCK -> IDBLOCK*2 -> CONVBLOCK -> IDBLOCK*3
    -> CONVBLOCK -> IDBLOCK*5 -> CONVBLOCK -> IDBLOCK*2 -> AVGPOOL -> TOPLAYER

    Arguments:
    input_shape -- shape of the images of the dataset
    classes -- integer, number of classes

    Returns:
    model -- a Model() instance in Keras
    """

    # Define the input as a tensor with shape input_shape
    X_input = Input(input_shape)


    # Zero-Padding
    X = ZeroPadding2D((3, 3))(X_input)

    # Stage 1
    X = Conv2D(64, (7, 7), strides = (2, 2), name = 'conv1', kernel_initializer = glorot_uniform(seed=0))(X)
    X = BatchNormalization(axis = 3, name = 'bn_conv1')(X)
    X = Activation('relu')(X)
    X = MaxPooling2D((3, 3), strides=(2, 2))(X)

    # Stage 2
    X = convolutional_block(X, f = 3, filters = [64, 64, 256], stage = 2, block='a', s = 1)
    X = identity_block(X, 3, [64, 64, 256], stage=2, block='b')
    X = identity_block(X, 3, [64, 64, 256], stage=2, block='c')

    ### START CODE HERE ###

    # Stage 3 (≈4 lines)
    # The convolutional block uses three set of filters of size [128,128,512], "f" is 3, "s" is 2 and the block is "a".
    # The 3 identity blocks use three set of filters of size [128,128,512], "f" is 3 and the blocks are "b", "c" and "d".
    X = convolutional_block(X, f = 3, filters=[128,128,512], stage = 3, block='a', s = 2)
    X = identity_block(X, f = 3, filters=[128,128,512], stage= 3, block='b')
    X = identity_block(X, f = 3, filters=[128,128,512], stage= 3, block='c')
    X = identity_block(X, f = 3, filters=[128,128,512], stage= 3, block='d')

    # Stage 4 (≈6 lines)
    # The convolutional block uses three set of filters of size [256, 256, 1024], "f" is 3, "s" is 2 and the block is "a".
    # The 5 identity blocks use three set of filters of size [256, 256, 1024], "f" is 3 and the blocks are "b", "c", "d", "e" and "f".
    X = convolutional_block(X, f = 3, filters=[256, 256, 1024], block='a', stage=4, s = 2)
    X = identity_block(X, f = 3, filters=[256, 256, 1024], block='b', stage=4)
    X = identity_block(X, f = 3, filters=[256, 256, 1024], block='c', stage=4)
    X = identity_block(X, f = 3, filters=[256, 256, 1024], block='d', stage=4)
    X = identity_block(X, f = 3, filters=[256, 256, 1024], block='e', stage=4)
    X = identity_block(X, f = 3, filters=[256, 256, 1024], block='f', stage=4)

    # Stage 5 (≈3 lines)
    # The convolutional block uses three set of filters of size [512, 512, 2048], "f" is 3, "s" is 2 and the block is "a".
    # The 2 identity blocks use three set of filters of size [256, 256, 2048], "f" is 3 and the blocks are "b" and "c".
    X = convolutional_block(X, f = 3, filters=[512, 512, 2048], stage=5, block='a', s = 2)

    # filters should be [256, 256, 2048], but it fail to be graded. Use [512, 512, 2048] to pass the grading
    X = identity_block(X, f = 3, filters=[256, 256, 2048], stage=5, block='b')
    X = identity_block(X, f = 3, filters=[256, 256, 2048], stage=5, block='c')

    # AVGPOOL (≈1 line). Use "X = AveragePooling2D(...)(X)"
    # The 2D Average Pooling uses a window of shape (2,2) and its name is "avg_pool".
    X = AveragePooling2D(pool_size=(2,2))(X)

    ### END CODE HERE ###

    # output layer
    X = Flatten()(X)
    X = Dense(classes, activation='softmax', name='fc' + str(classes), kernel_initializer = glorot_uniform(seed=0))(X)


    # Create model
    model = Model(inputs = X_input, outputs = X, name='ResNet50')

    return model
运行以下代码以构建模型图。如果你的实现不正确,则可以通过运行下面的model.fit(...)时检查准确性
In [11]:
model = ResNet50(input_shape = (64, 64, 3), classes = 6)
如在Keras教程笔记本中所见,在训练模型之前,你需要通过编译模型来配置学习过程。
In [12]:
model.compile(optimizer='adam', loss='categorical_crossentropy', metrics=['accuracy'])
现在可以训练模型了。 你唯一需要的就是数据集。
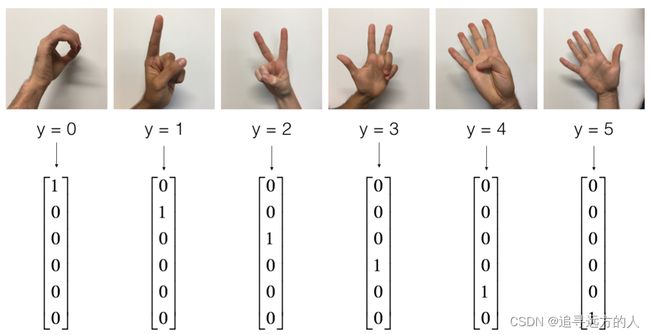
加载SIGNS数据集。
图6 :SIGNS 数据集
In [13]:
X_train_orig, Y_train_orig, X_test_orig, Y_test_orig, classes = load_dataset()

# Normalize image vectors
X_train = X_train_orig/255.
X_test = X_test_orig/255.

# Convert training and test labels to one hot matrices
Y_train = convert_to_one_hot(Y_train_orig, 6).T
Y_test = convert_to_one_hot(Y_test_orig, 6).T

print ("number of training examples = " + str(X_train.shape[0]))
print ("number of test examples = " + str(X_test.shape[0]))
print ("X_train shape: " + str(X_train.shape))
print ("Y_train shape: " + str(Y_train.shape))
print ("X_test shape: " + str(X_test.shape))
print ("Y_test shape: " + str(Y_test.shape))
number of training examples = 1080
number of test examples = 120
X_train shape: (1080, 64, 64, 3)
Y_train shape: (1080, 6)
X_test shape: (120, 64, 64, 3)
Y_test shape: (120, 6)
运行以下单元格,训练模型(批处理大小为32)2个epoch。在CPU上,每个epoch大约需要5分钟。
In [14]:
model.fit(X_train, Y_train, epochs = 20, batch_size = 32)
WARNING:tensorflow:From /opt/conda/lib/python3.6/site-packages/tensorflow/python/ops/math_ops.py:3066: to_int32 (from tensorflow.python.ops.math_ops) is deprecated and will be removed in a future version.
Instructions for updating:
Use tf.cast instead.
Epoch 1/20
1080/1080 [==============================] - 198s 183ms/step - loss: 2.7697 - acc: 0.2880
Epoch 2/20
1080/1080 [==============================] - 187s 173ms/step - loss: 1.8029 - acc: 0.4815
Epoch 3/20
1080/1080 [==============================] - 187s 173ms/step - loss: 1.2630 - acc: 0.6398
Epoch 4/20
1080/1080 [==============================] - 187s 173ms/step - loss: 0.8306 - acc: 0.7657
Epoch 5/20
1080/1080 [==============================] - 187s 173ms/step - loss: 1.0470 - acc: 0.7231
Epoch 6/20
1080/1080 [==============================] - 187s 173ms/step - loss: 0.7639 - acc: 0.8185
Epoch 7/20
1080/1080 [==============================] - 187s 173ms/step - loss: 0.5335 - acc: 0.9083
Epoch 8/20
1080/1080 [==============================] - 187s 173ms/step - loss: 0.5189 - acc: 0.9204
Epoch 9/20
1080/1080 [==============================] - 187s 173ms/step - loss: 0.7759 - acc: 0.8620
Epoch 10/20
1080/1080 [==============================] - 187s 173ms/step - loss: 1.3442 - acc: 0.5750
Epoch 11/20
1080/1080 [==============================] - 187s 173ms/step - loss: 0.5672 - acc: 0.7861
Epoch 12/20
1080/1080 [==============================] - 187s 173ms/step - loss: 0.3369 - acc: 0.8843
Epoch 13/20
1080/1080 [==============================] - 187s 173ms/step - loss: 0.2433 - acc: 0.9185
Epoch 14/20
1080/1080 [==============================] - 187s 173ms/step - loss: 0.1352 - acc: 0.9537
Epoch 15/20
1080/1080 [==============================] - 188s 174ms/step - loss: 0.1032 - acc: 0.9630
Epoch 16/20
1080/1080 [==============================] - 187s 173ms/step - loss: 0.0695 - acc: 0.9759
Epoch 17/20
1080/1080 [==============================] - 187s 173ms/step - loss: 0.0814 - acc: 0.9741
Epoch 18/20
1080/1080 [==============================] - 187s 174ms/step - loss: 0.0642 - acc: 0.9741
Epoch 19/20
1080/1080 [==============================] - 187s 173ms/step - loss: 0.0632 - acc: 0.9787
Epoch 20/20
1080/1080 [==============================] - 186s 173ms/step - loss: 0.1022 - acc: 0.9630
Out[14]:
<keras.callbacks.History at 0x7f1bc06eecc0>
Expected Output:
Epoch 1/20
1080/1080 [] - 198s 183ms/step - loss: 2.7697 - acc: 0.2880
Epoch 2/20
1080/1080 [] - 187s 173ms/step - loss: 1.8029 - acc: 0.4815
…
Epoch 19/20
1080/1080 [] - 187s 173ms/step - loss: 0.0632 - acc: 0.9787
Epoch 20/20
1080/1080 [] - 186s 173ms/step - loss: 0.1022 - acc: 0.9630
让我们看看这个模型(仅在训练了2个epoch)在测试集上的表现。
In [15]:
preds = model.evaluate(X_test, Y_test)
print ("Loss = " + str(preds[0]))
print ("Test Accuracy = " + str(preds[1]))
120/120 [==============================] - 6s 47ms/step
Loss = 0.47188322941462196
Test Accuracy = 0.8916666626930236
预期输出:
Loss = 0.47188322941462196
Test Accuracy = 0.8916666626930236
为了完成这项作业,我们已要求你仅在两个epoch内训练模型。尽管它表现不佳,也请继续提交作业; 为了检查正确性,在线评分器也将仅在几个epoch内运行你的代码。
示例训练模型(未提供)
完成此任务的正式(分级)部分后,如果需要,你还可以选择训练ResNet进行更多epoch。训练约20个epoch时,我们会获得更好的性能,但是在CPU上进行训练将需要一个多小时。
使用GPU,我们已经在SIGNS数据集上训练了自己的ResNet50模型的权重。你可以在下面的单元格中的测试集上加载并运行我们训练好的模型。加载模型可能需要大约1分钟。
In [12]:
# model = load_model('ResNet50.h5') #这里要读模型,我们可以先沿用老的模型
In [16]:
preds = model.evaluate(X_test, Y_test)
print ("Loss = " + str(preds[0]))
print ("Test Accuracy = " + str(preds[1]))
120/120 [==============================] - 4s 37ms/step
Loss = 0.47188322941462196
Test Accuracy = 0.8916666626930236
如果对ResNet50进行足够数量的迭代训练,则它将是用于图像分类的强大模型。我们希望你可以使用所学的知识并将其应用于你自己的分类问题,以实现最新的准确性。
恭喜你完成此作业!你现在已经实现了一个优异的图像分类系统!
4 测试你自己的图片(可选练习)
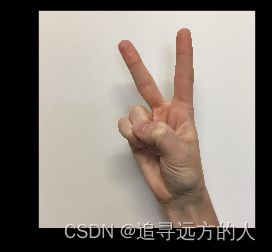
如果愿意,你也可以拍自己的手的照片并查看模型的输出。 你可以:
- 单击此笔记本上部栏中的"File",然后单击"Open"以在Coursera Hub上运行。
- 将图像添加到Jupyter Notebook的目录中,在"images"文件夹中
- 在以下代码中写下你的图片名称
- 运行代码,然后检查算法是否正确!
In [17]:
img_path = 'my_image.jpg'
img = image.load_img(img_path, target_size=(64, 6 4))
x = image.img_to_array(img)
x = np.expand_dims(x, axis=0)
x = preprocess_input(x)
print('Input image shape:', x.shape)
my_image = scipy.misc.imread(img_path)
imshow(my_image)
print("class prediction vector [p(0), p(1), p(2), p(3), p(4), p(5)] = ")
print(model.predict(x))
Input image shape: (1, 64, 64, 3)
/opt/conda/lib/python3.6/site-packages/ipykernel_launcher.py:7: DeprecationWarning: `imread` is deprecated!
`imread` is deprecated in SciPy 1.0.0, and will be removed in 1.2.0.
Use ``imageio.imread`` instead.
  import sys
class prediction vector [p(0), p(1), p(2), p(3), p(4), p(5)] =
[[1. 0. 0. 0. 0. 0.]]
你还可以通过运行以下代码来打印模型的摘要。
In [18]:
最后,运行下面的代码以可视化你的ResNet50。你也可以通过转到"File -> Open…-> model.png".下载模型的.png图片。
In [19]:
plot_model(model, to_file='model.png')
SVG(model_to_dot(model).create(prog='dot', format='svg'))
Out[19]:
你应该记住的内容:
- 非常深的"plain"网络在实践中不起作用,因为梯度消失而难以训练。
- skip-connections有助于解决梯度消失问题。它们还使ResNet块易于学习识别功能。
- 块有两种主要类型:标识块和卷积块。
- 通过将这些块堆叠在一起,可以构建非常深的残差网络。
参考
- Kaiming He, Xiangyu Zhang, Shaoqing Ren, Jian Sun - Deep Residual Learning for Image Recognition (2015)
- Francois Chollet’s github repository: https://github.com/fchollet/deep-learning-models/blob/master/resnet50.py


